spring-boot基于websocket实现服务器推送消息到客户端
一、添加依赖
 <dependency>
    <groupId>org.springframework.boot</groupId>
    <artifactId>spring-boot-starter-websocket</artifactId>
 <exclusions>
    <exclusion>
       <groupId>org.springframework.boot</groupId>
        <artifactId>spring-boot-starter-tomcat</artifactId>
    </exclusion>
 </exclusions>
</dependency>
一定要将tomcat依赖包排除掉 否则会报错 javax.websocket.server.ServerContainer not available
二、添加配置类
通过配置类 启用WebSocket的支持:
import org.springframework.context.annotation.Bean;
import org.springframework.context.annotation.Configuration;
import org.springframework.web.socket.server.standard.ServerEndpointExporter;

/**
 * @Author: Robin
 * @ClassName: WebSocketConfig
 * @Description: 开启WebSocket支持的配置类
 * @DateTime: 2024/2/27 14:27
 */
@Configuration
public class WebSocketConfig {

	@Bean
	public ServerEndpointExporter serverEndpointExporter() {
		return new ServerEndpointExporter();
	}

}
三、创建WebSocketEndpoint处理类
import org.springframework.stereotype.Component;
import org.springframework.stereotype.Service;

import javax.websocket.*;
import javax.websocket.server.PathParam;
import javax.websocket.server.ServerEndpoint;
import java.util.concurrent.ConcurrentHashMap;

/**
 * @Author: Robin
 * @ClassName: WebSocketEndpoint
 * @Description: websocket连接接口
 * @DateTime: 2024/2/27 10:57
 */
@ServerEndpoint("/wss/{id}")
@Component
@Service
public class WebSocketEndpoint {

	// 用于存储所有打开的会话,键是唯一的客户端ID
	private static final ConcurrentHashMap<String, Session> sessions = new ConcurrentHashMap<>();

	private String id;

	@OnOpen
	public void onOpen(@PathParam("id") String id, Session session) {
		// 生成一个唯一的客户端ID
		sessions.put(id, session);
		this.id = id;
		System.out.println("连接已打开,客户端ID: " + id);
	}

	@OnMessage
	public void onMessage(String message, Session session) {
		System.out.println("收到消息: " + message);
	}

	@OnClose
	public void onClose(Session session) {
		String clientId = this.id;
		sessions.remove(clientId);
		System.out.println("连接已关闭,客户端ID: " + clientId);
	}

	@OnError
	public void onError(Session session, Throwable throwable) {
		String clientId = this.id;
		sessions.remove(clientId);
		System.out.println("发生错误,客户端ID: " + clientId);
		throwable.printStackTrace();
	}

	// 用于向特定客户端发送消息的方法
	public static void sendMessageToClient(String id, String message) {
		Session session = sessions.get(id);
		if (session != null && session.isOpen()) {
			try {
				session.getAsyncRemote().sendText(message);
			}
			catch (Exception e) {
				System.out.println("发送消息时发生错误,客户端ID: " + id);
				e.printStackTrace();
			}
		}
	}

}
连接时传入的id为业务系统中用户的身份id便于确认当前用的身份,已key的形式存入sessions的map中,当需要给指定的用户推送消息时候只需要传入id便可找到对应的session
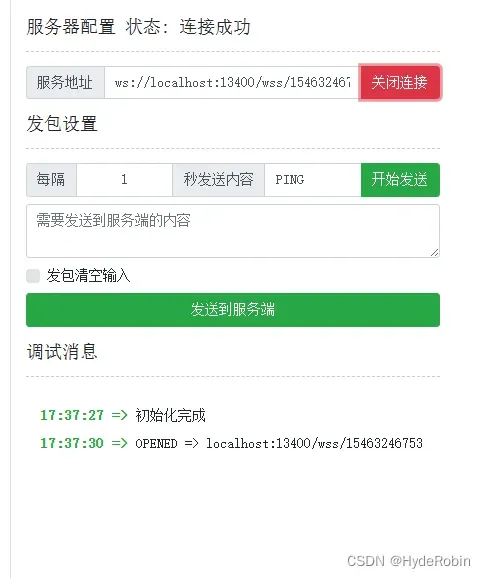
四、测试连接
websocket在线测试工具有很多、postman也可以进行测试
我自己用的是 WebSocket在线测试工具 (wstool.js.org)
websocket请求分为两种:ws和wss
ws:针对于没有ssl证书的域名,可以理解为http
wss:针对于有ssl证书的域名,可以理解为https
1、本地服务连接
当调用本地服务测试时要采用ws的请求形式,wss是调不通的
ws://localhost:13400/wss/{id}
2、服务器连接
服务器如果采用了nginx代理,则需要修改nginx配置文件,添加针对于wss请求的配置参数
location /wss {
    proxy_pass http://127.0.0.1:13400;
    proxy_http_version 1.1;
    proxy_set_header Upgrade $http_upgrade;
    proxy_set_header Connection "upgrade";
    # 默认60s断开连接
    proxy_read_timeout 60s;
}
请求地址:wss://域名/wss/{id}
eader Upgrade $http_upgrade;
proxy_set_header Connection “upgrade”;
# 默认60s断开连接
proxy_read_timeout 60s;
}
请求地址:wss://域名/wss/{id}
版权声明:本文为博主作者:HydeRobin原创文章,版权归属原作者,如果侵权,请联系我们删除!
原文链接:https://blog.csdn.net/HydeRobin/article/details/136328378