目录
一、序言
本文主要讲述一个微信小程序前后端项目搭建的过程,主要内容包括小程序(前端)搭建和后端搭建,其中会描述可能遇到的问题以及解决措施,文章将会分为几个部分进行讲述,这章将讲述前端小程序搭建的内容,其中包括软件下载、客户端向服务端发送数据,接收并处理来自服务端的数据等内容;本项目的前端运用的框架是uni-app,后端运用的框架是Springboot,如各位需求满足,可继续往下看;
关于前后端分离的好处,个人认为是可以增加代码可维护性,降低了许多后期维护成本,更容易发现问题,解决问题;其次项目可以分工给团队,减少开发难度。对于新手或者想要独立完成一个总体项目的同志是个不错的练习。
二、小程序搭建
1、开发语言
本项目运用的框架是uni-app,uni-app是一个使用 Vue.js 开发所有前端应用的框架,该框架的开发语言类似于vue.js,语法的规则有些变化(具体变化查看以下链接);
白话uni-app | uni-app官网 (dcloud.net.cn)![]() https://uniapp.dcloud.net.cn/vernacular.html# vue建立在标准 HTML、CSS 和 JavaScript 之上,所以涉及的开发语言要了解:vue、CSS、JavaScript、HTML;如果是新手莫慌张,语法较简单,看一看例子就能简单上手,以下是uni-app官方的教程链接;
https://uniapp.dcloud.net.cn/vernacular.html# vue建立在标准 HTML、CSS 和 JavaScript 之上,所以涉及的开发语言要了解:vue、CSS、JavaScript、HTML;如果是新手莫慌张,语法较简单,看一看例子就能简单上手,以下是uni-app官方的教程链接;
常使用的主要三个语言板块:html、css、javascript,查看其中的一些格式变化即可。
uni-app组成和跨端原理 | uni-app官网 (dcloud.net.cn)![]() https://uniapp.dcloud.net.cn/tutorial/
https://uniapp.dcloud.net.cn/tutorial/
2、开发工具
- HBuilderX(下载地址如下)
HBuilderX-高效极客技巧 (dcloud.io)![]() https://www.dcloud.io/hbuilderx.html
https://www.dcloud.io/hbuilderx.html
- 微信开发者工具(下载地址如下)
微信开发者工具下载地址与更新日志 | 微信开放文档 (qq.com)![]() https://developers.weixin.qq.com/miniprogram/dev/devtools/download.html 下载稳定版本即可
https://developers.weixin.qq.com/miniprogram/dev/devtools/download.html 下载稳定版本即可

3、平台注册或登录,获取小程序APPID
微信公众平台 (qq.com)![]() https://mp.weixin.qq.com/ 小程序开发需要APPID才能发布或发行,这个步骤需要进入平台,注册登录后,填写小程序信息,然后获取APPID即可;
https://mp.weixin.qq.com/ 小程序开发需要APPID才能发布或发行,这个步骤需要进入平台,注册登录后,填写小程序信息,然后获取APPID即可;
4、创建uni-app项目(这部分属于项目的前端部分)
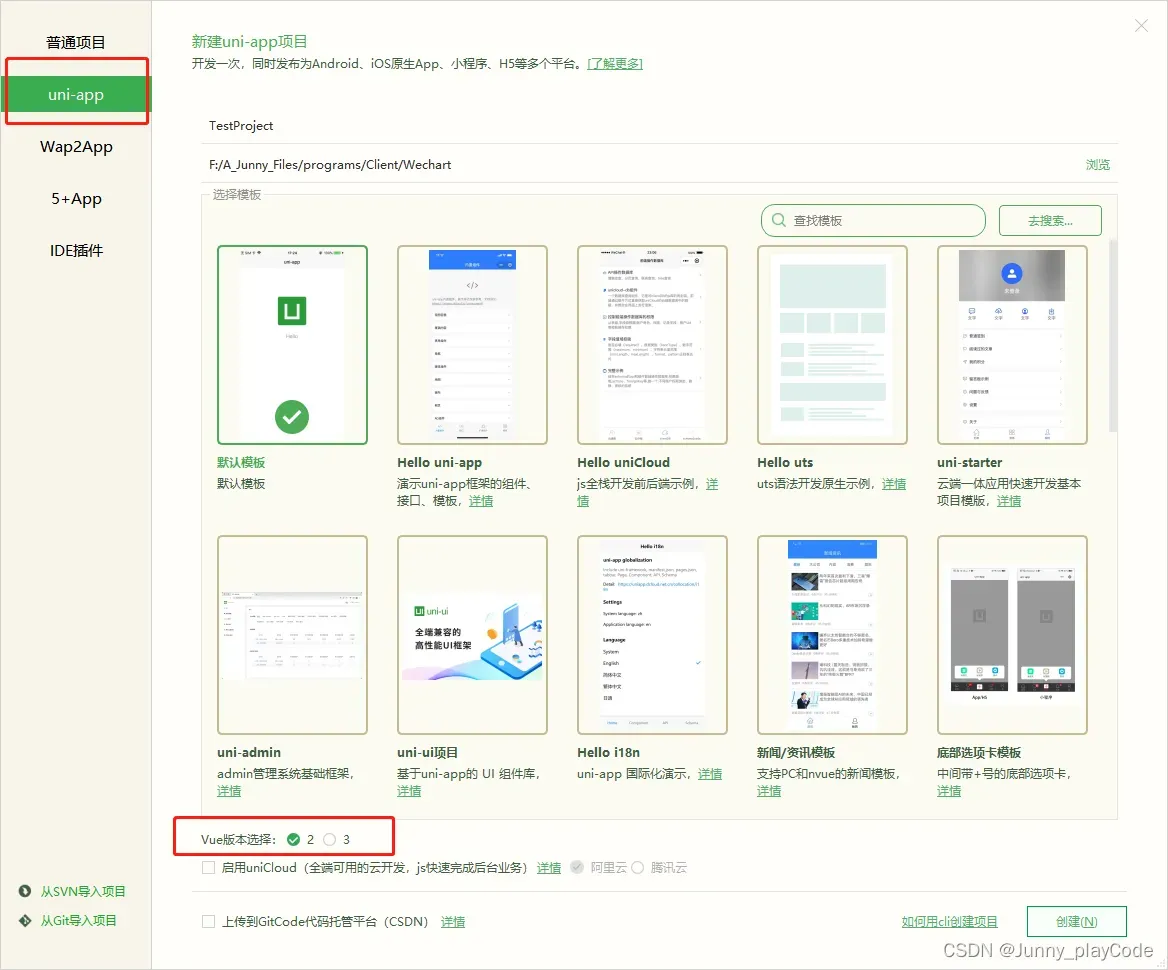
选择uni-app项目,选择默认版本,vue选择版本2即可,如果选择vue3,那么根据官方教程学习即可;本项目选择的是vue2;
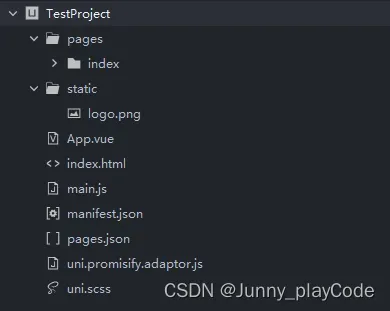
创建后项目的目录如图所示:
5、编写项目
这里编写一个小demo,实现前端接口向后端传输数据,以及接收后端传来的数据;
打开index页面,编写代码:
<template>
	<view class="content">
		<image class="logo" src="/static/logo.png"></image>
		<view class="text-area">
			<text class="title">名称:{{title}}</text>
		</view>
		<input class="input-box" placeholder="请输入修改的名称" @input="setTitle" />
		<button @click="postData"> 修改</button>
	</view>
</template>

<script>
	export default {
		data() {
			return {
				title: 'Hello',
				tempTitle: ""
			}
		},
		onLoad() {
			let isThis = this;
			var option = {
				method: "GET",
			};
			isThis.getData(option);
		},
		methods: {
			setTitle: function(e) {
				console.log(e.detail.value)
				this.tempTitle = e.detail.value;
			},
			getData(option) {
				let isThis = this;
				uni.showLoading({
					title: '加载中',
					mask: false
				});
				uni.request({
					url: '',
					method: option.method || 'GET', //不传默认为GET
					data: option.data || {}, //不传默认为空
					header: option.header || {
						'Content-Type': 'application/json'
					},
					success: (res) => {
						if (res.data.status == 1) {
							isThis.title = res.data.data.title;
							uni.hideLoading();
						} else {
							isThis.title = "";
							uni.hideLoading();
							uni.showModal({
								title: '提示',
								content: res.data.msg,
								showCancel: false,
								success: res => {},
								fail: () => {},
								complete: () => {}
							});
						}
					},
					fail: (err) => {
						uni.showToast({
							icon: 'none',
							title: '啊哦~ 服务器出问题了,请刷新!',
							duration: 2000
						});
					}
				})
			},
			postData() {
				let isThis = this;
				uni.showLoading({
					title: '加载中',
					mask: false
				});
				var data = {
					"title": isThis.tempTitle,
				}
				uni.request({
					url: '',
					method: 'POST',
					data: data,
					header: {
						'Content-Type': 'application/json'
					},
					success: (res) => {
						if (res.data.status == 1) {
							uni.hideLoading();
						} else {
							uni.hideLoading();
							uni.showModal({
								title: '提示',
								content: res.data.msg,
								showCancel: false,
								success: res => {},
								fail: () => {},
								complete: () => {}
							});
						}
					},
					fail: (err) => {
						uni.showToast({
							icon: 'none',
							title: '啊哦~ 服务器出问题了,请刷新!',
							duration: 2000
						});
					}
				})
			},
		}
	}
</script>

<style>
	.content {
		display: flex;
		flex-direction: column;
		align-items: center;
		justify-content: center;
	}

	.logo {
		height: 200rpx;
		width: 200rpx;
		margin-top: 200rpx;
		margin-left: auto;
		margin-right: auto;
		margin-bottom: 50rpx;
	}

	.text-area {
		display: flex;
		justify-content: center;
	}

	.title {
		font-size: 36rpx;
		color: #8f8f94;
	}

	.input-box {
		margin: 10px auto;
		padding: 10px;
		width: 80%;
		border: #b8b8be 1px solid;
		height: 60rpx;
		border-radius: 10px;
	}
</style>
(1)前端接收后端数据
getData(option) {
let isThis = this;
uni.showLoading({
title: ‘加载中’,
mask: false
});
uni.request({
url: ”, //后端接口
method: option.method || ‘GET’, //不传默认为GET
data: option.data || {}, //不传默认为空
header: option.header || {
‘Content-Type’: ‘application/json’
},
success: (res) => {
if (res.data.status == 1) {
isThis.title = res.data.data.title;
uni.hideLoading();
} else {
isThis.title = “”;
uni.hideLoading();
uni.showModal({
title: ‘提示’,
content: res.data.msg,
showCancel: false,
success: res => {},
fail: () => {},
complete: () => {}
});
}
},
fail: (err) => {
uni.showToast({
icon: ‘none’,
title: ‘啊哦~ 服务器出问题了,请刷新!’,
duration: 2000
});
}
})
},
(2)前端发送数据
postData() {
let isThis = this;
uni.showLoading({
title: ‘加载中’,
mask: false
});
var data = {
“title”: isThis.tempTitle,
}
uni.request({
url: ”, //后端接口
method: ‘POST’,
data: data,
header: {
‘Content-Type’: ‘application/json’
},
success: (res) => {
if (res.data.status == 1) {
uni.hideLoading();
} else {
uni.hideLoading();
uni.showModal({
title: ‘提示’,
content: res.data.msg,
showCancel: false,
success: res => {},
fail: () => {},
complete: () => {}
});
}
},
fail: (err) => {
uni.showToast({
icon: ‘none’,
title: ‘啊哦~ 服务器出问题了,请刷新!’,
duration: 2000
});
}
})
},
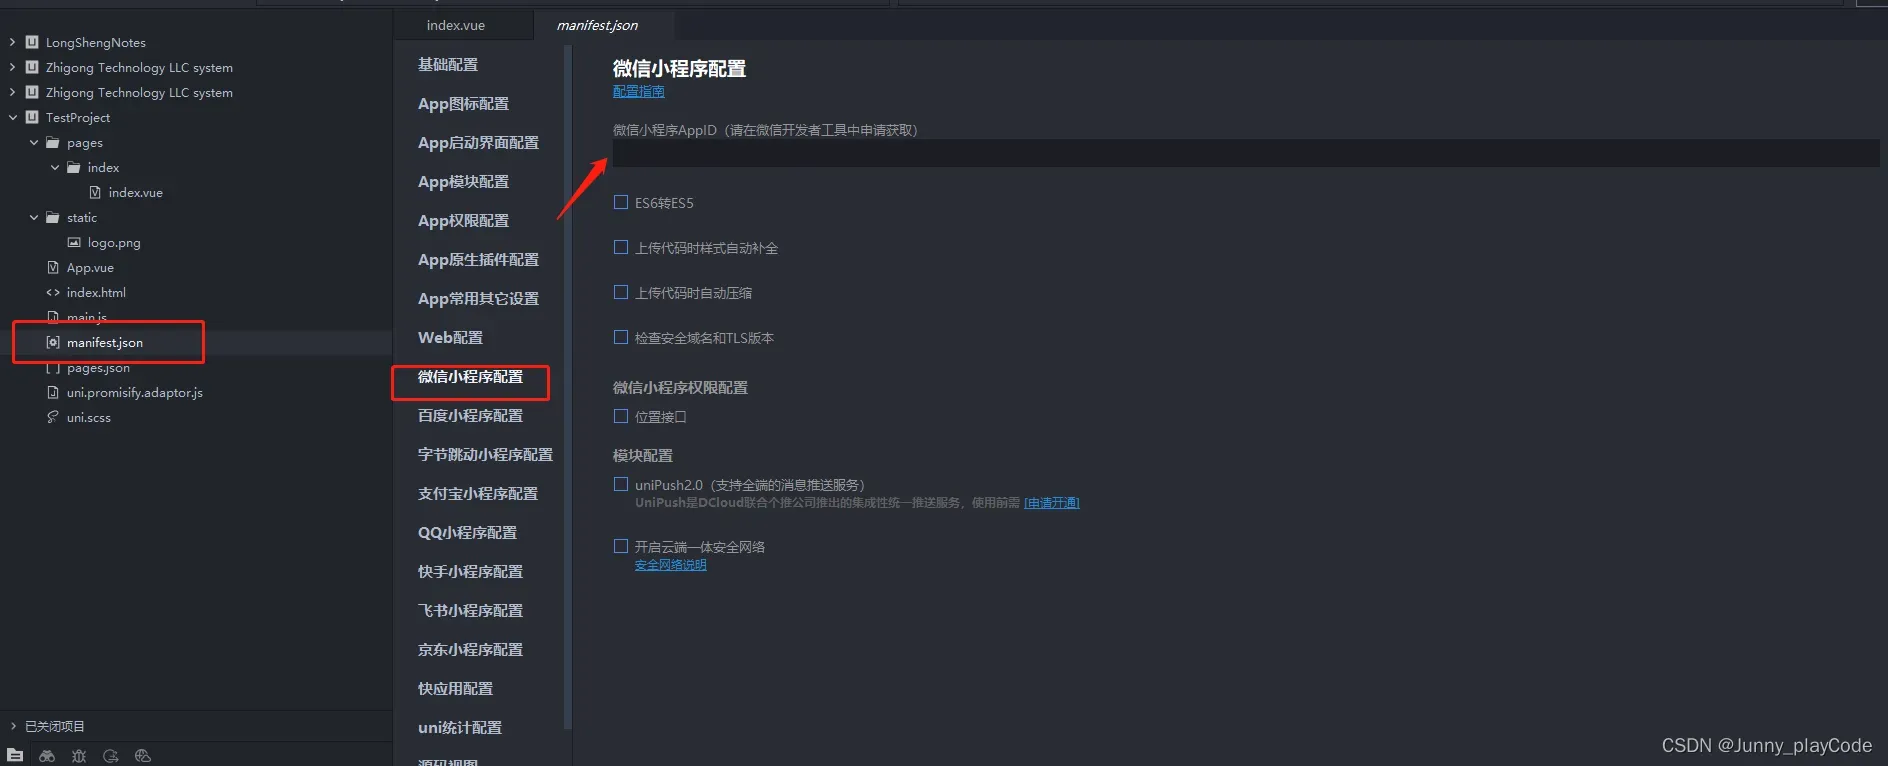
6、填写获取的APPID
找到项目的根目录的manifest.json文件,选择“微信小程序配置”,填写对应的APPID;
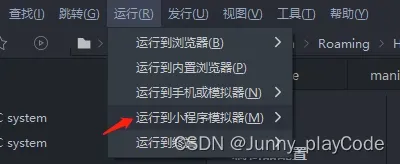
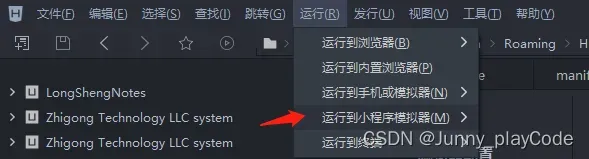
7、配置小程序模拟器
点击菜单栏“运行”,选择“运行到小程序模拟器”,选择“运行设置”,设置微信开发者工具路径

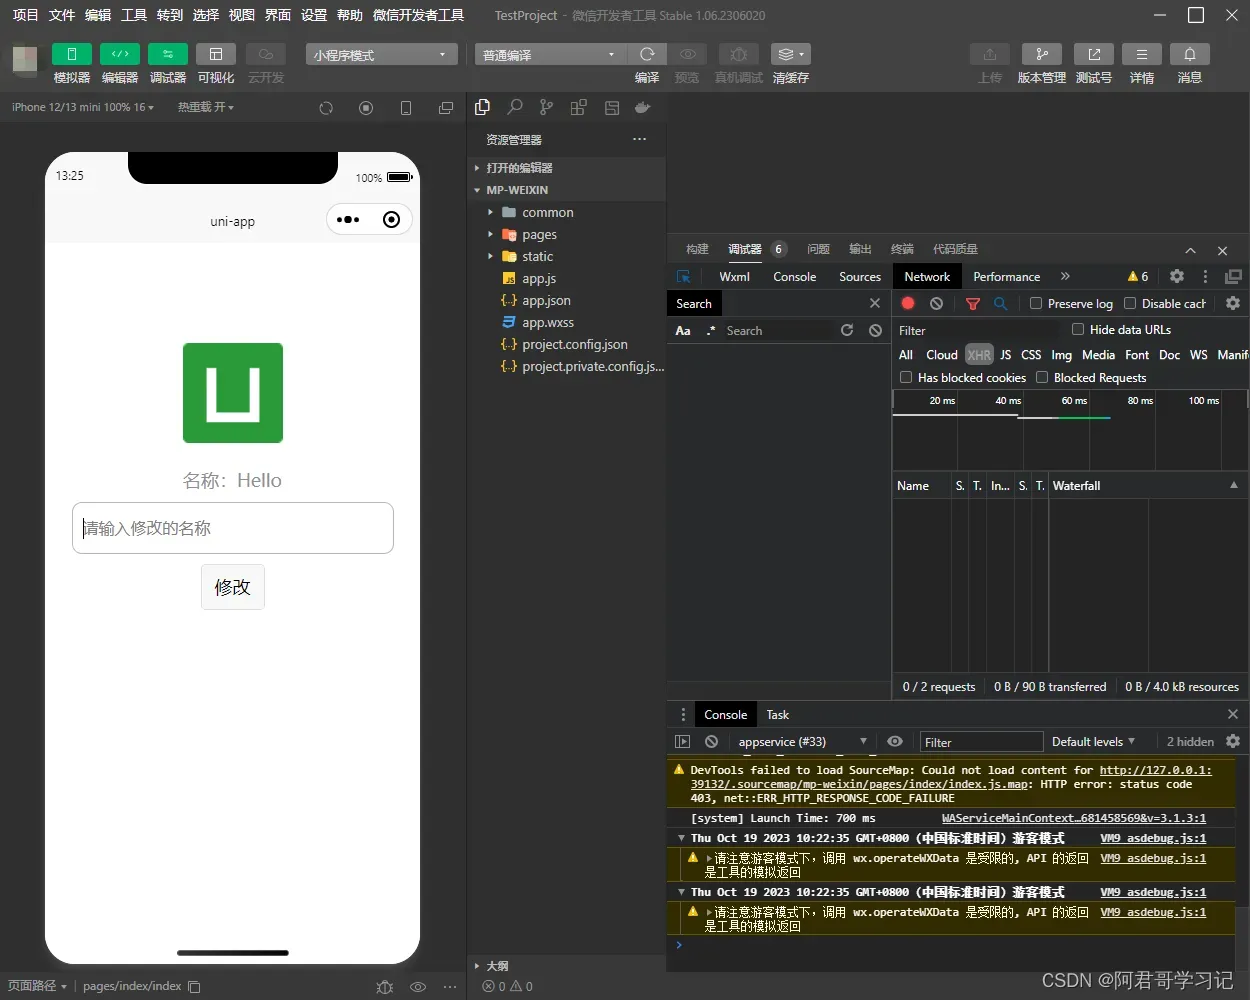
8、运行项目
运行小程序模拟器查看项目效果,且修改代码可以实时展现修改效果
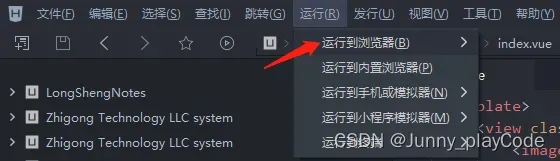
如果没有下载微信开发者工具,那么可以选择运行到浏览器进行查看项目效果,然后选择对应的浏览器即可;
微信开发者工具效果图:
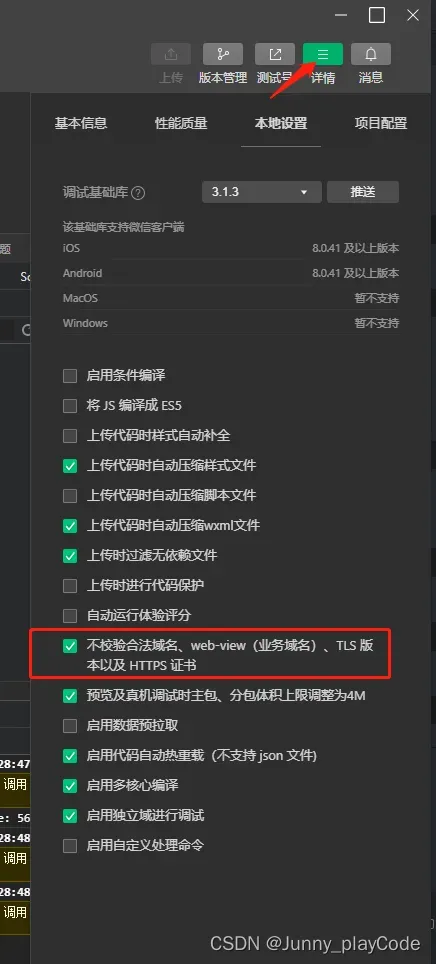
可能出现运行不成功的问题,解决措施如下
到此前端搭建基本完成,接下来进军后端部分!
请查看下一章内容 ❤微信小程序-JAVA Springboot项目-后端搭建-项目搭建02-CSDN博客![]() https://blog.csdn.net/qq_53316719/article/details/133924718?spm=1001.2014.3001.5501
https://blog.csdn.net/qq_53316719/article/details/133924718?spm=1001.2014.3001.5501
版权声明:本文为博主作者:阿君哥学习记原创文章,版权归属原作者,如果侵权,请联系我们删除!
原文链接:https://blog.csdn.net/qq_53316719/article/details/133885119