首先,需要安装selenium库和对应的浏览器驱动程序。以Chrome浏览器为例,可以使用以下命令安装selenium和chromedriver:
pip install selenium
然后,需要下载对应版本的chromedriver,并将其添加到环境变量中。下载地址:http://chromedriver.storage.googleapis.com/index.html
不懂安装的,可以参考Chormedriver下载和安装
# 导入需要的库
from selenium import webdriver
# 导入Keys模块,用于模拟键盘按键操作
from selenium.webdriver.common.keys import Keys

# 创建Chrome浏览器实例
driver = webdriver.Chrome()

# 打开百度网页
driver.get("https://www.baidu.com")

# 获取百度搜索框元素
search_box = driver.find_element_by_name("wd")

# 在搜索框中输入关键词
search_box.send_keys("Python")

# 模拟按下回车键进行搜索
search_box.send_keys(Keys.RETURN)

# 或者通过这种方法回车搜索
# ---------------------------------------
# 获取搜索按钮元素
# search_button = driver.find_element_by_id("su")

# 点击搜索按钮
# search_button.click()
#-----------------------------------------

# 等待页面加载完成
driver.implicitly_wait(10)

# 获取搜索结果列表元素
search_results = driver.find_elements_by_css_selector(".result")

# 输出搜索结果标题和链接
for result in search_results:
    title = result.find_element_by_css_selector("h3").text
    link = result.find_element_by_css_selector("a").get_attribute("href")
    print(title, link)

# 点击第一个搜索结果链接
first_result = search_results[0].find_element_by_css_selector("a")
first_result.click()

# 返回上一页
driver.back()

# 刷新当前页面
driver.refresh()

# 最大化浏览器窗口
driver.maximize_window()

# 关闭浏览器实例
driver.quit()
代码中涵盖了常见的浏览器操作,包括打开网页、查找元素、输入文本、模拟按键、等待页面加载、获取元素属性、点击链接、返回上一页、刷新页面、最大化窗口和关闭浏览器实例等。同时还添加了详细的注释说明,方便理解和学习。
或者也可以通过这种方法实现浏览器基本操作
# 导入selenium库中的webdriver模块
from selenium import webdriver
# 导入Keys模块,用于模拟键盘按键操作
from selenium.webdriver.common.keys import Keys

# 创建Chrome浏览器对象
driver = webdriver.Chrome()

# 打开网页
driver.get('https://www.baidu.com')

# 获取当前页面标题
title = driver.title
print(title)

# 获取当前页面的URL
url = driver.current_url
print(url)

# 查找页面元素并输入文本
search_box = driver.find_element_by_css_selector('#kw')
search_box.send_keys('Python')
search_box.send_keys(Keys.ENTER)

# 等待页面加载完成
driver.implicitly_wait(10)

# 查找页面元素并点击
result_link = driver.find_element_by_css_selector('#content_left > div > h3 > a')
result_link.click()

# 切换到新的页面窗口
window_handles = driver.window_handles
driver.switch_to.window(window_handles[-1])

# 获取页面源代码
html = driver.page_source
print(html)

# 关闭浏览器窗口
driver.quit()
以上代码中,首先导入了webdriver模块和Keys模块。然后创建了Chrome浏览器对象,使用get()方法打开了百度网站,使用title和current_url属性获取了页面标题和URL。接着使用find_element_by_css_selector()方法查找搜索框元素,使用send_keys()方法输入了文本并模拟了回车键,使用implicitly_wait()方法等待页面加载完成。然后再次使用find_element_by_css_selector()方法查找搜索结果链接元素,并使用click()方法模拟了鼠标点击操作,接着使用window_handles属性和switch_to.window()方法切换到新的页面窗口,使用page_source属性获取页面源代码。最后使用quit()方法关闭浏览器窗口。
大家会发现运行时会有如下显示:
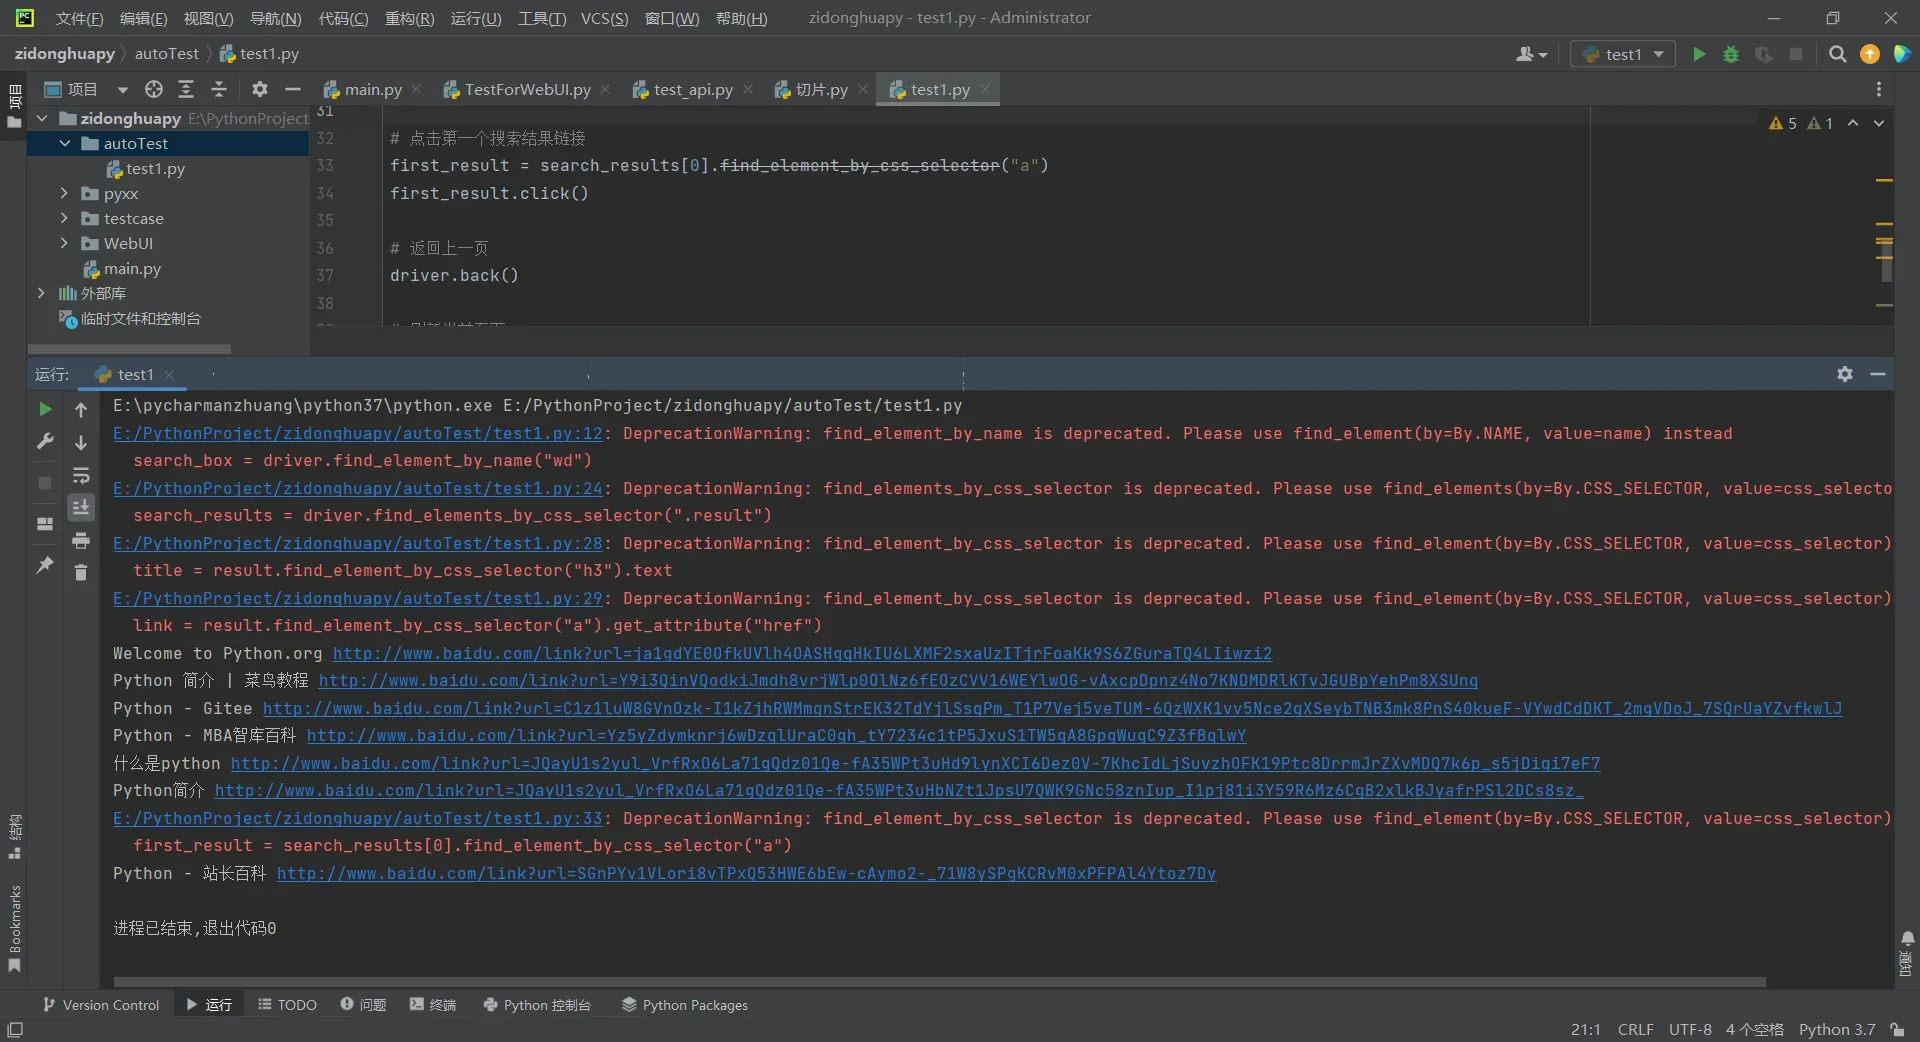
是因为 `find_element_by_css_selector` 方法已经被弃用,最新版本的 Selenium 推荐使用 `find_element` 方法。因此,这段代码使用了更新后的方法来定位页面元素:
result_link = driver.find_element(By.CSS_SELECTOR, '#content_left > div > h3 > a')这行代码使用了 `By.CSS_SELECTOR` 作为第一个参数,`’#content_left > div > h3 > a’` 作为第二个参数。这意味着我们要使用 CSS 选择器定位一个符合该选择器的元素,即 `’#content_left > div > h3 > a’` 元素。
该代码执行后,将返回一个 WebElement 对象,该对象代表了页面上的一个元素,即 `’#content_left > div > h3 > a’` 元素。我们可以对该对象执行其他操作,例如点击、获取其属性或文本等。
与之类似的其他方法也同理:
# 旧版本:通过ID查找元素
element = driver.find_element_by_id(“element_id”)
最新的:
element = driver.find_element(By.ID, "element_id")
# 旧版本:通过class查找元素
element = driver.find_element_by_class_name(“element_class”)
最新的:
element = driver.find_element(By.CLASS_NAME, "element_class")
# 旧版本:通过标签名查找元素
element = driver.find_element_by_tag_name(“element_tag”)
最新的:
element = driver.find_element(By.TAG_NAME, "element_tag")
需要注意的是,需要先导入By模块
from selenium.webdriver.common.by import By
下面继续讲解一些常见的浏览器操作。
1. 切换窗口
有时候我们需要在多个窗口之间切换,可以使用switch_to.window()方法来实现。下面是一个例子,假设我们在一个页面中点击一个链接打开了一个新的窗口,并需要在新窗口中进行操作:
# 获取当前窗口句柄
current_window_handle = driver.current_window_handle

# 点击链接打开新窗口
link = driver.find_element_by_css_selector("a[target='_blank']")
link.click()

# 等待新窗口打开并切换到新窗口
driver.implicitly_wait(10)
all_window_handles = driver.window_handles
new_window_handle = [handle for handle in all_window_handles if handle != current_window_handle][0]
driver.switch_to.window(new_window_handle)

# 在新窗口中进行操作

# 切换回原来的窗口
driver.switch_to.window(current_window_handle)
代码中,我们首先获取当前窗口句柄,然后点击链接打开新窗口。等待新窗口打开后,我们获取所有窗口的句柄,并找到新窗口的句柄。然后使用switch_to.window()方法切换到新窗口,进行操作。最后再使用switch_to.window()方法切换回原来的窗口。
2. 处理弹窗
有时候我们需要在页面中处理弹窗,可以使用switch_to.alert()方法来实现。下面是一个例子,假设我们在一个页面中点击一个按钮会弹出一个警告框,并需要在警告框中输入文本后确认:
# 点击按钮弹出警告框
button = driver.find_element_by_css_selector("button")
button.click()

# 等待警告框出现并切换到警告框
driver.implicitly_wait(10)
alert = driver.switch_to.alert

# 在警告框中输入文本并确认
alert.send_keys("Hello World!")
alert.accept()

# 切换回原来的窗口
driver.switch_to.default_content()
代码中,我们首先点击页面上的按钮,等待警告框出现后,使用switch_to.alert方法切换到警告框。然后我们可以使用send_keys()方法在警告框中输入文本,使用accept()方法确认。最后使用switch_to.default_content()方法切换回原来的窗口。
3. 执行JavaScript代码
有时候我们需要在页面中执行JavaScript代码,可以使用execute_script()方法来实现。下面是一个例子,假设我们需要在页面中滚动到页面底部:
# 执行JavaScript代码,滚动到页面底部
driver.execute_script("window.scrollTo(0, document.body.scrollHeight);")
代码中,我们使用execute_script()方法执行了一段JavaScript代码,将页面滚动到底部。可以根据实际需要编写不同的JavaScript代码。
4. 执行鼠标操作
有时候我们需要在页面中模拟鼠标操作,比如鼠标点击、鼠标移动等,可以使用ActionChains类来实现。下面是一个例子,假设我们需要在页面中进行鼠标悬停和点击:
# 导入ActionChains类
from selenium.webdriver.common.action_chains import ActionChains

# 获取需要操作的元素
element = driver.find_element_by_css_selector("a")

# 创建ActionChains对象
actions = ActionChains(driver)

# 鼠标悬停在元素上
actions.move_to_element(element).perform()

# 鼠标点击元素
actions.click(element).perform()
代码中,我们首先导入ActionChains类,然后获取需要操作的元素。接着创建ActionChains对象,并使用move_to_element()方法将鼠标悬停在元素上,使用click()方法进行鼠标点击。最后使用perform()方法执行操作。
5. 截图
有时候我们需要对页面进行截图,可以使用screenshot()方法来实现。下面是一个例子,假设我们需要对页面进行截图并保存到本地:
# 对页面进行截图并保存到本地
driver.save_screenshot("screenshot.png")
6. 等待页面元素出现
有时候我们需要等待页面中某个元素出现后再进行操作,可以使用WebDriverWait类来实现。下面是一个例子,假设我们需要等待页面中的某个按钮出现后再进行点击:
# 导入WebDriverWait类和expected_conditions模块
from selenium.webdriver.support.ui import WebDriverWait
from selenium.webdriver.support import expected_conditions as EC

# 等待页面中的按钮出现并点击
wait = WebDriverWait(driver, 10)
button = wait.until(EC.presence_of_element_located((By.CSS_SELECTOR, "button")))
button.click()
代码中,我们首先导入WebDriverWait类和expected_conditions模块,然后创建WebDriverWait对象,设置等待时间和条件。在这个例子中,我们使用presence_of_element_located()方法指定等待条件,即元素出现在页面中。然后使用until()方法进行等待,并返回等待结果。最后进行点击操作。
7. 设置浏览器参数
有时候我们需要设置浏览器的一些参数,比如浏览器窗口大小、页面加载策略等,可以使用options类来实现。下面是一个例子,假设我们需要设置浏览器窗口大小和页面加载策略:
# 导入options类
from selenium.webdriver.chrome.options import Options

# 创建options对象
options = Options()

# 设置浏览器窗口大小
options.add_argument("--window-size=1920,1080")

# 设置页面加载策略
prefs = {"profile.managed_default_content_settings.images": 2}
options.add_experimental_option("prefs", prefs)

# 创建浏览器实例并使用options
driver = webdriver.Chrome(options=options)
代码中,我们首先导入Options类,然后创建Options对象。接着使用add_argument()方法设置浏览器窗口大小,使用add_experimental_option()方法设置页面加载策略。最后创建浏览器实例时使用options参数指定使用Options对象。
8. 自动化测试框架
除了单纯的使用selenium进行浏览器操作外,我们还可以将selenium作为自动化测试框架来使用,实现自动化测试。下面是一个简单的例子,假设我们需要对百度搜索进行自动化测试:
# 导入unittest库和TestCase类
import unittest

class TestBaiduSearch(unittest.TestCase):
    def setUp(self):
        self.driver = webdriver.Chrome()
        self.driver.implicitly_wait(10)
        self.driver.maximize_window()

    def tearDown(self):
        self.driver.quit()

    def test_search(self):
        self.driver.get("https://www.baidu.com")
        search_box = self.driver.find_element_by_name("wd")
        search_box.send_keys("Python")
        search_box.send_keys(Keys.RETURN)
        search_results = self.driver.find_elements_by_css_selector(".result")
        self.assertTrue(len(search_results) > 0)

if __name__ == "__main__":
    unittest.main()
代码中,我们首先导入unittest库和TestCase类,然后定义一个继承TestCase类的测试类。在测试类中,我们使用setUp()方法创建浏览器实例,并设置等待时间和窗口大小。使用tearDown()方法在测试结束后关闭浏览器实例。使用test_search()方法进行测试,打开百度网页,输入关键词并进行搜索,然后断言搜索结果列表中有结果。最后使用unittest.main()方法运行测试。
9. 禁用浏览器图片加载
有时候我们需要在浏览器中禁用图片加载,可以使用selenium-wire库来实现。selenium-wire是一个基于selenium的插件库,可以拦截浏览器的网络请求,从而实现一些高级功能。下面是一个例子,假设我们需要在浏览器中禁用图片加载:
首先需要安装selenium-wire库:
pip install selenium-wire
然后使用selenium-wire库创建浏览器实例,并在请求头中添加Accept字段,指定不接受图片类型的请求:
# 导入selenium-wire库
from seleniumwire import webdriver

# 创建浏览器实例
options = webdriver.ChromeOptions()
options.add_experimental_option("excludeSwitches", ["enable-automation"])
options.add_experimental_option("useAutomationExtension", False)
driver = webdriver.Chrome(options=options)

# 禁用图片加载
driver.header_overrides = {
    "Accept": "text/html,application/xhtml+xml,application/xml;q=0.9,image/webp,*/*;q=0.8"
}
代码中,我们首先导入selenium-wire库,然后创建浏览器实例时使用selenium-wire的webdriver类。使用header_overrides属性设置请求头,指定只接受HTML、XML和WebP类型的请求。这样就可以在浏览器中禁用图片加载了。
10. 使用代理服务器
有时候我们需要在浏览器中使用代理服务器,可以使用selenium-wire库来实现。下面是一个例子,假设我们需要在浏览器中使用代理服务器:
首先需要安装selenium-wire库:
pip install selenium-wire
然后使用selenium-wire库创建浏览器实例,并设置代理服务器:
# 导入selenium-wire库
from seleniumwire import webdriver

# 创建浏览器实例
options = webdriver.ChromeOptions()
options.add_argument("--proxy-server=http://username:password@proxy-server:port")
driver = webdriver.Chrome(options=options)
11. 使用无头浏览器
有时候我们需要在后台运行浏览器,而不需要弹出浏览器窗口,可以使用无头浏览器来实现。无头浏览器是一种不带界面的浏览器,可以在后台执行浏览器操作,比如爬虫、自动化测试等。下面是一个例子,假设我们需要使用无头浏览器打开网页:
# 导入options类
from selenium.webdriver.chrome.options import Options

# 创建options对象
options = Options()

# 设置无头模式
options.add_argument("--headless")

# 创建浏览器实例并使用options
driver = webdriver.Chrome(options=options)
代码中,我们首先导入Options类,然后创建Options对象。使用add_argument()方法设置无头模式,即在后台运行浏览器而不显示窗口。最后创建浏览器实例时使用options参数指定使用Options对象。
12. 使用Chrome DevTools协议
Chrome DevTools协议是一种基于WebSocket的通信协议,可以与Chrome浏览器通信,并获取浏览器的状态和性能信息,比如DOM结构、CSS样式、JavaScript执行情况等。可以使用selenium和Chrome DevTools协议库来实现。下面是一个例子,假设我们需要使用Chrome DevTools协议获取页面的DOM结构:
首先需要安装Chrome DevTools协议库:
pip install pychrome
然后使用Chrome DevTools协议库创建浏览器实例,并获取页面的DOM结构:
# 导入Chrome DevTools协议库
import pychrome

# 创建浏览器实例
options = webdriver.ChromeOptions()
options.add_experimental_option("excludeSwitches", ["enable-automation"])
options.add_experimental_option("useAutomationExtension", False)
driver = webdriver.Chrome(options=options)

# 连接浏览器
browser = pychrome.Browser(url="http://127.0.0.1:9222")

# 获取页面的DOM结构
tab = browser.new_tab()
tab.start()
tab.Page.navigate(url="https://www.baidu.com")
tab.wait(5)
result = tab.Runtime.evaluate(expression="document.documentElement.outerHTML")
print(result["result"]["value"])
tab.stop()
browser.close_tab(tab.id)
代码中,我们首先导入pychrome库,然后创建浏览器实例时使用selenium的webdriver类。使用pychrome
库的Browser类连接浏览器,使用new_tab()方法创建一个新选项卡,使用start()方法开始调试,使用Page.navigate()方法打开网页,等待5秒后使用Runtime.evaluate()方法获取页面的DOM结构。最后使用stop()方法停止调试,使用close_tab()方法关闭选项卡。
13. 使用Firefox浏览器
除了Chrome浏览器外,还可以使用Firefox浏览器来进行浏览器操作,可以使用selenium和geckodriver来实现。下面是一个例子,假设我们需要使用Firefox浏览器打开网页:
首先需要安装geckodriver:
brew install geckodriver
然后使用selenium库创建Firefox浏览器实例:
# 创建Firefox浏览器实例
driver = webdriver.Firefox()
代码中,我们使用selenium的webdriver类创建Firefox浏览器实例,与Chrome浏览器实例类似。
14. 使用其他浏览器
除了Chrome浏览器和Firefox浏览器外,还可以使用其他浏览器来进行浏览器操作,比如Safari、Edge等。可以使用selenium和相应的浏览器驱动来实现。下面是一个例子,假设我们需要使用Safari浏览器打开网页:
首先需要安装Safari浏览器驱动,可以在Safari浏览器的开发者选项中找到并安装。
然后使用selenium库创建Safari浏览器实例:
# 创建Safari浏览器实例
driver = webdriver.Safari()
代码中,我们使用selenium的`webdriver
类创建Safari浏览器实例,与Chrome浏览器实例和Firefox浏览器实例类似。
15. 使用多个浏览器实例
有时候我们需要使用多个浏览器实例进行浏览器操作,可以使用selenium库创建多个浏览器实例。下面是一个例子,假设我们需要使用两个Chrome浏览器实例打开不同的网页:
# 创建第一个Chrome浏览器实例
options1 = webdriver.ChromeOptions()
driver1 = webdriver.Chrome(options=options1)

# 打开第一个网页
driver1.get("https://www.baidu.com")

# 创建第二个Chrome浏览器实例
options2 = webdriver.ChromeOptions()
driver2 = webdriver.Chrome(options=options2)

# 打开第二个网页
driver2.get("https://www.google.com")
代码中,我们首先使用selenium的webdriver类创建第一个Chrome浏览器实例,然后打开第一个网页。接着再创建第二个Chrome浏览器实例,并打开第二个网页。这样就可以同时使用多个浏览器实例进行浏览器操作了。
文章出处登录后可见!