Yolov5添加PSA极化自注意力机制
- PSA极化自注意力机制来源
- 使用效果
- 极化过程示意图
- 源代码
- Yolov5添加PSA极化自注意力的步骤
最近在学习目标检测领域的yolov5算法,发现PSA(极化自注意力机制)对于该算法的改进可能有用,于是在网上几经搜寻,无果,遂自己动手写了一个,现分享给大家
PSA极化自注意力机制来源
论文链接: Polarized Self-Attention: Towards High-quality Pixel-wise Regression
代码地址: https://github.com/DeLightCMU/PSA
使用效果
 图1 原图 图1 原图
| 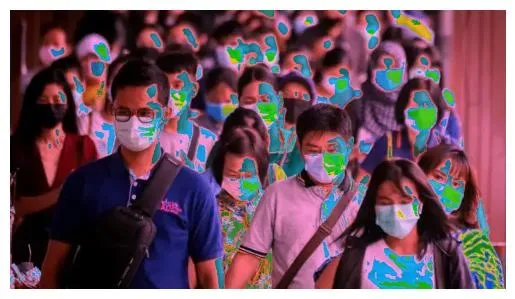 图2 平行极化 图2 平行极化
|  图3 顺序极化 图3 顺序极化
|
极化过程示意图
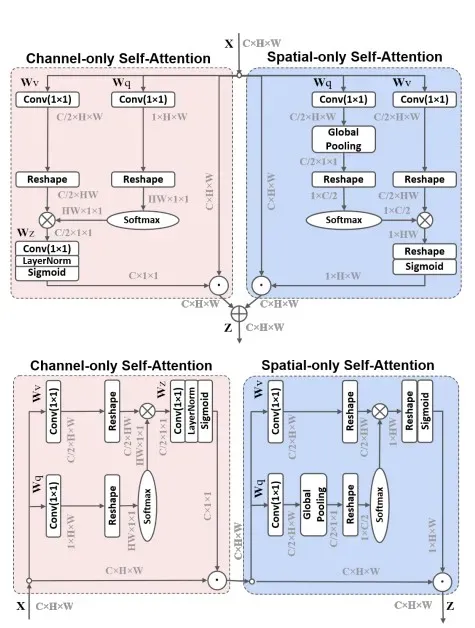
作者在网上没有找到pytorch框架下的PSA模块源码,于是根据论文中的流程自己动手写了一个。
论文中的流程图:
源代码
class PSA_Channel(nn.Module):
    def __init__(self, c1) -> None:
        super().__init__()
        c_ = c1 // 2  # hidden channels
        self.cv1 = nn.Conv2d(c1, c_, 1)
        self.cv2 = nn.Conv2d(c1, 1, 1)
        self.cv3 = nn.Conv2d(c_, c1, 1)
        self.reshape1 = nn.Flatten(start_dim=-2, end_dim=-1)
        self.reshape2 = nn.Flatten()
        self.sigmoid = nn.Sigmoid()
        self.softmax = nn.Softmax(1)
        self.layernorm = nn.LayerNorm([c1, 1, 1])

    def forward(self, x): # shape(batch, channel, height, width)
        x1 = self.reshape1(self.cv1(x)) # shape(batch, channel/2, height*width)
        x2 = self.softmax(self.reshape2(self.cv2(x))) # shape(batch, height*width)
        y = torch.matmul(x1, x2.unsqueeze(-1)).unsqueeze(-1) # 高维度下的矩阵乘法(最后两个维度相乘)
        return self.sigmoid(self.layernorm(self.cv3(y))) * x

class PSA_Spatial(nn.Module):
    def __init__(self, c1) -> None:
        super().__init__()
        c_ = c1 // 2  # hidden channels
        self.cv1 = nn.Conv2d(c1, c_, 1)
        self.cv2 = nn.Conv2d(c1, c_, 1)
        self.reshape1 = nn.Flatten(start_dim=-2, end_dim=-1)
        self.globalPooling = nn.AdaptiveAvgPool2d(1)
        self.softmax = nn.Softmax(1)
        self.sigmoid = nn.Sigmoid()

    def forward(self, x): # shape(batch, channel, height, width)
        x1 = self.reshape1(self.cv1(x)) # shape(batch, channel/2, height*width)
        x2 = self.softmax(self.globalPooling(self.cv2(x)).squeeze(-1)) # shape(batch, channel/2, 1)
        y = torch.bmm(x2.permute(0,2,1), x1) # shape(batch, 1, height*width)
        return self.sigmoid(y.view(x.shape[0], 1, x.shape[2], x.shape[3])) * x

class PSA(nn.Module):
    def __init__(self, in_channel, parallel=True) -> None:
        super().__init__()
        self.parallel = parallel
        self.channel = PSA_Channel(in_channel)
        self.spatial = PSA_Spatial(in_channel)

    def forward(self, x):
        if(self.parallel):
            return self.channel(x) + self.spatial(x)
        return self.spatial(self.channel(x))
Yolov5添加PSA极化自注意力的步骤
第一步,将☝️上面的PSA模块代码粘贴到models/common.py文件下。
第二步,构建添加PSA模块的网络。在models文件夹下面创建yolov5s-PSA.yaml文件,并且将👇下面的内容粘贴上去。
# YOLOv5 🚀 by Ultralytics, GPL-3.0 license

# Parameters
nc: 80  # number of classes
depth_multiple: 0.33  # model depth multiple  深度——神经网络的层数, 宽度——每层的通道数, 分辨率——是指网络中特征图的分辨率
width_multiple: 0.50  # layer channel multiple
anchors:
  - [10,13, 16,30, 33,23]  # P3/8
  - [30,61, 62,45, 59,119]  # P4/16
  - [116,90, 156,198, 373,326]  # P5/32

# YOLOv5 v6.0 backbone
backbone:
  # [from, number, module, args]
  [[-1, 1, Conv, [64, 6, 2, 2]],  # 0-P1/2
   [-1, 1, Conv, [128, 3, 2]],  # 1-P2/4
   [-1, 3, C3, [128]],
   [-1, 1, PSA, [64]], # PSA
   [-1, 1, Conv, [256, 3, 2]],  # 3-P3/8
   [-1, 6, C3, [256]],
   [-1, 1, PSA, [128]], # PSA
   [-1, 1, Conv, [512, 3, 2]],  # 5-P4/16
   [-1, 9, C3, [512]],
   [-1, 1, PSA, [256]], # PSA
   [-1, 1, Conv, [1024, 3, 2]],  # 7-P5/32
   [-1, 3, C3, [1024]],
   [-1, 1, SPPF, [1024, 5]],  # 9
  ]

# YOLOv5 v6.0 head
head:
  [[-1, 1, Conv, [512, 1, 1]],
   [-1, 1, nn.Upsample, [None, 2, 'nearest']],
   [[-1, 8], 1, Concat, [1]],  # cat backbone P4
   [-1, 3, C3, [512, False]],  # 13

   [-1, 1, Conv, [256, 1, 1]],
   [-1, 1, nn.Upsample, [None, 2, 'nearest']],
   [[-1, 5], 1, Concat, [1]],  # cat backbone P3
   [-1, 3, C3, [256, False]],  # 17 (P3/8-small)

   [-1, 1, Conv, [256, 3, 2]],
   [[-1, 17], 1, Concat, [1]],  # cat head P4
   [-1, 3, C3, [512, False]],  # 20 (P4/16-medium)

   [-1, 1, Conv, [512, 3, 2]],
   [[-1, 13], 1, Concat, [1]],  # cat head P5
   [-1, 3, C3, [1024, False]],  # 23 (P5/32-large)

   [[20, 23, 26], 1, Detect, [nc, anchors]],  # Detect(P3, P4, P5)
  ]
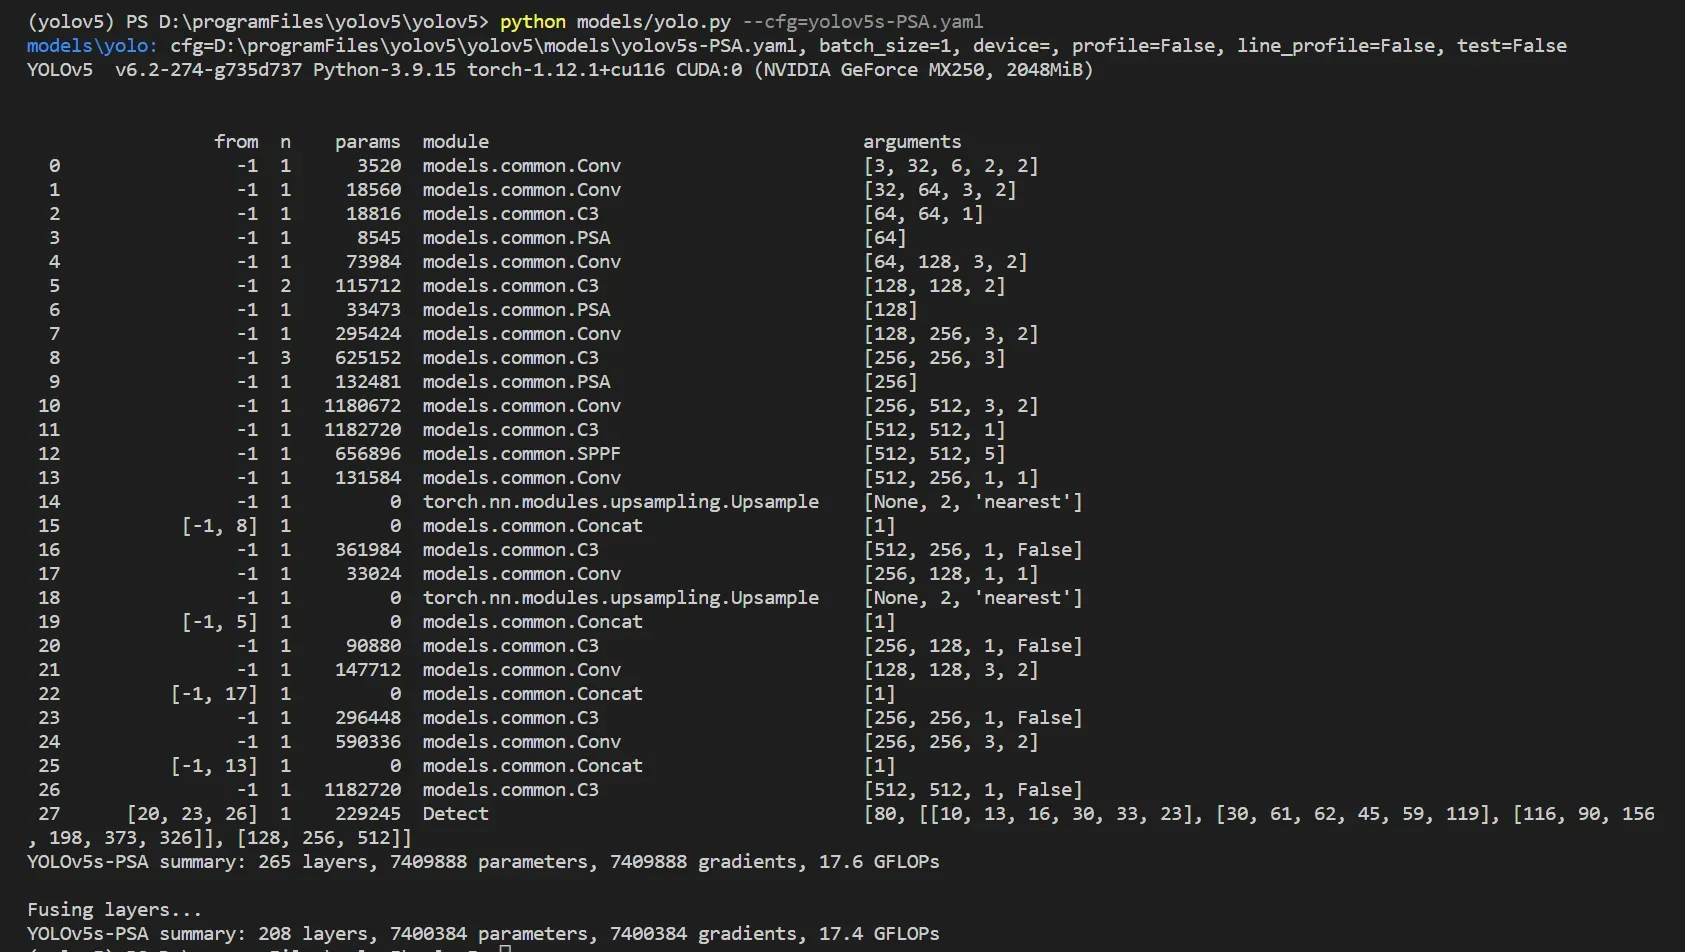
第三步,在终端输入命令python models/yolo.py --cfg=yolov5s-PSA.yaml,运行后可查看网络细节。
到这一步大功告成,我们就可以愉快的使用这个网络了😊
文章出处登录后可见!
已经登录?立即刷新