文章目录
- 一、MMSegmentation介绍
- 二、MMSegmentation基本框架
- 1、model设置
- 2、dataset设置
- 2.1 Dataset Class文件配置
- 2.2 Dataset Config文件配置
- 2.3 Total Config文件配置
- 三、运行代码
- 四、附录
- 1、MMSegmentation框架解释
- 2、MMSegmentation使用的预训练backbone
- 3、官方帮助文档
- 参考文章来源
一、MMSegmentation介绍
MMSegmentation是openmmlab项目下开源的图像语义分割框架,目前支持pytorch,由于其拥有pipeline加速,完善的数据增强体系,完善的模型库,作为大数据语义分割训练及测试的代码框架是再好不过了。
二、MMSegmentation基本框架
理解MMSeg最重要的就是弄懂Config文件,共有4类:
(1)model config
(2)dataset config
(3)runtime config
(4)schedule config
如果你想知道为什么分成这四大类,请参考本文附录部分,对这个不感兴趣就继续往下看。其实3和4大多数人都用不到的,重点还是在1和2,下面就从这两个角度给大家来一个不算精细的讲解。
1、model设置
如果采用的是MMSegmentation里面支持的模型,那么固然是不需要自己写class了,自己挑一个模型就可以了。这些model的目录保存在了configs/_base/models里面了。
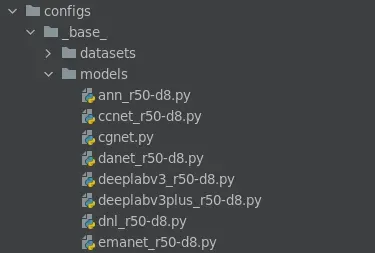
models文件夹下的模型名称:第一个下划线前面的都好理解,就是模型的名字,那r50-d8可能就是resnet的类型了,有人会问,那resnet101和resnet152哪去了,别急,其实这些只是baseline,它的backbone是可以改的,比如说我们要使用的是danet_r50-d8.py,我们先打开它(这部分,如果需要单GPU训练,将SyncBN改成BN):
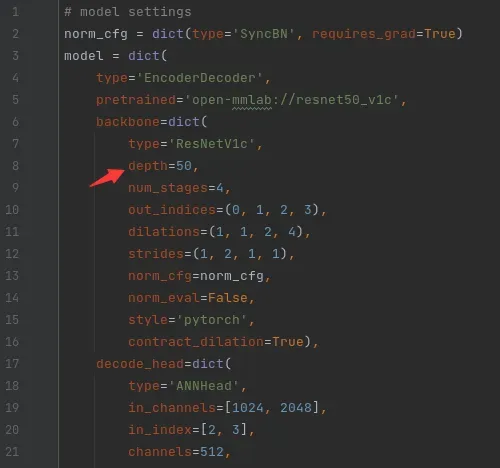
只需要把model.backbone.depth设为101或者152就可以使用resnet101或者resnet152啦,如果你的本地没有模型,mmSeg就会从model_zoo里面下载一个,如果本地有(应该是保存在了checkpoint里面),则自动加载本地的,不会重复下载。其他的操作后面会讲,另外如果你是多GPU操作就选择使用SyncBN,否则就使用BN就可以了。如果使用了SyncBN却只有一块可用的GPU,那可能会报类似AssertionError:Default process group is not initialized的错误。有人可能问那我直接改了这个文件不就把原来的默认参数给覆盖了嘛,不要紧,看到后面大家就会明白这个问题很容易解决,这里只是给大家做一个demo。
2、dataset设置
数据集设置比model的稍微复杂一点,这里会直接定义一个自己的数据集(Custom Dataset)来说明其原理。数据集需要准备的文件有三个:
(1)Dataset Class文件
(2)Dataset Config文件
(3)Total Config文件
在第四章中1节提到的config文件就是Total config(顶层设置文件),也是train.py文件直接调用的config文件,而Dataset Class文件是用来定义数据集的类别数和标签名称的,Dataset Config文件则是用来定义数据集目录、数据集信息(例如图片大小)、数据增强操作以及pipeline的。
2.1 Dataset Class文件配置
首先来说Dataset Class文件,这个文件存放在 mmseg/datasets/ 目录下:
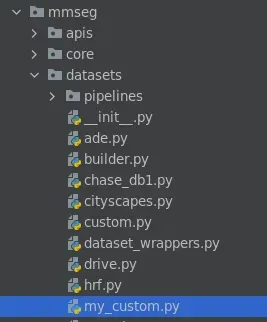
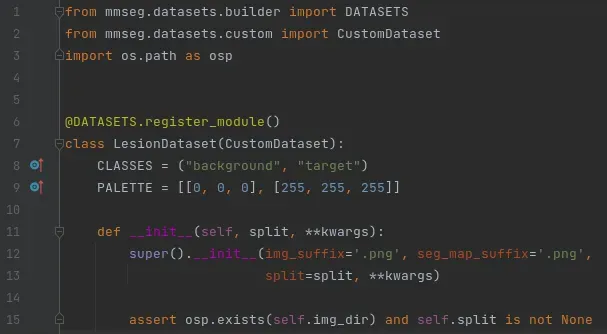
在这个目录下自己建一个数据集文件,并命个名,我这里命名为:my_custom.py。配置文件实际上是继承该目录下custom.py当中的CustomDataset父类的,这样写起了就简单多了,大多数情况下(当你的数据集是以一张张图片出现并且可用PIL模块读入时),你只需要设置两个参数即可——类别标签名称(CLASSES)和类别标签上色的RGB颜色(PALETTE)。以我的配置文件为例,代码如下:
代码中的img_suffix和seg_map_suffix分别是你的数据集图片的后缀和标签图片的后缀,因个人差异而定,tif格式的图片还没有试过,但是jpg和png的肯定是可以的。
设置好之后记得保存在mmseg/datasets/目录下(我的文件名叫my_custom.py)。另外还需要设置一下该目录下的__init__文件:
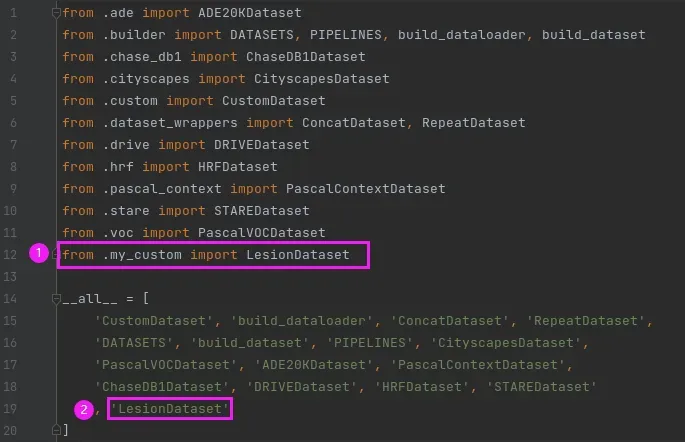
需要改两个地方,①import的时候要把自己的Dataset加载进来,②__all__数组里面需要加入自己的Dataset类名称,修改完成之后保存。
这两部操作完成之后还不行,由于训练的时候需要txt文件指示训练集、验证集和测试集的txt文件,一开始我以为这只是一个optional option,但无奈Custom Dataset的__init___下面给我来了一句assert osp.exists(self.img_dir) and self.split is not None,那好吧,不知道删了and后面的条件会有什么后果,还是自己创一个吧,写来一个简单的划分数据集并保存到txt的demo,大家可以把这个py文件放到你的数据集上一级目录上并对着稍微改改:
import mmcv
import os.path as osp
data_root = "/data3/datasets/Custom/Lab/Segmentation/"
ann_dir = "ann_png1"
split_dir = 'splits'
mmcv.mkdir_or_exist(osp.join(data_root, split_dir))
filename_list = [osp.splitext(filename)[0] for filename in mmcv.scandir(
    osp.join(data_root, ann_dir), suffix='.png')]
with open(osp.join(data_root, split_dir, 'train.txt'), 'w') as f:
  # select first 4/5 as train set
  train_length = int(len(filename_list)*4/5)
  f.writelines(line + '\n' for line in filename_list[:train_length])
with open(osp.join(data_root, split_dir, 'val.txt'), 'w') as f:
  # select last 1/5 as train set
  f.writelines(line + '\n' for line in filename_list[train_length:])
data_root写自己的工作目录名称,ann_dir写标签图片所在的目录,split_dir则是在data_root下生成split txt文件保存的文件夹目录,其他的就不需要怎么改了。如果你在data_root/split_dir/下成功找到了train.txt和val.txt文件,就没有问题了。
2.2 Dataset Config文件配置
Dataset Config文件在 configs/base/datasets 目录下,需要自己新建一个xxx.py文件。
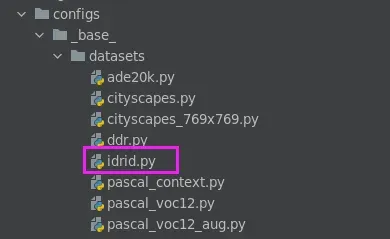
以我自己的Custom Dataset(idrid.py)为例,它的书写格式如下:
# dataset settings
"""
rgb mean:
 [116.51282647  56.43716432  16.30857136]
rgb std:
 [80.20605713 41.23209693 13.29250962]
"""
dataset_type = 'LesionDataset'
# data_root = '../data/IDRID'
data_root = '/home/pengdao.xu/python/pytorch/M2MRF-Lesion-Segmentation/data/IDRID'
img_norm_cfg = dict(
    mean=[116.513, 56.437, 16.309], std=[80.206, 41.232, 13.293], to_rgb=True)
image_scale = (1440, 960)
crop_size = (960, 1440)
palette = [
    [0, 0, 0],
    [128, 0, 0],  # EX: red
    [0, 128, 0],  # HE: green
    [128, 128, 0],  # SE: yellow
    [0, 0, 128]  # MA: blue
]
classes = ['bg', 'EX', 'HE', 'SE', 'MA']
train_pipeline = [
    dict(type='LoadImageFromFile'),
    dict(type='LoadAnnotations'),
    dict(type='Resize', img_scale=image_scale, ratio_range=(0.5, 2.0)),
    dict(type='RandomCrop', crop_size=crop_size, cat_max_ratio=0.75),
    dict(type='RandomFlip', flip_ratio=0),
    dict(type='PhotoMetricDistortion'),
    dict(type='Normalize', **img_norm_cfg),
    dict(type='Pad', size=crop_size, pad_val=0, seg_pad_val=0),
    dict(type='DefaultFormatBundle'),
    dict(type='Collect', keys=['img', 'gt_semantic_seg']),
]
test_pipeline = [
    dict(type='LoadImageFromFile'),
    dict(
        type='MultiScaleFlipAug',
        img_scale=image_scale,
        # img_ratios=[0.5, 0.75, 1.0, 1.25, 1.5, 1.75],
        flip=False,
        transforms=[
            dict(type='Resize', keep_ratio=True),
            # dict(type='RandomFlip'),
            dict(type='Normalize', **img_norm_cfg),
            dict(type='ImageToTensor', keys=['img']),
            dict(type='Collect', keys=['img']),
        ])
]

data = dict(
    samples_per_gpu=1,
    workers_per_gpu=1,
    train=dict(
        img_dir='image/train',
        ann_dir='label/train/annotations',
        data_root=data_root,
        classes=classes,
        palette=palette,
        type=dataset_type,
        pipeline=train_pipeline),
    val=dict(
        img_dir='image/test',
        ann_dir='label/test/annotations',
        data_root=data_root,
        classes=classes,
        palette=palette,
        type=dataset_type,
        pipeline=test_pipeline),
    test=dict(
        img_dir='image/test',
        ann_dir='label/test/annotations',
        data_root=data_root,
        classes=classes,
        palette=palette,
        type=dataset_type,
        pipeline=test_pipeline))
需要改的地方有以下几个:
(1)img_norm_cfg:数据集的方差和均值
(2)crop_size:数据增强时裁剪的大小. img_dir:
(3)img_scale:原图像尺寸
(4)data_root:工作目录
(5)img_dir:工作目录下存图片的目录
(6)ann_dir:工作目录下存标签的目录
(7)split:之前操作做txt文件的目录(我这里没有用到)
(8)sample_per_gpu:batch size
(9)workers_per_gpu:dataloader的线程数目,一般设2,4,8,根据CPU核数确定,或使用os.cpu_count()函数代替
(10)PhotoMetricDistortion是数据增强操作,有四个参数(参考博客)分别是亮度、对比度、饱和度和色调,它们的默认设定如下:
brightness_delta=32; # 32
contrast_range=(0.5, 1.5); # (0.5, 1.5),下限-上限
saturation_range=(0.5, 1.5); # (0.5, 1.5),下限-上限
hue_delta=18; # 18
如果不想使用默认设定,仿照其他选项将自定义参数写在后面即可,例如
dict(type='PhotoMetricDistortion',contrast_range=(0.5, 1.0))
改好之后保存 configs/base/datasets 目录下。
2.3 Total Config文件配置
Total Config文件是train.py直接调用的config文件,在第四章中1也有介绍,在此只说明如何即可。该文件在 config/ 目录下的xxx(model名),你选用的是哪一个model,就选择哪一个目录。
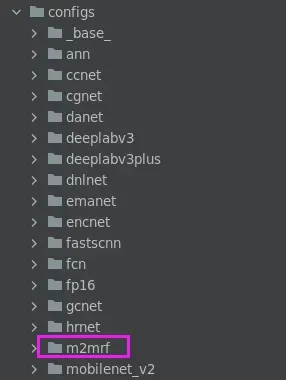
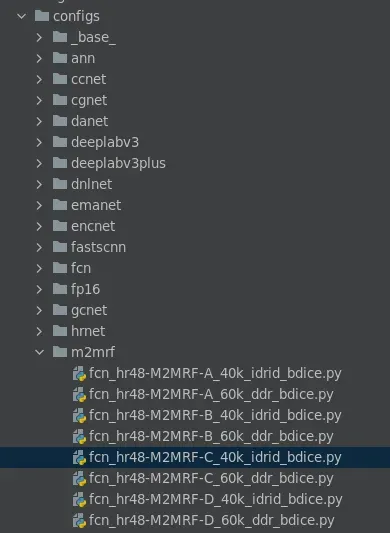
以m2mrf为例,我们书写一个total config文件,并保存在configs/m2mrf的文件夹下:
_base_ = [
    '../_base_/models/fcn_hr48.py',
    '../_base_/datasets/idrid.py',
    '../_base_/default_runtime.py',
    '../_base_/schedules/schedule_40k_idrid.py'
]
model = dict(
    use_sigmoid=True,
    backbone=dict(
        type='HRNet_M2MRF_C',  # DownSample/UpSample: Cascade/One-Step
        m2mrf_patch_size=(8, 8),
        m2mrf_encode_channels_rate=4,
        m2mrf_fc_channels_rate=64,
    ),
    decode_head=dict(
        num_classes=4,
        loss_decode=dict(type='BinaryLoss', loss_type='dice', loss_weight=1.0, smooth=1e-5)
    )
)
test_cfg = dict(mode='whole', compute_aupr=True)
这个代码就一个__base__的数组,第一个元素代表模型路径,也就是在第二章1中介绍的模型文件;第二个元素代表数据集的Dataset config文件(第二章中2.2 Dataset Config文件配置 );第三个元素和第四个元素本教程未涉及到,按照默认参数写也没有太大问题,如果想修改训练的代数以及log和save的频率就修改第4元素及响应文件,在此就不再赘述了。另外如果你的模型不是19类的(因为是原模型是根据cityscapes写的,输出通道为19),需按照上面修改一下。
三、运行代码
在项目目录下,输入python tools/train.py xxxconfig.py –work-dir=xxx即可运行,其中xxxconfig.py就是我们刚刚保存的Total config文件(记得要把完整路径也加上),work-dir其实就是保存log和model的目录(如果没有会自己创建)。如果发现import mmseg找不到这个包,那八成是调试器运行目录不在根目录下造成的,要不就配置run的目录,要不就直接吧tools/train.py复制到根目录下运行。运行结果差不多是这样:

四、附录
1、MMSegmentation框架解释
在MMSegmentation的项目目录下,打开**Configs/**下面的目录
随便打开一个文件(如上图选中.py文件),可以看到:
_base_ = [
    '../_base_/models/fcn_hr48.py',
    '../_base_/datasets/idrid.py',
    '../_base_/default_runtime.py',
    '../_base_/schedules/schedule_40k_idrid.py'
]
model = dict(
    use_sigmoid=True,
    backbone=dict(
        type='HRNet_M2MRF_C',  # DownSample/UpSample: Cascade/One-Step
        m2mrf_patch_size=(8, 8),
        m2mrf_encode_channels_rate=4,
        m2mrf_fc_channels_rate=64,
    ),
    decode_head=dict(
        num_classes=4,
        loss_decode=dict(type='BinaryLoss', loss_type='dice', loss_weight=1.0, smooth=1e-5)
    )
)
test_cfg = dict(mode='whole', compute_aupr=True)
从文件的名字也可以看出,它是模型(baseline+backbone、数据集、schedule的组合(runtime是default设置,就没包含在名称内)。
2、MMSegmentation使用的预训练backbone
预训练backbone下载链接为:
mmcv预训练模型下载地址(.json文件,复制对应模型的链接即可下载)
{
  "vgg16_caffe": "https://download.openmmlab.com/pretrain/third_party/vgg16_caffe-292e1171.pth",
  "detectron/resnet50_caffe": "https://download.openmmlab.com/pretrain/third_party/resnet50_caffe-788b5fa3.pth",
  "detectron2/resnet50_caffe": "https://download.openmmlab.com/pretrain/third_party/resnet50_msra-5891d200.pth",
  "detectron/resnet101_caffe": "https://download.openmmlab.com/pretrain/third_party/resnet101_caffe-3ad79236.pth",
  "detectron2/resnet101_caffe": "https://download.openmmlab.com/pretrain/third_party/resnet101_msra-6cc46731.pth",
  "detectron2/resnext101_32x8d": "https://download.openmmlab.com/pretrain/third_party/resnext101_32x8d-1516f1aa.pth",
  "resnext50_32x4d": "https://download.openmmlab.com/pretrain/third_party/resnext50-32x4d-0ab1a123.pth",
  "resnext101_32x4d": "https://download.openmmlab.com/pretrain/third_party/resnext101_32x4d-a5af3160.pth",
  "resnext101_64x4d": "https://download.openmmlab.com/pretrain/third_party/resnext101_64x4d-ee2c6f71.pth",
  "contrib/resnet50_gn": "https://download.openmmlab.com/pretrain/third_party/resnet50_gn_thangvubk-ad1730dd.pth",
  "detectron/resnet50_gn": "https://download.openmmlab.com/pretrain/third_party/resnet50_gn-9186a21c.pth",
  "detectron/resnet101_gn": "https://download.openmmlab.com/pretrain/third_party/resnet101_gn-cac0ab98.pth",
  "jhu/resnet50_gn_ws": "https://download.openmmlab.com/pretrain/third_party/resnet50_gn_ws-15beedd8.pth",
  "jhu/resnet101_gn_ws": "https://download.openmmlab.com/pretrain/third_party/resnet101_gn_ws-3e3c308c.pth",
  "jhu/resnext50_32x4d_gn_ws": "https://download.openmmlab.com/pretrain/third_party/resnext50_32x4d_gn_ws-0d87ac85.pth",
  "jhu/resnext101_32x4d_gn_ws": "https://download.openmmlab.com/pretrain/third_party/resnext101_32x4d_gn_ws-34ac1a9e.pth",
  "jhu/resnext50_32x4d_gn": "https://download.openmmlab.com/pretrain/third_party/resnext50_32x4d_gn-c7e8b754.pth",
  "jhu/resnext101_32x4d_gn": "https://download.openmmlab.com/pretrain/third_party/resnext101_32x4d_gn-ac3bb84e.pth",
  "msra/hrnetv2_w18_small": "https://download.openmmlab.com/pretrain/third_party/hrnetv2_w18_small-b5a04e21.pth",
  "msra/hrnetv2_w18": "https://download.openmmlab.com/pretrain/third_party/hrnetv2_w18-00eb2006.pth",
  "msra/hrnetv2_w32": "https://download.openmmlab.com/pretrain/third_party/hrnetv2_w32-dc9eeb4f.pth",
  "msra/hrnetv2_w40": "https://download.openmmlab.com/pretrain/third_party/hrnetv2_w40-ed0b031c.pth",
  "msra/hrnetv2_w48": "https://download.openmmlab.com/pretrain/third_party/hrnetv2_w48-d2186c55.pth",
  "bninception_caffe": "https://download.openmmlab.com/pretrain/third_party/bn_inception_caffe-ed2e8665.pth",
  "kin400/i3d_r50_f32s2_k400": "https://download.openmmlab.com/pretrain/third_party/i3d_r50_f32s2_k400-2c57e077.pth",
  "kin400/nl3d_r50_f32s2_k400": "https://download.openmmlab.com/pretrain/third_party/nl3d_r50_f32s2_k400-fa7e7caa.pth",
  "res2net101_v1d_26w_4s": "https://download.openmmlab.com/pretrain/third_party/res2net101_v1d_26w_4s_mmdetv2-f0a600f9.pth",
  "regnetx_400mf": "https://download.openmmlab.com/pretrain/third_party/regnetx_400mf-a5b10d96.pth",
  "regnetx_800mf": "https://download.openmmlab.com/pretrain/third_party/regnetx_800mf-1f4be4c7.pth",
  "regnetx_1.6gf": "https://download.openmmlab.com/pretrain/third_party/regnetx_1.6gf-5791c176.pth",
  "regnetx_3.2gf": "https://download.openmmlab.com/pretrain/third_party/regnetx_3.2gf-c2599b0f.pth",
  "regnetx_4.0gf": "https://download.openmmlab.com/pretrain/third_party/regnetx_4.0gf-a88f671e.pth",
  "regnetx_6.4gf": "https://download.openmmlab.com/pretrain/third_party/regnetx_6.4gf-006af45d.pth",
  "regnetx_8.0gf": "https://download.openmmlab.com/pretrain/third_party/regnetx_8.0gf-3c68abe7.pth",
  "regnetx_12gf": "https://download.openmmlab.com/pretrain/third_party/regnetx_12gf-4c2a3350.pth",
  "resnet18_v1c": "https://download.openmmlab.com/pretrain/third_party/resnet18_v1c-b5776b93.pth",
  "resnet50_v1c": "https://download.openmmlab.com/pretrain/third_party/resnet50_v1c-2cccc1ad.pth",
  "resnet101_v1c": "https://download.openmmlab.com/pretrain/third_party/resnet101_v1c-e67eebb6.pth",
  "mmedit/vgg16": "https://download.openmmlab.com/mmediting/third_party/vgg_state_dict.pth",
  "mmedit/res34_en_nomixup": "https://download.openmmlab.com/mmediting/third_party/model_best_resnet34_En_nomixup.pth",
  "mmedit/mobilenet_v2": "https://download.openmmlab.com/mmediting/third_party/mobilenet_v2.pth",
  "contrib/mobilenet_v3_large": "https://download.openmmlab.com/pretrain/third_party/mobilenet_v3_large-bc2c3fd3.pth",
  "contrib/mobilenet_v3_small": "https://download.openmmlab.com/pretrain/third_party/mobilenet_v3_small-47085aa1.pth",
  "resnest50": "https://download.openmmlab.com/pretrain/third_party/resnest50_d2-7497a55b.pth",
  "resnest101": "https://download.openmmlab.com/pretrain/third_party/resnest101_d2-f3b931b2.pth",
  "resnest200": "https://download.openmmlab.com/pretrain/third_party/resnest200_d2-ca88e41f.pth",
  "darknet53": "https://download.openmmlab.com/pretrain/third_party/darknet53-a628ea1b.pth",
  "mmdet/mobilenet_v2": "https://download.openmmlab.com/mmdetection/v2.0/third_party/mobilenet_v2_batch256_imagenet-ff34753d.pth"
}
3、官方帮助文档
可在**docs/**中查看
希望本文对您有帮助,谢谢阅读!
参考文章来源
以上是我参考另一位博主的文章以及自己实现过程进行综合完成的,博主的文章来源:https://blog.csdn.net/weixin_44044411/article/details/118196847?spm=1001.2014.3001.5506
文章出处登录后可见!