目录
前言:
RStudio 1.4为RStudio IDE带来了对Python编程语言的改进支持。本文将探讨如何将Python与R和RStudio一起使用。
RStudio使用 R包reticulate 与Python交互,因此RStudio的Python集成需要:
- 安装 Python (2.7 or newer; 3.5 or newer preferred), and
- 安装R包reticulate (1.20 or newer, as available from CRAN)
1-安装reticulate包
install.packages("reticulate")
library(reticulate)
2-安装Python,
2.1-Step1:安装miniconda()
首先,需要在您的机器上安装Python。如果您还没有安装Python,可以通过几种方式安装它:
- (推荐)使用reticulate::install_miniconda(),使用reticulate包安装Python的Miniconda发行版;
- (Windows)通过https://www.python.org/downloads/windows/提供的官方Python二进制文件安装Python;
- (macOS)通过https://www.python.org/downloads/mac-osx/提供的官方Python二进制文件安装Python;
- (Linux)从源代码安装Python,或者通过操作系统的包管理器提供的Python版本安装Python。有关详细信息,请参阅https://docs.python.org/3/using/unix.html。如果您自己从源代码安装Python,最好将其安装到 /opt/python/<version>之类的位置,这样RStudio和reticullate可以更容易地发现它。
本文使用最简单的安装Python模式,即全程只需要在RStudio中键入多行R语言命令。
reticulate::miniconda() #安装miniconda
2.2-Step2:安装python
reticulate::reply_python() #安装Python其实,在第4节中使用Python,在R中打开一个Python脚本,运行一下,这个过程会自动运行reticulate::reply_python()函数的,可以先不执行这步,直接运行4.1节中给出的Python代码试一下,看下效果。
其他一些有用但不必须的代码
Sys.which("python")         #有时不知道自己的Python在哪里,可以通过这个函数获得路径
reticulate::py_available()  #查看是否已经安装好Python,TRUE表示已经安装,FALSE表示没有安装。
3-选择Python的默认版本(这步可以忽略)
这步可以忽略,目前我在使用中,发现按照前面的步骤,到这步的时候,可以不选择Python的默认版本。不执行这一步,可以正常使用Python和安装Python模块,目前没有发现什么异常。
(一定要配置Python环境,不然在RStudio不能成功Python包。
可以通过Tools->Global Options…->Python配置默认版本的Python以与RStudio一起使用:)

Python解释器也就是Python,这一步是选择Python的默认版本。
“Python解释器(Python interpreters):”输入框显示要使用的默认Python解释器(如果有)。如果您已经知道要使用的Python解释器的位置,您可以在该输入框中键入解释器的位置。
否则,如果输入框中没有显示默认Python解释器,可以通过单击“选择…”按钮在系统上发现Python解释器:
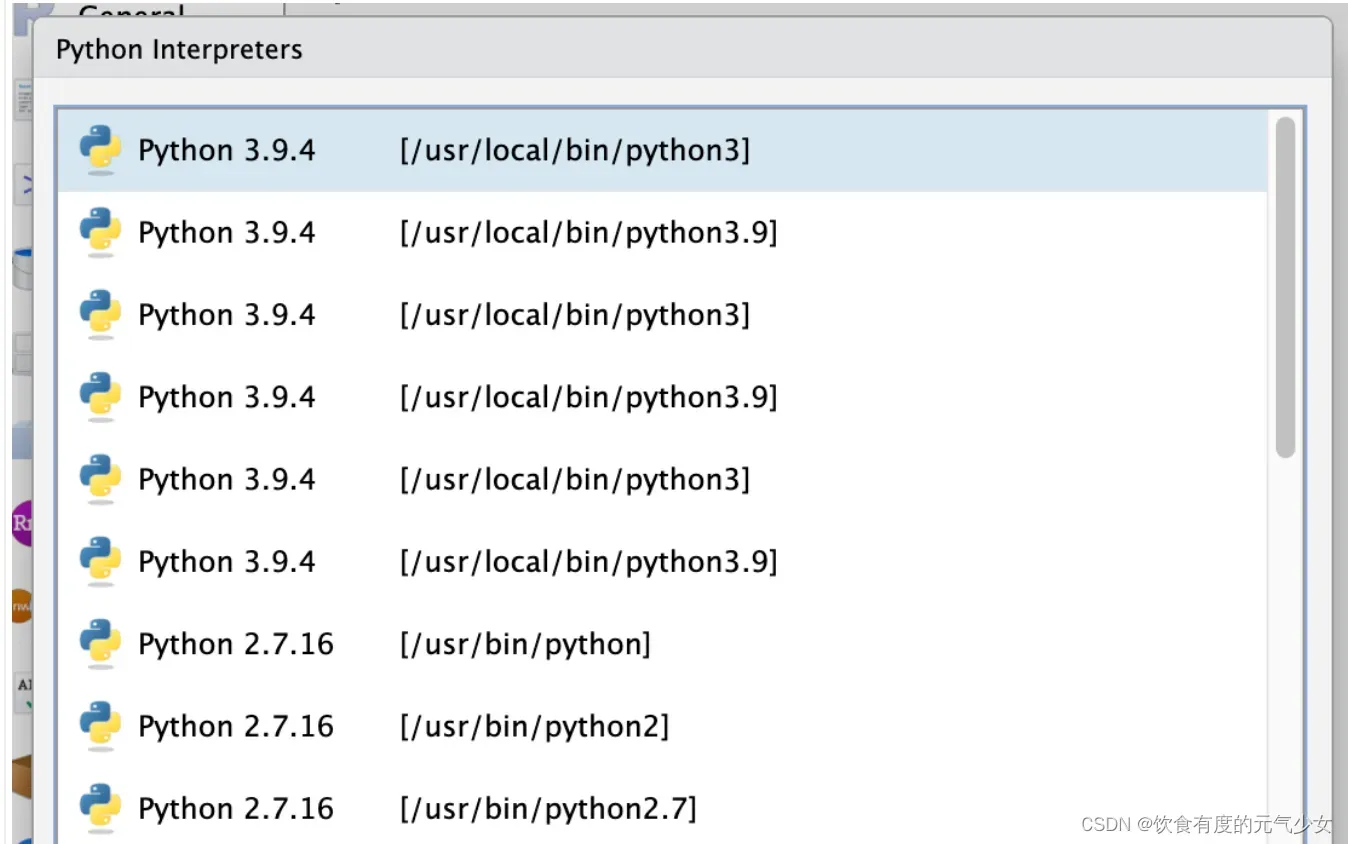
RStudio将通过几种不同的方法搜索Python解释器:
- On the PATH;
- For virtual environments, located within the ~/.virtualenvs folder;
- For Conda environments, as reported by conda –list,
- For pyenv Python installations located in ~/.pyenv,
- For Python installations located in /opt/python.
测试环境:
py_available() #检测Python是否安装成功,返回TRUE即表示安装成功
4-使用Python
4.1 运行一个简单的Python脚本
reticulate包可以在当前运行的R会话中加载和使用Python。安装reticulate包后,可以打开Python脚本(扩展名为. py),并执行其中的代码,类似于R。
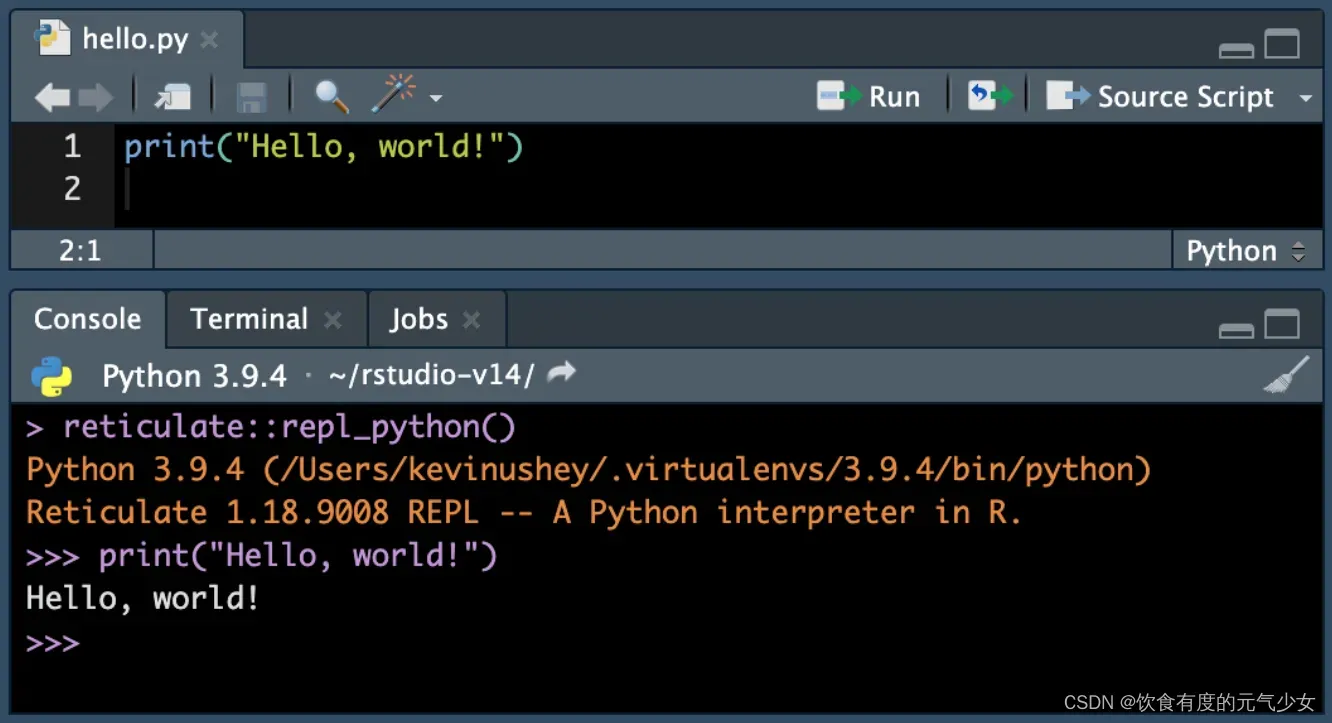
注意到:在控制台(console)中,>表示运行R代码,>>>表示运行的Python代码。
请注意,RStudio使用reticulate Python REPL来执行代码,并根据正在执行的脚本在R和Python之间自动切换。
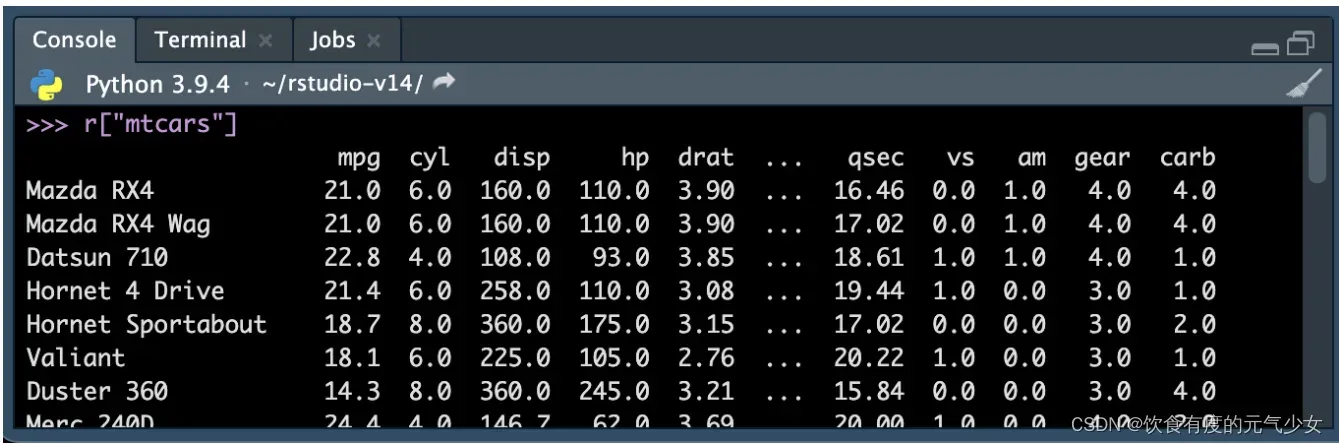
当reticulate REPL处于活动状态时,可以通过r辅助对象访问R会话中的对象。例如,r[“mtcar”]可用于从R访问mtcar数据集,并将其转换为pandas DataFrame(如果可用),如果没有,则转换为Python dictionary。
4.2 在RStudio上安装Python模块
以pandas模块为例:
reticulate::py_install("pandas")# 安装seaborn绘图库
# pip = T指定从pip安装,默认从conda安装
py_install("seaborn", pip = T)
# 查看seaborn模块是否已安装
py_module_available("seaborn")
> [1] TRUE4.3 在 R 中调用 Python 模块
例子1:
# 调用os模块的listdir()函数
os <- import("os")
os$listdir("./")
>  [1] ".Rproj.user"      "convert.R"        "reticulate.Rmd"   "Reticulate.Rproj"
>  [5] "Rscript.R"        "summary.html"     "summary.md"       "summary.nb.html"
>  [9] "summary.Rmd"      "test_pyscript.py"
例子2:
# 调用seaborn模块的load_dataset()函数
# 需要seaborn模块已安装
sns <- import("seaborn")
tips <- sns$load_dataset("tips")
print(head(tips))
>   total_bill  tip    sex smoker day   time size
> 1      16.99 1.01 Female     No Sun Dinner    2
> 2      10.34 1.66   Male     No Sun Dinner    3
> 3      21.01 3.50   Male     No Sun Dinner    3
> 4      23.68 3.31   Male     No Sun Dinner    2
> 5      24.59 3.61 Female     No Sun Dinner    4
> 6      25.29 4.71   Male     No Sun Dinner    4
4.4 在RStudio上调用Python脚本写的函数
想法与在RStudio中调用C++自定义函数一样。建议编写的Python自定义函数名与Python脚本名称一样,这样通过source_python()函数调用这个Python自定义函数,这意味着Python自定义函数可以在RStudio中不变函数名使用,使用的其实时同名的R函数。
例子1:
(1)在Python环境下,编写一个Python脚本,保存为flights.py。可以看到这个python函数名为read_flights().
import pandas
def read_flights(file):
  flights = pandas.read_csv(file)
  flights = flights[flights['dest'] == "ORD"]
  flights = flights[['carrier', 'dep_delay', 'arr_delay']]
  flights = flights.dropna()
  return flights
(2)在RStudio中使用source_python调用实现写好的flight.py文件。
source_python("flights.py")
flights <- read_flights("flights.csv") #使用flights.py脚本中的Python自定义函数

library(ggplot2)
ggplot(flights, aes(carrier, arr_delay)) + geom_point() + geom_jitter()
例子2:
假设 Python 脚本为test_pyscript.py,内容如下:
# 打印一些数据
for i in range(10):
  print("hello world)

# 定义1个函数
def sum_two_value(a, b):
  return a + b
在 R 中执行 test_pyscript.py
source_python("./test_pyscript.py")

> hello world
> hello world
> hello world
> hello world
> hello world
> hello world
> hello world
> hello world
> hello world
> hello world

sum_two_value(1, 2)
> [1] 3
4.5 Python 与 R 对象相互转换的方式
R → Python
设置一些R对象:
A <- 1

B <- c(1, 2, 3)

C <- c(a = 1, b = 2, c = 3)

D <- matrix(1:4, nrow = 2)

E <- data.frame(a = c(1, 2), b = c(3, 4))

G <- list(1, 2, 3)

H <- list(c(1, 2), c(3, 4))

I <- list(a = c(1, 2), b = c(3, 4))

J <- function(a, b) {
  return(a + b)
}

K1 <- NULL
K2 <- T
K3 <- F
上述 R 对象转为 Python 对象(Python Cell)
r.A
> 1.0
type(r.A)
> <class 'float'>
r.B
> [1.0, 2.0, 3.0]
type(r.B)
> <class 'list'>
r.C
> [1.0, 2.0, 3.0]
type(r.C)
> <class 'list'>
r.D
> array([[1, 3],
>        [2, 4]])
type(r.D)
> <class 'numpy.ndarray'>
r.E
>      a    b
> 0  1.0  3.0
> 1  2.0  4.0
type(r.E)
> <class 'pandas.core.frame.DataFrame'>
r.G
> [1.0, 2.0, 3.0]
type(r.G)
> <class 'list'>
r.H
> [[1.0, 2.0], [3.0, 4.0]]
type(r.H)
> <class 'list'>
r.I
> {'a': [1.0, 2.0], 'b': [3.0, 4.0]}
type(r.I)
> <class 'dict'>
r.J
> <function make_python_function.<locals>.python_function at 0x000001AE204ECE18>
type(r.J)
> <class 'function'>
r.J(2, 3)
> 5
r.K1
type(r.K1)
> <class 'NoneType'>
r.K2
> True
type(r.K2)
> <class 'bool'>
r.K3
> False
type(r.K3)
> <class 'bool'>
Python → R
设置一些 Python 对象(Python Cell)
A = 1

B = [1, 2, 3]

C = [[1, 2], [3, 4]]

D1 = [[1], 2, 3]
D2 = [[1, 2], 2, 3]

E = (1, 2, 3)

FF = ((1, 2), (3, 4))

G = ((1, 2), 3, 4)

H = {"a": [1, 2, 3],
     "b": [2, 3, 4]
     }

I = {"a": 1,
     "b": [2, 3, 4]
     }

def J(a, b):
  return a + b
上述 Python 对象转为 R 对象(R Cell)
py$A
> [1] 1
class(py$A)
> [1] "integer"

py$B
> [1] 1 2 3
class(py$B)
> [1] "integer"

py$C
> [[1]]
> [1] 1 2
>
> [[2]]
> [1] 3 4
class(py$C)
> [1] "list"

py$D1
> [[1]]
> [1] 1
>
> [[2]]
> [1] 2
>
> [[3]]
> [1] 3
class(py$D1)
> [1] "list"
py$D2
> [[1]]
> [1] 1 2
>
> [[2]]
> [1] 2
>
> [[3]]
> [1] 3
class(py$D2)
> [1] "list"

py$E
> [[1]]
> [1] 1
>
> [[2]]
> [1] 2
>
> [[3]]
> [1] 3
class(py$E)
> [1] "list"

py$FF
> [[1]]
> [[1]][[1]]
> [1] 1
>
> [[1]][[2]]
> [1] 2
>
>
> [[2]]
> [[2]][[1]]
> [1] 3
>
> [[2]][[2]]
> [1] 4
class(py$FF)
> [1] "list"

py$G
> [[1]]
> [[1]][[1]]
> [1] 1
>
> [[1]][[2]]
> [1] 2
>
>
> [[2]]
> [1] 3
>
> [[3]]
> [1] 4
class(py$G)
> [1] "list"

py$H
> $a
> [1] 1 2 3
>
> $b
> [1] 2 3 4
class(py$H)
> [1] "list"

py$I
> $a
> [1] 1
>
> $b
> [1] 2 3 4
class(py$I)
> [1] "list"

py$J
> <function J at 0x000001AE204ECE18>
class(py$J)
> [1] "python.builtin.function" "python.builtin.object"
py$J(2, 3)
> [1] 55-在 R Console 中交互式运行 R
- repl_python () 进入 Python 环境
- exit 退出 Python 环境
6-在RStudio中安装Python包遇到问题时解决方案
问题:No module named ‘tensorflow_probability’
通过在新的R会话中运行以下操作可以解决许多安装问题(您可以使用Ctrl+Shift+F10在Rdios中重新启动R):
# install the development version of packages, in case the
# issue is already fixed but not on CRAN yet.
install.packages("remotes")
remotes::install_github(sprintf("rstudio/%s", c("reticulate", "tensorflow", "keras")))
reticulate::miniconda_uninstall() # start with a blank slate
reticulate::install_miniconda()
tfprobability::install_tfprobability()
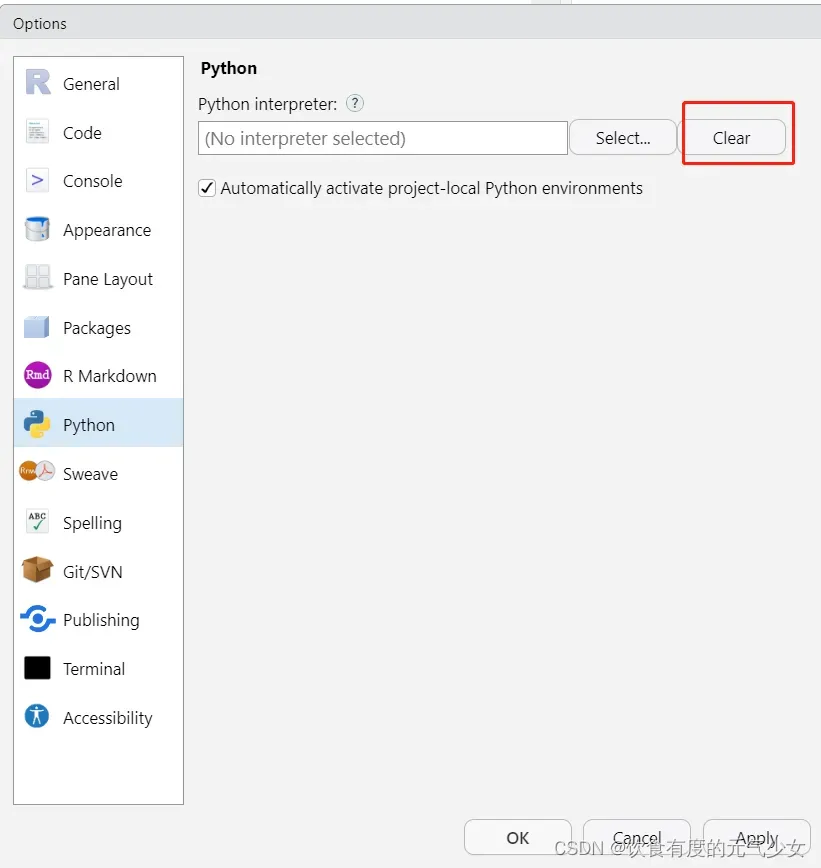
注意:其中在miniconda_uninstall() 卸载之前安装的miniconda时,要将RStudio中Tools–>Global Options—>Python–>将Python interpreter(Python解释器)清除掉。(注:下图是已经清除掉的界面,如果没有执行清楚操作,Python interpreter输入框中是有内容的)。
参考:
https://support.posit.co/hc/en-us/articles/1500007929061 (给出了在RStudio中配置Python环境的最简单方法)
🤔 Reticulate | 如何在Rstudio中优雅地调用Python!? – 知乎 (zhihu.com) (给出了安装Python包的命令)
No module named ‘tensorflow_probability’ · Issue #155 · rstudio/tfprobability · GitHub (安装包遇到问题时的解决办法)
reticulate:在R中使用Python – 知乎 (zhihu.com)
文章出处登录后可见!