1. GhostNet网络
一张图片经过神经网络进行特征提取后,能够得到很多特征图。
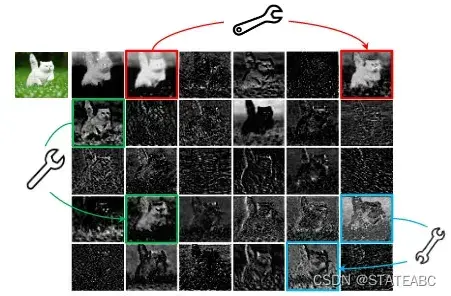
在特征图中会有一些相似性很高,这就是神经网络中存在的特征图冗杂的情况(如图中扳手相连的两幅特征图)。
作者认为可以对其中的一个特征图进行(Cheap Operations)简单的线性运算从而生成更多相似特征图,从而可以使用更少的参数生成更多的特征图,将相似的特征图认为是彼此的Ghost。
2. Ghost Module
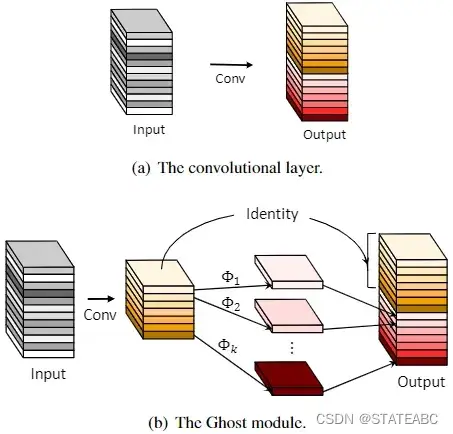
作者用Ghost Module代替传统卷积,首先采用普通的1×1卷积对输入图片进行通道数的压缩,然后再进行深度可分离卷积(逐层卷积)得到更多的特征图,然后将不同的特征图concat到一起,组合成新的output。
Ghost Module构建代码
class GhostModule(nn.Module):
    def __init__(self, inp, oup, kernel_size=1, ratio=2, dw_size=3, stride=1, relu=True):
        super(GhostModule, self).__init__()
        #ratio一般会指定成2,保证输出特征层的通道数等于exp
        self.oup = oup
        init_channels = math.ceil(oup / ratio)
        new_channels = init_channels*(ratio-1)

        #利用1x1卷积对输入进来的特征图进行通道的浓缩,获得特征通缩
        #跨通道的特征提取
        self.primary_conv = nn.Sequential(
            nn.Conv2d(inp, init_channels, kernel_size, stride, kernel_size//2, bias=False),  #1x1卷积的输入通道数为GhostModule的输出通道数oup/2
            nn.BatchNorm2d(init_channels),                       #1x1卷积后进行标准化
            nn.ReLU(inplace=True) if relu else nn.Sequential(),  #ReLU激活函数
        )

        #在获得特征浓缩后,使用逐层卷积,获得额外的特征图
        #跨特征点的特征提取    一般会设定大于1的卷积核大小
        self.cheap_operation = nn.Sequential(
            nn.Conv2d(init_channels, new_channels, dw_size, 1, dw_size//2, groups=init_channels, bias=False),  #groups参数的功能就是将普通卷积转换成逐层卷据
            nn.BatchNorm2d(new_channels),
            nn.ReLU(inplace=True) if relu else nn.Sequential(),
        )

    def forward(self, x):
        x1 = self.primary_conv(x)
        x2 = self.cheap_operation(x1)
        #将1x1卷积后的结果和逐层卷积后的结果进行堆叠
        out = torch.cat([x1,x2], dim=1)
        return out[:,:self.oup,:,:]
1×1卷积的输入通道数为GhostModule的输出通道数oup/2,因为最终输出特征层由1×1卷积后的结果和逐层卷积后的结果进行堆叠组成的,进行逐层卷积时特征层的通道数不变,如果要保证最终输出特征层的通道数是一个固定值,那么就要使得1×1卷积后的结果的通道数为最终输出特征层的1/2。
3. Ghost BottleNeck原理
Ghost BottleNeck是由Ghost Module组成的瓶颈结构
Ghost BottleNeck整体架构和Residual Block非常相似,也可以直接认为是将Residual Block中的普通卷积操作替换成Ghost Module得到。
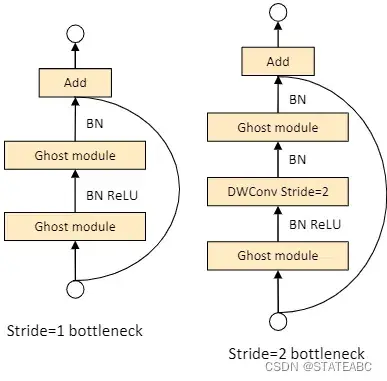
左图中主干部分用用两个Ghost Module(GM)串联组成,其中第一个GM扩大通道数,第二个GM将通道数降低到与输入通道数一致;残差边部分与ResNet一样。由于S=1,因此不会对输入特征层的高和宽进行压缩,其功能为加深网络的深度。
右图中主干部分的两个GM之间加入了一个stride=2的Deepwise卷积,可以将特征图高和宽进行压缩,使其大小降为输入的1/2;在残差边部分,也会添加一个步长为2×2的深度可分离卷积和1×1的普通卷积,以保证Add操作可以对齐。由于S=2,因此会对输入特征层的高和宽进行压缩,其功能为改变输入特征层的形状。
实际应用中,为了进一步提高效率,GhostModule中的所有常规卷积都用pointwise卷积代替。
Ghost BottleNeck构建代码:
class GhostBottleneck(nn.Module):
    def __init__(self, in_chs, mid_chs, out_chs, dw_kernel_size=3, stride=1, act_layer=nn.ReLU, se_ratio=0.):
        super(GhostBottleneck, self).__init__()
        has_se = se_ratio is not None and se_ratio > 0.
        self.stride = stride
        #首先利用一个ghost模块进行特征提取
        #此时指定的通道数会比较大,可以看作是逆残差结构,进行通道数上升
        self.ghost1 = GhostModule(in_chs, mid_chs, relu=True)

        if self.stride > 1:     #根据步长判断是否使用深度可分离卷积对输入特征图进行高和宽的压缩
            #如果要进行特征图的高宽压缩,则进行逐层卷积
            self.conv_dw = nn.Conv2d(mid_chs, mid_chs, dw_kernel_size, stride=stride,
                             padding=(dw_kernel_size-1)//2,
                             groups=mid_chs, bias=False)
            self.bn_dw = nn.BatchNorm2d(mid_chs)

        if has_se:    #判断是否使用注意力机制模块
            self.se = SqueezeExcite(mid_chs, se_ratio=se_ratio)
        else:
            self.se = None

        #再次利用一个ghost模块进行特征提取
        self.ghost2 = GhostModule(mid_chs, out_chs, relu=False)
        #判断步长是否等1、输入通道和输出通道是否一样
        if (in_chs == out_chs and self.stride == 1):
            self.shortcut = nn.Sequential()
        else:     #如果不一样则利用深度可分离卷积和1x1卷积调整通道数,保证主干部分和残差边部分能够进行相加
            self.shortcut = nn.Sequential(
                nn.Conv2d(in_chs, in_chs, dw_kernel_size, stride=stride,
                       padding=(dw_kernel_size-1)//2, groups=in_chs, bias=False),
                nn.BatchNorm2d(in_chs),
                nn.Conv2d(in_chs, out_chs, 1, stride=1, padding=0, bias=False),
                nn.BatchNorm2d(out_chs),
            )


    def forward(self, x):        #前向传播
        residual = x

        x = self.ghost1(x)

        if self.stride > 1:
            x = self.conv_dw(x)
            x = self.bn_dw(x)

        if self.se is not None:
            x = self.se(x)

        x = self.ghost2(x)

        x += self.shortcut(residual)
        return x
4. GhostNet的构建
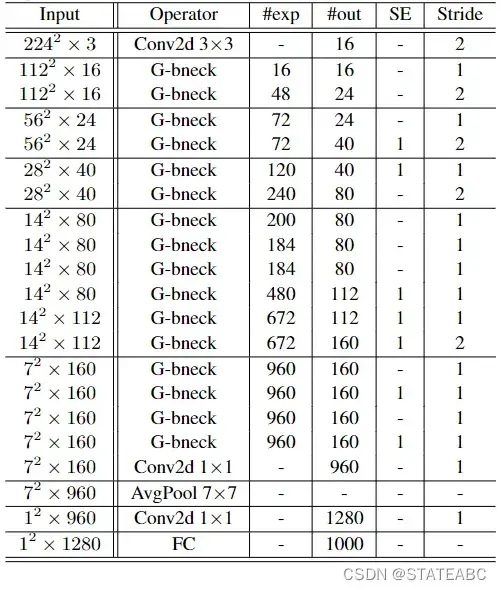
整个Ghostnet都是由Ghost Bottlenecks进行组成的。
当一张图片输入到Ghostnet当中时,首先进行一个16通道的普通1×1卷积块(卷积+标准化+激活函数)。
之后就开始Ghost Bottlenecks的堆叠了,利用Ghost Bottlenecks,最终获得了一个7x7x160的特征层(当输入是224x224x3的时候)。
然后利用一个1×1的卷积块进行通道数的调整,此时可以获得一个7x7x960的特征层。
之后进行一次全局平均池化,然后再利用一个1×1的卷积块进行通道数的调整,获得一个1x1x1280的特征层。
最后平铺后进行全连接就可以进行分类了。
class GhostNet(nn.Module):
    def __init__(self, cfgs, num_classes=1000, width=1.0, dropout=0.2):
        super(GhostNet, self).__init__()
        # setting of inverted residual blocks
        self.cfgs = cfgs
        self.dropout = dropout

        # building first layer   对输入图片进行第一个卷积标准化+激活函数
        output_channel = _make_divisible(16 * width, 4)
        #以应用到yolov4为例   416,416,3 ->  208,208,16   压缩高和宽,通道数扩张
        self.conv_stem = nn.Conv2d(3, output_channel, 3, 2, 1, bias=False)   #s=2,output_channel=16
        self.bn1 = nn.BatchNorm2d(output_channel)
        self.act1 = nn.ReLU(inplace=True)
        input_channel = output_channel

        # building inverted residual blocks   构建瓶颈结构
        stages = []
        block = GhostBottleneck
        for cfg in self.cfgs:    #对配置列表进行循环
            layers = []
            for k, exp_size, c, se_ratio, s in cfg:
                output_channel = _make_divisible(c * width, 4)
                hidden_channel = _make_divisible(exp_size * width, 4)
                #根据cfg里面的内容构建瓶颈结构
                layers.append(block(input_channel, hidden_channel, output_channel, k, s,
                              se_ratio=se_ratio))
                #计算下一个瓶颈结构的输入
                input_channel = output_channel
            stages.append(nn.Sequential(*layers))
        #卷积标准化+激活函数
        output_channel = _make_divisible(exp_size * width, 4)
        stages.append(nn.Sequential(ConvBnAct(input_channel, output_channel, 1)))
        input_channel = output_channel
        #根据构建好的block序列模型
        self.blocks = nn.Sequential(*stages)
        #构建分类才能够
        # building last several layers
        output_channel = 1280
        self.global_pool = nn.AdaptiveAvgPool2d((1, 1))
        self.conv_head = nn.Conv2d(input_channel, output_channel, 1, 1, 0, bias=True)
        self.act2 = nn.ReLU(inplace=True)
        self.classifier = nn.Linear(output_channel, num_classes)

    def forward(self, x):
        #第一个卷积标注化+激活函数
        x = self.conv_stem(x)
        x = self.bn1(x)
        x = self.act1(x)
        #瓶颈结构特征提取
        x = self.blocks(x)
        #构建分类岑那个
        x = self.global_pool(x)

        x = self.conv_head(x)
        x = self.act2(x)
        x = x.view(x.size(0), -1)
        if self.dropout > 0.:
            x = F.dropout(x, p=self.dropout, training=self.training)
        x = self.classifier(x)
        return x


def ghostnet(**kwargs):
    """
    Constructs a GhostNet model
    """
    cfgs = [
        # k, t, c, SE, s
        # k代表卷积核大小,表示跨特征点的特征提取能力
        # t代表第一个ghost模块的通道数大小,它的值一般比较大一点
        # c代表瓶颈结构最终的输出通道数
        # SE代表是否使用注意力机制,如果不为0就是用注意力机制
        # s代表步长,如果s=2就会对输入特征层进行高和宽的压缩
        # stage1
        # 208,208,16 -> 208,208,16
        [[3,  16,  16, 0, 1]],
        # stage2
        # 208,208,16 -> 104,104,24
        [[3,  48,  24, 0, 2]],
        [[3,  72,  24, 0, 1]],
        # stage3
        # 104,104,24 -> 52,52,40
        [[5,  72,  40, 0.25, 2]],
        [[5, 120,  40, 0.25, 1]],
        # stage4
        # 52,52,40 -> 26,26,80 -> 26,26,112
        [[3, 240,  80, 0, 2]],
        [[3, 200,  80, 0, 1],
         [3, 184,  80, 0, 1],
         [3, 184,  80, 0, 1],
         [3, 480, 112, 0.25, 1],
         [3, 672, 112, 0.25, 1]
        ],
        # stage5
        # 26,26,112 -> 13,13,160
        [[5, 672, 160, 0.25, 2]],
        [[5, 960, 160, 0, 1],
         [5, 960, 160, 0.25, 1],
         [5, 960, 160, 0, 1],
         [5, 960, 160, 0.25, 1]
        ]
    ]
    return GhostNet(cfgs, **kwargs)
5. 将GhostNet应用到Yolov4上
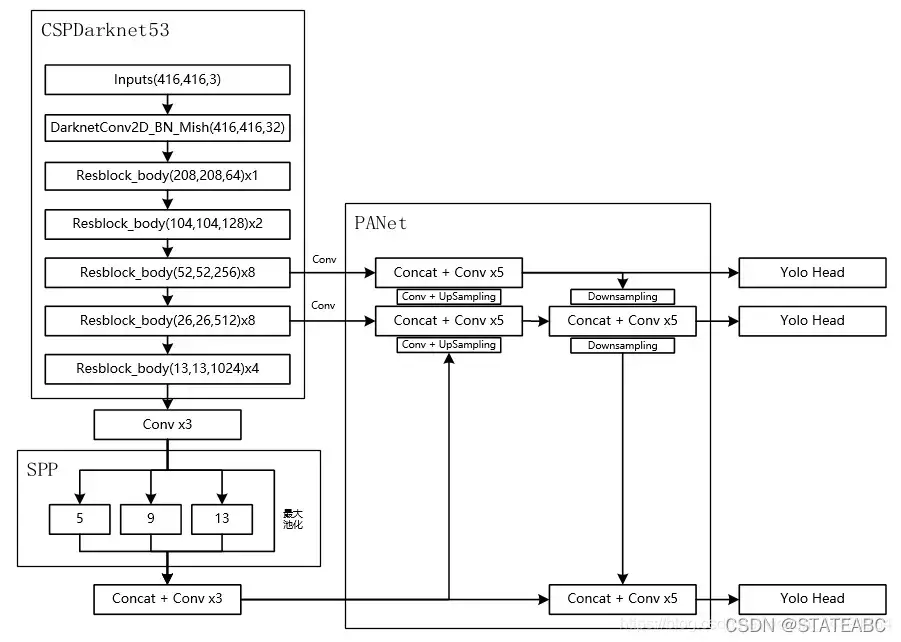 需要利用主干特征提取网络获得的三个有效特征进行加强特征金字塔的构建
取出stage3、stage4、stage5的输出:
class GhostNet(nn.Module):
    def __init__(self, pretrained=True):
        super(GhostNet, self).__init__()
        model = ghostnet()
        if pretrained:
            state_dict = torch.load("model_data/ghostnet_weights.pth")
            model.load_state_dict(state_dict)
        del model.global_pool
        del model.conv_head
        del model.act2
        del model.classifier
        del model.blocks[9]
        self.model = model

    def forward(self, x):
        x = self.model.conv_stem(x)
        x = self.model.bn1(x)
        x = self.model.act1(x)
        feature_maps = []

        for idx, block in enumerate(self.model.blocks):
            x = block(x)
            if idx in [2,4,6,8]:
                feature_maps.append(x)
        return feature_maps[1:]
参考文献:
原作者解读
Ghostnet网络介绍与构建
文章出处登录后可见!