文章目录
简介
功能介绍
基本原理
控件控制入门:记事本操作
控件分析与可用参数
控件延迟搜索机制
示例:连续打开三个记事本并关闭
UIAutomation的常见功能
基本方法
获取窗口对象
控件查找方法
窗口属性调整
WalkTree遍历子控件
Bitmap位图对象的使用
对多个显示器分别截屏
剪切板操作
自带的Logger日志输出类
全局热键与多线程
管理员提权
通过实例学习UI自动化
控制win10计算器自动计算
窗口的拖拽与缩放
管理员提权操作并读取设备管理器栏目数据
记事本文本输入与字体调整
wireshark抓包数据读取
PDF目录折叠展开提取器
简介
功能介绍
本文档大纲:
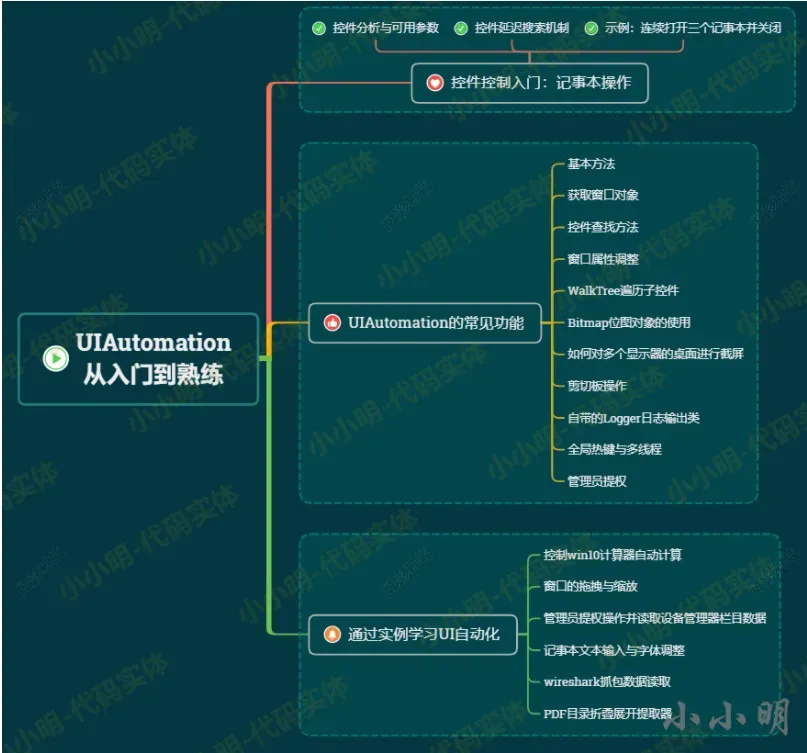
可以看到uiautomation模块除了核心功能UI控件的控制、截图和数据提取外,还支持全局热键注册、剪切板操作和管理员权限提权。
在常规的模拟鼠标和键盘操作,我们一般使用pyautogui,uiautomation模块不仅能直接支持这些操作,还能通过控件定位方式直接定位到目标控件的位置,而不需要自己去获取对应坐标位置。uiautomation模块不仅支持任意坐标位置截图,还支持目标控件的截图,缺点在于截取产生的图片对象难以直接与PIL库配合,只能导出文件后让PIL图像处理库重新读取。对于能够获取到其ScrollItemPattern对象的控件还可以通过ScrollIntoView方法进行视图定位,与游览器的元素定位效果几乎一致。
在常规的热键功能,我们一般使用pynput实现,但现在有了uiautomation模块,热键注册会比pynput更简单功能更强。uiautomation模块所支持的剪切板操作的功能也远远超过常规的专门用于剪切板复制粘贴的库。更牛的是uiautomation模块能直接支持让你的python程序实现管理员提权。
基本上这个库的功能超过好几个专门针对某个功能的库。我们可以看看一下这个库自动化操作过程的动图效果:

掌握这个框架之后,你能够实现的自动化效果远不止如此。
这么优秀的框架你是否心动了呢?心动不如行动,学起来吧!!!
基本原理
uiautomation模块项目地址:https://github.com/yinkaisheng/Python-UIAutomation-for-Windows
uiautomation是yinkaisheng业余时间开发一个模块。封装了微软UIAutomation API,支持自动化Win32,MFC,WPF,Modern UI(Metro UI), Qt, IE, Firefox( version<=56 or >=60), Chrome谷歌游览器和基于Electron开发的应用程序(加启动参数–force-renderer-accessibility也能支持UIAutomation被自动化).
uiautomation只支持Python 3版本,依赖comtypes和typing这两个包,但Python不要使用3.7.6和3.8.1这两个版本,comtypes在这两个版本中不能正常工作(issue)。
UIAutomation的工作原理:
UIAutomation操作程序时会给程序发送WM_GETOBJECT消息,如果程序处理WM_GETOBJECT消息,实现UI Automation Provider,并调用函数
UiaReturnRawElementProvider(HWND hwnd,WPARAM wparam,LPARAM lparam,IRawElementProviderSimple *el),此程序就支持UIAutomation。
IRawElementProviderSimple 就是 UI Automation Provider,包含了控件的各种信息,如Name,ClassName,ContorlType,坐标等。
UIAutomation 根据程序返回的 IRawElementProviderSimple,就能遍历程序的控件,得到控件各种属性,进行自动化操作。若程序没有处理WM_GETOBJECT或没有实现UIAutomation Provider,UIAutomation则无法识别这些程序内的控件,不支持自动化。
很多DirectUI程序没有实现UIAutomation Provider,所以不支持自动化。
关于各控件所支持的控件模式,可参考:
https://docs.microsoft.com/zh-cn/windows/win32/winauto/uiauto-controlpatternmapping
在使用uiautomation模块前需要先安装:
pip install uiautomation安装后会在python安装目录下的Scripts目录下得到一个automation.py脚本,可以使用它来准确获取目标窗口的控件结构信息。
automation.py脚本也可以从https://github.com/yinkaisheng/Python-UIAutomation-for-Windows/raw/master/automation.py下载。
当然使用windows自带的inspect.exe图形化工具来观察控件的树形结构更加,通过everything可以很快在系统中找到该工具。
⚠️ :inspect.exe工具获取到的控件类型可能与automation.py脚本打印的结果不太一样,如果发现控件实际不存在,要以automation.py脚本打印的结果为准。
控件控制入门:记事本操作
控件分析与可用参数
首先打开记事本窗口,并设置窗口前置:
import subprocess
import uiautomation as auto

subprocess.Popen('notepad.exe')# 从桌面的第一层子控件中找到记事本程序的窗口WindowControl
notepadWindow = auto.WindowControl(searchDepth=1, ClassName='Notepad')print(notepadWindow.Name)# 设置窗口前置
notepadWindow.SetTopmost(True)
运行上述代码后,会打开一个窗口前置的记事本程序。
控件可用参数说明:
searchFromControl = None:从哪个控件开始查找,如果为None,从根控件Desktop开始查找
searchDepth = 0xFFFFFFFF: 搜索深度
searchInterval = SEARCH_INTERVAL:搜索间隔
foundIndex = 1 :搜索到的满足搜索条件的控件索引,索引从1开始
Name:控件名字
SubName :控件部分名字
RegexName:使用re.match匹配符合正则表达式的名字,Name,SubName,RegexName只能使用一个,不能同时使用
ClassName :类名字
AutomationId: 控件AutomationId
ControlType :控件类型
Depth:控件相对于searchFromControl的精确深度
Compare:自定义比较函数function(control: Control, depth: int)->bool
searchDepth和Depth的区别:
searchDepth在指定的深度范围内(包括1~searchDepth层中的所有子孙控件)搜索第一个满足搜索条件的控件
Depth只在Depth所在的深度(如果Depth>1,排除1~searchDepth-1层中的所有子孙控件)搜索第一个满足搜索条件的控件
为了进一步操作该程序,我们可以使用inspect.exe工具或automation.py脚本分析控件结构。
通过inspect.exe工具分析控件时可以看到记事本的编辑区类型为DocumentControl:
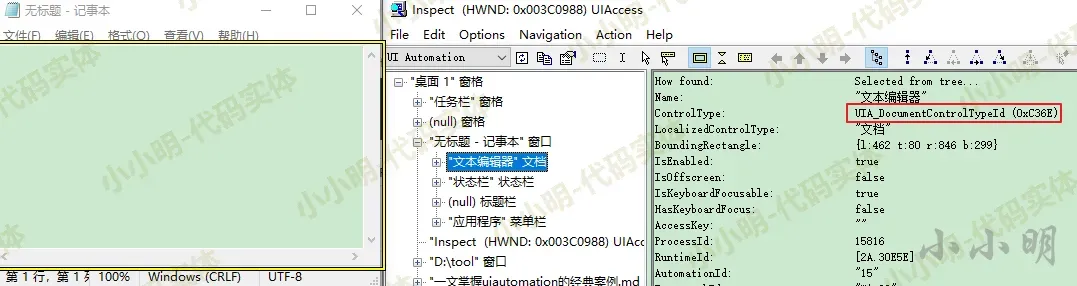
但uiautomation实际使用该类型查找控件时却会找不到控件报错。
下面我们使用automation.py脚本来分析目标窗口,我的Python安装目录为D:Miniconda3所以automation.py脚本会存在于D:Miniconda3Scriptsautomation.py
查看帮助信息:
>python D:Miniconda3Scriptsautomation.py -h
UIAutomation 2.0.15 (Python 3.7.4, 64 bit)
usage
-h      show commandhelp
-t      delay time, default 3 seconds, begin to enumerate after Value seconds, this must be an integer
        you can delay a few seconds and make a window active so automation can enumerate the active window
-d      enumerate tree depth, this must be an integer, if it is null, enumerate the whole tree
-r      enumerate from root:Desktop window, if it is null, enumerate from foreground window
-f      enumerate from focused control, if it is null, enumerate from foreground window
-c      enumerate the control under cursor, if depth is <0, enumerate from its ancestor up to depth
-a      show ancestors of the control under cursor
-n      show control full name, if it is null, show first 30 characters of control's name in console,
        always show full name in log file @AutomationLog.txt
-p      show process id of controls

if UnicodeError or LookupError occurred when printing,
try to change the active code page of console window by using chcp or see the log file @AutomationLog.txt
chcp, get current active code page
chcp 936, set active code page to gbk
chcp 65001, set active code page to utf-8

examples:
automation.py -t3
automation.py -t3 -r -d1 -m -n
automation.py -c -t3
下面为了后续命令简化一点,我先将automation.py文件复制到cmd所在的当前目录。
执行以下命令:
python automation.py -t1 -d1立马在1秒内将鼠标激活记事本窗口,可以看到控制台打印:
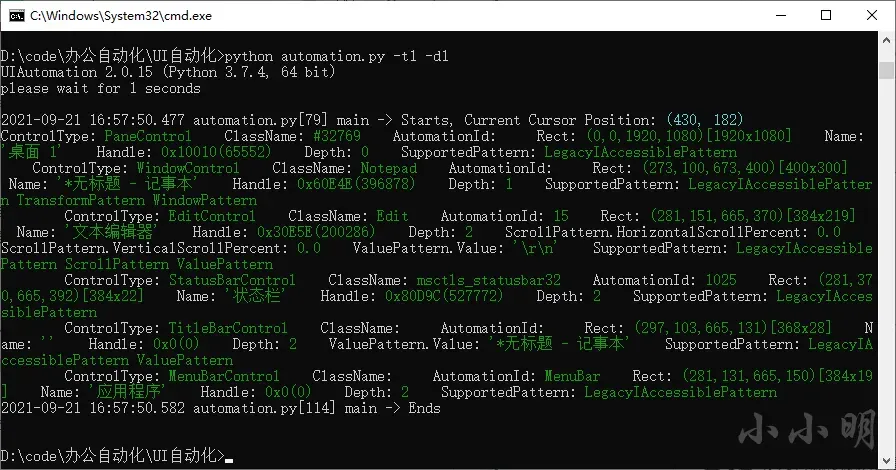
可以看到第一个控件的类型为EditControl。
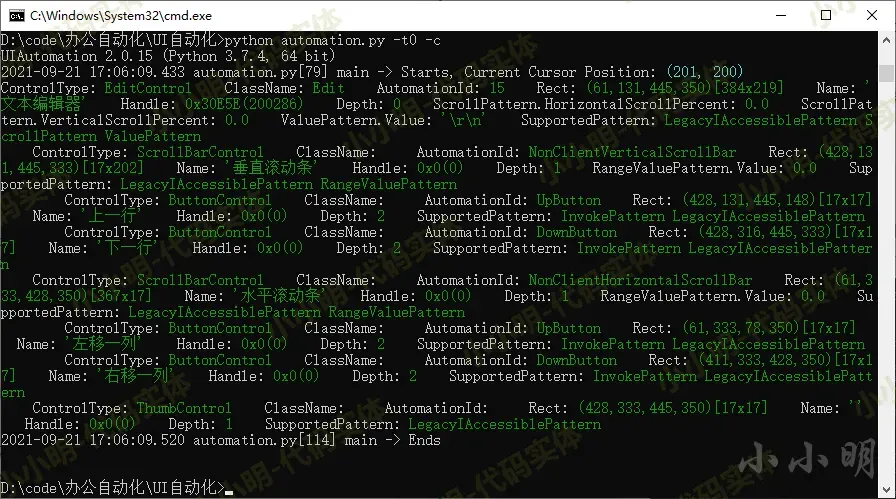
下面将鼠标移动到记事本的编辑框内之后,执行:
python automation.py -t0 -c就得到编辑器的全部子控件信息:
下面我们使用uiautomation向记事本输入文本。
首先获取输入框:
edit = notepadWindow.EditControl()方法1-使用EditControl支持的ValuePattern:
edit.GetValuePattern().SetValue('方法1')该方法直接修改编辑框的文本内容。
方法2-发送按键指令输入文本:
edit.SendKeys('方法2')该方法的输入效果比较像打字机输入。
方法3-复制文本后到剪切板粘贴:
auto.SetClipboardText("方法3")
edit.SendKeys('{Ctrl}v')
获取当前编辑框中的文本:
print(edit.GetValuePattern().Value)最后我们点击标题栏的关闭按钮(可以通过索引或名称查找目标按钮):
# 通过标题栏第三个按钮找到关闭按钮
notepadWindow.TitleBarControl(Depth=1).ButtonControl(foundIndex=3).Click()
或:
# 通过标题栏查找名称为关闭的按钮
notepadWindow.TitleBarControl(Depth=1).ButtonControl(searchDepth=1, Name='关闭').Click()
最后保存并关闭:
notepadWindow.TitleBarControl(Depth=1).ButtonControl(searchDepth=1, Name='关闭').Click()# 确认保存
auto.SendKeys('{ALT}s')# 输入文件名,并快捷键点击保存
auto.SendKeys('自动保存{ALT}s')# 如果弹出文件名冲突提示,则确认覆盖
auto.SendKeys('{ALT}y')
完整代码:
import subprocess
import uiautomation as auto

subprocess.Popen('notepad.exe')# 首先从桌面的第一层子控件中找到记事本程序的窗口WindowControl,再从这个窗口查找子控件
notepadWindow = auto.WindowControl(searchDepth=1, ClassName='Notepad')print(notepadWindow.Name)# 设置窗口前置
notepadWindow.SetTopmost(True)# 输入文本
edit = notepadWindow.EditControl()
auto.SetClipboardText("WIN98中的“98”是什么意思?")
edit.SendKeys('{Ctrl}v')# 获取文本print("编辑框内容:",edit.GetValuePattern().Value)# 通过标题栏查找名称为关闭的按钮
notepadWindow.TitleBarControl(Depth=1).ButtonControl(searchDepth=1, Name='关闭').Click()# 确认保存
auto.SendKeys('{ALT}s')# 输入文件名,并快捷键点击保存
auto.SendKeys('自动保存{ALT}s')# 如果弹出文件名冲突提示,则确认覆盖
auto.SendKeys('{ALT}y')
控件延迟搜索机制
底层COM对象方法:
⚠️ Control.Element返回IUIAutomation底层COM对象IUIAutomationElement, 基本上Control的所有属性或方法都是通过调用IUIAutomationElement COM API和Win32 API实现的。
延迟搜索控件:
当我们创建一个Control对象时,uiautomation并不会马上开始搜索控件,而是当使用其属性或方法,并且内部的Control.Element是None时uiautomation才开始搜索控件。如果在uiautomation.TIME_OUT_SECOND(默认为10)秒内找不到控件,uiautomation就会抛出一个LookupError异常。
也可以调用Control.Refind立马或重新开始搜索控件,例如:
edit = notepadWindow.EditControl()
edit.Refind()True但是当控件不存在时,则会报出错误。
为了避免函数最终抛出异常,可以调用Control.Exists(maxSearchSeconds, searchIntervalSeconds, printIfNotExist)检查目标控件是否存在:
edit = notepadWindow.EditControl()
edit.Exists()TrueControl.Refind和Control.Exists均会使Control.Element无效并触发重新搜索逻辑。
另一种检查目标控件是否存在的方法是auto.WaitForExist(control, timeout)。
下面继续以记事本为对象演示这个机制。首先打开第一个记事本并获取输入控件:
import subprocess
import uiautomation as auto
auto.uiautomation.SetGlobalSearchTimeout(2)# 设置全局搜索超时时间为2秒

subprocess.Popen('notepad.exe')
window = auto.WindowControl(searchDepth=1, ClassName='Notepad')# 创建控件对象时并不会开始搜索控件
edit = window.EditControl()
此时,控件window和edit还没有开始搜索,内部Control.Element的值为None。
第一次调用SendKeys时,才开始搜索控件window和edit:
# 第一次调用SendKeys时, 才开始搜索控件window和edit
edit.SendKeys('第一次调用')
搜索完毕后,才会开始执行发送按键方法,此时Control.Element有效。
第二次调用SendKeys不会触发搜索(Control.Element不为None):
edit.SendKeys('第二次调用')然后我们清空输入的内容,并关闭刚才打开的记事本:
edit.GetValuePattern().SetValue('')
window.GetWindowPattern().Close()
关闭后,此时虽然window和edit有值却已经无效了。
再次打开记事本,就必须重新搜索控件(否则无法操作新启动的窗口):
subprocess.Popen('notepad.exe')# 运行第二个Notepad
window.Refind()# 必须重新搜索
edit.Refind()# 必须重新搜索
然后可以将其关闭:
window.GetWindowPattern().Close()window和edit的Element再次失效。
Exists方法则既可以判断控件是否存在,也可以触发重新搜索:
subprocess.Popen('notepad.exe')# 运行第三个Notepadif window.Exists(maxSearchSeconds=1.5, searchIntervalSeconds=0.3):# 触发重新搜索if edit.Exists(maxSearchSeconds=1.5):# 触发重新搜索
        edit.SendKeys('third notepad')# 之前的Exists保证edit.Element有效
        edit.SendKeys('{Ctrl}a{Del}')
    window.GetWindowPattern().Close()else:print("窗口1.5秒内未找到")
示例:连续打开三个记事本并关闭
完整代码与注释:
import subprocess
import uiautomation as auto
# 设置全局搜索超时2秒
auto.uiautomation.SetGlobalSearchTimeout(2)

subprocess.Popen('notepad.exe')
window = auto.WindowControl(searchDepth=1, ClassName='Notepad')
window.SetTopmost(True)
edit = window.EditControl()# 当第一次调用SendKeys时, uiautomation开始在2秒内搜索控件window和edit# 因为SendKeys内部会间接调用Control.Element并且Control.Element值是None# 如果在15秒内找不到window和edit,会抛出LookupError异常try:
    edit.SendKeys('第一个记事本程序')except LookupError as ex:print("第一个记事本窗口在2秒内未找到")# 第二次调用SendKeys不会触发搜索, 之前的调用保证Control.Element有效
edit.SendKeys('{Ctrl}a{Del}')# 关闭第一个Notepad, window和edit的Element虽然有值,但是无效了
window.GetWindowPattern().Close()

subprocess.Popen('notepad.exe')# 运行第二个Notepad
window.Refind()# 必须重新搜索
edit.Refind()# 必须重新搜索
edit.SendKeys('第二个记事本程序')
edit.SendKeys('{Ctrl}a{Del}')
window.GetWindowPattern().Close()# 关闭第二个Notepad, window和edit的Element虽然有值,但是再次无效了

subprocess.Popen('notepad.exe')# 运行第三个Notepadif window.Exists(3,1):# 触发重新搜索if edit.Exists(3):# 触发重新搜索
        edit.SendKeys('第三个记事本程序')# 之前的Exists保证edit.Element有效
        edit.SendKeys('{Ctrl}a{Del}')
    window.GetWindowPattern().Close()else:print("第三个记事本程序在三秒内不存在")
UIAutomation的常见功能
导包:
import uiautomation as auto基本方法
显示桌面(相当于点击桌面右下角的按钮):
auto.ShowDesktop()获取uiautomation已运行的时间:
auto.ProcessTime()判断两个控件是否一致:
auto.ControlsAreSame(control1, control2)鼠标点击指定坐标:
auto.Click(x, y)右键单击:
auto.RightClick(x, y)鼠标拖拽(鼠标从(x1,y1)位置按下鼠标拖动到(x2,y2)位置):
auto.DragDrop(x1, y1, x2, y2, moveSpeed=1)moveSpeed参数决定了移动的速度。
关于鼠标滚轮操作详见后面的实例,被找到的控件调用鼠标点击方法不需要传入坐标。
获取窗口对象
获取桌面对象:
c = auto.GetRootControl()返回运行当前python程序的控制台窗口对象:
cmdWindow = auto.GetConsoleWindow()没有找到则返回None。
获取当前鼠标位置对应的窗口:
c = auto.ControlFromCursor().GetTopLevelControl()ControlFromCursor返回了当前鼠标位置的控件,GetTopLevelControl获取了该控件对应的顶级窗口对象。
获取当前激活窗口对应的对象:
c = auto.GetForegroundControl().GetTopLevelControl()控件查找方法
获取所有的子控件:
control.GetChildren()获取首个子控件:
control.GetFirstChildControl()获取最后一个子控件:
control.GetLastChildControl()获取下一个兄弟控件:
control.GetNextSiblingControl()获取前一个兄弟控件:
control.GetPreviousSiblingControl()获取父控件:
control.GetParentControl()获取顶层窗口控件:
control.GetTopLevelControl()获取满足指定条件的祖先控件:
control.GetAncestorControl(func)传入的函数参数要求:function(control: Control, depth: int) -> bool
当函数返回True时表示找到控件并返回,例如以下方法几乎可以得与GetTopLevelControl()相同的结果:
control.GetAncestorControl(lambda c, d:isinstance(c, auto.WindowControl))窗口属性调整
假设获取到一个窗口对象:
win = auto.ControlFromCursor().GetTopLevelControl()获取本地窗口句柄:
win.NativeWindowHandle根据本地窗口句柄获取窗口控件对象:
win2 = auto.ControlFromHandle(win.NativeWindowHandle)经测试,对象一致:
auto.ControlsAreSame(win, win2)True隐藏窗口:
win.Hide(0)显示窗口:
win.Show(0)窗口最小化:
win.Minimize()窗口最大化:
win.Maximize()判断窗口是否已经被最小化:
auto.IsIconic(win.NativeWindowHandle)IsIconic进支持传入本地窗口句柄。
将最小化的窗口的恢复显示:
修改窗口的位置和大小,例如将某个窗口调整到最后一个屏幕的一半:
rects = auto.GetMonitorsRect()
rect = rects[-1]
win.MoveWindow(rect.left, rect.top,
rect.width()//2, rect.height()-30)不过这种调整方法对于cmd这种命令行窗口无效,只能在获取其TransformPattern对象后,调用Move和Resize方法来实现。上面的MoveWindow等价于:
transform_win = win.GetTransformPattern()
transform_win.Move(rect.left, rect.top)
transform_win.Resize(rect.width()//2, rect.height()-30)
移动窗口到屏幕中心位置:
win.MoveToCenter()窗口置顶:
window.SetTopmost(True)获取窗口标题并修改窗口标题:
win.SetWindowText(win.GetWindowText()+"|小小明")获取运行当前python程序控制台窗口的标题:
auto.GetConsoleTitle()# auto.GetConsoleOriginalTitle()设置运行当前python程序控制台窗口的标题:
auto.SetConsoleTitle('自定义控制台标题')WalkTree遍历子控件
除了auto.WalkTree遍历目标控件外,还有auto.WalkControl遍历控件,区别在于auto.WalkTree必须传入自定义函数指定遍历的行为。auto.WalkControl将会在后面涉及可折叠类型的控件遍历时进行演示,下面给出一个简单的通过WalkTree遍历桌面的示例:
import uiautomation as auto


defGetFirstChild(control):return control.GetFirstChildControl()defGetNextSibling(control):return control.GetNextSiblingControl()


desktop = auto.GetRootControl()for control, depth in auto.WalkTree(desktop, getFirstChild=GetFirstChild, getNextSibling=GetNextSibling,
                                    includeTop=True, maxDepth=2):ifnot control.Name:continueprint(' '* depth *4, control.Name)
maxDepth指定了遍历深度,除了指定这两个方法以外还可以只转入getChildren方法:
defGetChildren(control):return control.GetChildren()for control, depth, remain in auto.WalkTree(desktop,
                                            getChildren=GetChildren,
                                            includeTop=True,
                                            maxDepth=2):ifnot control.Name:continueprint(' '* depth *4, control.Name)
结果过滤的方逻辑我们还可以写到yieldCondition的传入函数中:
defyieldCondition(control, depth):if control.Name:returnTruefor control, depth, remain in auto.WalkTree(desktop,
                                            getChildren=GetChildren,
                                            yieldCondition=yieldCondition,
                                            includeTop=True,
                                            maxDepth=2):print(' '* depth *4, control.Name)
在我电脑当前执行结果均为:
桌面 1
任务栏
开始
在这里输入你要搜索的内容
开始
在这里输入你要搜索的内容
系统时钟, 23:02, 2021/11/15
test - Jupyter Notebook - 360安全浏览器 13.1
Chrome Legacy Window
一文掌握uiautomation的经典案例.md• - Typora
Typora
UIAutomation_demos – clipboard_test.py PyCharm
Program ManagerWalkTree的规则是当设置getChildren函数时,忽略getFirstChild和getNextSibling,否则使用这两个函数。设置yieldCondition函数时则开启额外的过滤。
甚至可以使用WalkTree方法计算全排列问题:
defNextPermutations(aTuple):
    left, permutation = aTuple
    ret =[]for i, item inenumerate(left):
        nextLeft = left[:]del nextLeft[i]
        nextPermutation = permutation +[item]
        ret.append((nextLeft, nextPermutation))return ret


uniqueItems =list("abc")
n =len(uniqueItems)
count =0for(left, permutation), depth, remain in auto.WalkTree((uniqueItems,[]), NextPermutations,
                                                        yieldCondition=lambda c, d: d == n):
    count +=1print(count, permutation)
1 ['a', 'b', 'c']
2 ['a', 'c', 'b']
3 ['b', 'a', 'c']
4 ['b', 'c', 'a']
5 ['c', 'a', 'b']
6 ['c', 'b', 'a']可以看到已经顺利的计算出正确的结果。
Bitmap位图对象的使用
默认新建的图片为空白透明图片:
width, height =500,500# 创建一张透明图片
bitmap = auto.Bitmap(width, height)
然后我们可以设置一点颜色,首先以逐像素遍历的方式操作:
width, height =500,500# 创建一张透明图片
bitmap = auto.Bitmap(width, height)
start = auto.ProcessTime()for x inrange(width):for y inrange(height):
        color =((x-width)**2+(y-height)**2)*255//(width**2+height**2)
        bitmap.SetPixelColor(x, y,0xFF00FF| color <<24)
cost = auto.ProcessTime()- start
print(f'SetPixelColor 逐像素设置 {width}x{height} 图片的颜色耗时 {cost:.3f}s')
bitmap.ToFile('tmp.png')
SetPixelColor 逐像素设置 500x500 图片的颜色耗时 0.648s上述代码遍历每个像素点,通过SetPixelColor方法设置颜色。可以看到耗时达到0.6秒以上,能否快一点呢?
SetPixelColorsOfRect方法可以直接设置整个区域的颜色:
start = auto.ProcessTime()
colors =[]for x inrange(width):for y inrange(height):
        color =((x-width)**2+(y-height)**2)*255//(width**2+height**2)
        colors.append(0xFF00FF| color <<24)
bitmap.SetPixelColorsOfRect(0,0, width, height, colors)
cost = auto.ProcessTime()- start
print(f'SetPixelColorsOfRect 设置 {width}x{height} 图片矩形区域的颜色,耗时 {cost:.3f}s')
bitmap.ToFile('tmp.png')
SetPixelColorsOfRect 设置 500x500 图片矩形区域的颜色,耗时 0.460s显然设置整个区域的颜色会更快一些。
经测试使用GetPixelColor方法获取到的颜色值可能会因为负数补码导致获取到的值与当初设置的不一致。我们可以通过GetAllPixelColors方法获取原生数组后,然后计算偏移量获取颜色值:
colors = bitmap.GetAllPixelColors()defgetPixelColor(x, y):return colors[x*width+y]

getPixelColor(10,10)4110352639可以通过控件的ToBitmap方法对该控件截图获取Bitmap对象,传入参数可以决定截取的范围,例如我们截图桌面范围480*360范围内(不传参则获取整个控件)的图片:
root = auto.GetRootControl()
bitmap = root.ToBitmap(0,0,480,360)
bitmap.ToFile('tmp.png')
Image("tmp.png")
ToBitmap方法也可以使用Bitmap.FromControl方法替代:
bitmap = auto.Bitmap.FromControl(control, x, y, width, height)裁切图片:
with bitmap.Copy(150,100,80,102)as subBitmap:
    subBitmap.ToFile('tmp.png')
    display(Image("tmp.png"))
结果:成功裁切出 极速PDF阅读器 的图标。
若需要同时裁切多个部分,可以使用GetPixelColorsOfRects方法:
width, height =75,85
rects =[((width*i,0, width, height))for i inrange(3)]
colors = bitmap.GetPixelColorsOfRects(rects)for nativeArray in colors:with auto.Bitmap(width, height)as subBitmap:
        subBitmap.SetPixelColorsOfRect(0,0, width, height, nativeArray)
        subBitmap.ToFile('tmp.png')
        display(Image("tmp.png"))
X轴翻转:
with bitmap.RotateFlip(auto.RotateFlipType.RotateNoneFlipX)as bmp:
        bmp.ToFile('tmp.png')
        display(Image("tmp.png"))
Y轴翻转:
with bitmap.RotateFlip(auto.RotateFlipType.RotateNoneFlipY) as bmp:
    bmp.ToFile('tmp.png')
    display(Image("tmp.png"))
90度旋转:
with bitmap.Rotate(90)as bmp:
    bmp.ToFile('tmp.png')
    display(Image("tmp.png"))
30度旋转(非90度整数倍 旋转):
with bitmap.Rotate(30)as bmp:
    bmp.ToFile('tmp.png')
    display(Image("tmp.png"))
对多个显示器分别截屏
结合前面的方法,我们可以对桌面截屏,对鼠标下的控件截屏,对当前激活窗口截屏等等。
基本都是在获取相应控件后调用如下方法:
control.CaptureToImage(savePath)获取桌面控件前面已经演示,下面看看如何同时获取多个屏幕的截图:
c = auto.GetRootControl()
rects = auto.GetMonitorsRect()print(rects)for rect in rects:
    c.CaptureToImage('tmp.png', rect.left, rect.top,
                     rect.width(), rect.height())
    display(Image("tmp.png"))
核心点就是通过GetMonitorsRect获取所有屏幕的坐标范围数组,截图时指定坐标范围即可。
剪切板操作
通常我们会使用pyperclip对文本进行复制粘贴,但实际上uiautomation所支持的剪切板操作会更加丰富,不仅支持纯文本,还支持富文本和图片。
涉及文件的剪切板操作,个人已经在**《UI自动化控制微信发送文件》**一文中实现将文件设置到剪切板中。
获取当前剪切板的内容格式:
import uiautomation as auto

formats = auto.GetClipboardFormats()print(formats)
{49282: 'HTML Format', 49402: 'Rich Text Format', 13: 'CF_UNICODETEXT', 1: 'CF_TEXT', 49287: 'UniformResourceLocator', 50062: 'JAVA_DATAFLAVOR:application/x-java-jvm-local-objectref; class=c', 16: 'CF_LOCALE', 7: 'CF_OEMTEXT'}读取剪切板时,我们可以根据当前剪切板的格式分别作不同的处理:
formats = auto.GetClipboardFormats()for k, v in formats.items():if k == auto.ClipboardFormat.CF_UNICODETEXT:print("文本格式:", auto.GetClipboardText())elif k == auto.ClipboardFormat.CF_HTML:
        htmlText = auto.GetClipboardHtml()print("富文本格式:", htmlText)elif k == auto.ClipboardFormat.CF_BITMAP:
        bmp = auto.GetClipboardBitmap()print("位图:", bmp)
不过更关键的是设置数据到剪切板。
设置文本到剪切板:
auto.SetClipboardText('Hello World')设置富文本到剪切板:
auto.SetClipboardHtml('<h1>Title</h1><br><h3>Hello</h3><br><p>test html</p><br>')设置图片到剪切板,只需要将Bitmap设置到剪切板即可,下面演示通过图片文件路径构造Bitmap并设置到剪切板:
with auto.Bitmap.FromFile(path)as bmp:
    auto.SetClipboardBitmap(bmp)
而根据文件路径设置文件到剪切板已通过win32clipboard实现,详见:**《UI自动化控制微信发送文件》**一文。
自带的Logger日志输出类
uiautomation自带了日志输出类,有时我们希望输出不仅到控制台,同时输出到文件时,可以直接使用uiautomation自带的方法。
基础输出:
auto.Logger.Write(
    log: Any,
    consoleColor:int=-1,
    writeToFile:bool=True,
    printToStdout:bool=True,
    logFile:str=None,
    printTruncateLen:int=0,)
log: 要输出的日志内容
consoleColor: 文本在控制台输出的颜色
writeToFile: 是否输出到文件,默认为True
printToStdout: 是否输出到控制台,默认为True
logFile: 日志文件所在位置,默认为当前目录下的@AutomationLog.txt文件
printTruncateLen: 日志截断大小,每条输出超过长度限制时在控制台的输出会被截断。设置该值小于等于0时则不截断。
对于第二个颜色参数,我们可以直接通过auto.ConsoleColor中的变量来获取对应常量,例如:
auto.Logger.Write('测试输出', auto.ConsoleColor.Yellow)可以看一下支持的颜色列表:
colors =[color for color indir(
    auto.ConsoleColor)ifnot color.startswith("__")]print(colors)
['Black', 'Blue', 'Cyan', 'DarkBlue', 'DarkCyan', 'DarkGray', 'DarkGreen', 'DarkMagenta', 'DarkRed', 'DarkYellow', 'Default', 'Gray', 'Green', 'Magenta', 'Red', 'White', 'Yellow']auto.Logger.WriteLine函数与auto.Logger.Write几乎等价,只是少了printTruncateLen参数。
可以使用auto.Logger.ColorfullyWrite方法对指定部分的文本修改颜色:
auto.Logger.ColorfullyWrite('一段文本<Color=Red>红色</Color>,黑色<Color=Blue>蓝色</Color>结束')
不过以上命令的颜色效果只在有标准控制台的窗口输出才有效。
全局热键与多线程
在常规的场景中,我们一般使用pynput实现全局热键的注册,但实际上pynput相对于uiautomation库的热键功能是比较难用。
在uiautomation注册全局热键非常简单,只需要调用auto.RunByHotKey传入快捷键和函数即可。下面演示一个简单的例子,按下快捷键分别打印文本:
import threading
from threading import Event

import uiautomation as auto


defdemo1(stopEvent: Event):
    thread = threading.currentThread()print(thread.name, thread.ident,"demo1")defdemo2(stopEvent: Event):
    thread = threading.currentThread()print(thread.name, thread.ident,"demo2")defdemo3(stopEvent: Event):
    thread = threading.currentThread()print(thread.name, thread.ident,"demo3")if __name__ =='__main__':
    thread = threading.currentThread()print(thread.name, thread.ident,"main")
    auto.RunByHotKey({(0, auto.Keys.VK_F2): demo1,(auto.ModifierKey.Control, auto.Keys.VK_1): demo2,(auto.ModifierKey.Control | auto.ModifierKey.Shift, auto.Keys.VK_2): demo3,}, waitHotKeyReleased=False)
以上代码分别注册了快捷键F2,Ctrl+1和Ctrl+Shift+2。下面测试运行该程序并分别按下这三个快捷键,最后按下Ctrl+D结束程序:
MainThread 4404 main
Register hotkey ('','VK_F2') successfully
Register hotkey ('Control','VK_1') successfully
Register hotkey ('Control|Shift','VK_2') successfully
Register exit hotkey ('Control','VK_D') successfully
----------hotkey ('','VK_F2') pressed----------
Thread-14608 demo1
<Thread(Thread-1, started 4608)>for function demo1 exits, hotkey ('','VK_F2')----------hotkey ('Control','VK_1') pressed----------
Thread-212468 demo2
<Thread(Thread-2, started 12468)>for function demo2 exits, hotkey ('Control','VK_1')----------hotkey ('Control|Shift','VK_2') pressed----------
Thread-35428 demo3
<Thread(Thread-3, started 5428)>for function demo3 exits, hotkey ('Control|Shift','VK_2')
Exit hotkey pressed. Exit
由于每次按下热键都会启动独立的线程执行该函数,从打印日志可以看到每次按下执行函数的线程都不同。
RunByHotKey的参数列表如下:
RunByHotKey(keyFunctions: Dict[Tuple[int,int],(...)-> Any],
                stopHotKey: Optional[Tuple[int,int]]=None,
                exitHotKey: Tuple[int,int]=(ModifierKey.Control, Keys.VK_D),
                waitHotKeyReleased:bool=True)
其中exitHotKey表示程序退出的快捷键,默认为Ctrl+D。waitHotKeyReleased表示是否等待弹起后执行,经测试设置为False不等待更佳。
stopHotKey表示产生退出事件的快捷键,当我们设置该参数并在运行中按下该快捷键,函数的参数stopEvent将会被设置,调用.is_set()将会返回True。
我们可以在热键需要执行一个耗时较长的循环操作时,在循环中判断该事件是否被设置,设置就退出循环。
演示一个简单的示例,按下Ctrl+S启动热键,每0.5秒打印一个数字直到10,按下Ctrl+E则中断热键执行。重新按下Ctrl+S还可以继续:
import threading
from threading import Event

import uiautomation as auto


defdemo1(stopEvent: Event):for i inrange(10):if stopEvent.is_set():print("退出循环")breakprint(i, end=" ")
        stopEvent.wait(0.5)if __name__ =='__main__':
    thread = threading.currentThread()print(thread.name, thread.ident,"main")
    auto.RunByHotKey({(0, auto.Keys.VK_S): demo1,}, stopHotKey=(0, auto.Keys.VK_E),
        waitHotKeyReleased=True)
测试一下:
Register hotkey ('Control','VK_S') successfully
Register stop hotkey ('Control','VK_E') successfully
Register exit hotkey ('Control','VK_D') successfully
----------hotkey ('Control','VK_S') pressed----------01234----------stop hotkey pressed----------
退出热键被按下,结束!
<Thread(Thread-1, started 10016)>for function demo1 exits, hotkey ('Control','VK_S')
Exit hotkey pressed. Exit
需要注意在线程中需要使用控件对象相关方法时,要在新线程中进行相应的初始化:
auto.InitializeUIAutomationInCurrentThread()...
auto.UninitializeUIAutomationInCurrentThread()
也可以使用with语句简化代码:
with auto.UIAutomationInitializerInThread():
	pass
…和pass替换为线程中实际操作的代码。
⚠️:否则部分场景下会报错。
管理员提权
模板代码为:
if __name__ =='__main__':if auto.IsUserAnAdmin():
        main()else:print('RunScriptAsAdmin', sys.executable, sys.argv)
        auto.RunScriptAsAdmin(sys.argv)
将原本存在于__main__代码块中的内容存放于main()方法中即可。
通过实例学习UI自动化
控制win10计算器自动计算
自动控制计算器更简单的方法是复制粘贴需要计算的字符串到计算器,但本节的目的为了演示点击按钮计算的效果。
首先启动计算器并设置窗口置顶:
import uiautomation as auto
import os
import sys
import time
import subprocess

# 显示搜索控件所遍历的控件数和搜索时间
auto.uiautomation.DEBUG_SEARCH_TIME =True# 设置全局搜索超时时间为1秒
auto.uiautomation.SetGlobalSearchTimeout(1)# 创建计算器窗口控件
calcWindow = auto.WindowControl(
    searchDepth=1, ClassName='ApplicationFrameWindow', Compare =lambda c,d : c.Name =='Calculator'or c.Name =='计算器', desc='计算器窗口')ifnot calcWindow.Exists(0,0):
    subprocess.Popen('calc')# 设置窗口前置
calcWindow.SetTopmost(True)
2021-09-21 23:10:34.990 <ipython-input-5-ff74c0c97515>[17] <module> -> {ClassName: 'ApplicationFrameWindow', desc: '计算器窗口', ControlType: WindowControl} TraverseControls: 2, SearchTime: 1.004s[23:10:33.984967 - 23:10:34.990062]⚠️ Compare参数可以传入自定义搜索函数,两个参数分别为控件对象和搜索深度。上述代码能够适配Name属性可能为中文或英文的情况。
不过ClassName参数足够定位到计算器窗口,Compare参数可以直接删除。
Desc是无效的属性,可以在debug日志中打印出来,当然任何无效属性都可以在debug日志中打印出来。
calcWindow.Exists(0, 0)判断了计算器窗口是否已经存在,防止重复打开新的窗口。
切换到科学计算器:
# 调低waitTime可以加快点击速度
calcWindow.ButtonControl(AutomationId='TogglePaneButton',
                         desc='打开导航').Click(waitTime=0.01)
calcWindow.ListItemControl(AutomationId='Scientific',
                           desc='选择科学计算器').Click(waitTime=0.01)
clearButton = calcWindow.ButtonControl(AutomationId='clearEntryButton',
                                       desc='点击CE清空所有输入')if clearButton.Exists(0,0):
    clearButton.Click(waitTime=0)else:
    calcWindow.ButtonControl(AutomationId='clearButton',
                             desc='点击C清空所有输入').Click(waitTime=0)
2021-09-21 23:22:28.966 <ipython-input-10-a63d4ee11410>[3] <module> -> {AutomationId: 'TogglePaneButton', desc: '打开导航', ControlType: ButtonControl} TraverseControls: 121, SearchTime: 0.061s[23:22:28.906224 - 23:22:28.966385]
2021-09-21 23:22:29.518 <ipython-input-10-a63d4ee11410>[5] <module> -> {AutomationId: 'Scientific', desc: '选择科学计算器', ControlType: ListItemControl} TraverseControls: 133, SearchTime: 0.077s[23:22:29.442885 - 23:22:29.518933]
2021-09-21 23:22:29.876 <ipython-input-10-a63d4ee11410>[12] <module> -> {AutomationId: 'clearButton', desc: '点击C清空所有输入', ControlType: ButtonControl} TraverseControls: 51, SearchTime: 0.029s[23:22:29.846955 - 23:22:29.876364]⚠️清空按钮在输入框有数和没有数时,按钮的标题和AutomationId不一样,所以先判断其中一种情况的按钮是否存在,不存在则切换到另一种形式的按钮进行点击。
其中按钮的AutomationId属性可以通过inspect.exe工具或automation.py脚本获取。
下面只演示四则运算,先通过inspect.exe工具获取每个按钮控件对应的AutomationId:
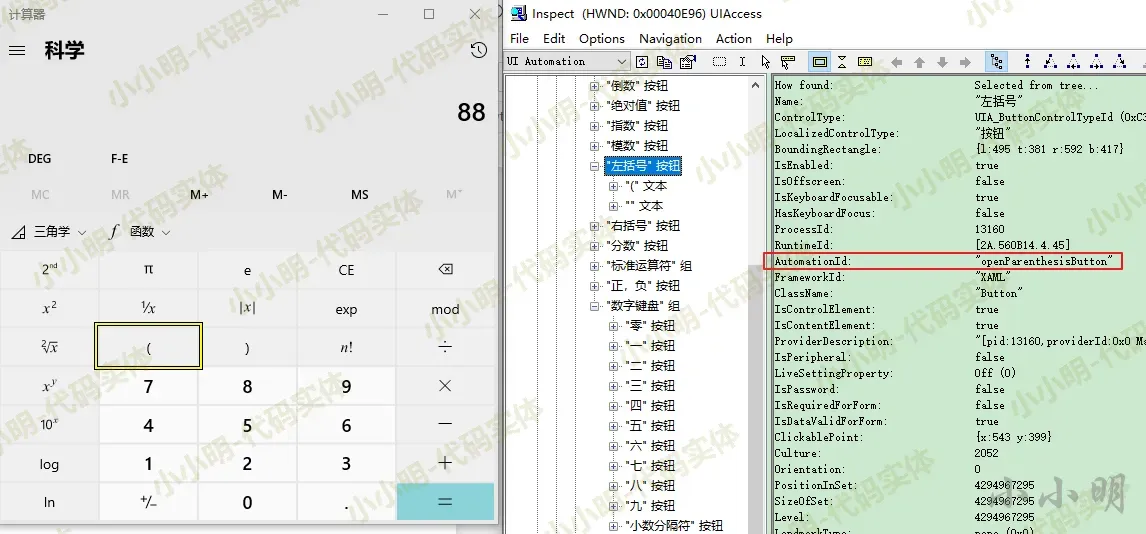
然后通过auto.WalkControl遍历所有控件,从而缓存每个字符对应的按钮控件:
id2char ={'num0Button':'0','num1Button':'1','num2Button':'2','num3Button':'3','num4Button':'4','num5Button':'5','num6Button':'6','num7Button':'7','num8Button':'8','num9Button':'9','decimalSeparatorButton':'.','plusButton':'+','minusButton':'-','multiplyButton':'*','divideButton':'/','equalButton':'=','openParenthesisButton':'(','closeParenthesisButton':')'}
char2Button ={}for c, d in auto.WalkControl(calcWindow, maxDepth=4):if c.AutomationId in id2char:
        char2Button[id2char[c.AutomationId]]= c
然后封装一下对四则运算表达式计算的函数:
defcalc(expression):
    expression =''.join(expression.split())ifnot expression.endswith('='):
        expression +='='for char in expression:
        char2Button[char].Click(waitTime=0)
    time.sleep(0.1)
    calcWindow.SendKeys('{Ctrl}c', waitTime=0.1)return auto.GetClipboardText()
测试一个四则表达式:
calc('1234 * (4 + 5 + 6) - 78 / 90.8')
需要截屏的话可以调用如下命令:
calcWindow.CaptureToImage('calc.png', x=7, y=0, width=-14, height=-7)⚠️x和y表示起始坐标,由于win10的计算器存在7像素的阴影,所以可以去掉。
width和height为负数时,表示原宽度减少指定值。垂直方向上只有下方有阴影,水平方向上左右均有阴影。
关闭程序只需调用:
calcWindow.GetWindowPattern().Close()完整代码:
import uiautomation as auto
import os
import sys
import time
import subprocess
# 显示搜索控件所遍历的控件数和搜索时间
auto.uiautomation.DEBUG_SEARCH_TIME =True# 设置全局搜索超时时间为1秒
auto.uiautomation.SetGlobalSearchTimeout(1)# 创建计算器窗口控件
calcWindow = auto.WindowControl(
searchDepth=1, ClassName='ApplicationFrameWindow', desc='计算器窗口')ifnot calcWindow.Exists(0,0):
subprocess.Popen('calc')# 设置窗口前置
calcWindow.SetTopmost(True)# 调低waitTime可以加快点击速度
calcWindow.ButtonControl(AutomationId='TogglePaneButton',
desc='打开导航').Click(waitTime=0.01)
calcWindow.ListItemControl(AutomationId='Scientific',
desc='选择科学计算器').Click(waitTime=0.01)
clearButton = calcWindow.ButtonControl(AutomationId='clearEntryButton',
desc='点击CE清空所有输入')if clearButton.Exists(0,0):
clearButton.Click(waitTime=0)else:
calcWindow.ButtonControl(AutomationId='clearButton',
desc='点击C清空所有输入').Click(waitTime=0)
id2char ={'num0Button':'0','num1Button':'1','num2Button':'2','num3Button':'3','num4Button':'4','num5Button':'5','num6Button':'6','num7Button':'7','num8Button':'8','num9Button':'9','decimalSeparatorButton':'.','plusButton':'+','minusButton':'-','multiplyButton':'*','divideButton':'/','equalButton':'=','openParenthesisButton':'(','closeParenthesisButton':')'}
char2Button ={}for c, d in auto.WalkControl(calcWindow, maxDepth=4):if c.AutomationId in id2char:
char2Button[id2char[c.AutomationId]]= c
defcalc(expression):
expression =''.join(expression.split())ifnot expression.endswith('='):
expression +='='for char in expression:
char2Button[char].Click(waitTime=0)
time.sleep(0.1)
calcWindow.SendKeys('{Ctrl}c', waitTime=0.1)return auto.GetClipboardText()
result = calc('1234 * (4 + 5 + 6) - 78 / 90.8')print('1234 * (4 + 5 + 6) - 78 / 90.8 =', result)
result = calc('3*3+4*4')print('3*3+4*4 =', result)
result = calc('2*3.14159*10')print('2*3.14159*10 =', result)
calcWindow.CaptureToImage('calc.png', x=7, y=0, width=-14, height=-7)
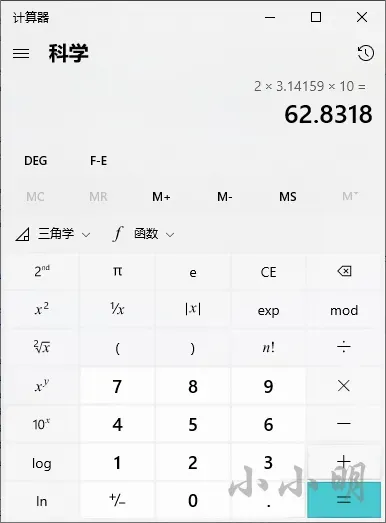
calcWindow.GetWindowPattern().Close()结果:
1234 * (4 + 5 + 6) - 78 / 90.8 = 18509.140969162995594713656387665
3*3+4*4 = 25
2*3.14159*10 = 62.8318
产生的截图:
运行过程中的原速动图:

窗口的拖拽与缩放
下面我们使用一个记事本窗口作为前置窗口就行演示,首先打开记事本窗口:
import sys
import time
import subprocess

import uiautomation as auto
# 设置全局搜索超时时间为1秒
auto.uiautomation.SetGlobalSearchTimeout(1)

note = auto.WindowControl(searchDepth=1, ClassName='Notepad')ifnot note.Exists(0,0):
    subprocess.Popen('notepad.exe')
note.SetActive()
note.SetTopmost(waitTime=0)
调整窗口位置和大小后,输入文本:
# 移动窗口的位置,前两个参数表示左上角的位置,后两个参数编程窗口大小
note.MoveWindow(300,70,480,400)
edit = note.EditControl()
edit.SendKeys('{Ctrl}{End}{Enter 2}我是置顶窗口!!!n我将遮住其他窗口.')
打开计算器窗口并调整:
# 打开计算器窗口并调整:
calcWindow = auto.WindowControl(
    searchDepth=1, ClassName='ApplicationFrameWindow')ifnot calcWindow.Exists(0,0):
    subprocess.Popen('calc')
calcWindow.SetActive()
calcWindow.MoveWindow(100,100,320,500)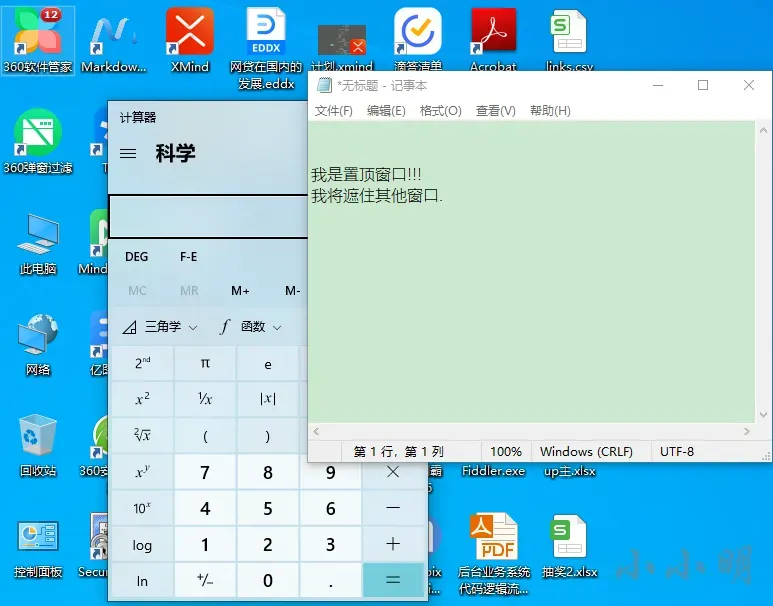
再进行本例最精彩的部分,以拖拽方式移动窗口:
# 鼠标从位置(240, 110)拖拽到(840, 110)
auto.DragDrop(240,110,840,110, waitTime=0.1)# 再拖拽回去
auto.DragDrop(840,110,240,110, waitTime=0.1)
最后打印文本并关闭窗口:
calcWindow.GetWindowPattern().Close()
edit.SendKeys('{Ctrl}{End}{Enter 2}关闭计算器窗口')
vp = edit.GetValuePattern()print('当前文本:', vp.Value)# 激活记事本窗口
note.SetActive()
note.GetWindowPattern().Close()# 确认不保存
auto.SendKeys('{ALT}n')
完整代码:
import sys
import time
import subprocess

import uiautomation as auto
# 设置全局搜索超时时间为1秒
auto.uiautomation.SetGlobalSearchTimeout(1)

note = auto.WindowControl(searchDepth=1, ClassName='Notepad')ifnot note.Exists(0,0):
    subprocess.Popen('notepad.exe')
note.SetActive()
note.SetTopmost(waitTime=0)# 移动窗口的位置,前两个参数表示左上角的位置,后两个参数编程窗口大小
note.MoveWindow(300,70,480,400)
edit = note.EditControl()
edit.SendKeys('{Ctrl}{End}{Enter 2}我是置顶窗口!!!n我将遮住其他窗口.')# 打开计算器窗口并调整:
calcWindow = auto.WindowControl(
    searchDepth=1, ClassName='ApplicationFrameWindow')ifnot calcWindow.Exists(0,0):
    subprocess.Popen('calc')
calcWindow.SetActive()
calcWindow.MoveWindow(100,100,320,500)# 鼠标从位置(240, 110)拖拽到(840, 110)
auto.DragDrop(240,110,840,110, waitTime=0.1)# 再拖拽回去
auto.DragDrop(840,110,240,110, waitTime=0.1)# 打印文本并关闭窗口:
calcWindow.GetWindowPattern().Close()
edit.SendKeys('{Ctrl}{End}{Enter 2}关闭计算器窗口')
vp = edit.GetValuePattern()print('当前文本:', vp.Value)# 激活记事本窗口
note.SetActive()
note.GetWindowPattern().Close()# 确认不保存
auto.SendKeys('{ALT}n')
运行效果(图片使用了全局色键压缩,导致颜色失真):
管理员提权操作并读取设备管理器栏目数据
由于必须要有管理员权限才能读取设备管理器,在没有管理员权限的控制台需要进行管理员身份提权。本案例涉及很多小知识点,下面先拆分来单独列出来。
获取屏幕大小:
auto.GetScreenSize()(1920, 1080)获取当前运行的程序的控制台并移动:
sw, sh = auto.GetScreenSize()
cmdWindow = auto.GetConsoleWindow()if cmdWindow:
    cmdTransformPattern = cmdWindow.GetTransformPattern()
    cmdTransformPattern.Move(sw //2,0)
    cmdTransformPattern.Resize(sw //2, sh *3//4)
打开设置管理器并修改窗口大小和位置:
subprocess.Popen('mmc.exe devmgmt.msc')
mmcWindow = auto.WindowControl(searchDepth =1, ClassName ='MMCMainFrame')
mmcTransformPattern = mmcWindow.GetTransformPattern()
mmcTransformPattern.Move(0,0)
mmcTransformPattern.Resize(sw //2, sh *3//4)
下面我们的目标是提取出设备管理器的每一项的信息:
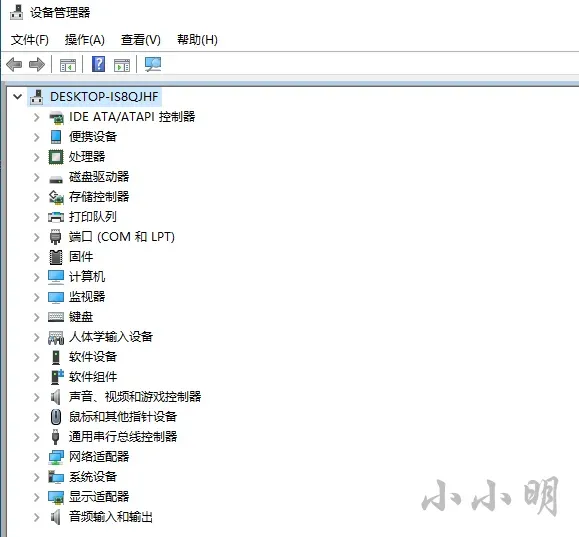
tree = mmcWindow.TreeControl()for item, depth in auto.WalkControl(tree, includeTop=False):ifnotisinstance(item, auto.TreeItemControl):continue
    item.GetSelectionItemPattern().Select(waitTime=0.01)
    pattern = item.GetExpandCollapsePattern()if pattern.ExpandCollapseState == auto.ExpandCollapseState.Collapsed:
        pattern.Expand(waitTime=0.01)print(' '*(depth -1)*4, item.Name)
部分结果:
DESKTOP-IS8QJHF
     IDE ATA/ATAPI 控制器
         Intel(R) 300 Series Chipset Family SATA AHCI Controller
     便携设备
         Seagate1.81TB
	 .....
     音频输入和输出
         24B1W1G5 (英特尔(R) 显示器音频)
         Realtek Digital Output (Realtek High Definition Audio)
         立体声混音 (Realtek High Definition Audio)
         扬声器 (Realtek High Definition Audio)
上述代码执行后,滚动条已经到底底部,下面我们可以执行以下代码让滚动条回到顶部:
treeScrollPattern = tree.GetScrollPattern()
treeScrollPattern.SetScrollPercent(-1,0)
SetScrollPercent传入的两个参数表示将滚动条移动到指定百分比位置:
horizontalPercent: 横向位置百分比
verticalPercent: 纵向位置百分比
传入-1表示不移动,由于没有横向滚动条,所以第一个参数传入了-1。
当然也可以移动到底部:
treeScrollPattern.SetScrollPercent(-1,100)也可以使用鼠标滑轮实现:
# 滚动条未到顶就使鼠标滑轮不停往上滑while treeScrollPattern.VerticalScrollPercent >0:
    tree.WheelUp(waitTime=0.01)# 滚动条未到底就使鼠标滑轮不停往下滑while treeScrollPattern.VerticalScrollPercent <100:
    tree.WheelDown(waitTime=0.01)
上述两个操作也可以直接通过快捷键实现:
tree.SendKeys('{Ctrl}{Home}', waitTime =1)
tree.SendKeys('{Ctrl}{End}', waitTime =1)
前面我们在获取tree控件时,设备管理器并没有滚动条,展开控件后产生的滚动条。此时必须更新控件信息:
print(tree.NativeWindowHandle, tree.Element,len(tree.GetChildren()))
tree.Refind()print(tree.NativeWindowHandle, tree.Element,len(tree.GetChildren()))
329304 <POINTER(IUIAutomationElement) ptr=0x1df11091f00 at 1df1c7d14c8> 1
329304 <POINTER(IUIAutomationElement) ptr=0x1df11092480 at 1df1d889148> 2可以看到再重新查找控件后,控件信息发生变化。
下面我们直接拖拽滚动条来实现界面区域的变化,我们需要先知道windows的滚动条组件由三个按钮和一个缩略图组成,首先我们获取滚动条和其中的滑动块对象:
vScrollBar = tree.ScrollBarControl(AutomationId='NonClientVerticalScrollBar')
thumb = vScrollBar.ThumbControl()
然后移动鼠标到滑动块中心位置并获取位置坐标:
x, y = thumb.MoveCursorToMyCenter()print(x, y)941 663获取整个滚动条的坐标范围:
vScrollBarRect = vScrollBar.BoundingRectangle
print(vScrollBarRect, vScrollBarRect.top, vScrollBarRect.bottom)
(933,86,950,778)[17x692] 86 778鼠标拖拽滑动条从底到顶:
vScrollBar = tree.ScrollBarControl(AutomationId='NonClientVerticalScrollBar')
thumb = vScrollBar.ThumbControl()
x, y = thumb.MoveCursorToMyCenter()
vScrollBarRect = vScrollBar.BoundingRectangle
auto.DragDrop(x, y, x, vScrollBarRect.top, waitTime=1)
从顶到底:
x, y = thumb.MoveCursorToMyCenter()
auto.DragDrop(x, y, x, vScrollBarRect.bottom, waitTime=1)
下面我们将上述方法整理到一个脚本中,假如我们需要管理员提权可以使用如下命令:
auto.RunScriptAsAdmin(sys.argv)实际使用过程中需要使用如下命令判断是否已经具备管理员避免无限循环:
auto.IsUserAnAdmin()完整代码:
"""
小小明的代码
CSDN主页:https://blog.csdn.net/as604049322
"""
__author__ ='小小明'
__time__ ='2021/11/12'import subprocess
import sys
import time

import uiautomation as auto


defmain():
    sw, sh = auto.GetScreenSize()
    cmdWindow = auto.GetConsoleWindow()if cmdWindow:
        cmdTransformPattern = cmdWindow.GetTransformPattern()
        cmdTransformPattern.Move(sw //4,0)
        cmdTransformPattern.Resize(sw //4, sh *3//5)

    subprocess.Popen('mmc.exe devmgmt.msc')
    mmcWindow = auto.WindowControl(searchDepth=1, ClassName='MMCMainFrame')
    mmcTransformPattern = mmcWindow.GetTransformPattern()
    mmcTransformPattern.Move(0,0)
    mmcTransformPattern.Resize(sw //4, sh *3//5)

    tree = mmcWindow.TreeControl()for item, depth in auto.WalkControl(tree, includeTop=False):ifnotisinstance(item, auto.TreeItemControl):continue
        item.GetSelectionItemPattern().Select(waitTime=0.01)
        pattern = item.GetExpandCollapsePattern()if pattern.ExpandCollapseState == auto.ExpandCollapseState.Collapsed:
            pattern.Expand(waitTime=0.01)print(' '*(depth -1)*4, item.Name)

    tree = mmcWindow.TreeControl()
    treeScrollPattern = tree.GetScrollPattern()print("ScrollPattern.SetScrollPercent(1, 0)")
    treeScrollPattern.SetScrollPercent(1,0)print("ScrollPattern.SetScrollPercent(1, 100)")
    treeScrollPattern.SetScrollPercent(1,100)

    treeScrollPattern = tree.GetScrollPattern()print("滚动条未到顶就使鼠标滑轮不停往上滑")# 滚动条未到顶就使鼠标滑轮不停往上滑while treeScrollPattern.VerticalScrollPercent >0:
        tree.WheelUp(waitTime=0.01)print("滚动条未到底就使鼠标滑轮不停往下滑")# 滚动条未到底就使鼠标滑轮不停往下滑while treeScrollPattern.VerticalScrollPercent <100:
        tree.WheelDown(waitTime=0.01)print("快捷键控制窗口滚动到顶")
    tree.SendKeys('{Ctrl}{Home}', waitTime=1)
    time.sleep(1)print("快捷键控制窗口滚动到底")
    tree.SendKeys('{Ctrl}{End}', waitTime=1)

    tree.Refind()

    vScrollBar = tree.ScrollBarControl(AutomationId='NonClientVerticalScrollBar')
    thumb = vScrollBar.ThumbControl()
    vScrollBarRect = vScrollBar.BoundingRectangle
    x, y = thumb.MoveCursorToMyCenter()print("拖拽滚动条向上移动...")
    auto.DragDrop(x, y, x, vScrollBarRect.top, waitTime=1)
    x, y = thumb.MoveCursorToMyCenter()print("拖拽滚动条向下移动...")
    auto.DragDrop(x, y, x, vScrollBarRect.bottom, waitTime=1)print("关闭设备管理器")
    mmcWindow.GetWindowPattern().Close()input("已经运行完毕,回车结束")if __name__ =='__main__':if auto.IsUserAnAdmin():
        main()else:print('RunScriptAsAdmin', sys.executable, sys.argv)
        auto.RunScriptAsAdmin(sys.argv)
运行过程:
记事本文本输入与字体调整
首先打开记事本窗口,调整大小激活并置顶:
import uiautomation as auto
import subprocess
# 设置全局搜索超时时间为1秒
auto.uiautomation.SetGlobalSearchTimeout(1)# 查找notepad
note = auto.WindowControl(
searchDepth=1, ClassName='Notepad', RegexName='.* - 记事本')ifnot auto.WaitForExist(note,0.1):
subprocess.Popen('notepad')
sw, sh = auto.GetScreenSize()
note.MoveWindow(sw //10, sh //10, sw //2, sh //2)
note.SetActive()
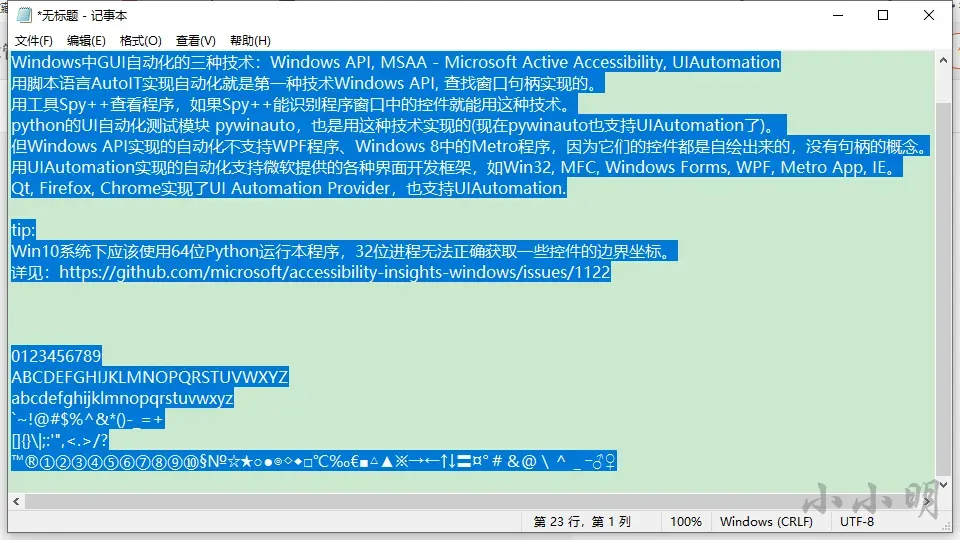
note.SetTopmost()下面我们测试一下文本输入:
text ="""Windows中GUI自动化的三种技术:Windows API, MSAA - Microsoft Active Accessibility, UIAutomation
用脚本语言AutoIT实现自动化就是第一种技术Windows API, 查找窗口句柄实现的。
用工具Spy++查看程序,如果Spy++能识别程序窗口中的控件就能用这种技术。
python的UI自动化测试模块 pywinauto,也是用这种技术实现的(现在pywinauto也支持UIAutomation了)。
但Windows API实现的自动化不支持WPF程序、Windows 8中的Metro程序,因为它们的控件都是自绘出来的,没有句柄的概念。
用UIAutomation实现的自动化支持微软提供的各种界面开发框架,如Win32, MFC, Windows Forms, WPF, Metro App, IE。
Qt, Firefox, Chrome实现了UI Automation Provider,也支持UIAutomation.

tip:
Win10系统下应该使用64位Python运行本程序,32位进程无法正确获取一些控件的边界坐标。
详见:https://github.com/microsoft/accessibility-insights-windows/issues/1122
"""
edit = note.EditControl()
edit.Click(waitTime=0)
edit.GetValuePattern().SetValue('你好')
edit.SendKeys('{Ctrl}{End}{Enter}下面开始演示{! 4}{ENTER}',0.2,0)
edit.SendKeys(text)
edit.SendKeys('{Enter 3}0123456789{Enter}', waitTime=0)
edit.SendKeys('ABCDEFGHIJKLMNOPQRSTUVWXYZ{ENTER}', waitTime=0)
edit.SendKeys('abcdefghijklmnopqrstuvwxyz{ENTER}', waitTime=0)
edit.SendKeys('`~!@#$%^&*()-_=+{ENTER}', waitTime=0)
edit.SendKeys('[]{{}{}}\|;:'",<.>/?{ENTER}', waitTime=0)
edit.SendKeys('™®①②③④⑤⑥⑦⑧⑨⑩§№☆★○●◎◇◆□℃‰€■△▲※→←↑↓〓¤°#&@\^_―♂♀')
edit.SendKeys("{ENTER}{CTRL}a")
note.CaptureToImage('Notepad.png')
其中SendKeys的参数为:control.SendKeys(text: str, interval: float = 0.01,waitTime: float = 0.5, charMode: bool = True)
interval参数决定了输入的间隔,修改这个参数为0.2减慢了输入的频率更像打字机的效果。
最终产生的截图为:
下面我们修改一下字体相关信息:
# 查找菜单
note.MenuItemControl(Name='格式(O)').Click()
note.MenuItemControl(Name='字体(F)...').Click()
windowFont = note.WindowControl(Name='字体')
font_data ={"字体(F):":"微软雅黑","字形(Y):":"常规","大小(S):":"小四"}for k, v in font_data.items():
    listItem = windowFont.ListControl(
        searchDepth=2, AutomationId='1000', Name=k).ListItemControl(Name=v)if listItem.Exists(1):
        listItem.GetScrollItemPattern().ScrollIntoView()
        listItem.Click()
其中ScrollIntoView()方法滚动目标到可见区域。
可以通过以下方面打印字体列表中的所有可选字体:
font_ListControl = windowFont.ListControl(
    searchDepth=2, AutomationId='1000', Name="字体(F):")for item, depth in auto.WalkControl(font_ListControl, includeTop=True, maxDepth=2):if depth !=1or item.ControlType != auto.ControlType.ListItemControl:continueprint(item.Name)
Agency FB
Algerian
Arial
...
微软雅黑
新宋体
幼圆对于需要展开的项目则需要先展开下拉列表,例如打印所有的脚本项:
windowFont.SetActive()
combo = windowFont.ComboBoxControl(AutomationId='1140')
pattern = combo.GetExpandCollapsePattern()if pattern.ExpandCollapseState == auto.ExpandCollapseState.Collapsed:
    pattern.Expand(waitTime=0)for item, depth in auto.WalkControl(combo, includeTop=True, maxDepth=2):if depth !=2or item.ControlType != auto.ControlType.ListItemControl:continueprint(item.Name)
中文 GB2312
西欧语言
希腊语
土耳其语
中欧字符
西里尔文我们选择中文类型的脚本:
combo.Select('中文 GB2312')最后点击确定按钮:
windowFont.ButtonControl(Name='确定').Click()完整代码:
import uiautomation as auto
import subprocess
# 设置全局搜索超时时间为1秒
auto.uiautomation.SetGlobalSearchTimeout(1)# 查找notepad
note = auto.WindowControl(
    searchDepth=1, ClassName='Notepad', RegexName='.* - 记事本')ifnot auto.WaitForExist(note,0.1):
    subprocess.Popen('notepad')
sw, sh = auto.GetScreenSize()
note.MoveWindow(sw //10, sh //10, sw //2, sh //2)
note.SetActive()
note.SetTopmost()
text ="""Windows中GUI自动化的三种技术:Windows API, MSAA - Microsoft Active Accessibility, UIAutomation
用脚本语言AutoIT实现自动化就是第一种技术Windows API, 查找窗口句柄实现的。
用工具Spy++查看程序,如果Spy++能识别程序窗口中的控件就能用这种技术。
python的UI自动化测试模块 pywinauto,也是用这种技术实现的(现在pywinauto也支持UIAutomation了)。
但Windows API实现的自动化不支持WPF程序、Windows 8中的Metro程序,因为它们的控件都是自绘出来的,没有句柄的概念。
用UIAutomation实现的自动化支持微软提供的各种界面开发框架,如Win32, MFC, Windows Forms, WPF, Metro App, IE。
Qt, Firefox, Chrome实现了UI Automation Provider,也支持UIAutomation.

tip:
Win10系统下应该使用64位Python运行本程序,32位进程无法正确获取一些控件的边界坐标。
详见:https://github.com/microsoft/accessibility-insights-windows/issues/1122
"""
edit = note.EditControl()
edit.Click(waitTime=0)
edit.GetValuePattern().SetValue('你好')
edit.SendKeys('{Ctrl}{End}{Enter}下面开始演示{! 4}{ENTER}',0.2,0)
edit.SendKeys(text)
edit.SendKeys('{Enter 3}0123456789{Enter}', waitTime=0)
edit.SendKeys('ABCDEFGHIJKLMNOPQRSTUVWXYZ{ENTER}', waitTime=0)
edit.SendKeys('abcdefghijklmnopqrstuvwxyz{ENTER}', waitTime=0)
edit.SendKeys('`~!@#$%^&*()-_=+{ENTER}', waitTime=0)
edit.SendKeys('[]{{}{}}\|;:'",<.>/?{ENTER}', waitTime=0)
edit.SendKeys('™®①②③④⑤⑥⑦⑧⑨⑩§№☆★○●◎◇◆□℃‰€■△▲※→←↑↓〓¤°#&@\^_―♂♀')
edit.SendKeys("{ENTER}{CTRL}a")
note.CaptureToImage('Notepad.png')# 查找菜单
note.MenuItemControl(Name='格式(O)').Click()
note.MenuItemControl(Name='字体(F)...').Click()
windowFont = note.WindowControl(Name='字体')
font_data ={"字体(F):":"微软雅黑","字形(Y):":"常规","大小(S):":"小四"}for k, v in font_data.items():
    listItem = windowFont.ListControl(
        searchDepth=2, AutomationId='1000', Name=k).ListItemControl(Name=v)if listItem.Exists(1):
        listItem.GetScrollItemPattern().ScrollIntoView()
        listItem.Click()
windowFont.SetActive()
combo = windowFont.ComboBoxControl(AutomationId='1140')
combo.Select('中文 GB2312')
windowFont.ButtonControl(Name='确定').Click()
note.SetTopmost(False)
subprocess.Popen('Notepad.png', shell=True)
执行结果:
wireshark抓包数据读取
下面我们演示如何保存wireshark抓包到的数据。首先我们需要自行打开wireshark程序后进行抓包。抓包几秒钟后有了如下结果:

下面我们的目标是保存这个表格的数据。
首先我们需要获取wireshark的窗口对象,经过inspect工具的检查,ClassName和AutomationId均为MainWindow:
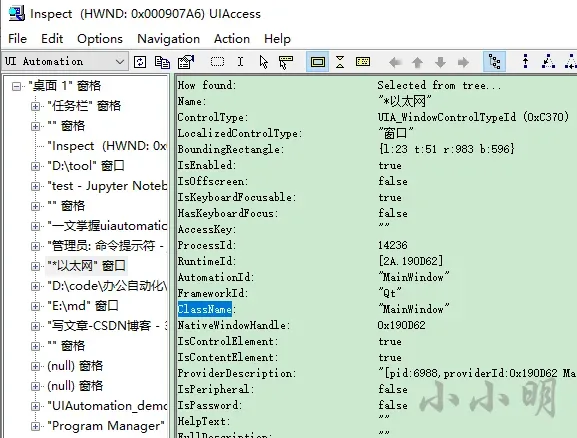
这个对象的Name属性与窗口标题一致会根据状态不断变化,所以不能作为一个查找项,正常情况在能够保证开的窗口很少的情况下,我们可以通过如下简单的代码获取到wireshark的窗口对象:
win = auto.WindowControl(
    searchDepth=1, ClassName='MainWindow', AutomationId='MainWindow')
但是ClassName值为MainWindow的窗口实在太多了,我们无法确认时就需要其他方法来查找窗口,否则可能找到的窗口并不是wireshark。
但是wireshark有个过滤选择器工具栏的AutomationId为”MainWindow.displayFilterToolBar”:
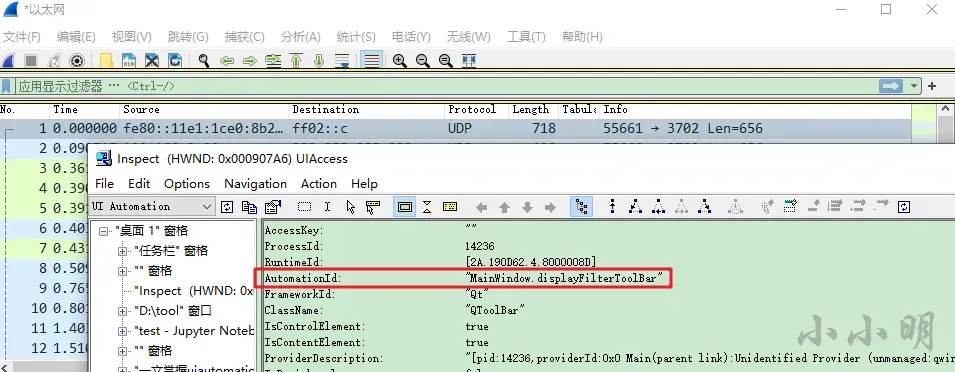
我们可以以此为唯一标识找出wireshark窗口对象。
思路:从桌面根对象下面开始遍历每个窗口对象,判断它是否存在AutomationId为”MainWindow.displayFilterToolBar”的工具栏,找到即可返回,具体编码:
import uiautomation as auto
import time
# 设置全局搜索超时时间为1秒
auto.uiautomation.SetGlobalSearchTimeout(1)deffind_wiresharkWindow():for win in auto.GetRootControl().GetChildren():if win.ClassName !='MainWindow'or win.AutomationId !='MainWindow':continueif win.ToolBarControl(AutomationId='MainWindow.displayFilterToolBar').Exists(0,0):return win
然后我们在获取到窗口后,调整一下窗口位置:
wiresharkWindow = find_wiresharkWindow()
sw, sh = auto.GetScreenSize()
wiresharkWindow.MoveWindow(10,10, sw //2, sh *3//5)
wiresharkWindow.SetActive(waitTime=0.1)
wiresharkWindow.SetTopmost()
然后可以开始遍历树控件获取数据:
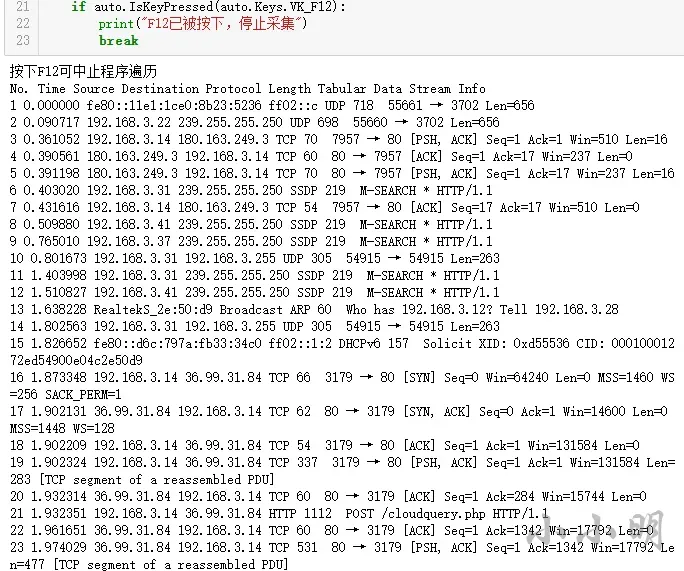
print("按下F12可中止程序遍历")
tree = wiresharkWindow.TreeControl(
    searchDepth=4, ClassName='PacketList', Name='Packet list')
rect = tree.BoundingRectangle
tree.Click(y=50, waitTime=0.1)
auto.SendKeys('{Home}', waitTime=0.1)
treeItemCount =0
columnCount =0for item, depth in auto.WalkControl(tree):ifisinstance(item, auto.HeaderControl):print(item.Name, end=" ")
        columnCount +=1elifisinstance(item, auto.TreeItemControl):if treeItemCount % columnCount ==0:print()
        treeItemCount +=1print(item.Name, end=" ")if item.BoundingRectangle.bottom >= rect.bottom:
            auto.SendKeys('{PageDown}', waitTime=0.1)if auto.IsKeyPressed(auto.Keys.VK_F12):print("F12已被按下,停止采集")break
为了避免程序持续无休止的运行,增加快捷键判断,循环中发现某个快捷键被按下则退出循环。可以看到打印结果很完美:
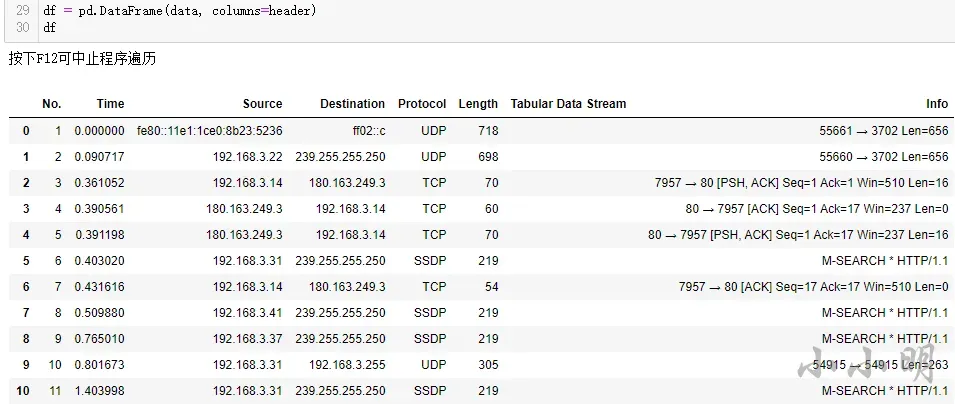
下面我们重新组织一下代码,使结果最终能保存为pandas的datafream对象,完整代码如下:
import pandas as pd
import uiautomation as auto

# 设置全局搜索超时时间为1秒
auto.uiautomation.SetGlobalSearchTimeout(1)deffind_wiresharkWindow():for win in auto.GetRootControl().GetChildren():if win.ClassName !='MainWindow'or win.AutomationId !='MainWindow':continueif win.ToolBarControl(AutomationId='MainWindow.displayFilterToolBar').Exists(0,0):return win


wiresharkWindow = find_wiresharkWindow()
sw, sh = auto.GetScreenSize()
wiresharkWindow.MoveWindow(10,10, sw //2, sh *3//5)
wiresharkWindow.SetActive(waitTime=0.1)
wiresharkWindow.SetTopmost()print("按下F12可中止程序遍历")
tree = wiresharkWindow.TreeControl(
    searchDepth=4, ClassName='PacketList', Name='Packet list')
rect = tree.BoundingRectangle
tree.Click(y=50, waitTime=0.1)
auto.SendKeys('{Home}', waitTime=0.1)
treeItemCount =0
columnCount =0
header =[]
data, row =[],[]for item, depth in auto.WalkControl(tree):ifisinstance(item, auto.HeaderControl):
        header.append(item.Name)
        columnCount +=1elifisinstance(item, auto.TreeItemControl):if row and treeItemCount % columnCount ==0:
            data.append(row)
            row =[]
        treeItemCount +=1
        row.append(item.Name)if item.BoundingRectangle.bottom >= rect.bottom:
            auto.SendKeys('{PageDown}', waitTime=0.1)if auto.IsKeyPressed(auto.Keys.VK_F12):print("F12已被按下,停止采集")break
wiresharkWindow.SetTopmost(False)if row:
    data.append(row)
df = pd.DataFrame(data, columns=header)
df
结果:
PDF目录折叠展开提取器
本例计划开发一个针对树形控件的折叠展开工具,计划开发三个热键功能:
递归展开某树形控件
递归折叠某树形控件
递归提取整棵树的文本
当我们按某个快捷键时,则会自动定位当前鼠标下的控件,是树形控件时就会进行对应的操作。针对递归提取整棵树的文本,鼠标放到一个树形控件的任意位置,都会自动定位当前树的祖先控件。
下面针对这三个功能注册热键为Ctrl+1,Ctrl+2,Ctrl+3。最终完整代码为:
import uiautomation as auto


defExpandTreeItem(stopEvent):with auto.UIAutomationInitializerInThread():
        tree = auto.ControlFromCursor()if tree.ControlType notin[auto.ControlType.TreeControl, auto.ControlType.TreeItemControl]:returnfor item, depth in auto.WalkControl(tree, includeTop=True):ifnotisinstance(item, auto.TreeItemControl):continue
            ecpt = item.GetExpandCollapsePattern()if ecpt and ecpt.ExpandCollapseState == auto.ExpandCollapseState.Collapsed:
                sipt = item.GetScrollItemPattern()if sipt:
                    sipt.ScrollIntoView(waitTime=0.01)
                ecpt.Expand(waitTime=0.01)
        sipt = tree.GetScrollItemPattern()if sipt:
            sipt.ScrollIntoView(waitTime=0.01)defcopy_pdf_catalog(stopEvent):
    result =[]with auto.UIAutomationInitializerInThread():
        tree = auto.ControlFromCursor()if tree.ControlType notin[auto.ControlType.TreeControl, auto.ControlType.TreeItemControl]:return
        tree = tree.GetAncestorControl(lambda c, d:isinstance(c, auto.TreeControl))for item, depth in auto.WalkControl(tree, includeTop=True):ifnotisinstance(item, auto.TreeItemControl):continue
            name = item.Name
            if name:print("t"*(depth -1)+ name)
                result.append("t"*(depth -1)+ name)
            ecpt = item.GetExpandCollapsePattern()if ecpt and ecpt.ExpandCollapseState == auto.ExpandCollapseState.Collapsed:
                sipt = item.GetScrollItemPattern()if sipt:
                    sipt.ScrollIntoView(waitTime=0.01)
                ecpt.Expand(waitTime=0.01)
    text ="n".join(result)
    auto.SetClipboardText(text)defCollapseTreeItem_recursion(treeItem: auto.TreeItemControl):ifnotisinstance(treeItem, auto.TreeItemControl):return
    children = treeItem.GetChildren()ifnot children:returnfor it in children:
        CollapseTreeItem_recursion(it)
    ecpt = treeItem.GetExpandCollapsePattern()if ecpt and ecpt.ExpandCollapseState == auto.ExpandCollapseState.Expanded:
        ecpt.Collapse(waitTime=0.05)defcollapseTreeItem(stopEvent):with auto.UIAutomationInitializerInThread():
        treeItem = auto.ControlFromCursor()
        CollapseTreeItem_recursion(treeItem)if __name__ =='__main__':
    auto.RunByHotKey({(auto.ModifierKey.Control, auto.Keys.VK_1): collapseTreeItem,(auto.ModifierKey.Control, auto.Keys.VK_2): ExpandTreeItem,(auto.ModifierKey.Control, auto.Keys.VK_3): copy_pdf_catalog,}, waitHotKeyReleased=False)
经测试对极速PDF的目录完全有效,我们可以用来递归折叠或展开PDF的目录,或者直接从UI提取目录的内容。
运行后程序显示:
Register hotkey ('Control', 'VK_1') successfully
Register hotkey ('Control', 'VK_2') successfully
Register hotkey ('Control', 'VK_3') successfully
Register exit hotkey ('Control', 'VK_D') successfully
先按下Ctrl+1测试一下折叠功能(录屏软件挡住时无法获取到鼠标下的控件,所以用手机录):
按下Ctrl+2则非常顺利的进行了相应的反向操作,大家可以自己感受一下。
按下Ctrl+3,执行完毕后,我将剪切板中的内容粘贴到记事本:
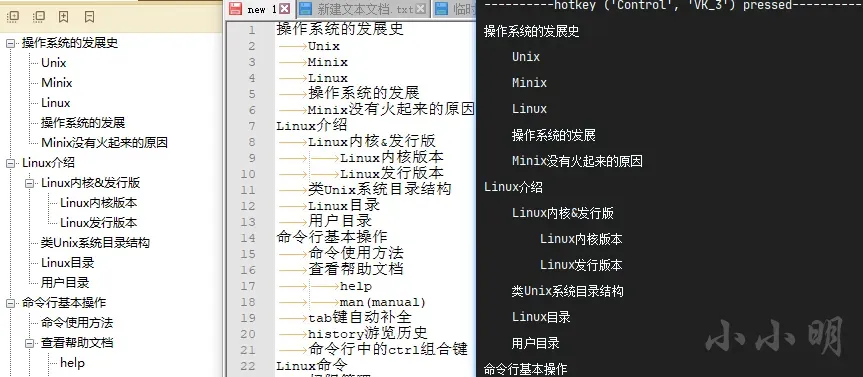
可以看到已经完美提取出PDF的目录,该复制到剪切板中的目录还可以直接粘贴到思维导图中。
文章出处登录后可见!