在本教程中,您将学习如何使用 OpenCV 和 Python 构建人员计数器。使用 OpenCV,我们将实时计算进或出百货商店的人数。
在今天博客文章的第一部分,我们将讨论如何利用两者来创建更准确的人员计数器。之后,我们将查看项目的目录结构,然后实施整个人员计数项目。最后,我们将检查将 OpenCV 的人数统计应用到实际视频中的结果。
1.了解对象检测与对象跟踪
在继续本教程的其余部分之前,您必须了解对象检测和对象跟踪之间的根本区别。
当我们应用对象检测时,我们是在确定一个对象在图像/帧中的位置。与目标跟踪算法相比,目标检测器通常在计算上更昂贵,因此也更慢。目标检测算法的例子包括Haar级联、HOG +线性支持向量机(HOG + Linear SVM)和基于深度学习的目标检测器,如Faster R-CNN、YOLO和Single Shot检测器(SSD)。
另一方面,对象跟踪器将接受对象在图像中位置的输入 (x, y) 坐标,并将:
- 1.为该特定对象分配唯一 ID
- 2.在对象围绕视频流移动时跟踪对象,根据帧的各种属性(梯度、光流等)预测下一帧中的新对象位置
对象跟踪算法的示例包括 MedianFlow、MOSSE、GOTURN、核化相关滤波器和判别相关滤波器等。
2.结合对象检测和对象跟踪
高精度目标跟踪器将目标检测和目标跟踪的概念结合到一个算法中,通常分为两个阶段:
- 1.阶段1 检测:在检测阶段,我们正在运行计算成本更高的对象跟踪器,以 (1) 检测是否有新对象进入我们的视野,以及 (2) 看看我们是否可以找到在跟踪阶段“丢失”的对象。对于每个检测到的对象,我们使用新的边界框坐标创建或更新对象跟踪器。由于我们的目标检测器的计算成本更高,我们每 N 帧只运行一次此阶段。
- 2.阶段2 跟踪:当我们不处于“检测”阶段时,我们处于“跟踪”阶段。对于我们检测到的每个对象,我们创建一个对象跟踪器来跟踪对象在框架周围的移动。我们的目标跟踪器应该比目标检测器更快、更高效。我们将继续跟踪,直到我们到达第 N 帧,然后重新运行我们的目标检测器。然后重复整个过程。
这种混合方法的好处是我们可以应用高度准确的对象检测方法而没有太多的计算负担。我们将实施这样一个跟踪系统来建立我们的人员计数器。
这种混合方法的好处是我们可以应用高度准确的对象检测方法而没有太多的计算负担。我们将实施这样一个跟踪系统来建立我们的人员计数器。
3.项目结构
让我们回顾一下今天博客文章的项目结构。获取代码后,您可以使用tree命令检查目录结构:
$ tree --dirsfirst
.
├── pyimagesearch
│   ├── __init__.py
│   ├── centroidtracker.py
│   └── trackableobject.py
├── mobilenet_ssd
│   ├── MobileNetSSD_deploy.caffemodel
│   └── MobileNetSSD_deploy.prototxt
├── videos
│   ├── example_01.mp4
│   └── example_02.mp4
├── output
│   ├── output_01.avi
│   └── output_02.avi
└── people_counter.py
最重要的两个目录:
- 1.pyimagesearch/:该模块包含质心跟踪算法。 “组合对象跟踪算法”部分介绍了质心跟踪算法。
- 2.mobilenet_ssd/:包含 Caffe 深度学习模型文件。
今天项目的核心包含在people_counter.py脚本中——这是我们将花费大部分时间的地方。今天我们还将回顾trackableobject.py脚本。
4.结合对象跟踪算法
为了实现我们的人员计数器,我们将同时使用 OpenCV 和 dlib。我们将 OpenCV 用于标准的计算机视觉/图像处理功能,以及用于人数统计的深度学习对象检测器。
然后我们将使用 dlib 来实现相关过滤器。我们也可以在这里使用 OpenCV;但是,对于这个项目,dlib 对象跟踪实现更容易使用。
除了 dlib 的对象跟踪实现,我们还将使用质心跟踪实现。回顾整个质心跟踪算法超出了这篇博文的范围,但我在下面提供了一个简短的概述。
在步骤#1,我们接受一组边界框并计算它们对应的质心(即边界框的中心):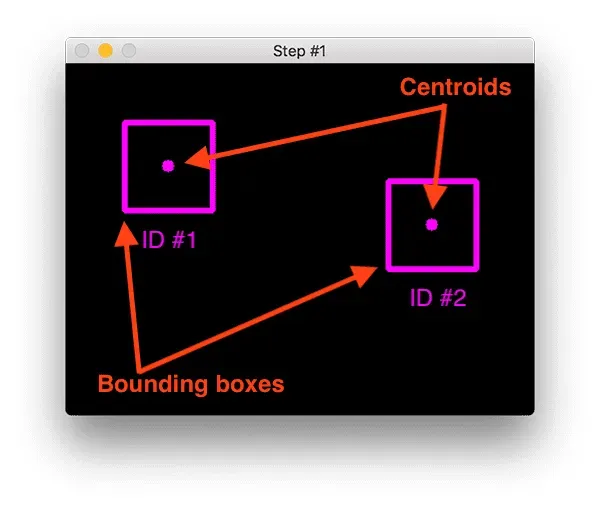
要使用 Python 通过质心脚本构建简单的对象跟踪,第一步是接受边界框坐标并使用它们来计算质心。
边界框本身可以由以下任一方式提供:
- 1.目标检测器(如 HOG + Linear SVM、Faster R-CNN、SSDs 等)
- 2.或对象跟踪器(例如相关过滤器)
在上图中,您可以看到我们在算法的初始迭代中有两个对象要跟踪。
在步骤#2中,我们计算任何新质心(黄色)和现有质心(紫色)之间的欧几里得距离: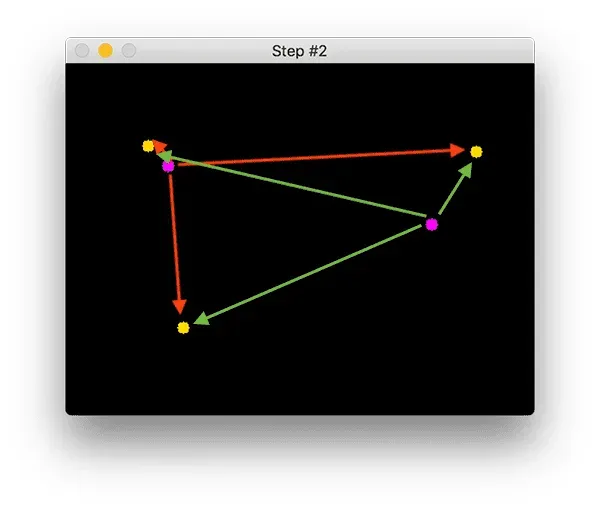
此图像中有三个对象。我们需要计算每对原始质心(紫色)和新质心(黄色)之间的欧几里得距离。
质心跟踪算法假设它们之间具有最小欧几里德距离的质心对必须是相同的对象 ID。
在上面的示例图像中,我们有两个现有的质心(紫色)和三个新的质心(黄色),这意味着检测到了一个新的对象(因为与旧的质心相比,还有一个新的质心)。
然后箭头表示计算所有紫色质心和所有黄色质心之间的欧几里得距离。一旦我们有了欧几里得距离,我们就会在步骤#3中尝试关联对象 ID: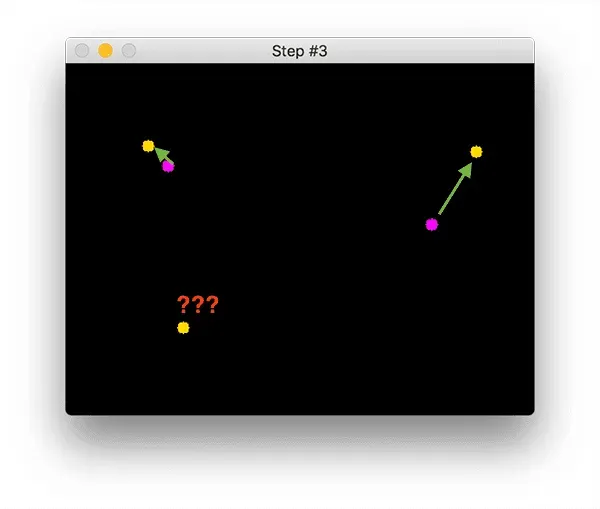
您可以看到我们的质心跟踪器已选择关联使它们各自的欧几里得距离最小化的质心。但是左下角的点呢?它没有与任何东西相关联——我们该怎么办? 要回答这个问题,我们需要执行步骤#4,注册新对象: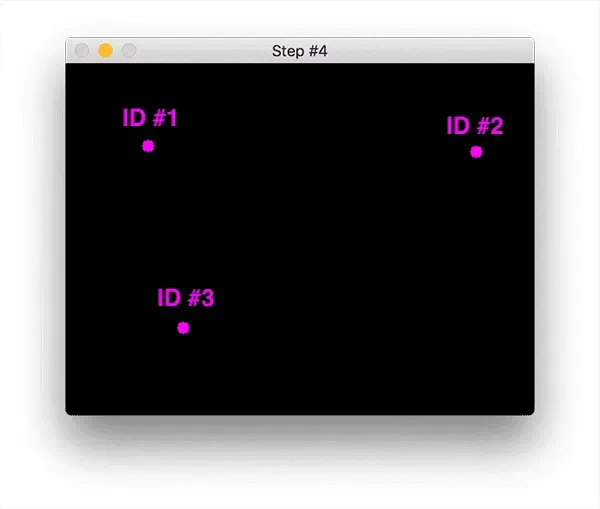
注册意味着我们通过以下方式将新对象添加到我们的跟踪对象列表中:
- 1.为其分配一个新的对象 ID
- 2.存储新对象的边界框坐标的质心
如果对象丢失或离开视野,我们可以简单地取消注册对象(步骤#5)。
5.创建可追踪对象
为了跟踪和计算视频流中的对象,我们需要一种简单的方法来存储有关对象本身的信息,包括:
- 对象ID
- 前一个质心(所以我们可以很容易地找出物体移动的方向)
- 对象是否已被计数
为了实现所有这些目标,我们可以定义一个TrackableObject实例——打开trackableobject.py文件并插入以下代码:
class TrackableObject:
	def __init__(self, objectID, centroid):
		# store the object ID, then initialize a list of centroids
		# using the current centroid
		self.objectID = objectID
		self.centroids = [centroid]
		# initialize a boolean used to indicate if the object has
		# already been counted or not
		self.counted = False
TrackableObject构造函数接受objectID + centroid并存储它们。centroids变量是一个列表,因为它将包含对象的质心位置历史记录。 构造函数还将counted初始化为False,表示该对象还没有被计数。
6.使用 OpenCV + Python 实现我们的人员计数器
# import the necessary packages
from pyimagesearch.centroidtracker import CentroidTracker
from pyimagesearch.trackableobject import TrackableObject
from imutils.video import VideoStream
from imutils.video import FPS
import numpy as np
import argparse
import imutils
import time
import dlib
import cv2
我们首先导入必要的包:
- 从 pyimagesearch 模块,我们导入自定义的 CentroidTracker 和 TrackableObject 类。
- imutils.video 中的 VideoStream 和 FPS 模块将帮助我们使用网络摄像头并计算估计的每秒帧数 (FPS) 吞吐率。
- 我们需要 imutils 的 OpenCV 便利功能。
- dlib 库将用于其相关跟踪器实现。
- OpenCV 将用于深度神经网络推理、打开视频文件、写入视频文件以及在我们的屏幕上显示输出帧。
现在所有工具都触手可及,让我们解析命令行参数:
# construct the argument parse and parse the arguments
ap = argparse.ArgumentParser()
ap.add_argument("-p", "--prototxt", required=True,
	help="path to Caffe 'deploy' prototxt file")
ap.add_argument("-m", "--model", required=True,
	help="path to Caffe pre-trained model")
ap.add_argument("-i", "--input", type=str,
	help="path to optional input video file")
ap.add_argument("-o", "--output", type=str,
	help="path to optional output video file")
ap.add_argument("-c", "--confidence", type=float, default=0.4,
	help="minimum probability to filter weak detections")
ap.add_argument("-s", "--skip-frames", type=int, default=30,
	help="# of skip frames between detections")
args = vars(ap.parse_args())
我们有六个命令行参数,允许我们在运行时从终端将信息传递给我们的人员计数器脚本:
- –prototxt:Caffe 部署 prototxt 文件的路径。
- –model:Caffe 预训练 CNN 模型的路径。
- –input: 可选的输入视频文件路径。如果未指定路径,将使用您的网络摄像头。
- –output:可选的输出视频路径。如果未指定路径,则不会录制视频。
- –confidence:默认值为 0.4 ,这是有助于过滤掉弱检测的最小概率阈值。
- –skip-frames:在跟踪对象上再次运行我们的 DNN 检测器之前要跳过的帧数。请记住,对象检测的计算成本很高,但它确实有助于我们的跟踪器重新评估帧中的对象。默认情况下,我们在使用 OpenCV DNN 模块和我们的 CNN 单次检测器模型检测对象之间跳过 30 帧。
现在我们的脚本可以在运行时动态处理命令行参数,让我们准备我们的 SSD:
# initialize the list of class labels MobileNet SSD was trained to detect
CLASSES = ["background", "aeroplane", "bicycle", "bird", "boat",
	"bottle", "bus", "car", "cat", "chair", "cow", "diningtable",
	"dog", "horse", "motorbike", "person", "pottedplant", "sheep",
	"sofa", "train", "tvmonitor"]
# load our serialized model from disk
print("[INFO] loading model...")
net = cv2.dnn.readNetFromCaffe(args["prototxt"], args["model"])
首先,我们将初始化CLASSES——SSD 支持的类列表。我们只对“人”类感兴趣,但您也可以计算其他移动对象。
我们加载用于检测对象的预训练 MobileNet SSD(但同样,我们只对检测和跟踪人感兴趣,而不是任何其他类)。
我们可以初始化我们的视频流:
# if a video path was not supplied, grab a reference to the webcam
if not args.get("input", False):
	print("[INFO] starting video stream...")
	vs = VideoStream(src=0).start()
	time.sleep(2.0)
# otherwise, grab a reference to the video file
else:
	print("[INFO] opening video file...")
	vs = cv2.VideoCapture(args["input"])
首先,我们处理使用网络摄像头视频流的情况。否则,我们将从视频文件中捕获帧。在开始循环帧之前,我们还有一些初始化要执行:
# initialize the video writer (we'll instantiate later if need be)
writer = None
# initialize the frame dimensions (we'll set them as soon as we read
# the first frame from the video)
W = None
H = None
# instantiate our centroid tracker, then initialize a list to store
# each of our dlib correlation trackers, followed by a dictionary to
# map each unique object ID to a TrackableObject
ct = CentroidTracker(maxDisappeared=40, maxDistance=50)
trackers = []
trackableObjects = {}
# initialize the total number of frames processed thus far, along
# with the total number of objects that have moved either up or down
totalFrames = 0
totalDown = 0
totalUp = 0
# start the frames per second throughput estimator
fps = FPS().start()
其余的初始化包括:
- writer:我们的视频写入器。如果我们正在写入视频,我们稍后会实例化这个对象。
- W 和 H:我们的帧尺寸。我们需要将这些插入到cv2.VideoWriter中。
- ct:我们的CentroidTracker。
- trackers:存储 dlib 相关跟踪器的列表。
- trackableObjects:将objectID映射到TrackableObject的字典。
- totalFrames:处理的帧总数。
- totalDown 和 totalUp:向下或向上移动的对象/人的总数。
- fps:我们用于基准测试的每秒帧数估计器。
现在我们所有的初始化都处理好了,让我们循环传入的帧:
# loop over frames from the video stream
while True:
	# grab the next frame and handle if we are reading from either
	# VideoCapture or VideoStream
	frame = vs.read()
	frame = frame[1] if args.get("input", False) else frame
	# if we are viewing a video and we did not grab a frame then we
	# have reached the end of the video
	if args["input"] is not None and frame is None:
		break
	# resize the frame to have a maximum width of 500 pixels (the
	# less data we have, the faster we can process it), then convert
	# the frame from BGR to RGB for dlib
	frame = imutils.resize(frame, width=500)
	rgb = cv2.cvtColor(frame, cv2.COLOR_BGR2RGB)
	# if the frame dimensions are empty, set them
	if W is None or H is None:
		(H, W) = frame.shape[:2]
	# if we are supposed to be writing a video to disk, initialize
	# the writer
	if args["output"] is not None and writer is None:
		fourcc = cv2.VideoWriter_fourcc(*"MJPG")
		writer = cv2.VideoWriter(args["output"], fourcc, 30,
			(W, H), True)
我们开始循环。在循环的顶部,我们抓取下一帧。如果我们已经到达视频的结尾,我们将跳出循环。
帧进行预处理。这包括调整大小和交换颜色通道,因为dlib需要rgb图像。我们为视频编写器获取帧的尺寸。 如果通过命令行参数提供了输出路径,我们将从那里实例化视频编写器。
现在让我们使用 SSD检测人:
	# initialize the current status along with our list of bounding
	# box rectangles returned by either (1) our object detector or
	# (2) the correlation trackers
	status = "Waiting"
	rects = []
	# check to see if we should run a more computationally expensive
	# object detection method to aid our tracker
	if totalFrames % args["skip_frames"] == 0:
		# set the status and initialize our new set of object trackers
		status = "Detecting"
		trackers = []
		# convert the frame to a blob and pass the blob through the
		# network and obtain the detections
		blob = cv2.dnn.blobFromImage(frame, 0.007843, (W, H), 127.5)
		net.setInput(blob)
		detections = net.forward()
我们将状态初始化为Waiting。可能的状态包括:
- Waiting:在这种状态下,我们正在等待检测和跟踪人员。
- Detecting:我们正在使用 MobileNet SSD 检测人员。
- Tracking:人们在帧中被跟踪,我们正在计算totalUp和totalDown。
我们的rects列表将通过检测或跟踪来填充。我们继续初始化rects。
重要的是要了解深度学习对象检测器的计算成本非常高,尤其是当您在 CPU 上运行它们时。
为了避免在每一帧上运行我们的目标检测器,并加快我们的跟踪管道,我们将跳过 N 帧(由命令行参数设置–skip-frames,其中 30 是默认值)。只有每 N 帧,我们才会使用 SSD 进行对象检测。否则,我们将只是跟踪中间的移动对象。
使用模运算符,我们确保每 N 帧执行一次 if 语句中的代码。 进入if语句后,我们会将状态更新为Detecting。 然后我们初始化新的跟踪器列表。
接下来,我们将通过对象检测进行推理。我们首先从图像中创建一个blob,然后将该blob通过网络传递以获得检测。 现在我们将遍历每个检测,希望找到属于person类的对象:
		# loop over the detections
		for i in np.arange(0, detections.shape[2]):
			# extract the confidence (i.e., probability) associated
			# with the prediction
			confidence = detections[0, 0, i, 2]
			# filter out weak detections by requiring a minimum
			# confidence
			if confidence > args["confidence"]:
				# extract the index of the class label from the
				# detections list
				idx = int(detections[0, 0, i, 1])
				# if the class label is not a person, ignore it
				if CLASSES[idx] != "person":
					continue
循环检测,我们不断获得信心,过滤掉那些非人为的结果。
现在我们可以为每个人计算一个边界框并开始相关性跟踪:
				# compute the (x, y)-coordinates of the bounding box
				# for the object
				box = detections[0, 0, i, 3:7] * np.array([W, H, W, H])
				(startX, startY, endX, endY) = box.astype("int")
				# construct a dlib rectangle object from the bounding
				# box coordinates and then start the dlib correlation
				# tracker
				tracker = dlib.correlation_tracker()
				rect = dlib.rectangle(startX, startY, endX, endY)
				tracker.start_track(rgb, rect)
				# add the tracker to our list of trackers so we can
				# utilize it during skip frames
				trackers.append(tracker)
计算我们的box。 然后实例化我们的dlib相关跟踪器,然后将对象的边界框坐标传递给dlib.rectangle,将结果存储为rect。 随后,我们开始跟踪,并将跟踪器附加到跟踪器列表中。 这是我们每 N 个跳帧执行的所有操作的封装! 让我们处理在 else 块中进行跟踪的典型操作:
	# otherwise, we should utilize our object *trackers* rather than
	# object *detectors* to obtain a higher frame processing throughput
	else:
		# loop over the trackers
		for tracker in trackers:
			# set the status of our system to be 'tracking' rather
			# than 'waiting' or 'detecting'
			status = "Tracking"
			# update the tracker and grab the updated position
			tracker.update(rgb)
			pos = tracker.get_position()
			# unpack the position object
			startX = int(pos.left())
			startY = int(pos.top())
			endX = int(pos.right())
			endY = int(pos.bottom())
			# add the bounding box coordinates to the rectangles list
			rects.append((startX, startY, endX, endY))
大多数时候,并没有发生在跳帧倍数上。在此期间,我们将利用跟踪器来跟踪对象,而不是应用检测。 我们开始遍历可用跟踪器。 我们继续将状态更新为Tracking并获取对象位置。 我们提取位置坐标,然后在我们的rects列表中填充信息。 现在让我们画一条水平可视化线(人们必须穿过它才能被跟踪)并使用质心跟踪器来更新我们的对象质心:
	# draw a horizontal line in the center of the frame -- once an
	# object crosses this line we will determine whether they were
	# moving 'up' or 'down'
	cv2.line(frame, (0, H // 2), (W, H // 2), (0, 255, 255), 2)
	# use the centroid tracker to associate the (1) old object
	# centroids with (2) the newly computed object centroids
	objects = ct.update(rects)
我们画一条水平线,我们将用它来可视化人们“越过”——一旦人们越过这条线,我们将增加各自的计数器 然后,我们利用CentroidTracker实例化来接受rects列表,无论它们是通过对象检测还是对象跟踪生成的。我们的质心跟踪器会将对象 ID 与对象位置相关联。 在下一个代码块中,我们将回顾一个人在帧中向上或向下移动的逻辑:
	# loop over the tracked objects
	for (objectID, centroid) in objects.items():
		# check to see if a trackable object exists for the current
		# object ID
		to = trackableObjects.get(objectID, None)
		# if there is no existing trackable object, create one
		if to is None:
			to = TrackableObject(objectID, centroid)
		# otherwise, there is a trackable object so we can utilize it
		# to determine direction
		else:
			# the difference between the y-coordinate of the *current*
			# centroid and the mean of *previous* centroids will tell
			# us in which direction the object is moving (negative for
			# 'up' and positive for 'down')
			y = [c[1] for c in to.centroids]
			direction = centroid[1] - np.mean(y)
			to.centroids.append(centroid)
			# check to see if the object has been counted or not
			if not to.counted:
				# if the direction is negative (indicating the object
				# is moving up) AND the centroid is above the center
				# line, count the object
				if direction < 0 and centroid[1] < H // 2:
					totalUp += 1
					to.counted = True
				# if the direction is positive (indicating the object
				# is moving down) AND the centroid is below the
				# center line, count the object
				elif direction > 0 and centroid[1] > H // 2:
					totalDown += 1
					to.counted = True
		# store the trackable object in our dictionary
		trackableObjects[objectID] = to
我们首先遍历更新后的对象id的边界框坐标。我们尝试为当前的objectID获取TrackableObject。如果objectID的TrackableObject不存在,我们就创建一个。否则,已经存在一个 TrackableObject ,所以我们需要弄清楚对象(人)是向上还是向下移动。
为此,我们获取给定对象之前所有质心位置的y坐标值。然后,通过取当前质心位置与之前所有质心位置的平均值之间的差来计算方向。
我们取平均值的原因是为了确保我们的方向跟踪更稳定。如果我们只存储这个人之前的质心位置,我们就有可能得到错误的方向计数。请记住,对象检测和对象跟踪算法并不是“魔法”——有时它们预测的边界框可能与您的预期略有不同;因此,通过取平均值,我们可以使我们的人工计算更加准确。
如果TrackableObject还没有被计数,我们需要确定它是否已经准备好被计数,通过:
- 1.检查direction是否为负(表示对象向上移动)并且质心在中心线上方。在这种情况下,我们增加totalUp。
- 2.或者检查direction是否为正(表示物体正在向下移动)且质心在中心线以下。如果这是真的,我们增加totalDown。
最后,我们将TrackableObject存储在trackableObjects字典中,这样我们就可以在捕获下一帧时获取并更新它。
接下来的三个代码块处理:
- 显示(在框架中绘制和写入文本)
- 将帧写入磁盘上的视频文件(如果存在–output命令行参数)
- 捕捉击键
- 清理
首先,我们将在框架上绘制一些信息以进行可视化:
		# draw both the ID of the object and the centroid of the
		# object on the output frame
		text = "ID {}".format(objectID)
		cv2.putText(frame, text, (centroid[0] - 10, centroid[1] - 10),
			cv2.FONT_HERSHEY_SIMPLEX, 0.5, (0, 255, 0), 2)
		cv2.circle(frame, (centroid[0], centroid[1]), 4, (0, 255, 0), -1)
	# construct a tuple of information we will be displaying on the
	# frame
	info = [
		("Up", totalUp),
		("Down", totalDown),
		("Status", status),
	]
	# loop over the info tuples and draw them on our frame
	for (i, (k, v)) in enumerate(info):
		text = "{}: {}".format(k, v)
		cv2.putText(frame, text, (10, H - ((i * 20) + 20)),
			cv2.FONT_HERSHEY_SIMPLEX, 0.6, (0, 0, 255), 2)
在这里,我们在框架上覆盖以下数据:
- ObjectID:每个对象的ID。
- centroid:对象的中心将由一个点表示,该点是通过填充一个圆圈而创建的。
- info: 包括totalUp、totalDown和status
然后我们将帧写入视频文件(如果需要)并处理按键:
	# check to see if we should write the frame to disk
	if writer is not None:
		writer.write(frame)
	# show the output frame
	cv2.imshow("Frame", frame)
	key = cv2.waitKey(1) & 0xFF
	# if the `q` key was pressed, break from the loop
	if key == ord("q"):
		break
	# increment the total number of frames processed thus far and
	# then update the FPS counter
	totalFrames += 1
	fps.update()
在此代码块中,我们:
- 如果需要,将帧写入输出视频文件
- 显示帧并处理按键。如果q被按下,我们将跳出帧处理循环。
- 更新我们的fps计数器
现在是清理的时候了:
# stop the timer and display FPS information
fps.stop()
print("[INFO] elapsed time: {:.2f}".format(fps.elapsed()))
print("[INFO] approx. FPS: {:.2f}".format(fps.fps()))
# check to see if we need to release the video writer pointer
if writer is not None:
	writer.release()
# if we are not using a video file, stop the camera video stream
if not args.get("input", False):
	vs.stop()
# otherwise, release the video file pointer
else:
	vs.release()
# close any open windows
cv2.destroyAllWindows()
为了完成脚本,我们向终端显示 FPS 信息,释放所有指针,并关闭所有打开的窗口。
7.完整代码
- 1.people_counter.py
from pyimagesearch.centroidtracker import CentroidTracker
from pyimagesearch.trackableobject import TrackableObject
from imutils.video import VideoStream
from imutils.video import FPS
import numpy as np
import argparse
import imutils
import time
import dlib
import cv2


# 构造参数解析并解析参数
ap = argparse.ArgumentParser()
ap.add_argument("-p", "--prototxt", required=True,
	help="path to Caffe 'deploy' prototxt file")
ap.add_argument("-m", "--model", required=True,
	help="path to Caffe pre-trained model")
ap.add_argument("-i", "--input", type=str,
	help="path to optional input video file")
ap.add_argument("-o", "--output", type=str,
	help="path to optional output video file")
ap.add_argument("-c", "--confidence", type=float, default=0.4,
	help="minimum probability to filter weak detections")
ap.add_argument("-s", "--skip-frames", type=int, default=30,
	help="# of skip frames between detections")
args = vars(ap.parse_args())

# 初始化类标签列表
CLASSES = ["background", "aeroplane", "bicycle", "bird", "boat",
	"bottle", "bus", "car", "cat", "chair", "cow", "diningtable",
	"dog", "horse", "motorbike", "person", "pottedplant", "sheep",
	"sofa", "train", "tvmonitor"]
# 从磁盘加载我们的序列化模型
print("[INFO] loading model...")
net = cv2.dnn.readNetFromCaffe(args["prototxt"], args["model"])

# 如果未提供视频路径,请获取网络摄像头的引用
if not args.get("input", False):
	print("[INFO] starting video stream...")
	vs = VideoStream(src=0).start()
	time.sleep(2.0)
# 否则,获取对视频文件的引用
else:
	print("[INFO] opening video file...")
	vs = cv2.VideoCapture(args["input"])

# 初始化视频写入器(如果需要,我们稍后将进行实例化)
writer = None
# 初始化帧尺寸(我们将在从视频中读取第一帧后立即设置它们)
W = None
H = None
# 实例化我们的质心跟踪器,然后初始化一个列表来存储每个dlib相关跟踪器,
# 然后是一个字典来将每个唯一的对象ID映射到TrackableObject
ct = CentroidTracker(maxDisappeared=40, maxDistance=50)
trackers = []
trackableObjects = {}
# 初始化到目前为止处理的帧总数,以及向上或向下移动的对象总数
totalFrames = 0
totalDown = 0
totalUp = 0
# 启动FPS评估器
fps = FPS().start()

# 循环视频流中的帧
while True:
	# 如果我们正在从 VideoCapture 或 VideoStream 读取数据,则抓取下一帧并处理
	frame = vs.read()
	frame = frame[1] if args.get("input", False) else frame
	# 如果我们正在观看视频并且我们没有抓取帧,那么我们已经到了视频的结尾
	if args["input"] is not None and frame is None:
		break
	# 调整帧的最大宽度为 500 像素(我们拥有的数据越少,我们处理它的速度就越快),
	# 然后将帧从 BGR 转换为 RGB 用于 dlib
	frame = imutils.resize(frame, width=500)
	rgb = cv2.cvtColor(frame, cv2.COLOR_BGR2RGB)
	# 如果帧尺寸为空,则设置它们
	if W is None or H is None:
		(H, W) = frame.shape[:2]
	# 如果我们应该将视频写入磁盘,请初始化写入器
	if args["output"] is not None and writer is None:
		fourcc = cv2.VideoWriter_fourcc(*"MJPG")
		writer = cv2.VideoWriter(args["output"], fourcc, 30,
			(W, H), True)


	# 初始化当前状态以及由(1)我们的对象检测器或(2)相关跟踪器返回的边界框矩形列表
	status = "Waiting"
	rects = []
	# 检查我们是否应该运行计算量更大的目标检测方法来帮助我们的跟踪器
	if totalFrames % args["skip_frames"] == 0:
		# 设置状态并初始化我们的新对象跟踪器集
		status = "Detecting"
		trackers = []
		# 将帧转换为 blob 并通过网络传递 blob 并获得检测结果
		blob = cv2.dnn.blobFromImage(frame, 0.007843, (W, H), 127.5)
		net.setInput(blob)
		detections = net.forward()

		# 循环检测结果
		for i in np.arange(0, detections.shape[2]):
			# 提取与预测相关的置信度(即概率)
			confidence = detections[0, 0, i, 2]
			# 通过要求最小置信度过滤掉弱检测
			if confidence > args["confidence"]:
				# 从检测列表中提取类标签的索引
				idx = int(detections[0, 0, i, 1])
				# 如果类标签不是人,则忽略它
				if CLASSES[idx] != "person":
					continue
				# 计算对象边界框的 (x, y) 坐标
				box = detections[0, 0, i, 3:7] * np.array([W, H, W, H])
				(startX, startY, endX, endY) = box.astype("int")
				# 利用边界框坐标构造一个 dlib 矩形对象,然后启动 dlib 相关跟踪器
				tracker = dlib.correlation_tracker()
				rect = dlib.rectangle(startX, startY, endX, endY)
				tracker.start_track(rgb, rect)
				# 将跟踪器添加到我们的跟踪器列表中,以便我们可以在跳帧期间使用它
				trackers.append(tracker)

	# 否则,我们应该利用目标跟踪器而不是目标检测器来获得更高的FPS
	else:
		# 遍历跟踪器
		for tracker in trackers:
			# 将系统的状态设置为“跟踪”而不是“等待”或“检测”
			status = "Tracking"
			# 更新跟踪器并获取更新的位置
			tracker.update(rgb)
			pos = tracker.get_position()
			# 解包位置对象
			startX = int(pos.left())
			startY = int(pos.top())
			endX = int(pos.right())
			endY = int(pos.bottom())
			# 将边界框坐标添加到矩形列表
			rects.append((startX, startY, endX, endY))

	# 在帧中心画一条水平线——一旦一个物体穿过这条线,我们将确定他们是在“向上”还是“向下”移动。
	cv2.line(frame, (0, H // 2), (W, H // 2), (0, 255, 255), 2)
	# 使用质心跟踪器将 (1) 旧对象质心与 (2) 新计算的对象质心相关联
	objects = ct.update(rects)

	# 循环遍历被跟踪的对象
	for (objectID, centroid) in objects.items():
		# 检查当前对象 ID 是否存在可跟踪对象
		to = trackableObjects.get(objectID, None)
		# 如果没有现有的可跟踪对象,则创建一个
		if to is None:
			to = TrackableObject(objectID, centroid)
		# 否则,有一个可追踪的物体,所以我们可以利用它来确定方向
		else:
			# *当前*质心的 y 坐标与 *previous* 质心的平均值之间的差异
			# 将告诉我们物体在哪个方向移动(“向上”为负,“向下”为正)
			y = [c[1] for c in to.centroids]
			direction = centroid[1] - np.mean(y)
			to.centroids.append(centroid)
			# 检查对象是否已被计数
			if not to.counted:
				# 如果方向为负(表示物体向上移动)且质心在中线以上,则计算物体
				if direction < 0 and centroid[1] < H // 2:
					totalUp += 1
					to.counted = True
				# 如果方向为正(表示物体正在向下移动)并且质心低于中心线,则计算物体
				elif direction > 0 and centroid[1] > H // 2:
					totalDown += 1
					to.counted = True
		# 将可跟踪对象存储在我们的字典中
		trackableObjects[objectID] = to

		# 在输出帧上绘制对象的 ID 和对象的质心
		text = "ID {}".format(objectID)
		cv2.putText(frame, text, (centroid[0] - 10, centroid[1] - 10),
			cv2.FONT_HERSHEY_SIMPLEX, 0.5, (0, 255, 0), 2)
		cv2.circle(frame, (centroid[0], centroid[1]), 4, (0, 255, 0), -1)
	# 构建我们将在帧上显示的信息元组
	info = [
		("Up", totalUp),
		("Down", totalDown),
		("Status", status),
	]
	# 遍历信息元组并将它们绘制在我们的帧上
	for (i, (k, v)) in enumerate(info):
		text = "{}: {}".format(k, v)
		cv2.putText(frame, text, (10, H - ((i * 20) + 20)),
			cv2.FONT_HERSHEY_SIMPLEX, 0.6, (0, 0, 255), 2)


	# 检查我们是否应该将帧写入磁盘
	if writer is not None:
		writer.write(frame)
	# 显示输出帧
	cv2.imshow("Frame", frame)
	key = cv2.waitKey(1) & 0xFF
	# 如果' q '键被按下,中断循环
	if key == ord("q"):
		break
	# 增加到目前为止处理的帧总数,然后更新 FPS 计数器
	totalFrames += 1
	fps.update()

# 停止定时器,显示FPS信息
fps.stop()
print("[INFO] elapsed time: {:.2f}".format(fps.elapsed()))
print("[INFO] approx. FPS: {:.2f}".format(fps.fps()))
# 检查我们是否需要释放视频写入器指针
if writer is not None:
	writer.release()
# 如果我们不使用视频文件,请停止摄像头视频流
if not args.get("input", False):
	vs.stop()
# 否则,释放视频文件指针
else:
	vs.release()
# 关闭所有打开的窗口
cv2.destroyAllWindows()
- 2.centroidtracker.py
(1)质心跟踪器是最可靠的跟踪器之一。
(2)为了简单起见,质心跟踪器计算包围框的质心。
(3)也就是说,边界框是图像中对象的(x, y)坐标。
(4)一旦我们的SSD获得了坐标,跟踪器就会计算包围框的质心(中心)。换句话说,就是物体的中心。
(5)然后为每一个被检测到的特定对象分配一个唯一的ID,用于跟踪帧序列。
from scipy.spatial import distance as dist
from collections import OrderedDict
import numpy as np

class CentroidTracker:
	def __init__(self, maxDisappeared=50, maxDistance=50):
		# 初始化下一个唯一的对象ID,并使用两个有序字典来跟踪给定对象ID到其质心的映射,
		# 以及它被标记为“消失”的连续帧数
		self.nextObjectID = 0
		self.objects = OrderedDict()
		self.disappeared = OrderedDict()

		# 存储一个给定对象允许被标记为“消失”的最大连续帧数,直到我们需要从跟踪中注销该对象
		self.maxDisappeared = maxDisappeared

		# 存储质心之间的最大距离以关联对象——如果距离大于这个最大距离,我们开始将对象标记为“消失”
		self.maxDistance = maxDistance

	def register(self, centroid):
		# 注册对象时,我们使用下一个可用的对象 ID 来存储质心
		self.objects[self.nextObjectID] = centroid
		self.disappeared[self.nextObjectID] = 0
		self.nextObjectID += 1

	def deregister(self, objectID):
		# 要注销对象 ID,我们从各自的字典中删除对象 ID
		del self.objects[objectID]
		del self.disappeared[objectID]

	def update(self, rects):
		# 检查输入边界框矩形列表是否为空
		if len(rects) == 0:
			# 循环遍历任何现有的跟踪对象并将它们标记为消失
			for objectID in list(self.disappeared.keys()):
				self.disappeared[objectID] += 1

				# 如果我们已经达到给定对象被标记为消失的最大连续帧数,则取消注册它
				if self.disappeared[objectID] > self.maxDisappeared:
					self.deregister(objectID)

			# 早点返回,因为没有要更新的质心或跟踪信息
			return self.objects

		# 初始化当前帧的输入质心数组
		inputCentroids = np.zeros((len(rects), 2), dtype="int")

		# 循环边界框矩形
		for (i, (startX, startY, endX, endY)) in enumerate(rects):
			# 使用边界框坐标推导出质心
			cX = int((startX + endX) / 2.0)
			cY = int((startY + endY) / 2.0)
			inputCentroids[i] = (cX, cY)

		# 如果我们当前没有跟踪任何对象,则获取输入质心并注册它们中的每一个
		if len(self.objects) == 0:
			for i in range(0, len(inputCentroids)):
				self.register(inputCentroids[i])

		# 否则,我们目前正在跟踪对象,因此我们需要尝试将输入质心与现有对象质心匹配
		else:
			# 获取一组对象 ID 和相应的质心
			objectIDs = list(self.objects.keys())
			objectCentroids = list(self.objects.values())

			# 分别计算每对对象质心和输入质心之间的距离——我们的目标是将输入质心与现有对象质心匹配
			D = dist.cdist(np.array(objectCentroids), inputCentroids)

			# 为了执行这种匹配,我们必须 (1) 找到每一行中的最小值,
			# 然后 (2) 根据它们的最小值对行索引进行排序,以便具有最小值的行位于索引列表的 *front*
			rows = D.min(axis=1).argsort()

			# 接下来,我们对列执行类似的处理,方法是在每个列中找到最小的值,
			# 然后使用之前计算的行索引列表进行排序
			cols = D.argmin(axis=1)[rows]

			# 为了确定我们是否需要更新、注册或取消注册一个对象,我们需要跟踪我们已经检查过的行和列索引
			usedRows = set()
			usedCols = set()

			# 循环遍历(行,列)索引元组的组合
			for (row, col) in zip(rows, cols):
				# 如果我们之前已经检查过行值或列值,请忽略它
				if row in usedRows or col in usedCols:
					continue

				# 如果质心之间的距离大于最大距离,则不要将两个质心关联到同一个对象
				if D[row, col] > self.maxDistance:
					continue

				# 否则,获取当前行的对象 ID,设置其新质心,并重置消失的计数器
				objectID = objectIDs[row]
				self.objects[objectID] = inputCentroids[col]
				self.disappeared[objectID] = 0

				# 表明我们已经分别检查了每个行和列索引
				usedRows.add(row)
				usedCols.add(col)

			# 计算我们尚未检查的行和列索引
			unusedRows = set(range(0, D.shape[0])).difference(usedRows)
			unusedCols = set(range(0, D.shape[1])).difference(usedCols)

			# 如果对象质心的数量等于或大于输入质心的数量,
			# 我们需要检查并查看其中一些对象是否可能已经消失
			if D.shape[0] >= D.shape[1]:
				# 循环未使用的行索引
				for row in unusedRows:
					# 获取相应行索引的对象 ID 并增加消失的计数器
					objectID = objectIDs[row]
					self.disappeared[objectID] += 1

					# 检查对象的连续帧数是否被标记为“消失”,以注销该对象
					if self.disappeared[objectID] > self.maxDisappeared:
						self.deregister(objectID)

			# 否则,如果输入质心的数量大于现有对象质心的数量,我们需要将每个新的输入质心注册为可跟踪对象
			else:
				for col in unusedCols:
					self.register(inputCentroids[col])

		# 返回可跟踪对象的集合
		return self.objects
- 3.trackableobject.py
class TrackableObject:
	def __init__(self, objectID, centroid):
		# 存储对象 ID,然后使用当前质心初始化质心列表
		self.objectID = objectID
		self.centroids = [centroid]

		# 初始化一个布尔值,用于指示对象是否已被计数
		self.counted = False
8.运行结果
打开终端并执行以下命令:
python people_counter.py --prototxt mobilenet_ssd/MobileNetSSD_deploy.prototxt \
	--model mobilenet_ssd/MobileNetSSD_deploy.caffemodel \
	--input videos/example_01.mp4 --output output/output_01.avi
我们的人数统计以下人员:
- 进入百货公司(下)
- 离开人数(上)
在第一个视频的最后,你会看到有7个人进入,3个人离开。
此外,检查终端输出,你会发现我们的人计数器能够实时运行,达到34帧每秒。尽管我们正在使用深度学习对象检测器来更准确地检测人。
我们的 34 FPS 帧率是通过我们的两个阶段过程实现的: 每 30 帧检测一次人 然后在其间的所有帧中应用更快、更有效的对象跟踪算法。
9.改进我们的人员计数器应用程序
为了构建我们的 OpenCV 人员计数器,我们使用了 dlib 的相关性跟踪器。此方法易于使用,并且只需要很少的代码。
然而,我们的实现有点低效——为了跟踪多个对象,我们需要创建关联跟踪器对象的多个实例。然后当我们需要在后续帧中计算对象的位置时,我们需要遍历所有 N 个对象跟踪器并获取更新的位置。
所有这些计算都将发生在我们脚本的主执行线程中,从而降低了我们的 FPS 速率。
因此,提高性能的一种简单方法是使用dlib的多对象跟踪器,以使我们的 FPS 速率提高 45%! 注意:OpenCV 也实现了多对象跟踪,但不是多进程(至少在撰写本文时)。 OpenCV 的多对象方法当然更容易使用,但如果没有多处理能力,在这种情况下它并没有多大帮助。
最后,为了获得更高的跟踪精度(但在没有快速 GPU 的情况下会牺牲速度),您可以研究基于深度学习的对象跟踪器,例如 Deep SORT。
BONUS
前几天在github上看见一个改进版:
- 主要目标是将项目用作可以随时扩展的业务视角。
- 用例:实时统计商店/大楼/购物中心等的人数。
- 如果人数超过限制,工作人员将收到警报。
- 自动化功能并优化实时流媒体以获得更好的性能(使用线程)。
- 作为一项措施,以进行足迹分析,并在某种程度上应对COVID-19。
参考目录
https://pyimagesearch.com/2018/08/13/opencv-people-counter/
https://github.com/saimj7/People-Counting-in-Real-Time
版权声明:本文为博主求则得之,舍则失之原创文章,版权归属原作者,如果侵权,请联系我们删除!
原文链接:https://blog.csdn.net/weixin_43229348/article/details/123353009