1、MMdetection系列版本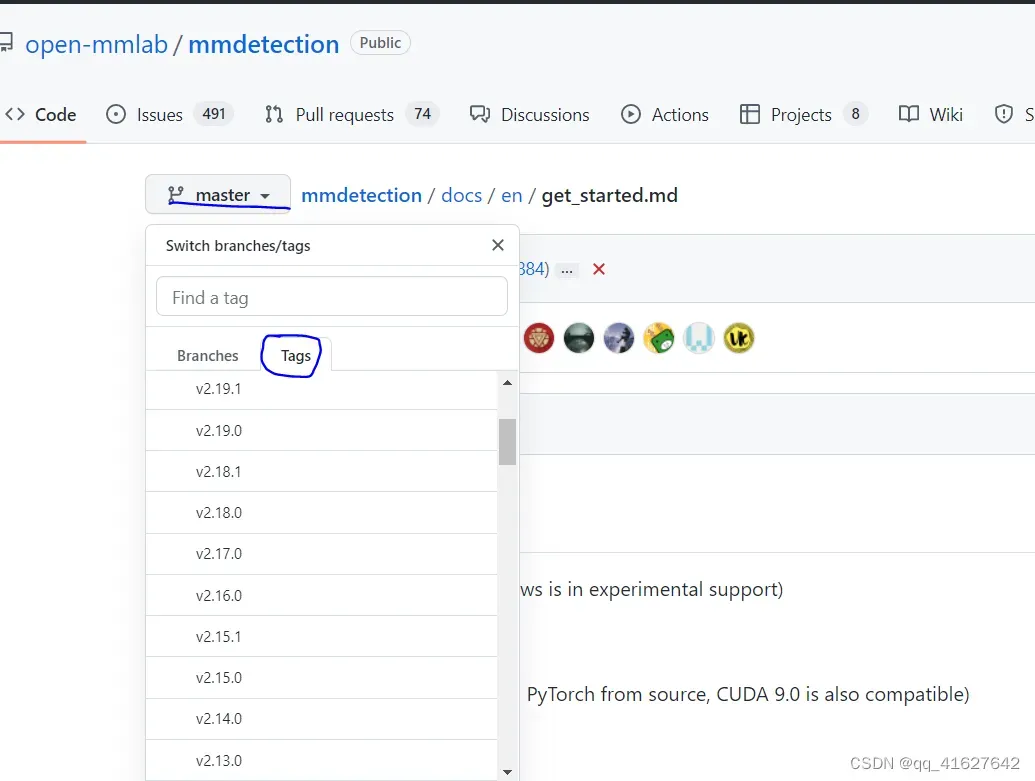
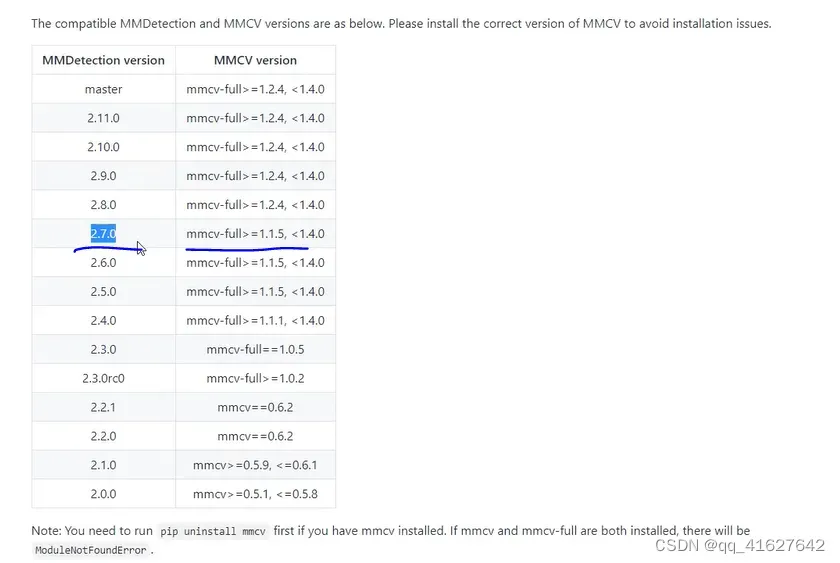
2、 MMDetection和MMCV兼容版本
| MMDetection version | MMCV version |
|---|---|
| master | mmcv-full>=1.3.17, <1.6.0 |
| 2.24.1 | mmcv-full>=1.3.17, <1.6.0 |
| 2.24.0 | mmcv-full>=1.3.17, <1.6.0 |
| 2.23.0 | mmcv-full>=1.3.17, <1.5.0 |
| 2.22.0 | mmcv-full>=1.3.17, <1.5.0 |
| 2.21.0 | mmcv-full>=1.3.17, <1.5.0 |
| 2.20.0 | mmcv-full>=1.3.17, <1.5.0 |
| 2.19.1 | mmcv-full>=1.3.17, <1.5.0 |
| 2.19.0 | mmcv-full>=1.3.17, <1.5.0 |
| 2.18.0 | mmcv-full>=1.3.17, <1.4.0 |
| 2.17.0 | mmcv-full>=1.3.14, <1.4.0 |
| 2.16.0 | mmcv-full>=1.3.8, <1.4.0 |
| 2.15.1 | mmcv-full>=1.3.8, <1.4.0 |
| 2.15.0 | mmcv-full>=1.3.8, <1.4.0 |
| 2.14.0 | mmcv-full>=1.3.8, <1.4.0 |
| 2.13.0 | mmcv-full>=1.3.3, <1.4.0 |
| 2.12.0 | mmcv-full>=1.3.3, <1.4.0 |
| 2.11.0 | mmcv-full>=1.2.4, <1.4.0 |
| 2.10.0 | mmcv-full>=1.2.4, <1.4.0 |
| 2.9.0 | mmcv-full>=1.2.4, <1.4.0 |
| 2.8.0 | mmcv-full>=1.2.4, <1.4.0 |
| 2.7.0 | mmcv-full>=1.1.5, <1.4.0 |
| 2.6.0 | mmcv-full>=1.1.5, <1.4.0 |
| 2.5.0 | mmcv-full>=1.1.5, <1.4.0 |
| 2.4.0 | mmcv-full>=1.1.1, <1.4.0 |
| 2.3.0 | mmcv-full==1.0.5 |
| 2.3.0rc0 | mmcv-full>=1.0.2 |
| 2.2.1 | mmcv==0.6.2 |
| 2.2.0 | mmcv==0.6.2 |
| 2.1.0 | mmcv>=0.5.9, <=0.6.1 |
| 2.0.0 | mmcv>=0.5.1, <=0.5.8 |
3、Installation(Linux系统环境安装)
Windows10系统下swin-transformer目标检测环境搭建[0]
3.1 搭建基本环境
cuda与pytorch版本[0]
conda create -n mmdetection python=3.7 -y   #创建环境
conda activate mmdetection                  #激活环境
conda install pytorch torchvision torchaudio cudatoolkit=10.2 -c pytorch  #安装 PyTorch and torchvision

#或者这样安装
pip3 install torch==1.8.2+cu102 torchvision==0.9.2+cu102 torchaudio===0.8.2 -f https://download.pytorch.org/whl/lts/1.8/torch_lts.html  -i http://mirrors.aliyun.com/pypi/simple/ --trusted-host mirrors.aliyun.com

验证是否安装成功

>>> import torchvision
>>> import torch
>>> import.__version__
  File "<stdin>", line 1
    import.__version__
          ^
SyntaxError: invalid syntax
>>> torch.__version__
'1.8.2+cu102'
3.2 安装mmcv-full
| CUDA | torch 1.11 | torch 1.10 | torch 1.9 | torch 1.8 | torch 1.7 | torch 1.6 | torch 1.5 |
|---|---|---|---|---|---|---|---|
| 11.5 | install | ||||||
| 11.3 | install | install | |||||
| 11.1 | install | install | install | ||||
| 11.0 | install | ||||||
| 10.2 | install | install | install | install | install | install | install |
| 10.1 | install | install | install | install | |||
| 9.2 | install | install | install | ||||
| cpu | install | install | install | install | install | install | install |
#Install mmcv-full. 安装mmcv-full
pip install mmcv-full -f https://download.openmmlab.com/mmcv/dist/{cu_version}/{torch_version}/index.html


Please replace {cu_version} and {torch_version} in the url to your desired one. For example, to install the latest mmcv-full with CUDA 11.0 and PyTorch 1.7.0, use the following command:

pip install mmcv-full -f https://download.openmmlab.com/mmcv/dist/cu110/torch1.7.0/index.html

pip install mmcv-full==1.3.9 -f https://download.openmmlab.com/mmcv/dist/cu111/torch1.9.0/index.html #明确mmcv-full的版本号


pip install mmcv-full -f https://download.openmmlab.com/mmcv/dist/cu102/torch1.8.0/index.html


pip install mmcv-full==1.3.17 -f https://download.openmmlab.com/mmcv/dist/cu102/torch1.8.0/index.html -i http://mirrors.aliyun.com/pypi/simple/ --trusted-host mirrors.aliyun.com

验证是否安装成功
import mmcv


如果出现
>>> import mmcv
No CUDA runtime is found, using CUDA_HOME='/usr/local/cuda-10.2'

我们去看看驱动:
nvidia-smi

如果返回NVIDIA驱动失效简单解决方案:NVIDIA-SMI has failed because it couldn‘t communicate with the NVIDIA driver.

这种情况是由于重启服务器,linux内核升级导致的,由于linux内核升级,之前的Nvidia驱动就不匹配连接了,但是此时Nvidia驱动还在,可以通过命令 nvcc -V 找到答案。


解决方法:

查看已安装驱动的版本信息
ls /usr/src | grep nvidia
(mmdetection) lhy@thales-Super-Server:~$ ls /usr/src | grep nvidia
nvidia-440.33.01


进行下列操作
sudo apt-get install dkms
sudo dkms install -m nvidia -v 440.33.01


然后进行验证:
(mmdetection) lhy@thales-Super-Server:~$ nvidia-smi
Fri May  6 00:56:02 2022
+-----------------------------------------------------------------------------+
| NVIDIA-SMI 440.33.01    Driver Version: 440.33.01    CUDA Version: 10.2     |
|-------------------------------+----------------------+----------------------+
| GPU  Name        Persistence-M| Bus-Id        Disp.A | Volatile Uncorr. ECC |
| Fan  Temp  Perf  Pwr:Usage/Cap|         Memory-Usage | GPU-Util  Compute M. |
|===============================+======================+======================|
|   0  TITAN RTX           Off  | 00000000:02:00.0 Off |                  N/A |
|  0%   47C    P0    54W / 280W |      0MiB / 24220MiB |      0%      Default |
+-------------------------------+----------------------+----------------------+
|   1  TITAN RTX           Off  | 00000000:03:00.0 Off |                  N/A |
|  0%   47C    P0    65W / 280W |      0MiB / 24220MiB |      0%      Default |
+-------------------------------+----------------------+----------------------+
|   2  TITAN RTX           Off  | 00000000:82:00.0 Off |                  N/A |
|  0%   48C    P0    63W / 280W |      0MiB / 24220MiB |      1%      Default |
+-------------------------------+----------------------+----------------------+
|   3  TITAN RTX           Off  | 00000000:83:00.0 Off |                  N/A |
|  0%   46C    P0    42W / 280W |      0MiB / 24220MiB |      0%      Default |
+-------------------------------+----------------------+----------------------+

+-----------------------------------------------------------------------------+
| Processes:                                                       GPU Memory |
|  GPU       PID   Type   Process name                             Usage      |
|=============================================================================|
|  No running processes found                                                 |
+-----------------------------------------------------------------------------+
(mmdetection) lhy@thales-Super-Server:~$ python
Python 3.7.13 (default, Mar 29 2022, 02:18:16)
[GCC 7.5.0] :: Anaconda, Inc. on linux
Type "help", "copyright", "credits" or "license" for more information.
>>> import mmcv
https://download.openmmlab.com/mmcv/dist/cu102/torch1.6.0/index.html[0]
根据这个 网址可以查看torch1.6.0支持的mmcv-full的版本
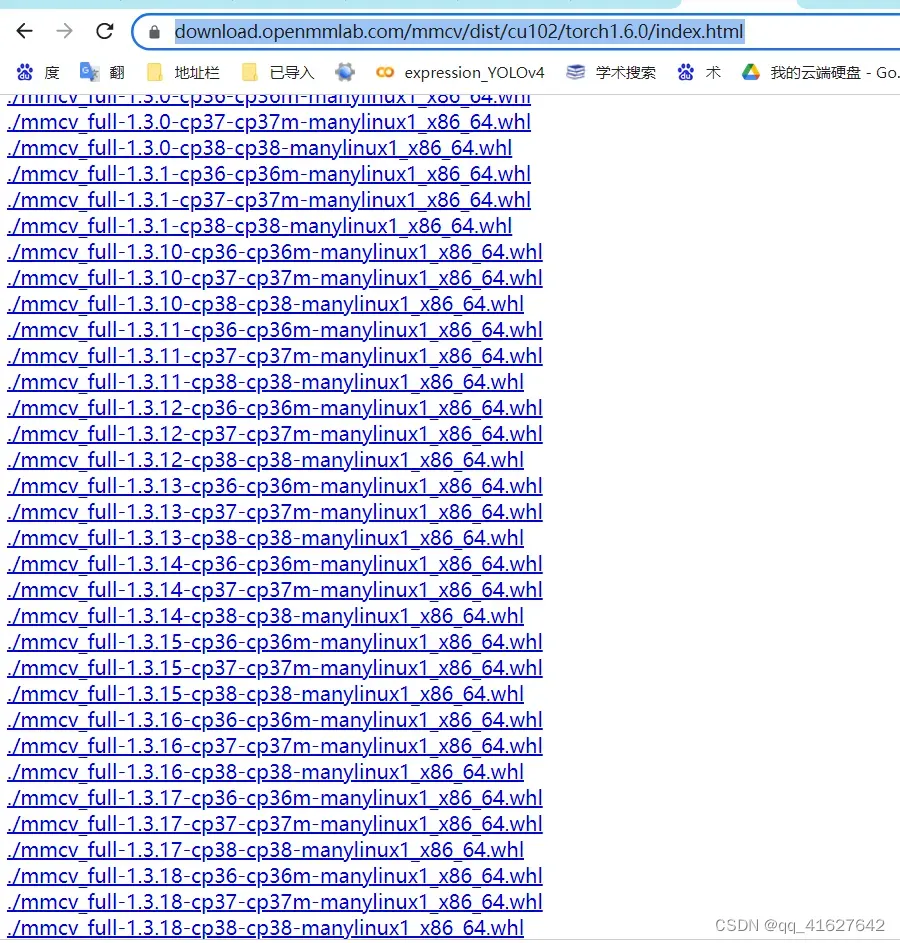
注意:上面提供的预构建包不包括所有版本的mmcv-full,您可以单击相应的链接来查看支持的版本。例如,您可以单击cu102-torch1.8.0,可以看到cu102-torch1.8.0只提供1.3.0及以上版本的mmcv-full。此外,从v1.3.17开始,我们不再提供使用PyTorch 1.3和1.4编译的完整的mmcv预构建包。你可以在这里找到用PyTorch 1.3和1.4编译的以前版本。在我们的Cl中,兼容性仍然得到保证,但我们将在明年放弃对PyTorch 1.3和1.4的支持。
1.3 安装其他必要的Python包
pip install cython matplotlib opencv-python timm -i [http://mirrors.aliyun.com/pypi/simple/]1.3 安装 MMDetection
# These must be installed before building mmdetection
pip install -r requirements.txt -i http://mirrors.aliyun.com/pypi/simple/ --trusted-host mirrors.aliyun.com

pip install cython matplotlib opencv-python
cython
numpy
matplotlib


You can simply install mmdetection with the following command:
你可以使用下面的命令简单地安装mmdetection:

pip install mmdet

或者克隆存储库然后安装:
git clone https://github.com/open-mmlab/mmdetection.git
cd mmdetection
pip install -r requirements/build.txt
pip install -v -e .  # or "python setup.py develop"

安装完成
Using /home/lhy/anaconda3/envs/mmdetection/lib/python3.7/site-packages
Finished processing dependencies for mmdet==2.24.1


a.当指定-e或develop时,MMDetection被安装在dev模式下,对代码所做的任何本地修改都将生效,无需重新安装
b.如果你想使用opencv-python-headless而不是opencv-python,你可以在安装MMCV之前安装它。


安装额外依赖Instaboost, Panoptic Segmentation, LVIS数据集,或Albumentations。

# for instaboost
pip install instaboostfast
# for panoptic segmentation
pip install git+https://github.com/cocodataset/panopticapi.git
# for LVIS dataset
pip install git+https://github.com/lvis-dataset/lvis-api.git
# for albumentations
pip install -r requirements/albu.txt


d.如果你想使用albumentations,我们建议使用pip install -r requirements/ albumentations或pip install -U albumentations——nobinary qudida, albumentations。如果您简单地使用pip install albumentations>=0.3.2,它将同时安装opencv-python-headless(即使您已经安装了opencv-python)。我们建议在安装albumentation的产品后检查环境,以确保opencv-python和opencv-python-headless没有被同时安装,因为如果同时安装可能会导致意想不到的问题。请参阅官方文件了解更多细节。
2、 Windows 的mmcv-full安装
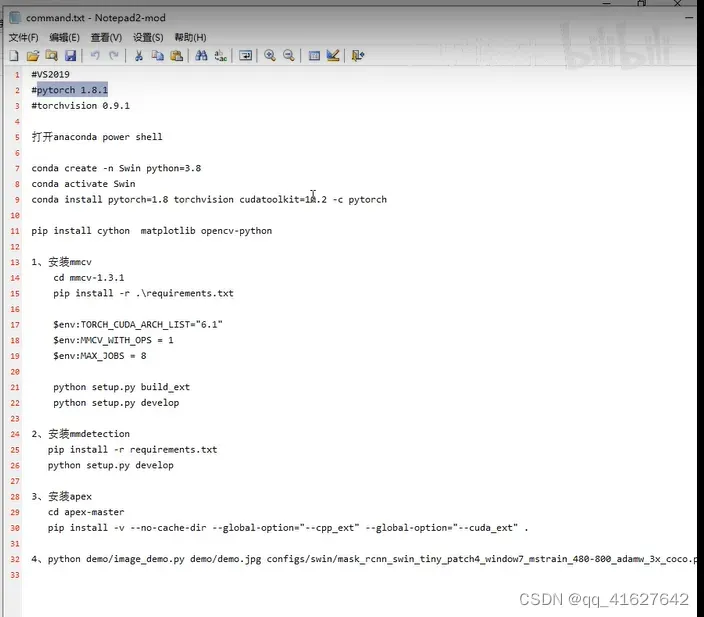
1、打开Anaconda Powershell prompt命令窗口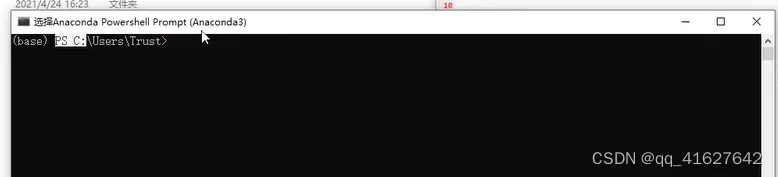
conda create -n swim python=3.8 -y # These must be installed before building mmdetection
pip install cython matplotlib opencv-python
cython
numpy
matplotlib通过查询可知按照官方的方式只能安装2.7.0版本的mmdetection
windows的本地编译安装
目标检测学习笔记——mmdet的mmcv安装[0]
- 准备 MMCV 源代码
+![]() https://github.com/open-mmlab/mmcv/graphs/contributors[0]
https://github.com/open-mmlab/mmcv/graphs/contributors[0]
git clone https://github.com/open-mmlab/mmcv.git
git checkout v1.2.0 # based on target version
cd mmcv- 安装所需 Python 依赖包
- 置 MSVC 编译器
- 训练你自己的数据集
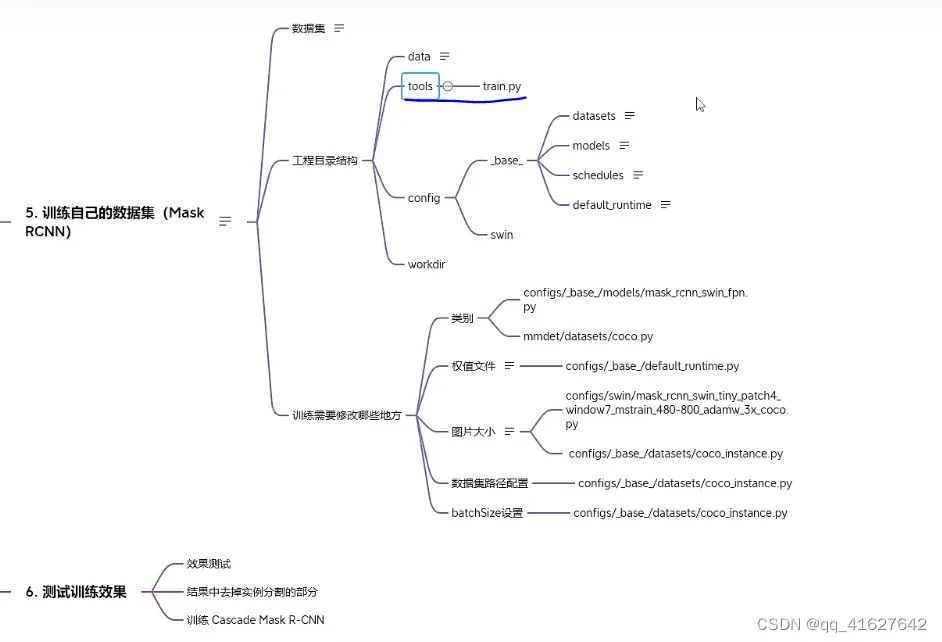
4、Swin Transform 训练自己的数据集
Swin Transformer Object Detection 目标检测-2——训练自己的数据集[0]
Swin-transformer纯目标检测训练自己的数据集[0]
4.1 准备coco数据集
4.2 配置修改工程
1、设置类别数(configs/base/models/mask_rcnn_swin_fpn.py):
修改 configs/base/models/mask_rcnn_swin_fpn.py 中 num_classes 为自己数据集的类别(有两处需要修改)。两处大概在第54行和73行,修改为自己数据集的类别数量,示例如下。[0]
# model settings
model = dict(
    type='MaskRCNN',
    pretrained=None,
    backbone=dict(
        type='SwinTransformer',
        embed_dim=96,
        depths=[2, 2, 6, 2],
        num_heads=[3, 6, 12, 24],
        window_size=7,
        mlp_ratio=4.,
        qkv_bias=True,
        qk_scale=None,
        drop_rate=0.,
        attn_drop_rate=0.,
        drop_path_rate=0.2,
        ape=False,
        patch_norm=True,
        out_indices=(0, 1, 2, 3),
        use_checkpoint=False),
    neck=dict(
        type='FPN',
        in_channels=[96, 192, 384, 768],
        out_channels=256,
        num_outs=5),
    rpn_head=dict(
        type='RPNHead',
        in_channels=256,
        feat_channels=256,
        anchor_generator=dict(
            type='AnchorGenerator',
            scales=[8],
            ratios=[0.5, 1.0, 2.0],
            strides=[4, 8, 16, 32, 64]),
        bbox_coder=dict(
            type='DeltaXYWHBBoxCoder',
            target_means=[.0, .0, .0, .0],
            target_stds=[1.0, 1.0, 1.0, 1.0]),
        loss_cls=dict(
            type='CrossEntropyLoss', use_sigmoid=True, loss_weight=1.0),
        loss_bbox=dict(type='L1Loss', loss_weight=1.0)),
    roi_head=dict(
        type='StandardRoIHead',
        bbox_roi_extractor=dict(
            type='SingleRoIExtractor',
            roi_layer=dict(type='RoIAlign', output_size=7, sampling_ratio=0),
            out_channels=256,
            featmap_strides=[4, 8, 16, 32]),
        bbox_head=dict(
            type='Shared2FCBBoxHead',
            in_channels=256,
            fc_out_channels=1024,
            roi_feat_size=7,
            num_classes=80,  #修改为自己的类别,注意这里不需要加BG类(+1)
            bbox_coder=dict(
                type='DeltaXYWHBBoxCoder',
                target_means=[0., 0., 0., 0.],
                target_stds=[0.1, 0.1, 0.2, 0.2]),
            reg_class_agnostic=False,
            loss_cls=dict(
                type='CrossEntropyLoss', use_sigmoid=False, loss_weight=1.0),
            loss_bbox=dict(type='L1Loss', loss_weight=1.0)),
        mask_roi_extractor=dict(
            type='SingleRoIExtractor',
            roi_layer=dict(type='RoIAlign', output_size=14, sampling_ratio=0),
            out_channels=256,
            featmap_strides=[4, 8, 16, 32]),
        mask_head=dict(
            type='FCNMaskHead',
            num_convs=4,
            in_channels=256,
            conv_out_channels=256,
            num_classes=80,  #修改为自己的类别,注意这里不需要加BG类(+1)
            loss_mask=dict(
                type='CrossEntropyLoss', use_mask=True, loss_weight=1.0))),
    # model training and testing settings
    train_cfg=dict(
        rpn=dict(
            assigner=dict(
                type='MaxIoUAssigner',
                pos_iou_thr=0.7,
                neg_iou_thr=0.3,
                min_pos_iou=0.3,
                match_low_quality=True,
                ignore_iof_thr=-1),
            sampler=dict(
                type='RandomSampler',
                num=256,
                pos_fraction=0.5,
                neg_pos_ub=-1,
                add_gt_as_proposals=False),
            allowed_border=-1,
            pos_weight=-1,
            debug=False),
        rpn_proposal=dict(
            nms_pre=2000,
            max_per_img=1000,
            nms=dict(type='nms', iou_threshold=0.7),
            min_bbox_size=0),
        rcnn=dict(
            assigner=dict(
                type='MaxIoUAssigner',
                pos_iou_thr=0.5,
                neg_iou_thr=0.5,
                min_pos_iou=0.5,
                match_low_quality=True,
                ignore_iof_thr=-1),
            sampler=dict(
                type='RandomSampler',
                num=512,
                pos_fraction=0.25,
                neg_pos_ub=-1,
                add_gt_as_proposals=True),
            mask_size=28,
            pos_weight=-1,
            debug=False)),
    test_cfg=dict(
        rpn=dict(
            nms_pre=1000,
            max_per_img=1000,
            nms=dict(type='nms', iou_threshold=0.7),
            min_bbox_size=0),
        rcnn=dict(
            score_thr=0.05,
            nms=dict(type='nms', iou_threshold=0.5),
            max_per_img=100,
mask_thr_binary=0.5)))2、修改配置信息(间隔和加载预训练模型configs/base/default_runtime.py)
修改 configs/base/default_runtime.py 中的 interval,loadfrom
interval:dict(interval=1) # 表示多少个 epoch 验证一次,然后保存一次权重信息,
第1行interval=1表示每1个epoch保存一次权重信息,表示多少个 epoch 验证一次,然后保存一次权重信息,
第4行interval=50表示每50次打印一次日志信息
loadfrom:表示加载哪一个训练好的权重,可以直接写绝对路径如: load_from = r”E:\workspace\Python\Pytorch\Swin-Transformer-Object-Detection\mask_rcnn_swin_tiny_patch4_window7.pth”
checkpoint_config = dict(interval=1) #表示每一个epoch保存一次权重信息
# yapf:disable
log_config = dict(
    interval=50, #表示每50次评估打印一次日志信息
    hooks=[
        dict(type='TextLoggerHook'),
        # dict(type='TensorboardLoggerHook')
    ])
# yapf:enable
custom_hooks = [dict(type='NumClassCheckHook')]

dist_params = dict(backend='nccl')
log_level = 'INFO'
load_from = None  #加载的预训练模型
resume_from = None
workflow = [('train', 1)]
3、修改训练尺寸大小、max_epochs按需修改(configs/swin/mask_rcnn_swin_tiny_patch4_window7_mstrain_480-800_adamw_3x_coco.py)
如果显存够的话可以不改(基本都运行不起来),文件位置为:configs/swin/mask_rcnn_swin_tiny_patch4_window7_mstrain_480-800_adamw_3x_coco.py
修改所有的 img_scale 为 :img_scale = [(224, 224)] 或者 img_scale = [(256, 256)] 或者 480,512等。
同时 configs/base/datasets/coco_instance.py 或者configs/base/datasets/coco_detection.py中的 img_scale 也要改成 img_scale = [(224, 224)] 或者其他值
第3行’…/base/datasets/coco_instance.py’修改为’…/base/datasets/coco_detection.py’
第69行的max_epochs按需修改
_base_ = [
    '../_base_/models/mask_rcnn_swin_fpn.py',
    '../_base_/datasets/coco_instance.py', #做目标检测,修改为coco_detection.py
    '../_base_/schedules/schedule_1x.py', '../_base_/default_runtime.py'
]

model = dict(
    backbone=dict(
        embed_dim=96,
        depths=[2, 2, 6, 2],
        num_heads=[3, 6, 12, 24],
        window_size=7,
        ape=False,
        drop_path_rate=0.2,
        patch_norm=True,
        use_checkpoint=False
    ),
    neck=dict(in_channels=[96, 192, 384, 768]))

img_norm_cfg = dict(
    mean=[123.675, 116.28, 103.53], std=[58.395, 57.12, 57.375], to_rgb=True)

# augmentation strategy originates from DETR / Sparse RCNN
train_pipeline = [
    dict(type='LoadImageFromFile'),
    dict(type='LoadAnnotations', with_bbox=True, with_mask=True),
    dict(type='RandomFlip', flip_ratio=0.5),
    dict(type='AutoAugment',
         policies=[
             [
                 dict(type='Resize',
                      #这里可以根据自己的硬件设置进行修改
                      img_scale=[(480, 1333), (512, 1333), (544, 1333), (576, 1333),
                                 (608, 1333), (640, 1333), (672, 1333), (704, 1333),
                                 (736, 1333), (768, 1333), (800, 1333)],
                      multiscale_mode='value',
                      keep_ratio=True)
             ],
             [
                 dict(type='Resize',
                      img_scale=[(400, 1333), (500, 1333), (600, 1333)],
                      multiscale_mode='value',
                      keep_ratio=True),
                 dict(type='RandomCrop',
                      crop_type='absolute_range',
                      crop_size=(384, 600),
                      allow_negative_crop=True),
                 dict(type='Resize',
                      #这里可以根据自己的硬件设置进行修改
                      img_scale=[(480, 1333), (512, 1333), (544, 1333),
                                 (576, 1333), (608, 1333), (640, 1333),
                                 (672, 1333), (704, 1333), (736, 1333),
                                 (768, 1333), (800, 1333)],
                      multiscale_mode='value',
                      override=True,
                      keep_ratio=True)
             ]
         ]),
    dict(type='Normalize', **img_norm_cfg),
    dict(type='Pad', size_divisor=32),
    dict(type='DefaultFormatBundle'),
    dict(type='Collect', keys=['img', 'gt_bboxes', 'gt_labels', 'gt_masks']),
]
data = dict(train=dict(pipeline=train_pipeline))

optimizer = dict(_delete_=True, type='AdamW', lr=0.0001, betas=(0.9, 0.999), weight_decay=0.05,
                 paramwise_cfg=dict(custom_keys={'absolute_pos_embed': dict(decay_mult=0.),
                                                 'relative_position_bias_table': dict(decay_mult=0.),
                                                 'norm': dict(decay_mult=0.)}))
lr_config = dict(step=[27, 33])
runner = dict(type='EpochBasedRunnerAmp', max_epochs=36) #训练的epoch可以根据需要修改

# do not use mmdet version fp16
fp16 = None
optimizer_config = dict(
    type="DistOptimizerHook",
    update_interval=1,
    grad_clip=None,
    coalesce=True,
    bucket_size_mb=-1,
    use_fp16=True,
)
4、配置数据集路径、img_scale、samples_per_gpu、workers_per_gpu(configs/base/datasets/coco_detection.py)
configs/base/datasets/coco_instance.py 文件的最上面指定了数据集的路径,因此在项目下新建 data/coco目录,下面四个子目录 annotations和test2017,train2017,val2017。路径/configs/base/datasets/coco_detection.py,第2行的data_root数据集根目录路径,第8行的img_scale可以根据需要修改,下面train、test、val数据集的具体路径ann_file根据自己数据集修改
第31行的samples_per_gpu表示batch size大小,太大会内存溢出
第32行的workers_per_gpu表示每个GPU对应线程数,2、4、6、8按需修改
修改 batch size 和 线程数:根据自己的显存和CPU来设置
dataset_type = 'CocoDataset'
data_root = 'data/coco/' #数据的根目录
img_norm_cfg = dict(
    mean=[123.675, 116.28, 103.53], std=[58.395, 57.12, 57.375], to_rgb=True)
train_pipeline = [
    dict(type='LoadImageFromFile'),
    dict(type='LoadAnnotations', with_bbox=True, with_mask=True),
    dict(type='Resize', img_scale=(1333, 800), keep_ratio=True), #img_scale修改
    dict(type='RandomFlip', flip_ratio=0.5),
    dict(type='Normalize', **img_norm_cfg),
    dict(type='Pad', size_divisor=32),
    dict(type='DefaultFormatBundle'),
    dict(type='Collect', keys=['img', 'gt_bboxes', 'gt_labels', 'gt_masks']),
]
test_pipeline = [
    dict(type='LoadImageFromFile'),
    dict(
        type='MultiScaleFlipAug',
        img_scale=(1333, 800), #img_scale修改
        flip=False,
        transforms=[
            dict(type='Resize', keep_ratio=True),
            dict(type='RandomFlip'),
            dict(type='Normalize', **img_norm_cfg),
            dict(type='Pad', size_divisor=32),
            dict(type='ImageToTensor', keys=['img']),
            dict(type='Collect', keys=['img']),
        ])
]
data = dict(
    samples_per_gpu=2, #batch size大小
    workers_per_gpu=2, #每个GPU对应线程数
    train=dict(
        type=dataset_type,
        ann_file=data_root + 'annotations/instances_train2017.json',
        img_prefix=data_root + 'train2017/',
        pipeline=train_pipeline),
    val=dict(
        type=dataset_type,
        ann_file=data_root + 'annotations/instances_val2017.json',
        img_prefix=data_root + 'val2017/',
        pipeline=test_pipeline),
    test=dict(
        type=dataset_type,
        ann_file=data_root + 'annotations/instances_val2017.json',
        img_prefix=data_root + 'val2017/',
        pipeline=test_pipeline))
evaluation = dict(metric=['bbox', 'segm'])
- 目录 5、修改分类数组:mmdet/datasets/coco.py
-
one:路径/mmdet/datasets/coco.py的第23行CLASSES two:路径/mmdet/core/evaluation/class_names.py的第67行coco_classes 修改为自己数据集的类别 CLASSES中填写自己的分类:CLASSES = (‘person’, ‘bicycle’, ‘car’) one: @DATASETS.register_module() class CocoDataset(CustomDataset): CLASSES = (‘person’, ‘bicycle’, ‘car’, ‘motorcycle’, ‘airplane’, ‘bus’, ‘train’, ‘truck’, ‘boat’, ‘traffic light’, ‘fire hydrant’, ‘stop sign’, ‘parking meter’, ‘bench’, ‘bird’, ‘cat’, ‘dog’, ‘horse’, ‘sheep’, ‘cow’, ‘elephant’, ‘bear’, ‘zebra’, ‘giraffe’, ‘backpack’, ‘umbrella’, ‘handbag’, ‘tie’, ‘suitcase’, ‘frisbee’, ‘skis’, ‘snowboard’, ‘sports ball’, ‘kite’, ‘baseball bat’, ‘baseball glove’, ‘skateboard’, ‘surfboard’, ‘tennis racket’, ‘bottle’, ‘wine glass’, ‘cup’, ‘fork’, ‘knife’, ‘spoon’, ‘bowl’, ‘banana’, ‘apple’, ‘sandwich’, ‘orange’, ‘broccoli’, ‘carrot’, ‘hot dog’, ‘pizza’, ‘donut’, ‘cake’, ‘chair’, ‘couch’, ‘potted plant’, ‘bed’, ‘dining table’, ‘toilet’, ‘tv’, ‘laptop’, ‘mouse’, ‘remote’, ‘keyboard’, ‘cell phone’, ‘microwave’, ‘oven’, ‘toaster’, ‘sink’, ‘refrigerator’, ‘book’, ‘clock’, ‘vase’, ‘scissors’, ‘teddy bear’, ‘hair drier’, ‘toothbrush’)#修改为自己的类别数 #two def coco_classes(): return [ ‘person’, ‘bicycle’, ‘car’, ‘motorcycle’, ‘airplane’, ‘bus’, ‘train’, ‘truck’, ‘boat’, ‘traffic_light’, ‘fire_hydrant’, ‘stop_sign’, ‘parking_meter’, ‘bench’, ‘bird’, ‘cat’, ‘dog’, ‘horse’, ‘sheep’, ‘cow’, ‘elephant’, ‘bear’, ‘zebra’, ‘giraffe’, ‘backpack’, ‘umbrella’, ‘handbag’, ‘tie’, ‘suitcase’, ‘frisbee’, ‘skis’, ‘snowboard’, ‘sports_ball’, ‘kite’, ‘baseball_bat’, ‘baseball_glove’, ‘skateboard’, ‘surfboard’, ‘tennis_racket’, ‘bottle’, ‘wine_glass’, ‘cup’, ‘fork’, ‘knife’, ‘spoon’, ‘bowl’, ‘banana’, ‘apple’, ‘sandwich’, ‘orange’, ‘broccoli’, ‘carrot’, ‘hot_dog’, ‘pizza’, ‘donut’, ‘cake’, ‘chair’, ‘couch’, ‘potted_plant’, ‘bed’, ‘dining_table’, ‘toilet’, ‘tv’, ‘laptop’, ‘mouse’, ‘remote’, ‘keyboard’, ‘cell_phone’, ‘microwave’, ‘oven’, ‘toaster’, ‘sink’, ‘refrigerator’, ‘book’, ‘clock’, ‘vase’, ‘scissors’, ‘teddy_bear’, ‘hair_drier’, ‘toothbrush’ ] #修改为自己的数据集名称 4.3 开始训练执行图下命令 one:路径/mmdet/datasets/coco.py的第23行CLASSES two:路径/mmdet/core/evaluation/class_names.py的第67行coco_classes 修改为自己数据集的类别 CLASSES中填写自己的分类:CLASSES = ('person', 'bicycle', 'car') one: @DATASETS.register_module() class CocoDataset(CustomDataset): CLASSES = ('person', 'bicycle', 'car', 'motorcycle', 'airplane', 'bus', 'train', 'truck', 'boat', 'traffic light', 'fire hydrant', 'stop sign', 'parking meter', 'bench', 'bird', 'cat', 'dog', 'horse', 'sheep', 'cow', 'elephant', 'bear', 'zebra', 'giraffe', 'backpack', 'umbrella', 'handbag', 'tie', 'suitcase', 'frisbee', 'skis', 'snowboard', 'sports ball', 'kite', 'baseball bat', 'baseball glove', 'skateboard', 'surfboard', 'tennis racket', 'bottle', 'wine glass', 'cup', 'fork', 'knife', 'spoon', 'bowl', 'banana', 'apple', 'sandwich', 'orange', 'broccoli', 'carrot', 'hot dog', 'pizza', 'donut', 'cake', 'chair', 'couch', 'potted plant', 'bed', 'dining table', 'toilet', 'tv', 'laptop', 'mouse', 'remote', 'keyboard', 'cell phone', 'microwave', 'oven', 'toaster', 'sink', 'refrigerator', 'book', 'clock', 'vase', 'scissors', 'teddy bear', 'hair drier', 'toothbrush')#修改为自己的类别数 #two def coco_classes(): return [ 'person', 'bicycle', 'car', 'motorcycle', 'airplane', 'bus', 'train', 'truck', 'boat', 'traffic_light', 'fire_hydrant', 'stop_sign', 'parking_meter', 'bench', 'bird', 'cat', 'dog', 'horse', 'sheep', 'cow', 'elephant', 'bear', 'zebra', 'giraffe', 'backpack', 'umbrella', 'handbag', 'tie', 'suitcase', 'frisbee', 'skis', 'snowboard', 'sports_ball', 'kite', 'baseball_bat', 'baseball_glove', 'skateboard', 'surfboard', 'tennis_racket', 'bottle', 'wine_glass', 'cup', 'fork', 'knife', 'spoon', 'bowl', 'banana', 'apple', 'sandwich', 'orange', 'broccoli', 'carrot', 'hot_dog', 'pizza', 'donut', 'cake', 'chair', 'couch', 'potted_plant', 'bed', 'dining_table', 'toilet', 'tv', 'laptop', 'mouse', 'remote', 'keyboard', 'cell_phone', 'microwave', 'oven', 'toaster', 'sink', 'refrigerator', 'book', 'clock', 'vase', 'scissors', 'teddy_bear', 'hair_drier', 'toothbrush' ] #修改为自己的数据集名称 -
python tools/train.py configs\swin\mask_rcnn_swin_tiny_patch4_window7_mstrain_480-800_adamw_3x_coco.py 实际命令根据自己使用的修改,可以看到已经可以训练了,但是这样还是训练的带mask的,还不是真正意义上的目标检测模型。 4.4、禁用maskpython tools/train.py configs\swin\mask_rcnn_swin_tiny_patch4_window7_mstrain_480-800_adamw_3x_coco.py 实际命令根据自己使用的修改,可以看到已经可以训练了,但是这样还是训练的带mask的,还不是真正意义上的目标检测模型。 -
1.路径./configs/base/models/mask_rcnn_swin_fpn.py中第75行use_mask=True 修改为use_mask=False 还需要删除mask_roi_extractor和mask_head两个变量,大概在第63行和68行,这里删除之后注意末尾的逗号和小括号的格式匹配问题 2.路径/configs/swin/mask_rcnn_swin_tiny_patch4_window7_mstrain_480-800_adamw_3x_coco.py中: 第26行dict(type=‘LoadAnnotations’, with_bbox=True, with_mask=True)修改为dict(type=‘LoadAnnotations’, with_bbox=True, with_mask=False) 第60行删掉’gt_masks’ 训练时使用下面命令训练: bash tools/dist_train.sh ‘configs/swin/mask_rcnn_swin_tiny_patch4_window7_mstrain_480-800_adamw_3x_coco.py’ 1 –cfg-options model.pretrained=’checkpoints/swin_tiny_patch4_window7_224.pth’ 其中1为GPU数量,按需修改,预训练模型model.pretrained可选 4、遇到的问题及解决办法1.路径./configs/base/models/mask_rcnn_swin_fpn.py中第75行use_mask=True 修改为use_mask=False 还需要删除mask_roi_extractor和mask_head两个变量,大概在第63行和68行,这里删除之后注意末尾的逗号和小括号的格式匹配问题 2.路径/configs/swin/mask_rcnn_swin_tiny_patch4_window7_mstrain_480-800_adamw_3x_coco.py中: 第26行dict(type=‘LoadAnnotations’, with_bbox=True, with_mask=True)修改为dict(type=‘LoadAnnotations’, with_bbox=True, with_mask=False) 第60行删掉’gt_masks’ 训练时使用下面命令训练: bash tools/dist_train.sh 'configs/swin/mask_rcnn_swin_tiny_patch4_window7_mstrain_480-800_adamw_3x_coco.py' 1 --cfg-options model.pretrained='checkpoints/swin_tiny_patch4_window7_224.pth' 其中1为GPU数量,按需修改,预训练模型model.pretrained可选
1.AssertionError: Incompatible version of pycocotools is installed. Run pip uninstall pycocotools first. Then run pip install mmpycocotools to install open-mmlab forked pycocotools.
解决方案已在命令行中给出:
pip uninstall pycocotoolspip install mmpycocotools2.KeyError: “CascadeRCNN: ‘backbone.layers.0.blocks.0.attn.relative_position_bias_table'”
预训练模型加载错误,应该使用imagenet预训练的模型,而不是在coco上微调的模型,这个错误我也很无奈啊,跟我预想的使用coco模型预训练不一样,官方github也有人提出相同问题,解决办法就是不加载预训练模型从头训练,或者在https://github.com/microsoft/Swin-Transformer上下载分类的模型。
3.import pycocotools._mask as _mask
File “pycocotools/_mask.pyx”, line 1, in init pycocotools._mask
ValueError: numpy.ndarray size changed, may indicate binary incompatibility. Expected 88 from C header, got 80 from PyObject
numpy版本问题,使用pip install –upgrade numpy升级numpy版本
- 5、测试训练好的模型
- 添加一个自己的图片在demo目录下,执行:
python demo/image_demo.py demo/000019.jpg configs\swin\mask_rcnn_swin_tiny_patch4_window7_mstrain_480-800_adamw_3x_coco.py work_dirs/mask_rcnn_swin_tiny_patch4_window7_mstrain_480-800_adamw_3x_coco/latest.pth latest.pth 就是自己训练好的最新的权重文件,默认会放在workdir下。python demo/image_demo.py demo/000019.jpg configs\swin\mask_rcnn_swin_tiny_patch4_window7_mstrain_480-800_adamw_3x_coco.py work_dirs/mask_rcnn_swin_tiny_patch4_window7_mstrain_480-800_adamw_3x_coco/latest.pth - 不输出实例分割图
-
demo/image_demo.py 做如下修改: # test a single image result = inference_detector(model, args.img) new_result = result[0] # show the results show_result_pyplot(model, args.img, new_result, score_thr=args.score_thr) 三、训练 cascade_mask_rcnn_swindemo/image_demo.py 做如下修改: # test a single image result = inference_detector(model, args.img) new_result = result[0] # show the results show_result_pyplot(model, args.img, new_result, score_thr=args.score_thr)
与之前训练mask_rcnn_swin_一样,但是如果是单卡多修改如下部分
configs/swin/cascade_mask_rcnn_swin_small_patch4_window7_mstrain_480-800_giou_4conv1f_adamw_3x_coco.py 文件中,所有的 SyncBN 改为 BN。
文章出处登录后可见!