Yolov5如何更换BiFPN?
第一步:修改common.py
将如下代码添加到common.py文件中
# BiFPN
# 两个特征图add操作
class BiFPN_Add2(nn.Module):
    def __init__(self, c1, c2):
        super(BiFPN_Add2, self).__init__()
        # 设置可学习参数 nn.Parameter的作用是:将一个不可训练的类型Tensor转换成可以训练的类型parameter
        # 并且会向宿主模型注册该参数 成为其一部分 即model.parameters()会包含这个parameter
        # 从而在参数优化的时候可以自动一起优化
        self.w = nn.Parameter(torch.ones(2, dtype=torch.float32), requires_grad=True)
        self.epsilon = 0.0001
        self.conv = nn.Conv2d(c1, c2, kernel_size=1, stride=1, padding=0)
        self.silu = nn.SiLU()

    def forward(self, x):
        w = self.w
        weight = w / (torch.sum(w, dim=0) + self.epsilon)
        return self.conv(self.silu(weight[0] * x[0] + weight[1] * x[1]))


# 三个特征图add操作
class BiFPN_Add3(nn.Module):
    def __init__(self, c1, c2):
        super(BiFPN_Add3, self).__init__()
        self.w = nn.Parameter(torch.ones(3, dtype=torch.float32), requires_grad=True)
        self.epsilon = 0.0001
        self.conv = nn.Conv2d(c1, c2, kernel_size=1, stride=1, padding=0)
        self.silu = nn.SiLU()

    def forward(self, x):
        w = self.w
        weight = w / (torch.sum(w, dim=0) + self.epsilon)
        # Fast normalized fusion
        return self.conv(self.silu(weight[0] * x[0] + weight[1] * x[1] + weight[2] * x[2]))
第二步:修改yolo.py
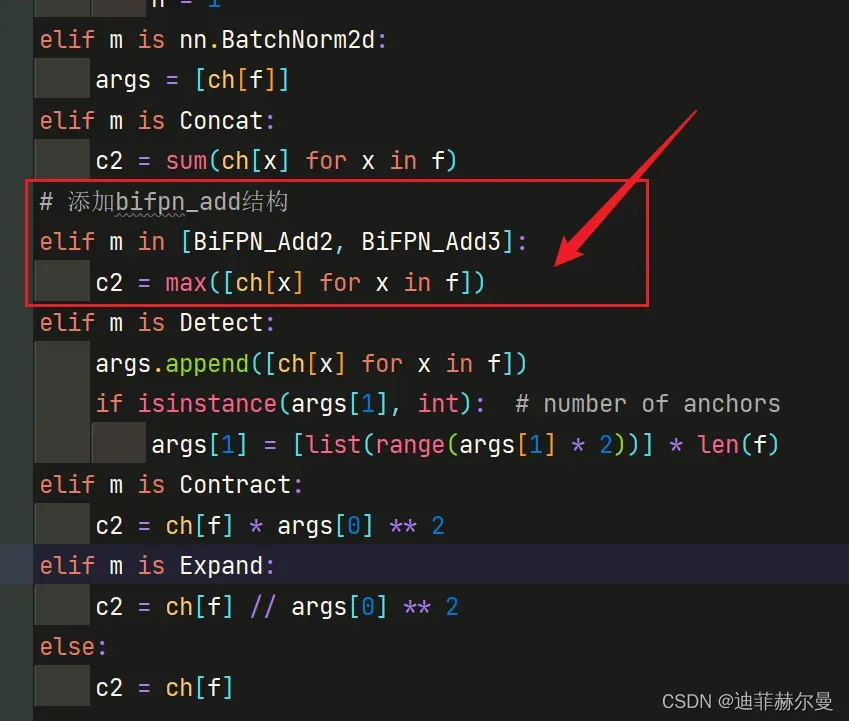
在parse_model函数中找到elif m is Concat:语句,在其后面加上BiFPN_Add相关语句

elif m is Concat:
    c2 = sum(ch[x] for x in f)
# 添加bifpn_add结构
elif m in [BiFPN_Add2, BiFPN_Add3]:
    c2 = max([ch[x] for x in f])
第三步:修改train.py
- 将
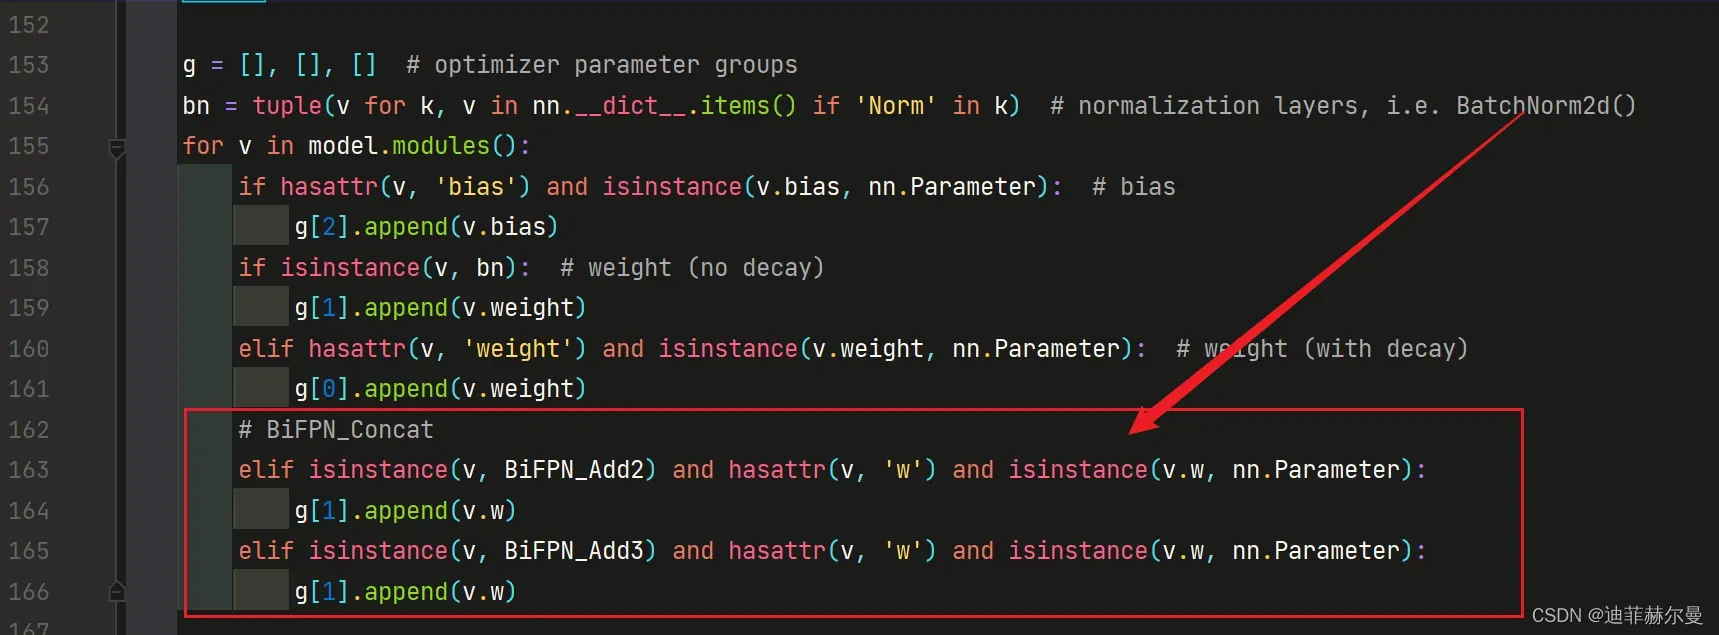
BiFPN_Add2和BiFPN_Add3函数中定义的w参数,加入g1

g = [], [], []  # optimizer parameter groups
    bn = tuple(v for k, v in nn.__dict__.items() if 'Norm' in k)  # normalization layers, i.e. BatchNorm2d()
    for v in model.modules():
        # hasattr: 测试指定的对象是否具有给定的属性,返回一个布尔值
        if hasattr(v, 'bias') and isinstance(v.bias, nn.Parameter):  # bias
            g[2].append(v.bias)
        if isinstance(v, bn):  # weight (no decay)
            g[1].append(v.weight)
        elif hasattr(v, 'weight') and isinstance(v.weight, nn.Parameter):  # weight (with decay)
            g[0].append(v.weight)
        # BiFPN_Concat
        elif isinstance(v, BiFPN_Add2) and hasattr(v, 'w') and isinstance(v.w, nn.Parameter):
            g[1].append(v.w)
        elif isinstance(v, BiFPN_Add3) and hasattr(v, 'w') and isinstance(v.w, nn.Parameter):
            g[1].append(v.w)
- 导入
BiFPN_Add3,BiFPN_Add2
from models.common import BiFPN_Add3, BiFPN_Add2
第四步:修改yolov5.yaml
将Concat全部换成BiFPN_Add
# YOLOv5 🚀 by Ultralytics, GPL-3.0 license

# Parameters
nc: 80  # number of classes
depth_multiple: 0.33  # model depth multiple
width_multiple: 0.50  # layer channel multiple
anchors:
  - [10,13, 16,30, 33,23]  # P3/8
  - [30,61, 62,45, 59,119]  # P4/16
  - [116,90, 156,198, 373,326]  # P5/32

# YOLOv5 v6.0 backbone
backbone:
  # [from, number, module, args]
  [[-1, 1, Conv, [64, 6, 2, 2]],  # 0-P1/2
   [-1, 1, Conv, [128, 3, 2]],  # 1-P2/4
   [-1, 3, C3, [128]],
   [-1, 1, Conv, [256, 3, 2]],  # 3-P3/8
   [-1, 6, C3, [256]],
   [-1, 1, Conv, [512, 3, 2]],  # 5-P4/16
   [-1, 9, C3, [512]],
   [-1, 1, Conv, [1024, 3, 2]],  # 7-P5/32
   [-1, 3, C3, [1024]],
   [-1, 1, SPPF, [1024, 5]],  # 9
  ]

# YOLOv5 v6.1 BiFPN head
head:
  [[-1, 1, Conv, [512, 1, 1]],
   [-1, 1, nn.Upsample, [None, 2, 'nearest']],
   [[-1, 6], 1, BiFPN_Add2, [256, 256]],  # cat backbone P4
   [-1, 3, C3, [512, False]],  # 13

   [-1, 1, Conv, [256, 1, 1]],
   [-1, 1, nn.Upsample, [None, 2, 'nearest']],
   [[-1, 4], 1, BiFPN_Add2, [128, 128]],  # cat backbone P3
   [-1, 3, C3, [256, False]],  # 17

   [-1, 1, Conv, [512, 3, 2]],
   [[-1, 13, 6], 1, BiFPN_Add3, [256, 256]],  #v5s通道数是默认参数的一半
   [-1, 3, C3, [512, False]],  # 20

   [-1, 1, Conv, [512, 3, 2]],
   [[-1, 10], 1, BiFPN_Add2, [256, 256]],  # cat head P5
   [-1, 3, C3, [1024, False]],  # 23

   [[17, 20, 23], 1, Detect, [nc, anchors]],  # Detect(P3, P4, P5)
  ]
注意:BiFPN_Add本质是add操作,因此输入层通道数、feature map要完全对应
内容导航
本人更多Yolov5(v6.1)实战内容导航🍀
3.手把手带你Yolov5 (v6.1)添加注意力机制(一)(并附上30多种顶会Attention原理图)
4.手把手带你Yolov5 (v6.1)添加注意力机制(二)(在C3模块中加入注意力机制)
文章出处登录后可见!
已经登录?立即刷新
