函数cv::add()用于实现两个Mat类矩阵相加,或者矩阵和标量相加。
函数cv::add()的运算公式如下:
从上面的叙述可以看出:
- 1 函数add()可以进行掩码操作。
- 2 函数会对相加的结果进行饱和(saturate)操作,举个例子来说,如果数据类型为uhar,那么1+255=255,而不等于256。如果输出矩阵的数据类型为CV_32S,则不会进行饱和(saturate)操作,官方文档原话如下:
“Saturation is not applied when the output array has the depth CV_32S. You may even get result of an incorrect sign in the case of overflow.” - 3 多通道的矩阵相加时,各个通道分别单独作相加算。
- 4 两个相同数据类型的矩阵与矩阵相加时(即上面的第一种情况)可以用操作符+代替,即:
cv::add(A1, B1, C1);
相当于:
C1 = A1+B1;
虽然可以这样等效操作,但是昊虹君还是建议诸位用标准函数式操作,这样能提高代码的健壮性。
函数add()的原型如下:
void cv::add( 	InputArray  src1,
				InputArray 	src2,
				OutputArray dst,
				InputArray 	mask = noArray(),
				int 	dtype = -1
				)
前四个参数没什么好说的,这里说下最后一个参数dtype,它用于设置输出矩阵的数据类型,具体情况如下:
The input arrays and the output array can all have the same or different depths.
For example, you can add a 16-bit unsigned array to a 8-bit signed array and store the sum as a 32-bit floating-point array. Depth of the output array is determined by the dtype parameter.
In the second and third cases above, as well as in the first case, when src1.depth() == src2.depth(), dtype can be set to the default -1. In this case, the output array will have the same depth as the input array, be it src1, src2 or both.
上面这段话简单明了,就不翻译了。需要说明的是,当两个相加的矩阵数据类型相同时,参数dtype可以用默认值-1。当两个相加的矩阵数据类型不一致时,是必须要设置输出矩阵的数据类型的,否则程序运行时会报错,比如下面的报错:
OpenCV Error: Bad argument (When the input arrays in add/subtract/multiply/divide functions have different types, the output array type must be explicitly specified) in cv::arithm_op, file C:\builds\master_PackSlave-win32-vc12-shared\opencv\modules\core\src\arithm.cpp, line 2011

接下来,上示例代码:
示例代码1(相同数据类型的矩阵与矩阵相加)
//OpenCV版本:3.0.0
//VS版本:2013
#include <opencv2/opencv.hpp>
#include <iostream>
using namespace std;
int main()
{
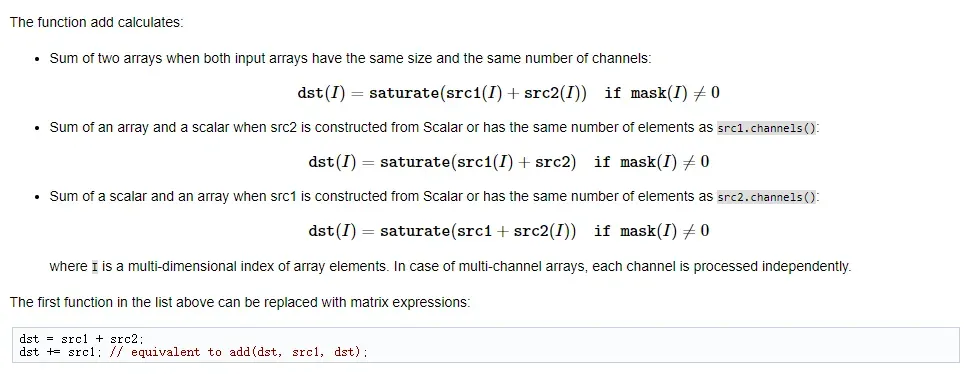
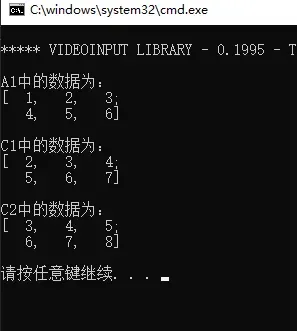
cv::Mat A1 = (cv::Mat_<uchar>(2, 3) << 1, 2, 3, 4, 5, 6);
cout << "A1中的数据为:\n" << A1 << endl << endl;
cv::Mat B1 = (cv::Mat_<uchar>(2, 3) << 2, 3, 4, 5, 6, 250);
cout << "B1中的数据为:\n" << B1 << endl << endl;
//相同数据类型的矩阵与矩阵相加
cv::Mat C1;
cv::add(A1, B1, C1);
cout << "C1中的数据为:\n" << C1 << endl << endl;
return(0);
}
运行结果如下:
注意:C1中的最后一个元素因为饱和操作从256变成了255。
示例代码2(不同数据类型的矩阵与矩阵相加)
//OpenCV版本:3.0.0
//VS版本:2013
#include <opencv2/opencv.hpp>
#include <iostream>
using namespace std;
int main()
{
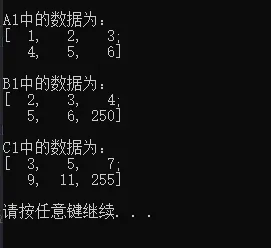
cv::Mat A1 = (cv::Mat_<uchar>(2, 3) << 1, 2, 3, 4, 5, 6);
cout << "A1中的数据为:\n" << A1 << endl << endl;
cv::Mat B1 = (cv::Mat_<int>(2, 3) << 2, 3, 4, 5, 6, 250);
cout << "B1中的数据为:\n" << B1 << endl << endl;
//不同数据类型的矩阵与矩阵相加
cv::Mat C1;
cv::InputArray mask1 = cv::noArray();
cv::add(A1, B1, C1, mask1, CV_16U);
cout << "C1中的数据为:\n" << C1 << endl << endl;
return(0);
}
运行结果如下:
注意,如下果语句:
cv::add(A1, B1, C1, mask1, CV_16U);
写成
cv::add(A1, B1, C1);
则程序在运行时会因为A1与B1的数据类型不一样而报错,如下图所示:
示例代码3(矩阵与标量相加)
//OpenCV版本:3.0.0
//VS版本:2013
#include <opencv2/opencv.hpp>
#include <iostream>
using namespace std;
int main()
{
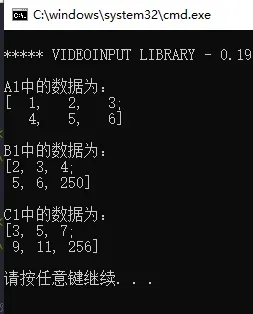
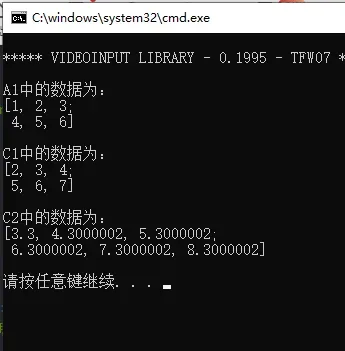
cv::Mat A1 = (cv::Mat_<uchar>(2, 3) << 1, 2, 3, 4, 5, 6);
cout << "A1中的数据为:\n" << A1 << endl << endl;
uchar b1 = 1;
int b2 = 2;
cv::Mat C1, C2;
cv::InputArray mask1 = cv::noArray();
cv::add(A1, b1, C1);//两个加数的数据类型相同
cv::add(A1, b2, C2, mask1, CV_8U);//两个加数的数据类型不同
cout << "C1中的数据为:\n" << C1 << endl << endl;
cout << "C2中的数据为:\n" << C2 << endl << endl;
return(0);
}
运行结果如下:
同样要注意:当两个加数的数据类型不一致时,如果不设置输出矩阵的数据类型,虽然此时不会报错,此时函数会自动处理,但为了程序的健壮性和可控性,昊虹君还是建议大家按上面的示例代码自己把数据类型控制好,因为你并不知道这个自动处理它会处理成什么样。
函数自动根据数据的情况进行类型转换的示例代码和运行结果如下:
//OpenCV版本:3.0.0
//VS版本:2013

#include <opencv2/opencv.hpp>

#include <iostream>
using namespace std;


int main()
{

	cv::Mat A1 = (cv::Mat_<float>(2, 3) << 1, 2, 3, 4, 5, 6);
	cout << "A1中的数据为:\n" << A1 << endl << endl;


	uchar b1 = 1;
	double b2 = 2.3;

	cv::Mat C1, C2;
	cv::add(A1, b1, C1);
	cv::add(A1, b2, C2);
	cout << "C1中的数据为:\n" << C1 << endl << endl;
	cout << "C2中的数据为:\n" << C2 << endl << endl;


	return(0);
}
上面的这个示例代码的结果是我们预期的,但我们把A1中的元素的数据类型改为uchar型,可能就不是我们想要的结果了:
//OpenCV版本:3.0.0
//VS版本:2013

#include <opencv2/opencv.hpp>

#include <iostream>
using namespace std;


int main()
{

	cv::Mat A1 = (cv::Mat_<uchar>(2, 3) << 1, 2, 3, 4, 5, 6);
	cout << "A1中的数据为:\n" << A1 << endl << endl;

	uchar b1 = 1;
	double b2 = 2.3;

	cv::Mat C1, C2;
	cv::add(A1, b1, C1);
	cv::add(A1, b2, C2);
	cout << "C1中的数据为:\n" << C1 << endl << endl;
	cout << "C2中的数据为:\n" << C2 << endl << endl;


	return(0);
}
按道理,C2中数据应该都有小数位,但是结果却没有,这就是函数自动处理的结果,有些自动处理并不是我们想要的结果。
示例代码4(带掩码操作的矩阵加法)
示例代码如下:
//OpenCV版本:3.0.0
//VS版本:2013

#include <opencv2/opencv.hpp>

#include <iostream>
using namespace std;


int main()
{

	cv::Mat A1 = (cv::Mat_<uchar>(2, 3) << 1, 2, 3, 4, 5, 6);
	cout << "A1中的数据为:\n" << A1 << endl << endl;

	cv::Mat B1 = (cv::Mat_<uchar>(2, 3) << 2, 3, 4, 5, 6, 250);
	cout << "B1中的数据为:\n" << B1 << endl << endl;

	cv::Mat mask1(2, 3, CV_8UC1, cv::Scalar(1));
	mask1.at<uchar>(0, 1) = 0;

	cv::Mat C1;
	cv::add(A1, B1, C1, mask1);
	cout << "C1中的数据为:\n" << C1 << endl << endl;

	return(0);
}
运行结果如下:
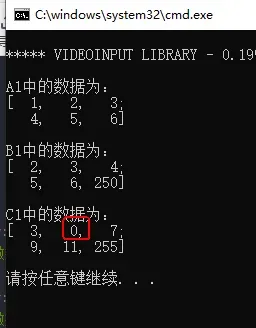
上面的第0行,第1列的元素是没有被掩盖了加法操作的,所以其结果为0。
文章出处登录后可见!