上一话
本章博客就是对OpenPose工具包进行开发;我呕心沥血(笑哭),经历重重困难,想放弃了很多次(因为openpose的编译实在是太麻烦了)但是后来还是成功了,各位点个赞吧!这个真的太麻烦了。

按照单帧图像和实时视频的顺序述写,其中单帧是使用的Pytorch编程只是调用OpenPose的模型;实时视频中使用Python调用OpenPose的包,所以必须得安装OpenPose,并对其进行编译,最后再使用。
首先从github上,下载CMU提供的源码下来:
项目结构
OpenPose-Demo-Pytorch-master
|
|----images----|----pose.jpg
|----bin(编译之后,从源码拷贝下来的,单帧不看这个)
|----x64(编译之后,从源码拷贝下来的,单帧不看这个)
|----Release(编译之后,从源码拷贝下来的,单帧不看这个)
|----models----|----pose----|----body_25----|----pose_deploy.prototxt
|                           |               |----pose_iter_584000.caffemodel
|                           |----coco----|----pose_deploy_linevec.prototxt
|                           |            |----pose_iter_440000.caffemodel
|----video----|----1.mp4
|----config.py
|----predict.py(单帧)
|----Demo.py(实时视频)
关键点详解
关键点25(model\pose\body_25\pose_iter_584000.caffemodel or pose_deploy.prototxt)如下图1. 所示,关键点18(model\pose\coco\pose_iter_440000.caffemodel or pose_deploy_linevec.prototxt)如下图2.所示。
下载模型,可在CMU的github上下载,上面提供了,就不再提供。
步骤:
git clone https://github.com/CMU-Perceptual-Computing-Lab/openpose.git
or
downloads .zip
cd openpose-master/models
bash getModels.sh (Linux)
双击 getModels.bat (Windows)
下载 pose_iter_584000.caffemodel
     pose_iter_440000.caffemodel
...(只用这两个,将其放置在我们项目的models\pose\下)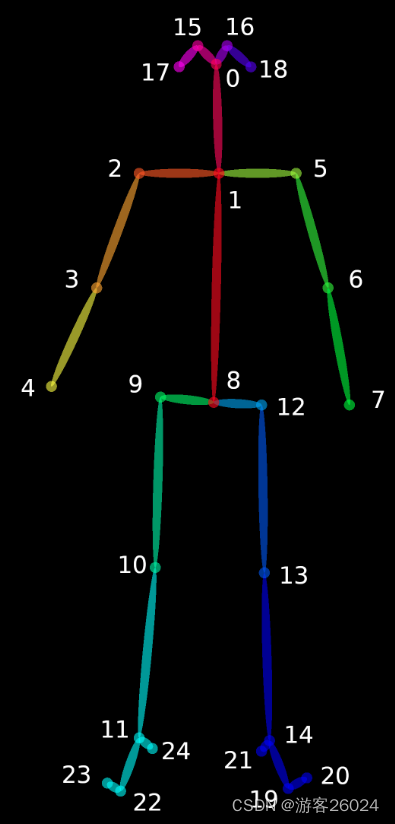
图1.
{0, “Nose”},
{1, “Neck”},
{2, “RShoulder”},
{3, “RElbow”},
{4, “RWrist”},
{5, “LShoulder”},
{6, “LElbow”},
{7, “LWrist”},
{8, “MidHip”},
{9, “RHip”},
{10, “RKnee”},
{11, “RAnkle”},
{12, “LHip”},
{13, “LKnee”},
{14, “LAnkle”},
{15, “REye”},
{16, “LEye”},
{17, “REar”},
{18, “LEar”},
{19, “LBigToe”},
{20, “LSmallToe”},
{21, “LHeel”},
{22, “RBigToe”},
{23, “RSmallToe”},
{24, “RHeel”}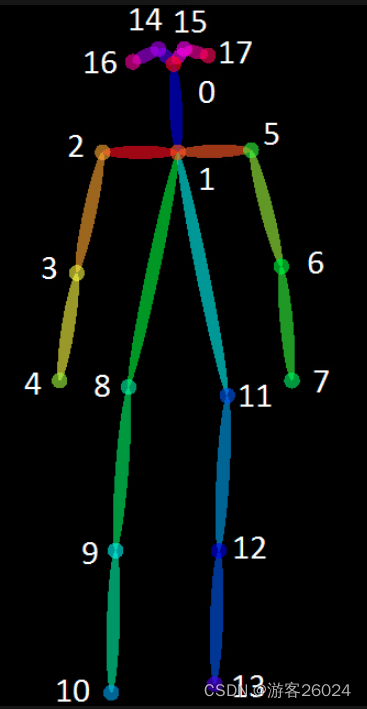
图2.
{"Nose": 0,
"Neck": 1,
"RShoulder": 2,
"RElbow": 3,
"LShoulder": 5,
"LElbow": 6,
"LWrist": 7,
"RHip": 8,
"RKnee": 9,
"RAnkle": 10,
"LHip": 11,
"LKnee": 12,
"LAnkle": 13,
"REye": 14,
"LEye": 15,
"REar": 16,
"LEar": 17,
"Background": 18}
1.单帧代码
对于单帧将之前的源码下载下来,并将模型权重拷贝(进入源码的models里面双击getModels.bat下载这些权重)到我们自己的项目,就是将models中.prototxt与.caffemodel拷走;之后我们对模型进行推理,其步骤主要为:
- 首先,读取模型与推理所需要的图像,在进行推理获取结果
- 其次,关键点检测,再利用PAFs,找到有些关键点对
- 最后,将点对组合成正确的人体骨骼图
配置文件
config.py
prototxt_25 = "models/pose/body_25/pose_deploy.prototxt"
caffemodel_25 = "models/pose/body_25/pose_iter_584000.caffemodel"

point_name_25 = ['None', 'Neck', 'RShoulder',
                 'RElbow', 'RWrist', 'LShoulder',
                 'LElbow', 'LWrist', 'MidHip',
                 'RHip', 'RKnee', 'RAnkle',
                 'LHip', 'LKnee', 'LAnkle',
                 'REye', 'LEye', 'REar',
                 'LEar', 'LBigToe', 'LSmallToe',
                 'LHeel', 'RBigToe', 'RSmallToe',
                 'RHeel']
point_pairs_25 = [[1, 8], [1, 2], [1, 5], [2, 3], [3, 4], [5, 6],
                  [6, 7], [8, 9], [9, 10], [10, 11], [8, 12], [12, 13],
                  [13, 14], [1, 0], [0, 15], [15, 17], [0, 16], [16, 18],
                  [2, 17], [5, 18], [14, 19], [19, 20], [14, 21], [11, 22],
                  [22, 23], [11, 24]]

map_idx_25 = [[26, 27], [40, 41], [48, 49], [42, 43], [44, 45], [50, 51],
              [52, 53], [32, 33], [28, 29], [30, 31], [34, 35], [36, 37],
              [38, 39], [56, 57], [58, 59], [62, 63], [60, 61], [64, 65],
              [46, 47], [54, 55], [66, 67], [68, 69], [70, 71], [72, 73],
              [74, 75], [76, 77]]

colors_25 = [[255, 0, 0], [255, 85, 0], [255, 170, 0],
             [255, 255, 0], [170, 255, 0], [85, 255, 0],
             [0, 255, 0], [0, 255, 85], [0, 255, 170],
             [0, 255, 255], [0, 170, 255], [0, 85, 255],
             [0, 0, 255], [85, 0, 255], [170, 0, 255],
             [255, 0, 255], [255, 0, 170], [255, 0, 85],
             [255, 170, 85], [255, 170, 170], [255, 170, 255],
             [255, 85, 85], [255, 85, 170], [255, 85, 255],
             [170, 170, 170]]

prototxt_18 = "./models/coco/pose_deploy_linevec.prototxt"
caffemodel_18 = "./models/coco/pose_iter_440000.caffemodel"

point_names_18 = ['Nose', 'Neck',
                  'R-Sho', 'R-Elb', 'R-Wr',
                  'L-Sho', 'L-Elb', 'L-Wr',
                  'R-Hip', 'R-Knee', 'R-Ank',
                  'L-Hip', 'L-Knee', 'L-Ank',
                  'R-Eye', 'L-Eye', 'R-Ear', 'L-Ear']

point_pairs_18 = [[1, 2], [1, 5], [2, 3], [3, 4], [5, 6], [6, 7],
                  [1, 8], [8, 9], [9, 10], [1, 11], [11, 12], [12, 13],
                  [1, 0], [0, 14], [14, 16], [0, 15], [15, 17],
                  [2, 17], [5, 16]]

map_idx_18 = [[31, 32], [39, 40], [33, 34], [35, 36], [41, 42], [43, 44],
              [19, 20], [21, 22], [23, 24], [25, 26], [27, 28], [29, 30],
              [47, 48], [49, 50], [53, 54], [51, 52], [55, 56],
              [37, 38], [45, 46]]

colors_18 = [[0, 100, 255], [0, 100, 255], [0, 255, 255],
             [0, 100, 255], [0, 255, 255], [0, 100, 255],
             [0, 255, 0], [255, 200, 100], [255, 0, 255],
             [0, 255, 0], [255, 200, 100], [255, 0, 255],
             [0, 0, 255], [255, 0, 0], [200, 200, 0],
             [255, 0, 0], [200, 200, 0], [0, 0, 0]]
OpenPose
predict.py(核心)
import cv2
import time
import numpy as np
import matplotlib.pyplot as plt
from config import *

class general_mulitpose_model(object):

    # 初始化 Pose keypoint_num: 25 or 18
    def __init__(self, keypoint_num):

    # 加载openpose模型
    def get_model(self):

    # 获取关键点
    def getKeypoints(self, probMap, threshold=0.1):

    # 获取有效点对
    def getValidPairs(self, output, detected_keypoints, width, height):

    # 连接有效点对,获取完整的人体骨骼图
    def getPersonwiseKeypoints(self, valid_pairs, invalid_pairs, keypoints_list):

    # 关键点连接后的可视化
    def vis_pose(self, img_file, personwiseKeypoints, keypoints_list):

    # 预测(推理)关键点
    def predict(self, imgfile):
初始化
 def __init__(self, keypoint_num):
        self.point_names = point_name_25 if keypoint_num == 25 else point_names_18
        self.point_pairs = point_pairs_25 if keypoint_num == 25 else point_pairs_18
        self.map_idx = map_idx_25 if keypoint_num == 25 else map_idx_18
        self.colors = colors_25 if keypoint_num == 25 else colors_18
        self.num_points = 25 if keypoint_num == 25 else 18

        self.prototxt = prototxt_25 if keypoint_num == 25 else prototxt_18
        self.caffemodel = caffemodel_25 if keypoint_num == 25 else caffemodel_18
        self.pose_net = self.get_model()
获取关键点
    def getKeypoints(self, probMap, threshold=0.1):
        mapSmooth = cv2.GaussianBlur(probMap, (3, 3), 0, 0)
        mapMask = np.uint8(mapSmooth > threshold)
        keypoints = []

        # find the blobs
        contours, hierarchy = cv2.findContours(mapMask, cv2.RETR_TREE, cv2.CHAIN_APPROX_SIMPLE)
        for cnt in contours:
            blobMask = np.zeros(mapMask.shape)
            blobMask = cv2.fillConvexPoly(blobMask, cnt, 1)
            maskedProbMap = mapSmooth * blobMask
            _, maxVal, _, maxLoc = cv2.minMaxLoc(maskedProbMap)
            keypoints.append(maxLoc + (probMap[maxLoc[1], maxLoc[0]],))
        return keypoints
获取有效点对
    def getValidPairs(self, output, detected_keypoints, width, height):
        valid_pairs = []
        invalid_pairs = []
        n_interp_samples = 15
        paf_score_th = 0.1
        conf_th = 0.7

        for k in range(len(self.map_idx)):
            # A -> B constitute a limb
            pafA = output[0, self.map_idx[k][0], :, :]
            pafB = output[0, self.map_idx[k][1], :, :]
            pafA = cv2.resize(pafA, (width, height))
            pafB = cv2.resize(pafB, (width, height))

            candA = detected_keypoints[self.point_pairs[k][0]]
            candB = detected_keypoints[self.point_pairs[k][1]]
            nA = len(candA)
            nB = len(candB)
            if (nA != 0 and nB != 0):
                valid_pair = np.zeros((0, 3))
                for i in range(nA):
                    max_j = -1
                    maxScore = -1
                    found = 0
                    for j in range(nB):
                        # Find d_ij
                        d_ij = np.subtract(candB[j][:2], candA[i][:2])
                        norm = np.linalg.norm(d_ij)
                        if norm:
                            d_ij = d_ij / norm
                        else:
                            continue
                        # Find p(u)
                        interp_coord = list(
                            zip(np.linspace(candA[i][0], candB[j][0], num=n_interp_samples),
                                np.linspace(candA[i][1], candB[j][1], num=n_interp_samples)))
                        # Find L(p(u))
                        paf_interp = []
                        for k in range(len(interp_coord)):
                            paf_interp.append([pafA[int(round(interp_coord[k][1])), int(round(interp_coord[k][0]))],
                                               pafB[int(round(interp_coord[k][1])), int(round(interp_coord[k][0]))]])
                        # Find E
                        paf_scores = np.dot(paf_interp, d_ij)
                        avg_paf_score = sum(paf_scores) / len(paf_scores)
                        # check if the connection is valid
                        # If the fraction of interpolated vectors aligned with PAF is higher then threshold -> Valid Pair
                        if (len(np.where(paf_scores > paf_score_th)[0]) / n_interp_samples) > conf_th:
                            if avg_paf_score > maxScore:
                                max_j = j
                                maxScore = avg_paf_score
                                found = 1
                    # Append the connection to the list
                    if found:
                        valid_pair = np.append(valid_pair, [[candA[i][3], candB[max_j][3], maxScore]], axis=0)

                # Append the detected connections to the global list
                valid_pairs.append(valid_pair)

            else:  # If no keypoints are detected
                print("No Connection : k = {}".format(k))
                invalid_pairs.append(k)
                valid_pairs.append([])

        return valid_pairs, invalid_pairs
连接有效点对,获取完整的人体骨骼图
    def getPersonwiseKeypoints(self, valid_pairs, invalid_pairs, keypoints_list):
        personwiseKeypoints = -1 * np.ones((0, self.num_points + 1))
        for k in range(len(self.map_idx)):
            if k not in invalid_pairs:
                partAs = valid_pairs[k][:, 0]
                partBs = valid_pairs[k][:, 1]
                indexA, indexB = np.array(self.point_pairs[k])
                for i in range(len(valid_pairs[k])):
                    found = 0
                    person_idx = -1
                    for j in range(len(personwiseKeypoints)):
                        if personwiseKeypoints[j][indexA] == partAs[i]:
                            person_idx = j
                            found = 1
                            break
                    if found:
                        personwiseKeypoints[person_idx][indexB] = partBs[i]
                        personwiseKeypoints[person_idx][-1] += keypoints_list[partBs[i].astype(int), 2] + \
                                                               valid_pairs[k][i][2]
                    elif not found and k < self.num_points - 1:
                        row = -1 * np.ones(self.num_points + 1)
                        row[indexA] = partAs[i]
                        row[indexB] = partBs[i]
                        row[-1] = sum(keypoints_list[valid_pairs[k][i, :2].astype(int), 2]) + \
                                  valid_pairs[k][i][2]
                        personwiseKeypoints = np.vstack([personwiseKeypoints, row])
        return personwiseKeypoints
关键点连接后的可视化
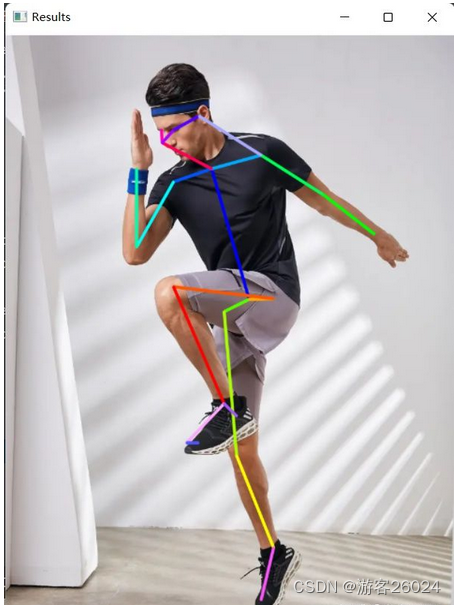
import cv2 显示
因为原始图像尺寸太大了,所以我resize了一下。
def vis_pose(self, img_file, personwiseKeypoints, keypoints_list):
img = cv2.imread(img_file)
for i in range(self.num_points - 1):
for n in range(len(personwiseKeypoints)):
index = personwiseKeypoints[n][np.array(self.point_pairs[i])]
if -1 in index:
continue
B = np.int32(keypoints_list[index.astype(int), 0])
A = np.int32(keypoints_list[index.astype(int), 1])
cv2.line(img, (B[0], A[0]), (B[1], A[1]), self.colors[i], 3, cv2.LINE_AA)
img = cv2.resize(img, (480, 640))
cv2.imshow("Results", img)
cv2.waitKey(0)
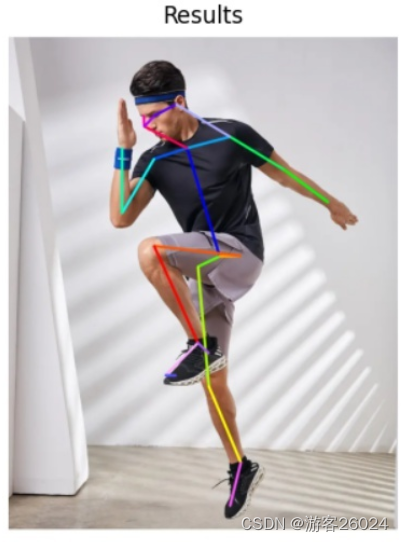
cv2.destroyAllWindows()import matplotlib.pyplot as plt 显示
    def vis_pose(self, img_file, personwiseKeypoints, keypoints_list):
        img = cv2.imread(img_file)
        for i in range(self.num_points - 1):
            for n in range(len(personwiseKeypoints)):
                index = personwiseKeypoints[n][np.array(self.point_pairs[i])]
                if -1 in index:
                    continue
                B = np.int32(keypoints_list[index.astype(int), 0])
                A = np.int32(keypoints_list[index.astype(int), 1])
                cv2.line(img, (B[0], A[0]), (B[1], A[1]), self.colors[i], 3, cv2.LINE_AA)
        plt.figure()
        plt.imshow(img[:, :, ::-1])
        plt.title('Results')
        plt.axis("off")
        plt.show()
预测(推理)关键点
    def predict(self, imgfile):
        img = cv2.imread(imgfile)
        height, width, _ = img.shape
        net_height = 368
        net_width = int((net_height / height) * width)
        start = time.time()

        in_blob = cv2.dnn.blobFromImage(
            img, 1.0 / 255, (net_width, net_height), (0, 0, 0), swapRB=False, crop=False)
        self.pose_net.setInput(in_blob)
        output = self.pose_net.forward()
        print("[INFO]Time Taken in Forward pass: {} ".format(time.time() - start))
        detected_keypoints = []
        keypoints_list = np.zeros((0, 3))
        keypoint_id = 0
        threshold = 0.1
        for part in range(self.num_points):
            probMap = output[0, part, :, :]
            probMap = cv2.resize(probMap, (width, height))

            keypoints = self.getKeypoints(probMap, threshold)
            print("Keypoints - {} : {}".format(self.point_names[part], keypoints))
            keypoint_with_id = []
            for i in range(len(keypoints)):
                keypoint_with_id.append(keypoints[i] + (keypoint_id,))
                keypoints_list = np.vstack([keypoints_list, keypoints[i]])
                keypoint_id += 1
            detected_keypoints.append(keypoint_with_id)
        valid_paris, invalid_pairs = self.getValidPairs(output, detected_keypoints, width, height)
        personwiseKeypoints = self.getPersonwiseKeypoints(valid_paris, invalid_pairs, keypoints_list)
        self.vis_pose(imgfile, personwiseKeypoints, keypoints_list)
main.py
if __name__ == '__main__':
    gmm = general_mulitpose_model(25)
    personwiseKeypoints, keypoints_list = gmm.predict("images/pose.jpg")
完整代码
import cv2
import time
import math
import numpy as np
from config import *


class general_mulitpose_model(object):
    def __init__(self, keypoint_num):
        self.point_names = point_name_25 if keypoint_num == 25 else point_names_18
        self.point_pairs = point_pairs_25 if keypoint_num == 25 else point_pairs_18
        self.map_idx = map_idx_25 if keypoint_num == 25 else map_idx_18
        self.colors = colors_25 if keypoint_num == 25 else colors_18
        self.num_points = 25 if keypoint_num == 25 else 18

        self.prototxt = prototxt_25 if keypoint_num == 25 else prototxt_18
        self.caffemodel = caffemodel_25 if keypoint_num == 25 else caffemodel_18
        self.pose_net = self.get_model()

    def get_model(self):
        coco_net = cv2.dnn.readNetFromCaffe(self.prototxt, self.caffemodel)
        return coco_net

    def predict(self, imgfile):
        start = time.time()
        img = cv2.imread(imgfile)
        height, width, _ = img.shape
        net_height = 368
        net_width = int((net_height / height) * width)
        start = time.time()

        in_blob = cv2.dnn.blobFromImage(
            img, 1.0 / 255, (net_width, net_height), (0, 0, 0), swapRB=False, crop=False)
        self.pose_net.setInput(in_blob)
        output = self.pose_net.forward()
        print("[INFO]Time Taken in Forward pass: {} ".format(time.time() - start))
        detected_keypoints = []
        keypoints_list = np.zeros((0, 3))
        keypoint_id = 0
        threshold = 0.1
        for part in range(self.num_points):
            probMap = output[0, part, :, :]
            probMap = cv2.resize(probMap, (width, height))

            keypoints = self.getKeypoints(probMap, threshold)
            print("Keypoints - {} : {}".format(self.point_names[part], keypoints))
            keypoint_with_id = []
            for i in range(len(keypoints)):
                keypoint_with_id.append(keypoints[i] + (keypoint_id,))
                keypoints_list = np.vstack([keypoints_list, keypoints[i]])
                keypoint_id += 1
            detected_keypoints.append(keypoint_with_id)
        valid_paris, invalid_pairs = self.getValidPairs(output, detected_keypoints, width, height)
        personwiseKeypoints = self.getPersonwiseKeypoints(valid_paris, invalid_pairs, keypoints_list)
        img = self.vis_pose(imgfile, personwiseKeypoints, keypoints_list)
        FPS = math.ceil(1 / (time.time() - start))
        img = cv2.putText(img, "FPS" + str(int(FPS)), (25, 50), cv2.FONT_HERSHEY_SIMPLEX, 1, (0, 255, 0), 3)
        return img

    def getKeypoints(self, probMap, threshold=0.1):
        mapSmooth = cv2.GaussianBlur(probMap, (3, 3), 0, 0)
        mapMask = np.uint8(mapSmooth > threshold)
        keypoints = []

        # find the blobs
        _, contours, hierarchy = cv2.findContours(mapMask, cv2.RETR_TREE, cv2.CHAIN_APPROX_SIMPLE)
        for cnt in contours:
            blobMask = np.zeros(mapMask.shape)
            blobMask = cv2.fillConvexPoly(blobMask, cnt, 1)
            maskedProbMap = mapSmooth * blobMask
            _, maxVal, _, maxLoc = cv2.minMaxLoc(maskedProbMap)
            keypoints.append(maxLoc + (probMap[maxLoc[1], maxLoc[0]],))
        return keypoints

    def getValidPairs(self, output, detected_keypoints, width, height):
        valid_pairs = []
        invalid_pairs = []
        n_interp_samples = 15
        paf_score_th = 0.1
        conf_th = 0.7

        for k in range(len(self.map_idx)):
            # A -> B constitute a limb
            pafA = output[0, self.map_idx[k][0], :, :]
            pafB = output[0, self.map_idx[k][1], :, :]
            pafA = cv2.resize(pafA, (width, height))
            pafB = cv2.resize(pafB, (width, height))

            candA = detected_keypoints[self.point_pairs[k][0]]
            candB = detected_keypoints[self.point_pairs[k][1]]
            nA = len(candA)
            nB = len(candB)
            if (nA != 0 and nB != 0):
                valid_pair = np.zeros((0, 3))
                for i in range(nA):
                    max_j = -1
                    maxScore = -1
                    found = 0
                    for j in range(nB):
                        # Find d_ij
                        d_ij = np.subtract(candB[j][:2], candA[i][:2])
                        norm = np.linalg.norm(d_ij)
                        if norm:
                            d_ij = d_ij / norm
                        else:
                            continue
                        # Find p(u)
                        interp_coord = list(
                            zip(np.linspace(candA[i][0], candB[j][0], num=n_interp_samples),
                                np.linspace(candA[i][1], candB[j][1], num=n_interp_samples)))
                        # Find L(p(u))
                        paf_interp = []
                        for k in range(len(interp_coord)):
                            paf_interp.append([pafA[int(round(interp_coord[k][1])), int(round(interp_coord[k][0]))],
                                               pafB[int(round(interp_coord[k][1])), int(round(interp_coord[k][0]))]])
                        # Find E
                        paf_scores = np.dot(paf_interp, d_ij)
                        avg_paf_score = sum(paf_scores) / len(paf_scores)
                        # check if the connection is valid
                        # If the fraction of interpolated vectors aligned with PAF is higher then threshold -> Valid Pair
                        if (len(np.where(paf_scores > paf_score_th)[0]) / n_interp_samples) > conf_th:
                            if avg_paf_score > maxScore:
                                max_j = j
                                maxScore = avg_paf_score
                                found = 1
                    # Append the connection to the list
                    if found:
                        valid_pair = np.append(valid_pair, [[candA[i][3], candB[max_j][3], maxScore]], axis=0)

                # Append the detected connections to the global list
                valid_pairs.append(valid_pair)

            else:  # If no keypoints are detected
                print("No Connection : k = {}".format(k))
                invalid_pairs.append(k)
                valid_pairs.append([])

        return valid_pairs, invalid_pairs

    def getPersonwiseKeypoints(self, valid_pairs, invalid_pairs, keypoints_list):
        personwiseKeypoints = -1 * np.ones((0, self.num_points + 1))
        for k in range(len(self.map_idx)):
            if k not in invalid_pairs:
                partAs = valid_pairs[k][:, 0]
                partBs = valid_pairs[k][:, 1]
                indexA, indexB = np.array(self.point_pairs[k])
                for i in range(len(valid_pairs[k])):
                    found = 0
                    person_idx = -1
                    for j in range(len(personwiseKeypoints)):
                        if personwiseKeypoints[j][indexA] == partAs[i]:
                            person_idx = j
                            found = 1
                            break
                    if found:
                        personwiseKeypoints[person_idx][indexB] = partBs[i]
                        personwiseKeypoints[person_idx][-1] += keypoints_list[partBs[i].astype(int), 2] + \
                                                               valid_pairs[k][i][2]
                    elif not found and k < self.num_points - 1:
                        row = -1 * np.ones(self.num_points + 1)
                        row[indexA] = partAs[i]
                        row[indexB] = partBs[i]
                        row[-1] = sum(keypoints_list[valid_pairs[k][i, :2].astype(int), 2]) + \
                                  valid_pairs[k][i][2]
                        personwiseKeypoints = np.vstack([personwiseKeypoints, row])
        return personwiseKeypoints

    def vis_pose(self, img_file, personwiseKeypoints, keypoints_list):
        img = cv2.imread(img_file)
        for i in range(self.num_points - 1):
            for n in range(len(personwiseKeypoints)):
                index = personwiseKeypoints[n][np.array(self.point_pairs[i])]
                if -1 in index:
                    continue
                B = np.int32(keypoints_list[index.astype(int), 0])
                A = np.int32(keypoints_list[index.astype(int), 1])
                cv2.line(img, (B[0], A[0]), (B[1], A[1]), self.colors[i], 3, cv2.LINE_AA)
        img = cv2.resize(img, (480, 640))
        return img


if __name__ == '__main__':
    gmm = general_mulitpose_model(25)
    img = gmm.predict("images/pose.jpg")
    cv2.imshow("frame", img)
    cv2.waitKey(0)
    cv2.destroyAllWindows()
运行结果
cv2显示
plt 显示
2.实时视频
因为之前都只是调用了openpose的模型并没有真正使用源码,所以现在真正使用,并且编译一下,其步骤为:
1)配置文件3rdparty\windows
将之前github上下载好的项目,找到位置打开,如我的位置:
D:\PycharmProject\openpose-master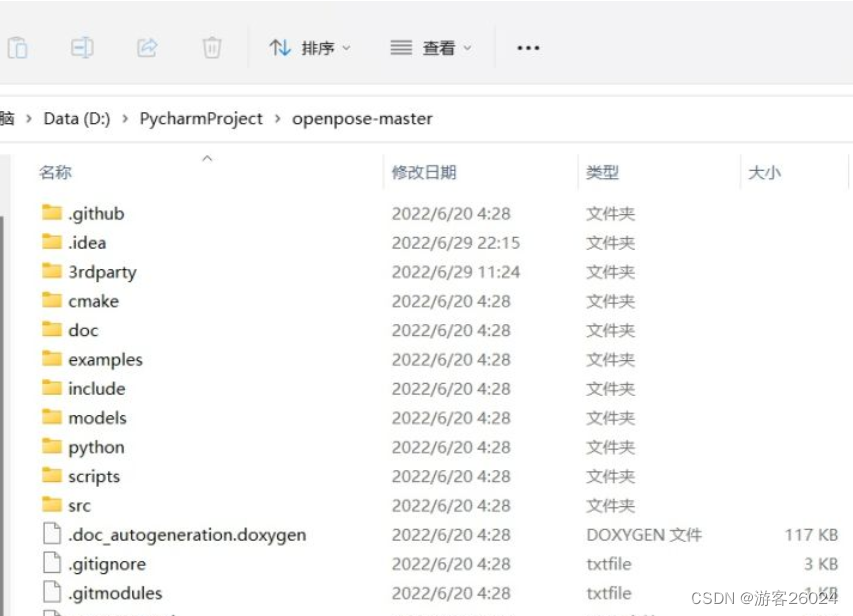
进入"3rdparty",找到windows,双击四个.bat文件
D:\PycharmProject\openpose-master\3rdparty\windows
getCaffe.bat
getCaffe3rdparty.bat
getFreeglut.bat
getOpenCV.bat 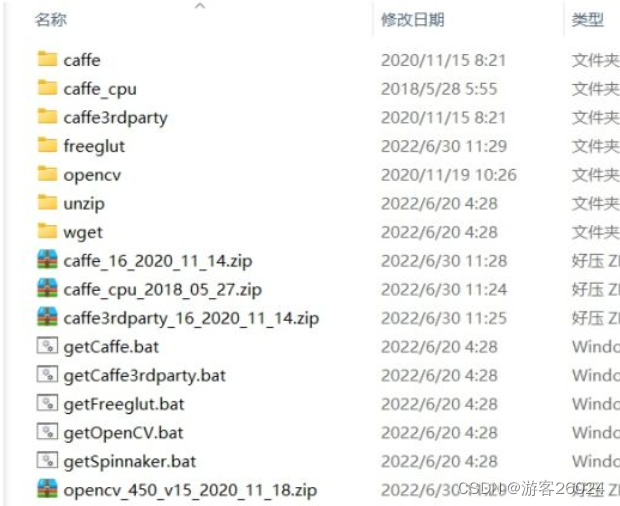
2)配置文件3rdparty\caffe or pybind11
进入官网的"3rdparty",找到caffe or pybind11
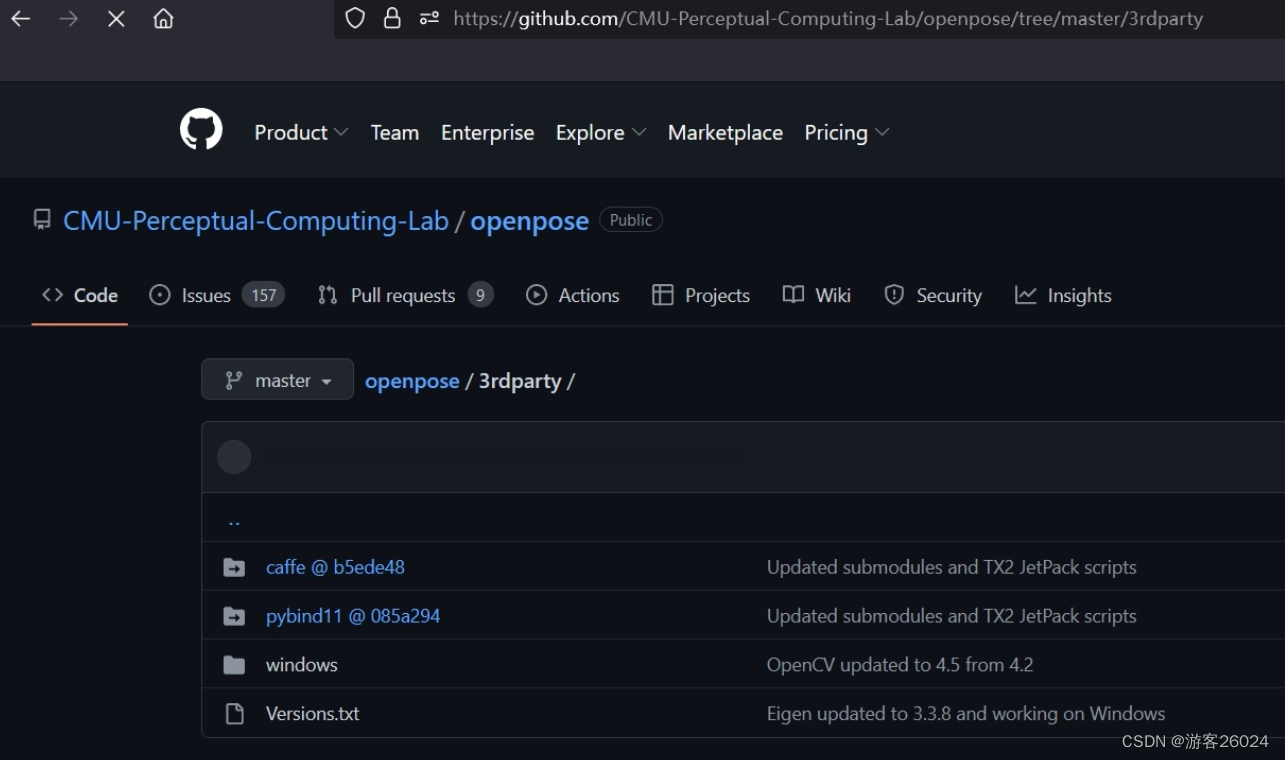
将其git clone https://github.com/CMU-Perceptual-Computing-Lab/caffe.git 或者 下载.zip文件, 放到你文件所在的位置如:
'D:\PycharmProject\openpose-master\3rdparty\caffe'
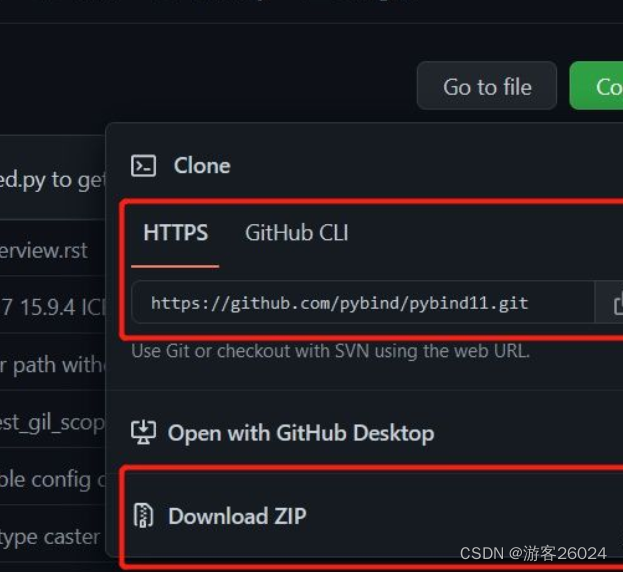
将其git clone https://github.com/pybind/pybind11.git 或者 下载.zip文件,放到你文件所在的位置如:'D:\PycharmProject\openpose-master\3rdparty\pybind11'
如图
3)模型下载(之前已经介绍过了)
cd openpose-master/models
bash getModels.sh (Linux)
双击 getModels.bat (Windows)
下载 pose_iter_584000.caffemodel
     pose_iter_440000.caffemodel
...(还有hand,face的模型)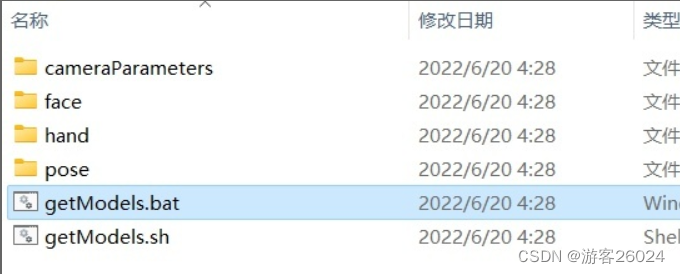

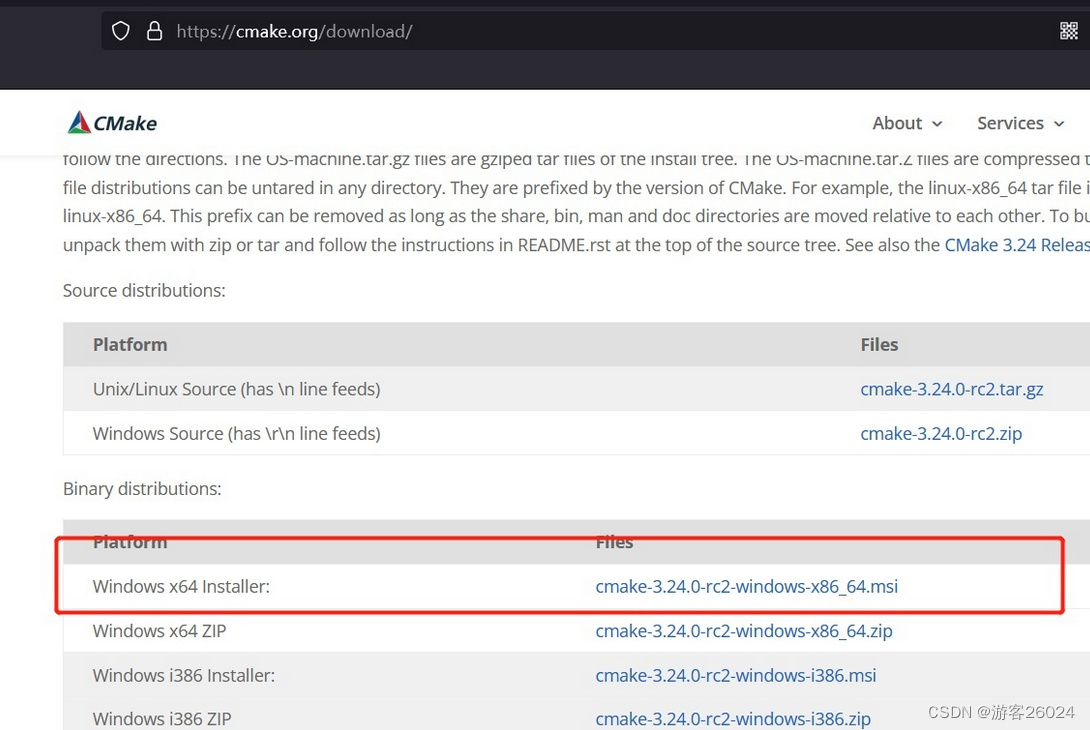
4)Cmake编译
首先下载cmake-gui:
https://cmake.org/download/![]() https://cmake.org/download/windows就下载.msi版本的
https://cmake.org/download/windows就下载.msi版本的
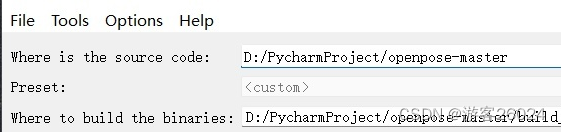
之后就是将openpose-master编译
第三行的build是自己取的名字,可以直接build或者其他build_CPU
点击Add Entry,输入自己的Python路径,再点击OK!
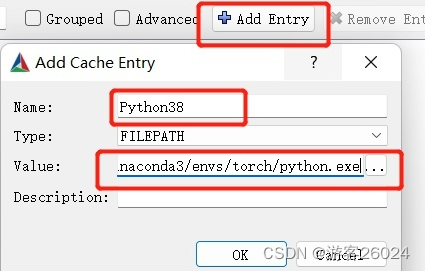
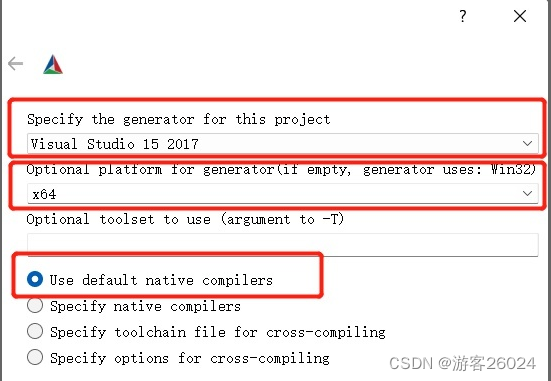
之后,点击“Configure“

配置vs,你的vs要和你电脑的版本一样,可在 控制面板-> 程序 中查看
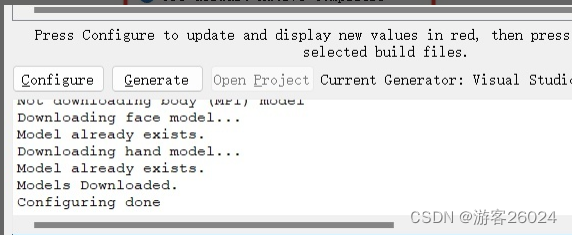
完成之后,再点BUILD_PYTHON,DOWNLOAD_BODY_25_MODEL,DOWNLOAD_BODY_COCO_MODEL,DOWNLOAD_BODY_MPI_MODEL(hand,face也如果有用也选吧!)。


“GPU_MODE”选中“CPU_ONLY”,不选"USE_CUDNN";你也可以选择"CUDA",那之后必须选择“USE_CUDNN”
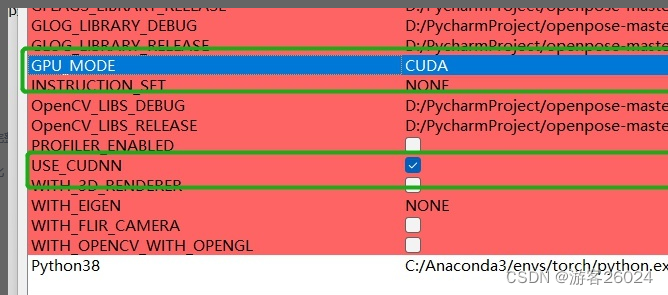
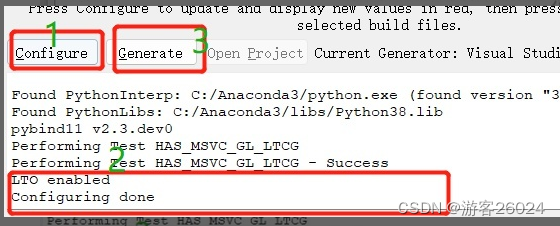
点击“Configure”,等全部完成之后,点击“Generate”
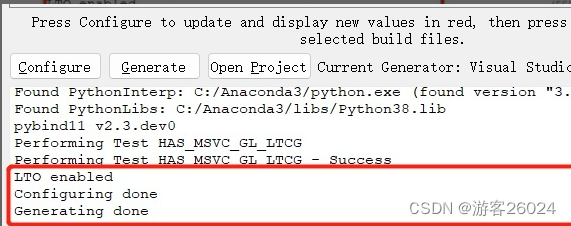
5)编译工程
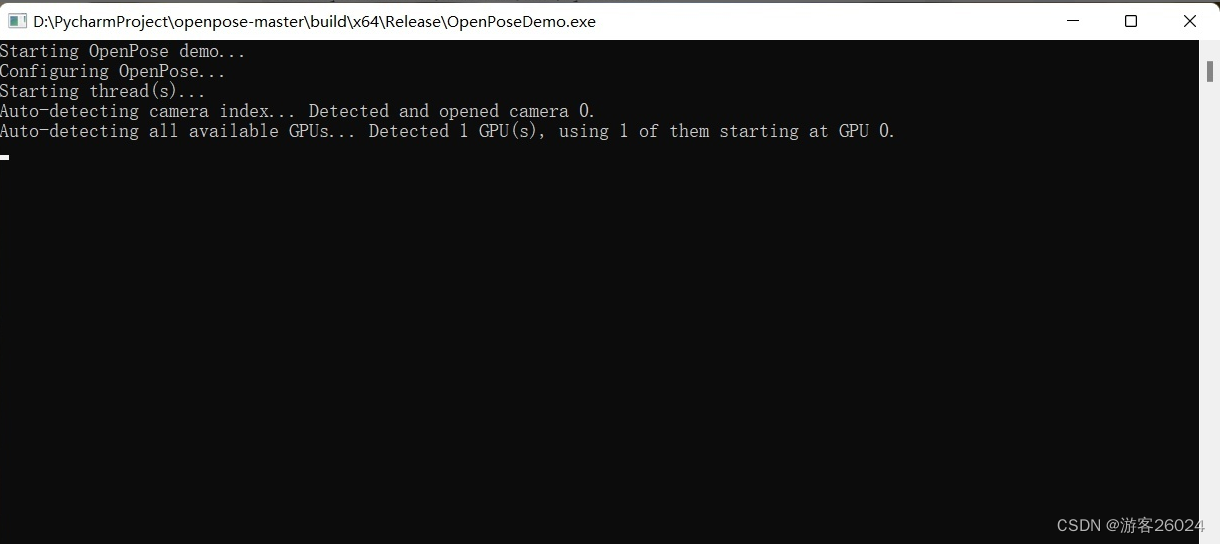
找到openpose-master/build/OpenPose.sln使用vs 2017打开,输入(release x64版本)点击绿色倒三角符号,等待结果
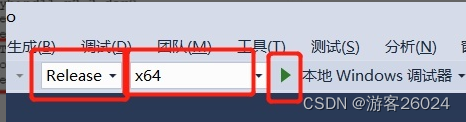
如果成功这是下面这种状态,并且视频摄像头打开,openpose开始识别人体姿态与人!
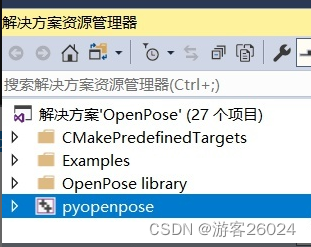
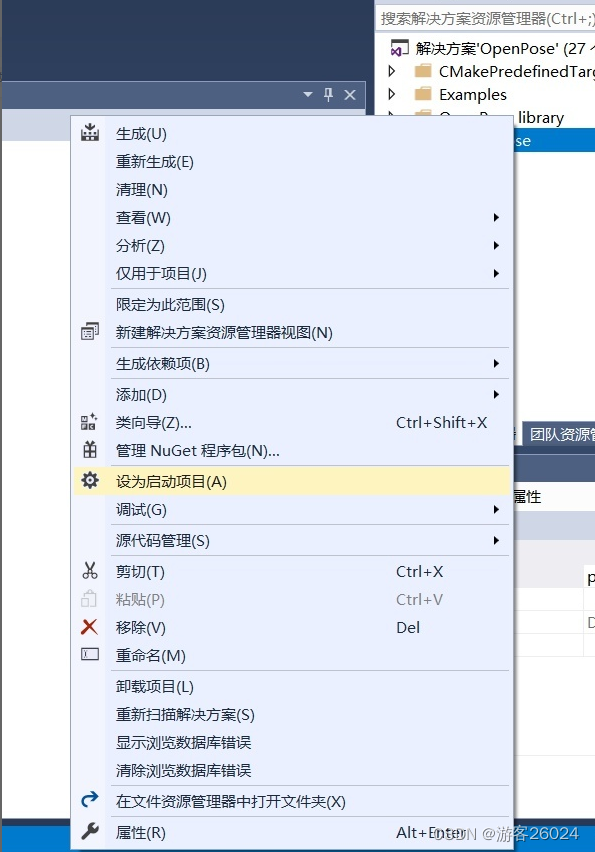
之后右键点击pyopenpose,设为启动项目
之后结合,官网给的代码,仿照"openpose-master\build\examples\tutorial_api_python\01_body_from_image.py"来导入pyopenpose
把官网给的openpose-master\build\bin 与 openpose-master\x64拷贝到自己的项目里面去
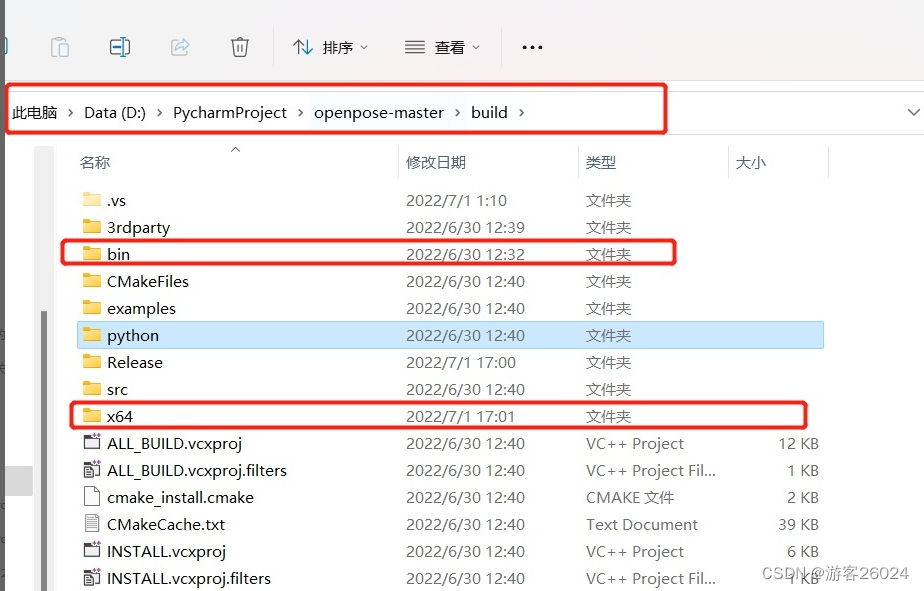
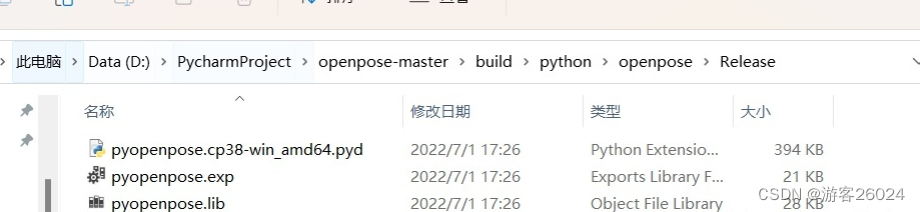
把openpose-master\build\python\openpose\Release 导入自己的项目
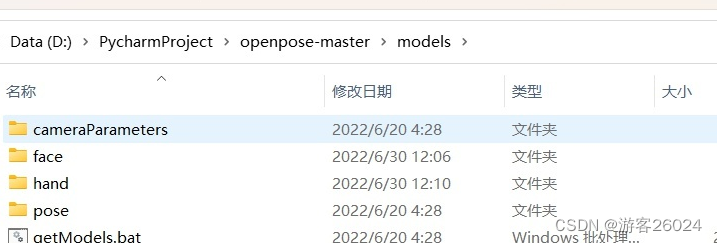
再把openpose-master\models中的 hand 和 face 还有 pose 导入自己的项目中去
代码
尝试导入openpose,查看是否成功
import os
import sys
from sys import platform

BASE_DIR = os.path.dirname(os.path.realpath(__file__))
if platform == 'win32':
    lib_dir = 'Release'
    bin_dir = 'bin'
    x64_dir = 'x64'
    lib_path = os.path.join(BASE_DIR, lib_dir)
    bin_path = os.path.join(BASE_DIR, bin_dir)
    x64_path = os.path.join(BASE_DIR, x64_dir)
    sys.path.append(lib_path)
    os.environ['PATH'] += ';' + bin_path + ';' + x64_path + '\Release;'
    try:
        import pyopenpose as op
        print("successful, import pyopenpose!")
    except ImportError as e:
        print("fail to import pyopenpose!")
        raise e
else:
    print(f"当前电脑环境:\n{platform}\n")
    sys.exit(-1)
查看结果

实时视频核心代码
    # 处理数据
    datum = op.Datum()

    # 开始openpose
    opWrapper = op.WrapperPython()

    # 配置参数
    params = dict()
    params["model_folder"] = BASE_DIR + "\models"
    params["model_pose"] = "BODY_25"
    params["number_people_max"] = 3
    params["disable_blending"] = False

    # 导入参数
    opWrapper.configure(params)
    opWrapper.start()
...
...
# 处理图像
# 输入图像frame打入datum.cvInputData
datum.cvInputData = frame
# 处理输入图像
opWrapper.emplaceAndPop(op.VectorDatum([datum]))
# 输出图像为opframe
opframe = datum.cvOutputData
....完整代码
import os
import time

import cv2
import sys
from tqdm import tqdm
from sys import platform

BASE_DIR = os.path.dirname(os.path.realpath(__file__))
if platform == 'win32':
    lib_dir = 'Release'
    bin_dir = 'bin'
    x64_dir = 'x64'
    lib_path = os.path.join(BASE_DIR, lib_dir)
    bin_path = os.path.join(BASE_DIR, bin_dir)
    x64_path = os.path.join(BASE_DIR, x64_dir)
    sys.path.append(lib_path)
    os.environ['PATH'] += ';' + bin_path + ';' + x64_path + '\Release;'
    try:
        import pyopenpose as op

        print("successful, import pyopenpose!")
    except ImportError as e:
        print("fail to import pyopenpose!")
        raise e
else:
    print(f"当前电脑环境:\n{platform}\n")
    sys.exit(-1)


def out_video(input):
    datum = op.Datum()
    opWrapper = op.WrapperPython()
    params = dict()
    params["model_folder"] = BASE_DIR + "\models"
    params["model_pose"] = "BODY_25"
    params["number_people_max"] = 3
    params["disable_blending"] = False
    opWrapper.configure(params)
    opWrapper.start()
    file = input.split("/")[-1]
    output = "video/out-optim-" + file
    print("It will start processing video: {}".format(input))
    cap = cv2.VideoCapture(input)
    frame_count = int(cap.get(cv2.CAP_PROP_FRAME_COUNT))
    frame_size = (int(cap.get(cv2.CAP_PROP_FRAME_WIDTH)), int(cap.get(cv2.CAP_PROP_FRAME_HEIGHT)))
    # create VideoWriter,VideoWriter_fourcc is video decode
    fourcc = cv2.VideoWriter_fourcc('D', 'I', 'V', 'X')
    fps = cap.get(cv2.CAP_PROP_FPS)
    out = cv2.VideoWriter(output, fourcc, fps, frame_size)
    # the progress bar
    with tqdm(range(frame_count)) as pbar:

        while cap.isOpened():
            start = time.time()
            success, frame = cap.read()
            if success:
                datum.cvInputData = frame
                opWrapper.emplaceAndPop(op.VectorDatum([datum]))
                opframe = datum.cvOutputData
                FPS = 1 / (time.time() - start)
                opframe = cv2.putText(opframe, "FPS" + str(int(FPS)), (25, 50), cv2.FONT_HERSHEY_SIMPLEX, 1,
                                      (0, 255, 0), 3)
                out.write(opframe)
                pbar.update(1)
            else:
                break

    pbar.close()
    cv2.destroyAllWindows()
    out.release()
    cap.release()
    print("{} finished!".format(output))


if __name__ == "__main__":
    video_dir = "video/2.avi"
    out_video(video_dir)
运行结果
OpenPose运行结果
效果比之前的MediaPipe好很多
参考:
工程实现 || 基于opencv使用openpose完成人体姿态估计![]() https://blog.csdn.net/magic_ll/article/details/108451560?spm=1001.2014.3001.5506openpose从安装到实战全攻略!(win10)
https://blog.csdn.net/magic_ll/article/details/108451560?spm=1001.2014.3001.5506openpose从安装到实战全攻略!(win10)![]() https://zhuanlan.zhihu.com/p/500651669
https://zhuanlan.zhihu.com/p/500651669
下一话
文章出处登录后可见!