一、前言
YOLO系列框架凭借其超高的运行流畅度和不俗的准确率,一直被广泛地应用到各个领域。
刚刚推出不久的YOLOV7在5 FPS到160 FPS范围内的速度和精度达到了新的高度,并在GPU V100上具有30 FPS或更高的所有已知实时目标检测器中具有最高的精度56.8%AP。YOLOv7-E6目标检测器(56 FPS V100,55.9% AP)比基于Transform的检测器SWINL Cascade-Mask R-CNN(9.2 FPS A100,53.9% AP)的速度和准确度分别高出509%和2%,以及基于卷积的检测器ConvNeXt-XL Cascade-Mask R-CNN (8.6 FPS A100, 55.2% AP) 速度提高551%,准确率提高0.7%。以及YOLOv7的表现优于:YOLOR、YOLOX、Scaled-YOLOv4、YOLOv5、DETR、Deformable DETR , DINO-5scale-R50, ViT-Adapter-B和许多其他目标检测器在速度和准确度上。
此外,研究者只在MS COCO数据集上从头开始训练YOLOv7,而不使用任何其他数据集或预训练的权重。
论文地址:https://arxiv.org/pdf/2207.02696.pdf
作为目标检测领域的一种框架,YOLOV7能在超低延时的情况下,还能把准确率提升一个层次,效果相当惊人。在识别过程中,将视频流中每一帧图像中的信息进行提取,获得待检测目标的识别种类、具体坐标、置信度等,这些信息可以应用到工业环境下的多个方向,比如:协助机械臂来实现精准夹取,协助无人车进行货物的运输和夹取,监控控制报警器等等,用途广泛。
二、整体制作过程
1.起因
YOLOV7的原始代码argparse库进行封装,让大多数的小白凭借终端命令行可以快速地运行代码查看效果,但是只运行代码而不能获取相关的信息来进一步控制一些硬件,这样的代码是难以落地到实际使用中去的。
于是,如何将detect.py即实时检测代码制作成API是个问题。只有制作成可调用的API,使得其他python程序可以快速调用,且在识别的过程中,还能实时超低延时地获取到识别到的信息(包括:识别到的种类、目标的大致二维坐标,置信度),通过这些信息再来编写相关的硬件控制代码来控制下位机(比如:arduino、STM32等),进而实现一定的自动化控制功能。
2.爆改detect.py的大致思路
将原始代码中使用 argparse库 封装的部分删去,尝试使用面向对象编程中的类来封装;原始的detect.py中还包含很多与其核心识别功能无关的部分,包括:对识别结果的保存等,我们的目标是制作出来的 API 还能保持原来的识别流畅度,于是我只保留进行核心识别的部分。
原本我采用的思路通过 OpenCV 将摄像头的图像保存到某个文件夹下,再将图像导入 YOLOV7 中来实现识别,这样通过图像文件作为中介,运行时还有考虑到读取和保存图像所用的时间,尝试后发现识别相当卡顿,无法应用到实际场景。于是,我删除了原始代码中的调用摄像头的代码,在调用程序中来调用摄像头图像,以 Mat 的格式传输到 API 中,再将得到的识别信息 return 到调用函数中,大大提高了运行速率。
3.代码
保留原始框架下的大部分代码,只修改和新增几个部分,分别是:
新建一个 detect_with_API.py 文件来代替原始的 detect.py 文件
import torch
from numpy import random
from models.experimental import attempt_load
from utils.datasets import  MyLoadImages
from utils.general import check_img_size, non_max_suppression, apply_classifier, \
    scale_coords, set_logging
from utils.plots import plot_one_box
from utils.torch_utils import select_device, load_classifier

class simulation_opt:
    def __init__(self, weights='models/yolov7.pt',
                 img_size = 640, conf_thres = 0.25,
                 iou_thres = 0.45,device='', view_img= False,
                 classes = None, agnostic_nms = False,
                 augment = False, update = False, exist_ok = False):
        self.weights = weights
        self.source = None
        self.img_size = img_size
        self.conf_thres = conf_thres
        self.iou_thres = iou_thres
        self.device = device
        self.view_img = view_img
        self.classes = classes
        self.agnostic_nms = agnostic_nms
        self.augment =augment
        self.update = update
        self.exist_ok = exist_ok

class detectapi:
    def __init__(self, weights, img_size=640):
        self.opt = simulation_opt(weights=weights, img_size=img_size)
        weights, imgsz = self.opt.weights, self.opt.img_size

        # Initialize
        set_logging()
        self.device = select_device(self.opt.device)
        self.half = self.device.type != 'cpu'  # half precision only supported on CUDA

        # Load model
        self.model = attempt_load(weights, map_location=self.device)  # load FP32 model
        self.stride = int(self.model.stride.max())  # model stride
        self.imgsz = check_img_size(imgsz, s=self.stride)  # check img_size

        if self.half:
            self.model.half()  # to FP16

        # Second-stage classifier
        self.classify = False
        if self.classify:
            self.modelc = load_classifier(name='resnet101', n=2)  # initialize
            self.modelc.load_state_dict(torch.load('weights/resnet101.pt', map_location=self.device)['model']).to(self.device).eval()

        # read names and colors
        self.names = self.model.module.names if hasattr(self.model, 'module') else self.model.names
        self.colors = [[random.randint(0, 255) for _ in range(3)] for _ in self.names]

    def detect(self, source):  # 使用时,调用这个函数
        if type(source) != list:
            raise TypeError('source must be a list which contain  pictures read by cv2')
        dataset = MyLoadImages(source, img_size=self.imgsz, stride=self.stride)#imgsz
        # 原来是通过路径加载数据集的,现在source里面就是加载好的图片,所以数据集对象的实现要
        # 重写。修改代码后附。在utils.dataset.py上修改。

        # Run inference
        if self.device.type != 'cpu':
            self.model(torch.zeros(1, 3, self.imgsz, self.imgsz).to(self.device).type_as(next(self.model.parameters())))  # run once
        #t0 = time.time()
        result = []
        '''
        for path, img, im0s, vid_cap in dataset:'''
        for img, im0s in dataset:
            img = torch.from_numpy(img).to(self.device)
            img = img.half() if self.half else img.float()  # uint8 to fp16/32
            img /= 255.0  # 0 - 255 to 0.0 - 1.0
            if img.ndimension() == 3:
                img = img.unsqueeze(0)

            # Inference
            #t1 = time_synchronized()
            pred = self.model(img, augment=self.opt.augment)[0]

            # Apply NMS
            pred = non_max_suppression(pred, self.opt.conf_thres, self.opt.iou_thres, classes=self.opt.classes, agnostic=self.opt.agnostic_nms)
            #t2 = time_synchronized()

            # Apply Classifier
            if self.classify:
                pred = apply_classifier(pred, self.modelc, img, im0s)
                # Print time (inference + NMS)
                #print(f'{s}Done. ({t2 - t1:.3f}s)')
                # Process detections
            det = pred[0]  # 原来的情况是要保持图片,因此多了很多关于保持路径上的处理。另外,pred
            # 其实是个列表。元素个数为batch_size。由于对于我这个api,每次只处理一个图片,
            # 所以pred中只有一个元素,直接取出来就行,不用for循环。
            im0 = im0s.copy()  # 这是原图片,与被传进来的图片是同地址的,需要copy一个副本,否则,原来的图片会受到影响
            # s += '%gx%g ' % img.shape[2:]  # print string
            # gn = torch.tensor(im0.shape)[[1, 0, 1, 0]]  # normalization gain whwh
            result_txt = []
            # 对于一张图片,可能有多个可被检测的目标。所以结果标签也可能有多个。
            # 每被检测出一个物体,result_txt的长度就加一。result_txt中的每个元素是个列表,记录着
            # 被检测物的类别引索,在图片上的位置,以及置信度
            if len(det):
                # Rescale boxes from img_size to im0 size
                det[:, :4] = scale_coords(img.shape[2:], det[:, :4], im0.shape).round()
                # Write results

                for *xyxy, conf, cls in reversed(det):
                    # xywh = (xyxy2xywh(torch.tensor(xyxy).view(1, 4)) / gn).view(-1).tolist()  # normalized xywh
                    line = (int(cls.item()), [int(_.item()) for _ in xyxy], conf.item())  # label format
                    result_txt.append(line)
                    label = f'{self.names[int(cls)]} {conf:.2f}'
                    plot_one_box(xyxy, im0, label=label, color=self.colors[int(cls)], line_thickness=3)
            result.append((im0, result_txt))  # 对于每张图片,返回画完框的图片,以及该图片的标签列表。
        return result, self.names
修改 根目录下 utils/datasets.py 文件,在 logger = logging.getLogger(__name__) 后一行加入以下代码,其他的代码保留原始的,不用删除也不用修改。
class MyLoadImages:  # for inference
    def __init__(self, path, img_size=640, stride=32):
        for img in path:
            if type(img)!=np.ndarray or len(img.shape)!=3:
                raise TypeError('there is a object which is not a picture read by cv2 in source')

        '''
        p = str(Path(path).absolute())  # os-agnostic absolute path
        if '*' in p:
            files = sorted(glob.glob(p, recursive=True))  # glob
        elif os.path.isdir(p):
            files = sorted(glob.glob(os.path.join(p, '*.*')))  # dir
        elif os.path.isfile(p):
            files = [p]  # files
        else:
            raise Exception(f'ERROR: {p} does not exist')

        images = [x for x in files if x.split('.')[-1].lower() in img_formats]
        videos = [x for x in files if x.split('.')[-1].lower() in vid_formats]
        ni, nv = len(images), len(videos)
        '''
        self.img_size = img_size
        self.stride = stride
        self.files = path
        self.nf = len(path)
        #self.video_flag = [False] * ni + [True] * nv
        self.mode = 'image'
        #if any(videos):
            #self.new_video(videos[0])  # new video
        #else:
            #self.cap = None
        #assert self.nf > 0, f'No images or videos found in {p}. ' \
                            #f'Supported formats are:\nimages: {img_formats}\nvideos: {vid_formats}'

    def __iter__(self):
        self.count = 0
        return self

    def __next__(self):
        if self.count == self.nf:
            raise StopIteration
        path = self.files[self.count]
        '''
        if self.video_flag[self.count]:
            # Read video
            self.mode = 'video'
            ret_val, img0 = self.cap.read()
            if not ret_val:
                self.count += 1
                self.cap.release()
                if self.count == self.nf:  # last video
                    raise StopIteration
                else:
                    path = self.files[self.count]
                    self.new_video(path)
                    ret_val, img0 = self.cap.read()

            self.frame += 1
            print(f'video {self.count + 1}/{self.nf} ({self.frame}/{self.nframes}) {path}: ', end='')
        '''
        # Read image
        self.count += 1
        #img0 = cv2.imread(path)  # BGR
        #assert img0 is not None, 'Image Not Found ' + path
        #print(f'image {self.count}/{self.nf} {path}: ', end='')

        # Padded resize
        img = letterbox(path, self.img_size, stride=self.stride)[0]

        # Convert
        img = img[:, :, ::-1].transpose(2, 0, 1)  # BGR to RGB, to 3x416x416
        img = np.ascontiguousarray(img)

        return img, path
新建一个 demo_run_API.py 文件,对 detect_with_API.py 中的 API 进行调用
import cv2
import detect_with_API
import torch
cap=cv2.VideoCapture('http://admin:admin@192.168.1.109:8081')# 0
a = detect_with_API.detectapi(weights='models/yolov7.pt')

if __name__ == '__main__':
    with torch.no_grad():
        while True:
            rec,img = cap.read()
            result,names = a.detect([img])
            img=result[0][0] #每一帧图片的处理结果图片
            # 每一帧图像的识别结果(可包含多个物体)
            for cls,(x1,y1,x2,y2),conf in result[0][1]:
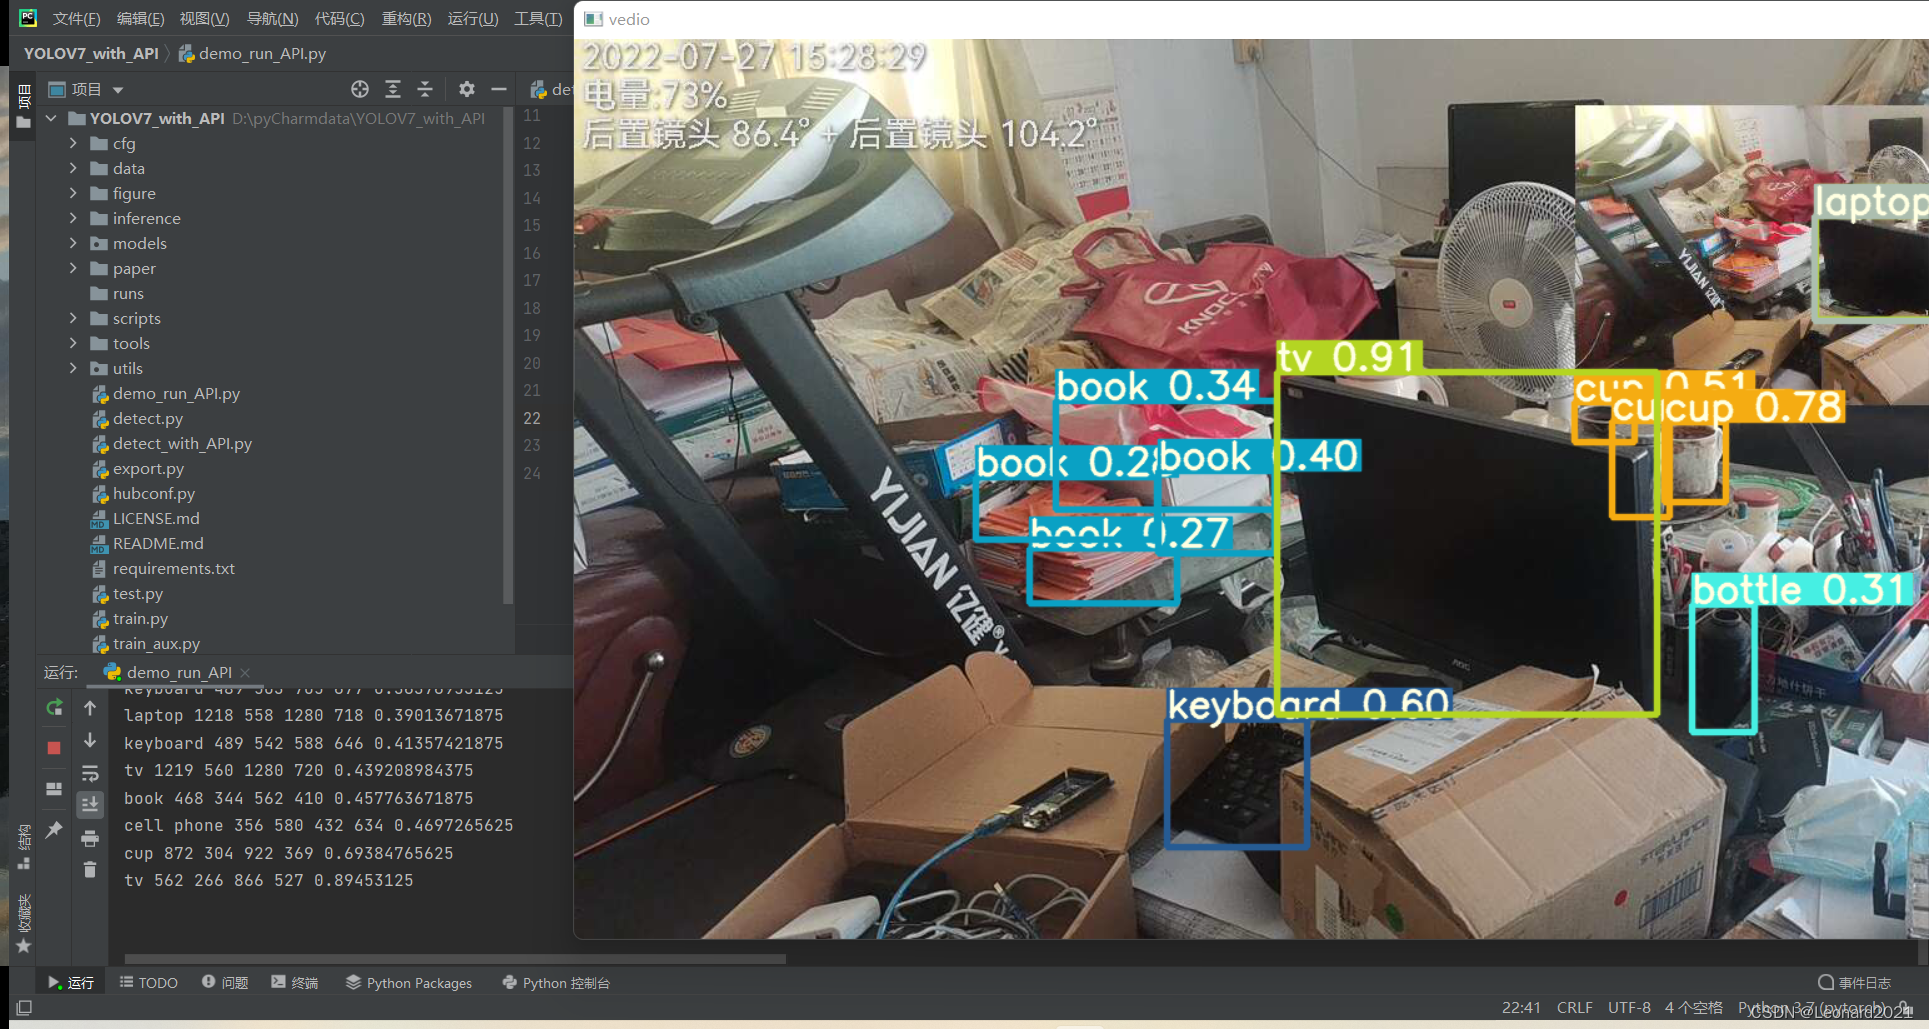
                print(names[cls],x1,y1,x2,y2,conf)#识别物体种类、左上角x坐标、左上角y轴坐标、右下角x轴坐标、右下角y轴坐标,置信度
                '''
                cv2.rectangle(img,(x1,y1),(x2,y2),(0,255,0))
                cv2.putText(img,names[cls],(x1,y1-20),cv2.FONT_HERSHEY_DUPLEX,1.5,(255,0,0))'''
            print()#将每一帧的结果输出分开
            cv2.imshow("vedio",img)

            if cv2.waitKey(1)==ord('q'):
                break
三、效果演示
我这里使用的是网络摄像头,你也可以用 USB 的接口摄像头或者电脑自带的摄像头。
配置好环境,摄像头后,运行 demo_run_API.py ,得:

我的整体项目框架如下,有需要的自取:
YOLOV7_with_API.7z-深度学习文档类资源-CSDN下载
若你用自己的数据集来定制化地训练自己的识别模型,可以参考:
YOLOV5训练自己的无人车避坑(障)系统_Leonard2021的博客-CSDN博客_yolo训练
YOLOV7的训练的函数是没有修改的,训练完成后,在我制作API中调用你自己训练的模型即可。
~~~~~~~~~~~~~~~~~~~~~~~~~~~~~~~~~~~~~~~~~~~~
如果本文对你有帮助,欢迎一键三连!
文章出处登录后可见!
