内容
- 前言
- 0、导入需要的包和基本配置
- 1、设置opt参数
- 2、执行main函数
- 3、执行run函数
- 3.1、载入参数
- 3.2、初始化配置1
- 3.3、调整模型
- 3.4、初始化配置2
- 3.5、加载val数据集
- 3.6、初始化配置3
- 3.7、开始验证
- 3.7.1、预处理图片和target
- 3.7.2、model 前向推理
- 3.7.3、计算验证集损失
- 3.7.4、Run NMS
- 3.7.5、统计每张图片的真实框、预测框信息
- 3.7.6、保存预测信息到image_name.txt文件
- 3.7.7、保存预测信息到wandb_logger
- 3.7.8、将预测信息保存到coco格式的json字典
- 3.7.9、计算混淆矩阵、计算correct、生成stats
- 3.7.10、画出前三个batch图片的gt和pred框
- 3.7.11、计算mAP
- 3.7.12、print打印各项指标
- 3.7.13、画出混淆矩阵并存入wandb_logger中
- 3.7.14、Save JSON
- 3.7.15、 Return results
- 总结
前言
源码:YOLOv5源码.
导航:【YOLOV5-5.x 源码讲解】整体项目文件导航.
注释版全部项目文件已上传至GitHub:yolov5-5.x-annotations.
这个文件主要是在每一轮训练结束后,验证当前模型的mAP、混淆矩阵等指标。这个文件本来是叫test.py的,但我觉得叫val.py可能更加恰当些,所以改了。
实际上这个脚本最常用的应该是通过train.py调用 run 函数,而不是通过执行 val.py 的。所以在了解这个脚本的时候,其实最重要的就是 run 函数。
0、导入需要的包和基本配置
import argparse                  # 解析命令行参数模块
import json                      # 实现字典列表和JSON字符串之间的相互解析
import os                        # 与操作系统进行交互的模块 包含文件路径操作和解析
import sys                       # sys系统模块 包含了与Python解释器和它的环境有关的函数
from pathlib import Path         # Path将str转换为Path对象 使字符串路径易于操作的模块
from threading import Thread     # 线程操作模块

import numpy as np
import torch
import yaml
from tqdm import tqdm

FILE = Path(__file__).absolute()  # FILE = WindowsPath 'F:\yolo_v5\yolov5-U\val.py'
# 将'F:/yolo_v5/yolov5-U'加入系统的环境变量  该脚本结束后失效
sys.path.append(FILE.parents[0].as_posix())  # add yolov5/ to path

from models.experimental import attempt_load
from utils.datasets import create_dataloader
from utils.general import coco80_to_coco91_class, check_dataset, check_file, check_img_size, check_requirements, \
     box_iou, non_max_suppression, scale_coords, xyxy2xywh, xywh2xyxy, set_logging, increment_path, colorstr
from utils.metrics import ap_per_class, ConfusionMatrix
from utils.plots import plot_images, output_to_target, plot_study_txt
from utils.torch_utils import select_device, time_synchronized
1、设置opt参数
def parse_opt():
    """
    opt参数详解
    data: 数据集配置文件地址 包含数据集的路径、类别个数、类名、下载地址等信息
    weights: 模型的权重文件地址 weights/yolov5s.pt
    batch_size: 前向传播的批次大小 默认32
    imgsz: 输入网络的图片分辨率 默认640
    conf-thres: object置信度阈值 默认0.25
    iou-thres: 进行NMS时IOU的阈值 默认0.6
    task: 设置测试的类型 有train, val, test, speed or study几种 默认val
    device: 测试的设备
    single-cls: 数据集是否只用一个类别 默认False
    augment: 测试是否使用TTA Test Time Augment 默认False
    verbose: 是否打印出每个类别的mAP 默认False
    下面三个参数是auto-labelling(有点像RNN中的teaching forcing)相关参数详见:https://github.com/ultralytics/yolov5/issues/1563 下面解释是作者原话
    save-txt: traditional auto-labelling
    save-hybrid: save hybrid autolabels, combining existing labels with new predictions before NMS (existing predictions given confidence=1.0 before NMS.
    save-conf: add confidences to any of the above commands
    save-json: 是否按照coco的json格式保存预测框,并且使用cocoapi做评估(需要同样coco的json格式的标签) 默认False
    project: 测试保存的源文件 默认runs/test
    name: 测试保存的文件地址 默认exp  保存在runs/test/exp下
    exist-ok: 是否存在当前文件 默认False 一般是 no exist-ok 连用  所以一般都要重新创建文件夹
    half: 是否使用半精度推理 默认False
    """
    parser = argparse.ArgumentParser(prog='val.py')
    parser.add_argument('--data', type=str, default='data/coco128.yaml', help='dataset.yaml path')
    parser.add_argument('--weights', nargs='+', type=str, default='weights/yolov5s.pt', help='model.pt path(s)')
    parser.add_argument('--batch-size', type=int, default=4, help='batch size')
    parser.add_argument('--imgsz', '--img', '--img-size', type=int, default=640, help='inference size (pixels)')
    parser.add_argument('--conf-thres', type=float, default=0.001, help='confidence threshold')
    parser.add_argument('--iou-thres', type=float, default=0.6, help='NMS IoU threshold')
    parser.add_argument('--task', default='val', help='train, val, test, speed or study')
    parser.add_argument('--device', default='', help='cuda device, i.e. 0 or 0,1,2,3 or cpu')
    parser.add_argument('--single-cls', action='store_true', help='treat as single-class dataset')
    parser.add_argument('--augment', action='store_true', help='augmented inference')
    parser.add_argument('--verbose', action='store_true', help='report mAP by class')
    parser.add_argument('--save-txt', default=True, action='store_true', help='save results to *.txt')
    parser.add_argument('--save-hybrid', action='store_true', help='save label+prediction hybrid results to *.txt')
    parser.add_argument('--save-conf', default=True, action='store_true', help='save confidences in --save-txt labels')
    parser.add_argument('--save-json', action='store_true', help='save a cocoapi-compatible JSON results file')
    parser.add_argument('--project', default='runs/test', help='save to project/name')
    parser.add_argument('--name', default='exp', help='save to project/name')
    parser.add_argument('--exist-ok', action='store_true', help='existing project/name ok, do not increment')
    parser.add_argument('--half', action='store_true', help='use FP16 half-precision inference')
    opt = parser.parse_args()   # 解析上述参数
    opt.save_json |= opt.data.endswith('coco.yaml')  # |或 左右两个变量有一个为True 左边变量就为True
    opt.save_txt |= opt.save_hybrid
    opt.data = check_file(opt.data)  # check file
    return opt
2、执行main函数
def main(opt):
    # 初始化日志 设置logging的等级level、输出格式和内容format等基本信息
    set_logging()
    # 打印信息  test(高亮): opt各个参数值
    print(colorstr('test: ') + ', '.join(f'{k}={v}' for k, v in vars(opt).items()))
    # 检测requirements文件中需要的包是否安装好了
    check_requirements(exclude=('tensorboard', 'thop'))

    # 如果task in ['train', 'val', 'test']就正常测试 训练集/验证集/测试集
    if opt.task in ('train', 'val', 'test'):  # run normally
        run(**vars(opt))

    # 如果opt.task == 'speed' 就测试yolov5系列和yolov3-spp各个模型的速度评估
    elif opt.task == 'speed':  # speed benchmarks
        for w in opt.weights if isinstance(opt.weights, list) else [opt.weights]:
            run(opt.data, weights=w, batch_size=opt.batch_size, imgsz=opt.imgsz, conf_thres=.25, iou_thres=.45,
                save_json=False, plots=False)

    # 如果opt.task = ['study']就评估yolov5系列和yolov3-spp各个模型在各个尺度下的指标并可视化
    elif opt.task == 'study':  # run over a range of settings and save/plot
        # python val.py --task study --data coco.yaml --iou 0.7 --weights yolov5s.pt yolov5m.pt yolov5l.pt yolov5x.pt
        x = list(range(256, 1536 + 128, 128))  # x axis (image sizes)
        for w in opt.weights if isinstance(opt.weights, list) else [opt.weights]:
            f = f'study_{Path(opt.data).stem}_{Path(w).stem}.txt'  # filename to save to
            y = []  # y axis
            for i in x:  # img-size
                print(f'\nRunning {f} point {i}...')
                r, _, t = run(opt.data, weights=w, batch_size=opt.batch_size, imgsz=i, conf_thres=opt.conf_thres,
                              iou_thres=opt.iou_thres, save_json=opt.save_json, plots=False)
                y.append(r + t)  # results and times
            np.savetxt(f, y, fmt='%10.4g')  # save
        os.system('zip -r study.zip study_*.txt')
        # 可视化各个指标
        plot_study_txt(x=x)  # plot
可以看到这个模块根据opt.task可以分为三个分支,我们主要的分支还是在 opt.task in (‘train’, ‘val’, ‘test’)。而其他的两个分支,大家大概看看在干什么就可以了,没什么用。一般我们都是直接进入第一个分支,执行run函数。
3、执行run函数
run 函数其实用train.py执行的,并不是执行val.py。
train.py调用(每个训练epoch后验证当前模型):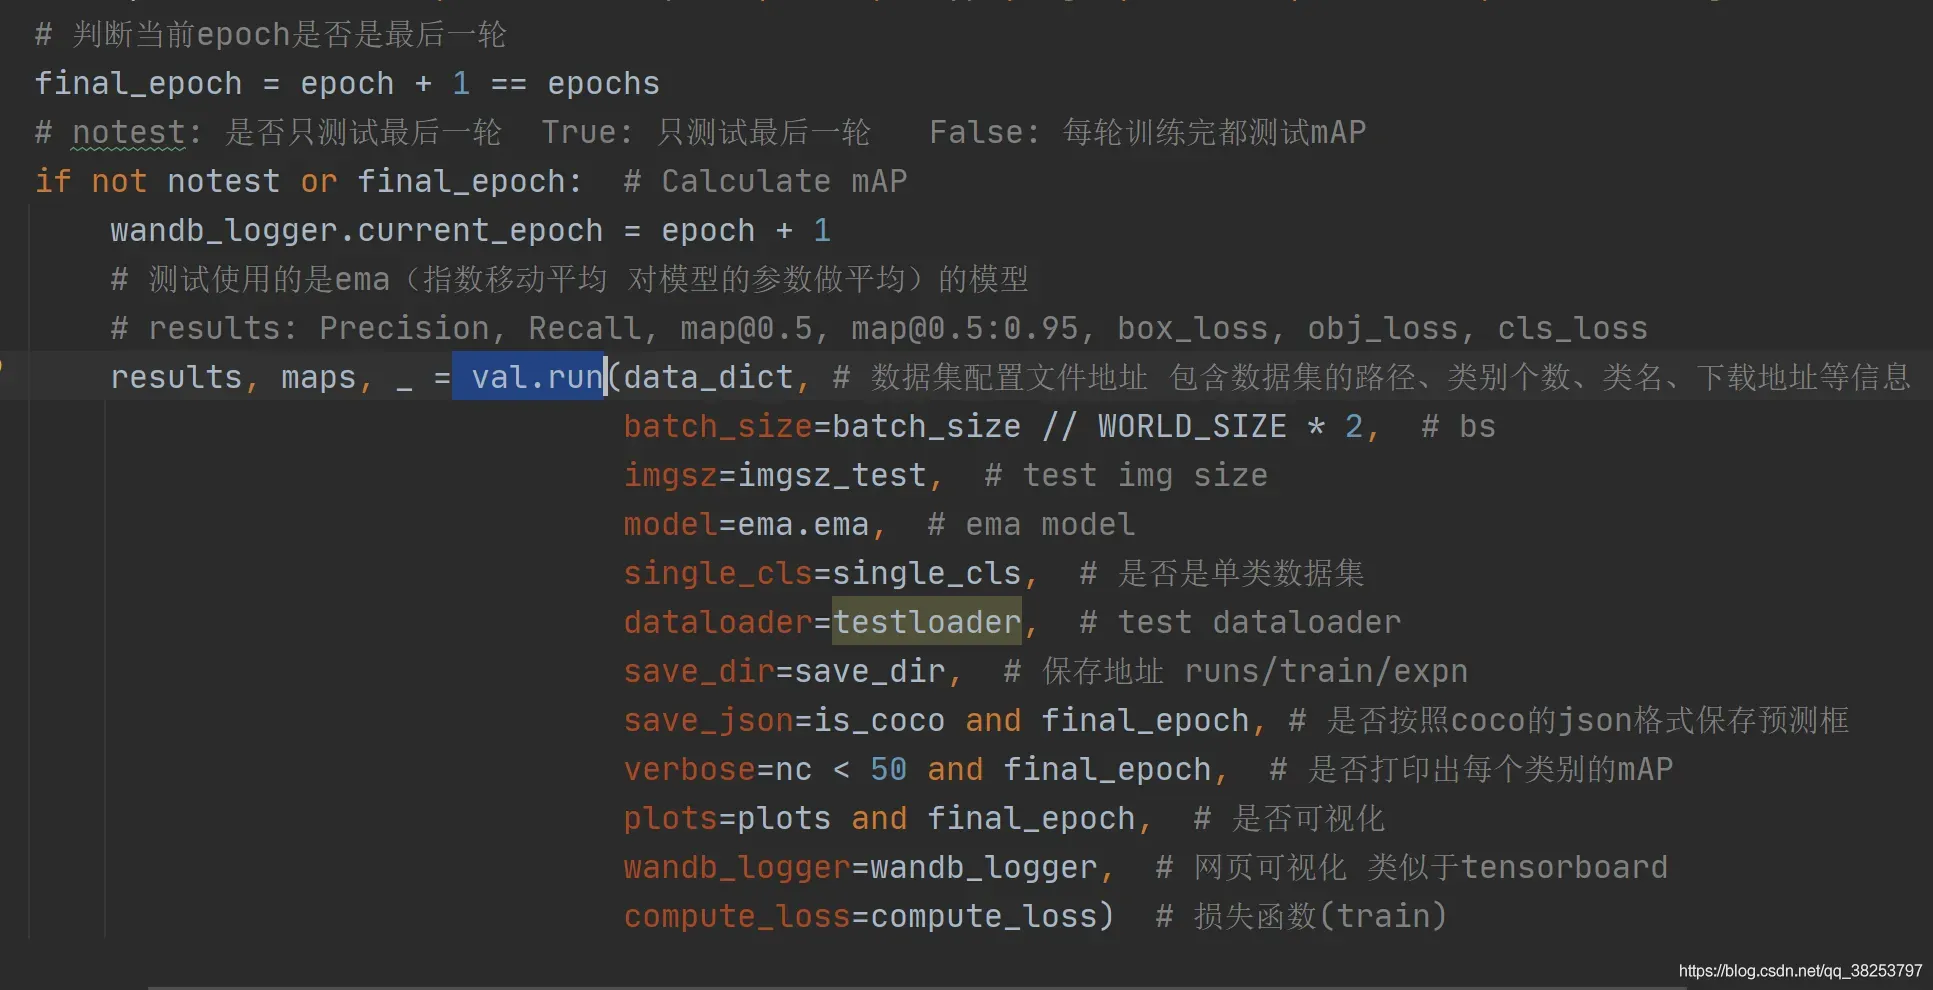
3.1、载入参数
@torch.no_grad()      # 不参与反向传播
def run(data, weights=None, batch_size=32, imgsz=640, conf_thres=0.001, iou_thres=0.6,
        task='val', device='', single_cls=False, augment=False, verbose=False, save_txt=False,
        save_hybrid=False, save_conf=False, save_json=False, project='runs/test', name='exp',
        exist_ok=False, half=True, model=None, dataloader=None, save_dir=Path(''), plots=True,
        wandb_logger=None, compute_loss=None,
        ):
    """
    :params data: 数据集配置文件地址 包含数据集的路径、类别个数、类名、下载地址等信息 train.py时传入data_dict
    :params weights: 模型的权重文件地址 运行train.py=None 运行test.py=默认weights/yolov5s.pt
    :params batch_size: 前向传播的批次大小 运行test.py传入默认32 运行train.py则传入batch_size // WORLD_SIZE * 2
    :params imgsz: 输入网络的图片分辨率 运行test.py传入默认640 运行train.py则传入imgsz_test
    :params conf_thres: object置信度阈值 默认0.25
    :params iou_thres: 进行NMS时IOU的阈值 默认0.6
    :params task: 设置测试的类型 有train, val, test, speed or study几种 默认val
    :params device: 测试的设备
    :params single_cls: 数据集是否只用一个类别 运行test.py传入默认False 运行train.py则传入single_cls
    :params augment: 测试是否使用TTA Test Time Augment 默认False
    :params verbose: 是否打印出每个类别的mAP 运行test.py传入默认Fasle 运行train.py则传入nc < 50 and final_epoch
    :params save_txt: 是否以txt文件的形式保存模型预测框的坐标 默认True
    :params save_hybrid: 是否save label+prediction hybrid results to *.txt  默认False
    :params save_conf: 是否保存预测每个目标的置信度到预测tx文件中 默认True
    :params save_json: 是否按照coco的json格式保存预测框,并且使用cocoapi做评估(需要同样coco的json格式的标签)
                       运行test.py传入默认Fasle 运行train.py则传入is_coco and final_epoch(一般也是False)
    :params project: 测试保存的源文件 默认runs/test
    :params name: 测试保存的文件地址 默认exp  保存在runs/test/exp下
    :params exist_ok: 是否存在当前文件 默认False 一般是 no exist-ok 连用  所以一般都要重新创建文件夹
    :params half: 是否使用半精度推理 FP16 half-precision inference 默认False
    :params model: 模型 如果执行test.py就为None 如果执行train.py就会传入ema.ema(ema模型)
    :params dataloader: 数据加载器 如果执行test.py就为None 如果执行train.py就会传入testloader
    :params save_dir: 文件保存路径 如果执行test.py就为‘’ 如果执行train.py就会传入save_dir(runs/train/expn)
    :params plots: 是否可视化 运行test.py传入默认True 运行train.py则传入plots and final_epoch
    :params wandb_logger: 网页可视化 类似于tensorboard 运行test.py传入默认None 运行train.py则传入wandb_logger(train)
    :params compute_loss: 损失函数 运行test.py传入默认None 运行train.py则传入compute_loss(train)
    :return (Precision, Recall, map@0.5, map@0.5:0.95, box_loss, obj_loss, cls_loss)
    """
3.2、初始化配置1
训练时(train.py)调用:初始化模型参数、训练设备
验证时(val.py)调用:初始化设备、save_dir文件路径、make dir、加载模型、check imgsz、 加载+check data配置信息
    # ============================================== 1、初始化配置1 ==================================================
    # 初始化模型并选择相应的计算设备
    # 判断是否是训练时调用run函数(执行train.py脚本), 如果是就使用训练时的设备 一般都是train
    training = model is not None
    if training:  # called by train.py
        device = next(model.parameters()).device  # get model device
    # 如果不是trin.py调用run函数(执行val.py脚本)就调用select_device选择可用的设备
    # 并生成save_dir + make dir + 加载模型model + check imgsz + 加载data配置信息
    else:
        device = select_device(device, batch_size=batch_size)

        # 生成save_dir文件路径  run\test\expn
        save_dir = increment_path(Path(project) / name, exist_ok=exist_ok)  # increment run
        # make dir run\test\expn\labels
        (save_dir / 'labels' if save_txt else save_dir).mkdir(parents=True, exist_ok=True)

        # 加载模型 load FP32 model  只在运行test.py才需要自己加载model
        model = attempt_load(weights, map_location=device)
        # gs: 模型最大的下采样stride 一般[8, 16, 32] 所有gs一般是32
        gs = max(int(model.stride.max()), 32)  # grid size (max stride)
        # 检测输入图片的分辨率imgsz是否能被gs整除 只在运行test.py才需要自己生成check imgsz
        # imgsz_test
        imgsz = check_img_size(imgsz, s=gs)  # check image size

        # Multi-GPU disabled, incompatible with .half() https://github.com/ultralytics/yolov5/issues/99
        # if device.type != 'cpu' and torch.cuda.device_count() > 1:
        #     model = nn.DataParallel(model)

        # Data 加载数据配置信息 只有运行test.py才需要加载数据配置信息, 因为它需要根据data生成新的dataloader
        # 而运行train.py时是直接传入testloader的, 所以不需要加载数据配置信息
        with open(data, encoding='utf-8') as f:
            data = yaml.safe_load(f)
        check_dataset(data)  # check
3.3、调整模型
半精度验证half model + 模型剪枝prune + 模型融合conv+bn
    # ============================================== 2、调整模型设置 ==================================================
    # Half model 只能在单GPU设备上才能使用
    # 一旦使用half, 不但模型需要设为half, 输入模型的图片也需要设为half
    half &= device.type != 'cpu'  # half precision only supported on CUDA
    if half:
        model.half()

    # from utils.torch_utils import prune
    # prune(model, 0.3)  # 模型剪枝

    # model = model.fuse()  # 模型融合  融合conv+bn

    model.eval()  # 启动模型验证模式
3.4、初始化配置2
是否是coco数据集is_coco + 类别个数nc + 计算mAP相关参数 + 初始化日志 Logging
    # ============================================== 3、初始化配置2 ==================================================
    # 测试数据是否是coco数据集
    is_coco = type(data['val']) is str and data['val'].endswith('coco/val2017.txt')  # COCO dataset bool
    nc = 1 if single_cls else int(data['nc'])  # number of classes

    # 计算mAP相关参数
    # 设置iou阈值 从0.5-0.95取10个(0.05间隔)   iou vector for mAP@0.5:0.95
    # # iouv: [0.50000, 0.55000, 0.60000, 0.65000, 0.70000, 0.75000, 0.80000, 0.85000, 0.90000, 0.95000]
    iouv = torch.linspace(0.5, 0.95, 10).to(device)
    # mAP@0.5:0.95 iou个数=10个
    niou = iouv.numel()

    # 初始化日志 Logging
    log_imgs = 0
    if wandb_logger and wandb_logger.wandb:
        log_imgs = min(wandb_logger.log_imgs, 100)
3.5、加载val数据集
训练时(train.py)调用:加载val数据集
验证时(val.py)调用:不需要加载val数据集 直接从train.py 中传入testloader
    # ============================================== 4、加载val数据集 ==================================================
    # 如果不是训练(执行val.py脚本调用run函数)就调用create_dataloader生成dataloader
    # 如果是训练(执行train.py调用run函数)就不需要生成dataloader 可以直接从参数中传过来testloader
    if not training:
        if device.type != 'cpu':
            # 这里创建一个全零数组测试下前向传播是否能够正常运行
            model(torch.zeros(1, 3, imgsz, imgsz).to(device).type_as(next(model.parameters())))  # run once
        task = task if task in ('train', 'val', 'test') else 'val'  # path to train/val/test images
        # 创建dataloader 这里的rect默认为True 矩形推理用于测试集 在不影响mAP的情况下可以大大提升推理速度
        dataloader = create_dataloader(data[task], imgsz, batch_size, gs, single_cls, pad=0.5, rect=True,
                                       prefix=colorstr(f'{task}: '))[0]
3.6、初始化配置3
初始化混淆矩阵 + 数据集类名 + 获取coco数据集的类别索引 + 设置tqdm进度条 + 初始化p, r, f1, mp, mr, map50, map指标和时间t0, t1, t2 + 初始化测试集的损失 + 初始化json文件中的字典 统计信息 ap等
    # ============================================== 5、初始化配置3 ==================================================
    # 初始化一些测试需要的参数
    seen = 0  # 初始化测试的图片的数量
    # 初始化混淆矩阵
    confusion_matrix = ConfusionMatrix(nc=nc)
    # 获取数据集所有类别的类名
    names = {k: v for k, v in enumerate(model.names if hasattr(model, 'names') else model.module.names)}
    # 获取coco数据集的类别索引
    # coco数据集是80个类 索引范围本应该是0~79,但是这里返回的确是0~90  coco官方就是这样规定的
    # coco80_to_coco91_class就是为了与上述索引对应起来,返回一个范围在0~80的索引数组
    coco91class = coco80_to_coco91_class()
    # 设置tqdm进度条的显示信息
    s = ('%20s' + '%11s' * 6) % ('Class', 'Images', 'Labels', 'P', 'R', 'mAP@.5', 'mAP@.5:.95')
    # 初始化p, r, f1, mp, mr, map50, map指标和时间t0, t1, t2
    p, r, f1, mp, mr, map50, map, t0, t1, t2 = 0., 0., 0., 0., 0., 0., 0., 0., 0., 0.
    # 初始化测试集的损失
    loss = torch.zeros(3, device=device)
    # 初始化json文件中的字典 统计信息 ap等
    jdict, stats, ap, ap_class, wandb_images = [], [], [], [], []
3.7、开始验证
    # ============================================== 6、开始验证 ==================================================
    for batch_i, (img, targets, paths, shapes) in enumerate(tqdm(dataloader, desc=s)):
3.7.1、预处理图片和target
        # 6.1、预处理图片和target
        t_ = time_synchronized()  # 获取当前时间
        img = img.to(device, non_blocking=True)  # img to device
        # 如果half为True 就把图片变为half精度  uint8 to fp16/32
        img = img.half() if half else img.float()
        img /= 255.0  # 0 - 255 to 0.0 - 1.0
        targets = targets.to(device)  # targets to device
        # batch size, channels, height, width
        nb, _, height, width = img.shape
        t = time_synchronized()  # 获取当前时间
        t0 += t - t_  # t0: 累计处理数据时间
3.7.2、model 前向推理
        # 6.2、Run model  前向推理
        # out:       推理结果 1个 [bs, anchor_num*grid_w*grid_h, xywh+c+20classes] = [1, 19200+4800+1200, 25]
        # train_out: 训练结果 3个 [bs, anchor_num, grid_w, grid_h, xywh+c+20classes]
        #                    如: [1, 3, 80, 80, 25] [1, 3, 40, 40, 25] [1, 3, 20, 20, 25]
        out, train_out = model(img, augment=augment)  # inference and training outputs
        t1 += time_synchronized() - t   # 累计前向推理时间 t1
3.7.3、计算验证集损失
        # 6.3、计算验证集损失
        # compute_loss不为空 说明正在执行train.py  根据传入的compute_loss计算损失值
        if compute_loss:
            loss += compute_loss([x.float() for x in train_out], targets)[1][:3]  # lbox, lobj, lcls
3.7.4、Run NMS
        # 6.4、Run NMS
        # 将真实框target的xywh(因为target是在labelimg中做了归一化的)映射到img(test)尺寸
        targets[:, 2:] *= torch.Tensor([width, height, width, height]).to(device)
        # save_hybrid: adding the dataset labels to the model predictions before NMS
        #              是在NMS之前将数据集标签targets添加到模型预测中
        # 这允许在数据集中自动标记(for autolabelling)其他对象(在pred中混入gt) 并且mAP反映了新的混合标签
        # targets: [num_target, img_index+class_index+xywh] = [31, 6]
        # lb: {list: bs} 第一张图片的target[17, 5] 第二张[1, 5] 第三张[7, 5] 第四张[6, 5]
        lb = [targets[targets[:, 0] == i, 1:] for i in range(nb)] if save_hybrid else []
        t = time_synchronized()
        out = non_max_suppression(out, conf_thres, iou_thres, labels=lb, multi_label=True, agnostic=single_cls)
        t2 += time_synchronized() - t   # 累计NMS时间
3.7.5、统计每张图片的真实框、预测框信息
        # 6.5、统计每张图片的真实框、预测框信息  Statistics per image
        # 为每张图片做统计,写入预测信息到txt文件,生成json文件字典,统计tp等
        # out: list{bs}  [300, 6] [42, 6] [300, 6] [300, 6]  [:, image_index+class+xywh]
        for si, pred in enumerate(out):
            # 6.5、统计每张图片的真实框、预测框信息
            # 获取第si张图片的gt标签信息 包括class, x, y, w, h    target[:, 0]为标签属于哪张图片的编号
            labels = targets[targets[:, 0] == si, 1:]   # [:, class+xywh]
            nl = len(labels)  # 第si张图片的gt个数
            # 获取标签类别
            tcls = labels[:, 0].tolist() if nl else []  # target class
            path = Path(paths[si])  # 第si张图片的地址
            # 统计测试图片数量 +1
            seen += 1

            # 如果预测为空,则添加空的信息到stats里
            if len(pred) == 0:
                if nl:
                    stats.append((torch.zeros(0, niou, dtype=torch.bool), torch.Tensor(), torch.Tensor(), tcls))
                continue

            # Predictions
            if single_cls:
                pred[:, 5] = 0
            predn = pred.clone()
            # 将预测坐标映射到原图img中
            scale_coords(img[si].shape[1:], predn[:, :4], shapes[si][0], shapes[si][1])  # native-space pred
3.7.6、保存预测信息到image_name.txt文件
预测信息:cls, xywh, conf
            # 6.6、保存预测信息到txt文件  runs\test\exp7\labels\image_name.txt
            if save_txt:
                # gn = [w, h, w, h] 对应图片的宽高  用于后面归一化
                gn = torch.tensor(shapes[si][0])[[1, 0, 1, 0]]  # normalization gain whwh
                for *xyxy, conf, cls in predn.tolist():
                    # xyxy -> xywh 并作归一化处理
                    xywh = (xyxy2xywh(torch.tensor(xyxy).view(1, 4)) / gn).view(-1).tolist()  # normalized xywh
                    line = (cls, *xywh, conf) if save_conf else (cls, *xywh)  # label format
                    # 保存预测类别和坐标值到对应图片image_name.txt文件中
                    with open(save_dir / 'labels' / (path.stem + '.txt'), 'a') as f:
                        f.write(('%g ' * len(line)).rstrip() % line + '\n')
                    # with open(save_dir / 'labels' / ('test' + '.txt'), 'a') as f:
                    #     f.write(('%g ' * len(line)).rstrip() % line + '\n')
如下所示:
3.7.7、保存预测信息到wandb_logger
            # 6.7、保存预测信息到wandb_logger(类似tensorboard)中
            if len(wandb_images) < log_imgs and wandb_logger.current_epoch > 0:  # Check for test operation
                if wandb_logger.current_epoch % wandb_logger.bbox_interval == 0:
                    box_data = [{"position": {"minX": xyxy[0], "minY": xyxy[1], "maxX": xyxy[2], "maxY": xyxy[3]},
                                 "class_id": int(cls),
                                 "box_caption": "%s %.3f" % (names[cls], conf),
                                 "scores": {"class_score": conf},
                                 "domain": "pixel"} for *xyxy, conf, cls in pred.tolist()]
                    boxes = {"predictions": {"box_data": box_data, "class_labels": names}}  # inference-space
                    wandb_images.append(wandb_logger.wandb.Image(img[si], boxes=boxes, caption=path.name))
            wandb_logger.log_training_progress(predn, path, names) if wandb_logger and wandb_logger.wandb_run else None
3.7.8、将预测信息保存到coco格式的json字典
jdict字典(预测信息):image_id + category_id + bbox + score
            # 6.8、将预测信息保存到coco格式的json字典(后面存入json文件) Append to pycocotools JSON dictionary
            # 类似: [{"image_id": 42, "category_id": 18, "bbox": [258.15, 41.29, 348.26, 243.78], "score": 0.236}, ...
            if save_json:
                # 获取图片id
                image_id = int(path.stem) if path.stem.isnumeric() else path.stem
                # 获取预测框 并将xyxy转为xywh格式
                box = xyxy2xywh(predn[:, :4])  # xywh
                # 之前的的xyxy格式是左上角右下角坐标  xywh是中心的坐标和宽高
                # 而coco的json格式的框坐标是xywh(左上角坐标 + 宽高)
                # 所以这行代码是将中心点坐标 -> 左上角坐标  xy center to top-left corner
                box[:, :2] -= box[:, 2:] / 2
                # image_id: 图片id 即属于哪张图片
                # category_id: 类别 coco91class()从索引0~79映射到索引0~90
                # bbox: 预测框坐标
                # score: 预测得分
                for p, b in zip(pred.tolist(), box.tolist()):
                    jdict.append({'image_id': image_id,
                                  'category_id': coco91class[int(p[5])] if is_coco else int(p[5]),
                                  'bbox': [round(x, 3) for x in b],
                                  'score': round(p[4], 5)})
3.7.9、计算混淆矩阵、计算correct、生成stats
correct(TP)计算过程
for gt中所有类别:
- 选出pred中属于该类别的所有预测框
- 选出gt中属于该类别的所有gt框
- 计算出选出的所有预测框 和 选出的所有gt框 ious
- 筛选出所有ious > 0.5的预测框 就是TP
- 如果存在TP 就统计所有TP中不同iou阈值下的TP 同时统计检测到的目标(detected)
- 重复这个过程 直到检测到的目标个数len(detected) = gt个数
            # 6.9、计算混淆矩阵、计算correct、生成stats
            # 初始化预测评定 niou为iou阈值的个数  Assign all predictions as incorrect
            # correct = [pred_obj_num, 10] = [300, 10]  全是False
            correct = torch.zeros(pred.shape[0], niou, dtype=torch.bool, device=device)
            if nl:
                detected = []  # target indices  用于存放已检测到的目标
                tcls_tensor = labels[:, 0]  # 当前图片的所有gt的类别

                tbox = xywh2xyxy(labels[:, 1:5])  # gt boxes  获得xyxy格式的框
                # 将预测框映射到原图img
                scale_coords(img[si].shape[1:], tbox, shapes[si][0], shapes[si][1])  # native-space labels
                if plots:
                    # 计算混淆矩阵 confusion_matrix
                    confusion_matrix.process_batch(predn, torch.cat((labels[:, 0:1], tbox), 1))

                # Per target class
                # 对图片中每个类别单独处理
                for cls in torch.unique(tcls_tensor):
                    # gt中该类别的索引  target indices   nonzero: 获取列表中为True的index
                    ti = (cls == tcls_tensor).nonzero(as_tuple=False).view(-1)
                    # 预测框中该类别的索引  prediction indices
                    pi = (cls == pred[:, 5]).nonzero(as_tuple=False).view(-1)

                    # Search for detections
                    if pi.shape[0]:
                        # Prediction to target ious
                        # predn[pi, :4]: 属于该类的预测框[144, 4]  tbox[ti]: 属于该类的gt框[13, 4]
                        # box_iou: [144, 4] + [13, 4] => [144, 13]  计算属于该类的预测框与属于该类的gt框的iou
                        # .max(1): [144] 选出每个预测框与所有gt box中最大的iou值, i为最大iou值时对应的gt索引
                        ious, i = box_iou(predn[pi, :4], tbox[ti]).max(1)  # best ious, indices

                        # Append detections
                        detected_set = set()  # 这个参数好像没什么用
                        for j in (ious > iouv[0]).nonzero(as_tuple=False):  # j: ious中>0.5的索引 只有iou>=0.5才是TP
                            # 获得检测到的目标
                            d = ti[i[j]]  # detected target
                            if d.item() not in detected_set:
                                detected_set.add(d.item())  # 没什么用
                                detected.append(d) # 将当前检测到的gt框d添加到detected()
                                # iouv为以0.05为步长  0.5-0.95的序列
                                # 统计所有TP中不同iou阈值下的TP  true positive  并在correct中记录下哪个预测框是哪个iou阈值下的TP
                                # correct: [pred_num, 10] = [300, 10]  记录着哪个预测框在哪个iou阈值下是TP
                                correct[pi[j]] = ious[j] > iouv  # iou_thres is 1xn
                                if len(detected) == nl:  # 如果检测到的目标值等于gt框的个数 就结束
                                    break

            # 将每张图片的预测结果统计到stats中
            # Append statistics(correct, conf, pcls, tcls)   bs个(correct, conf, pcls, tcls)
            # correct: [pred_num, 10] bool 当前图片每一个预测框在每一个iou条件下是否是TP
            # pred[:, 4]: [pred_num, 1] 当前图片每一个预测框的conf
            # pred[:, 5]: [pred_num, 1] 当前图片每一个预测框的类别
            # tcls: [gt_num, 1] 当前图片所有gt框的class
            stats.append((correct.cpu(), pred[:, 4].cpu(), pred[:, 5].cpu(), tcls))
3.7.10、画出前三个batch图片的gt和pred框
        # 6.10、Plot images
        # 画出前三个batch的图片的ground truth和预测框predictions(两个图)一起保存
        if plots and batch_i < 3:
            # ground truth
            f = save_dir / f'test_batch{batch_i}_labels.jpg'
            # Thread  表示在单独的控制线程中运行的活动 创建一个单线程(子线程)来执行函数 由这个子进程全权负责这个函数
            # target: 执行的函数  args: 传入的函数参数  daemon: 当主线程结束后, 由他创建的子线程Thread也已经自动结束了
            # .start(): 启动线程  当thread一启动的时候, 就会运行我们自己定义的这个函数plot_images
            # 如果在plot_images里面打开断点调试, 可以发现子线程暂停, 但是主线程还是在正常的训练(还是正常的跑)
            Thread(target=plot_images, args=(img, targets, paths, f, names), daemon=True).start()
            # predictions 传入plot_images函数之前需要改变pred的格式  target则不需要改
            f = save_dir / f'test_batch{batch_i}_pred.jpg'
            Thread(target=plot_images, args=(img, output_to_target(out), paths, f, names), daemon=True).start()
test_batch0_labels.jpg
test_batch0_pred.jpg:
3.7.11、计算mAP
    # 6.11、计算mAP
    # 统计stats中所有图片的统计结果 将stats列表的信息拼接到一起
    # stats(concat后): list{4} correct, conf, pcls, tcls  统计出的整个数据集的GT
    # correct [img_sum, 10] 整个数据集所有图片中所有预测框在每一个iou条件下是否是TP  [1905, 10]
    # conf [img_sum] 整个数据集所有图片中所有预测框的conf  [1905]
    # pcls [img_sum] 整个数据集所有图片中所有预测框的类别   [1905]
    # tcls [gt_sum] 整个数据集所有图片所有gt框的class     [929]
    stats = [np.concatenate(x, 0) for x in zip(*stats)]  # to numpy

    # stats[0].any(): stats[0]是否全部为False, 是则返回 False, 如果有一个为 True, 则返回 True
    if len(stats) and stats[0].any():
        # 根据上面的统计预测结果计算p, r, ap, f1, ap_class(ap_per_class函数是计算每个类的mAP等指标的)等指标
        # p: [nc] 最大平均f1时每个类别的precision
        # r: [nc] 最大平均f1时每个类别的recall
        # ap: [71, 10] 数据集每个类别在10个iou阈值下的mAP
        # f1 [nc] 最大平均f1时每个类别的f1
        # ap_class: [nc] 返回数据集中所有的类别index
        p, r, ap, f1, ap_class = ap_per_class(*stats, plot=plots, save_dir=save_dir, names=names)
        # ap50: [nc] 所有类别的mAP@0.5   ap: [nc] 所有类别的mAP@0.5:0.95
        ap50, ap = ap[:, 0], ap.mean(1)
        # mp: [1] 所有类别的平均precision(最大f1时)
        # mr: [1] 所有类别的平均recall(最大f1时)
        # map50: [1] 所有类别的平均mAP@0.5
        # map: [1] 所有类别的平均mAP@0.5:0.95
        mp, mr, map50, map = p.mean(), r.mean(), ap50.mean(), ap.mean()
        # nt: [nc] 统计出整个数据集的gt框中数据集各个类别的个数
        nt = np.bincount(stats[3].astype(np.int64), minlength=nc)  # number of targets per class
    else:
        nt = torch.zeros(1)
3.7.12、print打印各项指标
    # 6.12、print打印各项指标
    # Print results  数据集图片数量 + 数据集gt框的数量 + 所有类别的平均precision +
    #                所有类别的平均recall + 所有类别的平均mAP@0.5 + 所有类别的平均mAP@0.5:0.95
    pf = '%20s' + '%11i' * 2 + '%11.3g' * 4  # print format
    print(pf % ('all', seen, nt.sum(), mp, mr, map50, map))

    # Print results per class
    # 细节展示每个类别的各个指标  类别 + 数据集图片数量 + 这个类别的gt框数量 + 这个类别的precision +
    #                        这个类别的recall + 这个类别的mAP@0.5 + 这个类别的mAP@0.5:0.95
    if (verbose or (nc < 50 and not training)) and nc > 1 and len(stats):
        for i, c in enumerate(ap_class):
            print(pf % (names[c], seen, nt[c], p[i], r[i], ap50[i], ap[i]))

    # Print speeds  打印前向传播耗费的总时间、nms耗费总时间、总时间
    t = tuple(x / seen * 1E3 for x in (t0, t1, t2))  # speeds per image
    if not training:
        shape = (batch_size, 3, imgsz, imgsz)
        print(f'Speed: %.1fms pre-process, %.1fms inference, %.1fms NMS per image at shape {shape}' % t)
输出如图所示:
3.7.13、画出混淆矩阵并存入wandb_logger中
    # 6.13、画出混淆矩阵并存入wandb_logger中
    # Plots  confusion_matrix + wandb_logger
    if plots:
        confusion_matrix.plot(save_dir=save_dir, names=list(names.values()))
        if wandb_logger and wandb_logger.wandb:
            val_batches = [wandb_logger.wandb.Image(str(f), caption=f.name) for f in sorted(save_dir.glob('test*.jpg'))]
            wandb_logger.log({"Validation": val_batches})
    if wandb_images:
        wandb_logger.log({"Bounding Box Debugger/Images": wandb_images})
confusion_matrix.png:
3.7.14、Save JSON
    # 6.14、Save JSON
    # 采用之前保存的json文件格式预测结果 通过cocoapi评估各个指标
    # 需要注意的是 测试集的标签也要转为coco的json格式
    if save_json and len(jdict):
        w = Path(weights[0] if isinstance(weights, list) else weights).stem if weights is not None else ''  # weights
        anno_json = str(Path(data.get('path', '../coco')) / 'annotations/instances_val2017.json')  # annotations json
        # 获取预测框的json文件路径并打开
        pred_json = str(save_dir / f"{w}_predictions.json")  # predictions json
        print('\nEvaluating pycocotools mAP... saving %s...' % pred_json)
        with open(pred_json, 'w') as f:
            json.dump(jdict, f)

        try:  # https://github.com/cocodataset/cocoapi/blob/master/PythonAPI/pycocoEvalDemo.ipynb
            check_requirements(['pycocotools'])
            from pycocotools.coco import COCO
            from pycocotools.cocoeval import COCOeval

            # 获取并初始化测试集标签的json文件
            anno = COCO(anno_json)  # init annotations api
            # 初始化预测框的文件
            pred = anno.loadRes(pred_json)  # init predictions api
            # 创建评估器
            eval = COCOeval(anno, pred, 'bbox')
            if is_coco:
                eval.params.imgIds = [int(Path(x).stem) for x in dataloader.dataset.img_files]  # image IDs to evaluate
            # 评估
            eval.evaluate()
            eval.accumulate()
            # 展示结果
            eval.summarize()
            map, map50 = eval.stats[:2]  # update results (mAP@0.5:0.95, mAP@0.5)
        except Exception as e:
            print(f'pycocotools unable to run: {e}')
3.7.15、 Return results
    # 6.15、返回测试指标结果  Return results
    model.float()  # for training

    if not training:
        s = f"\n{len(list(save_dir.glob('labels/*.txt')))} labels saved to {save_dir / 'labels'}" if save_txt else ''
        print(f"Results saved to {save_dir}{s}")

    maps = np.zeros(nc) + map  # [80] 80个平均mAP@0.5:0.95
    for i, c in enumerate(ap_class):
        maps[c] = ap[i]  # maps [80] 所有类别的mAP@0.5:0.95
    # (mp, mr, map50, map, *(loss.cpu() / len(dataloader)).tolist()): {tuple:7}
    #      0: mp [1] 所有类别的平均precision(最大f1时)
    #      1: mr [1] 所有类别的平均recall(最大f1时)
    #      2: map50 [1] 所有类别的平均mAP@0.5
    #      3: map [1] 所有类别的平均mAP@0.5:0.95
    #      4: val_box_loss [1] 验证集回归损失
    #      5: val_obj_loss [1] 验证集置信度损失
    #      6: val_cls_loss [1] 验证集分类损失
    # maps: [80] 所有类别的mAP@0.5:0.95
    # t: {tuple: 3} 0: 打印前向传播耗费的总时间   1: nms耗费总时间   2: 总时间
    return (mp, mr, map50, map, *(loss.cpu() / len(dataloader)).tolist()), maps, t
一般会将数据返回到train.py中: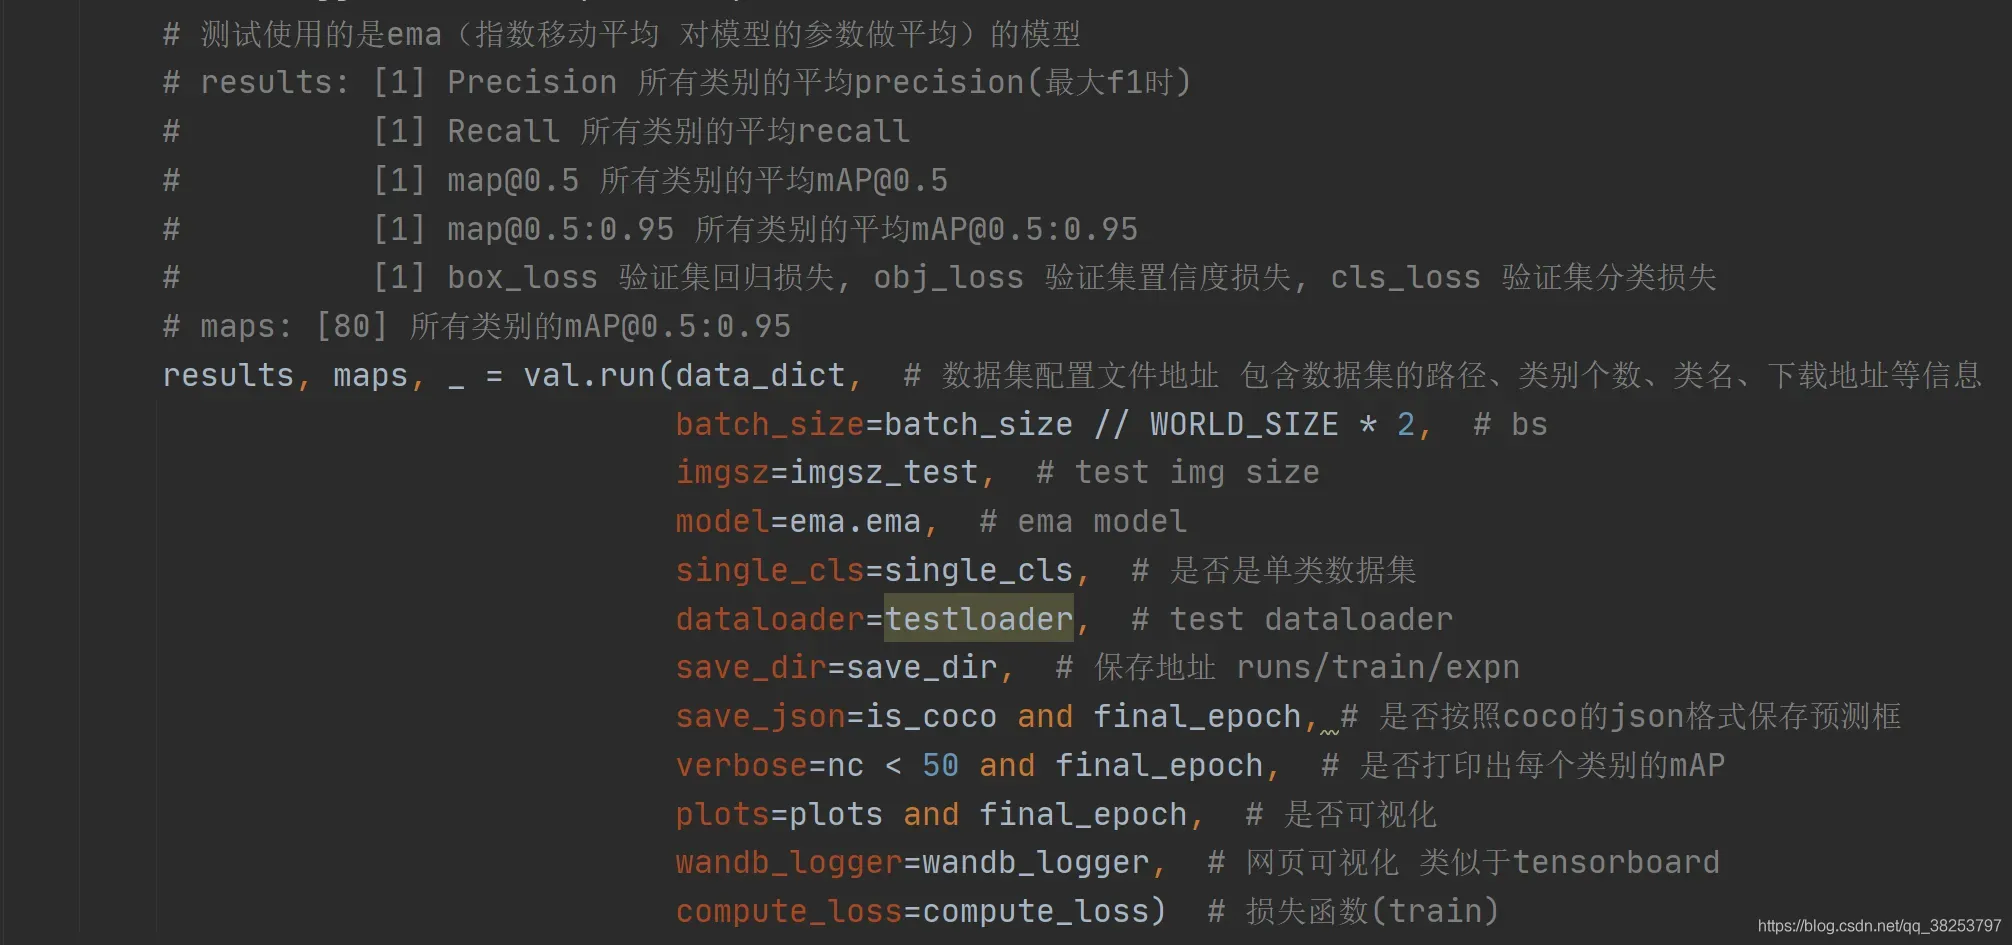
总结
这个脚本的代码还是比较简单的,主要的难点在于第3.7.9节和3.7.11节计算 混淆矩阵+计算correct+计算mAP 上。所以要想全部理解这个脚本,一定要结合metrics.py脚本一起看。
–2021.8.12
版权声明:本文为博主满船清梦压星河HK原创文章,版权归属原作者,如果侵权,请联系我们删除!
原文链接:https://blog.csdn.net/qq_38253797/article/details/119577291