文章目录
- ChatDoctor简介
- 数据构建和训练过程
- 建立外部知识库
- ChatDoctor相比ChatGPT有什么优势?
- ChatDoctor的效果
- 代码解读
- train_lora.py文件解读
- 微调实战
- 下载仓库并进入目录
- 创建conda环境并配置环境(安装相关依赖)
- 下载模型文件
- 微调数据
- 微调过程
- 全量微调
- 基于LoRA的微调
- 基于微调后的模型推理
ChatDoctor简介
ChatDoctor论文:
ChatDoctor: A Medical Chat Model Fine-tuned on LLaMA Model using Medical Domain Knowledge
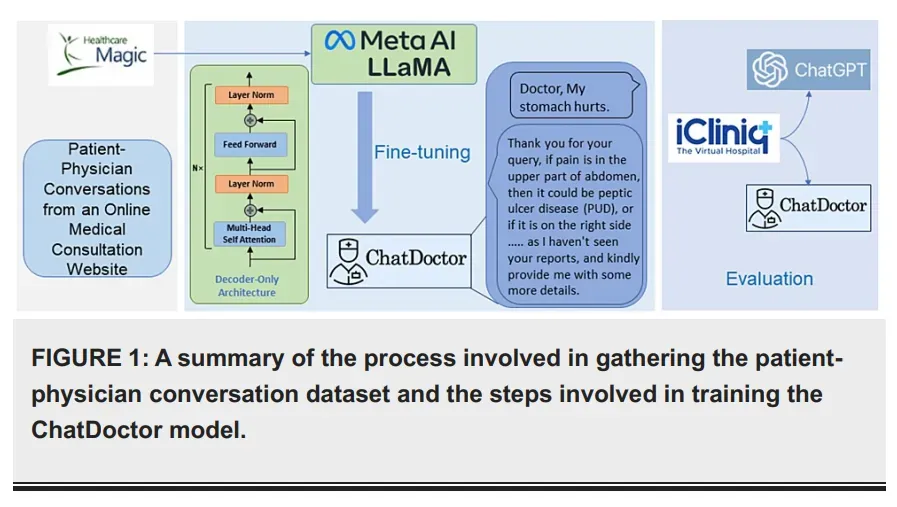
ChatDoctor是一款使用LLaMA模型并结合医学知识进行训练的医疗助手,研究人员先收集了10多万条真实医患对话(为了尊重隐私,这些数据已经经过了清洗和匿名的处理),然后使用这些数据对LLaMA模型进行微调。除此之外,还集成了一个自我导向的信息检索机制,允许模型访问和利用来自维基百科等在线资源的实时信息和离线医疗数据库的数据。
ChatDoctor不仅具备流畅的对话能力,在医疗领域的理解和诊断也达到了很高的水平。用户只需描述症状,ChatDoctor就会像真人医生一样询问其他症状与体征,然后给出初步诊断和治疗建议,而且完全开源免费!
当然,ChatDoctor只是一个AI助手,不能完全替代医生和专家,但在常见病症诊断方面,它已经表现已经非常不错了。
数据构建和训练过程
建立外部知识库
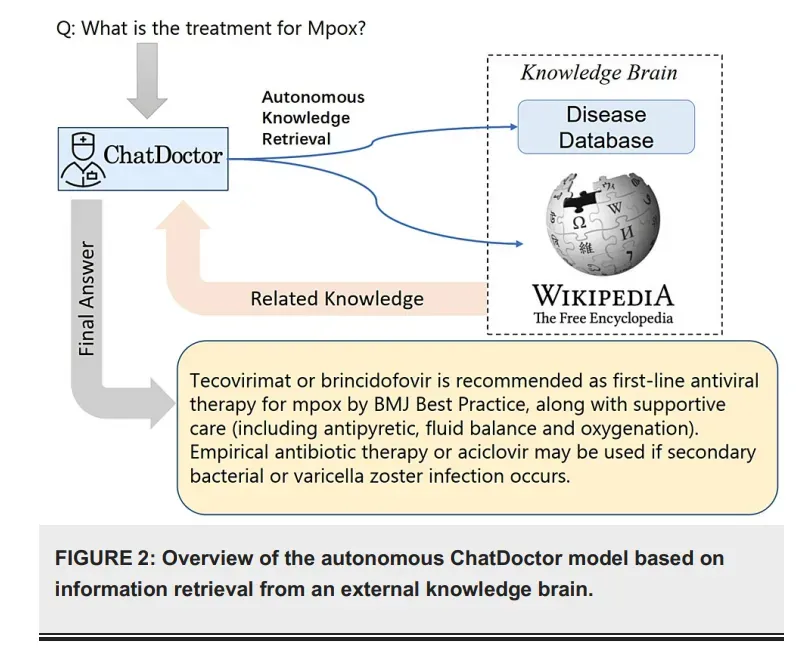
LLM通常预测序列中的下一个单词,导致潜在的不准确或错误的问题回答。此外,模型的输出在一定程度上是不可预测的,这在医学领域是不可接受的。然而,如果这些模型能够基于可靠的知识库生成或评估响应,那么它们的准确性可以得到显著提高。
ChatDoctor相比ChatGPT有什么优势?
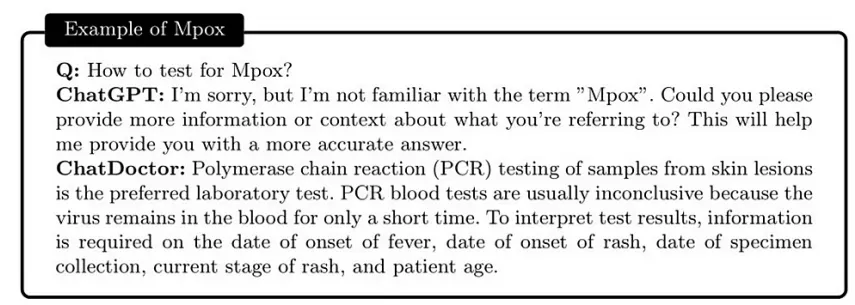
问:如何检测Mpox?
ChatGPT:很抱歉,我对Mpox这个词不太熟悉。你能否提供更多相关信息或背景?这将有助于我提供给你一个更准确的答案。
ChatDoctor:对皮肤病变样本进行聚合酶链反应(PCR)检测是首选的实验室检测方法。聚合酶链反应血液检测通常是不确定的,因为病毒在血液中停留的时间很短。为解释检测结果,需要提供发热发病日期、皮疹发病日期、标本采集日期、当前皮疹阶段和患者年龄等信息。
对于相对较新的医学疾病/术语。ChatGPT不能识别Mpox这个词(又名猴痘),而ChatDoctor可以借助外部知识,为Mpox的相关医疗测试提供精确的答案。
(猴痘最近于2022年11月28日被世界卫生组织(WHO)指定为猴痘,使其成为一个相对较新的术语。虽然ChatGPT无法提供令人满意的答案,但ChatDoctor由于其自主知识检索功能,能够从维基百科中提取有关猴痘的相关信息并提供精确的答案。)
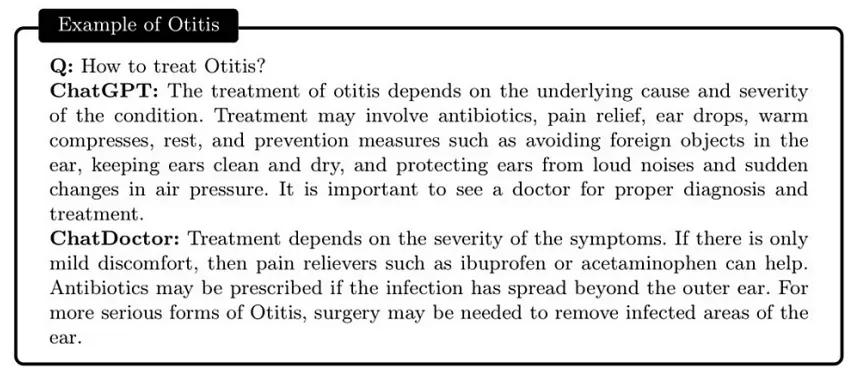
问:如何治疗中耳炎?
ChatGPT:中耳炎的治疗取决于潜在的病因和病情的严重程度。治疗包括抗生素、止痛、滴耳液、热敷、休息和预防措施,如避免耳内异物、保持耳朵清洁和干燥、保护耳朵免受噪音和气压突然变化的影响。去看医生进行正确的诊断和治疗是很重要的。
ChatDoctor:治疗取决于症状的严重程度。如果只有轻微的不适,那么止痛药,如布洛芬或对乙酰氨基酚可以帮助。如果感染已经扩散到外耳以外,可能会开抗生素。对于更严重的中耳炎,可能需要手术切除耳朵的感染区域。
ChatGPT提供了关于中耳炎的更一般的答案,而ChatDoctor则提供了更专业的回答:治疗中耳炎,借助于外部知识。
ChatDoctor的效果
通过大量的实验,发现通过医患对话进行微调的模型在准确率、召回率和F1分数方面都优于ChatGPT。
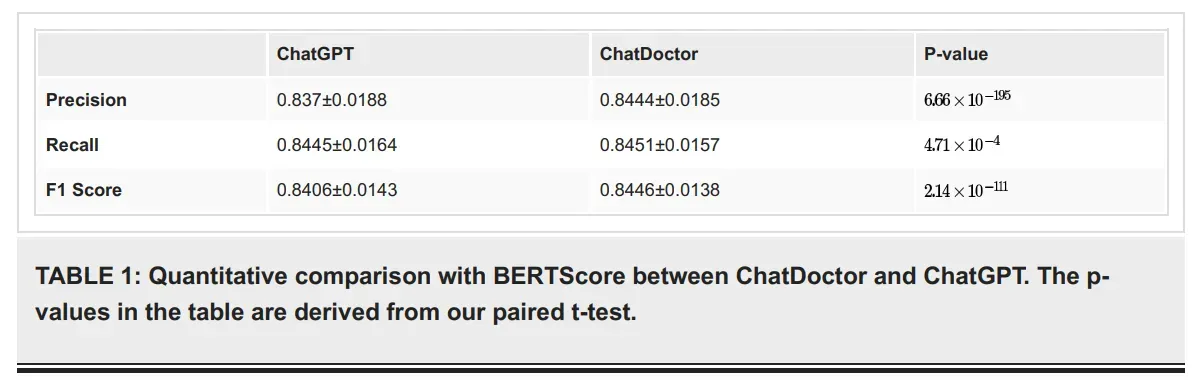
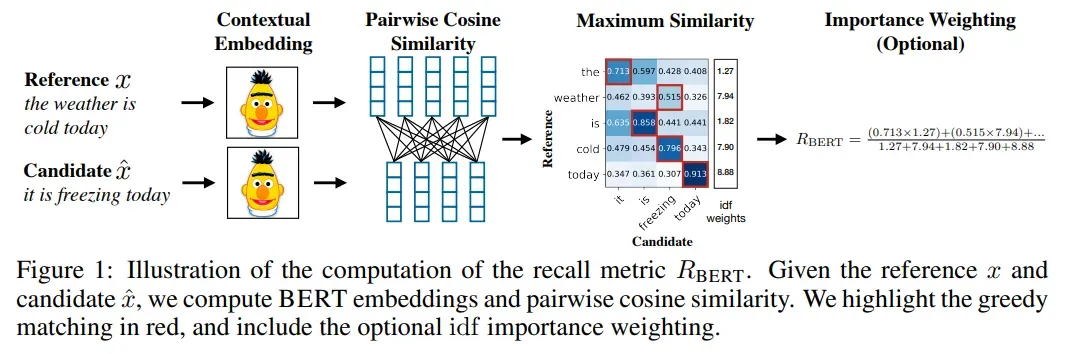
如上图所示,评估指标是通过BERTScore计算得到的,由于Chatdoctor论文中并没有对BERTScore进行详细描述,故可通过BERTScore论文即: Bertscore: Evaluating text generation with bert 来看下计算过程。
BertScore的核心是,对两个句子,即Reference(标准答案)和Candidate(模型生成答案)分别用Bert embeddding及进行表示,然后对两个句子中的词分别计算余弦相似度,得到一个相似度矩阵,最后做最大相似性得分的累加然后归一化(包含 idf (逆文档频率)重要性权重),得到。
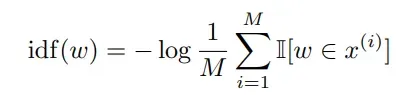
另外,上面的三个公式是没有考虑 idf 重要性权重的,idf计算公式如下:
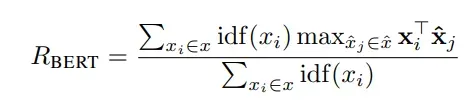
考虑 idf 后的 的计算公式如下:
此外,自主ChatDoctor模型能够检索最新的在线/离线信息,还可以回答关于相对较新的疾病的医学问题,这些疾病没有包括在医患培训对话中,例如猴痘。
代码解读
train_lora.py文件解读
导入相关的包
# 导入模型所需的包
import os
import sys
from typing import List

import fire
import torch
import transformers
from datasets import load_dataset
from typing import List, Optional, Union

# 从peft框架中导入相关配置文件
from peft import (
    LoraConfig,
    BottleneckConfig,
    get_peft_model,
    get_peft_model_state_dict,
    prepare_model_for_int8_training,
    set_peft_model_state_dict,
)
# 导入加载LlaMA模型所需的库
from transformers import AutoModelForCausalLM, AutoTokenizer, LLaMATokenizer
LLaMA属于CausalLM架构。
Causal decoder、Prefix decoder和encoder-decoder的区别:
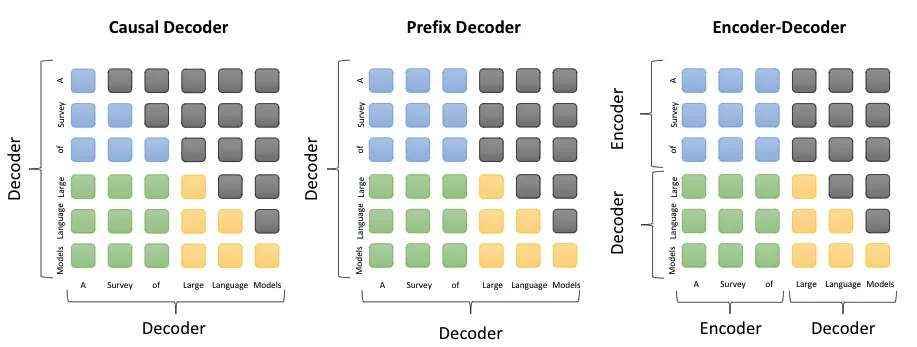
因果解码器(causal decoder,当前主流):因果解码器架构采用单向注意力掩码,以确保每个输入标记只能关注过去的标记和它本身。输入和输出标记通过解码器以相同的方式进行处理。如:GPT,BLOOM、LLaMA等。
前缀解码器(prefix decoder):前缀解码器结构修正了因果编码器的掩码机制,以使其能可对前缀标记执行双向注意力,并仅对生成的标记执行单向注意力。如GLM系列。
编码器-解码器(encoder-decoder):传统 Transformer 模型是建立在编码器-解码器架构上的 ,由两个 Transformer 块分别作为编码器和解码器。
微调过程中的重要参数
def train(
        # model/data params
        base_model: str = "",  # 必需的模型参数
        data_path: str = "yahma/alpaca-cleaned",  # 数据路径
        output_dir: str = "./lora-alpaca",  # 输出模型的目录
        adapter_name: str = "lora",  # 适配器名称
        # training hyperparams
        batch_size: int = 128,  # 批处理大小
        micro_batch_size: int = 4,  # 微批处理大小(可以根据batch_size与micro_batch_size的比值得到gradient_accumulation_steps)
        num_epochs: int = 3,  # 训练轮数
        learning_rate: float = 3e-4,  # 学习率
        cutoff_len: int = 256,  # 截断输入文本的最大长度
        val_set_size: int = 2000,  # 验证集大小
        use_gradient_checkpointing: bool = False,  # 是否使用梯度检查点(一种用时间换显存的方式)
        eval_step: int = 200,  # 每多少步进行一次验证
        save_step: int = 200,  # 每多少步保存一次模型
        # lora hyperparams
        lora_r: int = 8,  # LoRA模型的R参数,矩阵的秩
        lora_alpha: int = 16,  # LoRA模型的alpha参数
        lora_dropout: float = 0.05,  # LoRA模型的dropout率
        lora_target_modules: List[str] = None,  # LoRA模型的目标模块列表
        # 设置梯度累积的步数
    	gradient_accumulation_steps = batch_size // micro_batch_size
加载LLaMA模型和分词器
# 模型加载
model = AutoModelForCausalLM.from_pretrained(
        base_model,
        # 加载
        load_in_8bit=True,
        torch_dtype=torch.float16,
        device_map=device_map,
    )
# 分词器加载
    if model.config.model_type == "LLaMA":
        # Due to the name of transformers' LLaMATokenizer, we have to do this
        tokenizer = LLaMATokenizer.from_pretrained(base_model)
    else:
        tokenizer = AutoTokenizer.from_pretrained(base_model)

    tokenizer.pad_token_id = (
        0  # unk. we want this to be different from the eos token
    )
    # only-decoder 的LLM会普遍采用left padding,为了输入和输出的连续性。
    tokenizer.padding_side = "left"  # Allow batched inference
通过命令print(model),可以查看模型结构,如下:
LLaMAForCausalLM(
  (model): LLaMAModel(
    (embed_tokens): Embedding(32000, 4096, padding_idx=31999)
    (layers): ModuleList(
      (0-31): 32 x LLaMADecoderLayer(
        (self_attn): LLaMAAttention(
          (q_proj): Linear8bitLt(in_features=4096, out_features=4096, bias=False)
          (k_proj): Linear8bitLt(in_features=4096, out_features=4096, bias=False)
          (v_proj): Linear8bitLt(in_features=4096, out_features=4096, bias=False)
          (o_proj): Linear8bitLt(in_features=4096, out_features=4096, bias=False)
          (rotary_emb): RotaryEmbedding()
        )
        (mlp): LLaMAMLP(
          (gate_proj): Linear8bitLt(in_features=4096, out_features=11008, bias=False)
          (down_proj): Linear8bitLt(in_features=11008, out_features=4096, bias=False)
          (up_proj): Linear8bitLt(in_features=4096, out_features=11008, bias=False)
          (act_fn): SiLUActivation()
        )
        (input_layernorm): RMSNorm()
        (post_attention_layernorm): RMSNorm()
      )
    )
    (norm): RMSNorm()
  )
  (lm_head): Linear(in_features=4096, out_features=32000, bias=False)
)
也可以用下面命令进行详细查看:
for name, param in model.named_parameters():
    print(name,param.dtype)
对模型进行加载和量化,模型加载时,load_in_8bit=True 的 8bit 量化优化的是静态显存,是 bitsandbytes 库赋予的能力,会把加载模型转化成混合 8bit 的量化模型。模型量化本质是对浮点参数进行压缩的同时,降低压缩带来的误差。
还有一种方式是对模型加载后,通过model.quantize(8).cuda()实现的。
model = prepare_model_for_int8_training(model, use_gradient_checkpointing=use_gradient_checkpointing)
    # 此处提供了两种微调方法,一种是lora,一种是bottleneck
    if adapter_name == "lora":
        config = LoraConfig(
            r=lora_r,
            lora_alpha=lora_alpha,
            target_modules=lora_target_modules,
            lora_dropout=lora_dropout,
            bias="none",
            task_type="CAUSAL_LM",
        )
    elif adapter_name == "bottleneck":
        config = BottleneckConfig(
            bottleneck_size=bottleneck_size,
            non_linearity=non_linearity,
            adapter_dropout=adapter_dropout,
            use_parallel_adapter=use_parallel_adapter,
            use_adapterp=use_adapterp,
            target_modules=target_modules,
            scaling=scaling,
            bias="none",
            task_type="CAUSAL_LM",
        )
    model = get_peft_model(model, config)
prepare_model_for_int8_training 是对在 LoRA 微调中使用 LLM.int8() 进行了适配用来提高训练的稳定性。主要包括 layernorm 层保留 fp32 精度,输出层保留 fp32 精度,这样可以保证解码时随机 sample 的差异性。
use_gradient_checkpointing=True,这是一个时间换空间的技巧。gradient checkpoint 的实现是在前向传播的过程中使用 torch.no_grad() 不存储中间激活值,降低动态显存的占用,而只保存输入和激活函数,当进行反向传播的时候,会重新获取输入并计算激活值用于梯度计算。因此前向传播会计算两遍,所以需要更多的训练时间。可参考。
get_peft_model 会初始化 PeftModel 把原模型作为 base 模型,并在指定的 self-attention 层中加入 LoRA 层。
PeftModelForCausalLM(
  (base_model): LoraModel(
    (model): LLaMAForCausalLM(
      (model): LLaMAModel(
        (embed_tokens): Embedding(32000, 4096, padding_idx=31999)
        (layers): ModuleList(
          (0-31): 32 x LLaMADecoderLayer(
            (self_attn): LLaMAAttention(
              (q_proj): Linear8bitLt(
                in_features=4096, out_features=4096, bias=False
                (lora_dropout): Dropout(p=0.05, inplace=False)
                (lora_A): Linear(in_features=4096, out_features=8, bias=False)
                (lora_B): Linear(in_features=8, out_features=4096, bias=False)
              )
              (k_proj): Linear8bitLt(in_features=4096, out_features=4096, bias=False)
              (v_proj): Linear8bitLt(
                in_features=4096, out_features=4096, bias=False
                (lora_dropout): Dropout(p=0.05, inplace=False)
                (lora_A): Linear(in_features=4096, out_features=8, bias=False)
                (lora_B): Linear(in_features=8, out_features=4096, bias=False)
              )
              (o_proj): Linear8bitLt(in_features=4096, out_features=4096, bias=False)
              (rotary_emb): RotaryEmbedding()
            )
            (mlp): LLaMAMLP(
              (gate_proj): Linear8bitLt(in_features=4096, out_features=11008, bias=False)
              (down_proj): Linear8bitLt(in_features=11008, out_features=4096, bias=False)
              (up_proj): Linear8bitLt(in_features=4096, out_features=11008, bias=False)
              (act_fn): SiLUActivation()
            )
            (input_layernorm): RMSNorm()
            (post_attention_layernorm): RMSNorm()
          )
        )
        (norm): RMSNorm()
      )
      (lm_head): CastOutputToFloat(
        (0): Linear(in_features=4096, out_features=32000, bias=False)
      )
    )
  )
)
get_peft_model调用的就是peft框架下的lora
Peft 模型的使用非常方便,只需要按照原本的方式实例化模型,然后设置一下LORA的config,调用一下get_peft_model方法,就获得了在原模型基础上的peft模型。
get_peft_model—>mapping.py—>peft_model.py—>lora.py
lora.py下的LoraModel类:
- _find_and_replace: 找到所有需要加入lora策略的层,例如q_proj,把它们替换成lora模式,其中fullmatch完成查找匹配,_replace_module完成替换。
- 保留lora部分的参数可训练,其余参数全都固定下来不动。
lora.py下的Linear类:主要完成两个矩阵线性层的构建,reset_parameters对两个矩阵进行了参数初始化。
通过model.print_trainable_parameters() 查看微调参数占所有参数的占比。
trainable params: 4194304 || all params: 6742609920 || trainable%: 0.06220594176090199
加载数据集,并根据需要设置是否切分验证集数据。
if data_path.endswith(".json"):  # todo: support jsonl
        data = load_dataset("json", data_files=data_path)
else:
    data = load_dataset(data_path)
if val_set_size > 0:
    train_val = data["train"].train_test_split(
            test_size=val_set_size, shuffle=True, seed=42
        )
    train_data = (     train_val["train"].shuffle().map(generate_and_tokenize_prompt)
        )
    val_data = (      train_val["test"].shuffle().map(generate_and_tokenize_prompt)
        )
    else:
        train_data = data["train"].shuffle().map(generate_and_tokenize_prompt)
        val_data = None
通过generate_and_tokenize_prompt函数完成对数据的处理,第一步通过generate_prompt根据不同的数据格式输出对应形式的数据,第二步对数据进行分词。此外,还可以通过参数train_on_inputs设置是否对输入数据也进行训练。
def generate_and_tokenize_prompt(data_point):
        full_prompt = generate_prompt(data_point)
        tokenized_full_prompt = tokenize(full_prompt)
        if not train_on_inputs:
            user_prompt = generate_prompt({**data_point, "output": ""})
            tokenized_user_prompt = tokenize(user_prompt, add_eos_token=False)
            user_prompt_len = len(tokenized_user_prompt["input_ids"])

            tokenized_full_prompt["labels"] = [
                                                  -100
                                              ] * user_prompt_len + tokenized_full_prompt["labels"][
                                                                    user_prompt_len:
                                                                    ]  # could be sped up, probably
        return tokenized_full_prompt
def generate_prompt(data_point):
    # sorry about the formatting disaster gotta move fast
    # 根据不同的数据格式输出对应形式的数据
    if data_point["input"]:
        return f"""Below is an instruction that describes a task, paired with an input that provides further context. Write a response that appropriately completes the request.

                ### Instruction:
                {data_point["instruction"]}

                ### Input:
                {data_point["input"]}

                ### Response:
                {data_point["output"]}""" # noqa: E501
    else:
        return f"""Below is an instruction that describes a task. Write a response that appropriately completes the request.

                ### Instruction:
                {data_point["instruction"]}

                ### Response:
                {data_point["output"]}"""
def tokenize(prompt, add_eos_token=True):
        # there's probably a way to do this with the tokenizer settings
        # but again, gotta move fast
        result = tokenizer(
            prompt,
            truncation=True,
            max_length=cutoff_len,
            padding=False,
            return_tensors=None,
        )
        if (
                result["input_ids"][-1] != tokenizer.eos_token_id
                and len(result["input_ids"]) < cutoff_len
                and add_eos_token
        ):
            result["input_ids"].append(tokenizer.eos_token_id)
            result["attention_mask"].append(1)

        result["labels"] = result["input_ids"].copy()

        return result
处理后的数据如下所示:
'output':
"You need to take antibiotics to treat the infection. Penicillin, clindamycin or erythromycin can help. You can also use benzocaine topical to numb the pain or clove to soothe the area. However, if the abscess is severe, you'll need stronger medication like lincomycin."
'input':
"Doctor, I have a tooth abscess and it's really painful. What medication do I need?"
'instruction':
"If you are a doctor, please answer the medical questions based on the patient's description."
'input_ids':
[1, 13866, 338, 385, 15278, 393, 16612, 263, 3414, 29892, 3300, 2859, 411, 385, ...]
'attention_mask':
[1, 1, 1, 1, 1, 1, 1, 1, 1, 1, 1, 1, 1, 1, ...]
'labels':
[1, 13866, 338, 385, 15278, 393, 16612, 263, 3414, 29892, 3300, 2859, 411, 385, ...]
len():
6
最后通过transformers.Trainer.train完成训练,并通过model.save_pretrained(output_dir)进行参数保存。
微调实战
项目地址:https://github.com/Kent0n-Li/ChatDoctor
下载仓库并进入目录
git clone https://github.com/Kent0n-Li/ChatDoctor.git
cd ChatDoctor
创建conda环境并配置环境(安装相关依赖)
conda create -n chatdoctor python=3.10
pip install -r requirements.txt
pip install datasets
因为我们要基于lora进行微调,故需要安装peft框架,安装方式参考:
https://github.com/AGI-Edgerunners/LLM-Adapters/tree/main
将该仓库中的peft目录复制到本仓库中,然后通过下面命令进行安装。
cd peft/
pip install -e .
下载模型文件
推荐使用git命令下载模型文件,但注意需要提前下载git-lfs工具包,安装步骤如下:
# 先安装git(如已安装可忽略)
sudo apt-get install git
# 安装apt-get源
curl -s https://packagecloud.io/install/repositories/github/git-lfs/script.deb.sh | sudo bash
# 安装git-lfs
sudo apt-get install git-lfs
# 初始化git-lfs
git lfs install
模型文件下载地址:https://huggingface.co/decapoda-research/llama-7b-hf
下载命令:
git clone https://huggingface.co/decapoda-research/llama-7b-hf
微调数据
ChatDoctor数据集
来自HealthCareMagic.com的10万例实际患者与医生之间的对话HealthCareMagic-100k
来自icliniq.com的1万例实际患者与医生之间的对话icliniq-10k。
5k例由ChatGPT生成的患者与医生之间的对话GenMedGPT-5k和疾病数据库
数据集均是进行了手动和自动过滤,去除了医生和患者的身份信息,并使用语言工具纠正了语法错误。
微调过程
项目中提供了两种微调方式:一种是全量微调,一种是基于lora的微调
全量微调
如果是多卡进行微调可以直接使用项目中提供的命令
torchrun --nproc_per_node=4 --master_port=<your_random_port> train.py \
   --model_name_or_path <your_path_to_hf_converted_llama_ckpt_and_tokenizer> \
   --data_path ./HealthCareMagic-100k.json \
   --bf16 True \
   --output_dir pretrained \
   --num_train_epochs 1 \
   --per_device_train_batch_size 4 \
   --per_device_eval_batch_size 4 \
   --gradient_accumulation_steps 8 \
   --evaluation_strategy "no" \
   --save_strategy "steps" \
   --save_steps 2000 \
   --save_total_limit 1 \
   --learning_rate 2e-6 \
   --weight_decay 0. \
   --warmup_ratio 0.03 \
   --lr_scheduler_type "cosine" \
   --logging_steps 1 \
   --fsdp "full_shard auto_wrap" \
   --fsdp_transformer_layer_cls_to_wrap 'LLaMADecoderLayer' \
   --tf32 True
命令参数说明:
- nproc_per_node=4: 当前主机创建的进程数。一般设定为当前主机的 GPU 数量。
- master_port=<your_random_port>: 这个参数指定了一个随机的端口号,用于管理节点之间的通信。
- model_name_or_path <your_path_to_hf_converted_llama_ckpt_and_tokenizer>: 这个参数用于指定模型的名称或路径。你需要将其替换为你所使用的模型的名称或路径。
- data_path ./HealthCareMagic-100k.json: 指定训练数据的路径,这里使用了名为HealthCareMagic-100k.json的JSON文件作为训练数据。
- bf16 True: 启用了Brain Floating Point (BF16) 训练模式,这是一种深度学习训练时的数值精度设置,通常用于提高训练速度。
- output_dir pretrained: 指定训练模型的输出目录,模型训练后的权重和参数将会保存在这个目录中。
- num_train_epochs 1: 指定训练的轮数,这里设置为1,表示仅进行一轮的训练。
- per_device_train_batch_size 4: 指定每个处理器上的训练批次大小,这里设置为4,表示每个处理器一次处理4个样本。
- per_device_eval_batch_size 4: 指定每个处理器上的验证批次大小,类似于训练批次大小,这里也设置为4。
- gradient_accumulation_steps 8: 指定每多少个批次进行一次梯度累积,这里设置为8,意味着每8个批次的梯度将被累积并用于更新模型参数。
- evaluation_strategy “no”: 指定评估策略,这里设置为”no”,表示不进行评估。
- save_strategy “steps”: 指定模型保存策略,这里设置为”steps”,表示模型将在每2000个训练步骤后保存一次。
- save_steps 2000: 指定保存模型的训练步骤间隔,这里设置为2000,表示每2000个训练步骤保存一次模型。
- save_total_limit 1: 限制保存的模型文件数量,这里设置为1,表示只保留最近保存的一个模型文件。
- learning_rate 2e-6: 设置学习率,这里学习率为2e-6,即0.000002。
- weight_decay 0.: 设置权重衰减(L2正则化)的值,这里设置为0,表示不进行权重衰减。
- warmup_ratio 0.03: 设置学习率的预热比例,这里设置为3%,表示在训练开始时学习率会逐渐上升,占总训练步骤的3%。
- lr_scheduler_type “cosine”: 指定学习率调度器的类型,这里设置为”cosine”,表示使用余弦退火学习率调度器。
- logging_steps 1: 指定日志记录的步骤间隔,这里设置为1,表示每1个训练步骤记录一次日志。
- fsdp “full_shard auto_wrap”: 指定 Fully Sharded Data Parallel (FSDP) 训练策略。
- fsdp_transformer_layer_cls_to_wrap ‘LLaMADecoderLayer’: 指定要包装的Transformer层类型。
- tf32 True: 启用了TensorFloat 32 (TF32) 训练模式,这是一种数值精度设置,通常用于提高训练速度。
特别说明
bf16:google brain team为了深度学习而设计的数据类型,在深度学习中,会更关心范围,而不是精度(这也是为什么量化如火如荼),因为那么多权重本身就可以一定程度上弥补精度的损失。
打开fp16精度,Tesla V100、Tesla P100、T4等显卡建议启用以节省显存;
打开bf16精度,A100、H100、RTX3050及以后显卡建议启用以节省显存。
fsdp:一种数据并行的策略,这种类型的数据并行范式通过分片 optimizer states 、梯度、以及parameters,能够适应更多的数据和更大的模型。
基于LoRA的微调
python train_lora.py \
  --base_model '/data/sim_chatgpt/llama-7b-hf' \
  --data_path 'chatdoctor5k.json' \
  --output_dir './lora_models/' \
  --batch_size 1 \
  --micro_batch_size 1 \
  --num_epochs 1 \
  --learning_rate 3e-5 \
  --cutoff_len 256 \
  --val_set_size 120 \
  --adapter_name lora
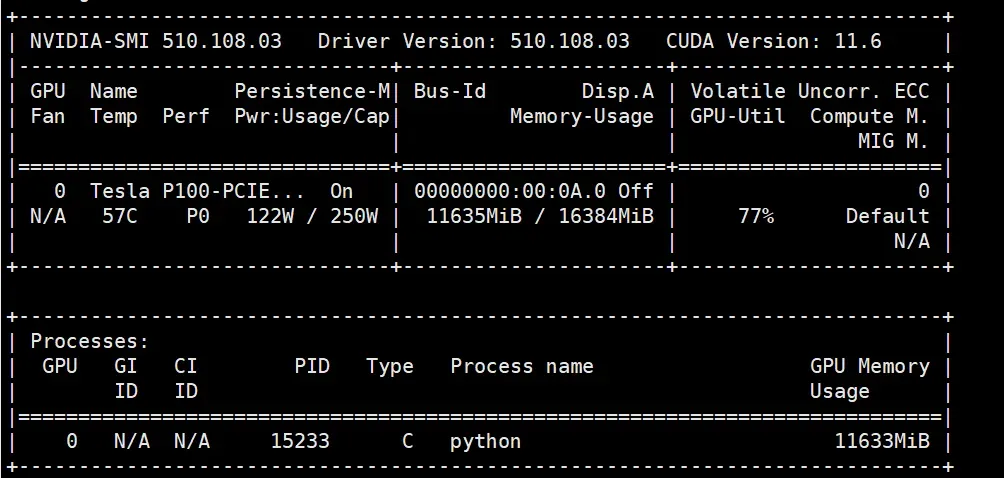
显存占用情况:约占用11G。
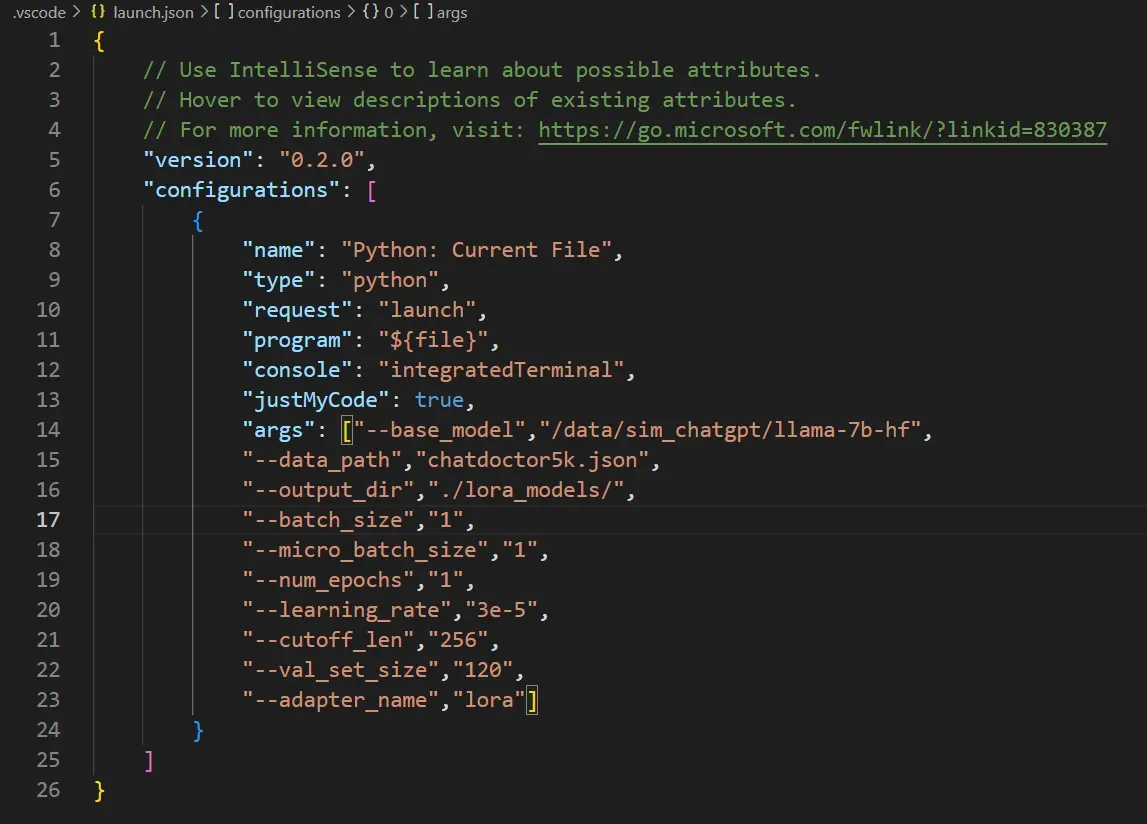
建议可以在VScode中进行debug,需要先点击Run下的Add Configration,会自动在.vscode下生成一个launch.json文件。在文件中填入”args”及对应的参数即可,如下:
"args": ["--base_model","/data/sim_chatgpt/llama-7b-hf",
            "--data_path","chatdoctor5k.json",
            "--output_dir","./lora_models/",
            "--batch_size","1",
            "--micro_batch_size","1",
            "--num_epochs","1",
            "--learning_rate","3e-5",
            "--cutoff_len","256",
            "--val_set_size"," ",
            "--adapter_name","lora"]
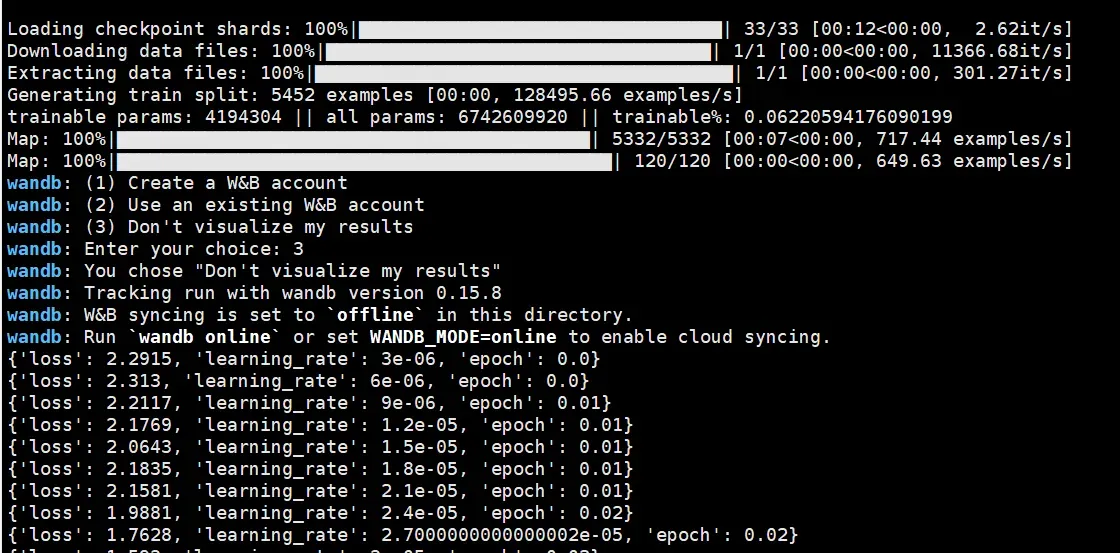
截图如下图所示
基于微调后的模型推理
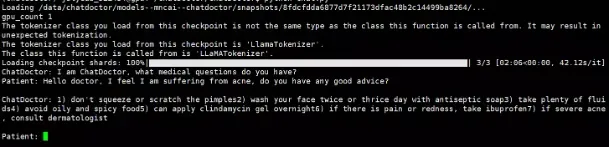
使用全量微调好的模型进行推理:mncai/chatdoctor
修改chat.py
load_model("/data/sim_chatgpt/chatdoctor")
执行 python chat.py即可
报错:
ImportError: LlamaConverter requires the protobuf library but it was
not found in your environment.
解决方法:
pip install protobuf==3.19.0
执行 python chat.py
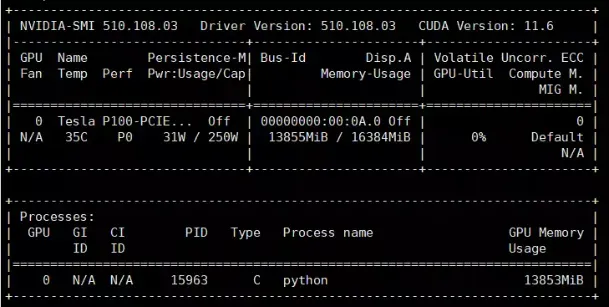
显存占用,约为14G
文章出处登录后可见!