目录
0 开发环境
作者:嘟粥yyds
时间:2023年7月31日
集成开发工具:Google Colab和PyCharm Professional 2021.1
集成开发环境:python3.10.6
第三方库:gradio、diffusers、transformers、torch、IPython、PIL、sentencepiece
1 介绍
1.1 Gradio简介
在现代的机器学习和深度学习领域,许多强大的模型被开发用于解决各种问题,例如图像生成、语言处理、文本分类等。然而,将这些复杂的模型转化为实际可用的应用并不是一件容易的事情。传统上,部署机器学习模型需要繁琐的工程和编程技能,限制了许多非技术专家无法享受这些强大模型的优势。
Gradio的出现为解决这个问题带来了一种简单而高效的解决方案。Gradio是由Rafael Gómez和Alexandre Passant开发的开源Python库,其目标是使机器学习模型的部署和使用变得简单易行。Gradio允许用户通过简单的代码,将训练好的机器学习模型转化为交互式应用程序,无需编写大量的前端代码或设计复杂的界面。这使得任何人都可以通过几步简单的操作,使用和探索机器学习模型的功能,而无需深入了解算法的细节。
1.2 Stable Diffusion模型简介
稳定扩散生成模型(Stable Diffusion)是一种潜在的文本到图像扩散模型,能够在给定任何文本输入的情况下生成照片般逼真的图像Stable Diffusion 是基于latent-diffusion 并与 Stability AI 和Runway合作实现的。
Stable Diffusion在图像生成领域取得了显著的成就。该模型由Zhengyang Wang、Yilun Xu等人在2020年提出。与许多传统的图像生成模型不同,Stable Diffusion采用了一种不同寻常的生成策略,即通过逐渐添加噪声来生成图像。这种方式使得模型能够生成高质量、高分辨率且更加真实的图像。
Stable Diffusion模型的核心思想是,通过控制随机噪声的强度来控制生成图像的多样性和质量。随着噪声逐渐减少,模型将逐渐产生更加真实和清晰的图像。这种稳定的生成过程有助于避免一些传统生成模型的一些问题,如模式崩溃和模式塌陷。因此,Stable Diffusion模型成为了图像生成领域的热门选择,受到了广泛关注。
2 使用Gradio搭建基本界面
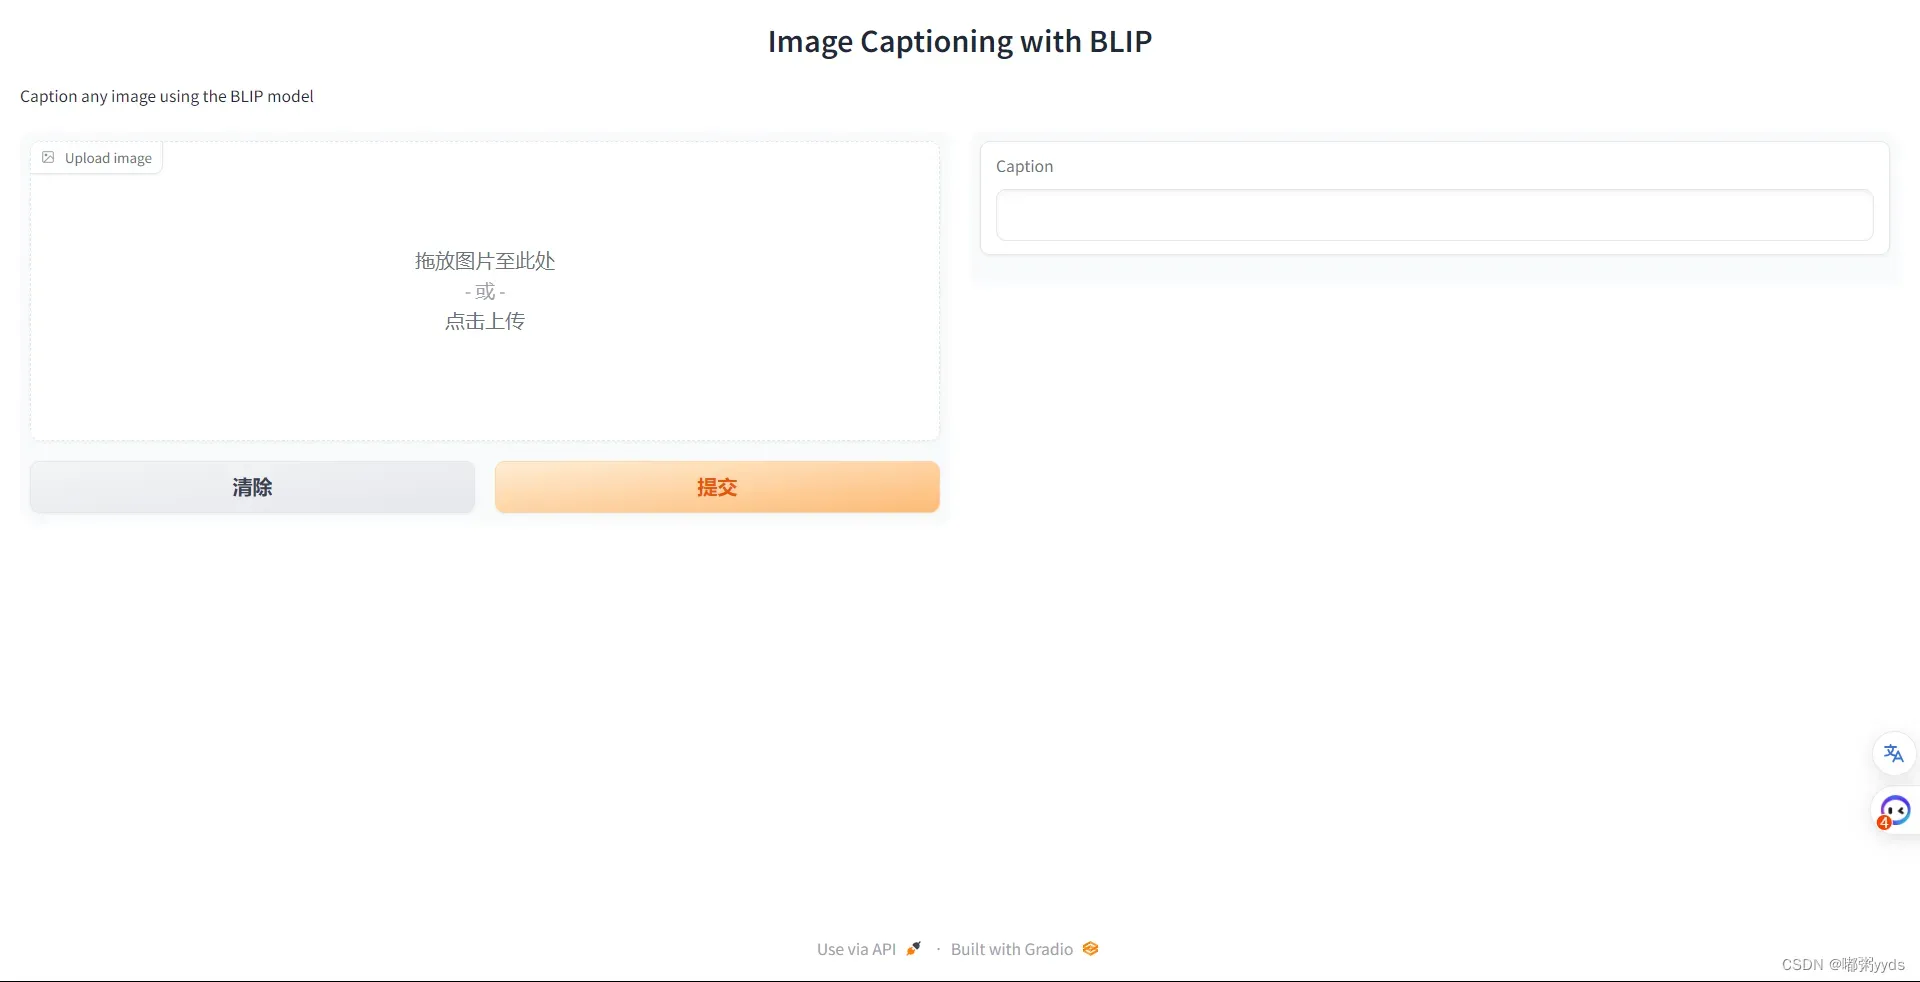
本部分将介绍使用Gradio搭建一个简易的图像字幕应用程序,以便读者能大致了解如何使用Gradio搭建界面,为后面讲解搭建Stable Diffusion模型打下基础。
2.1 安装依赖库
!pip install gradio
!pip install transformers
2.2 加载预训练模型
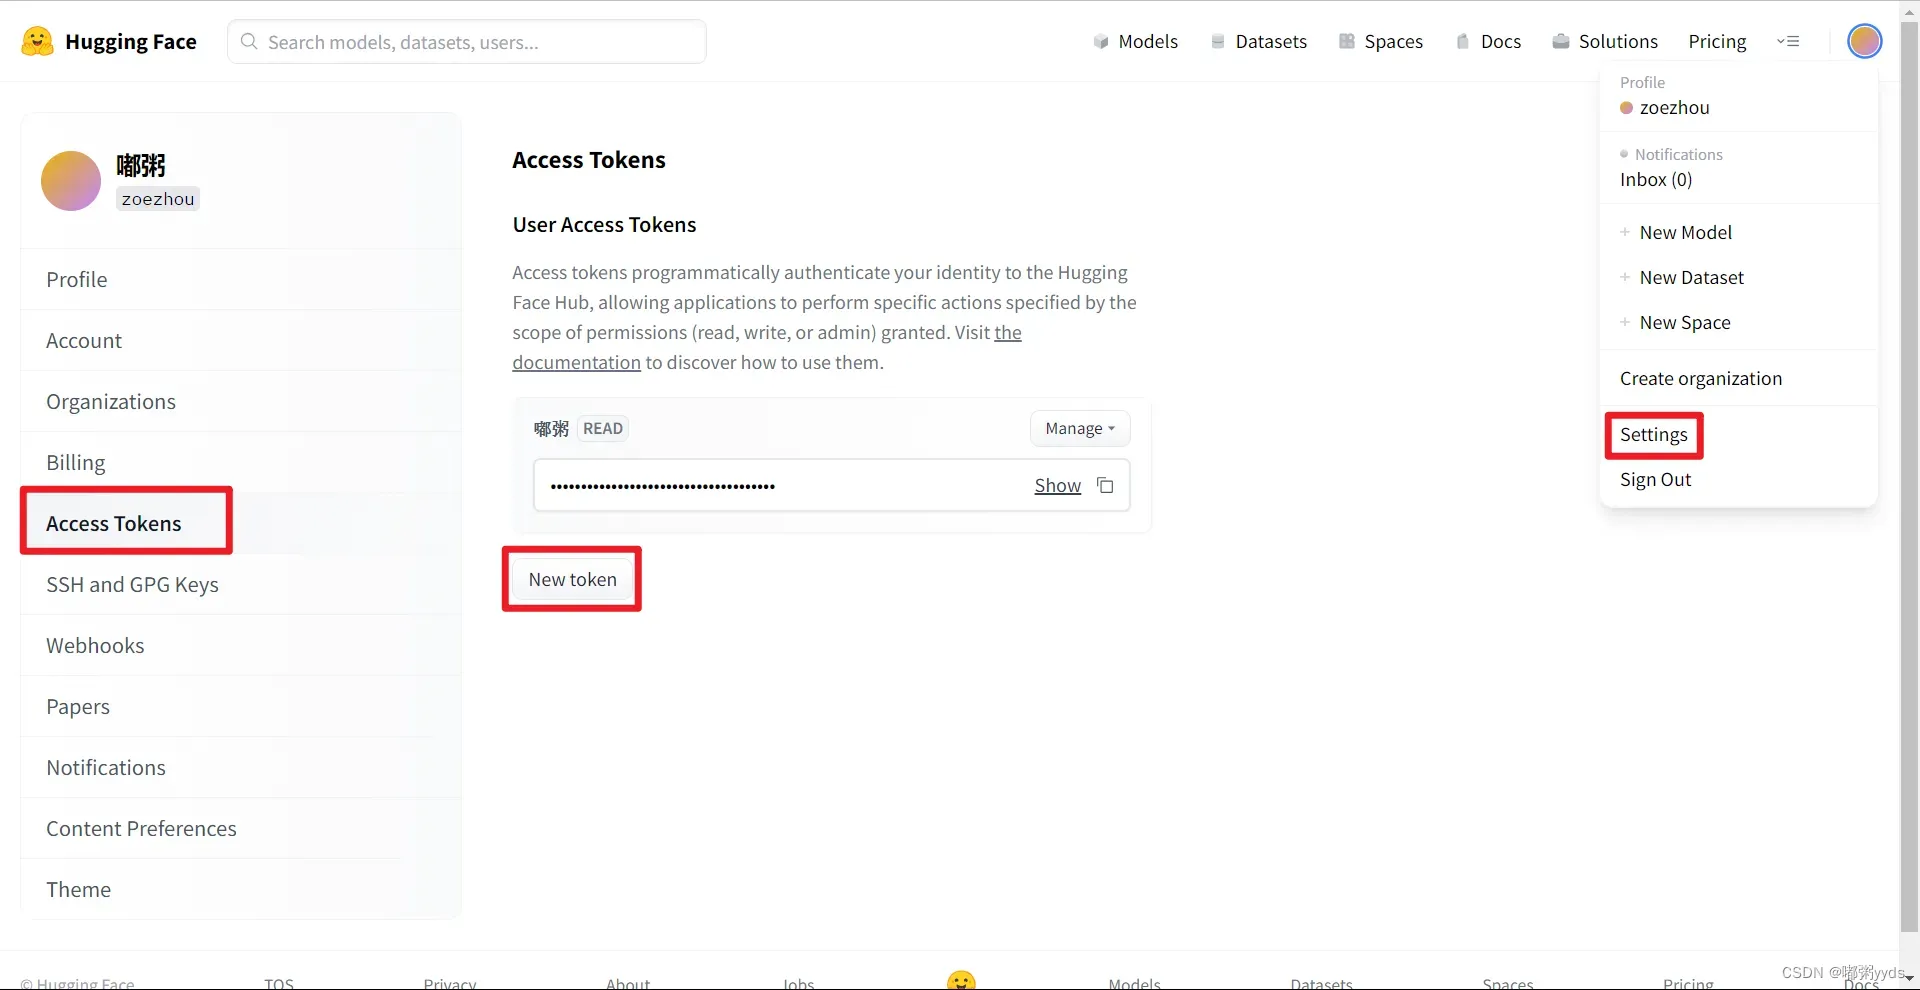
本部分讲解为使用API从 Hugging Face 加载预训练好的模型,读者若尚未有Hugging Face账号,不妨先注册一个。注册成功后,新建一个API_KEY,将其添加到系统环境变量中或复制直接记住均可。
图一:Hugging Face新建API_KEY
import IPython.display
import io
from PIL import Image
import base64
import os


# 换成你自己的hugging face的API_KEY
hf_api_key = os.environ.get('HF_API_KEY')

# 两个模型,效果都很不错
# ENDPOINT_URL = "https://api-inference.huggingface.co/models/Maciel/Muge-Image-Caption"
ENDPOINT_URL="https://api-inference.huggingface.co/models/Salesforce/blip-image-captioning-base"
2.3 解析返回的数据
# 辅助函数
import requests, json

# 图像到文本端点
def get_completion(inputs, parameters=None, ENDPOINT_URL=ENDPOINT_URL):
    headers = {
      "Authorization": f"Bearer {hf_api_key}",
      "Content-Type": "application/json"
    }
    data = { "inputs": inputs }
    if parameters is not None:
        data.update({"parameters": parameters})
    response = requests.request("POST",
                    ENDPOINT_URL,
                    headers=headers,
                    data=json.dumps(data))
    return json.loads(response.content.decode("utf-8"))
2.4 构建图像字幕应用程序
在这里,我们将使用 `Salesforce/blip-image-captioning-base` 的 14M 参数字幕模型。
image_url = "https://free-images.com/sm/9596/dog_animal_greyhound_983023.jpg"
display(IPython.display.Image(url=image_url))
get_completion(image_url)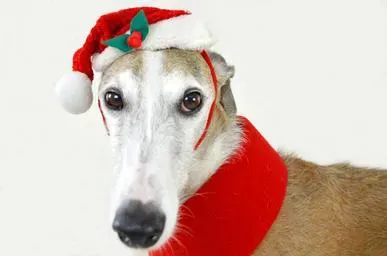
[{'generated_text': 'a dog wearing a santa hat and a red scarf'}]
可以看出,这个模型还是能挺准确的描述出图像的内容的。
import gradio as gr

def image_to_base64_str(pil_image):
    byte_arr = io.BytesIO()
    pil_image.save(byte_arr, format='PNG')
    byte_arr = byte_arr.getvalue()
    return str(base64.b64encode(byte_arr).decode('utf-8'))

def captioner(image):
    base64_image = image_to_base64_str(image)
    result = get_completion(base64_image)
    return result[0]['generated_text']

gr.close_all()
demo = gr.Interface(fn=captioner,
          inputs=[gr.Image(label="Upload image", type="pil")],
          outputs=[gr.Textbox(label="Caption")],
          title="Image Captioning with BLIP",
          description="Caption any image using the BLIP model",
          allow_flagging="never"
          # examples=["christmas_dog.jpeg"]
                   )

# share=True参数会生成一个公共URL,使得其他人也可通过这个URL访问这个应用程序
# server_port为设置的端口号,只要不与常用端口冲突,均可以设置
demo.launch(share=True, server_port=10055)
# 当想结束这个应用程序时,记得执行`demo.close()`,这将关闭端口并释放URL
图二:搭建后的页面
图三:示例图片测试结果

3 实现Stable Diffusion图像生成
在本部分,我们将深入探讨Stable Diffusion模型的实现细节,并逐步完善我们的图像生成应用。我们将介绍Stable Diffusion模型的基本原理,并将其集成到Gradio应用中,从而实现图像生成功能。
3.1 Stable Diffusion模型解析
在这一部分,我们将简要解释Stable Diffusion模型的核心原理。请注意,Stable Diffusion模型的详细实现可能较为复杂,这里只是简要介绍其基本概念。
Stable Diffusion模型是一种基于概率的生成模型,通过逐渐添加噪声来生成图像。模型的主要思想是,在生成图像的过程中,逐渐增加噪声的强度,并在每一步中,使用生成的图像和目标图像之间的差异来引导模型生成更加真实的图像。通过逐渐减少噪声的强度,模型能够逐渐生成高质量的图像。
具体来说,Stable Diffusion模型的生成过程如下:
- 初始化:从一个随机噪声图像开始生成过程。
- 扩散:逐渐增加噪声的强度,生成一系列模糊的图像。
- 驱动:根据生成的图像和目标图像之间的差异,引导模型向更真实的图像生成方向进行迭代优化。
- 稳定:随着噪声逐渐减少,生成的图像逐渐趋于稳定,最终生成高质量的图像。
由于Stable Diffusion模型的实现细节涉及到许多数学和算法方面的内容,这里不会详细展开。如果你对该模型感兴趣,可以查阅相关的研究论文和代码实现。
本文推荐论文及其代码:
- 论文:High-Resolution Image Synthesis with Latent Diffusion Models
- 论文代码:https://github.com/CompVis/latent-diffusion
3.2 将SD模型集成到Gradio应用中
在上一部分中,我们已经创建了一个基本的Gradio应用,它允许用户通过上传图像来获取图像描述。现在,我们将正式开始实现我们的应用,将实际的Stable Diffusion模型集成进来。
本文将会提供两种实现代码。一种跟之前构建的形式相同,通过API访问Hugging Face的预训练模型,这种方式依赖网络状态,运行较大的模型时容易断开连接,不稳定。另一种将模型下载到本地,这种方式不仅适用于加载Hugging Face上的预训练模型,也适用于加载自己训练的模型,相比之下更加普适,但这种方式对本地电脑GPU显存要求较高,若GPU显存不足可能出现运行时间长甚至无法运行。
3.2.1 本地加载
3.2.1.1 安装所需依赖库
!pip install gradio diffusers transformers sentencepieceimport io
from PIL import Image
import gradio as gr
from transformers import AutoTokenizer, AutoModelForSeq2SeqLM
from diffusers import DiffusionPipeline
import torch
import IPython.display as display3.2.1.2 加载模型
# 首先加载翻译模型  中 - 英
# 使用"Helsinki-NLP/opus-mt-zh-en"预训练模型的tokenizer
tokenizer = AutoTokenizer.from_pretrained("Helsinki-NLP/opus-mt-zh-en")

# 使用"Helsinki-NLP/opus-mt-zh-en"预训练模型
model = AutoModelForSeq2SeqLM.from_pretrained("Helsinki-NLP/opus-mt-zh-en")

# 加载SD模型
model_id = "runwayml/stable-diffusion-v1-5"
# model_id = "stabilityai/stable-diffusion-2-1"

pipeline = DiffusionPipeline.from_pretrained(model_id, torch_dtype=torch.float16)
def translate_zh_en(text):
# 使用tokenizer将中文文本编码为模型可接受的输入格式
inputs = tokenizer(text, return_tensors="pt", padding=True)
outputs = model.generate(**inputs)
# 将模型输出解码为英文文本
en_text = tokenizer.decode(outputs[0], skip_special_tokens=True)
return en_text
# 检查是否有可用的GPU,并设置设备
device = "cuda" if torch.cuda.is_available() else "cpu"
pipeline = pipeline.to(device)
def get_completion(prompt):
res = pipeline(prompt).images[0]
return res
def image_grid(imgs, rows, cols):
assert len(imgs) == rows * cols
w, h = imgs[0].size
grid = Image.new('RGB', size=(cols * w, rows * h))
grid_w, grid_h = grid.size
for i, img in enumerate(imgs):
grid.paste(img, box=(i % cols * w, i // cols * h))
return grid3.2.1.3 初试SD模型生成图像
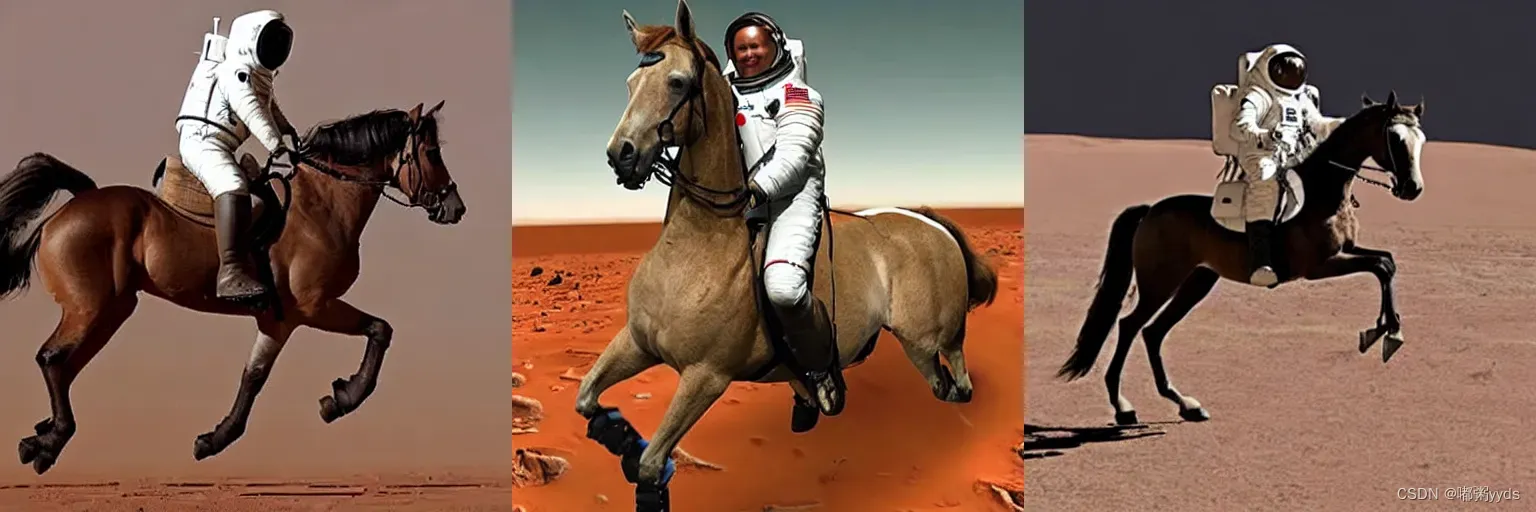
n_images = 3
prompts = ["a photo of an astronaut riding a horse on mars"] * n_images
result = pipeline(prompts, num_inference_steps=50)[0]

grid_image = image_grid(result, rows=1, cols=n_images)

# Display the image grid using IPython.display.display
display.display(grid_image)
图四:初试SD模型生成的图像
3.2.1.4 正式搭建
def generate(prompt):
prompt = translate_zh_en(prompt)
output = pipeline(prompt).images[0]
return output
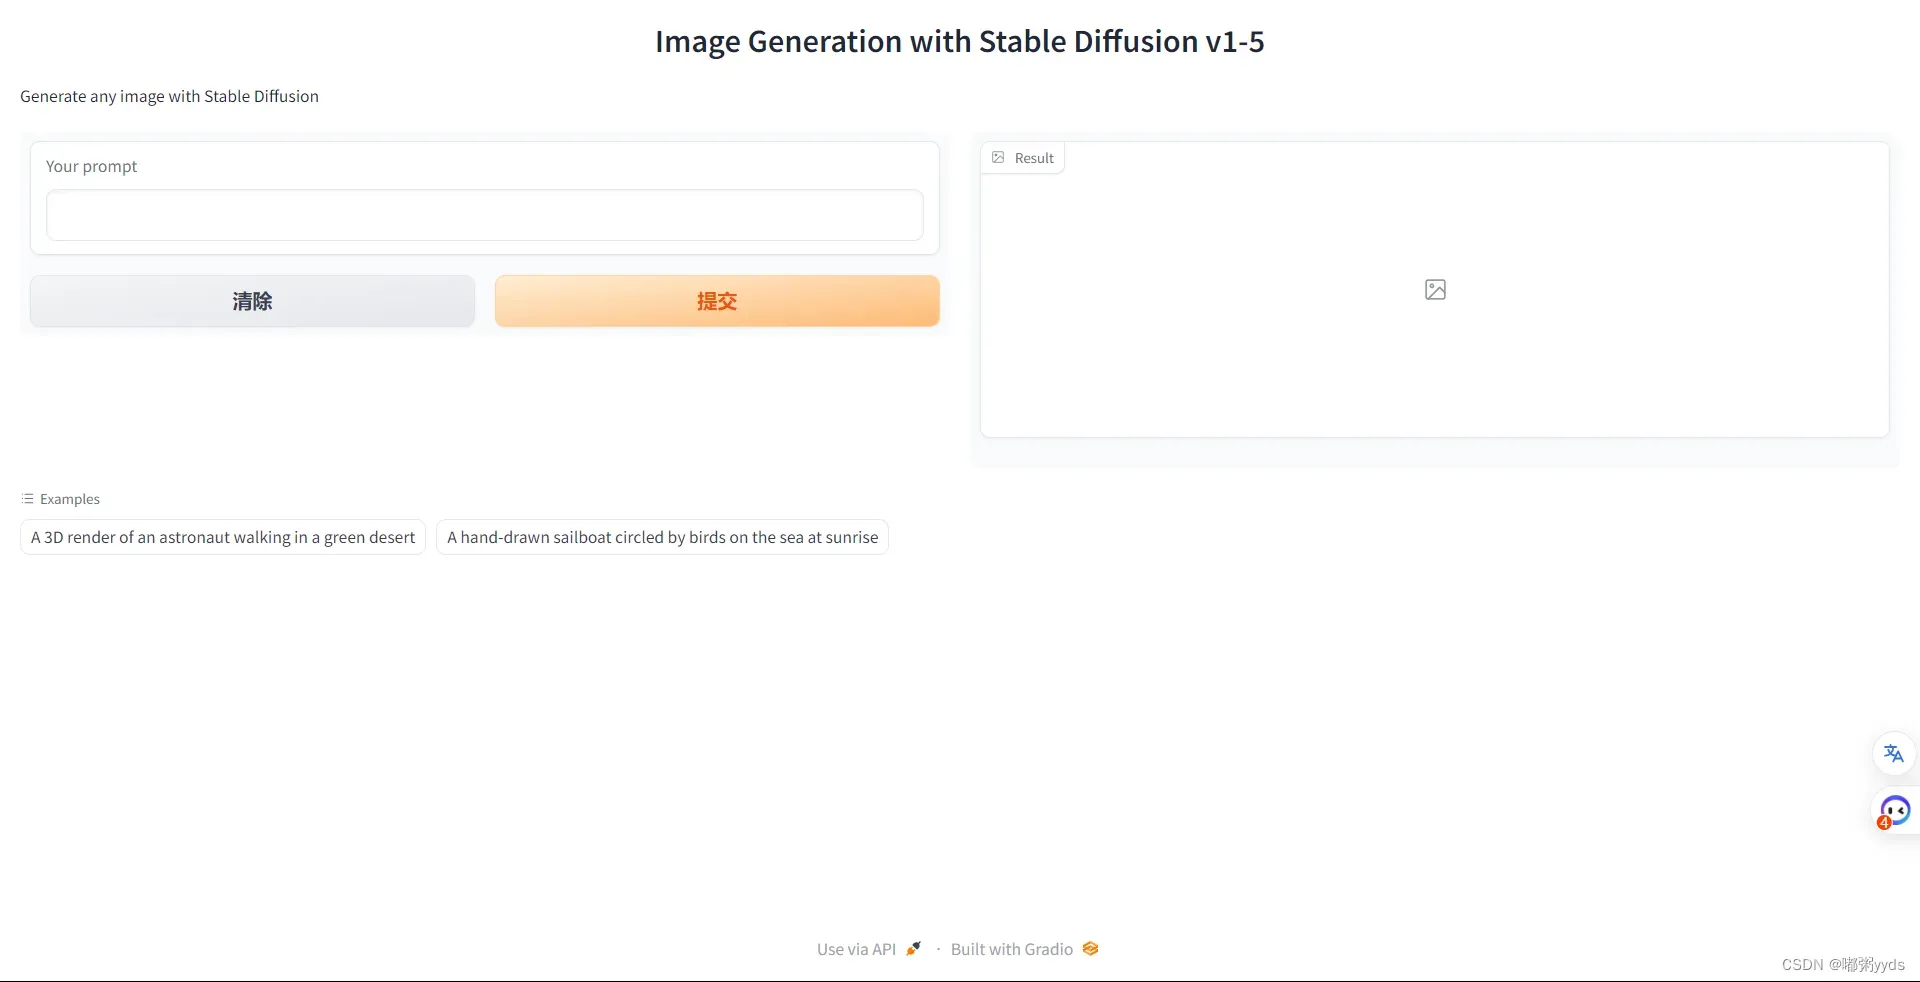
gr.close_all()
demo = gr.Interface(fn=generate,
inputs=[gr.Textbox(label="Your prompt")],
outputs=[gr.Image(label="Result")],
title="Image Generation with Stable Diffusion v1-5",
description="Generate any image with Stable Diffusion",
allow_flagging="never",
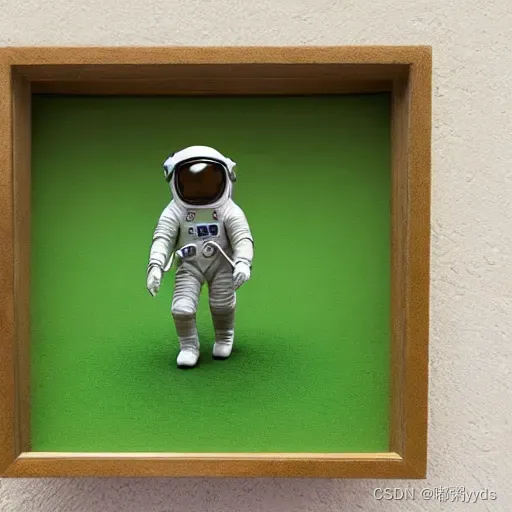
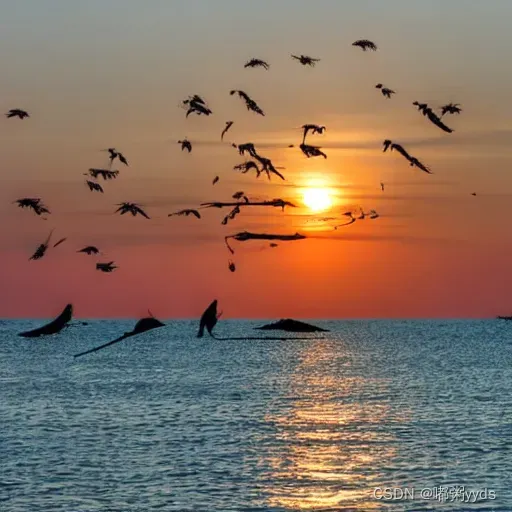
examples=["A 3D render of an astronaut walking in a green desert", "A hand-drawn sailboat circled by birds on the sea at sunrise"])
# debug=True 为设置在单元格输出信息,若不需要去掉也并无影响
# 当想关闭时,执行代码`demo.close()`
demo.launch(share=True, debug=True, server_port=10055)图五: 搭建后页面
 图六:两个Examples生成的图像
3.2.1.5 界面美化
这里提供几种美化方案,读者可自行选择使用哪种方案或自行美化。
方案一
import gradio as gr


def generate(prompt, negative_prompt, steps, guidance, width, height):
    prompt = translate_zh_en(prompt)
    negative_prompt = translate_zh_en(negative_prompt)

    params = {
        "negative_prompt": negative_prompt,
        "num_inference_steps": steps,
        "guidance_scale": guidance,
        "width": width,
        "height": height
    }

    output = pipeline(prompt, **params).images[0]

    return output

gr.close_all()
demo = gr.Interface(fn=generate,
              inputs=[
                  gr.Textbox(label="", placeholder="Enter your prompt"),
                  gr.Textbox(label="", placeholder="Enter a negative prompt"),
                  gr.Slider(label="Inference Steps", minimum=20, maximum=150, value=50,
                            info="In how many steps will the denoiser denoise the image?"),
                  gr.Slider(label="Guidance Scale", minimum=1, maximum=20, value=7.5,
                            info="Controls how much the text prompt influences the result"),
                  gr.Slider(label="Width", minimum=64, maximum=512, step=64, value=512),
                  gr.Slider(label="Height", minimum=64, maximum=512, step=64, value=512),
              ],
              outputs=[gr.Image(label="Result")],
              title="Image Generation with Stable Diffusion",
              description="Generate any image with Stable Diffusion",
              allow_flagging="never"
              )


# debug=True 为设置在单元格输出信息,若不需要去掉也并无影响
demo.launch(share=True, debug=True, server_port=10055)
图七:方案一美化后页面
图八:优化后相同prompt生成的图像
(注:prompt:An abstract oil painting of a river.左图是英文,右图是中文)
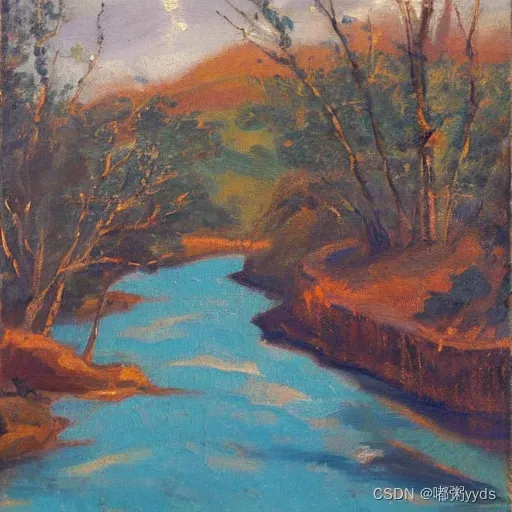
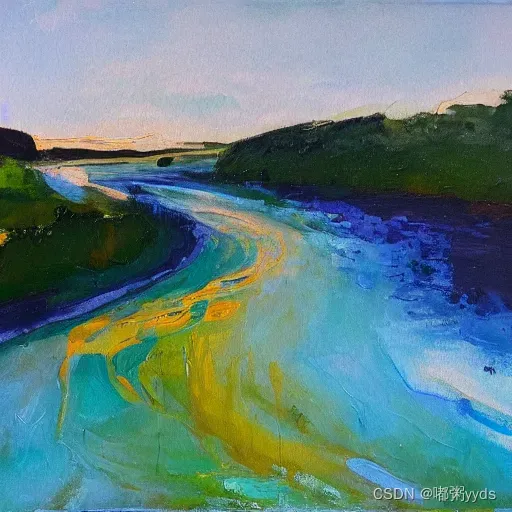
该方案的优化中加入了许多部件,使得用户能够更加灵活的控制Stable Diffusion模型生成图像的质量 。其中,两个prompt输入框无需多说,其他组件如
- Inference Steps:迭代步数,值越大生成的质量越高,响应执行时间也更长。
- Guidance Scale:指导尺度,值越大prompt对图像的限制越大,反之生成的图像自由发挥空间更多。
- Width/Height:宽、高,生成图像的宽和高,步长为64。
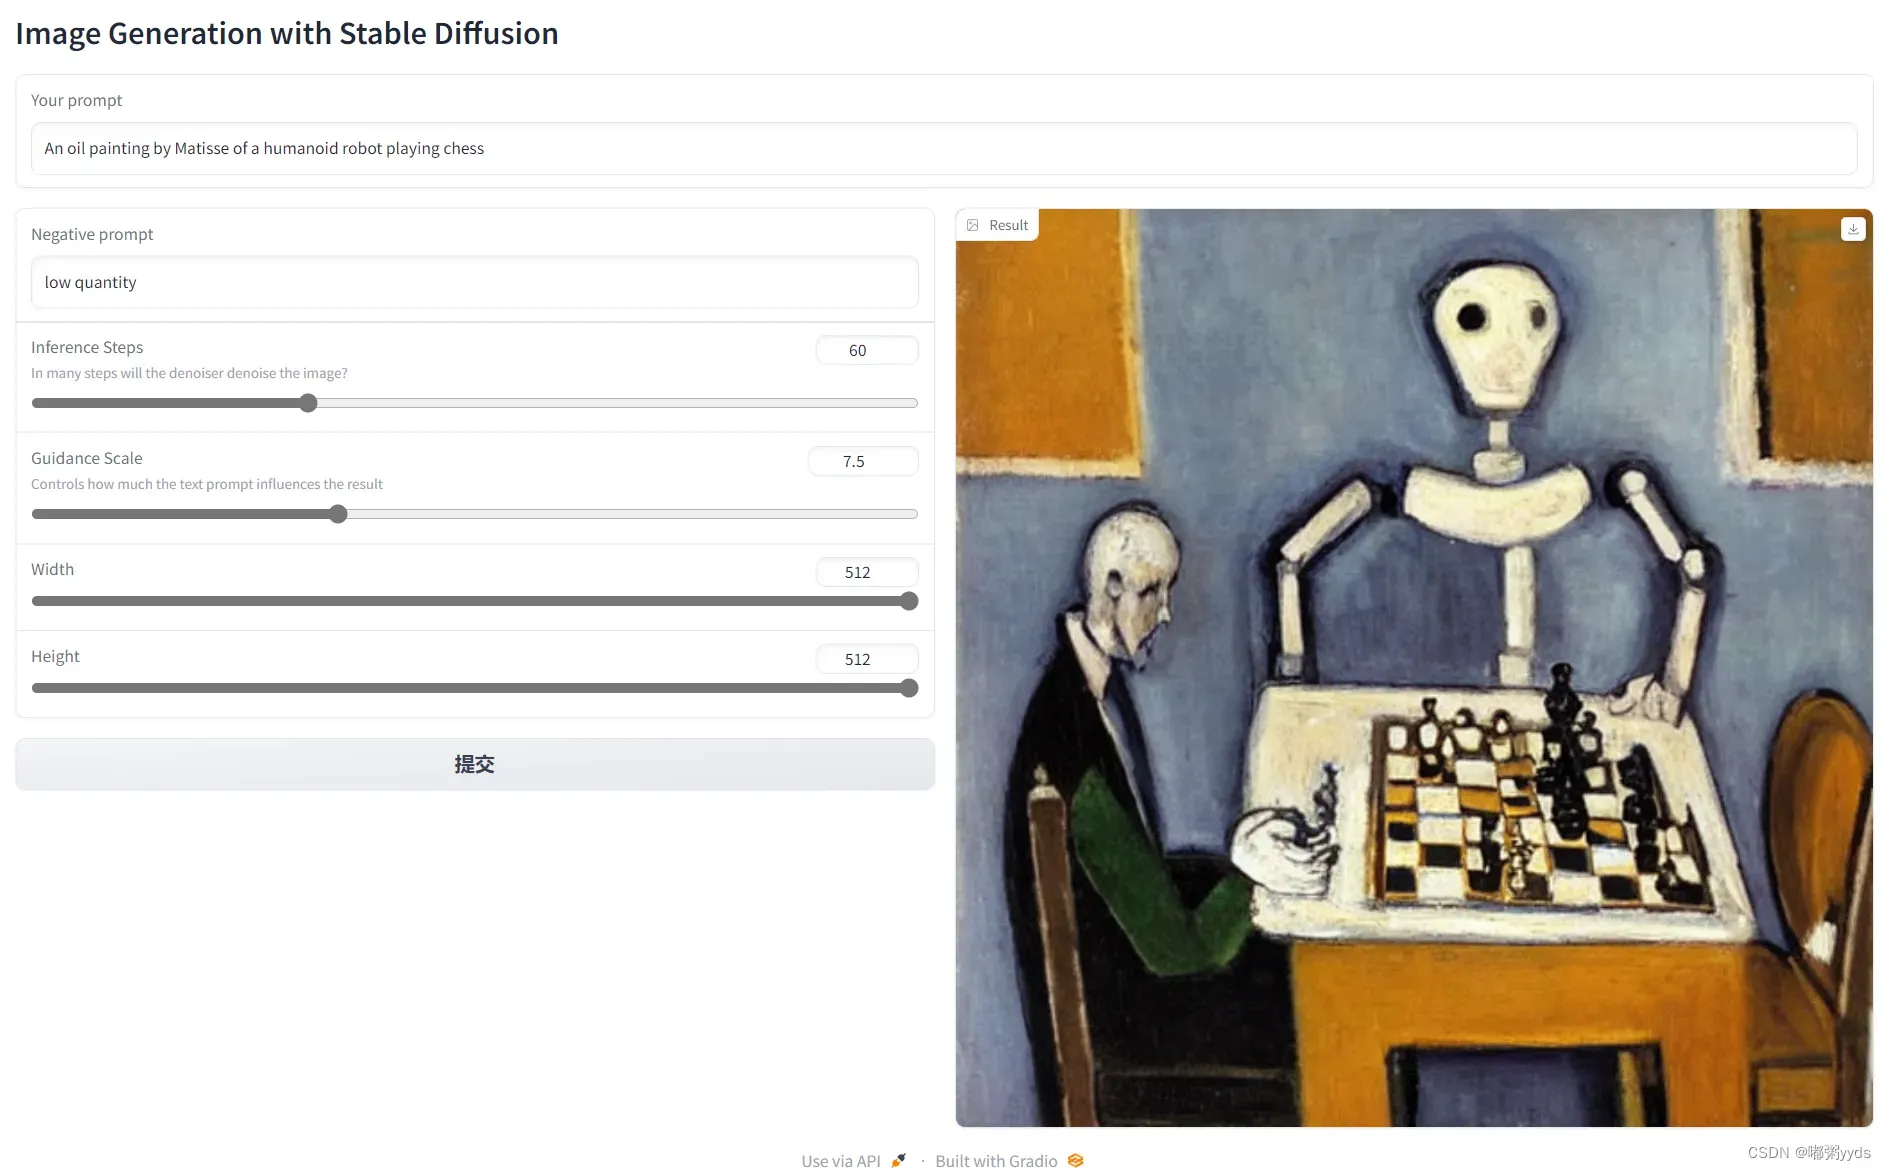
方案二
相较于方案一,该方案保留了所有组件,仅对布局做出了调整。
图九:方案二美化后页面
(注:prompt:An oil painting by Matisse of a humanoid robot playing chess)
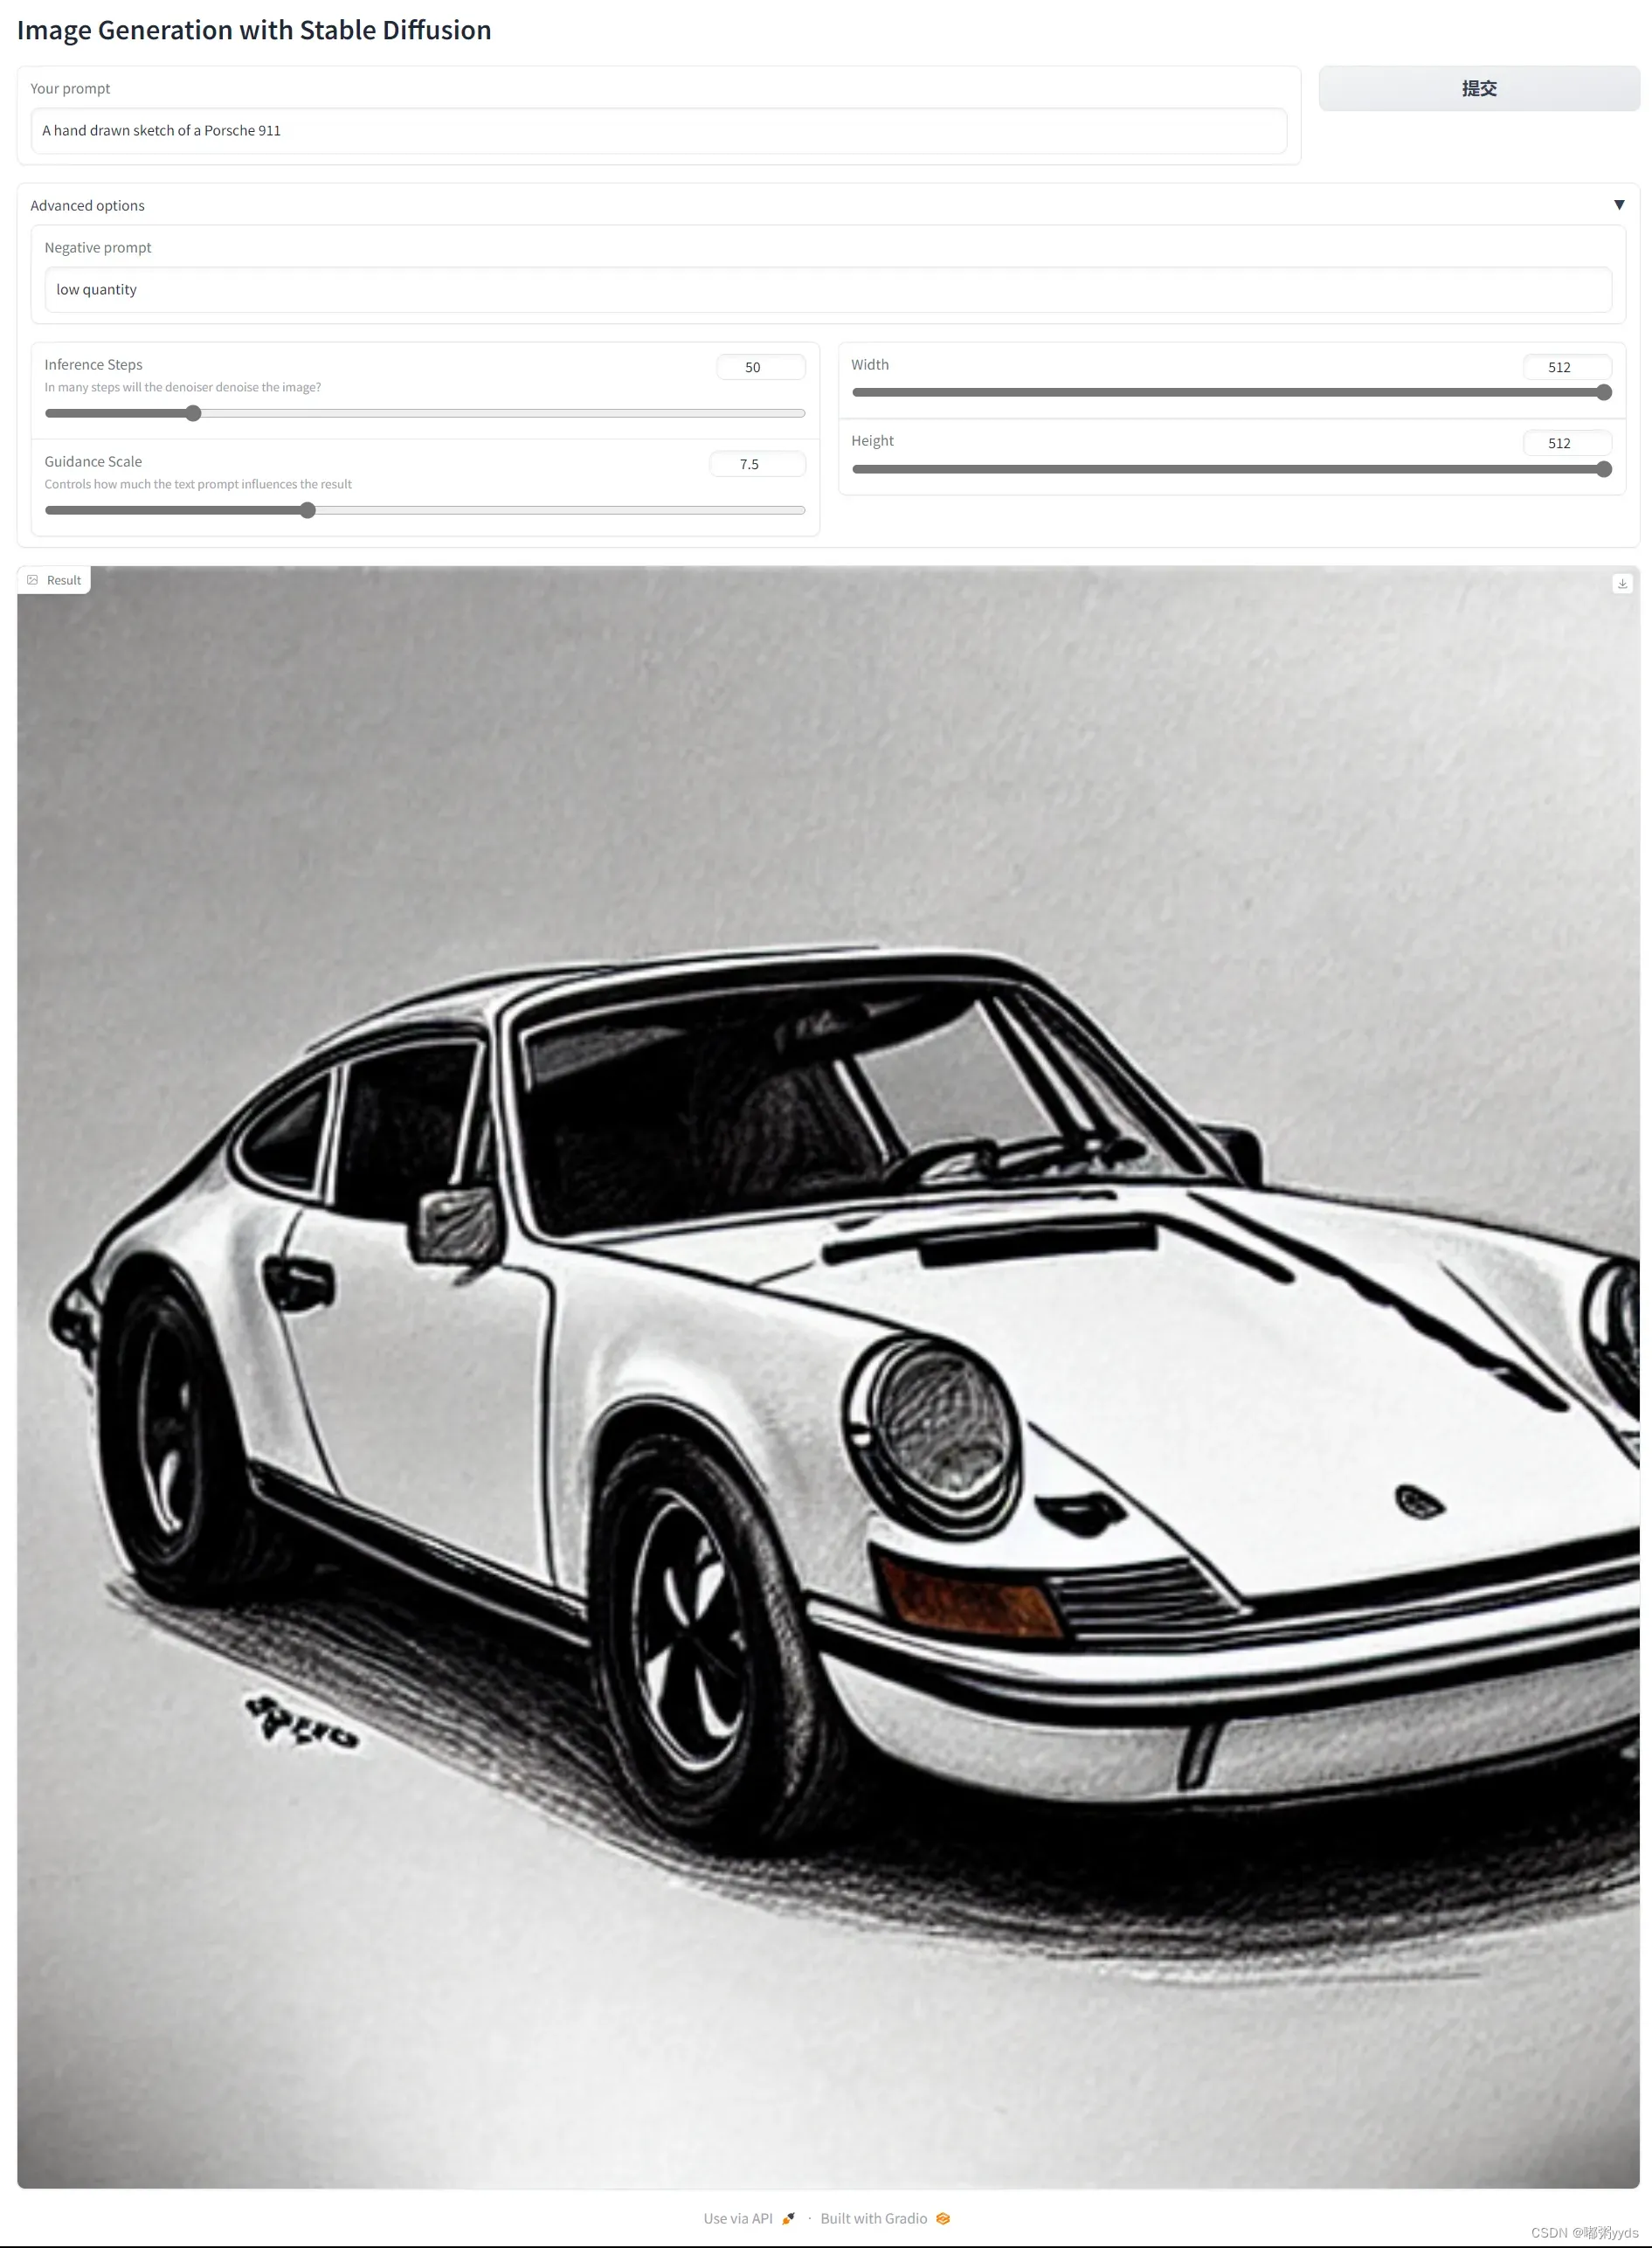
方案三
相较于前两个方案,该方案依旧保留了所有组件,仅调整其布局。
图十:方案三美化后页面
(注:prompt:A hand drawn sketch of a Porsche 911)
现在,我们已经成功地将Stable Diffusion模型集成到Gradio应用中。当用户输入prompt后,Stable Diffusion模型将生成一张的图像,并将结果显示在界面上。用户可以反复尝试,直到满意为止。这个应用为用户提供了一个简单而强大的图像生成体验,无需编程知识,即可生成高质量的图像。
3.2.2 API 加载
由于本地加载方案已经花费大量篇幅讲解,故API加载方式仅给出基础方案代码,读者可根据本地加载方式所给出的三种美化方案进行美化。
import io
import IPython.display
from PIL import Image
import base64
import requests, json


# 此处换上你自己的API_KEY
hf_api_key = os.environ.get('HF_API_KEY')
# 这里依旧给出两个SD模型的API_URL
API_URL = "https://api-inference.huggingface.co/models/runwayml/stable-diffusion-v1-5"
# API_URL = "https://api-inference.huggingface.co/models/stabilityai/stable-diffusion-2-1"


# 辅助函数
# Text-to-image endpoint
def get_completion(inputs, parameters=None, ENDPOINT_URL=API_URL):
    headers = {
      "Authorization": f"Bearer {hf_api_key}",
      "Content-Type": "application/json"
    }
    data = { "inputs": inputs }
    if parameters is not None:
        data.update({"parameters": parameters})
    response = requests.request("POST",
                ENDPOINT_URL,
                headers=headers,
                data=json.dumps(data))
    # Convert the response content to base64 encoding
    result_base64 = base64.b64encode(response.content).decode("utf-8")
    print(result_base64)
    return result_base64


prompt = "A 3D render of an astronaut walking in a green desert"


result = get_completion(prompt)
IPython.display.HTML(f'<img src="data:image/png;base64,{result}" />')

import gradio as gr

#A helper function to convert the PIL image to base64
#so you can send it to the API
def base64_to_pil(img_base64):
    base64_decoded = base64.b64decode(img_base64)
    byte_stream = io.BytesIO(base64_decoded)
    pil_image = Image.open(byte_stream)
    return pil_image

def generate(prompt):
    output = get_completion(prompt)
    result_image = base64_to_pil(output)
    return result_image

gr.close_all()
demo = gr.Interface(fn=generate,
        inputs=[gr.Textbox(label="Your prompt")],
        outputs=[gr.Image(label="Result")],
        title="Image Generation with Stable Diffusion",
        description="Generate any image with Stable Diffusion",
        allow_flagging="never",
        examples=["A 3D render of an astronaut walking in a green desert", "A hand-drawn sailboat circled by birds on the sea at sunrise"])

demo.launch(share=True, server_port=10055)
4 总结
本博客讲解了如何使用Gradio搭建一个基于Stable Diffusion模型的图像生成应用。Gradio为我们提供了一个简单而高效的界面库,使得将机器学习模型部署为交互式应用成为可能。同时,Stable Diffusion模型作为一种强大的图像生成模型,为我们提供了一种新颖而有效的图像生成方式。
在本文中,我们完成了以下主要内容:
- 简要介绍了Gradio和Stable Diffusion模型的基本概念,为读者提供了一个基本的了解。
- 讲解了准备工作,包括依赖库的安装、环境设置与模型的准备,为搭建图像生成应用做好了准备。
- 使用Gradio搭建了一个基本的图像生成界面,使用户可以通过输入prompt与Stable Diffusion模型交互。
- 解释了Stable Diffusion模型的基本原理,尽管没有详细展开实现细节,但为读者提供了一个了解该模型的基础。
- 将实际的Stable Diffusion模型集成到Gradio应用中,使得用户可以在简单的交互操作下生成高质量的图像。
通过这个简单的图像生成应用,展示了Gradio和Stable Diffusion模型的强大功能和优势。Gradio的简单易用性为我们提供了快速部署交互式应用的能力,而Stable Diffusion模型的高质量生成为用户提供了更加真实和清晰的图像体验。
当然,本博客只是一个入门级的教程,关于Gradio和Stable Diffusion模型还有更多的细节和高级技巧值得深入探索。
例如,本文只介绍了使用SD进行图像生成中的一种类型,实际上使用SD进行图像生成时,输入的prompt不仅可以是text,也可以是image等。且SD不仅可以进行图像生成,还可以进行图像修复、图像超分辨率、图像编辑、计算机视觉任务增强和图像合成等。
读者可以继续学习和研究这些内容,并探索更多可能性。在不断学习和实践中,相信你将能够构建更加复杂和强大的应用,并为更多人带来便利和乐趣。
文章出处登录后可见!