文章目录
- 一、string类的介绍
- 二、string类的使用
- 1.string的构造函数
- 2.string的赋值函数
- 3.string的遍历方法
- (1)[]+下标遍历
- (2)利用迭代器遍历
- (3)范围for遍历
- 4.反向迭代器
- 5.const修饰的迭代器
- 6.size()函数和capacity()函数
- 7.reverse和resize
- 8.string的插入操作
- (1)push_back函数
- (2)append函数
- (3)+=运算符
- (4)insert函数
- 9.string的删除操作
- (1)erase函数
- (2)pop_back
- 10.string的swap函数
- 11.c_str函数
- 12.substr函数
- 13.string的查找函数
- (1)find函数
- (2)rfind函数
- (3)查找函数的使用
- 14.getline函数
一、string类的介绍
C++中的string类是字符串类,它在C++中非常常用,有了string类以后,我们不需要像C语言那样定义字符数组来表示字符串,操作起来是非常方便的,因为string类底层已经将增、删、查、改以及扩容这些机制封装好了,我们只需要直接使用即可。
string类其实是basic_string模板类的一个实例,它是用char来实例化basic_string模板类。string类本质上就是一个可以管理动态增长的字符数组的类,并且这个字符数组以 ‘\0’ 结尾。

二、string类的使用
1.string的构造函数
string一共有7个构造函数,我们一般常用的构造函数是下图中的第一个函数即无参构造函数,第二个函数即拷贝构造函数,第四个函数即参数是常量字符串的构造函数。
下面我们举个小例子来实现以下string的构造:
#include <iostream>
#include <string>

using namespace std;

int main()
{
    string s1();// 无参构造函数
    string s2("hello world");// 常量字符串构造函数
    string s3(s2);// 拷贝构造函数

    // 拷贝构造还可以写成下面这样子
    string s4 = s2;
    return 0;
}
2.string的赋值函数
string提供了三种赋值函数,分别是通过string对象赋值给string对象,通过常量字符串赋值给string对象,通过字符赋值给string对象。

下面我们用代码演示一下这三种赋值函数的使用方法:
#include <iostream>
#include <string>

using namespace std;

int main ()
{
    string s1("hello");
    string s2;
    s2 = s1;
    cout << s2 << endl;

    s2 = "world";
    cout << s2 << endl;

    s2 = 'A';
    cout << s2 << endl;
    return 0;
}
3.string的遍历方法
(1)[]+下标遍历
string类是提供了[]运算符重载的,这也就意味着string可以让我们像访问数组一样利用下标来访问元素,下面我们用代码来演示一下:
size()是string的一个成员函数,可以返回string的元素个数(不包括\0)
#include <iostream>
#include <string>

using namespace std;

int main ()
{
    string s("hello world");
    for (size_t i = 0; i < s.size(); i++)
    {
        cout << s[i];
    }
    cout << endl;
    return 0;
}
(2)利用迭代器遍历
迭代器是容器内的内嵌类型,其实本质上是被重命名过的一个指针变量,迭代器是使用非常多的一个工具,下面用代码演示一下迭代器的使用:
#include <iostream>
#include <string>

using namespace std;

int main ()
{
    string s("hello world");
    string::iterator it = s.begin();
    while (it != s.end())
    {
        cout << *it;
        ++it;
    }
    cout << endl;
    return 0;
}
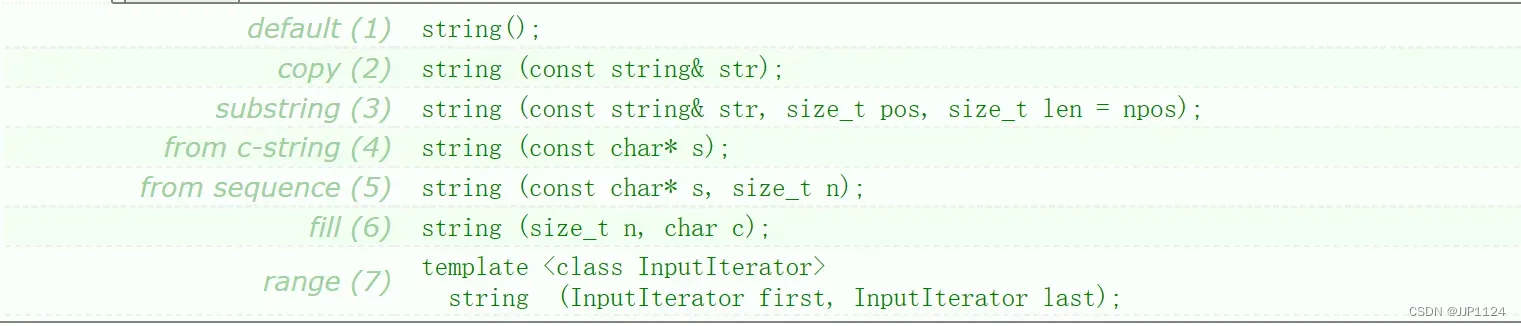
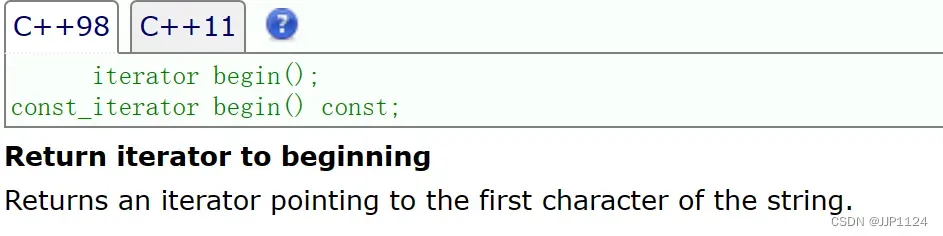
这里需要介绍一下begin()和end()这两个函数,这两个函数是string类提供的函数接口,是用来配合迭代器使用的。begin()函数返回的是string字符串的首位置,end()函数返回的是string字符串最后一个位置(即最后一个字符的下一个位置)
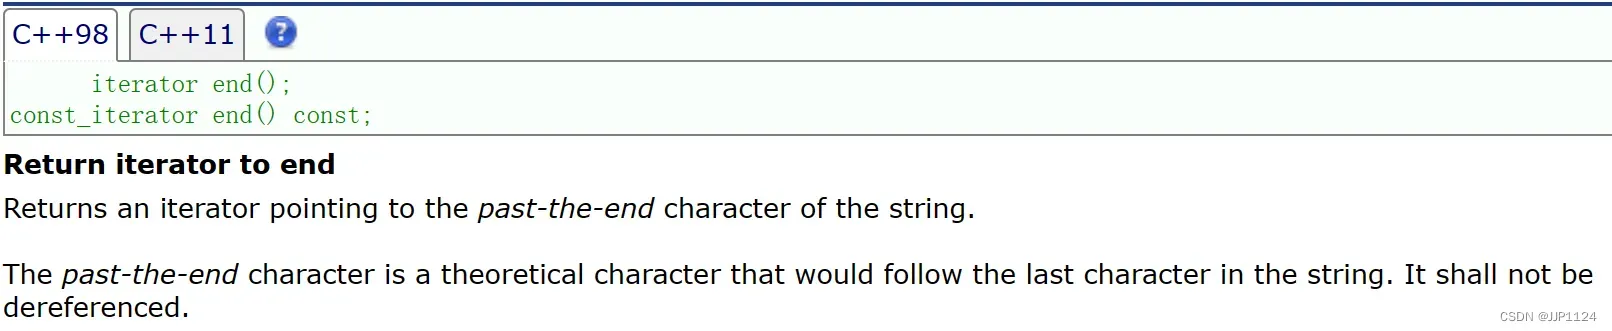
如下图所示,s.begin()指向的是字符’h’的位置,而s.end()指向的是字符’\0’的位置。
(3)范围for遍历
范围for是c++提供的一个非常方便的访问方式,它可以自动取对象的内容并且自动向后访问自动停止,范围for的底层实现其实是迭代器,我们还可以利用auto关键字来配合使用范围for,下面我们用代码演示一下范围for的使用方式:
#include <iostream>
#include <string>

using namespace std;

int main ()
{
    string s("hello world");
    for (auto ch : s)
    {
        cout << ch;
    }
    cout << endl;
    return 0;
}
4.反向迭代器
上面string的遍历我们介绍了迭代器遍历法,使用begin()函数和end()函数的迭代器遍历是正向迭代器,反向迭代器顾名思义,就是顺序反过来了,它的用法与正向迭代器非常类似。
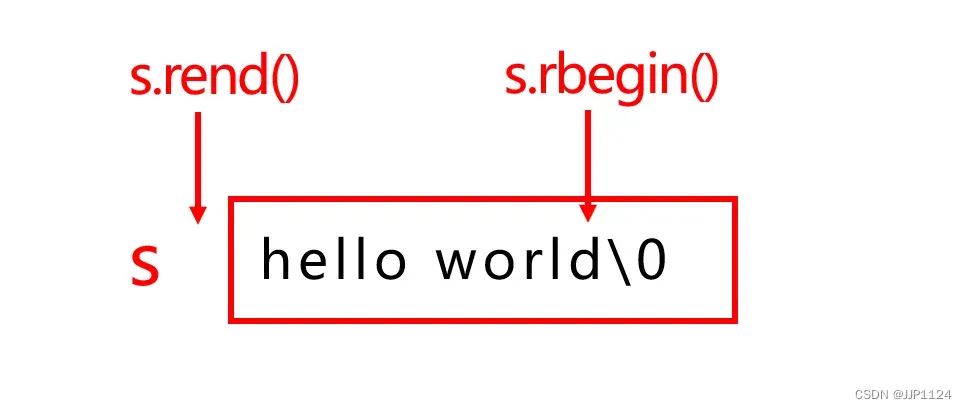
这里需要介绍一下rbegin()和rend()这两个函数,这两个函数是用来配合反向迭代器使用的,rbegin()函数返回的是string字符串的最后一个有效字符,rend()函数返回的是string字符串的第一个字符的前一个位置。


如下图所示,s.rbegin()指向的是字符’d’的位置,s.rend()指向的是字符’h’的前一个位置。
我们用代码来演示一下反向迭代器的使用:
#include <iostream>
#include <string>

using namespace std;

int main ()
{
    string s("hello world");
    string::reverse_iterator rit = s.rbegin();
    while (rit != s.rend())
    {
        cout << *rit;
        rit++;// 反向迭代器也是++
    }
    cout << endl;
    return 0;
}
5.const修饰的迭代器
我们前面介绍的所有迭代器都是普通类型的迭代器,这种迭代器的权限是可读可写的,但如果针对的是const修饰的string对象,我们就不能再使用可读可写的迭代器了,所以C++还提供了const修饰的迭代器,其权限只可读不可写,下面以begin()函数示例,end()、rbegin()、rend()函数都是一样的。

我们可以用代码来演示一下const修饰的迭代器的使用方法以及对比一下两类迭代器的区别:
#include <iostream>
#include <string>

using namespace std;

void Func(const string& s)
{
    string::const_iterator cit = s.begin();
    // 读操作
    while (cit != s.end())
    {
        cout << *cit;
        cit++;
    }
    cout << endl;

    // 不能进行写操作,会报错
    // cit = s.begin();
    // while (cit != s.end())
    // {
    //     (*cit) += 1;
    //     cout << *cit;
    //     cit++;
    // }

    string::const_reverse_iterator crit = s.rbegin();
    // 读操作
    while (crit != s.rend())
    {
        cout << *crit;
        crit++;
    }
    cout << endl;

    // 不能进行写操作,会报错
    // crit = s.rbegin();
    // while (crit != s.rend())
    // {
    //     (*crit) += 1;
    //     cout << *crit;
    //     crit++;
    // }
    // cout << endl;
}

int main ()
{
    string s("hello world");

    // 普通类型的正向迭代器
    string::iterator it = s.begin();
    // 读操作
    while (it != s.end())
    {
        cout << *it;
        it++;
    }
    cout << endl;

    // 写操作
    it = s.begin();
    while (it != s.end())
    {
        (*it) += 1;
        cout << *it;
        it++;
    }
    cout << endl;

    // 普通类型的反向迭代器
    string::reverse_iterator rit = s.rbegin();
    // 读操作
    while (rit != s.rend())
    {
        cout << *rit;
        rit++;
    }
    cout << endl;

    // 写操作
    rit = s.rbegin();
    while (rit != s.rend())
    {
        (*rit) -= 1;
        cout << *rit;
        rit++;
    }
    cout << endl;

    Func(s);
    return 0;
}
如果我们嫌迭代器类型的名称太长了,在定义的时候可以用auto自动推导。
6.size()函数和capacity()函数
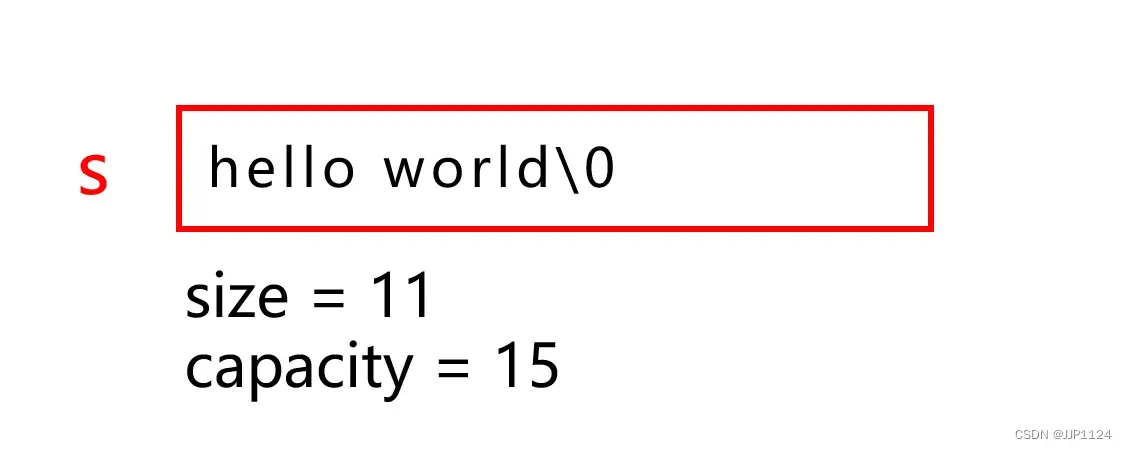
size()函数返回的是string对象的元素个数,即有效字符的个数,而capacity()函数返回的是string对象的容量,举个例子理解一下:
#include <iostream>
#include <string>

using namespace std;

int main ()
{
    string s("hello world");
    cout << s.size() << endl;
    cout << s.capacity() << endl;
    return 0;
}
7.reverse和resize
reserve函数是扩容函数,可以增大capacity的值,resize其实也是扩容函数,但resize改变的是size的值,当size的值增大时自动触发string的扩容机制从而也增大了capacity的值,并且resize在增带size值的时候还会对没有字符的位置初始化,如果没有指定初始化内容就默认初始化为’\0’,而reserve不会进行初始化。


下面可以举个例子来理解一下这两个函数:
#include <iostream>
#include <string>

using namespace std;

int main()
{
    string s("hello");
    cout << s << endl;
    cout << "size:" << s.size() << endl;
    cout << "capacity:" << s.capacity() << endl;
    cout << endl;

    s.reserve(25);
    cout << s << endl;
    cout << "size:" << s.size() << endl;
    cout << "capacity:" << s.capacity() << endl;
    cout << endl;

    s.resize(50, 'A');
    cout << s << endl;
    cout << "size:" << s.size() << endl;
    cout << "capacity:" << s.capacity() << endl;
    cout << endl;
    return 0;
}
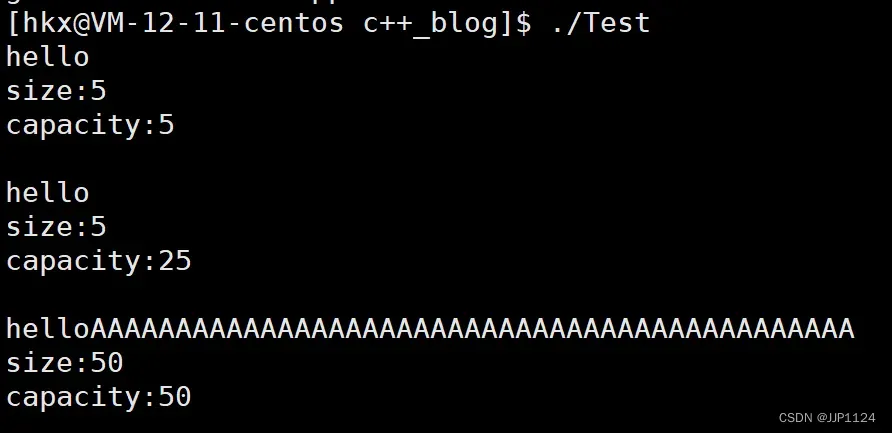
首先定义一个字符串“hello”,打印查看size和capacity的值;然后使用reserve函数将容量扩大到25,然后打印查看size和capacity的值;最后使用resize函数将size的值扩大到50并且初始化值设置为’A’,然后打印查看size和capacity的值。运行程序查看结果:
另外,一般情况下reserve函数和resize函数都不能缩容(这个由编译器决定),resize函数只能够将size的值变小,但不会让capacity的值也变小,再借用上面的例子我们可以看一下:
#include <iostream>
#include <string>

using namespace std;

int main()
{
    string s("hello");
    cout << s << endl;
    cout << "size:" << s.size() << endl;
    cout << "capacity:" << s.capacity() << endl;
    cout << endl;

    s.reserve(25);
    cout << s << endl;
    cout << "size:" << s.size() << endl;
    cout << "capacity:" << s.capacity() << endl;
    cout << endl;

    s.resize(50, 'A');
    cout << s << endl;
    cout << "size:" << s.size() << endl;
    cout << "capacity:" << s.capacity() << endl;
    cout << endl;

    // 此时进行缩容测试
    s.reserve(25);
    cout << s << endl;
    cout << "size:" << s.size() << endl;
    cout << "capacity:" << s.capacity() << endl;
    cout << endl;

    s.resize(20);
    cout << s << endl;
    cout << "size:" << s.size() << endl;
    cout << "capacity:" << s.capacity() << endl;
    cout << endl;
    return 0;
}
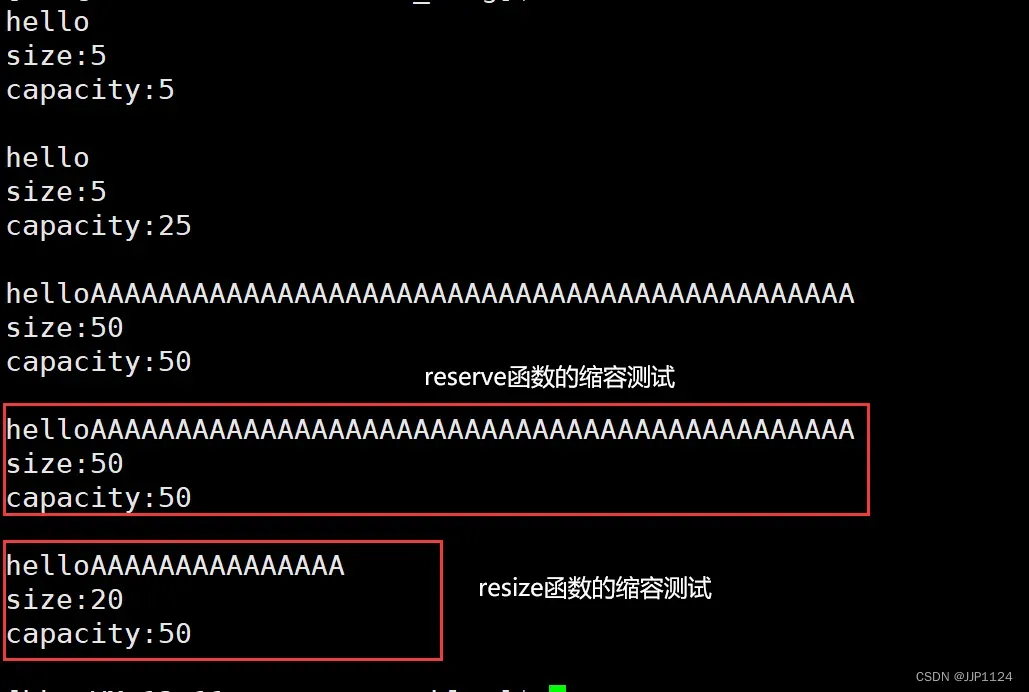
我们再原来将size和capacity的值都扩大到50的基础上,进行缩容测试,首先是用reserve函数将capacity设置为25,打印查看size和capacity的值;然后用resize将size的值设置为20,打印查看size和capacity的值,运行程序查看结果:
8.string的插入操作
(1)push_back函数
push_back函数可以实现string对象的插入操作,但是需要注意的是push_back函数只能够尾插入一个字符,不能插入字符串。

(2)append函数
append函数就比push_back函数多样,它可以插入字符串,可以插入另一个string对象,而且可以指定n个字符插入,非常多样化。
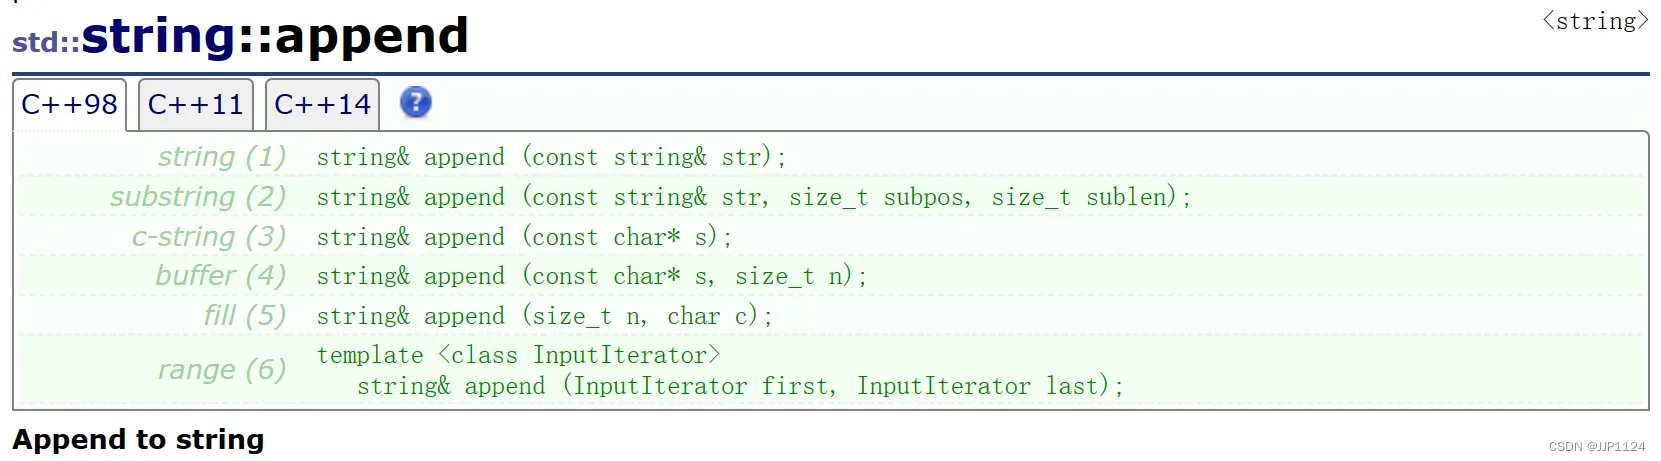
但我们平常append函数用的比较多的接口是这两个:插入常量字符串和插入另一个string对象
#include <iostream>
#include <string>

using namespace std;

int main ()
{
    string s("hello ");
    s.append("world");// 插入常量字符串
    string str("world");
    s.append(str);// 插入另一个string对象
    return 0;
}
(3)+=运算符
前面两种其实都不是最好用的,最好用的插入操作应该是使用+=运算符,它不仅可以插入新的string对象,还可以插入常量字符串,也可以插入单个字符,我们平时使用最多的方式也是这个方式。

#include <iostream>
#include <string>

using namespace std;

int main ()
{
    string s("hello ");
    s += "world"; // 插入常量字符串
    string str("world");
    s += str; // 插入新的string对象
    s += 'A';// 插入单个字符
    return 0;
}
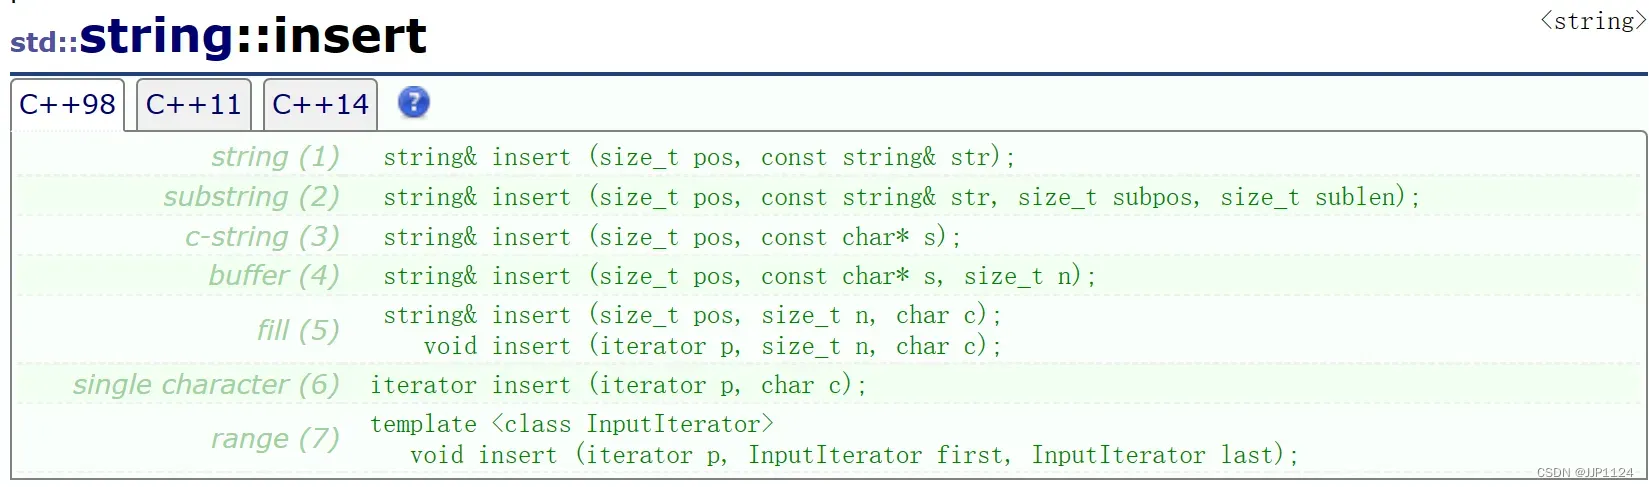
(4)insert函数
insert函数与上面的插入方法都不同,insert函数可以在任意的指定位置进行插入。insert函数的插入也是非常多样化的,它可以在任意的指定位置插入一个新的string对象、一个常量字符串、一个常量字符串的n个字符、一个字符等等。
下面我们用代码演示一下insert函数常用接口的使用方式:
#include <iostream>
#include <string>

using namespace std;

int main ()
{
    string s("hello");

    // 在下标为0的位置插入一个新的string对象
    string str("hello world");
    s.insert(0, str);

    // 在下标为0的位置插入一个常量字符串
    s.insert(0, "hello world");

    // 在下标为0的位置插入一个常量字符串的前3个字符
    s.insert(0, "hello world", 3);

    // 在下标为0的位置插入一个字符x
    s.insert(0, 1, 'x');
    s.insert(s.begin(), 'x');

    // 在下标为0的位置插入三个字符x
    s.insert(0, 3, 'x');

    return 0;
}
9.string的删除操作
(1)erase函数
erase函数可以删除任意指定位置的n个字符,使用起来也是非常方便。

#include <iostream>
#include <string>

using namespace std;

int main ()
{
    string s("hello world");

    // 删除下标为3位置的一个字符
    s.erase(3, 1);
    s.erase(s.begin()+3);

    // 删除以下标为3位置为起点的3个字符
    s.erase(3, 3);
    s.erase(s.begin() + 3, s.begin() + 6);

    // 删除以下标为3位置为起点往后的所有字符
    s.erase(3);

    return 0;
}
erase函数中带npos参数的接口,这个npos的缺省值是-1,也就是说如果我们在使用这个接口时没有传递npos的值,默认npos的值就是-1,而且npos是一个无符号整数,所以会被转换为整型的最大值。其实erase函数是有点冗余的,我们一般用的最多的还是带npos参数的接口,这个接口可以实现各种各样的删除操作。
(2)pop_back
C++11提供了pop_back接口,可以实现string对象的尾删操作,这个函数使用起来非常简单。

#include <iostream>
#include <string>

using namespace std;

int main ()
{
    string s("hello world");
    s.pop_back();
    cout << s << endl;
    return 0;
}
10.string的swap函数
string提供了swap函数,可以实现两个对象之间的交换。

这个函数使用非常简单,我们可以用代码演示一下使用方法:
#include <iostream>
#include <string>

using namespace std;

int main ()
{
    string s1("hello world");
    string s2("string");
    s1.swap(s2);

    cout << s1 << endl;
    cout << s2 << endl;
    return 0;
}
在C++的STL库中也有一个swap函数,它是一个函数模板,可以实现任意类型对象之间的交换:

但是STL库里的swap函数和string类提供的swap函数是有很大区别的(仅限于C++11之前,C++11引入了右值引用以后二者没有效率差别),string类提供的swap函数的效率更高,因为对于两个string对象来说,要实现交换只需要交换二者的指针指向的内容即可;而STL库提供的swap函数它是函数模板,它可以实现任意类型的交换,那就只能够将内容进行交换,也就是深拷贝,深拷贝的代价是很大的我们下面也会提到,所以其实现的效率会比较低。因此,对于string对象来说,更推荐使用string类提供的swap函数。
11.c_str函数
c_str函数可以返回string对象对应的char * 指针,这个函数可以很好地配合C语言的一些函数接口使用,因为C语言没有string类,所以有一些字符串操作的函数接口需要传递的参数是char * 类型的指针。

例如下面的例子,我们想要将string对象的内容通过strcpy函数拷贝到字符数组当中,就可以用到c_str函数:
#include <iostream>
#include <string>
#include <cstring>

using namespace std;

int main()
{
    string str("hello world");
    char* cstr = new char[str.size() + 1];
    strcpy(cstr, str.c_str());
    cout << cstr << endl;
    return 0;
}
12.substr函数
substr函数是用来返回string字符串的一个任意子串,我们可以通过设定起始位置pos和子串长度len来获取子串。

#include <iostream>
#include <string>

using namespace std;

int main()
{
    string s1("hello world");
    // 取出子串"world"
    string s2 = s1.substr(6, 5);
    cout << s2 << endl;
    return 0;
}
13.string的查找函数
(1)find函数
find函数使用得是比较多的,它可以查找string对象、常量字符串或者是一个字符,并且可以设定pos值来规定查找的起始位置,默认从0下标开始查找。

(2)rfind函数
rfind函数和find函数使用方法是一样的,只不过find函数是顺着查找,而rfind是倒着查找。find函数和rfind函数的区别就是查找方向不同。

(3)查找函数的使用
在计算机网络的学习中,我们有时候要对URL进行分割,URL可以分为协议、域名和uri,在这个场景中我们可以利用到字符串的查找函数:

#include <iostream>
#include <string>

using namespace std;

int main()
{
    string url("https://legacy.cplusplus.com/reference/string/string/rfind/");
    cout << url << endl;

    // 提取协议
    string protocol;
    size_t pos1 = url.find("://");
    // 查找成功
    if (pos1 != string::npos)
    {
        protocol = url.substr(0, pos1);
        cout << "协议:" << protocol << endl;
    }
    else
    {
        cout << "非法url" << endl;
    }

    // 提取域名
    string domainName;
    size_t pos2 = url.find('/', pos1 + 3);
    // 查找成功
    if (pos2 != string::npos)
    {
        domainName = url.substr(pos1 + 3, pos2 - (pos1 + 3));
        cout << "域名:" << domainName << endl;
    }
    else
    {
        cout << "非法url" << endl;
    }

    // 提取uri
    string uri = url.substr(pos2);
    cout << "uri:" << uri << endl;
    return 0;
}
运行程序查看结果如下图所示,成功将URL中的协议、域名和uri分离:

14.getline函数
当我们用cin对string进行流提取时,由于cin遇到空格和换行会停止读取,所以我们如果想要读取带有空格的字符串就会出现读取不完整的现象。此时就需要用到getline函数,getline函数可以获取一行字符串,即遇到换行符才会停止读取,遇到空格不会停止。

#include <iostream>
#include <string>

using namespace std;

int main()
{
    // 键盘输入字符串"hello world"
    string s;
    // cin s; // 这种写法遇到空格会停止
    getline(cin, s);
    cout << s << endl;
    return 0;
}
文章出处登录后可见!