Tesla M40 使用分享
这是在咸鱼上花800元购买的的M40 12G显卡进行深度学习的使用说明(时间节点2022.1)
1.安装Tesla显卡驱动
-
注意这里使用的Tesla显卡是专门的计算卡,所以没有视频输出接口,网上查到的资料说可以有两种使用方法,一是使用核心输出;二是使用另一张quadro亮机卡的双卡输出模式。
-
注意安装M40等大于4G显存显卡前,一定要去BIOS里打开大于4G选项,不然无法正确识别显卡。
-
这里我使用的是带核显的 Intel i7 8700,插上显卡就能在GPU-Z识别到M40
详细的配置信息如下:
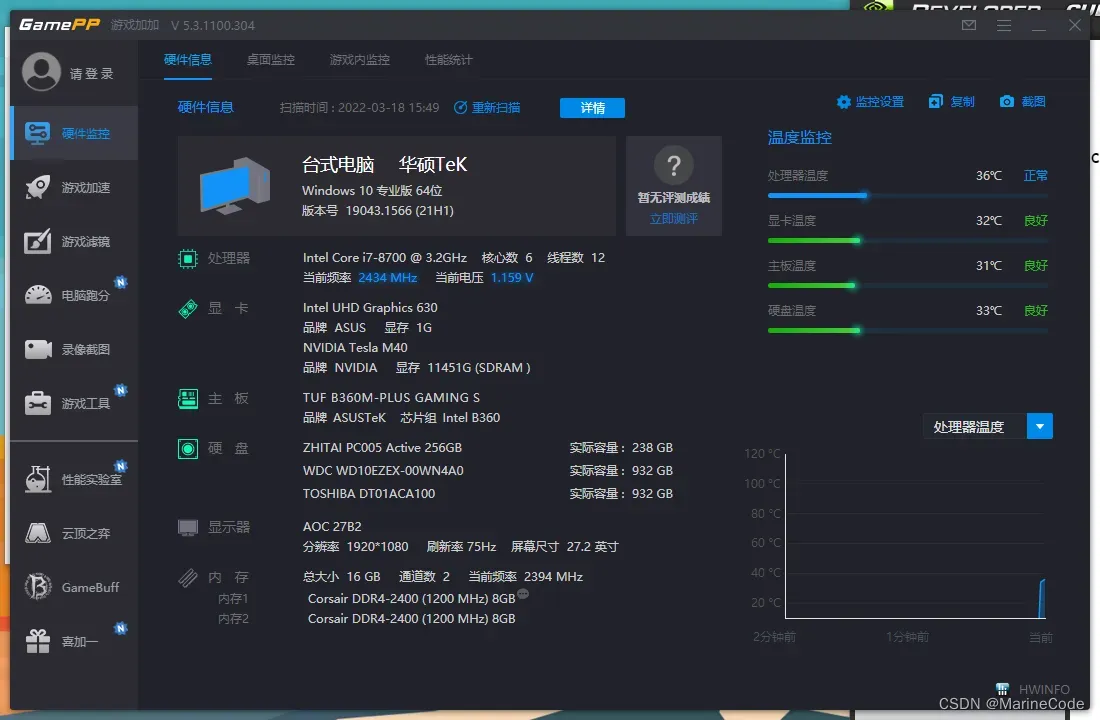
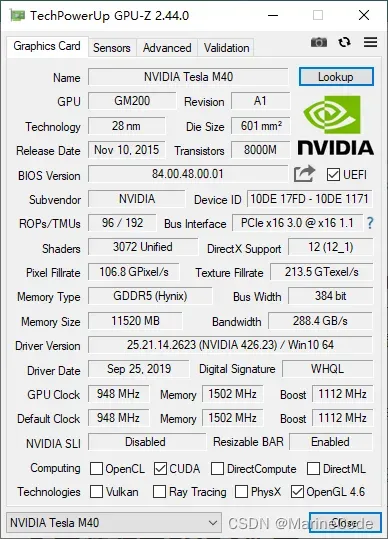
我查到的最新的支持M40的驱动版本是:NVIDIA Tesla Graphics Driver 426.23 for Windows 10 64-bit
网址如下:https://drivers.softpedia.com/get/GRAPHICS-BOARD/NVIDIA/NVIDIA-Tesla-Graphics-Driver-426-23-for-Windows-10-64-bit.shtml
2.安装对应CUDA版本
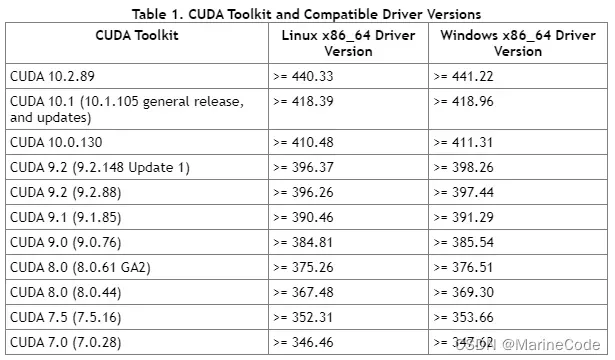
进入Nvidia官网查询一下对应能支持的CUDA版本,这里根据筛选条件及驱动版本426.23我选的是CUDA 10.1版本,因为这个版本支持的后续软件更多torch可以到1.8.1,不然选10.0.130只能安装torch1.4。
cuda 下载网址:https://developer.nvidia.com/cuda-10.1-download-archive-base
3.安装加速库cuDNN对应版本
这里我对应CUDA 10.1 版本在官网选择的是 cuDNN v8.0.5 for CUDA 10.1
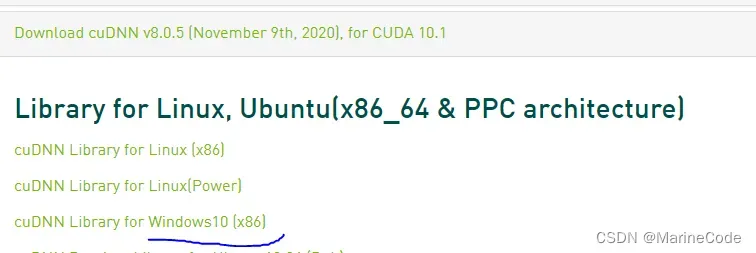
官网:https://developer.nvidia.com/rdp/cudnn-archive
参考的csdn方法下载后将3个文件夹内文件复制到CUDA的安装目录中即可。

其中include里的头文件cudnn.h定义了如下常数指定了其cuDNN版本是8.0.5
#define CUDNN_MAJOR 8
#define CUDNN_MINOR 0
#define CUDNN_PATCHLEVEL 5
4.验证CUDA,cuDNN安装完成
这里最简单的验证方法就是在命令行中输入nvcc -V,如果输出如下类似信息说明安装成功,可以看到输出的是release 10.1, V10.1.243 表示10.1版本安装正确。
C:\Users\Marine>nvcc -V
nvcc: NVIDIA (R) Cuda compiler driver
Copyright (c) 2005-2019 NVIDIA Corporation
Built on Sun_Jul_28_19:12:52_Pacific_Daylight_Time_2019
Cuda compilation tools, release 10.1, V10.1.243
还可以去CUDA的安装目录运行测试软件。
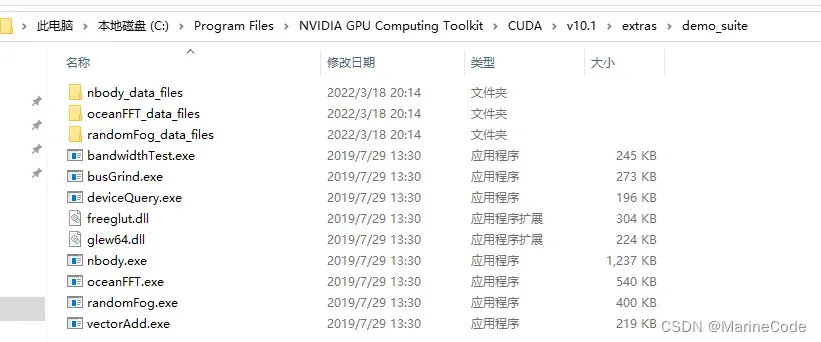
- deviceQuery.exe
C:\Program Files\NVIDIA GPU Computing Toolkit\CUDA\v10.1\extras\demo_suite>deviceQuery.exe
deviceQuery.exe Starting...

 CUDA Device Query (Runtime API) version (CUDART static linking)

Detected 1 CUDA Capable device(s)

Device 0: "Tesla M40"
  CUDA Driver Version / Runtime Version          10.1 / 10.1
  CUDA Capability Major/Minor version number:    5.2
  Total amount of global memory:                 11456 MBytes (12012355584 bytes)
  (24) Multiprocessors, (128) CUDA Cores/MP:     3072 CUDA Cores
  GPU Max Clock rate:                            1112 MHz (1.11 GHz)
  Memory Clock rate:                             3004 Mhz
  Memory Bus Width:                              384-bit
  L2 Cache Size:                                 3145728 bytes
  Maximum Texture Dimension Size (x,y,z)         1D=(65536), 2D=(65536, 65536), 3D=(4096, 4096, 4096)
  Maximum Layered 1D Texture Size, (num) layers  1D=(16384), 2048 layers
  Maximum Layered 2D Texture Size, (num) layers  2D=(16384, 16384), 2048 layers
  Total amount of constant memory:               zu bytes
  Total amount of shared memory per block:       zu bytes
  Total number of registers available per block: 65536
  Warp size:                                     32
  Maximum number of threads per multiprocessor:  2048
  Maximum number of threads per block:           1024
  Max dimension size of a thread block (x,y,z): (1024, 1024, 64)
  Max dimension size of a grid size    (x,y,z): (2147483647, 65535, 65535)
  Maximum memory pitch:                          zu bytes
  Texture alignment:                             zu bytes
  Concurrent copy and kernel execution:          Yes with 2 copy engine(s)
  Run time limit on kernels:                     No
  Integrated GPU sharing Host Memory:            No
  Support host page-locked memory mapping:       Yes
  Alignment requirement for Surfaces:            Yes
  Device has ECC support:                        Enabled
  CUDA Device Driver Mode (TCC or WDDM):         TCC (Tesla Compute Cluster Driver)
  Device supports Unified Addressing (UVA):      Yes
  Device supports Compute Preemption:            No
  Supports Cooperative Kernel Launch:            No
  Supports MultiDevice Co-op Kernel Launch:      No
  Device PCI Domain ID / Bus ID / location ID:   0 / 1 / 0
  Compute Mode:
     < Default (multiple host threads can use ::cudaSetDevice() with device simultaneously) >

deviceQuery, CUDA Driver = CUDART, CUDA Driver Version = 10.1, CUDA Runtime Version = 10.1, NumDevs = 1, Device0 = Tesla M40
Result = PASS
- bandwidthTest.exe
C:\Program Files\NVIDIA GPU Computing Toolkit\CUDA\v10.1\extras\demo_suite>bandwidthTest.exe
[CUDA Bandwidth Test] - Starting...
Running on...

 Device 0: Tesla M40
 Quick Mode

 Host to Device Bandwidth, 1 Device(s)
 PINNED Memory Transfers
   Transfer Size (Bytes)        Bandwidth(MB/s)
   33554432                     11938.2

 Device to Host Bandwidth, 1 Device(s)
 PINNED Memory Transfers
   Transfer Size (Bytes)        Bandwidth(MB/s)
   33554432                     11964.2

 Device to Device Bandwidth, 1 Device(s)
 PINNED Memory Transfers
   Transfer Size (Bytes)        Bandwidth(MB/s)
   33554432                     210716.9

Result = PASS

NOTE: The CUDA Samples are not meant for performance measurements. Results may vary when GPU Boost is enabled.
5.Pytorch 安装
这里使用pip指令进行安装,遵循官网中的指令即可
pytorch.org/get-started/previous-versions/
这里在新建的conda环境 使用即可
# CUDA 10.1
pip install torch==1.8.1+cu101 torchvision==0.9.1+cu101 torchaudio==0.8.1 -f https://download.pytorch.org/whl/torch_stable.html
安装过程如下(会自动匹配你的python版本我这里是3.9版本所以后缀都是cp39):
(pyt) C:\Users\Marine>pip install torch==1.8.1+cu101 torchvision==0.9.1+cu101 torchaudio==0.8.1 -f https://download.pytorch.org/whl/torch_stable.html
Looking in links: https://download.pytorch.org/whl/torch_stable.html
Collecting torch==1.8.1+cu101
  Downloading https://download.pytorch.org/whl/cu101/torch-1.8.1%2Bcu101-cp39-cp39-win_amd64.whl (1306.6 MB)
     ---------------------------------------- 1.3/1.3 GB 1.9 MB/s eta 0:00:00
Collecting torchvision==0.9.1+cu101
  Downloading https://download.pytorch.org/whl/cu101/torchvision-0.9.1%2Bcu101-cp39-cp39-win_amd64.whl (1.6 MB)
     ---------------------------------------- 1.6/1.6 MB 11.4 MB/s eta 0:00:00
Collecting torchaudio==0.8.1
  Downloading torchaudio-0.8.1-cp39-none-win_amd64.whl (109 kB)
     ---------------------------------------- 109.3/109.3 KB 908.9 kB/s eta 0:00:00
Collecting numpy
  Downloading numpy-1.22.3-cp39-cp39-win_amd64.whl (14.7 MB)
     ---------------------------------------- 14.7/14.7 MB 1.1 MB/s eta 0:00:00
Collecting typing-extensions
  Downloading typing_extensions-4.1.1-py3-none-any.whl (26 kB)
Collecting pillow>=4.1.1
  Downloading Pillow-9.0.1-cp39-cp39-win_amd64.whl (3.2 MB)
     ---------------------------------------- 3.2/3.2 MB 1.0 MB/s eta 0:00:00
Installing collected packages: typing-extensions, pillow, numpy, torch, torchvision, torchaudio
Successfully installed numpy-1.22.3 pillow-9.0.1 torch-1.8.1+cu101 torchaudio-0.8.1 torchvision-0.9.1+cu101 typing-extensions-4.1.1
文章出处登录后可见!
