本地部署 闻达:一个LLM调用平台
- 1. 什么是 闻达
- 2. Github 地址
- 3. 安装 Miniconda3
- 4. 创建虚拟环境
- 5. 安装 闻达
- 6. 下载各个 model
- 7. 配置各个 model
- 8. 使用 RWKV-4-Raven-14B-v11x 启动
- 9. 使用 chatglm-6b-int4 启动
- 10. 使用 stable-vicuna-13B 启动
- 11. 使用 moss-moon-003-sft-plugin-int4 启动(失败)
1. 什么是 闻达
闻达:一个 LLM 调用平台。为小模型外挂知识库查找和设计自动执行动作,实现不亚于于大模型的生成能力。
针对特定环境的内容生成是LLM使用中的一项重要应用,实现这一目的,主要有全量微调、lora 微调、和本项目方法。但个人没有做全量微调的,lora 微调只能牺牲基础能力换单任务效果(用 6B 模型 lora 调出来的单任务效果,专门设计一个 0.5B 模型也能实现,且推理成本更低)。
而本项目采用知识库 +auto 脚本的形式为 LLM 提高生成能力,充分考虑个人和中小企业的资源问题,以及国内大背景下知识安全和私密性问题,实现使小模型获得近似于大模型的生成能力。
- 目前支持模型:chatGLM-6B、chatRWKV、chatYuan、llama 系列以及 openaiapi 和 chatglm130b api,初步支持 moss。
- 使用知识库扩展模型所知信息,使用 auto 提高模型生成质量和复杂问题解决能力。
- 支持 chatGLM-6B、chatRWKV、llama 系列流式输出和输出过程中中断。
- 自动保存对话历史至浏览器(多用户同时使用不会冲突,chatRWKV 历史消息实现方式需使用 string)
- 对话历史管理(删除单条、清空)
- 支持局域网、内网部署和多用户同时使用。
2. Github 地址
https://github.com/l15y/wenda.git
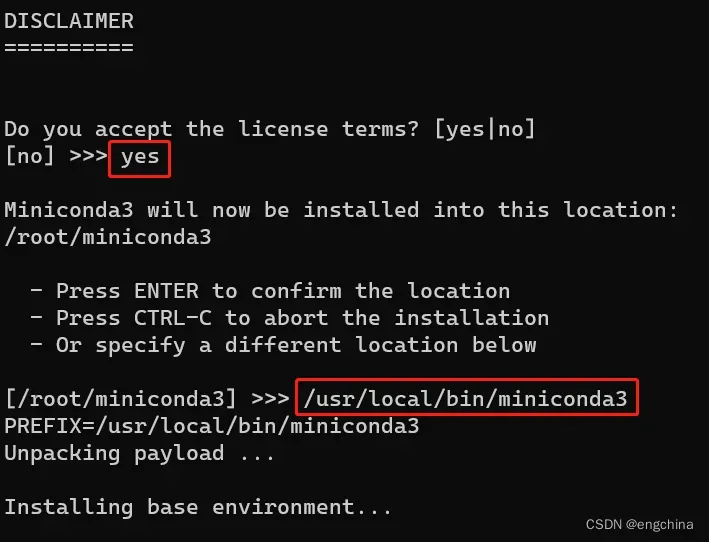
3. 安装 Miniconda3
下载 Conda 安装脚本,
wget https://repo.anaconda.com/miniconda/Miniconda3-latest-Linux-x86_64.sh
运行安装脚本,
bash Miniconda3-latest-Linux-x86_64.sh
按提示操作。当提示是否初始化 Conda 时,输入 “yes”,
安装完成后,关闭当前终端并打开新终端,这将激活 Conda,
sudo su - root
更新 Conda 至最新版本,
conda update conda


添加必要的 Conda 通道以获取更多软件包,
conda config --add channels conda-forge
conda config --add channels defaults
测试是否安装成功,
conda list
如果显示 Conda 及其内部包的列表,则说明安装成功。
4. 创建虚拟环境
conda create -n wenda python==3.10.6
conda activate wenda
5. 安装 闻达
git clone https://github.com/l15y/wenda; cd wenda
pip3 install -r requirements/requirements.txt \
 -r requirements/requirements-chatglm_api.txt \
 -r requirements/requirements-gpt4free.txt \
 -r requirements/requirements-openai.txt \
 -r requirements/requirements-replitcode.txt \
 -r requirements/requirements-glm6b-lora.txt \
 -r requirements/requirements-llama.txt \
 -r requirements/requirements-qdrant.txt
conda install pytorch torchvision torchaudio pytorch-cuda=11.8 -c pytorch -c nvidia
conda install -c huggingface transformers==4.27.4
conda install accelerate -c conda-forge
pip install cchardet
6. 下载各个 model
cd ./model
git clone https://huggingface.co/THUDM/chatglm-6b-int4
git clone https://huggingface.co/fnlp/moss-moon-003-sft-plugin-int4
git clone https://huggingface.co/replit/replit-code-v1-3b
wget -c https://huggingface.co/TheBloke/stable-vicuna-13B-GGML/resolve/main/stable-vicuna-13B.ggml.q5_1.bin
wget -c https://huggingface.co/BlinkDL/rwkv-4-raven/resolve/main/RWKV-4-Raven-14B-v11x-Eng99%25-Other1%25-20230501-ctx8192.pth -O RWKV-4-Raven-14B-v11x.pth
cd ..
7. 配置各个 model
cp example.config.yml config.yml
vi config.yml

--- 将各个 model 的 path 修改正确
llm_models:
  rwkv:
     path: "model/RWKV-4-Raven-14B-v11x.pth"      #rwkv模型位置"
  glm6b:
     path: "model/chatglm-6b-int4"
  llama:
     path: "model/stable-vicuna-13B.ggml.q5_1.bin"
  moss:
     path: "model/moss-moon-003-sft-plugin-int4"
  replitcode:
     path: "model/replit-code-v1-3b"
---
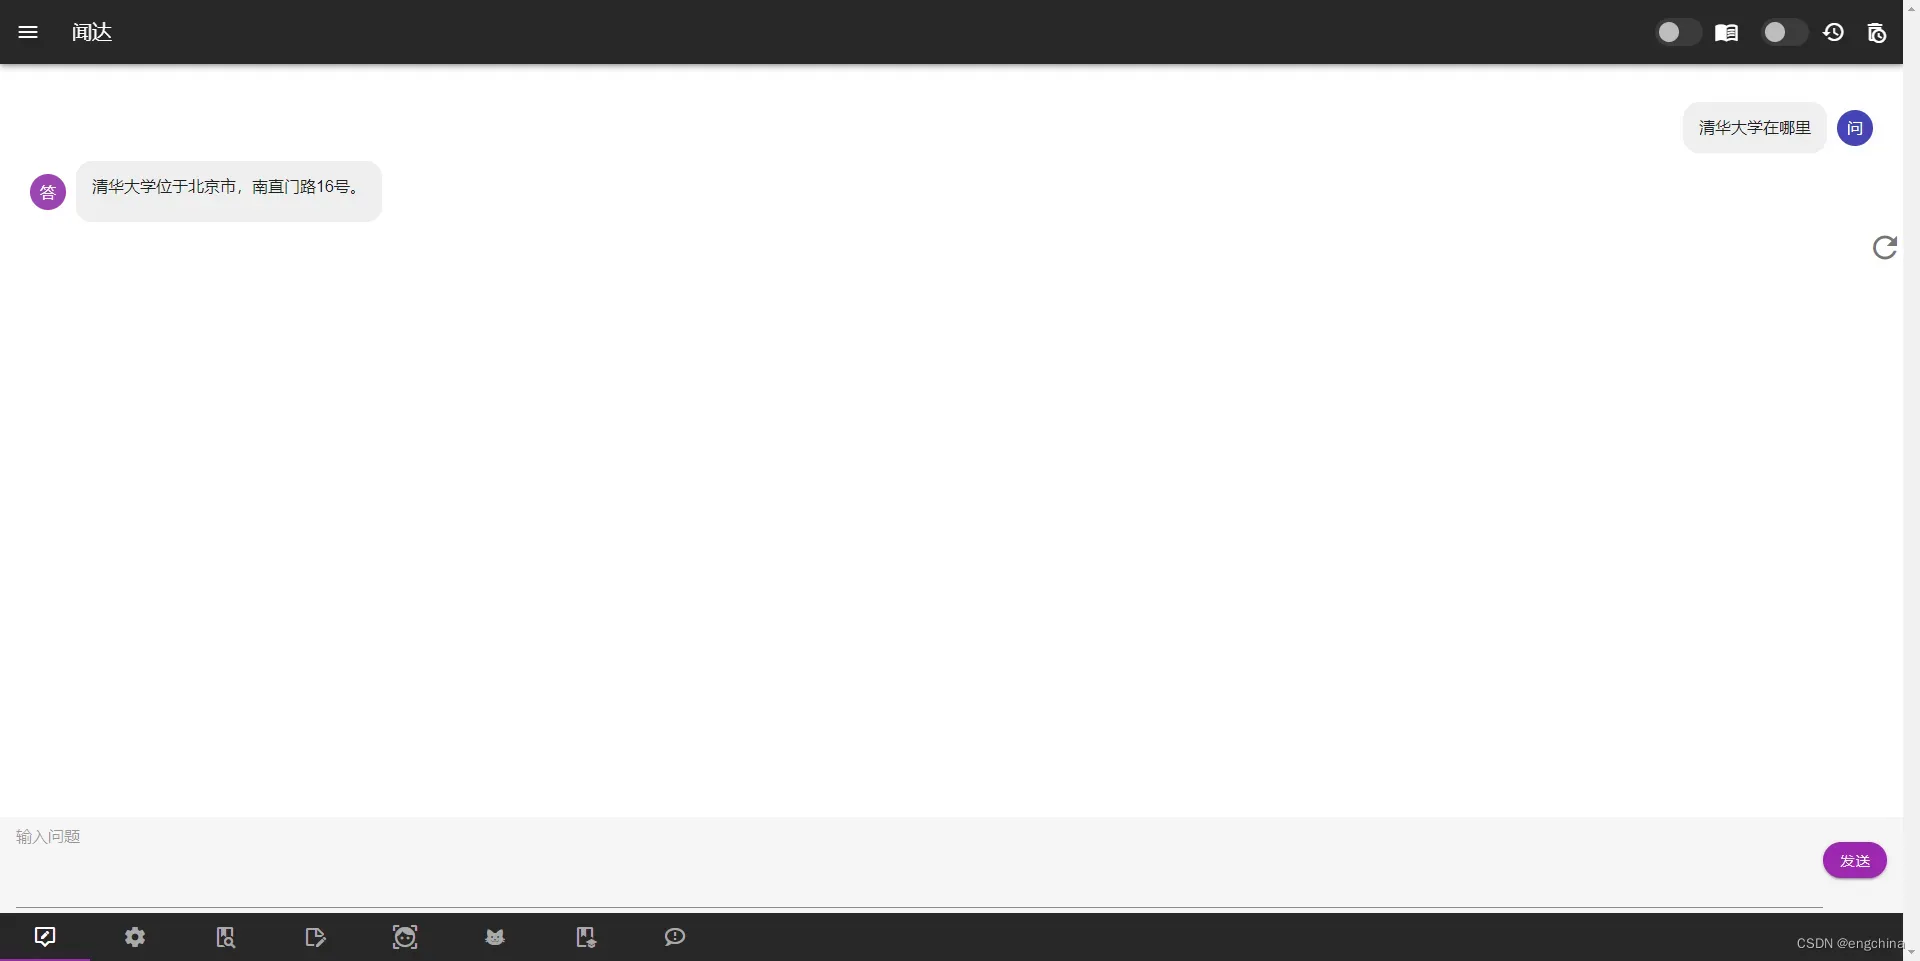
8. 使用 RWKV-4-Raven-14B-v11x 启动
启动,
./run_rwkv.sh
访问 http://127.0.0.1:17860/,问它清华大学在哪里?
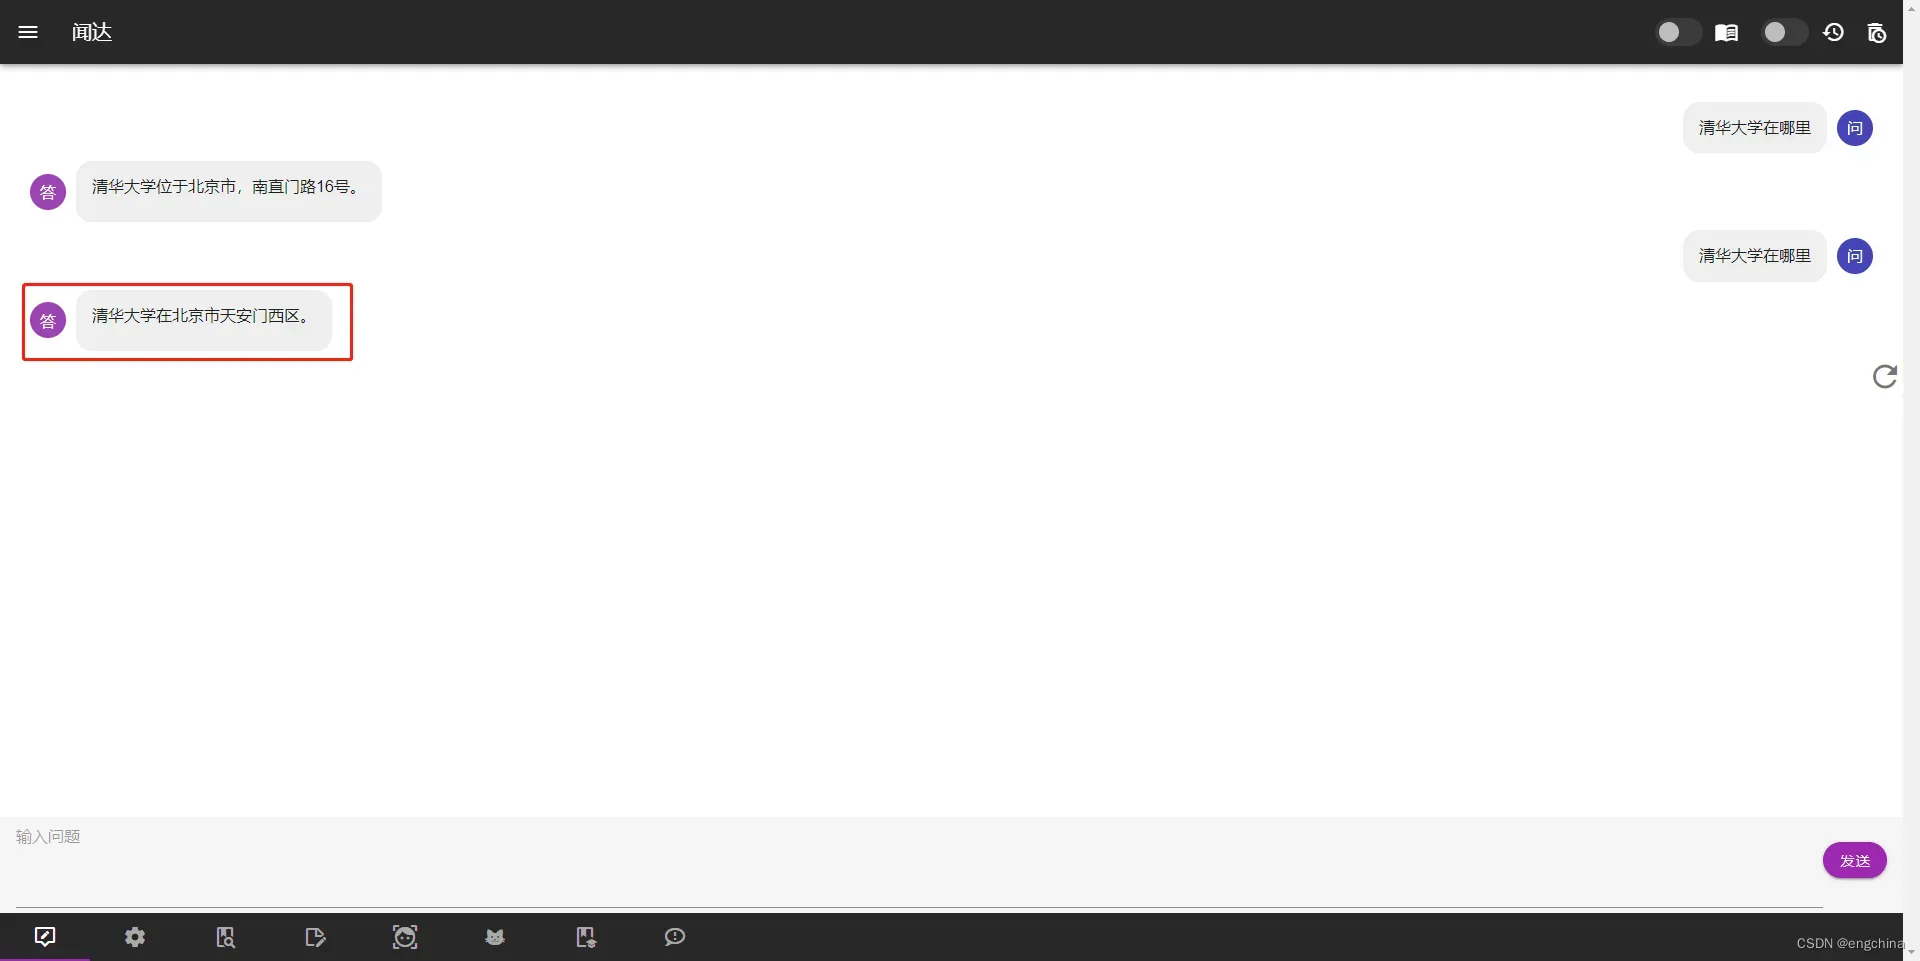
9. 使用 chatglm-6b-int4 启动
启动,
./run_GLM6B.sh
访问 http://127.0.0.1:17860/,问它清华大学在哪里?
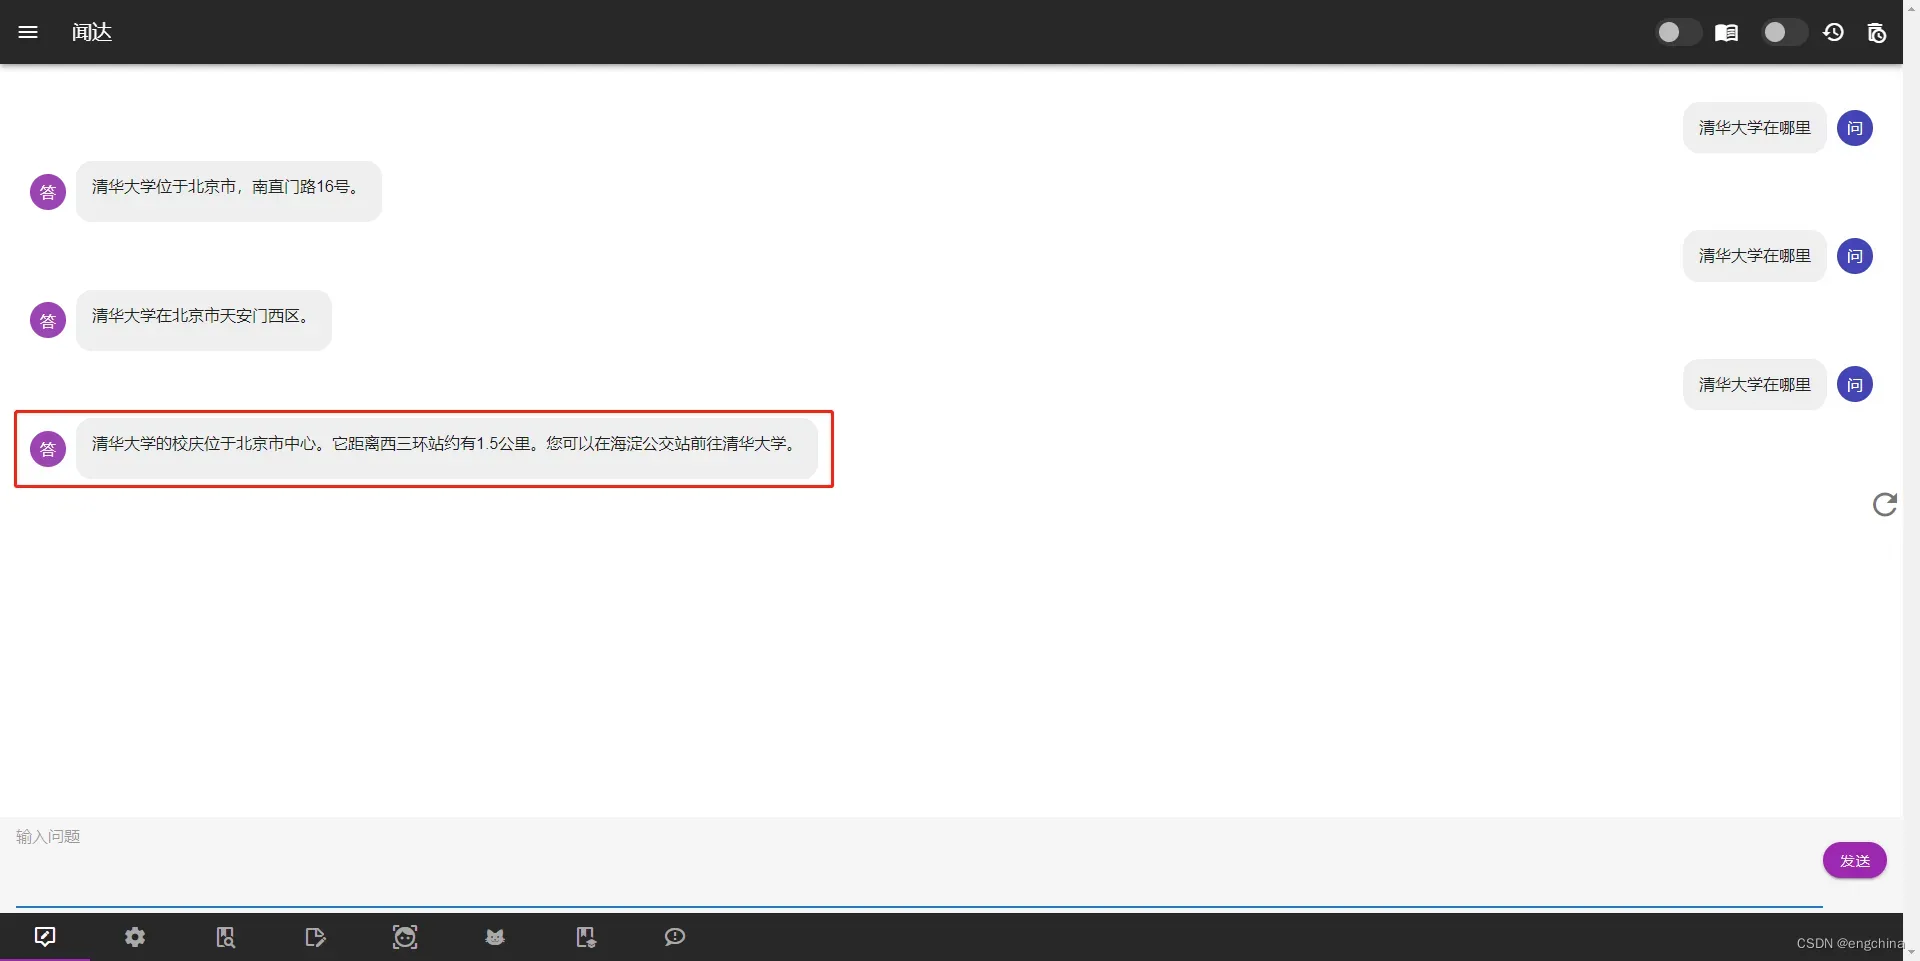
10. 使用 stable-vicuna-13B 启动
启动,
./run_llama.sh
访问 http://127.0.0.1:17860/,问它清华大学在哪里?
11. 使用 moss-moon-003-sft-plugin-int4 启动(失败)
启动,
./run_moss.sh
启动失败,之后有时间调查。
完结!
文章出处登录后可见!
已经登录?立即刷新