一、关于Diffusion 模型的简单介绍
首先diffusion模型和VAE、Flow、Gan等模型类似,均属于生成模型,可以和GCN、CNN等其他深度学习网络相结合,完成特定的生成任务,如下图:
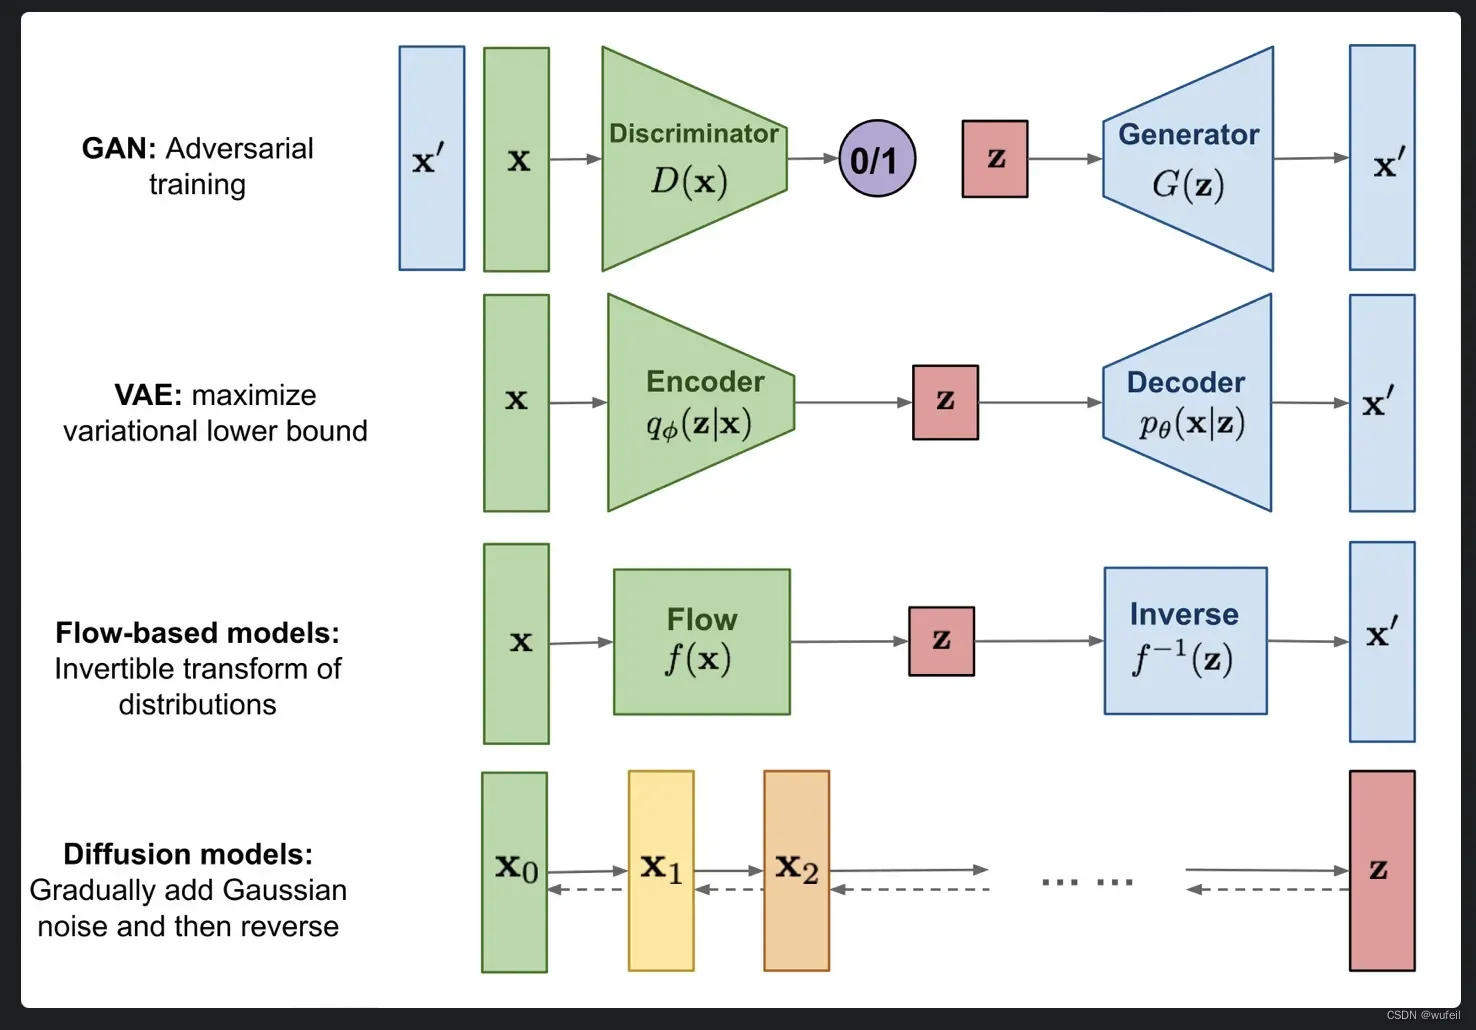
基于 GAN 生成模型,基于 VAE 的生成模型,以及基于 flow 的生成模型它们都可以生成较高质量的样本,但每种方法都有其局限性。GAN 在对抗训练过程中会出现模式崩塌和训练不稳定的问题;VAE 则严重依赖于目标损失函数;流模型则必须使用专门的框架来构建可逆变换。
扩散模型的灵感来自于非平衡热力学。他们定义了一个扩散步骤的马尔可夫链,慢慢地向数据添加随机噪声,然后学习反向扩散过程,从噪声中构建所需的数据样本。与VAE或flow模型不同,扩散模型的学习过程是固定的,潜变量具有高维数(与原始数据相同)。
扩散模型的目标是通过数据在潜在空间(latent space)的扩散过程,学习数据的潜在向量结构(latent structure),通俗点说,扩散模型学习利用数据逐步变成噪声的过程,学习反向的去噪声过程。在计算机视觉中,这意味着训练神经网络通过学习反向扩散过程对高斯噪声模糊的图像进行去噪。计算机视觉中使用的三个通用扩散建模框架的例子是去噪扩散概率模型(DDPM)、噪声条件评分网络(noise conditioned score networks)和随机微分方程(stochastic differential equations)(注:该分类为维基百科,也有分成: diffusion probabilistic models (Sohl-Dickstein et al., 2015), noise-conditioned score network (NCSN; Yang & Ermon, 2019), and denoising diffusion probabilistic models (DDPM; Ho et al. 2020))。
接下来搬运各种连接,以便大家进一步了解diffusion 模型。
通俗的理解diffusion 模型:
Diffusion Models: A Practical Guide | Scale AIWith the Release of Dall-E 2, Google’s Imagen, Stable Diffusion, and Midjourney, diffusion models have taken the world by storm, inspiring creativity and pushing the boundaries of machine learning. In this guide we help to denoise diffusion models, describing how they work and discussing practical applications for today and tomorrow.![]() https://scale.com/guides/diffusion-models-guide
https://scale.com/guides/diffusion-models-guide
非常详细的公式推导过程:
What are Diffusion Models? | Lil’Log[Updated on 2021-09-19: Highly recommend this blog post on score-based generative modeling by Yang Song (author of several key papers in the references)]. [Updated on 2022-08-27: Added classifier-free guidance, GLIDE, unCLIP and Imagen. [Updated on 2022-08-31: Added latent diffusion model.So far, I’ve written about three types of generative models, GAN, VAE, and Flow-based models. They have shown great success in generating high-quality samples, but each has some limitations of its own.https://lilianweng.github.io/posts/2021-07-11-diffusion-models/
How diffusion models work: the math from scratch | AI SummerA deep dive into the mathematics and the intuition of diffusion models. Learn how the diffusion process is formulated, how we can guide the diffusion, the main principle behind stable diffusion, and their connections to score-based models. https://theaisummer.com/diffusion-models/
训练difussion模型视频:
https://www.youtube.com/watch?v=TBCRlnwJtZU![]() https://www.youtube.com/watch?v=TBCRlnwJtZU
https://www.youtube.com/watch?v=TBCRlnwJtZU
简单的Diffusion模型代码:
GitHub – dome272/Diffusion-Models-pytorch: Pytorch implementation of Diffusion Models (https://arxiv.org/pdf/2006.11239.pdf)Pytorch implementation of Diffusion Models (https://arxiv.org/pdf/2006.11239.pdf) – GitHub – dome272/Diffusion-Models-pytorch: Pytorch implementation of Diffusion Models (https://arxiv.org/pdf/2006.11239.pdf) https://github.com/dome272/Diffusion-Models-pytorch
这里从上述github的扩散模型代码为例.
这是一个在100行代码内实现扩散模型的案例,且过程是易于理解的。与其他实现代码不同的是,这段代码没有使用下界公式进行采样(lower-bound formulation for sampling),并严格遵循DDPM(denoising diffusion probabilistic models)论文中的算法1,这使得它非常简短,易于理解。有两种实现:条件和无条件(conditional and unconditional )。此外,条件的代码还实现了分类器自由引导( Classifier-Free-Guidance,CFG)和指数移动平均( Classifier-Free-Guidance,EMA)。你可以从下面两个视频中的解释,理解扩散模型背后的理论和实现。
一、复制环境代码
复制项目代码:
git clone https://github.com/dome272/Diffusion-Models-pytorch.git使用env.yml创建项目环境:
conda env create -f env.yml三、训练unconditional diffusion model
根据github的内容,训练所需的数据集,可以从以下链接中下载:
可以选择其中一种类型来下载,也可以选择下载全部,这与生成的图片内容有关。下载完成后,可以放在./dataset中。也可以分为./dataset/train, ./dataset/test。
然后将ddmp.py中的以下部分换成刚才数据集保存的路径,例如:
./dataset/train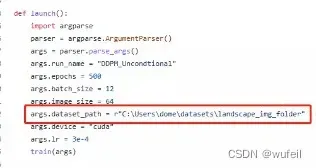
对于GPU只有16G显存的设备,还需要将args.batch_size改小一些,比如:6。原来的batch_size为12会导致爆内存。
![]()
接下来,对ddpm.py的代码进行解析,以期了解diffusion模型结构。从train()函数开始。
def train(args):
    #创建models,results,run_name文件夹
    setup_logging(args.run_name)
    device = args.device
    #加载数据为dataloader
    dataloader = get_data(args)
    model = UNet().to(device)
    #AdamW是类似adam的优化器,但是好一些?对正则化处理更正确
    optimizer = optim.AdamW(model.parameters(), lr=args.lr)
    mse = nn.MSELoss()
    #扩散模型
    diffusion = Diffusion(img_size=args.image_size, device=device)
    #记录log
    logger = SummaryWriter(os.path.join("runs", args.run_name))
    l = len(dataloader)

    for epoch in range(args.epochs):
        logging.info(f"Starting epoch {epoch}:")
        pbar = tqdm(dataloader)
        for i, (images, _) in enumerate(pbar):
            images = images.to(device)
            #随机采样扩散步数
            t = diffusion.sample_timesteps(images.shape[0]).to(device)
            #添加噪声,也称向前过程
            x_t, noise = diffusion.noise_images(images, t)
            #预测噪声,也称逆向过程
            predicted_noise = model(x_t, t)
            #噪声损失
            loss = mse(noise, predicted_noise)

            optimizer.zero_grad()
            loss.backward()
            optimizer.step()

            pbar.set_postfix(MSE=loss.item())
            logger.add_scalar("MSE", loss.item(), global_step=epoch * l + i)
        #扩单模型采样(生成)照片
        sampled_images = diffusion.sample(model, n=images.shape[0])
        save_images(sampled_images, os.path.join("results", args.run_name, f"{epoch}.jpg"))
        torch.save(model.state_dict(), os.path.join("models", args.run_name, f"ckpt.pt"))
在for循环迭代中,对于每一个图片样本,都使用了随机采样扩散步数(即噪声添加步数t),添加噪声,预测噪声t步,噪声损失的过程。在生成(sample)部分,基于已经带有噪声的X,先预测噪声,然后基于噪声和X计算真实的X。所以接下来仔细看看Diffusion模块,如何实现这些过程。
#扩散模型
class Diffusion:
    def __init__(self, noise_steps=1000, beta_start=1e-4, beta_end=0.02, img_size=256, device="cuda"):
        self.noise_steps = noise_steps
        self.beta_start = beta_start
        self.beta_end = beta_end
        self.img_size = img_size
        self.device = device

        self.beta = self.prepare_noise_schedule().to(device)
        self.alpha = 1. - self.beta
        #1-β累乘,其中每个元素的值等于其在x及之前所有元素的乘积
        self.alpha_hat = torch.cumprod(self.alpha, dim=0)

    def prepare_noise_schedule(self):
        #β,线性变化
        return torch.linspace(self.beta_start, self.beta_end, self.noise_steps)

    def noise_images(self, x, t):
         #添加噪声过程,向前过程,t步,由于高斯分布的特征不需要一步步添加。
         #根号下1-β的累乘
        sqrt_alpha_hat = torch.sqrt(self.alpha_hat[t])[:, None, None, None]
        #根号下1-(1-β)的累乘
        sqrt_one_minus_alpha_hat = torch.sqrt(1 - self.alpha_hat[t])[:, None, None, None]
        Ɛ = torch.randn_like(x)
        return sqrt_alpha_hat * x + sqrt_one_minus_alpha_hat * Ɛ, Ɛ

    def sample_timesteps(self, n):
        #随机添加噪声的步数
        return torch.randint(low=1, high=self.noise_steps, size=(n,))

    def sample(self, model, n):
        logging.info(f"Sampling {n} new images....")
        model.eval()
        with torch.no_grad():
            #随机初始化
            x = torch.randn((n, 3, self.img_size, self.img_size)).to(self.device)
            for i in tqdm(reversed(range(1, self.noise_steps)), position=0):
                t = (torch.ones(n) * i).long().to(self.device)
                #第t步的噪声,注意这里的t是从大到小的过程
                predicted_noise = model(x, t)
                alpha = self.alpha[t][:, None, None, None]
                alpha_hat = self.alpha_hat[t][:, None, None, None]
                beta = self.beta[t][:, None, None, None]
                if i > 1:
                    noise = torch.randn_like(x)
                else:
                    noise = torch.zeros_like(x)
                #还原样本
                x = 1 / torch.sqrt(alpha) * (x - ((1 - alpha) / (torch.sqrt(1 - alpha_hat))) * predicted_noise) + torch.sqrt(beta) * noise
        model.train()
        x = (x.clamp(-1, 1) + 1) / 2
        x = (x * 255).type(torch.uint8)
        return x
扩散模型的添加噪音过程是不需要一步步添加的,以下公式:
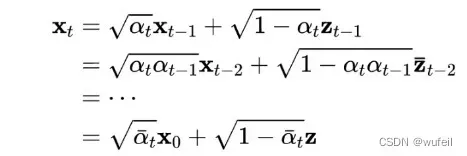
Xt为第t步的特征,可以直接表示为X0和高斯分布Z的叠加。所以显然这里不需要一步步叠加噪声。但是去噪过程需要一步步进行的。
由于这里没有采用下界公式进行采样(lower-bound formulation for sampling),所以这里的损失会简单一些,简化了,直接使用MSE损失。
以下是unconditional diffusion 的测试代码:
import os
import torch
import torch.nn as nn
from matplotlib import pyplot as plt
from tqdm import tqdm
from torch import optim
from utils import *
from modules import UNet
import logging

from ddpm import Diffusion

device = "cuda"
model = UNet().to(device)
ckpt = torch.load("unconditional_ckpt.pt")
model.load_state_dict(ckpt)
diffusion = Diffusion(img_size=64, device=device)
x = diffusion.sample(model, n=16)
plot_images(x)
生成的图片如下。质量还是比较差的,可能是模型没有训练好或者模型不完整的原因。
四、conditional diffusion model
train函数与unconditional的类似,不同的是,在预测噪声时候,是带有标签的,同时在采样时也需要有标签信息(标签和标签类别。)
def train(args):
	    setup_logging(args.run_name)
	    device = args.device
	    dataloader = get_data(args)
        # conditional 的UNet
	    model = UNet_conditional(num_classes=args.num_classes).to(device)
	    optimizer = optim.AdamW(model.parameters(), lr=args.lr)
	    mse = nn.MSELoss()
	    diffusion = Diffusion(img_size=args.image_size, device=device)
	    logger = SummaryWriter(os.path.join("runs", args.run_name))
	    l = len(dataloader)
	    ema = EMA(0.995)
	    ema_model = copy.deepcopy(model).eval().requires_grad_(False)

	    for epoch in range(args.epochs):
	        logging.info(f"Starting epoch {epoch}:")
	        pbar = tqdm(dataloader)
	        for i, (images, labels) in enumerate(pbar):
	            images = images.to(device)
	            labels = labels.to(device)
	            t = diffusion.sample_timesteps(images.shape[0]).to(device)
	            x_t, noise = diffusion.noise_images(images, t)
	            if np.random.random() < 0.1:
	                labels = None
                #预测噪声时,带有condition,即labels
	            predicted_noise = model(x_t, t, labels)
	            loss = mse(noise, predicted_noise)

	            optimizer.zero_grad()
	            loss.backward()
	            optimizer.step()
	            ema.step_ema(ema_model, model)

	            pbar.set_postfix(MSE=loss.item())
	            logger.add_scalar("MSE", loss.item(), global_step=epoch * l + i)

	        if epoch % 10 == 0:
	            labels = torch.arange(10).long().to(device)
	            sampled_images = diffusion.sample(model, n=len(labels), labels=labels)
	            ema_sampled_images = diffusion.sample(ema_model, n=len(labels), labels=labels)
	            plot_images(sampled_images)
	            save_images(sampled_images, os.path.join("results", args.run_name, f"{epoch}.jpg"))
	            save_images(ema_sampled_images, os.path.join("results", args.run_name, f"{epoch}_ema.jpg"))
	            torch.save(model.state_dict(), os.path.join("models", args.run_name, f"ckpt.pt"))
	            torch.save(ema_model.state_dict(), os.path.join("models", args.run_name, f"ema_ckpt.pt"))
	            torch.save(optimizer.state_dict(), os.path.join("models", args.run_name, f"optim.pt"))
conditional diffusion 模型的代码:与unconditional的不同,conditional diffusion在预测噪音是需要输入标签信息,同时使用unconditional的噪音,进行线性插值,获得用于复原样本的噪音。
class Diffusion:
    def __init__(self, noise_steps=1000, beta_start=1e-4, beta_end=0.02, img_size=256, device="cuda"):
        self.noise_steps = noise_steps
        self.beta_start = beta_start
        self.beta_end = beta_end

        self.beta = self.prepare_noise_schedule().to(device)
        self.alpha = 1. - self.beta
        self.alpha_hat = torch.cumprod(self.alpha, dim=0)

        self.img_size = img_size
        self.device = device

    def prepare_noise_schedule(self):
        return torch.linspace(self.beta_start, self.beta_end, self.noise_steps)

    def noise_images(self, x, t):
        sqrt_alpha_hat = torch.sqrt(self.alpha_hat[t])[:, None, None, None]
        sqrt_one_minus_alpha_hat = torch.sqrt(1 - self.alpha_hat[t])[:, None, None, None]
        Ɛ = torch.randn_like(x)
        return sqrt_alpha_hat * x + sqrt_one_minus_alpha_hat * Ɛ, Ɛ

    def sample_timesteps(self, n):
        return torch.randint(low=1, high=self.noise_steps, size=(n,))

    def sample(self, model, n, labels, cfg_scale=3):
        logging.info(f"Sampling {n} new images....")
        model.eval()
        with torch.no_grad():
            x = torch.randn((n, 3, self.img_size, self.img_size)).to(self.device)
            for i in tqdm(reversed(range(1, self.noise_steps)), position=0):
                t = (torch.ones(n) * i).long().to(self.device)
                predicted_noise = model(x, t, labels)
                if cfg_scale > 0:
                    uncond_predicted_noise = model(x, t, None)
                    #基于没有条件的噪音,带条件的噪音,类别信息进行线性插值,生成条件噪音
                    predicted_noise = torch.lerp(uncond_predicted_noise, predicted_noise, cfg_scale)
                alpha = self.alpha[t][:, None, None, None]
                alpha_hat = self.alpha_hat[t][:, None, None, None]
                beta = self.beta[t][:, None, None, None]
                if i > 1:
                    noise = torch.randn_like(x)
                else:
                    noise = torch.zeros_like(x)
                x = 1 / torch.sqrt(alpha) * (x - ((1 - alpha) / (torch.sqrt(1 - alpha_hat))) * predicted_noise) + torch.sqrt(beta) * noise
        model.train()
        x = (x.clamp(-1, 1) + 1) / 2
        x = (x * 255).type(torch.uint8)
        return x
基于上述内容,可以发现,扩散模型中的Unet模型是用来预测噪音的,而不是直接生成图片,这一点与其他的生成模型不同。
conditional diffusion 的测试代码(conditional_model_test.py):
import os
import torch
import torch.nn as nn
from matplotlib import pyplot as plt
from tqdm import tqdm
import os
import copy
import numpy as np
import torch
import torch.nn as nn
from tqdm import tqdm
from torch import optim
from utils import *
from modules import UNet_conditional, EMA
import logging

from ddpm_conditional import Diffusion

n = 10
device = "cuda"
model = UNet_conditional(num_classes=10).to(device)
ckpt = torch.load("conditional_ema_ckpt.pt")
model.load_state_dict(ckpt)
diffusion = Diffusion(img_size=64, device=device)
y = torch.Tensor([6] * n).long().to(device)
x = diffusion.sample(model, n, y, cfg_scale=3)
plot_images(x, 'conditional_ema_test')
生成的图片如下:

看起来还像那么回事。
整个项目代码,可以从百度网盘上下载:
我通过百度网盘分享的文件:Diffusio….zip
链接:https://pan.baidu.com/s/1wm-ITu_q_kNQ8f2euovHfg
提取码:4896
复制这段内容打开「百度网盘APP即可获取」
文章出处登录后可见!