目录
一、背景
BM1684X平台,移植YOLOv5s时,int8量化效果很差,单图测试如下:

原量化脚本采用auto_cali,脚本大致内容如下:
| Bash
python3 -m ufw.cali.cali_model \
–net_name $dst_model_prefix \
–model ${src_model_file} \
–cali_image_path ${image_src_dir} \
–cali_image_preprocess ‘resize_h=640,resize_w=640;scale=0.003921569,bgr2rgb=True’ \
–input_shapes “[${batch_size},3,${img_height},${img_width}]” \
–cali_iterations=1 \ |
注:模型基于官方yolov5s_v6.1
二、模型调优
2.1 基准选取
为了量化调优效果,这里需要测试fp32bmodel,如果官方有给出原始模型mAP数据,也可以直接使用,这里为了校验一下fp32bmodel,顺便一起做了。
mAP数据需要借助pycocotools工具包,采用coco2017 val数据集,通过编码实现模型推理、比对结果等逻辑。
2.1.1 官方精度数据
官方yolov5s_6.1数据如下,与fp32bmodel一致:
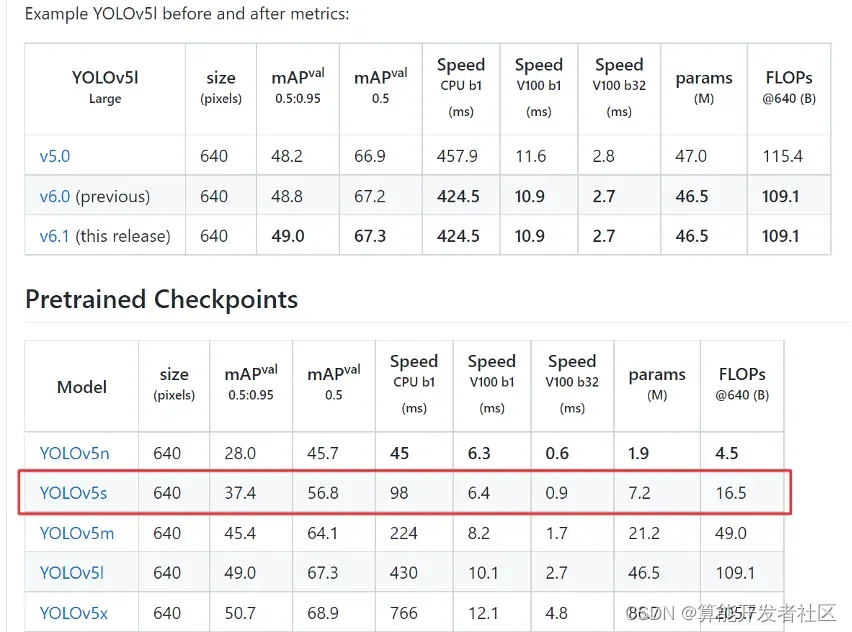
2.1.2 fp32bmodel的精度
实测性能数据如下:
| Bash
Average Precision (AP) @[ IoU=0.50:0.95 | area= all | maxDets=100 ] = 0.373
Average Precision (AP) @[ IoU=0.50 | area= all | maxDets=100 ] = 0.567
Average Precision (AP) @[ IoU=0.75 | area= all | maxDets=100 ] = 0.403
Average Precision (AP) @[ IoU=0.50:0.95 | area= small | maxDets=100 ] = 0.214
Average Precision (AP) @[ IoU=0.50:0.95 | area=medium | maxDets=100 ] = 0.423
Average Precision (AP) @[ IoU=0.50:0.95 | area= large | maxDets=100 ] = 0.489
Average Recall (AR) @[ IoU=0.50:0.95 | area= all | maxDets= 1 ] = 0.311
Average Recall (AR) @[ IoU=0.50:0.95 | area= all | maxDets= 10 ] = 0.520
Average Recall (AR) @[ IoU=0.50:0.95 | area= all | maxDets=100 ] = 0.584
Average Recall (AR) @[ IoU=0.50:0.95 | area= small | maxDets=100 ] = 0.409
Average Recall (AR) @[ IoU=0.50:0.95 | area=medium | maxDets=100 ] = 0.646
Average Recall (AR) @[ IoU=0.50:0.95 | area= large | maxDets=100 ] = 0.733 |
2.1.3 int8bmodel精度数据
未优化之前,int8量化模型的精度数据如下,对比官方数据,mAP@0.5降低了9.4个百分点:
| Python
Average Precision (AP) @[ IoU=0.50:0.95 | area= all | maxDets=100 ] = 0.290
Average Precision (AP) @[ IoU=0.50 | area= all | maxDets=100 ] = 0.474
Average Precision (AP) @[ IoU=0.75 | area= all | maxDets=100 ] = 0.317
Average Precision (AP) @[ IoU=0.50:0.95 | area= small | maxDets=100 ] = 0.159
Average Precision (AP) @[ IoU=0.50:0.95 | area=medium | maxDets=100 ] = 0.337
Average Precision (AP) @[ IoU=0.50:0.95 | area= large | maxDets=100 ] = 0.389
Average Recall (AR) @[ IoU=0.50:0.95 | area= all | maxDets= 1 ] = 0.269
Average Recall (AR) @[ IoU=0.50:0.95 | area= all | maxDets= 10 ] = 0.470
Average Recall (AR) @[ IoU=0.50:0.95 | area= all | maxDets=100 ] = 0.533
Average Recall (AR) @[ IoU=0.50:0.95 | area= small | maxDets=100 ] = 0.343
Average Recall (AR) @[ IoU=0.50:0.95 | area=medium | maxDets=100 ] = 0.596
Average Recall (AR) @[ IoU=0.50:0.95 | area= large | maxDets=100 ] = 0.681 |
2.2 多图量化
分析原脚本,可以看到,量化迭代图片张数太少,根据大多数模型量化经验,此处图片张数一般选用200张左右,过少不利于统计出数据分布,过多可能会引起过拟合。
实现尝试50、100、200,脚本如下,实测单图效果一般,val验证集测试精度有所提高。
| Bash
python3 -m ufw.cali.cali_model \
–net_name $dst_model_prefix \
–model ${src_model_file} \
–cali_image_path ${image_src_dir} \
–cali_image_preprocess ‘resize_h=640,resize_w=640;scale=0.003921569,bgr2rgb=True’ \
–input_shapes “[${batch_size},3,${img_height},${img_width}]” \
–cali_iterations=200 \
–outdir ${int8model_dir} \
–target ${platform} |
采用200张图片量化后,精度数据如下,对比【2.1.3】mAP@0.5提升了1.4个百分点:
| Bash
Average Precision (AP) @[ IoU=0.50:0.95 | area= all | maxDets=100 ] = 0.301
Average Precision (AP) @[ IoU=0.50 | area= all | maxDets=100 ] = 0.488
Average Precision (AP) @[ IoU=0.75 | area= all | maxDets=100 ] = 0.330
Average Precision (AP) @[ IoU=0.50:0.95 | area= small | maxDets=100 ] = 0.169
Average Precision (AP) @[ IoU=0.50:0.95 | area=medium | maxDets=100 ] = 0.361
Average Precision (AP) @[ IoU=0.50:0.95 | area= large | maxDets=100 ] = 0.413
Average Recall (AR) @[ IoU=0.50:0.95 | area= all | maxDets= 1 ] = 0.272
Average Recall (AR) @[ IoU=0.50:0.95 | area= all | maxDets= 10 ] = 0.470
Average Recall (AR) @[ IoU=0.50:0.95 | area= all | maxDets=100 ] = 0.533
Average Recall (AR) @[ IoU=0.50:0.95 | area= small | maxDets=100 ] = 0.344
Average Recall (AR) @[ IoU=0.50:0.95 | area=medium | maxDets=100 ] = 0.597
Average Recall (AR) @[ IoU=0.50:0.95 | area= large | maxDets=100 ] = 0.691 |
能够得出的结论是多图确实可以涨点,后续均采用200张进行。
2.3 预处理对齐&lmdb
分析官方源码,可以看到官方预处理采用letterbox方式,量化脚本采用直接缩放到640*640尺寸,预处理方式存在一定差异。
为了提升量化时效率,图片预处理在制作lmdb数据时一并做掉,数据集制作可以参考官方教程,需要自行写脚本实现,部分代码如下:
| Python
# 部分代码
lmdb = LMDB_Dataset(args.imageset_lmdbfolder)
for image_path in image_list:
print(‘reading image {}’.format(image_path))
cv_img = read_image(image_path, args.image_size)
lmdb.put(cv_img)
lmdb.close()
#制作的数据集:data.mdb |
此时需要调整量化脚本,采用lmdb数据集,而不用在量化过程中进行图片前处理操作,部分脚本如下:
| Bash
python3 -m ufw.cali.cali_model \
–net_name $dst_model_prefix \
–model ${src_model_file} \
–cali_lmdb ${lmdb_src_dir}\
–input_shapes “[${batch_size},3,${img_height},${img_width}]” \
–cali_iterations=200 \
–outdir ${int8model_dir} \
–target ${platform} \
–convert_bmodel_cmd_opt=”-opt=1″ |
精度数据如下所示,可以看到精度相对于【2.2】反而会有些下降,mAP@0.5降低了1.5个百分点(原因不详):
| Shell
Average Precision (AP) @[ IoU=0.50:0.95 | area= all | maxDets=100 ] = 0.283
Average Precision (AP) @[ IoU=0.50 | area= all | maxDets=100 ] = 0.463
Average Precision (AP) @[ IoU=0.75 | area= all | maxDets=100 ] = 0.306
Average Precision (AP) @[ IoU=0.50:0.95 | area= small | maxDets=100 ] = 0.133
Average Precision (AP) @[ IoU=0.50:0.95 | area=medium | maxDets=100 ] = 0.330
Average Precision (AP) @[ IoU=0.50:0.95 | area= large | maxDets=100 ] = 0.398
Average Recall (AR) @[ IoU=0.50:0.95 | area= all | maxDets= 1 ] = 0.264
Average Recall (AR) @[ IoU=0.50:0.95 | area= all | maxDets= 10 ] = 0.451
Average Recall (AR) @[ IoU=0.50:0.95 | area= all | maxDets=100 ] = 0.509
Average Recall (AR) @[ IoU=0.50:0.95 | area= small | maxDets=100 ] = 0.305
Average Recall (AR) @[ IoU=0.50:0.95 | area=medium | maxDets=100 ] = 0.569
Average Recall (AR) @[ IoU=0.50:0.95 | area= large | maxDets=100 ] = 0.679 |
结论:引入letterbox会降低精度,后续仍然采用【2.2】方式。
2.4 网络图优化
结合芯片平台特性,可以针对模型网络中某些node进行量化,比如depthwise conv、BN+bias等,如下图所示,下面从模型优化角度进行组合尝试。
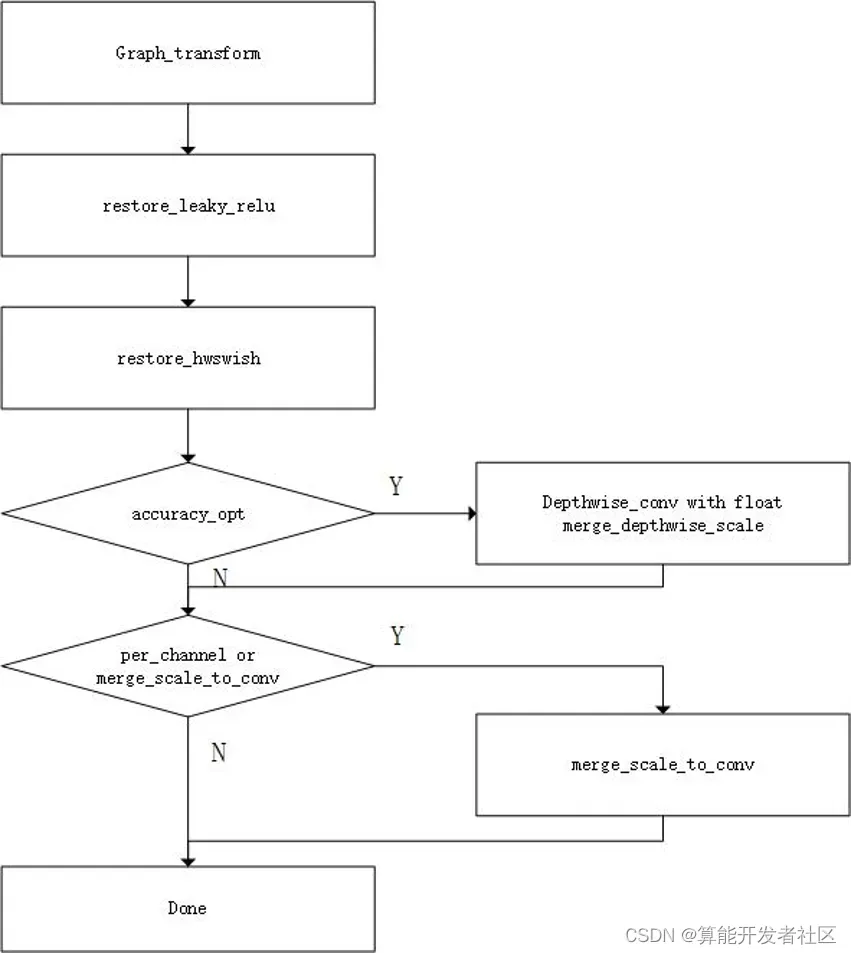
网络优化操作
2.4.1 per_channel优化
首先尝试使用按输入channel量化,此功能默认是关闭的,需要通过-per_channel进行开启,开启后,convolution计算时,会按照每个通道进行量化统计,脚本主要代码如下:
| Bash
python3 -m ufw.cali.cali_model \
–net_name=$dst_model_prefix \
–model=${src_model_file} \
–cali_image_path=${image_src_dir} \
–cali_iterations=200 \
–cali_image_preprocess=’resize_h=640,resize_w=640;scale=0.003921569,bgr2rgb=True’ \
–input_shapes=”[${batch_size},3,${img_height},${img_width}]” \
–outdir=${int8model_dir} \
–target=${platform} \
–convert_bmodel_cmd_opt=”-opt=1″ \
–try_cali_accuracy_opt=”-per_channel=true” |
精度数据如下所示,对比【2.3】没有变化,说明此优化未能提升精度。
| Shell
Average Precision (AP) @[ IoU=0.50:0.95 | area= all | maxDets=100 ] = 0.301
Average Precision (AP) @[ IoU=0.50 | area= all | maxDets=100 ] = 0.488
Average Precision (AP) @[ IoU=0.75 | area= all | maxDets=100 ] = 0.330
Average Precision (AP) @[ IoU=0.50:0.95 | area= small | maxDets=100 ] = 0.169
Average Precision (AP) @[ IoU=0.50:0.95 | area=medium | maxDets=100 ] = 0.361
Average Precision (AP) @[ IoU=0.50:0.95 | area= large | maxDets=100 ] = 0.413
Average Recall (AR) @[ IoU=0.50:0.95 | area= all | maxDets= 1 ] = 0.272
Average Recall (AR) @[ IoU=0.50:0.95 | area= all | maxDets= 10 ] = 0.470
Average Recall (AR) @[ IoU=0.50:0.95 | area= all | maxDets=100 ] = 0.533
Average Recall (AR) @[ IoU=0.50:0.95 | area= small | maxDets=100 ] = 0.344
Average Recall (AR) @[ IoU=0.50:0.95 | area=medium | maxDets=100 ] = 0.597
Average Recall (AR) @[ IoU=0.50:0.95 | area= large | maxDets=100 ] = 0.691 |
结论:该优化无效,后续不引入。
2.4.2 accuracy_opt优化
该优化会将网络中depthwise卷积采用浮点进行推理,以提高精度。该选项默认是关闭的,需要通过-accuracy_opt进行开启,主要脚本代码如下:
| Bash
python3 -m ufw.cali.cali_model \
–net_name=$dst_model_prefix \
–model=${src_model_file} \
–cali_image_path=${image_src_dir} \
–cali_iterations=200 \
–cali_image_preprocess=’resize_h=640,resize_w=640;scale=0.003921569,bgr2rgb=True’ \
–input_shapes=”[${batch_size},3,${img_height},${img_width}]” \
–outdir=${int8model_dir} \
–target=${platform} \
–convert_bmodel_cmd_opt=”-opt=1″ \
–try_cali_accuracy_opt=”-accuracy_opt=true” |
精度数据如下所示,对比【2.3】没有变化,说明此优化未生效。
| Shell
Average Precision (AP) @[ IoU=0.50:0.95 | area= all | maxDets=100 ] = 0.301
Average Precision (AP) @[ IoU=0.50 | area= all | maxDets=100 ] = 0.488
Average Precision (AP) @[ IoU=0.75 | area= all | maxDets=100 ] = 0.330
Average Precision (AP) @[ IoU=0.50:0.95 | area= small | maxDets=100 ] = 0.169
Average Precision (AP) @[ IoU=0.50:0.95 | area=medium | maxDets=100 ] = 0.361
Average Precision (AP) @[ IoU=0.50:0.95 | area= large | maxDets=100 ] = 0.413
Average Recall (AR) @[ IoU=0.50:0.95 | area= all | maxDets= 1 ] = 0.272
Average Recall (AR) @[ IoU=0.50:0.95 | area= all | maxDets= 10 ] = 0.470
Average Recall (AR) @[ IoU=0.50:0.95 | area= all | maxDets=100 ] = 0.533
Average Recall (AR) @[ IoU=0.50:0.95 | area= small | maxDets=100 ] = 0.344
Average Recall (AR) @[ IoU=0.50:0.95 | area=medium | maxDets=100 ] = 0.597
Average Recall (AR) @[ IoU=0.50:0.95 | area= large | maxDets=100 ] = 0.691 |
结论:该优化无效,后续不引入。
2.4.3 conv_group优化
该优化后将conv的输出channel,按照输出幅值进行分组,然后拆分成不同的组分别进行量化,默认是关闭的,需要通过-conv_group开启,主要脚本代码如下:
| Bash
python3 -m ufw.cali.cali_model \
–net_name=$dst_model_prefix \
–model=${src_model_file} \
–cali_image_path=${image_src_dir} \
–cali_iterations=200 \
–cali_image_preprocess=’resize_h=640,resize_w=640;scale=0.003921569,bgr2rgb=True’ \
–input_shapes=”[${batch_size},3,${img_height},${img_width}]” \
–outdir=${int8model_dir} \
–target=${platform} \
–convert_bmodel_cmd_opt=”-opt=1″ \
–try_cali_accuracy_opt=”-conv_group=true” |
精度数据如下所示,对比【2.3】没有变化,说明此优化未生效。
| Bash
Average Precision (AP) @[ IoU=0.50:0.95 | area= all | maxDets=100 ] = 0.301
Average Precision (AP) @[ IoU=0.50 | area= all | maxDets=100 ] = 0.488
Average Precision (AP) @[ IoU=0.75 | area= all | maxDets=100 ] = 0.330
Average Precision (AP) @[ IoU=0.50:0.95 | area= small | maxDets=100 ] = 0.169
Average Precision (AP) @[ IoU=0.50:0.95 | area=medium | maxDets=100 ] = 0.361
Average Precision (AP) @[ IoU=0.50:0.95 | area= large | maxDets=100 ] = 0.413
Average Recall (AR) @[ IoU=0.50:0.95 | area= all | maxDets= 1 ] = 0.272
Average Recall (AR) @[ IoU=0.50:0.95 | area= all | maxDets= 10 ] = 0.470
Average Recall (AR) @[ IoU=0.50:0.95 | area= all | maxDets=100 ] = 0.533
Average Recall (AR) @[ IoU=0.50:0.95 | area= small | maxDets=100 ] = 0.344
Average Recall (AR) @[ IoU=0.50:0.95 | area=medium | maxDets=100 ] = 0.597
Average Recall (AR) @[ IoU=0.50:0.95 | area= large | maxDets=100 ] = 0.691 |
结论:该优化无效,后续不引入。
2.4.4 总结
通过【2.4】章节的实验,可以确认目前的图优化对YOLOv5不生效。为了防止工具链存在问题,可以通过比较auto_cali环节calibration_use_pb输出,与手动分布执行calibration_use_pb的日志输出,并比较了两者int8umodel和deploy_int8_unique_top.prototxt,均一致,
注:
- 当前最新版本工具链会将三种优化合并,实际只生效一种
- 为了快速验证,建议将opt配置为1,auto_cali默认是2
- 可以采用分步量化,可以提高量化调优效率
2.5 混合精度
168X芯片内部集成了浮点计算单元,可以高效地利用浮点进行计算。根据芯片的这个特点,可以采用混合精度的方式来运行网络,允许部分层用定点进行计算,部分层用浮点进行计算。通过允许部分层用浮点进行计算,可以有效地提高网络的整体量化精度。
目前,量化工具对外提供了多种混合精度方式,比如:fpfwd_inputs(输入到某层)、fpfwd_outputs(某层到输出),可以通过如下命令查看:
| Bash
calibration_use_pb –help |
YOLOv5 head包含回归和分类,在量化时,数据分布不易于统计,一般可以设置成fp32,这里将最后一层卷积到输出全部设置为fp32,即浮点计算,脚本主要代码如下:
| Bash
python3 -m ufw.cali.cali_model \
–net_name=$dst_model_prefix \
–model=${src_model_file} \
–cali_image_path=${image_src_dir} \
–cali_iterations=200 \
–cali_image_preprocess=’resize_h=640,resize_w=640;scale=0.003921569,bgr2rgb=True’ \
–input_shapes=”[${batch_size},3,${img_height},${img_width}]” \
–outdir=${int8model_dir} \
–target=${platform} \
–convert_bmodel_cmd_opt=”-opt=1″ \
–try_cali_accuracy_opt=”-fpfwd_outputs=< 24 >86,< 24 >55,< 24 >18″ |
注:
- 可以通过prototxt文件查看conv的name
精度数据如下所示,对比【2.3】mAP略微提升,说明此优化有提升精度效果,可以加入。
| Python
Average Precision (AP) @[ IoU=0.50:0.95 | area= all | maxDets=100 ] = 0.310
Average Precision (AP) @[ IoU=0.50 | area= all | maxDets=100 ] = 0.491
Average Precision (AP) @[ IoU=0.75 | area= all | maxDets=100 ] = 0.338
Average Precision (AP) @[ IoU=0.50:0.95 | area= small | maxDets=100 ] = 0.179
Average Precision (AP) @[ IoU=0.50:0.95 | area=medium | maxDets=100 ] = 0.371
Average Precision (AP) @[ IoU=0.50:0.95 | area= large | maxDets=100 ] = 0.423
Average Recall (AR) @[ IoU=0.50:0.95 | area= all | maxDets= 1 ] = 0.278
Average Recall (AR) @[ IoU=0.50:0.95 | area= all | maxDets= 10 ] = 0.478
Average Recall (AR) @[ IoU=0.50:0.95 | area= all | maxDets=100 ] = 0.539
Average Recall (AR) @[ IoU=0.50:0.95 | area= small | maxDets=100 ] = 0.351
Average Recall (AR) @[ IoU=0.50:0.95 | area=medium | maxDets=100 ] = 0.605
Average Recall (AR) @[ IoU=0.50:0.95 | area= large | maxDets=100 ] = 0.699 |
结论:该混合精度策略生效,后续引入精度量化中。
2.6 阈值优化
阈值的选取对于网络量化效果有很大的影响,不同的阈值量化方法对于网络可能会有不同效果,理论上每个layer都能采用不同量化策略,最终逼近原生模型效果。
默认采用KL量化方法,可以采用如下命令查看支持的量化方法:
| Shell
t@8fd9d950d190:/workspace/code/sophon-examples/simple/YOLOv5/scripts# calibration_use_pb –help
…
-th_method (method to calculate
threshold.Options:KL(default),SYMKL,JSD,ADMM,ACIQ,PERCENT9999,MAX)
type: string default: “KL”
… |
注:这里给出几种量化策略的介绍,感兴趣的可以看一看
2.6.1 PERCENT9999
通过th_method配置,主要脚本如下:
| Bash
python3 -m ufw.cali.cali_model \
–net_name=$dst_model_prefix \
–model=${src_model_file} \
–cali_image_path=${image_src_dir} \
–cali_iterations=200 \
–cali_image_preprocess=’resize_h=640,resize_w=640;scale=0.003921569,bgr2rgb=True’ \
–input_shapes=”[${batch_size},3,${img_height},${img_width}]” \
–outdir=${int8model_dir} \
–target=${platform} \
–convert_bmodel_cmd_opt=”-opt=1″ \
–try_cali_accuracy_opt=”-fpfwd_outputs=< 24 >86,< 24 >55,< 24 >18;-th_method=PERCENT9999″ |
精度数据如下所示,对比【2.5】没有变化,说明此优化未生效。
| Python
Average Precision (AP) @[ IoU=0.50:0.95 | area= all | maxDets=100 ] = 0.310
Average Precision (AP) @[ IoU=0.50 | area= all | maxDets=100 ] = 0.491
Average Precision (AP) @[ IoU=0.75 | area= all | maxDets=100 ] = 0.338
Average Precision (AP) @[ IoU=0.50:0.95 | area= small | maxDets=100 ] = 0.179
Average Precision (AP) @[ IoU=0.50:0.95 | area=medium | maxDets=100 ] = 0.371
Average Precision (AP) @[ IoU=0.50:0.95 | area= large | maxDets=100 ] = 0.423
Average Recall (AR) @[ IoU=0.50:0.95 | area= all | maxDets= 1 ] = 0.278
Average Recall (AR) @[ IoU=0.50:0.95 | area= all | maxDets= 10 ] = 0.478
Average Recall (AR) @[ IoU=0.50:0.95 | area= all | maxDets=100 ] = 0.539
Average Recall (AR) @[ IoU=0.50:0.95 | area= small | maxDets=100 ] = 0.351
Average Recall (AR) @[ IoU=0.50:0.95 | area=medium | maxDets=100 ] = 0.605
Average Recall (AR) @[ IoU=0.50:0.95 | area= large | maxDets=100 ] = 0.699 |
结论:此优化不生效,后续不引入。
2.6.2 SYMKL
通过th_method配置,主要脚本如下:
| Bash
python3 -m ufw.cali.cali_model \
–net_name=$dst_model_prefix \
–model=${src_model_file} \
–cali_image_path=${image_src_dir} \
–cali_iterations=200 \
–cali_image_preprocess=’resize_h=640,resize_w=640;scale=0.003921569,bgr2rgb=True’ \
–input_shapes=”[${batch_size},3,${img_height},${img_width}]” \
–outdir=${int8model_dir} \
–target=${platform} \
–convert_bmodel_cmd_opt=”-opt=1″ \
–try_cali_accuracy_opt=”-fpfwd_outputs=< 24 >86,< 24 >55,< 24 >18;-th_method=SYMKL” |
精度数据如下所示,对比【2.5】精度有所下降,说明此优化未达效果。
| Python
Average Precision (AP) @[ IoU=0.50:0.95 | area= all | maxDets=100 ] = 0.300
Average Precision (AP) @[ IoU=0.50 | area= all | maxDets=100 ] = 0.476
Average Precision (AP) @[ IoU=0.75 | area= all | maxDets=100 ] = 0.327
Average Precision (AP) @[ IoU=0.50:0.95 | area= small | maxDets=100 ] = 0.170
Average Precision (AP) @[ IoU=0.50:0.95 | area=medium | maxDets=100 ] = 0.363
Average Precision (AP) @[ IoU=0.50:0.95 | area= large | maxDets=100 ] = 0.417
Average Recall (AR) @[ IoU=0.50:0.95 | area= all | maxDets= 1 ] = 0.275
Average Recall (AR) @[ IoU=0.50:0.95 | area= all | maxDets= 10 ] = 0.475
Average Recall (AR) @[ IoU=0.50:0.95 | area= all | maxDets=100 ] = 0.536
Average Recall (AR) @[ IoU=0.50:0.95 | area= small | maxDets=100 ] = 0.339
Average Recall (AR) @[ IoU=0.50:0.95 | area=medium | maxDets=100 ] = 0.603
Average Recall (AR) @[ IoU=0.50:0.95 | area= large | maxDets=100 ] = 0.700 |
结论:此优化属于负优化,后续不引入。
2.6.3 JSD
通过th_method配置,主要脚本如下:
| Bash
python3 -m ufw.cali.cali_model \
–net_name=$dst_model_prefix \
–model=${src_model_file} \
–cali_image_path=${image_src_dir} \
–cali_iterations=200 \
–cali_image_preprocess=’resize_h=640,resize_w=640;scale=0.003921569,bgr2rgb=True’ \
–input_shapes=”[${batch_size},3,${img_height},${img_width}]” \
–outdir=${int8model_dir} \
–target=${platform} \
–convert_bmodel_cmd_opt=”-opt=1″ \
–try_cali_accuracy_opt=”-fpfwd_outputs=< 24 >86,< 24 >55,< 24 >18;-th_method=JSD” |
精度数据如下所示,对比【2.5】精度有所下降(比【2.6.2稍微好一点】),说明此优化未达效果。
| Python
Average Precision (AP) @[ IoU=0.50:0.95 | area= all | maxDets=100 ] = 0.306
Average Precision (AP) @[ IoU=0.50 | area= all | maxDets=100 ] = 0.486
Average Precision (AP) @[ IoU=0.75 | area= all | maxDets=100 ] = 0.333
Average Precision (AP) @[ IoU=0.50:0.95 | area= small | maxDets=100 ] = 0.171
Average Precision (AP) @[ IoU=0.50:0.95 | area=medium | maxDets=100 ] = 0.368
Average Precision (AP) @[ IoU=0.50:0.95 | area= large | maxDets=100 ] = 0.420
Average Recall (AR) @[ IoU=0.50:0.95 | area= all | maxDets= 1 ] = 0.277
Average Recall (AR) @[ IoU=0.50:0.95 | area= all | maxDets= 10 ] = 0.477
Average Recall (AR) @[ IoU=0.50:0.95 | area= all | maxDets=100 ] = 0.538
Average Recall (AR) @[ IoU=0.50:0.95 | area= small | maxDets=100 ] = 0.343
Average Recall (AR) @[ IoU=0.50:0.95 | area=medium | maxDets=100 ] = 0.607
Average Recall (AR) @[ IoU=0.50:0.95 | area= large | maxDets=100 ] = 0.696 |
结论:此优化属于负优化,后续不引入。
2.6.4 ADMM
通过th_method配置,主要脚本如下:
| Bash
python3 -m ufw.cali.cali_model \
–net_name=$dst_model_prefix \
–model=${src_model_file} \
–cali_image_path=${image_src_dir} \
–cali_iterations=200 \
–cali_image_preprocess=’resize_h=640,resize_w=640;scale=0.003921569,bgr2rgb=True’ \
–input_shapes=”[${batch_size},3,${img_height},${img_width}]” \
–outdir=${int8model_dir} \
–target=${platform} \
–convert_bmodel_cmd_opt=”-opt=1″ \
–try_cali_accuracy_opt=”-fpfwd_outputs=< 24 >86,< 24 >55,< 24 >18;-th_method=ADMM” |
精度数据如下所示,对比【2.5】mAP@0.5提升5.9个百分点,说明此优化效果较为明显。
| Python
Average Precision (AP) @[ IoU=0.50:0.95 | area= all | maxDets=100 ] = 0.356
Average Precision (AP) @[ IoU=0.50 | area= all | maxDets=100 ] = 0.550
Average Precision (AP) @[ IoU=0.75 | area= all | maxDets=100 ] = 0.387
Average Precision (AP) @[ IoU=0.50:0.95 | area= small | maxDets=100 ] = 0.205
Average Precision (AP) @[ IoU=0.50:0.95 | area=medium | maxDets=100 ] = 0.408
Average Precision (AP) @[ IoU=0.50:0.95 | area= large | maxDets=100 ] = 0.465
Average Recall (AR) @[ IoU=0.50:0.95 | area= all | maxDets= 1 ] = 0.299
Average Recall (AR) @[ IoU=0.50:0.95 | area= all | maxDets= 10 ] = 0.508
Average Recall (AR) @[ IoU=0.50:0.95 | area= all | maxDets=100 ] = 0.572
Average Recall (AR) @[ IoU=0.50:0.95 | area= small | maxDets=100 ] = 0.389
Average Recall (AR) @[ IoU=0.50:0.95 | area=medium | maxDets=100 ] = 0.636
Average Recall (AR) @[ IoU=0.50:0.95 | area= large | maxDets=100 ] = 0.724
|
结论:此优化有效,后续可以考虑引入。
2.6.5 ACIQ
通过th_method配置,主要脚本如下:
| Bash
python3 -m ufw.cali.cali_model \
–net_name=$dst_model_prefix \
–model=${src_model_file} \
–cali_image_path=${image_src_dir} \
–cali_iterations=200 \
–cali_image_preprocess=’resize_h=640,resize_w=640;scale=0.003921569,bgr2rgb=True’ \
–input_shapes=”[${batch_size},3,${img_height},${img_width}]” \
–outdir=${int8model_dir} \
–target=${platform} \
–convert_bmodel_cmd_opt=”-opt=1″ \
–try_cali_accuracy_opt=”-fpfwd_outputs=< 24 >86,< 24 >55,< 24 >18;-th_method=ACIQ” |
精度数据如下所示,对比【2.5】mAP@0.5提升3个百分点,说明此优化效果较为明显。
| Python
Average Precision (AP) @[ IoU=0.50:0.95 | area= all | maxDets=100 ] = 0.330
Average Precision (AP) @[ IoU=0.50 | area= all | maxDets=100 ] = 0.521
Average Precision (AP) @[ IoU=0.75 | area= all | maxDets=100 ] = 0.352
Average Precision (AP) @[ IoU=0.50:0.95 | area= small | maxDets=100 ] = 0.190
Average Precision (AP) @[ IoU=0.50:0.95 | area=medium | maxDets=100 ] = 0.373
Average Precision (AP) @[ IoU=0.50:0.95 | area= large | maxDets=100 ] = 0.436
Average Recall (AR) @[ IoU=0.50:0.95 | area= all | maxDets= 1 ] = 0.285
Average Recall (AR) @[ IoU=0.50:0.95 | area= all | maxDets= 10 ] = 0.485
Average Recall (AR) @[ IoU=0.50:0.95 | area= all | maxDets=100 ] = 0.550
Average Recall (AR) @[ IoU=0.50:0.95 | area= small | maxDets=100 ] = 0.379
Average Recall (AR) @[ IoU=0.50:0.95 | area=medium | maxDets=100 ] = 0.604
Average Recall (AR) @[ IoU=0.50:0.95 | area= large | maxDets=100 ] = 0.703 |
结论:此优化有效,后续可以考虑引入。
2.6.6 MAX
通过th_method配置,主要脚本如下:
| Bash
python3 -m ufw.cali.cali_model \
–net_name=$dst_model_prefix \
–model=${src_model_file} \
–cali_image_path=${image_src_dir} \
–cali_iterations=200 \
–cali_image_preprocess=’resize_h=640,resize_w=640;scale=0.003921569,bgr2rgb=True’ \
–input_shapes=”[${batch_size},3,${img_height},${img_width}]” \
–outdir=${int8model_dir} \
–target=${platform} \
–convert_bmodel_cmd_opt=”-opt=1″ \
–try_cali_accuracy_opt=”-fpfwd_outputs=< 24 >86,< 24 >55,< 24 >18;-th_method=MAX” |
精度数据如下所示,对比【2.5】mAP@0.5提升5.3个百分点,说明此优化效果较为明显。
| Python
Average Precision (AP) @[ IoU=0.50:0.95 | area= all | maxDets=100 ] = 0.346
Average Precision (AP) @[ IoU=0.50 | area= all | maxDets=100 ] = 0.544
Average Precision (AP) @[ IoU=0.75 | area= all | maxDets=100 ] = 0.373
Average Precision (AP) @[ IoU=0.50:0.95 | area= small | maxDets=100 ] = 0.191
Average Precision (AP) @[ IoU=0.50:0.95 | area=medium | maxDets=100 ] = 0.391
Average Precision (AP) @[ IoU=0.50:0.95 | area= large | maxDets=100 ] = 0.453
Average Recall (AR) @[ IoU=0.50:0.95 | area= all | maxDets= 1 ] = 0.292
Average Recall (AR) @[ IoU=0.50:0.95 | area= all | maxDets= 10 ] = 0.495
Average Recall (AR) @[ IoU=0.50:0.95 | area= all | maxDets=100 ] = 0.562
Average Recall (AR) @[ IoU=0.50:0.95 | area= small | maxDets=100 ] = 0.376
Average Recall (AR) @[ IoU=0.50:0.95 | area=medium | maxDets=100 ] = 0.623
Average Recall (AR) @[ IoU=0.50:0.95 | area= large | maxDets=100 ] = 0.703 |
结论:此优化有效,后续可以考虑引入。
2.6.7 总结
这里采用全局量化策略,相互之间互斥,基于此,可以选出效果最好的量化策略,也即【2.6.4】中的ADMM。
注:如果有更加高精度的要求,还可以按照layer尝试采用不同量化策略
三、总结
基于以上调优实验,最终采用【2.2】+【2.5】+【2.6.4】优化组合,部分代码如下:
| Bash
python3 -m ufw.cali.cali_model \
–net_name=$dst_model_prefix \
–model=${src_model_file} \
–cali_image_path=${image_src_dir} \
–cali_iterations=200 \
–cali_image_preprocess=’resize_h=640,resize_w=640;scale=0.003921569,bgr2rgb=True’ \
–input_shapes=”[${batch_size},3,${img_height},${img_width}]” \
–outdir=${int8model_dir} \
–target=${platform} \
–convert_bmodel_cmd_opt=”-opt=1″ \
–try_cali_accuracy_opt=”-fpfwd_outputs=< 24 >86,< 24 >55,< 24 >18;-th_method=ADMM” |
调优后精度如下所示:
| Python
Average Precision (AP) @[ IoU=0.50:0.95 | area= all | maxDets=100 ] = 0.356
Average Precision (AP) @[ IoU=0.50 | area= all | maxDets=100 ] = 0.550 |
对比优化前精度,精度提升了7.6个百分点(mAP@0.5):
| Python
Average Precision (AP) @[ IoU=0.50:0.95 | area= all | maxDets=100 ] = 0.290
Average Precision (AP) @[ IoU=0.50 | area= all | maxDets=100 ] = 0.474 |
对比官方/fp32bmodel(两者一致),精度仅降低1.7个百分点(mAP@0.5):
| Python
Average Precision (AP) @[ IoU=0.50:0.95 | area= all | maxDets=100 ] = 0.373
Average Precision (AP) @[ IoU=0.50 | area= all | maxDets=100 ] = 0.567 |
四、相关链接
样例开源仓库:https://github.com/sophon-ai-algo/examples
BM1684 BMNNSDK文档:https://developer.sophgo.com/site/index/document/6/all.html
编译工具用户开发手册: https://doc.sophgo.com/docs/2.7.0/docs_latest_release/nntc/html/index.html
量化工具用户开发手册:https://doc.sophgo.com/docs/2.7.0/docs_latest_release/calibration-tools/html/index.html
算能量化工具介绍及使用说明:https://www.bilibili.com/video/BV1DA4y1S75p?spm_id_from=333.999.0
官网视频教程:https://developer.sophgo.com/site/index/course/all/all.html
官网文档中心:https://developer.sophgo.com/site/index/document/all/all.html
官网下载中心:https://developer.sophgo.com/site/index/material/all/all.html
官网论坛:https://developer.sophgo.com/forum/view/43.html