一文详解如何用GPU来运行Python代码/基于Python自制一个文件解压缩小工具

前几天捣鼓了一下Ubuntu,正是想用一下我旧电脑上的N卡,可以用GPU来跑代码,体验一下多核的快乐,感兴趣的小伙伴快跟随小编一起了解一下吧

简介

前几天捣鼓了一下Ubuntu,正是想用一下我旧电脑上的N卡,可以用GPU来跑代码,体验一下多核的快乐。

还好我这破电脑也是支持Cuda的:

1

2

3

4

5

6

7

8

9

10

11

12

13

$ sudo lshw -C display

  *-display                

       description: 3D controller

       product: GK208M [GeForce GT 740M]

       vendor: NVIDIA Corporation

       physical id: 0

       bus info: pci@0000:01:00.0

       version: a1

       width: 64 bits

       clock: 33MHz

       capabilities: pm msi pciexpress bus_master cap_list rom

       configuration: driver=nouveau latency=0

       resources: irq:35 memory:f0000000-f0ffffff memory:c0000000-cfffffff memory:d0000000-d1ffffff ioport:6000(size=128)

安装相关工具

首先安装一下Cuda的开发工具,命令如下:

1

$ sudo apt install nvidia-cuda-toolkit

查看一下相关信息:

1

2

3

4

5

6

$ nvcc --version

nvcc: NVIDIA (R) Cuda compiler driver

Copyright (c) 2005-2021 NVIDIA Corporation

Built on Thu_Nov_18_09:45:30_PST_2021

Cuda compilation tools, release 11.5, V11.5.119

Build cuda_11.5.r11.5/compiler.30672275_0

通过Conda安装相关的依赖包:

1

conda install numba & conda install cudatoolkit

通过pip安装也可以,一样的。

测试与驱动安装

简单测试了一下,发觉报错了:

1

2

3

4

5

6

7

8

9

10

11

12

13

14

15

16

17

18

19

20

21

22

23

24

25

26

27

28

29

30

31

32

33

34

$ /home/larry/anaconda3/bin/python /home/larry/code/pkslow-samples/python/src/main/python/cuda/test1.py

Traceback (most recent call last):

  File "/home/larry/anaconda3/lib/python3.9/site-packages/numba/cuda/cudadrv/driver.py", line 246, in ensure_initialized

    self.cuInit(0)

  File "/home/larry/anaconda3/lib/python3.9/site-packages/numba/cuda/cudadrv/driver.py", line 319, in safe_cuda_api_call

    self._check_ctypes_error(fname, retcode)

  File "/home/larry/anaconda3/lib/python3.9/site-packages/numba/cuda/cudadrv/driver.py", line 387, in _check_ctypes_error

    raise CudaAPIError(retcode, msg)

numba.cuda.cudadrv.driver.CudaAPIError: [100] Call to cuInit results in CUDA_ERROR_NO_DEVICE

During handling of the above exception, another exception occurred:

Traceback (most recent call last):

  File "/home/larry/code/pkslow-samples/python/src/main/python/cuda/test1.py", line 15, in <module>

    gpu_print[1, 2]()

  File "/home/larry/anaconda3/lib/python3.9/site-packages/numba/cuda/compiler.py", line 862, in __getitem__

    return self.configure(*args)

  File "/home/larry/anaconda3/lib/python3.9/site-packages/numba/cuda/compiler.py", line 857, in configure

    return _KernelConfiguration(self, griddim, blockdim, stream, sharedmem)

  File "/home/larry/anaconda3/lib/python3.9/site-packages/numba/cuda/compiler.py", line 718, in __init__

    ctx = get_context()

  File "/home/larry/anaconda3/lib/python3.9/site-packages/numba/cuda/cudadrv/devices.py", line 220, in get_context

    return _runtime.get_or_create_context(devnum)

  File "/home/larry/anaconda3/lib/python3.9/site-packages/numba/cuda/cudadrv/devices.py", line 138, in get_or_create_context

    return self._get_or_create_context_uncached(devnum)

  File "/home/larry/anaconda3/lib/python3.9/site-packages/numba/cuda/cudadrv/devices.py", line 153, in _get_or_create_context_uncached

    with driver.get_active_context() as ac:

  File "/home/larry/anaconda3/lib/python3.9/site-packages/numba/cuda/cudadrv/driver.py", line 487, in __enter__

    driver.cuCtxGetCurrent(byref(hctx))

  File "/home/larry/anaconda3/lib/python3.9/site-packages/numba/cuda/cudadrv/driver.py", line 284, in __getattr__

    self.ensure_initialized()

  File "/home/larry/anaconda3/lib/python3.9/site-packages/numba/cuda/cudadrv/driver.py", line 250, in ensure_initialized

    raise CudaSupportError(f"Error at driver init: {description}")

numba.cuda.cudadrv.error.CudaSupportError: Error at driver init: Call to cuInit results in CUDA_ERROR_NO_DEVICE (100)

网上搜了一下,发现是驱动问题。通过Ubuntu自带的工具安装显卡驱动:
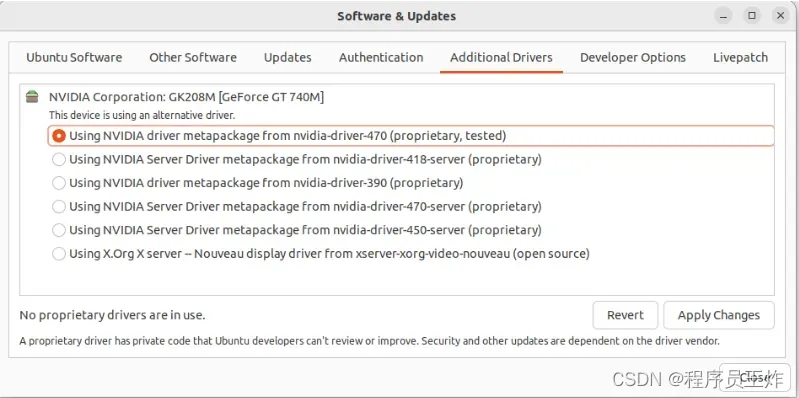
 

还是失败:

1

2

$ nvidia-smi

NVIDIA-SMI has failed because it couldn't communicate with the NVIDIA driver. Make sure that the latest NVIDIA driver is installed and running.

最后,通过命令行安装驱动,成功解决这个问题:

1

$ sudo apt install nvidia-driver-470

检查后发现正常了:

1

2

3

4

5

6

7

8

9

10

11

12

13

14

15

16

17

18

19

20

21

$ nvidia-smi

Wed Dec  7 22:13:49 2022      

+-----------------------------------------------------------------------------+

| NVIDIA-SMI 470.161.03   Driver Version: 470.161.03   CUDA Version: 11.4     |

|-------------------------------+----------------------+----------------------+

| GPU  Name        Persistence-M| Bus-Id        Disp.A | Volatile Uncorr. ECC |

| Fan  Temp  Perf  Pwr:Usage/Cap|         Memory-Usage | GPU-Util  Compute M. |

|                               |                      |               MIG M. |

|===============================+======================+======================|

|   0  NVIDIA GeForce ...  Off  | 00000000:01:00.0 N/A |                  N/A |

| N/A   51C    P8    N/A /  N/A |      4MiB /  2004MiB |     N/A      Default |

|                               |                      |                  N/A |

+-------------------------------+----------------------+----------------------+


+-----------------------------------------------------------------------------+

| Processes:                                                                  |

|  GPU   GI   CI        PID   Type   Process name                  GPU Memory |

|        ID   ID                                                   Usage      |

|=============================================================================|

|  No running processes found                                                 |

+-----------------------------------------------------------------------------+

测试代码也可以跑了。

测试Python代码

打印ID

准备以下代码:

1

2

3

4

5

6

7

8

9

10

11

12

13

14

15

16

17

from numba import cuda

import os

def cpu_print():

    print('cpu print')

@cuda.jit

def gpu_print():

    dataIndex = cuda.threadIdx.x + cuda.blockIdx.x * cuda.blockDim.x

    print('gpu print ', cuda.threadIdx.x, cuda.blockIdx.x, cuda.blockDim.x, dataIndex)

if __name__ == '__main__':

    gpu_print[4, 4]()

    cuda.synchronize()

    cpu_print()

这个代码主要有两个函数,一个是用CPU执行,一个是用GPU执行,执行打印操作。关键在于@cuda.jit这个注解,让代码在GPU上执行。运行结果如下:

$ /home/larry/anaconda3/bin/python /home/larry/code/pkslow-samples/python/src/main/python/cuda/print_test.py
gpu print  0 3 4 12
gpu print  1 3 4 13
gpu print  2 3 4 14
gpu print  3 3 4 15
gpu print  0 2 4 8
gpu print  1 2 4 9
gpu print  2 2 4 10
gpu print  3 2 4 11
gpu print  0 1 4 4
gpu print  1 1 4 5
gpu print  2 1 4 6
gpu print  3 1 4 7
gpu print  0 0 4 0
gpu print  1 0 4 1
gpu print  2 0 4 2
gpu print  3 0 4 3
cpu print

可以看到GPU总共打印了16次,使用了不同的Thread来执行。这次每次打印的结果都可能不同,因为提交GPU是异步执行的,无法确保哪个单元先执行。同时也需要调用同步函数cuda.synchronize(),确保GPU执行完再继续往下跑。

查看时间

我们通过这个函数来看GPU并行的力量:

1

2

3

4

5

6

7

8

9

10

11

12

13

14

15

16

17

18

19

20

21

22

23

24

25

26

27

28

29

30

from numba import jit, cuda

import numpy as np

# to measure exec time

from timeit import default_timer as timer

# normal function to run on cpu

def func(a):

    for i in range(10000000):

        a[i] += 1

# function optimized to run on gpu

@jit(target_backend='cuda')

def func2(a):

    for i in range(10000000):

        a[i] += 1

if __name__ == "__main__":

    n = 10000000

    a = np.ones(n, dtype=np.float64)

    start = timer()

    func(a)

    print("without GPU:", timer() - start)

    start = timer()

    func2(a)

    print("with GPU:", timer() - start)

结果如下:

$ /home/larry/anaconda3/bin/python /home/larry/code/pkslow-samples/python/src/main/python/cuda/time_test.py
without GPU: 3.7136273959999926
with GPU: 0.4040513340000871

可以看到使用CPU需要3.7秒,而GPU则只要0.4秒,还是能快不少的。当然这里不是说GPU一定比CPU快,具体要看任务的类型。

以上就是一文详解如何用GPU来运行Python代码的详细内容。

基于Python自制一个文件解压缩小工具

经常在办公的过程中会遇到各种各样的压缩文件处理,但是呢每个压缩软件支持的格式又是不同的。本文就来用Python自制一个文件解压缩小工具,可以支持7z/zip/rar三种格式,希望对大家有所帮助

经常在办公的过程中会遇到各种各样的压缩文件处理,但是呢每个压缩软件支持的格式又是不同的。

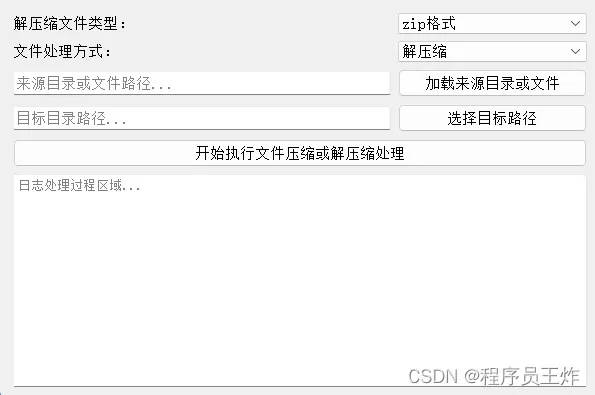
没有可以一种可以同时多种格式的并且免费的文件解压缩工具,于是我使用python的PyQt5开发出这个文件解压缩的小工具。

接下来,我们将开发过程中需要的python非标准库以及代码块做一个简单的介绍,有兴趣的小伙伴可以停下脚步一起来看看。

一般在windows的操作系统下文件解压缩的格式就是7z/zip/rar这三种,首先我们需要安装一下PyQt5以及需要文件解压缩处理的模块。

这里我们直接使用的是pip的安装方式进行安装,我的pip默认配置的是全局的清华大学镜像站。

1

2

3

pip install PyQt5

pip install py7zr

pip install rarfile

然后,在开始之前我们将需要的python标准或非标准模块全部导入代码块中准备进入下面的开发环节。

1

2

3

4

5

6

7

8

9

10

11

12

13

14

15

16

17

18

19

20

21

22

23

24

25

26

27

28

# Importing all the classes from the PyQt5.QtGui module.

from PyQt5.QtGui import *

# Importing all the classes from the PyQt5.QtWidgets module.

from PyQt5.QtWidgets import *

# Importing all the classes from the PyQt5.QtCore module.

from PyQt5.QtCore import *

# `import os` is importing the os module.

import os

# `import sys` is importing the sys module.

import sys

# `import zipfile as zip` is importing the zipfile module as zip.

import zipfile as zip

# `import py7zr` is importing the py7zr module.

import py7zr

# `import rarfile as rar` is importing the rarfile module as rar.

import rarfile as rar

# Importing the traceback module.

import traceback

import images

至此,我们开发需要使用到的python模块就全部导入进来了,这里说明一下我们使用到的英文注释是通过pycharm的AI插件直接生成的。

首先,创建一个名称为CompressUI的python类,将所有的UI页面组件及布局全部放在这个类中进行开发。

以及包括UI页面组件关联的槽函数也放在这个类中,也就是在CompressUI类中我们只处理页面操作相关的部分不做具体逻辑的实现。

1

2

3

4

5

6

7

8

9

10

11

12

13

14

15

16

17

18

19

20

21

22

23

24

25

26

27

28

29

30

31

32

33

34

35

36

37

38

39

40

41

42

43

44

45

46

47

48

49

50

51

52

53

54

55

56

57

58

59

60

61

62

63

64

65

66

67

68

69

70

71

72

73

74

75

76

77

78

79

80

81

82

83

84

85

86

87

88

89

90

91

92

class CompressUI(QWidget):

    def __init__(self):

        super(CompressUI, self).__init__()

        self.init_ui()

    def init_ui(self):

        self.setWindowTitle('文件解压缩处理工具 公众号:Python 集中营')

        self.setWindowIcon(QIcon(':/analysis.ico'))

        self.resize(600400)

        self.compress_file_type = QLabel()

        self.compress_file_type.setText('解压缩文件类型:')

        self.compress_file_type_combox = QComboBox()

        self.compress_file_type_combox.addItems(['7z格式''zip格式''rar格式'])

        self.file_catch_type = QLabel()

        self.file_catch_type.setText('文件处理方式:')

        self.file_catch_type_combox = QComboBox()

        self.file_catch_type_combox.addItems(['压缩''解压缩'])

        self.source_dir_or_file = QLineEdit()

        self.source_dir_or_file.setPlaceholderText('来源目录或文件路径...')

        self.source_dir_or_file_btn = QPushButton()

        self.source_dir_or_file_btn.setText('加载来源目录或文件')

        self.source_dir_or_file_btn.clicked.connect(self.source_dir_or_file_btn_clk)

        self.target_dir_or_file = QLineEdit()

        self.target_dir_or_file.setPlaceholderText('目标目录路径...')

        self.target_dir_or_file_btn = QPushButton()

        self.target_dir_or_file_btn.setText('选择目标路径')

        self.target_dir_or_file_btn.clicked.connect(self.target_dir_or_file_btn_clk)

        self.start_btn = QPushButton()

        self.start_btn.setText('开始执行文件压缩或解压缩处理')

        self.start_btn.clicked.connect(self.start_btn_clk)

        self.brower = QTextBrowser()

        self.brower.setReadOnly(True)

        self.brower.setFont(QFont('宋体'8))

        self.brower.setPlaceholderText('日志处理过程区域...')

        self.brower.ensureCursorVisible()

        grid = QGridLayout()

        grid.addWidget(self.compress_file_type, 0012)

        grid.addWidget(self.compress_file_type_combox, 0211)

        grid.addWidget(self.file_catch_type, 1012)

        grid.addWidget(self.file_catch_type_combox, 1211)

        grid.addWidget(self.source_dir_or_file, 2012)

        grid.addWidget(self.source_dir_or_file_btn, 2211)

        grid.addWidget(self.target_dir_or_file, 3012)

        grid.addWidget(self.target_dir_or_file_btn, 3211)

        grid.addWidget(self.start_btn, 4013)

        grid.addWidget(self.brower, 5013)

        self.thread_ = WorkThread(self)

        self.thread_.message.connect(self.show_message)

        self.thread_.finished.connect(self.thread_is_finished)

        self.setLayout(grid)

    def show_message(self, text):

        cursor = self.brower.textCursor()

        cursor.movePosition(QTextCursor.End)

        self.brower.append(text)

        self.brower.setTextCursor(cursor)

        self.brower.ensureCursorVisible()

    def target_dir_or_file_btn_clk(self):

        target_dir_or_file_path = QFileDialog.getExistingDirectory(self'选择文件夹', os.getcwd())

        self.target_dir_or_file.setText(target_dir_or_file_path)

    def source_dir_or_file_btn_clk(self):

        file_catch_type = self.file_catch_type_combox.currentText()

        if file_catch_type == '压缩':

            source_dir_or_file_path = QFileDialog.getExistingDirectory(self'选择文件夹', os.getcwd())

            self.source_dir_or_file.setText(source_dir_or_file_path)

        else:

            source_dir_or_file_path = QFileDialog.getOpenFileName(self"选取文件", os.getcwd(),

                                                                  "RAR File (*.rar);;ZIP File (*.zip);;7z File (*.7z)")

            self.source_dir_or_file.setText(source_dir_or_file_path[0])

    def start_btn_clk(self):

        self.start_btn.setEnabled(False)

        self.thread_.start()

    def thread_is_finished(self, text):

        if text is True:

            self.start_btn.setEnabled(True)

以上就是整个UI页面组件/布局以及组件对应的槽函数的的开发过程了,有需要的小伙伴可以仔细研究一下。


接下来进入具体业务的开发环节,我们创建一个名称为WorkThread的python类,该类继承自QThread的子线程。

并且在子线程中可以接收主线程的变量参数,以及向主线程中传递信息的操作。将子线程执行的过程信息实时传递到主线程的文本浏览器中。

1

2

3

4

5

6

7

8

9

10

11

12

13

14

15

16

17

18

19

20

21

22

23

24

25

26

27

28

29

30

31

32

33

34

35

36

37

38

39

40

41

42

43

44

45

46

47

48

49

50

51

52

53

54

55

56

57

58

59

60

61

62

63

64

65

66

67

68

69

70

71

72

73

74

75

76

77

78

79

80

81

82

83

84

85

86

87

88

89

90

91

92

93

94

95

96

97

98

99

100

101

102

103

104

105

106

107

108

109

110

111

112

113

114

115

class WorkThread(QThread):

    message = pyqtSignal(str)

    finished = pyqtSignal(bool)

    def __init__(self, parent=None):

        super(WorkThread, self).__init__(parent)

        self.parent = parent

        self.working = True

    def __del__(self):

        self.working = False

    def run(self):

        try:

            compress_file_type = self.parent.compress_file_type_combox.currentText()

            file_catch_type = self.parent.file_catch_type_combox.currentText()

            source_dir_or_file = self.parent.source_dir_or_file.text().strip()

            target_dir_or_file = self.parent.target_dir_or_file.text().strip()

            if source_dir_or_file == '' or target_dir_or_file == '':

                self.message.emit('来源或目标文件路径为空,请检查参数设置!')

                return

            if file_catch_type == '压缩' and os.path.isfile(source_dir_or_file):

                self.message.emit('当处理类型为:压缩,来源类型应该选择文件夹,请按顺序设置参数!')

                return

            if file_catch_type == '解压缩' and os.path.isdir(source_dir_or_file):

                self.message.emit('当处理类型为:解压缩,来源类型应该选择文件,请按顺序设置参数!')

                return

            self.message.emit('准备处理的格式类星星为:{}'.format(compress_file_type))

            self.message.emit('准备处理的处理类型为:{}'.format(file_catch_type))

            self.message.emit('来源文件或目录的路径为:{}'.format(source_dir_or_file))

            self.message.emit('目标目录的路径为:{}'.format(target_dir_or_file))

            if compress_file_type == 'zip格式':

                if file_catch_type == '压缩':

                    self.do_zip(source_dir_or_file, target_dir_or_file)

                else:

                    self.un_zip(source_dir_or_file, target_dir_or_file)

            elif compress_file_type == 'rar格式':

                if file_catch_type == '压缩':

                    self.message.emit('rar格式的文件压缩正在玩命开发中,请关注后续版本更新!')

                else:

                    self.un_rar(source_dir_or_file, target_dir_or_file)

            elif compress_file_type == '7z格式':

                if file_catch_type == '压缩':

                    self.do_7z(source_dir_or_file, target_dir_or_file)

                else:

                    self.un_7z(source_dir_or_file, target_dir_or_file)

            self.message.emit('当前处理过程:{}完成!'.format(file_catch_type))

            self.finished.emit(True)

        except:

            traceback.print_exc()

            self.finished.emit(True)

    def do_zip(self, source_, target_file):

        """

        If the user selects the "压缩" option, then the user can select a directory, and the path of the directory will be

        displayed in the text box

        """

        zip_file = zip.ZipFile(target_file, 'w')

        pre_len = len(os.path.dirname(source_))

        for parent, dirnames, filenames in os.walk(source_):

            for filename in filenames:

                print(f'{filename}')

                path_file = os.path.join(parent, filename)

                arcname = path_file[pre_len:].strip(os.path.sep)

                zip_file.write(path_file, arcname)

        zip_file.close()

    def un_zip(self, source_file, target_):

        """

        > Unzip a file to a target directory

        :param source_file: The file you want to unzip

        :param target_: the directory where you want to unzip the file

        """

        zip_file = zip.ZipFile(source_file)

        if os.path.isdir(target_):

            pass

        else:

            os.mkdir(target_)

        for names in zip_file.namelist():

            zip_file.extract(names, target_)

        zip_file.close()

    def do_7z(self, source_, target_file):

        """

        > This function takes a source file and a target file and compresses the source file into the target file using 7z

        :param source_: The source file or directory to be compressed

        :param target_file: The name of the file to be created

        """

        with py7zr.SevenZipFile(target_file, 'r') as file:

            file.extractall(path=source_)

    def un_7z(self, source_file, target_):

        """

        It takes a source directory and a target file, and creates a zip file containing the contents of the source

        directory

        :param source_: The path to the folder you want to zip

        :param target_file: The path to the zip file you want to create

        """

        with py7zr.SevenZipFile(source_file, 'w') as file:

            file.writeall(target_)

    def un_rar(self, source_file, target_):

        """

        It takes a source file and a target directory and unzips the source file into the target directory

        :param source_file: The path to the RAR file you want to extract

        :param target_: The directory where you want the files to be extracted to

        """

        obj_ = rar.RarFile(source_file.decode('utf-8'))

        obj_.extractall(target_.decode('utf-8'))

最后,使用python模块的主函数main,将整个应用加入到主体循环过程中就可以启动整个桌面应用了。

1

2

3

4

5

if __name__ == '__main__':

    app = QApplication(sys.argv)

    main = CompressUI()

    main.show()

    sys.exit(app.exec_())


完成上述的开发工作之后,我们可以选择使用常用的pyinstaller打包模块对整个应用进行打包操作,打包细节可以参考我的历史文章中的说明!

点击拿去​​​​​​​
50G+学习视频教程
100+Python初阶、中阶、高阶电子书籍

文章出处登录后可见!

已经登录?立即刷新

共计人评分,平均

到目前为止还没有投票!成为第一位评论此文章。

(0)
扎眼的阳光的头像扎眼的阳光普通用户
上一篇 2023年11月9日
下一篇 2023年11月9日

相关推荐