基于深度学习的图像分割方法
深度学习是在超声图像分割中非常实用的方法,它的主要优点是能够生成由丰富语义和细微信息组成的多层次特征。将深度学习网络应用到甲状腺检测中,可以准确、快速的定位并对结节和实质区域进行精准勾画。
使用深度神经网络的原因是神经网络是一种多层的、可训练的模型,这样的话,它就能对图像中的甲状腺结点起到分类效果,且通过一定量的正则化训练,神经网络的性能也将愈加优异,对图像的分类也更加精准。
为了对甲状腺结节进行更加精确的分割,有人提出了全卷积神经网络(FCN),将经典卷积神经网络CNN末尾的全连接层用卷积层代替,使得整个网络主要包括卷积层和池化层,对不同采样率的空洞卷积的特征图进行采样融合,从而起到分割效果,下面我将介绍如何通过FCN模型实现图像分割。
FCN模型实现图像分割的流程
注:我这里是用pycharm来编写和运行程序的,然后解释器选择的是Conda3,需要的库,如CV之类的,你们看着安装,学会第一个,其他的应该很快就能成功.
一、模型的构建:
模型的构建的一个关键就是用到了tensorflow库,没有安装的小伙伴可以看我之前的文章,可以通过里面的函数,定义模型的输入层、卷积层、池化层、反卷积层、输出层,经过各个步骤,模型就能构建出来,这里有一个地方得非常注意,输出层的activation函数千万别选softmax,一定要选sigmoid,别问我为什么知道。
二、数据集的预处理:
我获取到的数据集是由图像和掩膜两部分组成,数据集的处理就是将掩膜(灰度为白255和黑0)映射为前景(1)和背景(0)的标签,将标签转换成单通道,同时将图像转换为RGB、进行 min-max 归一化,并将它们转换为两个numpy数组。
三、构建模型、编译模型、训练模型:
在这之中,我们需要特别关注的是模型的编译以及模型的训练,在模型的编译之中,我们得选取合适的优化器,这里我通过多次测试,发现选择使用Adam优化器效果最好,然后是选择学习率,学习率过小->收敛过慢;学习率过大->错过局部最优,我选择0.001,损失函数选择二元交叉熵(binary_crossentropy),以准确率(accuracy)作为评价指标。
在模型的训练中,可以定义一个监测器,当训练迭代5次的loss都不再减小时,那么就说明训练的模型基本上已经达到当前的最优模型,需要停止训练,输入的参数就是图像、标签、迭代次数、验证集(不能和测试集一样,可以将部分的数据集分离出来定义成验证集,其他的归为测试集)、以及callbacks监视器。
最后,记得保存训练后的模型,毕竟训练一次非常耗时。
训练模型的代码:
import tensorflow as tf
import cv2
import numpy as np
import os
from keras.optimizers import Adam

os.environ['TF_CPP_MIN_LOG_LEVEL'] = '2'


# 构建FCN模型
def fcn_model(input_shape, num_classes):
    # 定义输入层
    inputs = tf.keras.layers.Input(shape=input_shape)

    # 定义卷积层
    conv1 = tf.keras.layers.Conv2D(32, (3, 3), activation='relu', padding='same')(inputs)
    conv2 = tf.keras.layers.Conv2D(32, (3, 3), activation='relu', padding='same')(conv1)

    # 定义池化层
    pool1 = tf.keras.layers.MaxPooling2D((2, 2))(conv2)

    # 定义更深的卷积层和池化层
    conv3 = tf.keras.layers.Conv2D(64, (3, 3), activation='relu', padding='same')(pool1)
    conv4 = tf.keras.layers.Conv2D(64, (3, 3), activation='relu', padding='same')(conv3)
    pool2 = tf.keras.layers.MaxPooling2D((2, 2))(conv4)

    # 定义更深的卷积层
    conv5 = tf.keras.layers.Conv2D(128, (3, 3), activation='relu', padding='same')(pool2)
    conv6 = tf.keras.layers.Conv2D(128, (3, 3), activation='relu', padding='same')(conv5)

    # 定义反卷积层
    up1 = tf.keras.layers.Conv2DTranspose(64, (3, 3), strides=(2, 2), padding='same')(conv6)

    # 将反卷积层与卷积层进行连接
    merge1 = tf.keras.layers.concatenate([conv4, up1], axis=3)
    conv7 = tf.keras.layers.Conv2D(64, (3, 3), activation='relu', padding='same')(merge1)
    conv8 = tf.keras.layers.Conv2D(64, (3, 3), activation='relu', padding='same')(conv7)

    # 定义更深的反卷积层
    up2 = tf.keras.layers.Conv2DTranspose(32, (3, 3), strides=(2, 2), padding='same')(conv8)

    # 将反卷积层与卷积层进行连接
    merge2 = tf.keras.layers.concatenate([conv2, up2], axis=3)
    conv9 = tf.keras.layers.Conv2D(32, (3, 3), activation='relu', padding='same')(merge2)
    conv10 = tf.keras.layers.Conv2D(32, (3, 3), activation='relu', padding='same')(conv9)

    # 定义输出层
    outputs = tf.keras.layers.Conv2D(num_classes, (1, 1), activation='sigmoid', padding='same')(conv10)

    # 创建模型
    model = tf.keras.models.Model(inputs=inputs, outputs=outputs)

    return model


def load_data(data_dir1,data_dir2):
    images = []
    labels = []

    # 图像和标签分类
    for filename in os.listdir(data_dir1):
        file = os.path.join(data_dir1, filename)
        file = cv2.imread(file)
        file = cv2.cvtColor(file, cv2.COLOR_BGR2RGB)  # 转换为RGB
        file = cv2.resize(file, (128, 128))
        # 将图像进行 min-max 归一化
        min_val = np.min(file)  # 计算图像的最小值
        max_val = np.max(file)  # 计算图像的最大值
        file = (file - min_val) / (max_val - min_val)
        images.append(file)

    for filename in os.listdir(data_dir2):
        file = os.path.join(data_dir2, filename)
        file = cv2.imread(file)
        file = cv2.cvtColor(file, cv2.COLOR_BGR2RGB)  # 转换为RGB
        file = cv2.resize(file, (128, 128))
        file = (file // 255).astype(np.float32)
        labels.append(file)

    # 将图像和标签转换为numpy数组
    images = np.array(images)
    labels = np.array(labels)

    # 将标签数据的通道数从3改为1
    if len(labels) > 0:
        labels = labels[..., 0]

    return images, labels


# 准备数据集
dirpath1 = r'D:\SourceCode\Pycharm_workspace\augtrain\image'
dirpath2 = r'D:\SourceCode\Pycharm_workspace\augtrain\mask'
# 定义图像和标签
x_train, y_train = load_data(dirpath1, dirpath2)

# 构建模型
input_shape = (128, 128, 3)
num_classes = 1  # 分类数
model = fcn_model(input_shape, num_classes)

# 编译模型
model.compile(
    optimizer=Adam(learning_rate=0.001),  # 使用Adam优化器. 学习率过小->收敛过慢;学习率过大->错过局部最优
    loss='binary_crossentropy',  # 配置损失函数,该函数适用于二分类,即标签数为1的情况
    metrics=['accuracy']  # 标注准确性评价指标
)

# 训练模型
# epochs(训练轮数):训练出来合适的权重
# 定义验证集
dirpath3 = r'D:\SourceCode\Pycharm_workspace\augtrain\image1'
dirpath4 = r'D:\SourceCode\Pycharm_workspace\augtrain\mask1'
x_val, y_val = load_data(dirpath3, dirpath4)
callback = tf.keras.callbacks.EarlyStopping(
    monitor='val_loss',  # 待监测的指标
    patience=5,     # 如果连续5个epoch验证集上的指标都没有改善,则停止训练
    verbose=0, mode='auto'
)
model.fit(x_train, y_train, epochs=100, validation_data=(x_val, y_val), callbacks=[callback])

# 保存模型
model.save('my_model.h5')
训练完成的模型,准确度可以达到90多,损失度为10%左右,这里就不提供了。
四、分割图像:
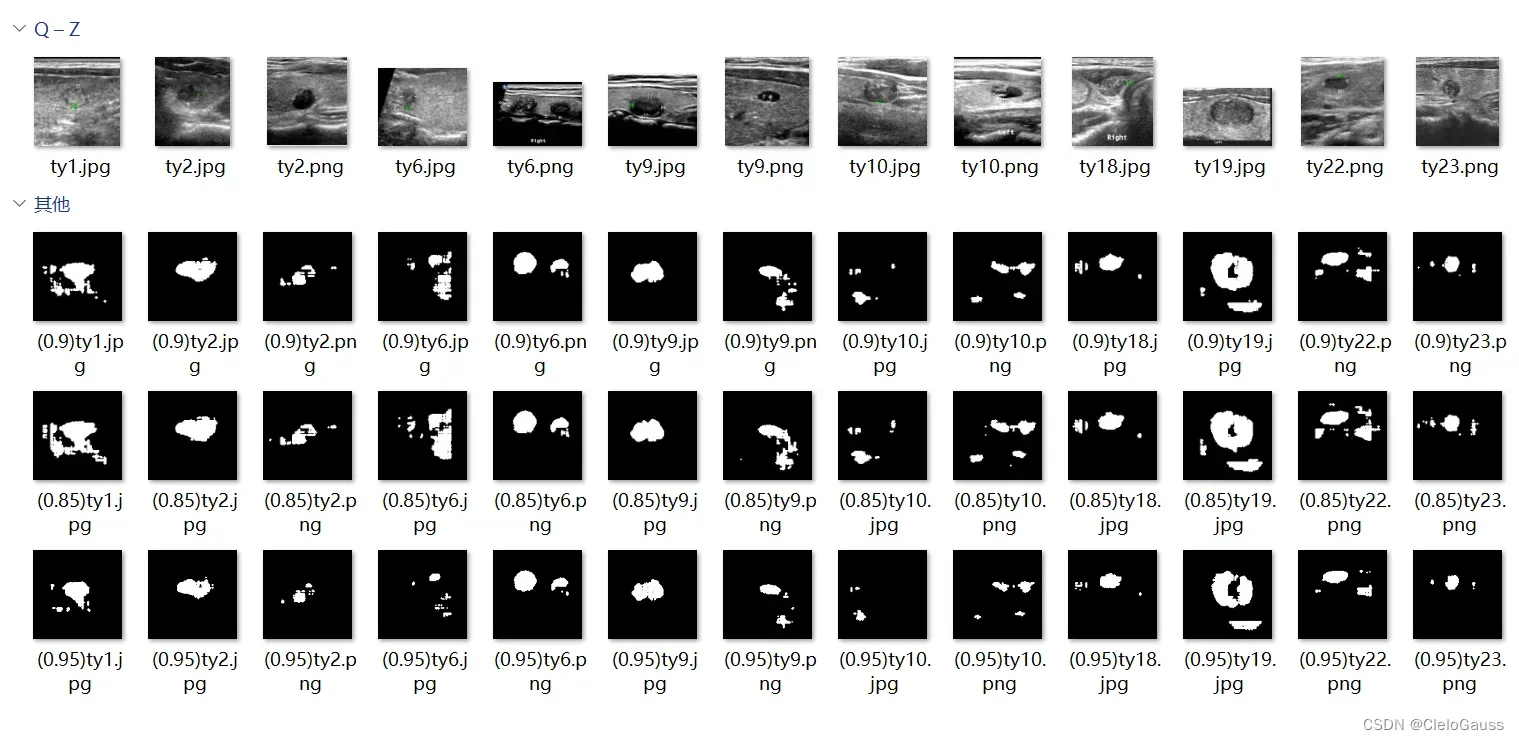
得到训练好之后的模型,之后就很简单了,无非就是带入需要分割的图像,我这里将图像的名字也记录了下来,取分别取P>0.85、0.9、0.95为前景,记录并比较得到的分割图像,观察他们的分割效果。如图:

代码:
import cv2
import numpy as np
import os
from tensorflow.python.keras.models import load_model

os.environ['TF_CPP_MIN_LOG_LEVEL'] = '2'


def load_data(data_dir1):
    images = []
    name = []

    for filename in os.listdir(data_dir1):
        file = os.path.join(data_dir1, filename)
        file = cv2.imread(file)
        file = cv2.cvtColor(file, cv2.COLOR_BGR2RGB)  # 转换为RGB
        file = cv2.resize(file, (128, 128))
        # 将图像进行 min-max 归一化
        min_val = np.min(file)  # 计算图像的最小值
        max_val = np.max(file)  # 计算图像的最大值
        file = (file - min_val) / (max_val - min_val)
        images.append(file)
        name.append(filename)

    # 将图像转换为numpy数组
    images = np.array(images)

    return images, name


# 加载保存的模型文件
model = load_model('my_model.h5')

# 加载预测图像
dirpath = r'D:\SourceCode\Pycharm_workspace\thyroid nodule'
img, filename = load_data(dirpath)

# 进行预测
prediction = model.predict(img)

# 将预测结果转换为分割图像
L = len(prediction)
for i in range(L):
    binary_output = np.where(prediction[i] > 0.95, 1, 0)   # 将大于0.5的取为前景
    binary_output = np.squeeze(binary_output)  # 去掉多余的维度
    binary_output = binary_output.astype(np.uint8)  # 数据类型转换为 uint8
    # 使用形态学操作消除噪声和毛刺
    kernel = cv2.getStructuringElement(cv2.MORPH_ELLIPSE, (3, 3))
    binary_output = cv2.erode(binary_output, kernel, iterations=1)
    binary_output = cv2.dilate(binary_output, kernel, iterations=1)
    name = r'D:\SourceCode\Pycharm_workspace\result/'+'(0.95)'+filename[i]
    # 处理之后,可以将二值化图像保存到文件中
    cv2.imwrite(name, binary_output * 255)
最后,我用的数据集是甲状腺的超声图像(7288张),需要的小伙伴,可以到我的百度网盘领取
链接:https://pan.baidu.com/s/1MSOcJ3k-QFbNaaytYVphPA
提取码:Clel
文章出处登录后可见!
