
✨✨ 欢迎大家来到景天科技苑✨✨
🎈🎈 养成好习惯,先赞后看哦~🎈🎈
🏆 作者简介:景天科技苑
🏆《头衔》:大厂架构师,华为云开发者社区专家博主,阿里云开发者社区专家博主,CSDN新星创作者,掘金优秀博主,51CTO博客专家等。
🏆《博客》:Python全栈,前后端开发,人工智能,js逆向,App逆向,网络系统安全,数据分析,Django,fastapi,flask等框架,linux,shell脚本等实操经验,网站搭建,面试宝典等分享。所属的专栏:flask框架零基础,进阶应用实战教学
景天的主页:景天科技苑
文章目录
- Jinja2流程控制语句
-
- if语句
- 循环语句
- Jinja2过滤器
-
- 常见的内建过滤器
-
- 字符串操作
- 列表操作
- 自定义过滤器
-
- 自定义过滤器方式一
- 自定义过滤器方式二
- 自定义过滤器实战案例
Jinja2流程控制语句
flask模板Jinja2中的流程控制语句主要包含两种,大致用法如下形式:
-
if / elif /else / endif
- if … endif
- if … else … endif
- if …elif … elif … endif
- if …elif … elif … else … endif
-
for / else / endfor
- for … endfor
- for … else … endfor
if语句
Jinja2 语法中的if语句跟 Python 中的 if 语句相似,后面的布尔值或返回布尔值的表达式将决定代码中的哪个流程会被执行.
用 {% if %} 定义的控制代码块,可以实现一些语言层次的功能,比如循环或者if语句
视图代码:
import random

from flask import Flask, render_template

app = Flask(__name__, template_folder="templates")

@app.route("/")
def index():
    score = random.randint(1, 100)
    html = render_template("index2.html", **locals())
    return html

if __name__ == '__main__':
    app.run(debug=True)
templates/index2.html,模板代码:
<!doctype html>
<html lang="en">
<head>
  <meta charset="UTF-8">
  <title>Document</title>
</head>
<body>
  <p>if判断</p>
  <p>{{ request.args.get("state") }}</p>
  {% if request.args.get("state") == "123456" %}
    <p>state的值是123456</p>
  {% endif %}

  <hr>
{#  转换成int类型#}
  {% if request.args.get("num", 0) | int % 2 == 0 %}
    <p>num是偶数,值为={{ request.args.get("num", 0) }}</p>
  {% else %}
    <p>num是奇数,值为={{ request.args.get("num", 0) }}</p>
  {% endif %}
  <hr>


  {% if score < 60 %}
  <p>本次考试不及格!</p>
  {% elif score < 80 %}
  <p>不够优秀,下次继续努力!</p>
  {% elif score < 90 %}
  <p>很棒,下次再加把劲,就要满分了!</p>
  {% else %}
  <p>学霸!厉害!</p>
  {% endif %}

</body>
</html>
浏览器访问,当不携带查询参数
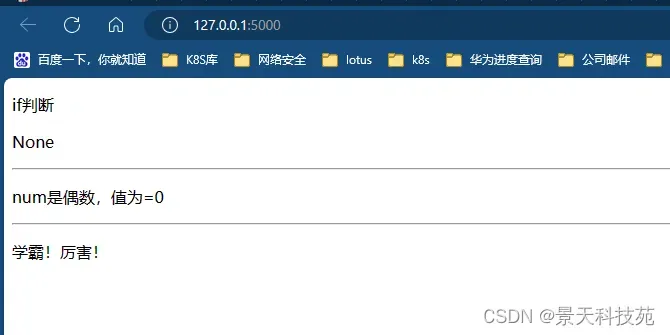
当携带了查询参数

循环语句
-
我们可以在 Jinja2 中使用循环来迭代任何列表或者生成器函数
-
循环和if语句可以组合使用
-
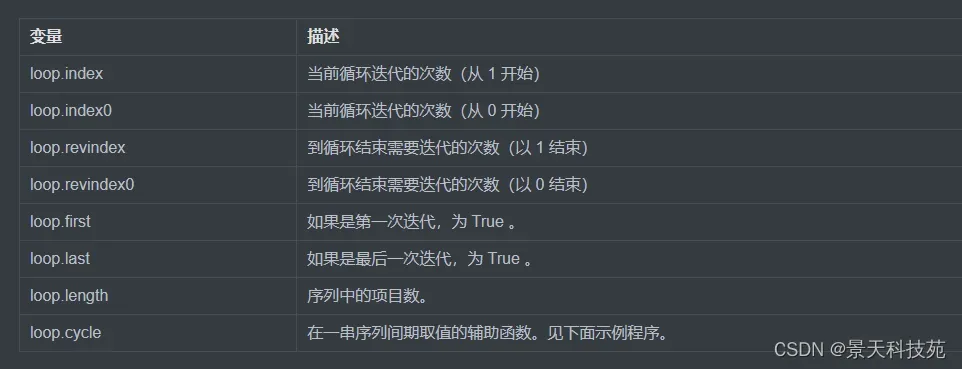
在循环内部,你可以使用一个叫做loop的特殊变量来获得关于for循环的一些信息
-
比如:要是我们想知道当前被迭代的元素序号,并模拟Python中的enumerate函数做的事情,则可以使用loop变量的index属性
在一个 for 循环块中可以访问这些特殊的变量:
视图代码:
import random

from flask import Flask, render_template

app = Flask(__name__, template_folder="templates")

@app.route("/")
def index():

    book_list = [
        {"id": 10, "title": "图书标题10a", "description": "图书介绍",},
        {"id": 13, "title": "图书标题13b", "description": "图书介绍",},
        {"id": 21, "title": "图书标题21c", "description": "图书介绍",},
        {"id": 10, "title": "图书标题10a", "description": "图书介绍", },
        {"id": 13, "title": "图书标题13b", "description": "图书介绍", },
        {"id": 21, "title": "图书标题21c", "description": "图书介绍", },
        {"id": 10, "title": "图书标题10a", "description": "图书介绍", },
        {"id": 13, "title": "图书标题13b", "description": "图书介绍", },
        {"id": 21, "title": "图书标题21c", "description": "图书介绍", },
    ]

    data_list = [
        {"id": 1, "name": "小明", "sex": 1},
        {"id": 2, "name": "小花", "sex": 0},
        {"id": 3, "name": "小白", "sex": 1},
    ]

    html = render_template("index3.html", **locals())
    return html

if __name__ == '__main__':
    app.run(debug=True)
templates/index3.html,模板代码:
<!doctype html>
<html lang="en">
<head>
<meta charset="UTF-8">
<title>Document</title>
<style>
.table{
border: 1px solid red;
border-collapse: collapse;
width: 800px;
}
.table tr th,
.table tr td{
border: 1px solid red;
text-align: center;
}
</style>
</head>
<body>
<table class="table">
<tr>
<th>序号</th>
<th>ID</th>
<th>标题</th>
<th>描述</th>
</tr>
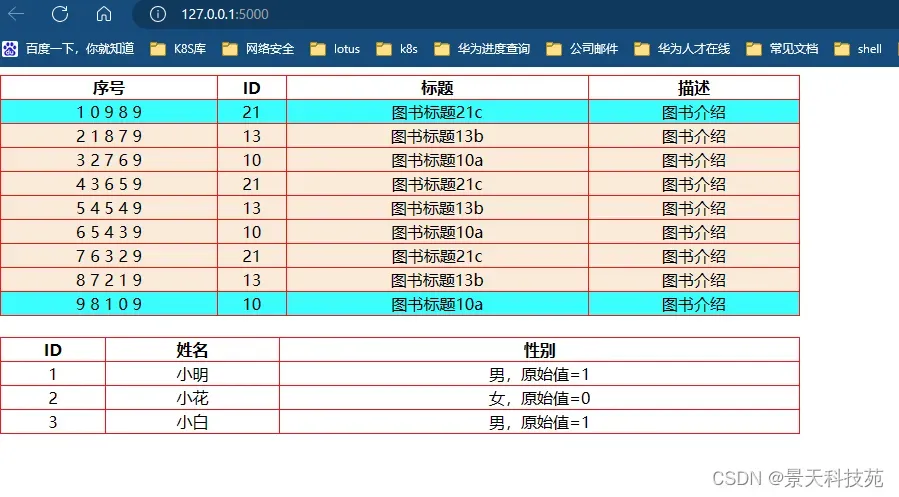
{% for book in book_list | reverse %}
{% if loop.first %}
<tr bgcolor="aqua">
{% elif loop.last %}
<tr bgcolor="aqua">
{% else %}
<tr bgcolor="#faebd7">
{% endif %}
<td>
{#loop根据索引的循环#}
{{ loop.index }}
{{ loop.index0 }}
{{ loop.revindex }}
{{ loop.revindex0 }}
{{ loop.length }}
</td>
<td>{{ book.id }}</td>
<td>{{ book.title }}</td>
<td>{{ book.description }}</td>
</tr>
{% endfor %}
</table>
<br>
<table class="table">
<tr>
<th>ID</th>
<th>姓名</th>
<th>性别</th>
</tr>
{% for data in data_list %}
<tr>
<td>{{ data.id }}</td>
<td>{{ data.name }}</td>
{# 男,女,男,女依次循环 #}
<td>{{ loop.cycle("男","女")}},原始值={{ data.sex }}</td>
</tr>
{% endfor %}
</table>
</body>
</html>
开启服务,浏览器访问
Jinja2过滤器
django中的模板引擎里面曾经使用过滤器,在flask中也有过滤器,并且也可以被用在 if 语句或者for语句中
小案例分析
视图代码,注意创建静态图片所在目录
from flask import Flask, render_template

app = Flask(__name__, template_folder="templates")

@app.route("/")
def index():
    book_list = [

        {"id": 1, "price": 78.50,   "title":"javascript入门",    "cover": "<img src='/static/images/course.png'>"},
        {"id": 2, "price": 78.5,    "title":"python入门",        "cover": "<img src='/static/images/course.png'>"},
        {"id": 3, "price": 78.6666, "title":"django web项目实战", "cover": "<img src='/static/images/course.png'>"},
        {"id": 4, "price": 78.6666, "title":"django web项目实战", "cover": "<script>alert('hello!')</script>"},
    ]
    html = render_template("index4.html", **locals())
    return html

if __name__ == '__main__':
    print(app.url_map)
    app.run(debug=True)
#flask默认静态文件路径是static,我们也可以通过static_folder参数来指定
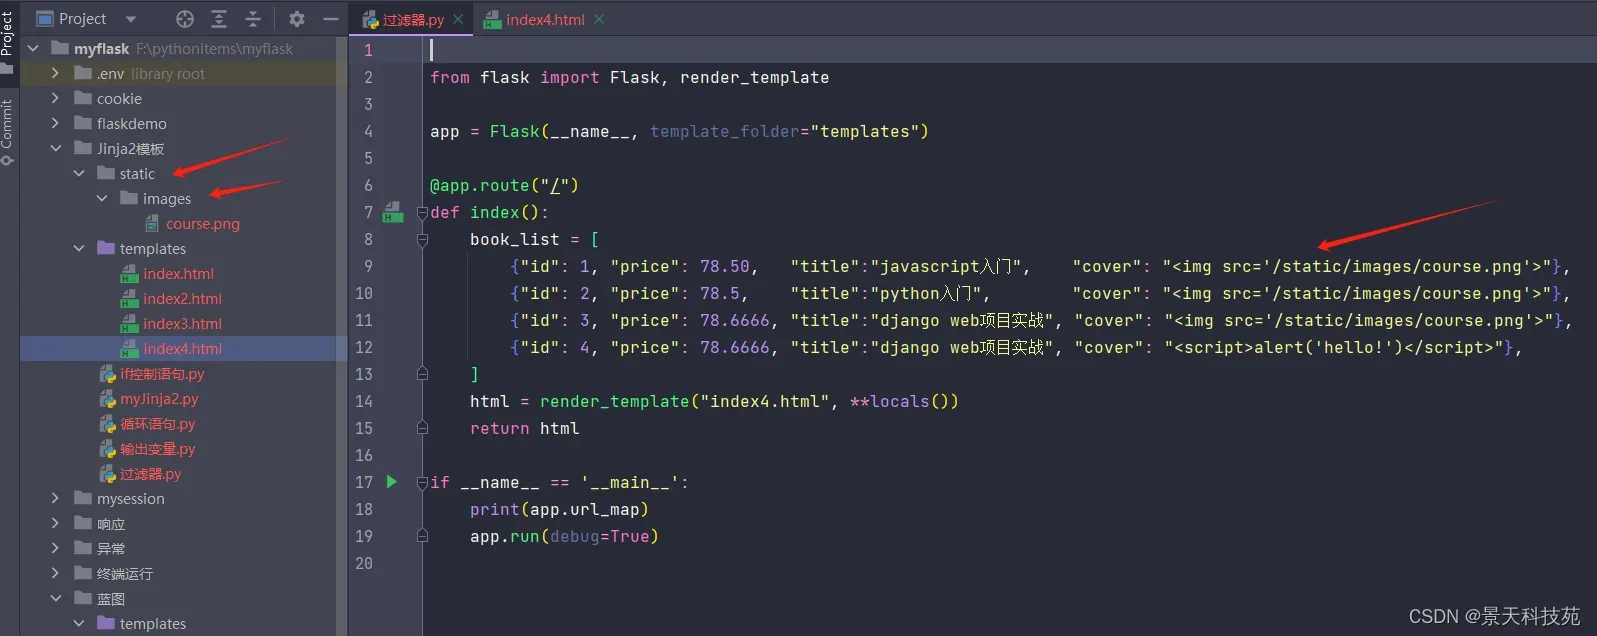
index4.html,模板代码:
<!doctype html>
<html lang="en">
<head>
<meta charset="UTF-8">
<title>Document</title>
<style>
.table{
border: 1px solid red;
border-collapse: collapse;
width: 800px;
}
.table tr th,
.table tr td{
border: 1px solid red;
text-align: center;
}
img{
max-width: 100%;
max-height: 50px;
}
</style>
</head>
<body>
<table class="table">
<tr>
<th>ID</th>
<th>标题</th>
<th>价格</th>
<th>封面</th>
</tr>
{% for book in book_list | reverse %}
<tr>
<th>{{ book.id }}</th>
<th>{{ book.title }}</th>
{# <th>{{ "%.2f" % book.price }}</th>#}
<th>{{ "%.2f" | format(book.price) }}</th>
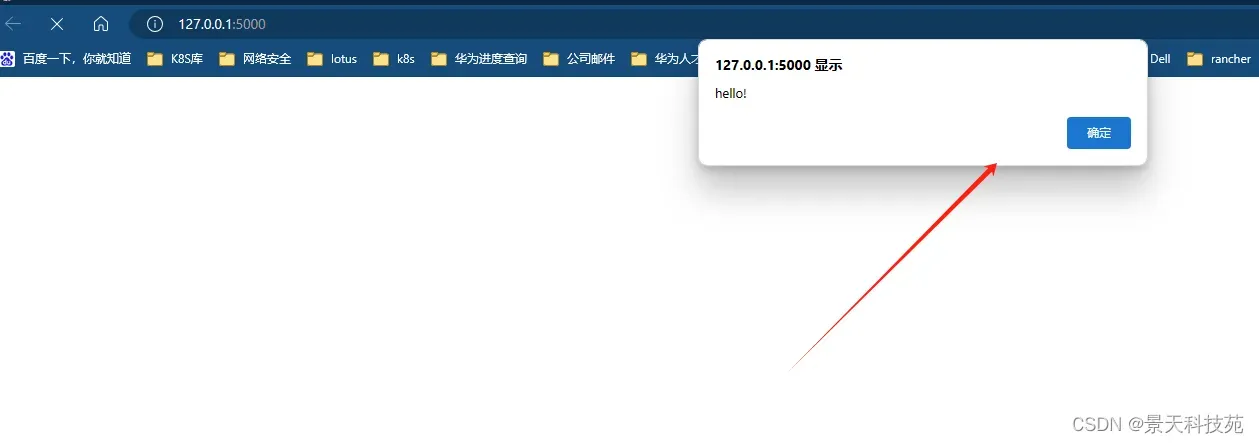
{# 后端传来的数据默认是以字符串形式展示,如果我们想实现展示标签效果,可以通过safe过滤器实现 #}
<th>{{ book.cover | safe }}</th>
</tr>
{% endfor %}
</table>
</body>
</html>
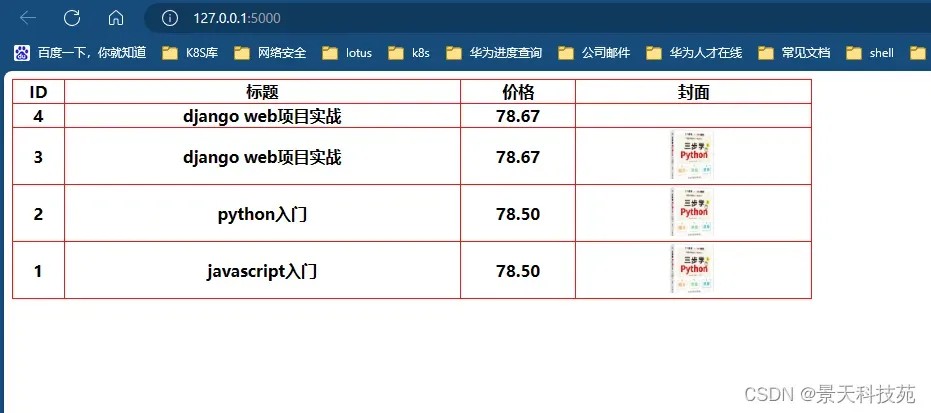
浏览器访问,js弹窗有
点确定,数据显示
flask中, 过滤器的本质就是函数。有时候我们不仅仅只是需要输出变量的值,我们还需要修改变量的显示,甚至格式化、运算等等,而在模板中是不能直接调用 Python 的方法,那么这就用到了过滤器。
使用方式:
-
过滤器的使用方式为:变量名 | 过滤器 | 。。。。。
{ {variable | filter_name(args1,args2,…)}} -
如果没有任何参数传给过滤器,则可以把括号省略掉
{ {variable | title }}
如:title过滤器的作用:把变量的值的首字母转换为大写,其他字母转换为小写
在 jinja2 中,过滤器是可以支持链式调用的,示例如下:
{{ "hello world" | reverse | upper }}
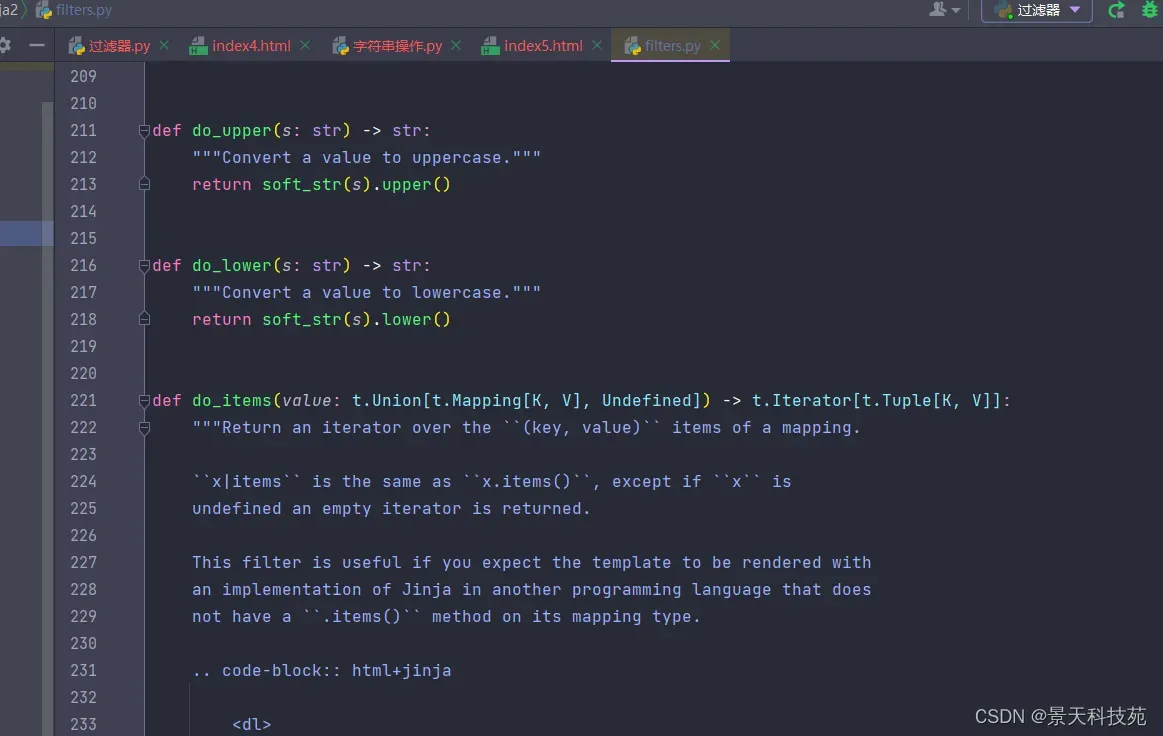
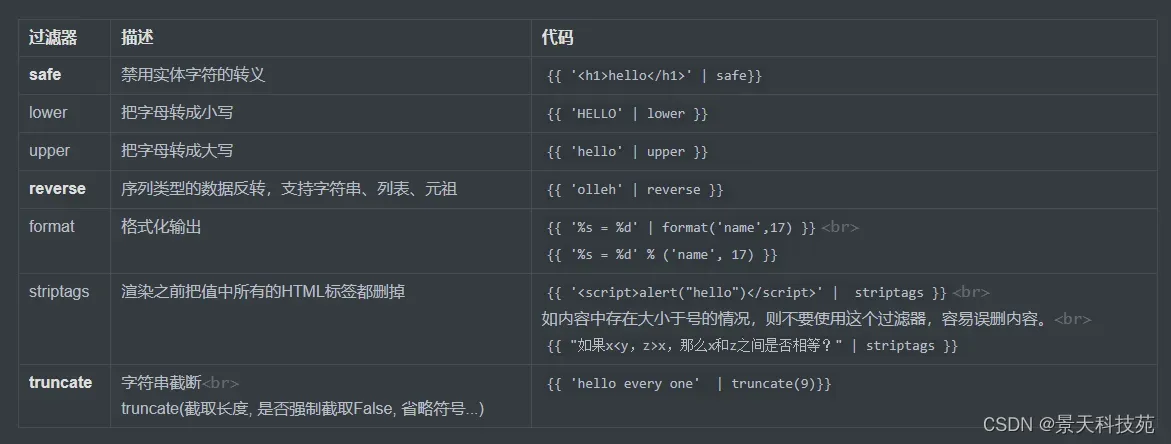
常见的内建过滤器
源代码:from jinja2.filters import FILTERS
源码展示,do开头的函数都是过滤器

字符串操作
视图代码:
from flask import Flask, render_template

app = Flask(__name__, template_folder="templates")

@app.route("/")
def index():
    html = render_template("index5.html", **locals())
    return html

if __name__ == '__main__':
    print(app.url_map)
    app.run(debug=True)
tempaltes/index5.html,代码:
<!doctype html>
<html lang="en">
<head>
<meta charset="UTF-8">
<title>Document</title>
</head>
<body>
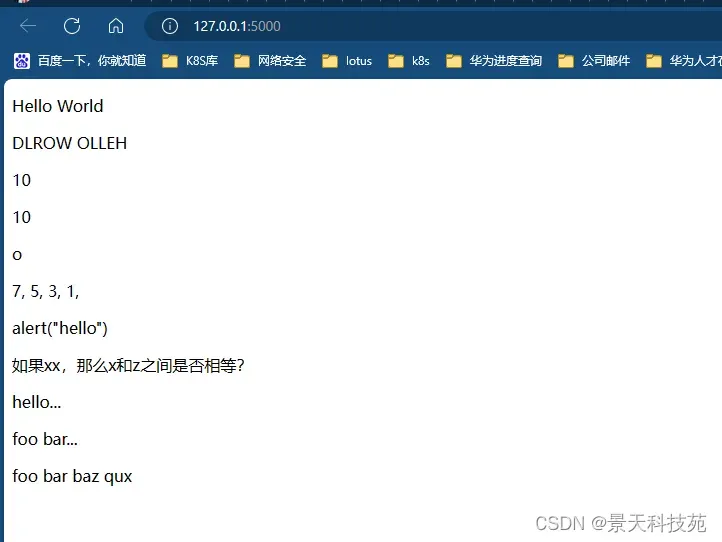
<p>{{ "HELLO WORLD".title() }}</p>
<p>{{ "HELLO WORLD" | title | reverse | upper }}</p>
<p>{{ age | default(10)}}</p>
<p>{{ age | d(10)}}</p>
<p>{{ "hello" | last }}</p>
{% for item in (1,3,5,7) | reverse %}
{{ item }},
{% endfor %}
<p>
{{ '<script>alert("hello")</script>' | striptags }}
</p>
<p>
{{ "如果x<y,z>x,那么x和z之间是否相等?" | striptags }}
</p>
<p>
{{ 'hello every one' | truncate(9)}}
</p>
<p>{{ "foo bar baz qux www"|truncate(11) }}</p>
{# foo bar... #}
<p>{{ "foo bar baz qux"|truncate(11, True, '...') }}</p>
{# foo bar ... #}
</body>
</html>
浏览器访问
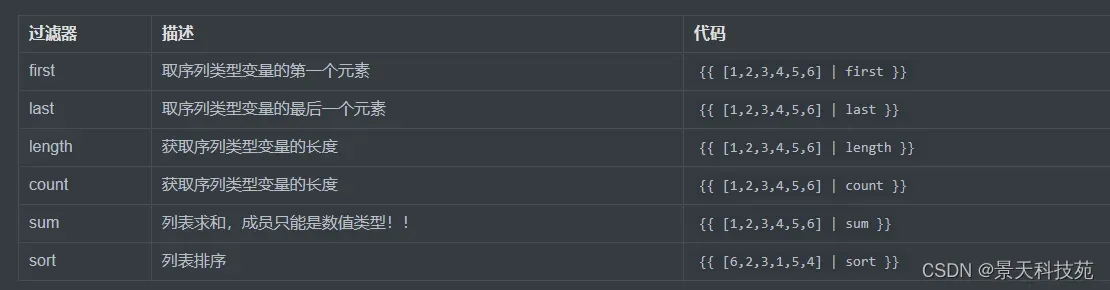
列表操作
视图代码:
from flask import Flask, render_template

app = Flask(__name__, template_folder="templates")

@app.route("/")
def index():
    html = render_template("index6.html", **locals())
    return html

if __name__ == '__main__':
    print(app.url_map)
    app.run(debug=True)
templates/index6.html,代码:
<!doctype html>
<html lang="en">
<head>
<meta charset="UTF-8">
<title>Document</title>
</head>
<body>
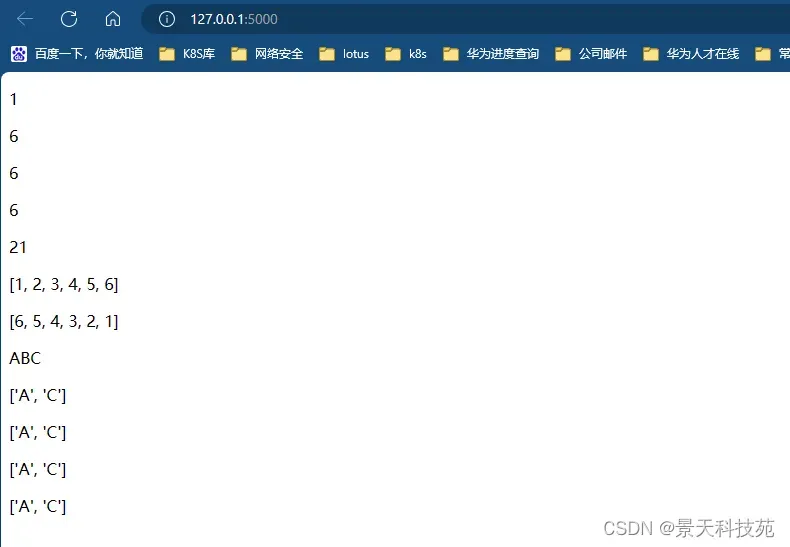
<p>{{ [1,2,3,4,5,6] | first }}</p>
<p>{{ [1,2,3,4,5,6] | last }}</p>
<p>{{ [1,2,3,4,5,6] | length }}</p>
<p>{{ [1,2,3,4,5,6] | count }}</p>
<p>{{ [1,2,3,4,5,6] | sum }}</p>
<p>{{ [1,2,3,4,5,6] | sort }}</p>
<p>{{ [1,2,3,4,5,6] | sort(reverse=True) }}</p>
{#针对范围的过滤#}
{% filter upper %}
<p>abc</p>
<p>{{ ["a","c"] }}</p>
<p>{{ ["a","c"] }}</p>
<p>{{ ["a","c"] }}</p>
<p>{{ ["a","c"] }}</p>
{% endfilter %}
</body>
</html>
代码解析
语句块过滤
{% filter upper %}
    <p>abc</p>
    <p>{{ ["a","c"] }}</p>
    <p>{{ ["a","c"] }}</p>
    <p>{{ ["a","c"] }}</p>
    <p>{{ ["a","c"] }}</p>
{% endfilter %}
浏览器访问
自定义过滤器
过滤器的本质是函数。当模板内置的过滤器不能满足项目需求,可以自定义过滤器。自定义过滤器有两种实现方式:
- 一种是通过Flask应用对象的 app.add_template_filter 方法进行注册
- 另一种通过装饰器来实现自定义过滤器进行注册
注意:自定义的过滤器名称如果和内置的过滤器重名,会覆盖内置的过滤器。
需求:编写一个过滤器,保留n位小数
自定义过滤器方式一
通过调用应用程序实例的 add_template_filter 方法实现自定义过滤器。该方法第一个参数是函数名,第二个参数是自定义的过滤器名称:
看下源码
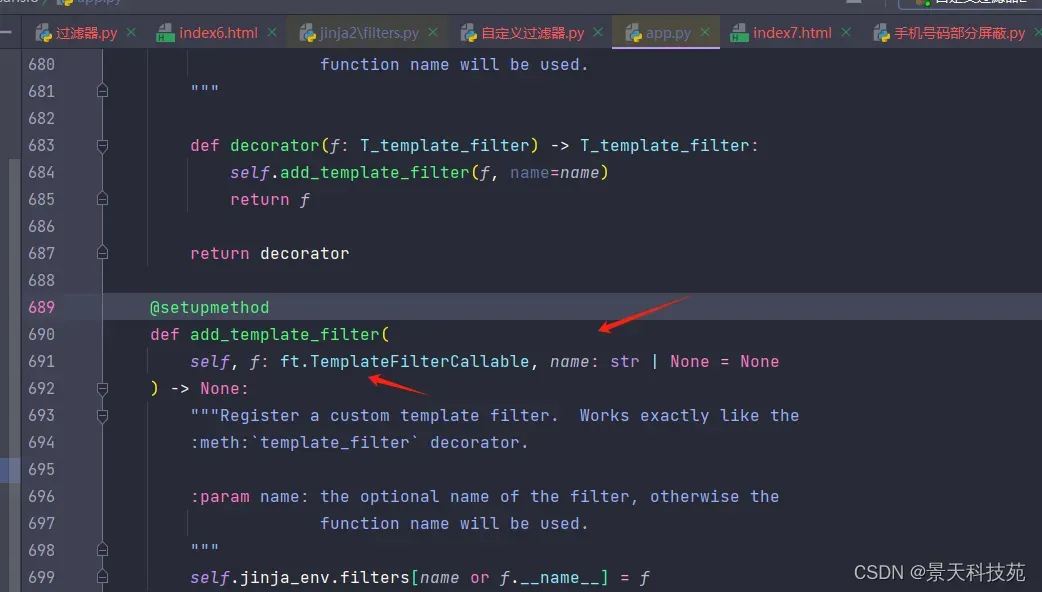
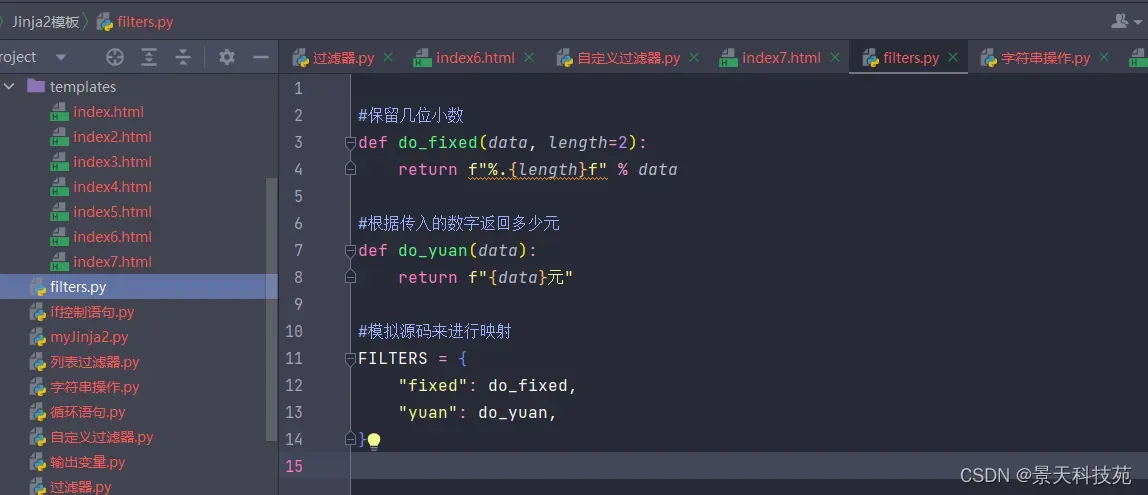
filters.py,代码:
#保留几位小数
def do_fixed(data, length=2):
    return f"%.{length}f" % data

#根据传入的数字返回多少元
def do_yuan(data):
    return f"{data}元"

#模拟源码来进行映射
FILTERS = {
    "fixed": do_fixed,
    "yuan": do_yuan,
}
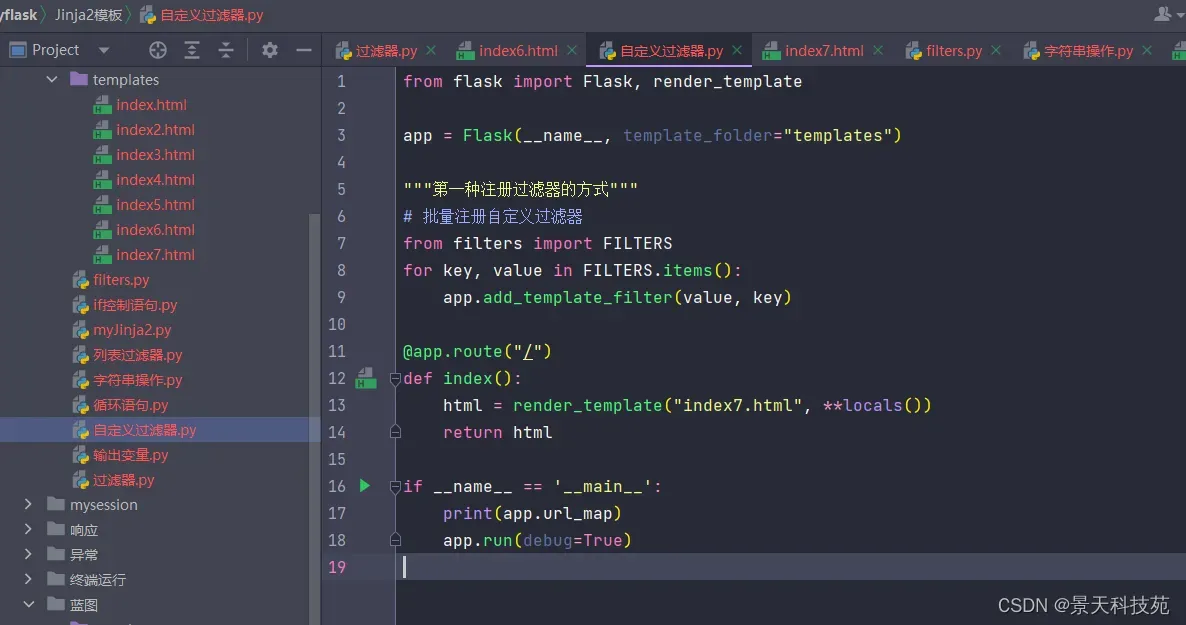
视图代码:
from flask import Flask, render_template

app = Flask(__name__, template_folder="templates")

"""第一种注册过滤器的方式"""
# 批量注册自定义过滤器
from filters import FILTERS
for key, value in FILTERS.items():
    app.add_template_filter(value, key)

@app.route("/")
def index():
    html = render_template("index7.html", **locals())
    return html

if __name__ == '__main__':
    print(app.url_map)
    app.run(debug=True)
templates/index7.html,模板代码:
<!doctype html>
<html lang="en">
<head>
<meta charset="UTF-8">
<title>Document</title>
</head>
<body>
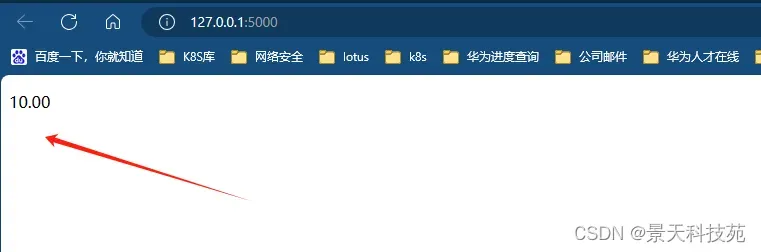
<p>{{ 10 | fixed }}</p>
<p>{{ 10 | yuan }}</p>
{# <p>{{ 10 | fixed2 }}</p>#}
</body>
</html>
浏览器访问,达到了过滤效果

自定义过滤器方式二
用装饰器来实现自定义过滤器。装饰器传入的参数是自定义的过滤器名称。
视图代码:
from flask import Flask, render_template

app = Flask(__name__, template_folder="templates")


"""第二种注册过滤器的方式,通过装饰器来实现"""
@app.template_filter("fixed2")
def do_fixed2(data):
    return f"{data:.2f}"


@app.route("/")
def index():
    html = render_template("index7.html", **locals())
    return html

if __name__ == '__main__':
    print(app.url_map)
    app.run(debug=True)
templates/html7.html调用过滤器,模板代码:
<!doctype html>
<html lang="en">
<head>
  <meta charset="UTF-8">
  <title>Document</title>
</head>
<body>


  <p>{{ 10 | fixed2 }}</p>
</body>
</html>
浏览器访问,也能过滤
综合对比上面两种方式,方式一比较好,跟官方比较接近,官方考虑比较周到,可以在filters.py里面添加多个过滤器,然后循环注册进去。
而方式二,每次装饰器只能注册一个过滤器。因此,工作中我们经常用第一种方式来自定义过滤器
自定义过滤器实战案例
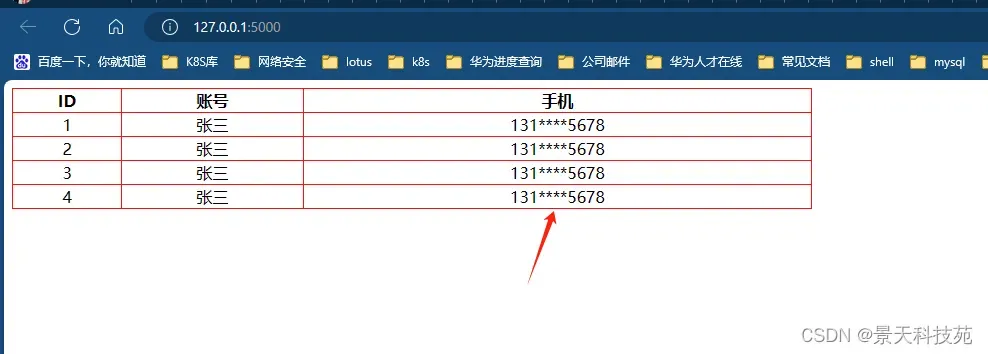
给手机进行部分屏蔽 13112345678 —> 131****5678
视图函数
from flask import Flask, render_template

app = Flask(__name__, template_folder="templates")

def do_mobile(data, dot="*"):
    return data[:3] + dot*4 + data[-4:]
#注册过滤器


app.add_template_filter(do_mobile, "mobile")

@app.route("/")
def index():
    user_list = [
        {"id":1,"name":"张三","mobile":"13112345678"},
        {"id":2,"name":"张三","mobile":"13112345678"},
        {"id":3,"name":"张三","mobile":"13112345678"},
        {"id":4,"name":"张三","mobile":"13112345678"},
    ]
    html = render_template("index8.html", **locals())
    return html

if __name__ == '__main__':
    app.run(debug=True)
templates/index8.html,模板代码:
<!doctype html>
<html lang="en">
<head>
  <meta charset="UTF-8">
  <title>Document</title>
  <style>
  .table{
      border: 1px solid red;
      border-collapse: collapse;
      width: 800px;
  }
  .table tr th,
  .table tr td{
      border: 1px solid red;
      text-align: center;
  }
  img{
      max-width: 100%;
      max-height: 50px;
  }
  </style>
</head>
<body>
  <table class="table">
    <tr>
      <th>ID</th>
      <th>账号</th>
      <th>手机</th>
    </tr>
    {% for user in user_list %}
    <tr>
      <td>{{ user.id }}</td>
      <td>{{ user.name }}</td>
      <td>{{ user.mobile | mobile }}</td>
    </tr>
    {% endfor %}

  </table>
</body>
</html>
浏览器访问,实现了手机号码部分屏蔽
总结:
本文详述了flask中Jinja2模板的流程控制语句if语句和for循环语句的用法,以及常见的一些内置过滤器用法,工作中,内置的过滤器肯定是不够用的,那我们怎么自定义过滤器呢?本文都有详述,而且关于自定义过滤器的实战也很使用,感兴趣的朋友可以一键三连,flask的高阶用法持续更新中!!!
版权声明:本文为博主作者:景天科技苑原创文章,版权归属原作者,如果侵权,请联系我们删除!
原文链接:https://blog.csdn.net/littlefun591/article/details/137083106