引言
人脸关键点检测即对人类面部若干个点位置进行检测,可以通过这些点的变化来实现许多功能,该技术可以应用到很多领域,例如捕捉人脸的关键点,然后驱动动画人物做相同的面部表情;识别人脸的面部表情,让机器能够察言观色等等。

如何检测人脸关键点
本文是实现15点的检测,至于N点的原理都是一样的,使用的算法模型是深度神经网络,使用CV也是可以的。
如何检测
这个问题抽象出来,就是一个使用神经网络来进行预测的功能,只不过输出是15个点的坐标,训练数据包含15个面部的特征点和面部的图像(大小为96×96),15个特征点分别是:left_eye_center, right_eye_center, left_eye_inner_corner, left_eye_outer_corner, right_eye_inner_corner, right_eye_outer_corner, left_eyebrow_inner_end, left_eyebrow_outer_end, right_eyebrow_inner_end, right_eyebrow_outer_end, nose_tip, mouth_left_corner, mouth_right_corner, mouth_center_top_lip, mouth_center_bottom_lip
因此神经网络需要学习一个从人脸图像到15个关键点坐标间的映射。
使用的网络结构
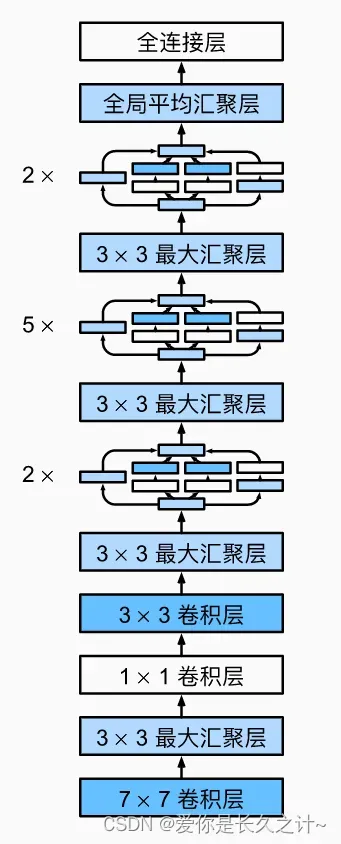
在本文中,我们使用深度神经网络来实现该功能,基本卷积块使用Google的Inception网络,也就是使用GoogLeNet网络,该结构的网络是基于卷积神经网络来改进的,是一个含有并行连接的网络。
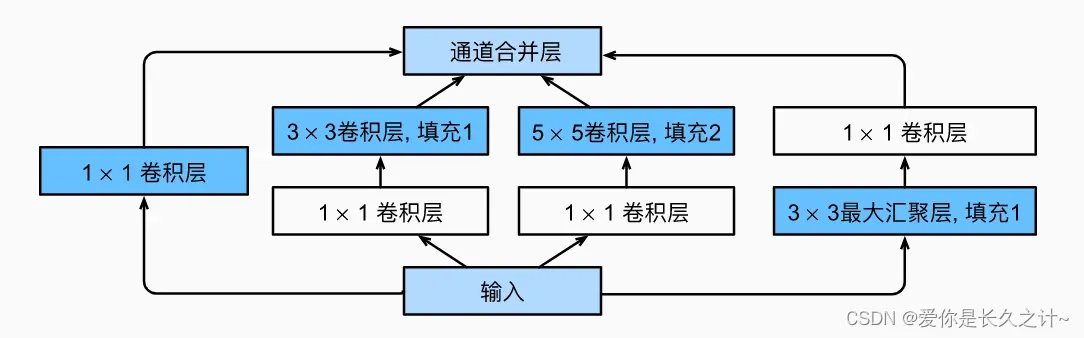
众所周知,卷积有滤波、提取特征的作用,但到底采用多大的卷积来提取特征是最好的呢?这个问题没有确切的答案,那就集百家之长:使用多个形状不一的卷积来提取特征并进行拼接,从而学习到更为丰富的特征;特别是里面加上了1×1的卷积结构,能够实现跨通道的信息交互和整合(其本质就是在多个channel上的线性求和),同时能在feature map通道数上的降维(读者可以验证计算一下,能够极大减少卷积核的参数),也能够增加非线性映射次数使得网络能够更深。
下面是Inception块的示意图:
整个GoogLeNet的结构如下所示:
接下来是代码实现部分,后续作者会补充神经网络的相关原理知识,若对此感兴趣的读者也可继续关注支持~
代码实现
import torch as tc
from torch import nn
from torch.nn import functional as F
from torch.utils.data import DataLoader
from torch.utils.data import TensorDataset
import numpy as np
import matplotlib.pyplot as plt
import pandas as pd
from sklearn.utils import shuffle

# 对图片像素的处理
def proFunc1(data,testFlag:bool=False) -> tuple:
    data['Image'] = data['Image'].apply(lambda im: np.fromstring(im, sep=' '))
    # 处理na
    data = data.dropna()
    # 神经网络对数据范围较为敏感 /255 将所有像素都弄到[0,1]之间
    X = np.vstack(data['Image'].values) / 255
    X = X.astype(np.float32)
    # 特别注意 这里要变成 n channle w h 要跟卷积第一层相匹配
    X = X.reshape(-1, 1,96, 96)
    # 等会神经网络的输入层就是 96 96 黑白图片 通道只有一个
    # 只有训练集才有y 测试集返回一个None出去
    if not testFlag:
        y = data[data.columns[:-1]].values
        # 规范化
        y = (y - 48) / 48
        X, y = shuffle(X, y, random_state=42)
        y = y.astype(np.float32)
    else:
        y = None

    return X,y

# 工具类
class UtilClass:

    def __init__(self,model,procFun,trainFile:str='data/training.csv',testFile:str='data/test.csv') -> None:
        self.trainFile = trainFile
        self.testFile = testFile
        self.trainData = None
        self.testData = None
        self.trainTarget = None
        self.model = model
        self.procFun = procFun

    @staticmethod
    def procData(data, procFunc ,testFlag:bool=False) -> tuple:
        return procFunc(data,testFlag)

    def loadResource(self):
        rawTrain = pd.read_csv(self.trainFile)
        rawTest = pd.read_csv(self.testFile)
        self.trainData , self.trainTarget = self.procData(rawTrain,self.procFun)
        self.testData , _ = self.procData(rawTest,self.procFun,testFlag=True)

    def getTrain(self):
        return tc.from_numpy(self.trainData), tc.from_numpy(self.trainTarget)

    def getTest(self):
        return tc.from_numpy(self.testData)

    @staticmethod
    def plotData(img, keyPoints, axis):
        axis.imshow(np.squeeze(img), cmap='gray')
        # 恢复到原始像素数据
        keyPoints = keyPoints * 48 + 48
        # 把keypoint弄到图上面
        axis.scatter(keyPoints[0::2], keyPoints[1::2], marker='o', c='c', s=40)

# 自定义的卷积神经网络
class MyCNN(tc.nn.Module):
    def __init__(self,imgShape = (96,96,1),keyPoint:int = 15):
        super(MyCNN, self).__init__()
        self.conv1 = tc.nn.Conv2d(in_channels=1, out_channels =10, kernel_size=3)
        self.pooling = tc.nn.MaxPool2d(kernel_size=2)
        self.conv2 = tc.nn.Conv2d(10, 5, kernel_size=3)
        # 这里的2420是通过下面的计算得出的 如果改变神经网络结构了
        # 需要计算最后的Liner的in_feature数量 输出是固定的keyPoint*2
        self.fc = tc.nn.Linear(2420, keyPoint*2)

    def forward(self, x):
        # print("start----------------------")
        batch_size = x.size(0)
        # x = x.view((-1,1,96,96))
        # print('after view shape:',x.shape)
        x = F.relu(self.pooling(self.conv1(x)))
        # print('conv1 size',x.shape)
        x = F.relu(self.pooling(self.conv2(x)))
        # print('conv2 size',x.shape)
        # print('end--------------------------')
        # 改形状
        x = x.view(batch_size, -1)
        # print(x.shape)
        x = self.fc(x)
        # print(x.shape)
        return x

# GoogleNet基本的卷积块
class MyInception(nn.Module):

    def __init__(self,in_channels, c1, c2, c3, c4,) -> None:
        super().__init__()

        self.p1_1 = nn.Conv2d(in_channels, c1, kernel_size=1)

        self.p2_1 = nn.Conv2d(in_channels, c2[0], kernel_size=1)
        self.p2_2 = nn.Conv2d(c2[0], c2[1], kernel_size=3, padding=1)

        self.p3_1 = nn.Conv2d(in_channels, c3[0], kernel_size=1)
        self.p3_2 = nn.Conv2d(c3[0], c3[1], kernel_size=5, padding=2)

        self.p4_1 = nn.MaxPool2d(kernel_size=3, stride=1, padding=1)
        self.p4_2 = nn.Conv2d(in_channels, c4, kernel_size=1)

    def forward(self, x):
        p1 = F.relu(self.p1_1(x))
        p2 = F.relu(self.p2_2(F.relu(self.p2_1(x))))
        p3 = F.relu(self.p3_2(F.relu(self.p3_1(x))))
        p4 = F.relu(self.p4_2(self.p4_1(x)))
        # 在通道维度上连结输出
        return tc.cat((p1, p2, p3, p4), dim=1)

# GoogLeNet的设计 此处参数结果google大量实验得出
b1 = nn.Sequential(nn.Conv2d(1, 64, kernel_size=7, stride=2, padding=3),
                   nn.ReLU(),
                   nn.MaxPool2d(kernel_size=3, stride=2, padding=1))

b2 = nn.Sequential(nn.Conv2d(64, 64, kernel_size=1),
                   nn.ReLU(),
                   nn.Conv2d(64, 192, kernel_size=3, padding=1),
                   nn.ReLU(),
                   nn.MaxPool2d(kernel_size=3, stride=2, padding=1))

b3 = nn.Sequential(MyInception(192, 64, (96, 128), (16, 32), 32),
                   MyInception(256, 128, (128, 192), (32, 96), 64),
                   nn.MaxPool2d(kernel_size=3, stride=2, padding=1))

b4 = nn.Sequential(MyInception(480, 192, (96, 208), (16, 48), 64),
                   MyInception(512, 160, (112, 224), (24, 64), 64),
                   MyInception(512, 128, (128, 256), (24, 64), 64),
                   MyInception(512, 112, (144, 288), (32, 64), 64),
                   MyInception(528, 256, (160, 320), (32, 128), 128),
                   nn.MaxPool2d(kernel_size=3, stride=2, padding=1))

b5 = nn.Sequential(MyInception(832, 256, (160, 320), (32, 128), 128),
                   MyInception(832, 384, (192, 384), (48, 128), 128),
                   nn.AdaptiveAvgPool2d((1,1)),
                   nn.Flatten())


uClass = UtilClass(model=None,procFun=proFunc1)
uClass.loadResource()
xTrain ,yTrain = uClass.getTrain()
xTest = uClass.getTest()

dataset = TensorDataset(xTrain, yTrain)
trainLoader = DataLoader(dataset, 64, shuffle=True, num_workers=4)

# 训练net并进行测试 由于显示篇幅问题 只能打印出极为有限的若干测试图片效果
def testCode(net):
    optimizer = tc.optim.Adam(params=net.parameters())
    criterion = tc.nn.MSELoss()

    for epoch in range(30):
        trainLoss = 0.0
        # 这里是用的是mini_batch 也就是说 每次只使用mini_batch个数据大小来计算
        # 总共有total个 因此总共训练 total/mini_batch 次
        # 由于不能每组数据只使用一次 所以在下面还要使用一个for循环来对整体训练多次
        for batchIndex, data in enumerate(trainLoader, 0):
            input_, y = data
            yPred = net(input_)
            loss = criterion(yPred, y)
            optimizer.zero_grad()
            loss.backward()
            optimizer.step()
            trainLoss += loss.item()
            # 只在每5个epoch的最后一轮打印信息
            if batchIndex % 30 ==29 and not epoch % 5 :
                print("[{},{}] loss:{}".format(epoch + 1, batchIndex + 1, trainLoss / 300))
                trainLoss = 0.0
    # 测试
    print("-----------test begin-------------")
    # print(xTest.shape)
    yPost = net(xTest)
    # print(yPost.shape)
    import matplotlib.pyplot as plt
    %matplotlib inline

    fig = plt.figure(figsize=(20,20))
    fig.subplots_adjust(left=0, right=1, bottom=0, top=1, hspace=0.05, wspace=0.05)
    for i in range(9,18):
        ax = fig.add_subplot(3, 3, i - 9 + 1, xticks=[], yticks=[])
        uClass.plotData(xTest[i], y[i], ax)
    print("-----------test end-------------")


if __name__ == "__main__":
    # 训练MyCNN网络 并可视化在9个测试数据的效果图
    myNet = MyCNN()
    testCode(myNet)
    inception = nn.Sequential(b1, b2, b3, b4, b5, nn.Linear(1024, 30))
	testCode(inception)
本文使用的数据可在此找到两个data文件,本文有你帮助的话,就给个点赞关注支持一下吧!
文章出处登录后可见!