文章目录
- 🍉 前情提要
- 🌷 效果演示
- 🥝 实现过程
- 1. utils.py
- 2. compare.html
- 3. forms.py
- 4. insightface_api.py
- 5. app.py
- 🍅 记录
- 1. Bugs
- 1.1 cv2.imshow()报错
- 1.2 insightface人脸检测标注框错乱(💢)
- 2. 杂记
- 🌾 小结
🍉 前情提要
前面通过PaddleHub的人脸检测模型
pyramidbox_lite_mobile,实现了一个在浏览器中上传人脸,进行人脸检测的小应用。这一节,我们将实现的功能是任意上传两张人脸图片,比较他们是否为同一人。
🌺 清风莫追 🌺
csdn个人主页:https://blog.csdn.net/m0_63238256
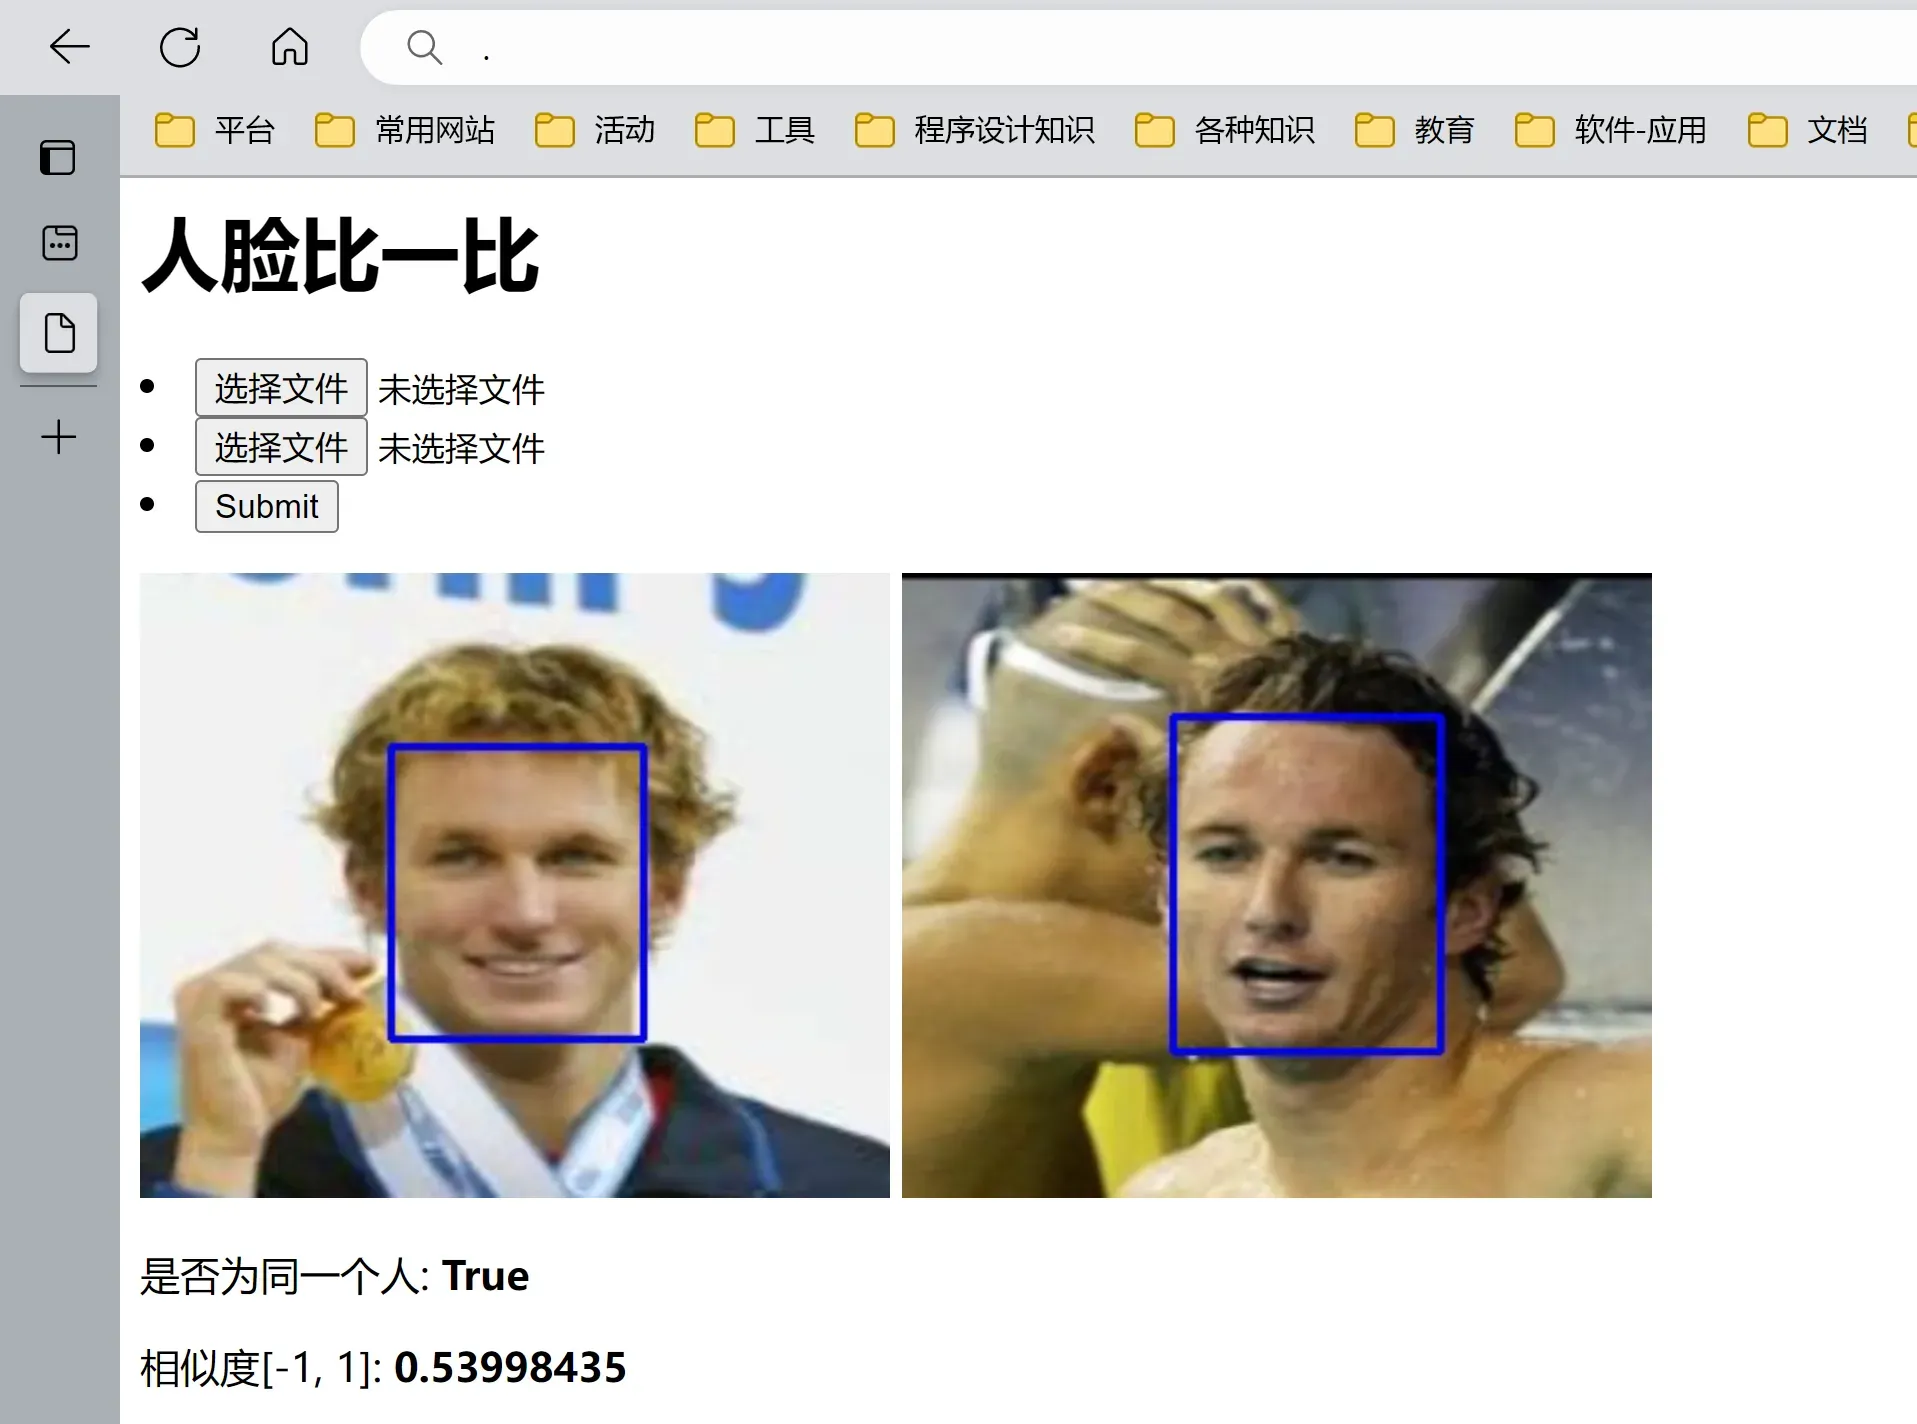
🌷 效果演示
🥝 实现过程
主要工具:Flask,Insightface
本来想继续使用PaddleHub的,但苦于没有找到合适的开箱即用的模型,于是我改用了Insightface。insightface是一个比较有名的人脸识别开源库,可以直接在Python中使用pip进行安装,我找到的文档是英文的,因此上手得有些吃力(英语不好)。
insightface的github地址:https://github.com/deepinsight/insightface/tree/master/model_zoo
本次的内容大致如下:
-
将insightface的人脸识别功能包装为一个Web服务
-
后端从浏览器表单获取两张人脸图片,转发给人脸识别,得到人脸标注框和特征向量
-
通过特征向量的余弦相似度实现人脸比对(判断两张脸是否属于同一人)
-
画人脸标注框
-
在前端显示结果
补充:其实可以不用将insightface包装成Web服务,只用封装成一个函数就行。但是我的Flask和insightface安装在不同的python虚拟环境中,因此就以API的形式进行通信了。
目录结构:
- templates
	- compare.html
- app.py
- insightface_api.py
- foms.py
- utils.py
其中,utils.py封装了一些小脚本。
1. utils.py
我选择了以base64编码的格式,在API间传递数据(图像、特征向量、标注框等)。数据需要多次在不同格式间转换,为此我将一些转换过程封装成了函数的形式放在一起。嗯······还包含了几个其它功能的小函数。
这样功能实现的代码看起来逻辑会清晰一些。
import base64
import numpy as np
import cv2


# 图片文件content转cv2,并缩放到指定尺寸
def content_to_cv2(contents: list, size: tuple):
    '''
    content -> np -> cv2 -> cv2<target_size>'''
    imgs_np = [np.asarray(bytearray(content), dtype=np.uint8) for content in contents]
    imgs_cv2 = [cv2.imdecode(img_np, cv2.IMREAD_COLOR) for img_np in imgs_np]
    imgs_cv2 = [cv2.resize(img_cv2, size, interpolation=cv2.INTER_LINEAR) for img_cv2 in imgs_cv2]
    return imgs_cv2


def base64_to_cv2(img: str):
    # 注:仅适合图像,不适合其它numpy数组,例如bboxs(人脸标注框)的数据
    # base64 -> 二进制 -> ndarray -> cv2
    # 解码为二进制数据
    img_codes = base64.b64decode(img)
    img_np = np.frombuffer(img_codes, np.uint8)
    img_cv2 = cv2.imdecode(img_np, cv2.IMREAD_COLOR)
    return img_cv2


def cv2_to_base64(image):
    data = cv2.imencode('.jpg', image)[1]
    return base64.b64encode(data.tostring()).decode('utf8')


def np_to_base64(array):
    return base64.b64encode(array.tostring()).decode('utf8')


def base64_to_np(arr_b64):
    return np.frombuffer(base64.b64decode(arr_b64), np.float32)


# 显示cv2格式的图像
def cv2_show(img_cv2):
    cv2.imshow('img', img_cv2)
    cv2.waitKey(0)
    cv2.destroyAllWindows()


# 画人脸标注框
def cv2_with_rectangle(img_cv2, bboxs: list):
    '''return --> 画好矩形标注框的图像'''
    bboxs = [bbox.astype('int32') for bbox in bboxs]
    for bbox in bboxs:
        cv2.rectangle(
            img_cv2,
            (bbox[0], bbox[1]),
            (bbox[2], bbox[3]),
            (255, 0, 0),  # 蓝色
            thickness=2)
    return img_cv2


# 计算特征向量的余弦相似度
def compare_face(emb1: np.ndarray, emb2: np.ndarray, threshold=0.6):
    '''
    @return -> (<numpy.bool>, <numpy.float32>)
    - bool: 是否为同一张人脸
    - float: 余弦相似度[-1, 1],值越大越相似 \n
    @params
    - threshold: 判断两张人脸为同一张的余弦相似度阈值
    '''
    # return --> 余弦相似度[-1, 1],值越大,越相似
    sim = np.dot(emb1, emb2) / (np.linalg.norm(emb1) * np.linalg.norm(emb2))
    print(type(sim))
    return sim > threshold, sim
2. compare.html
这里较为简陋地实现了浏览器中的显示效果。
<h1>人脸比一比</h1>


<!-- 上传图像的表单 -->
<form action="" method="post" class="mt-4" enctype="multipart/form-data">
    <!-- csrf这一句好像可以删掉 -->
    {{ form.csrf_token }}
    <li>{{ form.face_img() }}</li>
    <li>{{ form.face_img2() }}</li>
    <li><input type="submit" value="Submit"></li>
</form>

<!-- 显示检测结果 -->
{% for img_base64 in imgs_base64 %}
    <img src="data:image/jpeg;base64, {{ img_base64 }}" width="250" height="250">
{% endfor %}
{% if imgs_base64 %}
    <p>是否为同一个人: <b>{{ is_like }}</b></p>
    <p>相似度[-1, 1]: <b>{{ how_like }}</b></p>
{% endif %}

<!-- 显示错误信息 -->
{% if form.face_img.errors %}
    <div class="alert alert-danger">
        {% for error in form.face_img.errors %}
            {{ error }}
        {% endfor %}
    </div>
{% endif %}
3. forms.py
表单Face2Form将从浏览器获取两张人脸图片,以对比他们是否为同一人。
你可能很奇怪我为什么要使Face2Form类继承ImageForm,嗯······因为ImageForm是我上一节人脸检测时用过的,这样我之前的人脸检测就可以继续使用它。
from flask_wtf import FlaskForm
from flask_wtf.file import FileAllowed, FileRequired, FileSize, FileField

class ImageForm(FlaskForm):
    face_img = FileField("face_img",
        validators=[
            FileRequired(message="不能为空"),
            FileAllowed(['jpg', 'png'], message="仅支持jpg/png格式"),
            FileSize(max_size=2048000, message="图片不能大于2Mb")
        ],
        description="图片不能大于2Mb,仅支持jpg/png格式"
    )

# 两张人脸图片 --> 用于比较人脸是否相同
class Face2Form(ImageForm):
    face_img2 = FileField("face_img",
        validators=[
            FileRequired(message="不能为空"),
            FileAllowed(['jpg', 'png'], message="仅支持jpg/png格式"),
            FileSize(max_size=2048000, message="图片不能大于2Mb")
        ],
        description="图片不能大于2Mb,仅支持jpg/png格式"
    )
4. insightface_api.py
需要先安装insightface的python库:
pip install -U insightfae
在运行代码时可以自动下载的模型是buffalo_l,如果需要使用其它模型,需要另外手动下载模型文件,并解压到~/.insightface/models/目录下。我选择的是buffalo_sc。因为相比前者有326MB大小,buffalo_sc仅有16MB,更加轻量级。
模型手动下载地址:https://github.com/deepinsight/insightface/tree/master/python-package
(同时这也是insightface的python库的使用教程)
这个API接收一张base64编码格式的图片数据,并返回以json格式为数据体的响应。返回值的结构如下:
{
    'embeddings': [<embedding1>, <embedding2>, ...],
    'bboxs': [<bbox1>, <bbox2>]
}
代码:
# 基本完成
from flask import Flask, jsonify, request
from insightface.app import FaceAnalysis
from insightface.data import get_image as ins_get_image
import cv2
import numpy as np
import base64
from utils import base64_to_cv2, np_to_base64

app = Flask(__name__)
face_analysis = FaceAnalysis(providers=['CUDAExecutionProvider', 'CPUExecutionProvider'], name='buffalo_sc')
face_analysis.prepare(ctx_id=0, det_size=(640, 640))


@app.route('/detect', methods=['POST'])
def detect_faces():

    img_base64 = request.data
    img_cv2 = base64_to_cv2(img_base64)
    faces = face_analysis.get(img_cv2)

    embeddings = [np_to_base64(face['embedding']) for face in faces]
    bboxs =  [np_to_base64(face['bbox']) for face in faces]  # [x1, y1, x2, y2]左上角和右下角的坐标

    return jsonify({"embeddings": embeddings, "bboxs": bboxs})


if __name__ == '__main__':
    app.run(port=6000, debug=True)
5. app.py
我使用了较多的列表推导式(不久前学会的),可能导致代码的可读性较差,我针对其中的一部分,大致解释一下
rs = [requests.post(url=url, headers=headers, data=img_base64) for img_base64 in imgs_base64]
rs_json = [r.json() for r in rs]
bboxs = [r_json['bboxs'] for r_json in rs_json]
bboxs = [[base64_to_np(bbox) for bbox in bs] for bs in bboxs]
imgs_base64是两张图片的数据,这里其实就是前面包装的人脸识别的API发起了两次请求,每次都识别一张图片并得到一个响应对象<Response>,将这两个响应放入了一个列表中,即rs。故rs的结构如下:
[<Response1>, <Response2>]
r.json()用于获取响应对象中的数据,得到列表rs_json,列表中的每个元素对于一张图片的识别结果:
[<r_json1>, <r_json2>]
然后将每张图片中的标注框取出就得到bboxs,其中每个字符串是一个人脸的标注框数据编码成base64后的结果,由于一张图片中可以有多个人脸,所以bboxs的每个元素(指内层列表)中可能有多个字符串。
[[str1_1, str1_2, ...],
 [str2_1, str2_2, ...]]
然后将字符串解码为numpy的数组,得到解码后的bboxs,大致结构如下
[[[x1, y1, x2, y2],
 [x1, y1, x2, y2],...]
 [[x1, y1, x2, y2],
 [x1, y1, x2, y2],...]
代码:
from flask import Flask, render_template, request
import requests
from forms import Face2Form
import time
from utils import cv2_to_base64, base64_to_np
from utils import compare_face, cv2_with_rectangle, content_to_cv2


app = Flask(__name__)
app.config['SECRET_KEY'] = 'your_secret_key_here'

# 2. 比较两张人脸
@app.route('/compare', methods=['GET', 'POST'])
def compare():
    form = Face2Form()

    if form.validate_on_submit():

        # 1. 从前端获取人脸图片文件
        file1 = form.face_img.data
        file2 = form.face_img2.data
        files = [file1, file2]
        contents = [file.read() for file in files]

        # 2. 图片文件转cv2,并缩放到指定尺寸
        imgs_cv2 = content_to_cv2(contents, (300, 250))

        # 3. cv2转base64编码的字符串 --> 传给模型
        imgs_base64 = [cv2_to_base64(img_cv2) for img_cv2 in imgs_cv2]

        # 4. 载入模型 --> 获得特征向量 + 人脸标注框
        headers = {"Content-type": "application/json"}
        url = "http://127.0.0.1:6000/detect"
        rs = [requests.post(url=url, headers=headers, data=img_base64) for img_base64 in imgs_base64]
        rs_json = [r.json() for r in rs]
        embeddings = [r_json['embeddings'] for r_json in rs_json]
        embeddings = [[base64_to_np(emb) for emb in embs] for embs in embeddings]
        bboxs = [r_json['bboxs'] for r_json in rs_json]
        bboxs = [[base64_to_np(bbox) for bbox in bs] for bs in bboxs]

        # 5. 比较两张图片中,各自第一张人脸的特征向量
        embs = [embeddings[i][0] for i in range(len(embeddings))]
        is_like, how_like = compare_face(embs[0], embs[1], threshold=0.5)

        # 6. 框出检测到的人脸(第一张)
        imgs_cv2 = [cv2_with_rectangle(imgs_cv2[i], bboxs[i]) for i in range(len(imgs_cv2))]
        imgs_base64 = [cv2_to_base64(img_cv2) for img_cv2 in imgs_cv2]

        # 7. 返回比较结果
        return render_template(
            'compare.html', form=form,
            imgs_base64=imgs_base64,
            is_like=is_like,
            how_like=how_like)

    return render_template('compare.html', form=form)

# --> 启动app
if __name__ == '__main__':
    app.run(debug=True, port=5000)
启动应用
注意,app.py需要和insightface_api.py同时运行,才能正常工作。
python insightface_api.py
python app.py
🍅 记录
1. Bugs
1.1 cv2.imshow()报错
详细信息:
Traceback (most recent call last):
  File "d:\code_all\code_python\Web开发基础\face_verify\compare.py", line 18, in <module>
    cv2_show(img)
  File "d:\code_all\code_python\Web开发基础\face_verify\compare.py", line 10, in cv2_show
    cv2.imshow('img', img_cv2)
cv2.error: OpenCV(4.7.0) D:\a\opencv-python\opencv-python\opencv\modules\highgui\src\window.cpp:1272: error: (-2:Unspecified error) The function is
not implemented. Rebuild the library with Windows, GTK+ 2.x or Cocoa support. If you are on Ubuntu or Debian, install libgtk2.0-dev and pkg-config,
then re-run cmake or configure script in function 'cvShowImage'
大致是说:这个错误提示表明 OpenCV 的窗口相关功能没有实现,需要重新编译库并添加相应的支持。解决方案:重装opencv库。
1.2 insightface人脸检测标注框错乱(💢)
如下图(左为PaddleHub的人脸检测效果,右为insightface)
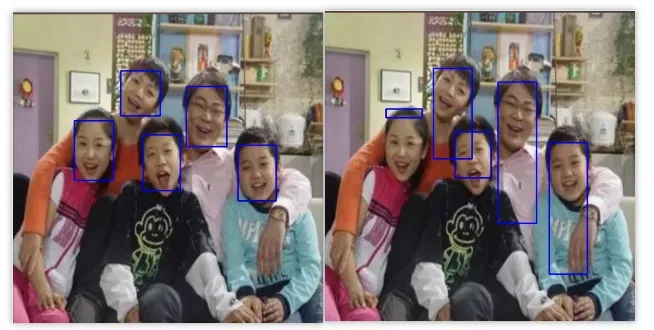
我在insightface的服务端使用cv2展示的图像是正常的,并没有发生失真。按理insightface作为一个之名的开源人脸识别库不至于这么糟糕,那还是我的问题咯。
解决:过不其然,是因为画矩形人脸标注框的时候,有个下标打错了(本来顺序是[0, 1, 2, 3],写成了[0, 1, 2, 2])。
2. 杂记
1、关于base64转numpy
在base64转numpy数组时,要注意元素的类型,之前是float32,解码成数组时就要写float32,否则你可能连元素的数量都对不上,比如你使用了uint8(常用于图像)时。且经历了np --> base64 --> np的过程,多维的numpy数组将被展平。因此,解码之后使用reshape成原来的形状,(在app间,你也可以把shape作为一条数据传过来)。
2、关于图片纵横比与识别效果
前面的代码中是直接将输入的图片变换为指定的尺寸,例如**(250, 250)**,但如果原来的图片并不是正方形,这样的尺寸变换就会导致失真,即图片被拉伸或压扁,导致有时图片中的人脸无法被识别。
其实可以写一个保持纵横比的缩放。
🌾 小结
本次成功在浏览器中实现人脸比对的功能,对Flask框架的了解还是比较浅,有时想要实现某个任务但是不知道要怎么办,不怎么会查找文档和相关的资料。例如,很疑惑jsonify()到底会给对方返回个啥,对方又要如何去取出其中的数据。
嗯······就感觉接触和使用不熟的东西的能力,有待提升。
文章链接:https://cfeng.blog.csdn.net/article/details/129719839
文章出处登录后可见!