目录
一、背景与总概
利用Python语言编写和调试一个识别手写数字图像的三层深度前馈网络,包括数据预处理,网络模型构建,模型参数初始化和正向推理,反向梯度下降参数寻优,最后模型预测的功能。目的是学会基本的深度网络模型建立、训练和推理过程,理解深度网络的实现原理。
通过自己学习人工智能之后,发现了三个的重要经验和总结,第一个是你对你研究事物本质的理解;第二个是,将你研究事物进行数据化,找到一个合理的数据表示以及数据的结构;第三个是,寻找与这个数据表示的形式和结构合适的“模型”(即模型算法等)。依据上面数据到模型的这个思路,对下文进行一个描写
首先,介绍一下MNIST手写数据集,这就是我们研究的事物了。该数据集包含60,000个用于训练的示例和10,000个用于测试的示例。数据集包含了0-9共10类手写数字图片,每张图片都做了尺寸归一化,都是28×28大小的灰度图。
训练集图像:train-images-idx3-ubyte.gz(9.9MB,包含60000个样本)
训练集标签:train-labels-idx1-ubyte.gz(29KB,包含60000个标签)
测试集图像:t10k-images-idx3-ubyte.gz(1.6MB,包含10000个样本)
测试集标签:t10k-labels-idx1-ubyte.gz(5KB,包含10000个标签)
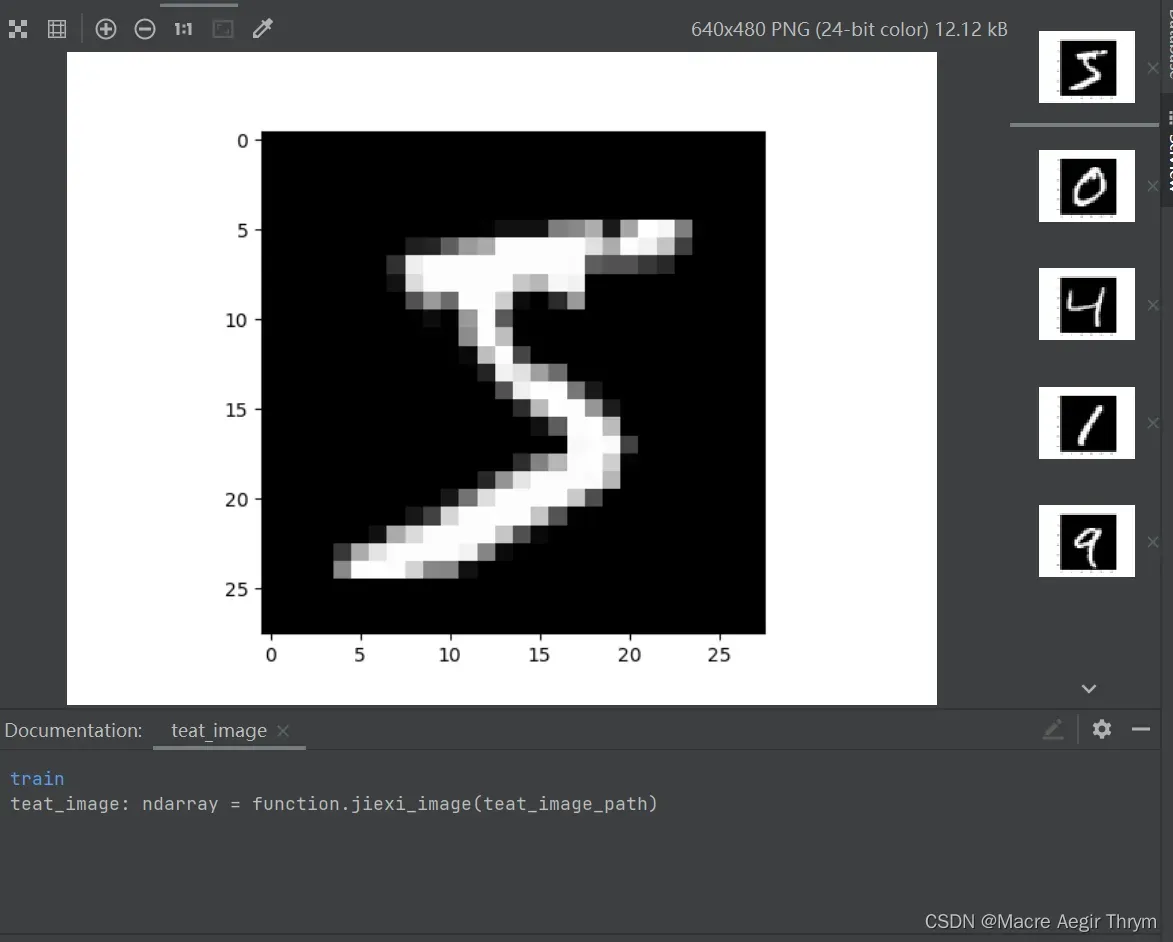
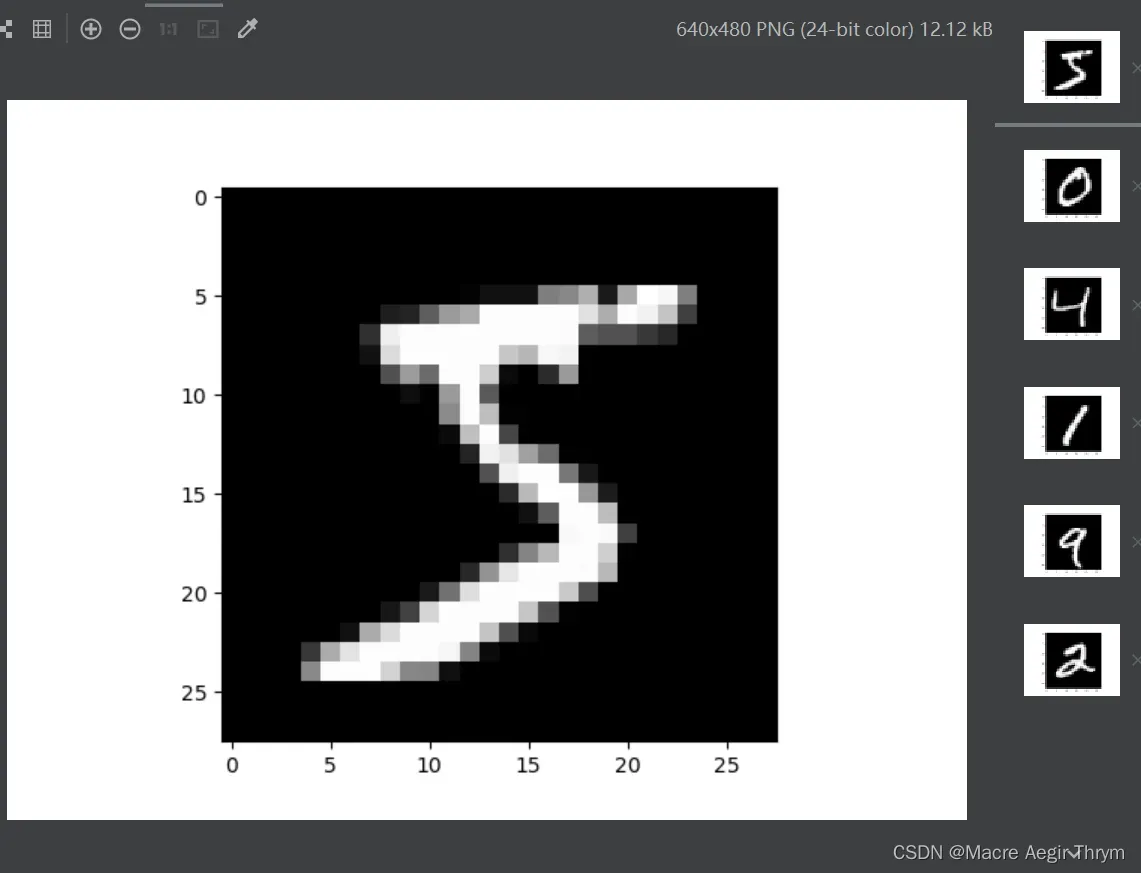
下图展示一些具体例子:
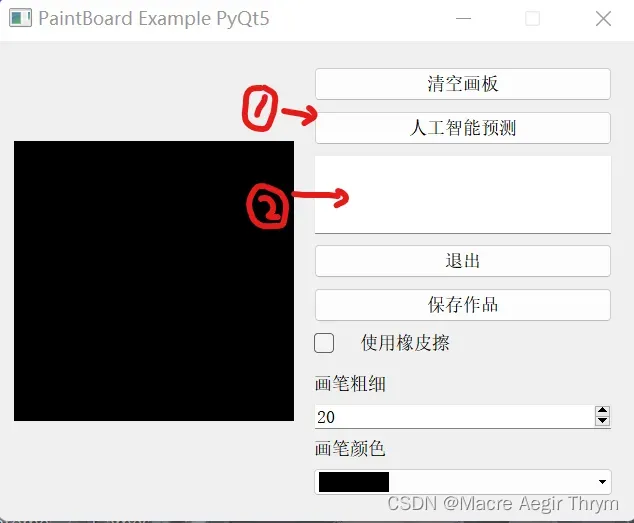
其次是手写板程序,在PyQt5实例 画板小程序_pyqt5画图板_CreatorGG的博客-CSDN博客的程序基础之上添加了,1人工智能预测,2预测结果展示的文本框。
传统机器学习的问题与缺陷随着深度学习的发展被得到解决,深度学习也可以说是神经网络的重命名,他是建立在多层非线性的神经网络结构之上,对数据表示进行抽象的一系列机器学习。深度学习的出现使得图像,语言得到突破性的发展。本此处理的数据为图像,所以最后我本次选用的模型是人工智能深度神经网络(一般的神经网络)。你也可以使用卷积神经网络模型,卷积神经网络是对将局部的特征十分的敏感,正确率会更高。
二、研究对象
在你的PycharmIDE里创建一个function.py的文件,在里面定义如下函数:
1:jiexi_image(path),此函数需要一个字符串对象的输入,是两个训练集和测试集的图像文件地址,返回的对象是一个numpy.array的对象。
def jiexi_image(path):
    # 用二进制读取
    data = open(path, 'rb').read()
    offset = 0
    fmt_header = '>iiii'
    magic_number, num_images, num_rows, num_cols = struct.unpack_from(fmt_header, data, offset)
    print('魔数:%d, 图片数量: %d张, 图片大小: %d*%d' % (magic_number, num_images, num_rows, num_cols))
    image_size = num_rows * num_cols
    offset += struct.calcsize(fmt_header)
    fmt_image = '>' + str(image_size) + 'B'
    images = np.empty((num_images, num_rows, num_cols))
    for i in range(num_images):
        if (i + 1) % 10000 == 0:
            print('已解析 %d' % (i + 1) + '张')
        images[i] = np.array(struct.unpack_from(fmt_image, data, offset)).reshape((num_rows, num_cols))
        offset += struct.calcsize(fmt_image)
    return images
2: jiexi_label(path) ,传入参数是训练集和测试集的两个label标签文件地址,是一个字符串对象,返回的也是一个numpy.array的对象。
def jiexi_label(path):
    data = open(path, 'rb').read()
    offset = 0
    fmt_header = '>ii'
    magic_number, num_images = struct.unpack_from(fmt_header, data, offset)
    print('魔数:%d, 图片数量: %d张' % (magic_number, num_images))
    # 解析数据集
    offset += struct.calcsize(fmt_header)
    fmt_image = '>B'
    labels = np.empty(num_images)
    for i in range(num_images):
        if (i + 1) % 10000 == 0:
            print('已解析 %d' % (i + 1) + '张')
        labels[i] = struct.unpack_from(fmt_image, data, offset)[0]
        offset += struct.calcsize(fmt_image)
    return labels
3:plot_data(images,labels,n,issave = False),传入图像,image是一个numpy.array对象;传入的标签,labels是一个numpy.array对象;传入的issave是一个判断逻辑值,如果是真就保存图片,但是一般是不保存的。
def plot_data(images,labels,n,issave = False):
    for i in range(n):
        print(labels[i])
        plt.imshow(images[i], cmap='gray')
        plt.show()
        # if(issave == True):
            # plt.savefig(fname = "save"+str(datetime.datetime.now())+".jpg")
    print('done')
接下来在你的工程文件夹下建立一个train.py 文件,在里面利用function.py里你设定的函数来解析训练集图像和测试集图像,训练集标签和测试集标签,然后利用plot_data函数打印数据,查看是否对应。
import function
#start1 = time.time()
train_image_path = './MNIST/train-images-idx3-ubyte/train-images.idx3-ubyte'
train_lable_path = './MNIST/train-labels-idx1-ubyte/train-labels.idx1-ubyte'
teat_image_path = './MNIST/t10k-images-idx3-ubyte/t10k-images.idx3-ubyte'
teat_lable_path = './MNIST/t10k-labels-idx1-ubyte/t10k-labels.idx1-ubyte'
# #加载数据
train_image = function.jiexi_image(train_image_path)
train_lable = function.jiexi_label(train_lable_path)
teat_image = function.jiexi_image(teat_image_path)
test_lable = function.jiexi_label(teat_lable_path)
# print(train_image.shape)

function.plot_data(train_image, train_lable, 10, True)
最终效果:
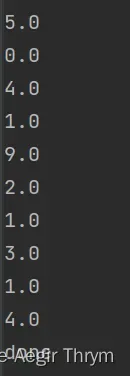
可以看出是正确的。
三、数据表示与结构
既然train_image, train_lable, teat_image , test_lable 是numpy.array对象,那么我们就可以对他进行操作,对他进行打印输出,print(train_image):
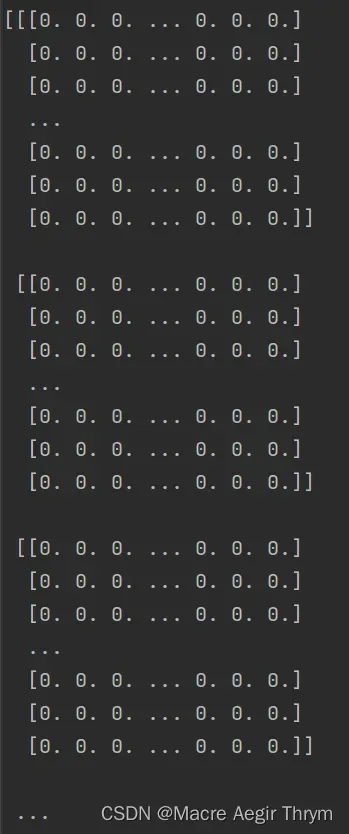
什么也看不出来,那我们打印一下他的维度来看看, 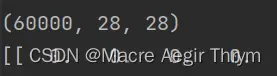 ,是一个三维数组。
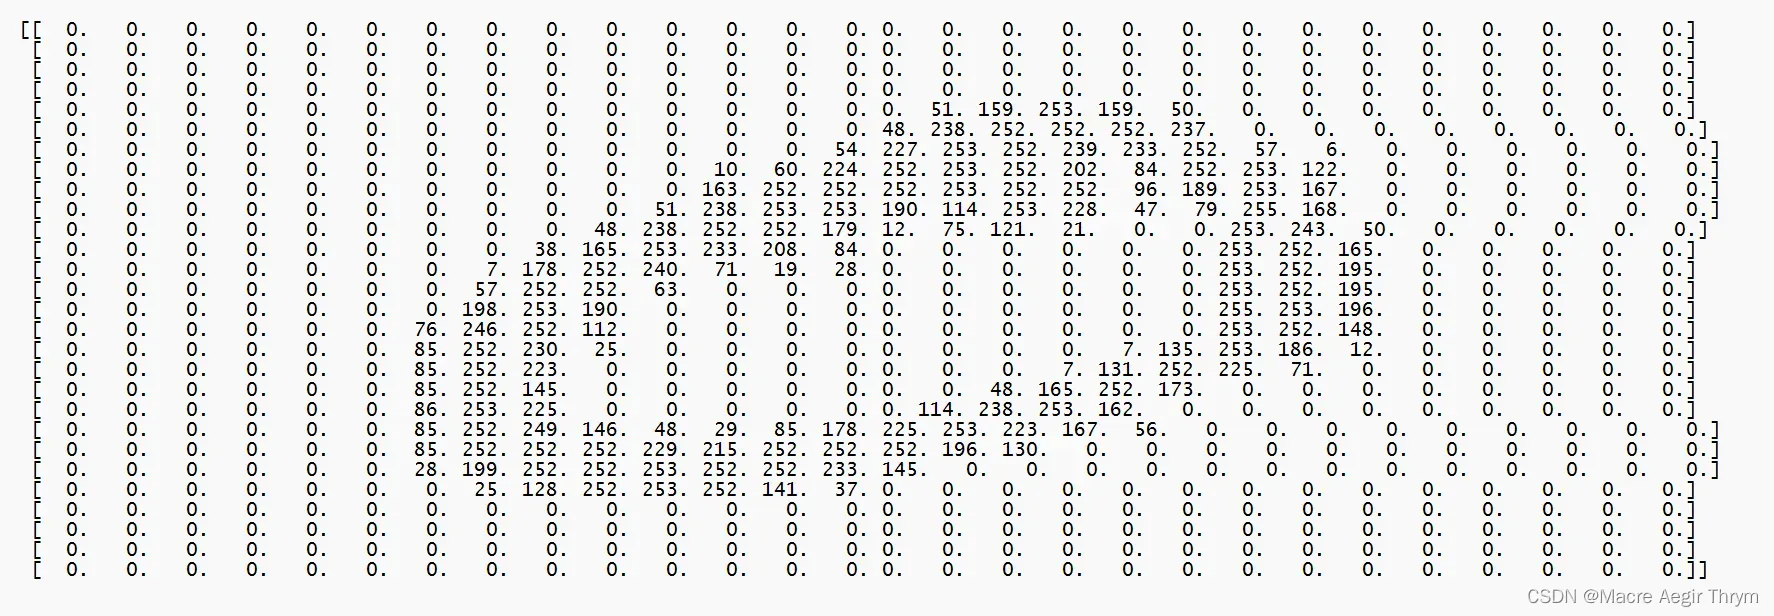
打印train_image[0]来看:
然后可以推知,我们要处理的对象结构是如下图所示。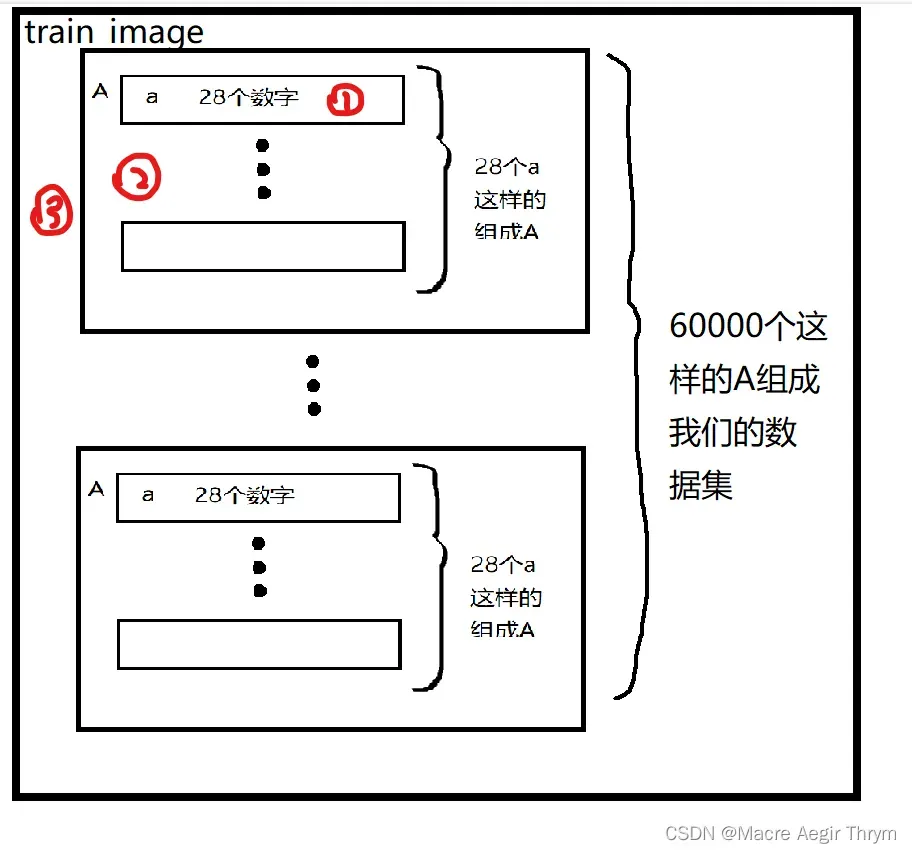
四、选择的模型
传统机器学习的问题与缺陷随着深度学习的发展被得到解决,深度学习也可以说是神经网络的重命名,他是建立在多层非线性的神经网络结构之上,对数据表示进行抽象的一系列机器学习。深度学习的出现使得图像,语言得到突破性的发展。本此处理的数据为图像,所以最后我本次选用的模型是人工智能深度神经网络(一般的神经网络)。你也可以使用卷积神经网络模型,卷积神经网络是对将局部的特征十分的敏感,正确率会更高。
在你的工程文件下创建一个DeepNET.py的文件,里面是深度神经网络所需要的各种函数。从零开始,从理论到代码实现无论是在研究和学习都是十分有帮助的,希望我和各位读者都保持住这个习惯。
本次,假设你已经有一定的知识储备了,如梯度下降法的本质,神经网络结构基本清楚,如果不清楚就十分推荐,deeplearning的吴大师的视频教程 [双语字幕]吴恩达深度学习deeplearning.ai_哔哩哔哩_bilibili 教的非常细致。
第一步,导入库,在DeepNET.py的文件里完善搭建深度神经网络所需要的函数。
深度神经网络概述,Deep Neural Networks, 深度神经网络,以下简称DNN。DNN里最基本的单元是神经元模型。每个神经元与其他神经元相连,当他“兴奋”时,就会向相连的神经元发送物质,改变神经元的电位。如果某个神经元的电位超过了一个阀值,那么它就会被激活。结果抽象可以得到沿用至今的M_P神经元模型。
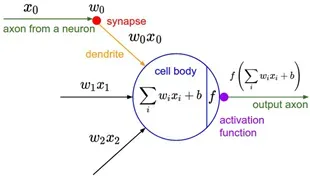
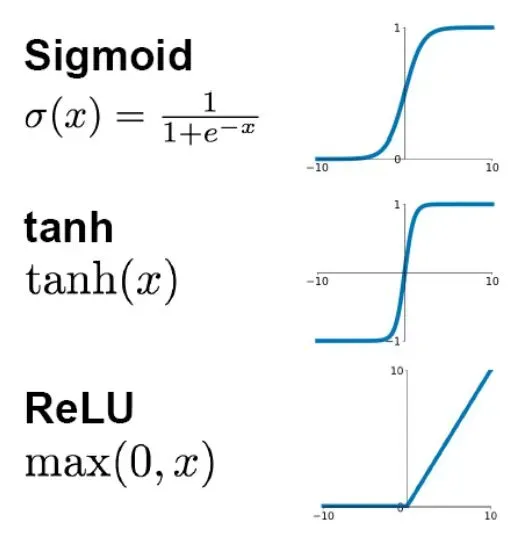
线性部分,是简单的相乘相加,激活部分是利用激活函数处理得到输出。常见的激活函数有sigmoid,relu等,本次采用的激活函数是relu函数。
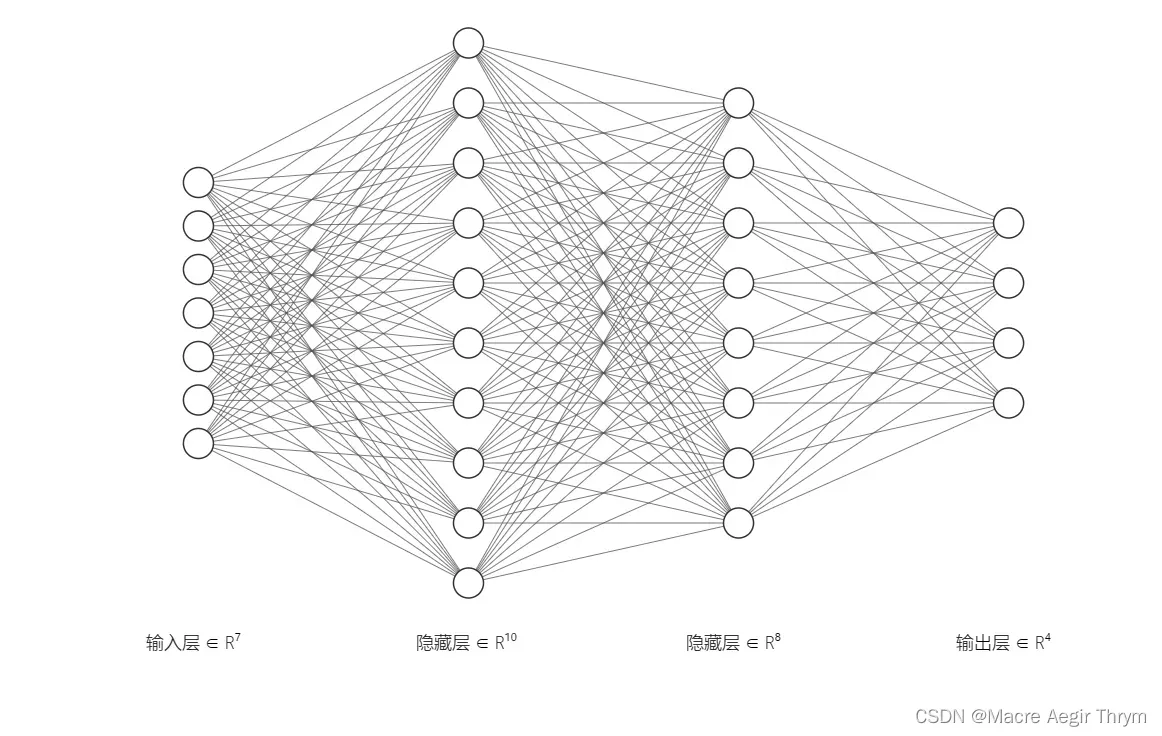
由神经元组成的多层神经网络,如图所示。有输入层,输出层以及中间隐含层。每一个输入线性求合,通过激活函数,传到下一个神经元,我们大可不必一个个的去算,我们可以使用向量化来使得我们的程序更加简洁。
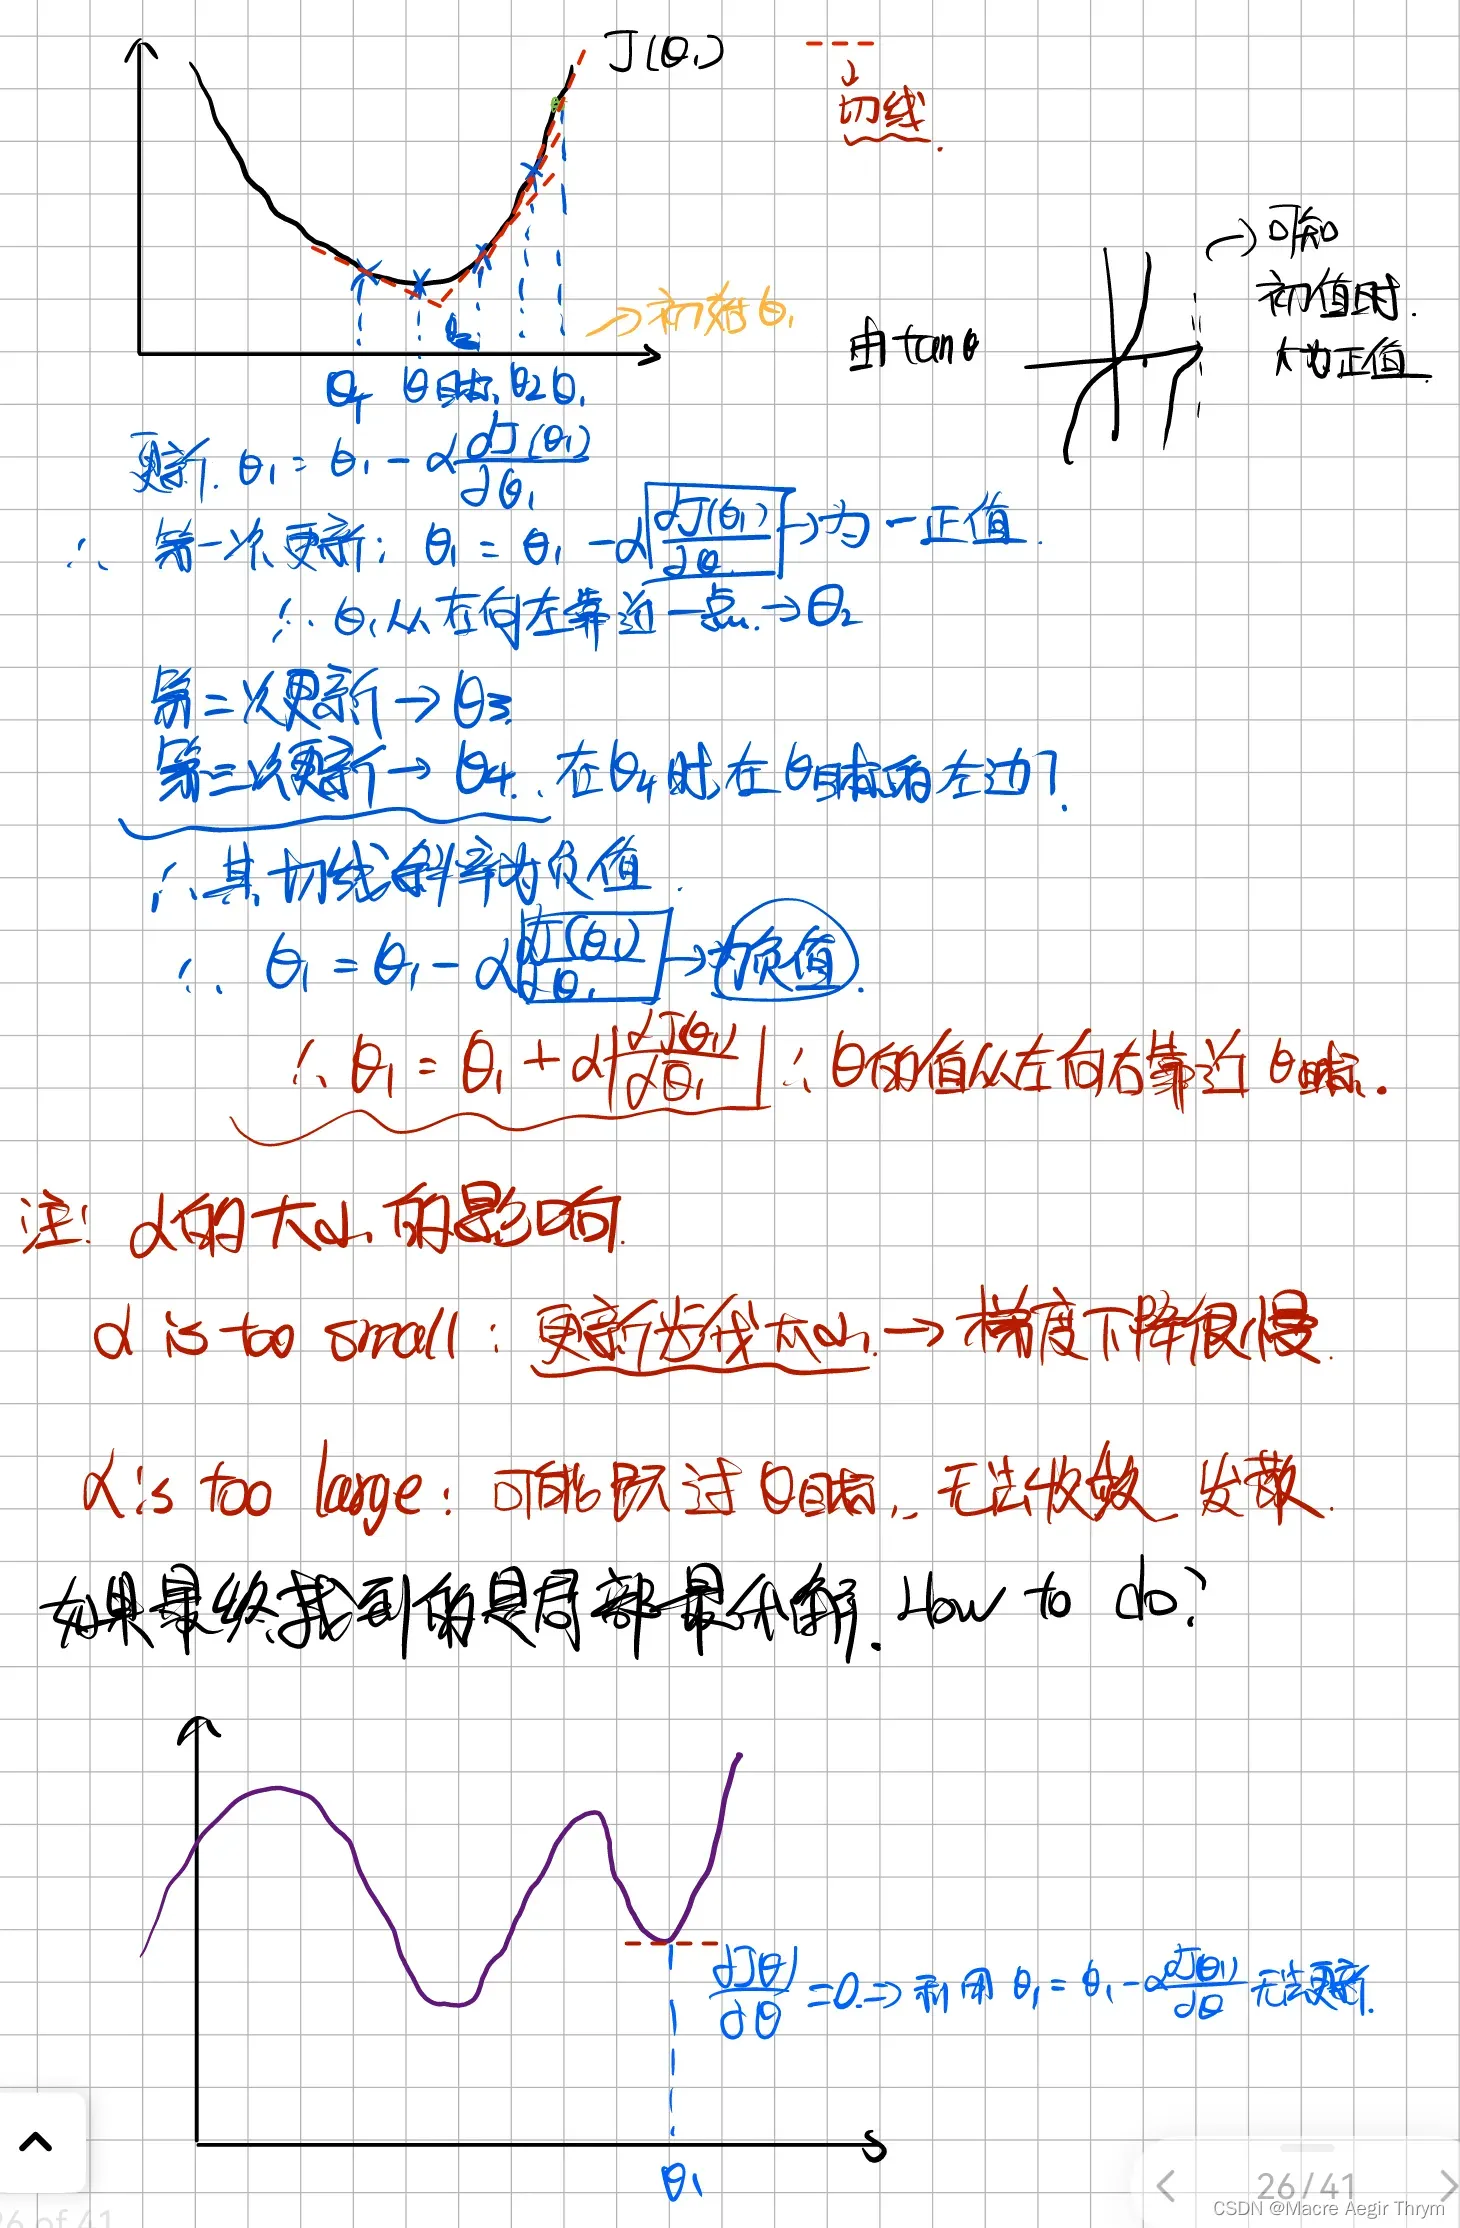
梯度下降法:

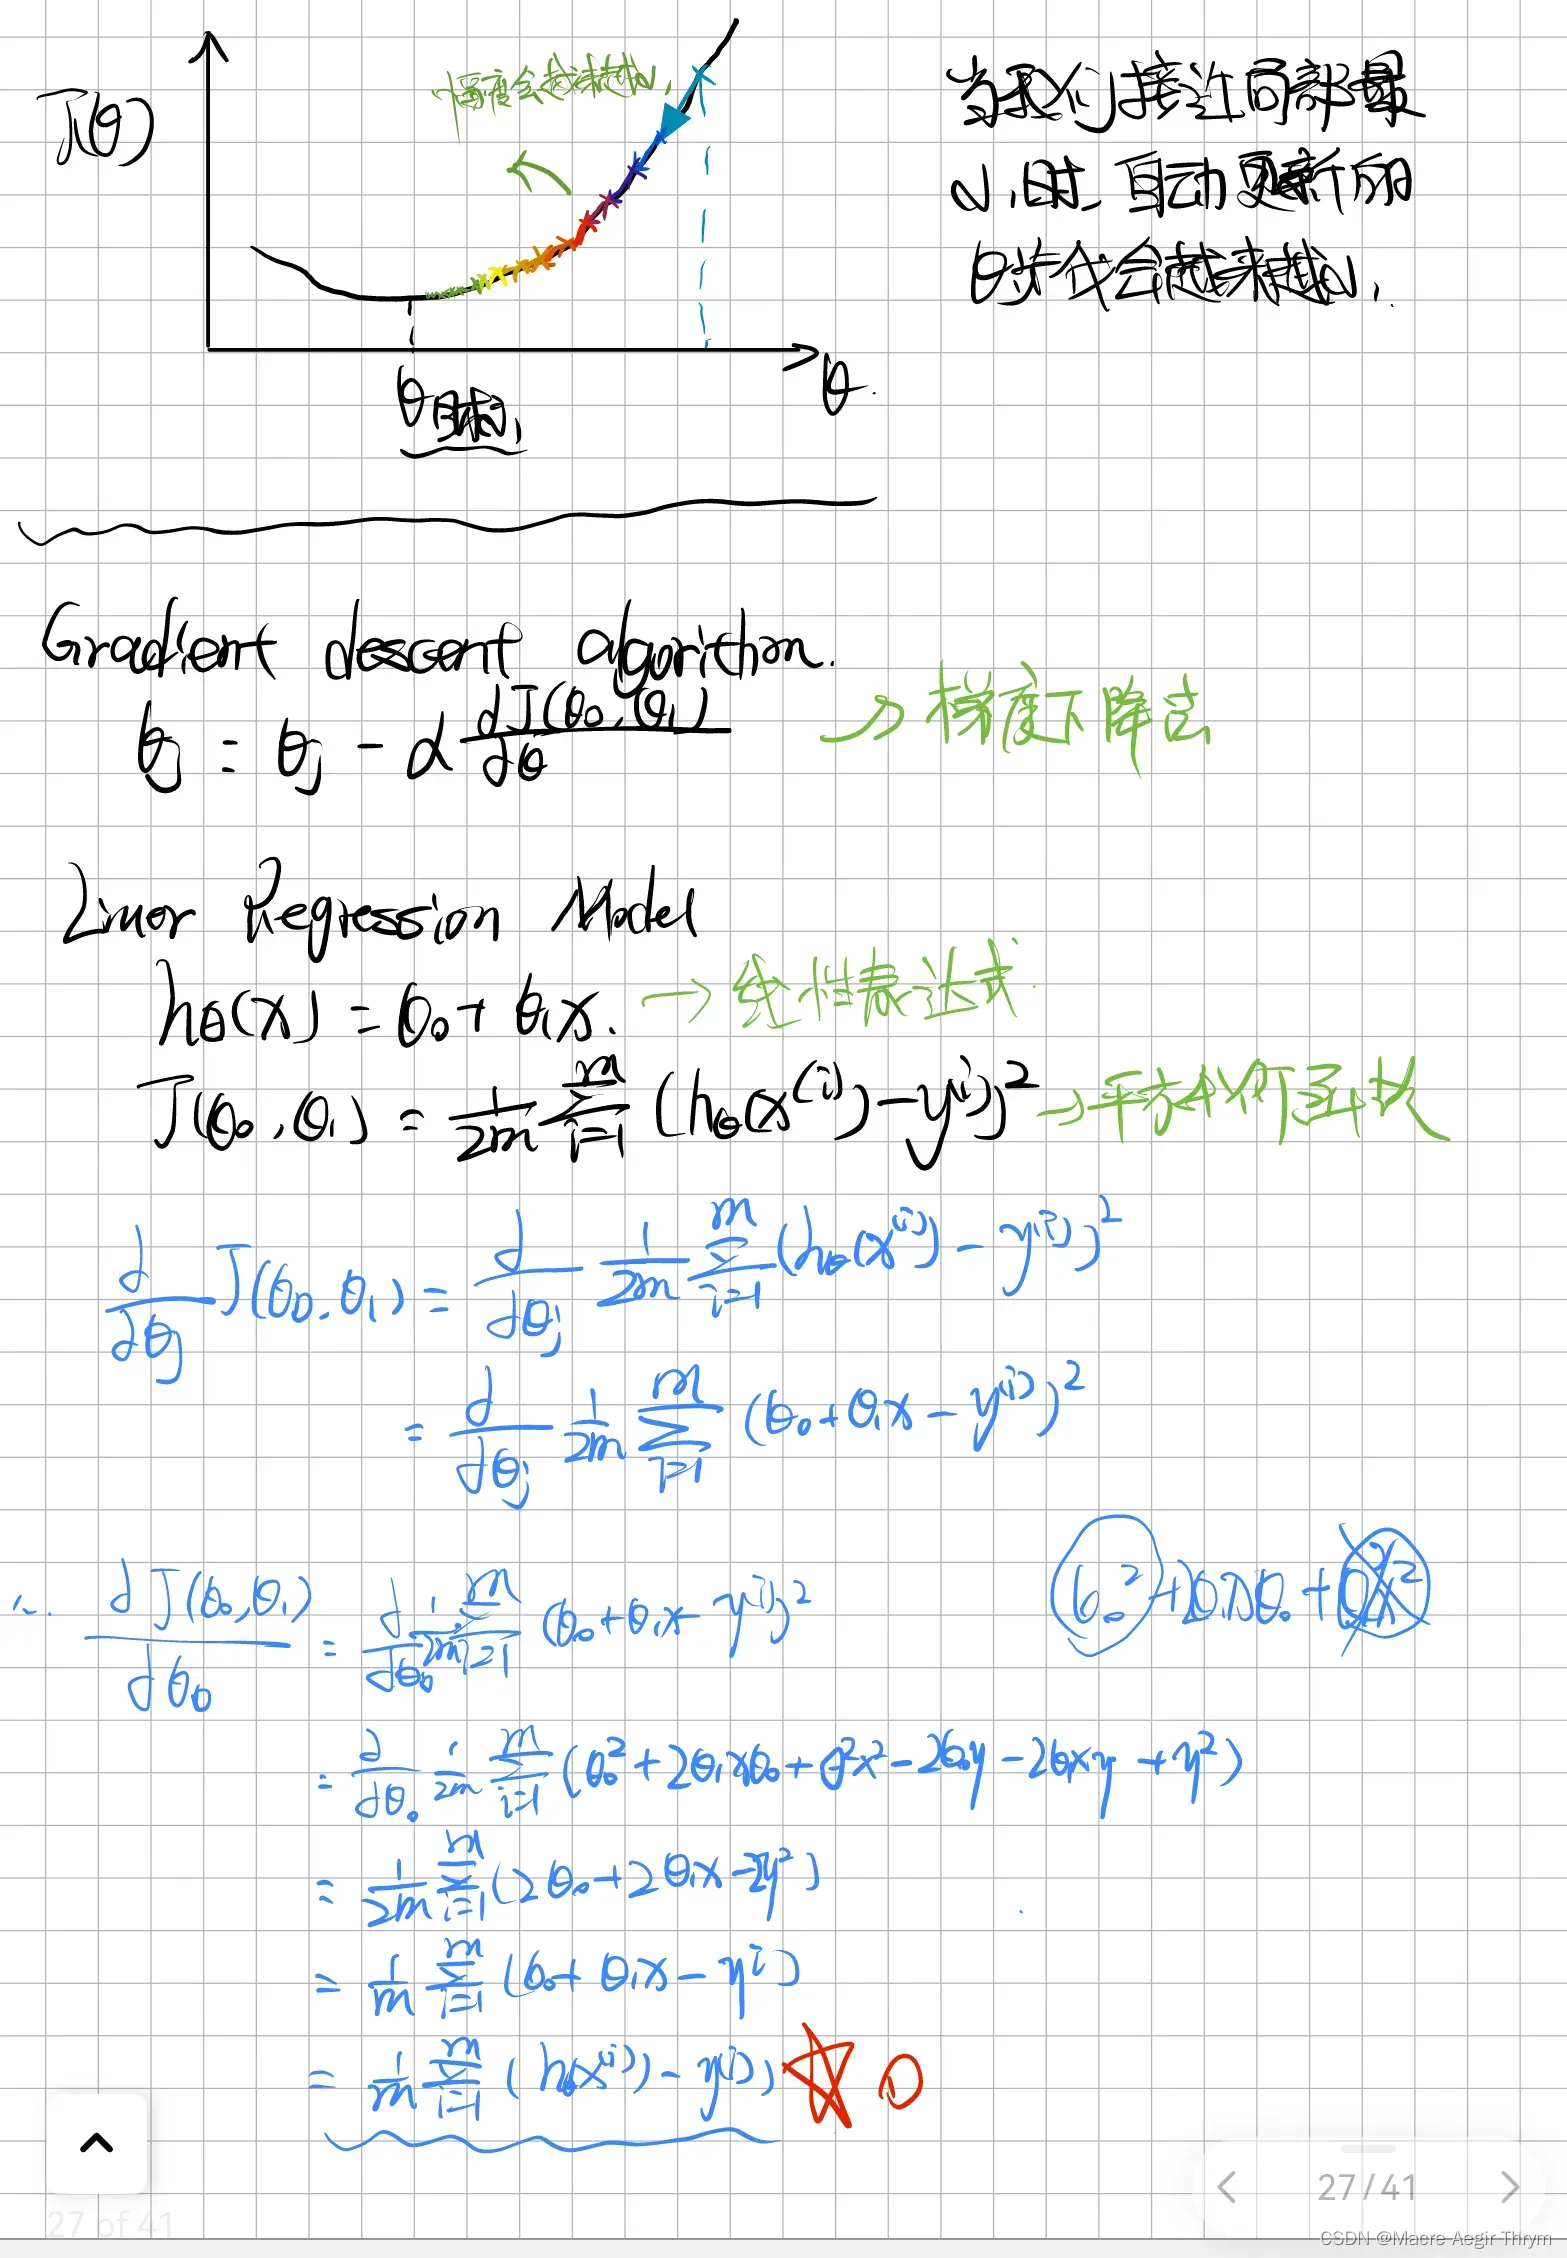
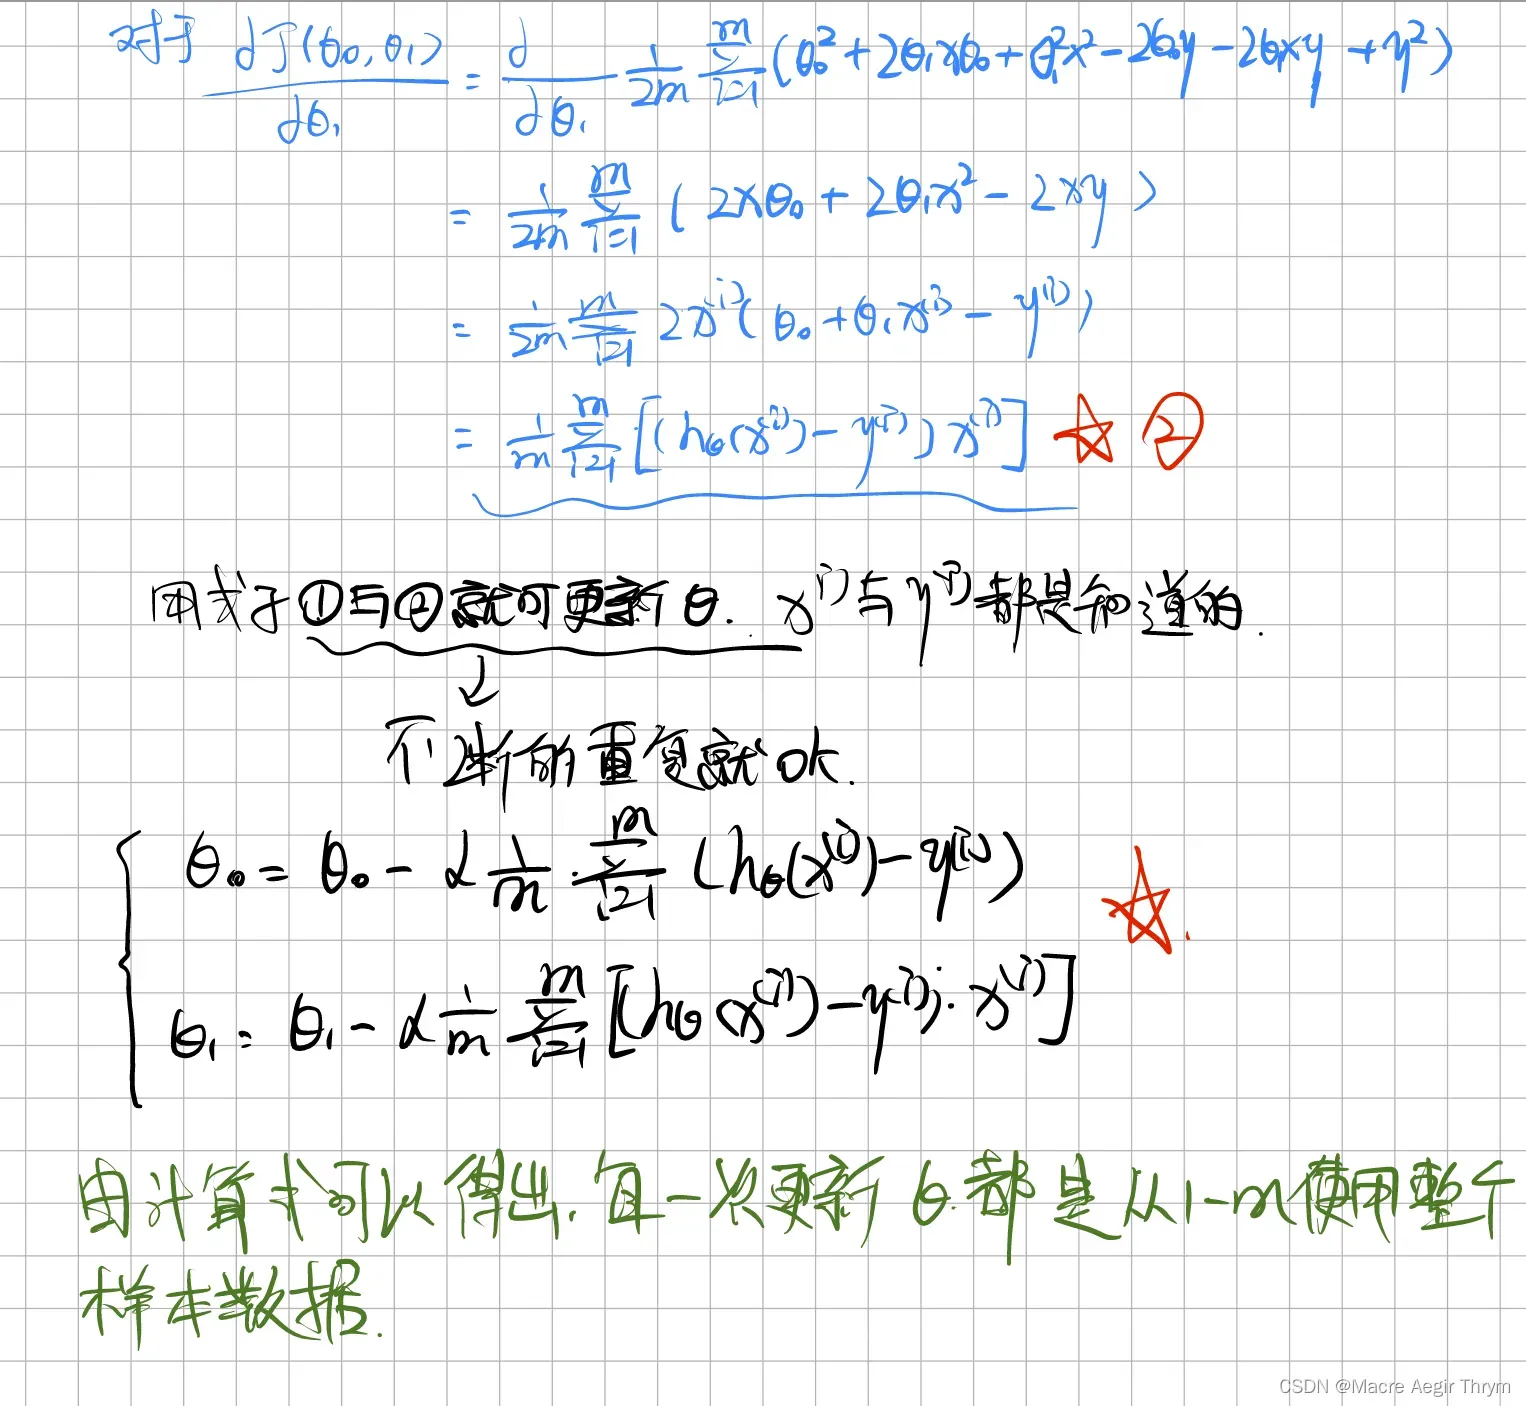
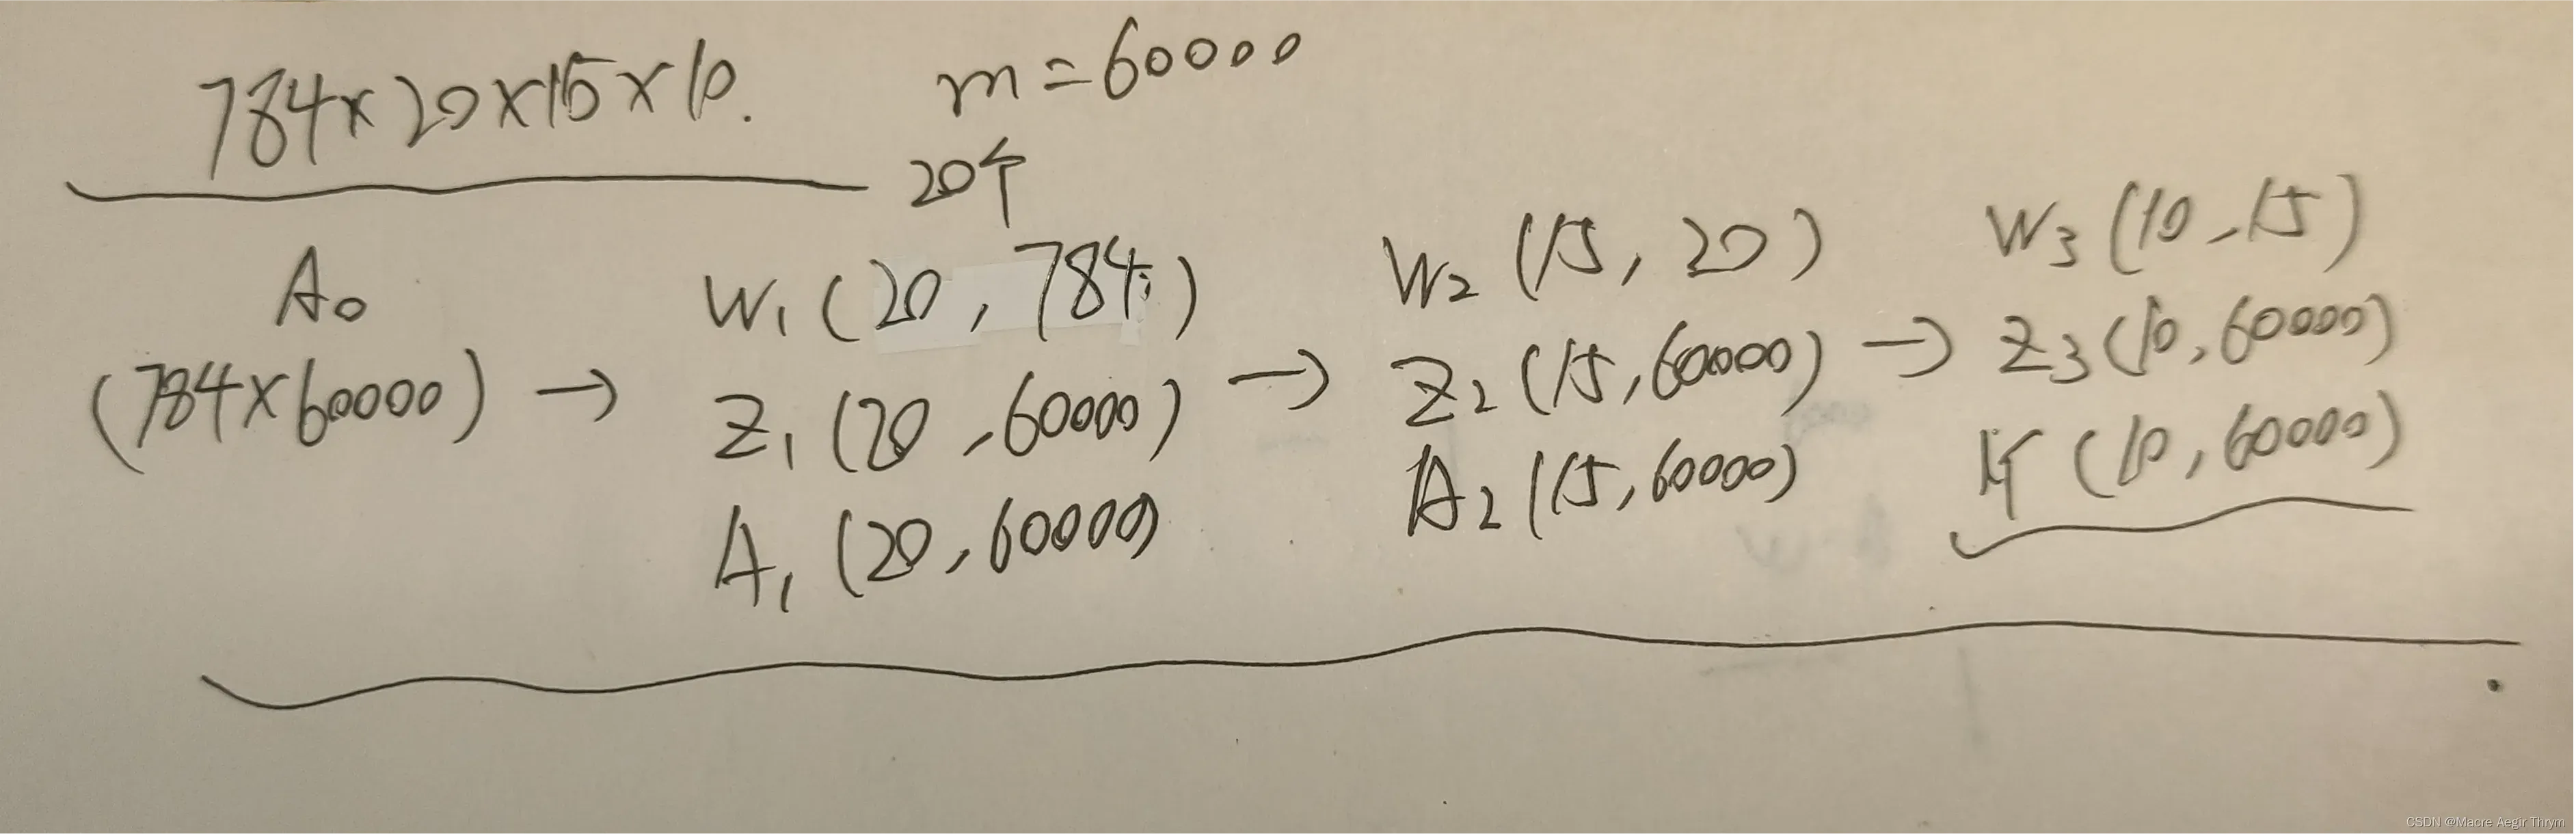
(下面为了简单我以输入的对象是28*28规格图片,第一层隐含单元有200个,第二层隐含单元是100个,输出层为10个的网络结构阐述。)
一般的构造网络的流程:
初始化超参数(包括启动深度神经网络的权值w,偏执b)–》向前传播(线性部分+激活函数)–》 计算代价 –》 反向传播 (激活函数反向,线性部分反向)–》更新超参数.
基础部分和总概 网络结构为 [28*28 200 100 10]
学习人工智能,应该理论应用于实践,应该多动手进行数学演算,将演算用代码实现,最后进行总结于改进。
(1)对这个网络的结构要有一个清楚的认识
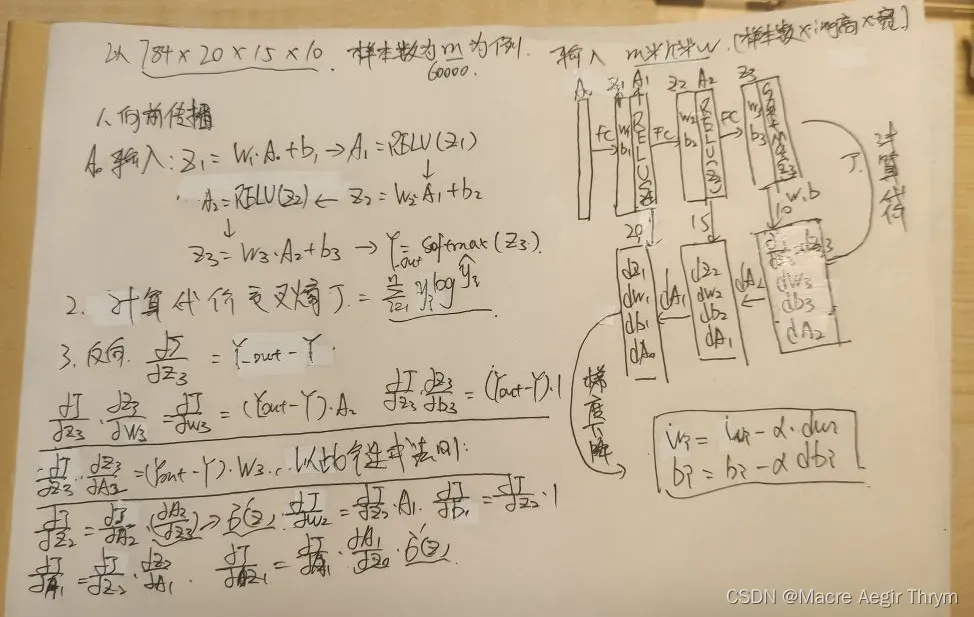
在草稿本上进行矩阵维数的测试
下面是对于想要了解代码一个个看清楚流程的去看,如果想直接跑通,代码在最后!
1、导入库,是导入一些必要的库
import matplotlib.pyplot as plt
import numpy as np
import datetime
import os
import sys
import h5py
2、定义所需要的softmax函数
def sigmoid(Z):
    A = 1/(1+np.exp(-Z))
    cache = Z
    return A, cache

def sigmoid_backward(dA, cache):
    Z = cache
    s = 1/(1+np.exp(-Z))
    dZ = dA * s * (1-s)
    return dZ


# relu函数 和反向求导
def relu(Z):
    A = np.maximum(0,Z)
    cache = Z
    return A, cache

def relu_backward(dA, cache):
    Z = cache
    dZ = np.array(dA, copy=True)
    dZ[Z <= 0] = 0
    return dZ


# Softmax
def softmax(Z):
    A = np.exp(Z)/np.sum(np.exp(Z),axis=0)
    cache = Z
    return A, cache
在此我把relu和sigmoid函数也给出,方便读者后续的使用,可以利用这个去做逻辑回归啊什么什么的,增加泛用性。
3、初始化参数
使用梯度下降法的首要步骤就是初始化参数,这个点是随机的。
输入的是 layers_dims是一个向量,是你的网络结构。返回的是一个字典对象parameters,里面有超参数w和b。、
恭喜你,走出了第一步,完成了初始化参数的步骤。
def init_W(layers_dims):
    np.random.seed(3)
    parameters = {}
    L = len(layers_dims)
    for l in range(1, L):
        parameters["W" + str(l)] = np.random.randn(layers_dims[l], layers_dims[l - 1]) / np.sqrt(layers_dims[l - 1])
        parameters["b" + str(l)] = np.zeros((layers_dims[l], 1))
    return parameters
4.1、向前传播之线性部分
 ,也就是输入x与权值相乘与偏执相加。是一层的线性部分。
def L_forword_sum(W,A,b):
    Z = np.dot(W,A)+b
    cache = (A,W,b)
    return Z,cache
4.2、向前传播之激活函数向前
隐含层使用的是relu函数,输出层使用的是softmax函数,参考(311条消息) 入门级都能看懂的softmax详解_bitcarmanlee的博客-CSDN博客。
(311条消息) ReLU函数简介_潇湘_AQ的博客-CSDN博客
本函数是基于线性部分建立的一个输入是A_prev是上一层的输出,W,b是本层的网络参数,activation是激活函数的名字,用于选择用哪一个函数。返回值是一个元组,包含A隐含层输出的激活值,和用于反向传播时的重要数据。
def L_activate_forworld(A_prev,W,b,activation):
    if activation == "relu":
        Z ,linear_cache =  L_forword_sum(W,A_prev,b)
        A, activation_cache = relu(Z)
    elif activation == "sigmoid":
        Z, linear_cache = L_forword_sum(W, A_prev, b)
        A, activation_cache = sigmoid(Z)
    elif activation == "softmax":
        Z, linear_cache = L_forword_sum(W, A_prev, b)
        A, activation_cache = softmax(Z)
    cache = (linear_cache, activation_cache)
    return A,cache
4.3、向前传播函数接口
线性部分+激活函数组成一次向前传播,线性部分的输出输入到激活函数最后得到的最终值。
函数输入x是初始的输入值即图片的大小,parameters是超参数字典。经过一个for循环可以完成整个向前传播。
恭喜你,你的网络利用这个函数就可以进行向前传播了。
def L_forword(X, parameters):
    caches = []
    A = X
    L = len(parameters) // 2
    for l in range(1, L):
        A_prev = A
        A, cache = L_activate_forworld(A_prev, parameters['W' + str(l)], parameters['b' + str(l)], "relu")
        caches.append(cache)
    # 最后一层使用softmax
    AL, cache  = L_activate_forworld(A, parameters['W' + str(L)], parameters['b' + str(L)], "softmax")
    caches.append(cache)
    return AL, caches
5、计算代价之交叉熵代价函数
(311条消息) 交叉熵损失函数(Cross Entropy Loss)_SongGu1996的博客-CSDN博客
你可以计算你的网络的代价了,每个网络都希望做到收敛快,代价小。
def cost(Y_out,Y):
    cost = -np.sum(np.multiply(np.log(Y_out), Y)) / Y_out.shape[1]
    cost = np.squeeze(cost)
    return cost
5.1、反向传播之线性部分的反向
感兴趣的可以到我的草稿上看。
def linear_backward(dZ, cache):
    A_prev, W, b = cache
    m = A_prev.shape[1]
    dW = np.dot(dZ, A_prev.T) / m
    db = np.sum(dZ, axis=1, keepdims=True) / m
    dA_prev = np.dot(W.T, dZ)
    return dA_prev, dW, db
5.2、反向传播之激活函数的反向
感兴趣的可以到我的草稿上看。
def linear_activation_backward(dA, cache, Y,activation="relu"):
    linear_cache, activation_cache = cache
    if activation == "relu":
        dZ = relu_backward(dA, activation_cache)
        dA_prev, dW, db = linear_backward(dZ, linear_cache)
    elif activation == "sigmoid":
        dZ = sigmoid_backward(dA, activation_cache)
        dA_prev, dW, db = linear_backward(dZ, linear_cache)
    elif activation == "softmax":
        dZ = dA - Y
        dA_prev, dW, db = linear_backward(dZ, linear_cache)
    return dA_prev, dW, db
5.3、 反向传播函数接口
将激活函数的反向和线性部分的反向组织好后,封装为一个反向函数接口。
恭喜你,你已经做好了反向传播了。
def L_model_backward(AL, Y, caches,case):
    grads = {}
    L = len(caches)
    m = AL.shape[1]
    Y = Y.reshape(AL.shape)
    dAL = - (np.divide(Y, AL) - np.divide(1 - Y, 1 - AL))
    if case == "softmax":
        current_cache = caches[L - 1]
        grads["dA" + str(L)], grads["dW" + str(L)], grads["db" + str(L)] = linear_activation_backward(AL, current_cache,Y,"softmax")

    elif case  == "sigmoid":
        current_cache = caches[L - 1]
        grads["dA" + str(L)], grads["dW" + str(L)], grads["db" + str(L)] = linear_activation_backward(AL, current_cache,Y, "sigmoid")

    for l in reversed(range(L - 1)):
        current_cache = caches[l]
        dA_prev_temp, dW_temp, db_temp = linear_activation_backward(grads["dA" + str(l + 2)], current_cache, Y ,"relu")
        grads["dA" + str(l + 1)] = dA_prev_temp
        grads["dW" + str(l + 1)] = dW_temp
        grads["db" + str(l + 1)] = db_temp
    return grads
6、利用梯度下降法 更新参数
梯度下降法是一个十分好的优化算法,他的目的更改参数使代价优化到最小。
def update_parameters(parameters, grads, learning_rate):
    L = len(parameters) // 2  # 整除
    for l in range(L):
        parameters["W" + str(l + 1)] = parameters["W" + str(l + 1)] - learning_rate * grads["dW" + str(l + 1)]
        parameters["b" + str(l + 1)] = parameters["b" + str(l + 1)] - learning_rate * grads["db" + str(l + 1)]
    return parameters
7、神经网络搭建
依据下面的过程,将你的函数,像拼拼图一样做出来。
初始化超参数(包括启动深度神经网络的权值w,偏执b)–》向前传播(线性部分+激活函数)–》 计算代价 –》 反向传播 (激活函数反向,线性部分反向)–》更新超参数
for循环是来进行重复训练的。.
X, 输入的样本集;Y,label集;
net_layers,网络结构;learning_rate=0.0075, 学习率;num_iterations=3000,迭代次数;step =1, 步长;print_cost=False, 是否打印代价;isPlot=True,是否绘制代价—迭代次数图;
def deepnet(X, Y,net_layers,learning_rate=0.0075, num_iterations=3000,step =1, print_cost=False, isPlot=True):
np.random.seed(1) #设计种子
costs = [] #用于画图
parameters = init_W(net_layers)
for i in range(0, num_iterations):
# 迭代
AL, caches = L_forword(X, parameters)
costi = cost(AL, Y) #这里的Y是标准化的Y
grads = L_model_backward(AL, Y, caches,"softmax")
parameters = update_parameters(parameters, grads, learning_rate)
if i % step == 0:
# 记录成本
costs.append(costi)
# 是否打印成本值
if print_cost:
print("第", i, "次迭代,成本值为:", np.squeeze(costi))
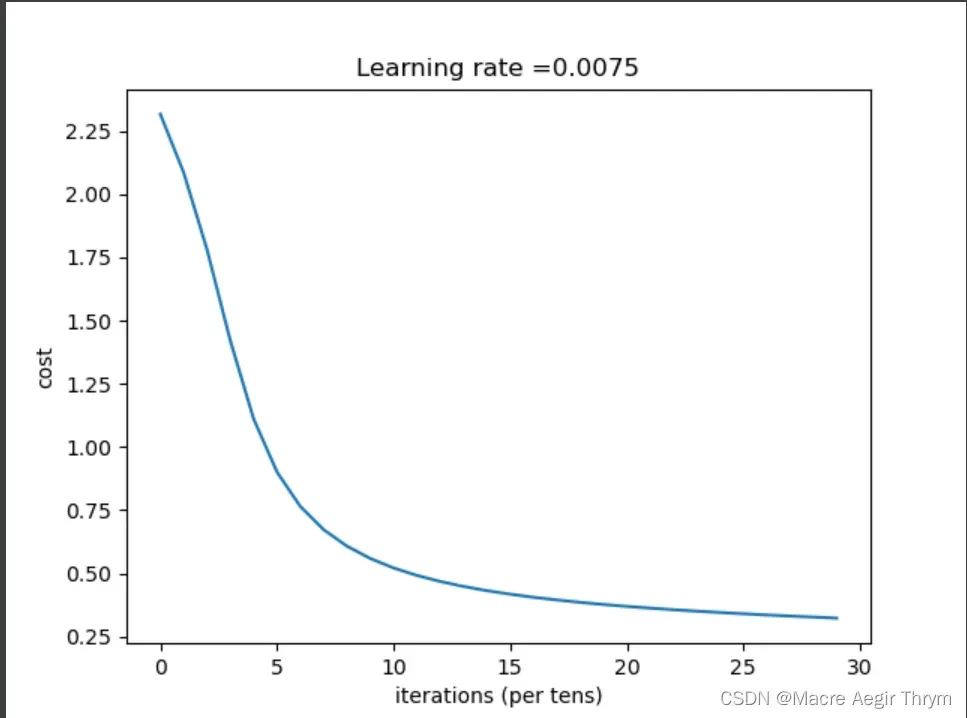
if isPlot:
plt.plot(np.squeeze(costs))
plt.ylabel('cost')
plt.xlabel('iterations (per tens)')
plt.title("Learning rate =" + str(learning_rate))
plt.show()
# plt.savefig(fnme = "cast"+str(datetime.datetime.now())+".jig")
return parameters8、测试集合测试
将得到的模型,用于测试集看准确率。
def predict(X, y, parameters,Y_org):

    m = X.shape[1]
    n = len(parameters) // 2  # 神经网络的层数
    p = np.zeros((1, m))

    # 根据参数前向传播
    probas, caches = L_forword(X, parameters)
    p = np.argmax(probas,axis=0)
    zql = float(np.sum((p == Y_org)) / m)
    print("准确度为: " + str(float(np.sum((p == Y_org)) / m)))

    error_list = []
    for i in range(m):
        if p[i] != Y_org[i]:
            error_list.append(i)
    return p,error_list,zql
9、保存模型
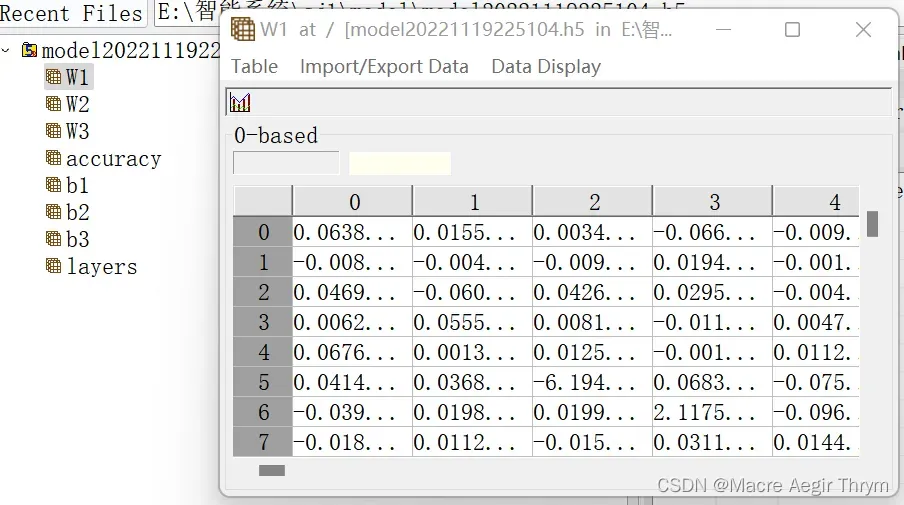
你所训练好的网络不仅仅只是训练好就完了,你要应用它,就得保存下来,我这里有两个保存函数,一个是保存为txt文本,一个是保存为h5文件,建议使用h5文件,也可以像vvg19那样使用.mat文件数据,只要是数据,你就可以打开,打开的接口可以自己写,如果自己写的话一般是学习其结构,转化为二进制在转化为你想要的数据,不过,基本有大佬写出来了,不要闭门造车。
def save_model(parameters):
    np.set_printoptions(threshold=sys.maxsize)

    model_number = 0
    f = open("model/model" + str(model_number) + ".txt", "a+")
    f.write(str(datetime.datetime.now()) + "n")
    f.write("model_number " + str(model_number) + "n")
    for i, j in parameters.items():
        f.write(str(i) + "n")
        f.write(str(j) + "n")
    f.close()
    return 0

#保存为h5数据格式
def save_h5(data,layers,zql):
    str1 = "./model/model"+str(datetime.datetime.now().strftime("%Y%m%d%H%M%S"))+".h5"
    f = h5py.File(str1, "w")
    ID = ["model layer "]
    f.create_dataset("layers",data = layers)
    i = len(data) // 2
    for j in range(i):
        f.create_dataset("W"+str(j+1),data = data["W"+str(j+1)])
        f.create_dataset("b"+str(j+1),data = data["b"+str(j+1)])
    f.create_dataset("accuracy",data = zql)
    f.close()
10、利用模型预测和读取h5数据格式的模型
保存好了数据,就是如何读取我们的网络参数,进行运用人工智能深度神经网络。利用这两个函数就可以。
def predict1(X, parameters):
    # 根据参数前向传播
    probas, caches = L_forword(X, parameters)
    p = np.argmax(probas,axis=0)
    return p

def read_ccs(path):
    w = h5py.File(path, "r")
    layers = w["layers"][:]
    l = len(layers)
    p = {}
    # print(l)
    for i in range(1, l):
        p["W" + str(i)] = w["W" + str(i)][:]
        p["b" + str(i)] = w["b" + str(i)][:]
    return p, layers
第二步,有了相应功能的函数,我们就可以进行训练。train.py里的具体内容如下。
import DeepNET
import time
import function
if __name__ == '__main__':
# 计时开始
start1 = time.time()
train_image_path = './MNIST/train-images-idx3-ubyte/train-images.idx3-ubyte'
train_lable_path = './MNIST/train-labels-idx1-ubyte/train-labels.idx1-ubyte'
teat_image_path = './MNIST/t10k-images-idx3-ubyte/t10k-images.idx3-ubyte'
teat_lable_path = './MNIST/t10k-labels-idx1-ubyte/t10k-labels.idx1-ubyte'
# #加载数据
train_image = function.jiexi_image(train_image_path)
train_lable = function.jiexi_label(train_lable_path)
teat_image = function.jiexi_image(teat_image_path)
test_lable = function.jiexi_label(teat_lable_path)
# print(train_image.shape)
function.plot_data(train_image,train_lable,10,True)
train_image = train_image.reshape(train_image.shape[0], -1).T / 255
teat_image = teat_image.reshape(teat_image.shape[0], -1).T / 255
train_lable1 = function.label_init(train_lable)
test_lable1 = function.label_init(test_lable)
print(train_image.shape)
end1 = time.time()
start2 = time.time()
layers = [784, 200, 150, 10]
parameters = DeepNET.deepnet(train_image, train_lable1,layers , learning_rate=0.0075, num_iterations=3000,
step=100, print_cost=True, isPlot=True)
end2 = time.time()
p ,error_list_train,zql1 = DeepNET.predict(train_image, train_lable1, parameters, train_lable)
p0 ,error_list_test ,zql2 = DeepNET.predict(teat_image,test_lable1,parameters,test_lable)
zql = [[zql1],[zql2]]
print("数据加载时间:",end1-start1," 秒")
print("模型训练时间:",end2-start2," 秒")
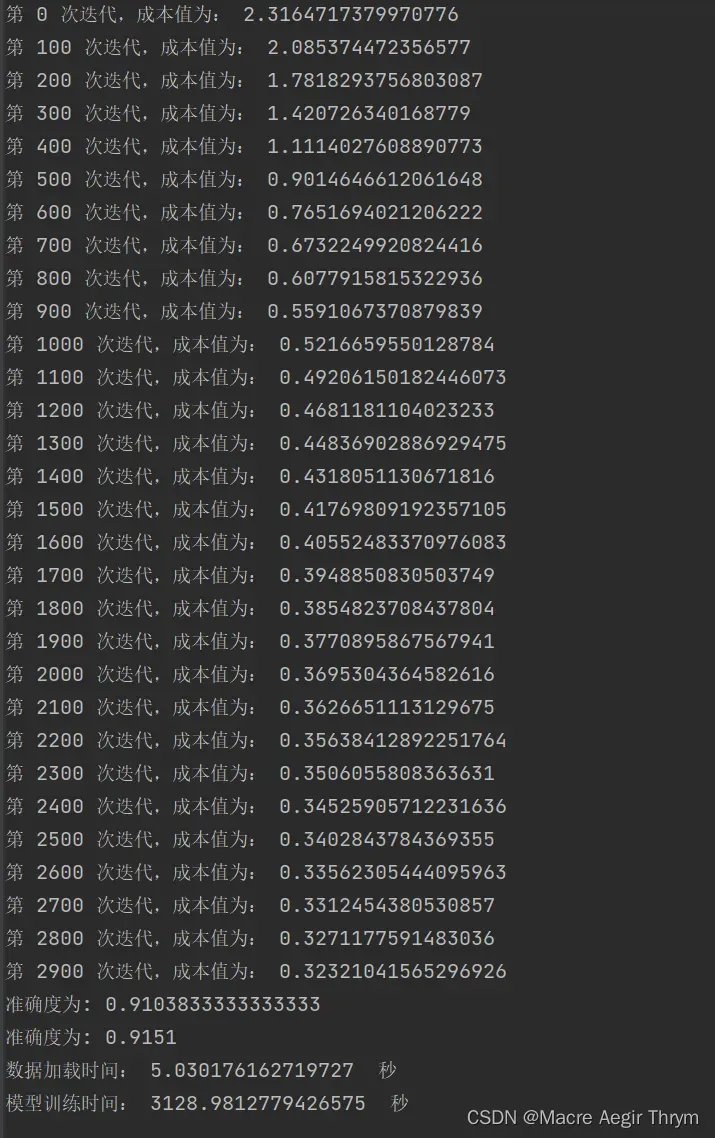
DeepNET.save_h5(parameters,layers,zql)五、效果展示
(1)训练情况
(2)模型保存情况 h5数据情况

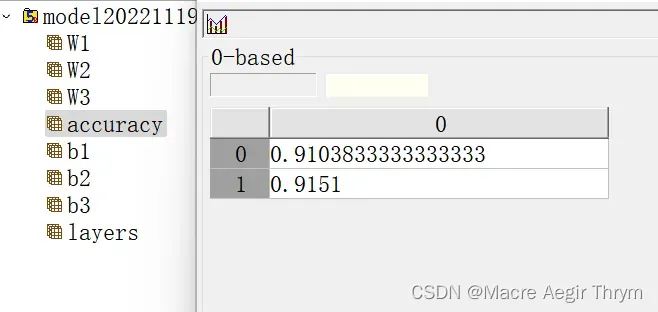

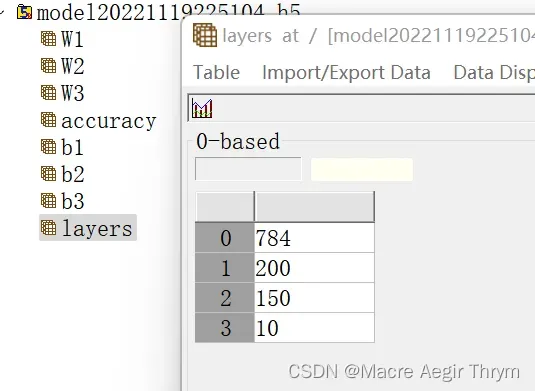
最终效果
综合来说,没有加优化正确率也是不错的,感兴趣的可以对网络进行优化。
六、画板部分
这里参考的是(311条消息) PyQt5实例 画板小程序_pyqt5画图板_CreatorGG的博客-CSDN博客
对qtpy5感兴趣的可以去学习一下。
整个手绘板加训练的程序在最后给出。
七、直接抄,直接方向跑!
训练网络,运行train.py。
训练出自己的网络后,使用main.py运行利用使用你的模型。
文件结构和目录:
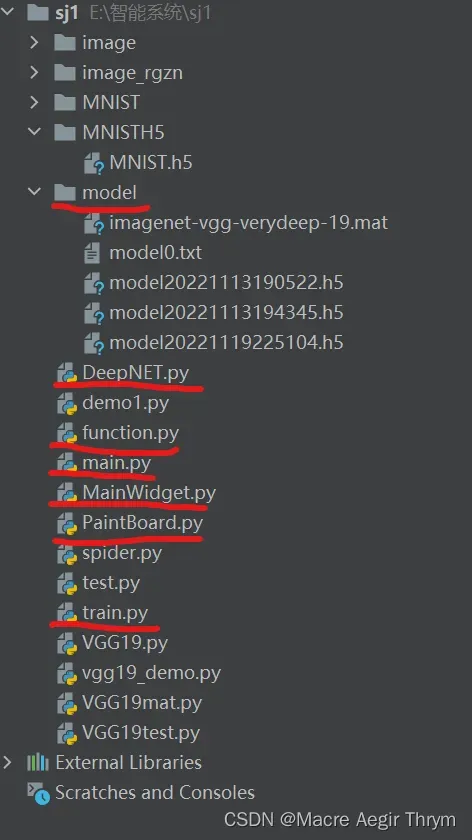
创建我红线的文件。
(1)function.py代码:
#此文件是一些函数 有加载数据模块
import datetime
import struct
import numpy as np
import matplotlib.pyplot as plt
from PIL import Image
import os


def jiexi_image(path):
    # 用二进制读取
    data = open(path, 'rb').read()
    offset = 0
    fmt_header = '>iiii'
    magic_number, num_images, num_rows, num_cols = struct.unpack_from(fmt_header, data, offset)
    print('魔数:%d, 图片数量: %d张, 图片大小: %d*%d' % (magic_number, num_images, num_rows, num_cols))
    image_size = num_rows * num_cols
    offset += struct.calcsize(fmt_header)
    fmt_image = '>' + str(image_size) + 'B'
    images = np.empty((num_images, num_rows, num_cols))
    for i in range(num_images):
        if (i + 1) % 10000 == 0:
            print('已解析 %d' % (i + 1) + '张')
        images[i] = np.array(struct.unpack_from(fmt_image, data, offset)).reshape((num_rows, num_cols))
        offset += struct.calcsize(fmt_image)
    return images

def jiexi_label(path):
    data = open(path, 'rb').read()
    offset = 0
    fmt_header = '>ii'
    magic_number, num_images = struct.unpack_from(fmt_header, data, offset)
    print('魔数:%d, 图片数量: %d张' % (magic_number, num_images))
    # 解析数据集
    offset += struct.calcsize(fmt_header)
    fmt_image = '>B'
    labels = np.empty(num_images)
    for i in range(num_images):
        if (i + 1) % 10000 == 0:
            print('已解析 %d' % (i + 1) + '张')
        labels[i] = struct.unpack_from(fmt_image, data, offset)[0]
        offset += struct.calcsize(fmt_image)
    return labels

def plot_data(images,labels,n,issave = False):
    for i in range(n):
        print(labels[i])
        plt.imshow(images[i], cmap='gray')
        plt.show()
        # if(issave == True):
            # plt.savefig(fname = "save"+str(datetime.datetime.now())+".jpg")

    print('done')


## 说明:输入原始图像路径和新建图像文件夹名称 默认修改出长度宽度为64*64
def stdimage(pathorg, name, pathnew=None, width=64, length=64):
    # 检查文件是否建立
    if pathnew == None:  # 如果没有手动创建
        tage = os.path.exists(os.getcwd() + '\' + name)  # 检查一下是否属实
        if not tage:  # 没有整个新文件夹
            os.mkdir(os.getcwd() + "\" + name)  # 创建文件夹,name
        image_path = os.getcwd() + "\" + name + "\"
    else:  # 已经手动创建
        tage = os.path.exists(pathnew + "\" + name)
        if not tage:
            path = os.getcwd()
            os.mkdir(path + "\" + name)
        image_path = path + "\" + name + "\"

    ## 开始处理
    i = 1  # 从一开始
    list_name = os.listdir(pathorg)  # 获取图片名称列表
    for item in list_name:
        # 检查是否有图片
        tage = os.path.exists(pathorg + str(i) + '.png')
        if not tage:
            image = Image.open(pathorg + '\' + item)
            std = image.resize((width, length), Image.ANTIALIAS)
            ## 模式为RGB
            if not std.mode == "RGB":
                std = std.convert('RGB')
            std.save(image_path + str(i) + '.png')
        i += 1


def label_init(lable):
    n = lable.shape[0]
    label_Y = np.zeros([10, n])
    res = lable.astype(int)
    for i in range(0, label_Y.shape[1]):
        label_Y[res[i], i] = 1
    return label_Y


def get_X(path):
    im_name_list = os.listdir(path)
    all_data = []
    for item in im_name_list:
        try:
            all_data.append(plt.imread(path + '\' + item).tolist())
        except:
            print(item + " open error ")
    return all_data
(2)DeepNet.py
import matplotlib.pyplot as plt
import numpy as np
import datetime
import os
import sys
import h5py

# sigmoid
def sigmoid(Z):
    A = 1/(1+np.exp(-Z))
    cache = Z
    return A, cache

def sigmoid_backward(dA, cache):
    Z = cache
    s = 1/(1+np.exp(-Z))
    dZ = dA * s * (1-s)
    return dZ


# relu函数 和反向求导
def relu(Z):
    A = np.maximum(0,Z)
    cache = Z
    return A, cache

def relu_backward(dA, cache):
    Z = cache
    dZ = np.array(dA, copy=True)
    dZ[Z <= 0] = 0
    return dZ


# Softmax
def softmax(Z):
    A = np.exp(Z)/np.sum(np.exp(Z),axis=0)
    cache = Z
    return A, cache
# 初始化w
# def INIT_W(n_x,n_h1,n_h2,n_y):
#     W1 = np.random.randn(n_h1, n_x ) * 0.01
#     b1 = np.zeros((n_h1, 1))
#     W2 = np.random.randn(n_h2,n_h1)*0.01
#     b2 = np.zeros((n_h2,1))
#     W3 = np.random.randn(n_y, n_h2) * 0.01
#     b3 = np.zeros((n_y, 1))
#     INIT = {
#         "W1" : W1,
#         "b1" : b1,
#         "W2" : W2,
#         "b2" : b2,
#         "W3" : W3,
#         "b3" : b3
#     }
#     return INIT


def init_W(layers_dims):
    np.random.seed(3)
    parameters = {}
    L = len(layers_dims)
    for l in range(1, L):
        parameters["W" + str(l)] = np.random.randn(layers_dims[l], layers_dims[l - 1]) / np.sqrt(layers_dims[l - 1])
        parameters["b" + str(l)] = np.zeros((layers_dims[l], 1))
    return parameters


# 向前
def L_forword_sum(W,A,b):
    Z = np.dot(W,A)+b
    cache = (A,W,b)
    return Z,cache

def L_activate_forworld(A_prev,W,b,activation):
    if activation == "relu":
        Z ,linear_cache =  L_forword_sum(W,A_prev,b)
        A, activation_cache = relu(Z)
    elif activation == "sigmoid":
        Z, linear_cache = L_forword_sum(W, A_prev, b)
        A, activation_cache = sigmoid(Z)
    elif activation == "softmax":
        Z, linear_cache = L_forword_sum(W, A_prev, b)
        A, activation_cache = softmax(Z)
    cache = (linear_cache, activation_cache)
    return A,cache


def L_forword(X, parameters):
    caches = []
    A = X
    L = len(parameters) // 2
    for l in range(1, L):
        A_prev = A
        A, cache = L_activate_forworld(A_prev, parameters['W' + str(l)], parameters['b' + str(l)], "relu")
        caches.append(cache)
    # 最后一层使用softmax
    AL, cache  = L_activate_forworld(A, parameters['W' + str(L)], parameters['b' + str(L)], "softmax")
    caches.append(cache)
    return AL, caches

#计算代价
def cost(Y_out,Y):
    cost = -np.sum(np.multiply(np.log(Y_out), Y)) / Y_out.shape[1]
    cost = np.squeeze(cost)
    return cost

#线性返回
def linear_backward(dZ, cache):
    A_prev, W, b = cache
    m = A_prev.shape[1]
    dW = np.dot(dZ, A_prev.T) / m
    db = np.sum(dZ, axis=1, keepdims=True) / m
    dA_prev = np.dot(W.T, dZ)
    return dA_prev, dW, db


def linear_activation_backward(dA, cache, Y,activation="relu"):
    linear_cache, activation_cache = cache
    if activation == "relu":
        dZ = relu_backward(dA, activation_cache)
        dA_prev, dW, db = linear_backward(dZ, linear_cache)
    elif activation == "sigmoid":
        dZ = sigmoid_backward(dA, activation_cache)
        dA_prev, dW, db = linear_backward(dZ, linear_cache)
    elif activation == "softmax":
        dZ = dA - Y
        dA_prev, dW, db = linear_backward(dZ, linear_cache)
    return dA_prev, dW, db


def L_model_backward(AL, Y, caches,case):
    grads = {}
    L = len(caches)
    m = AL.shape[1]
    Y = Y.reshape(AL.shape)
    dAL = - (np.divide(Y, AL) - np.divide(1 - Y, 1 - AL))
    if case == "softmax":
        current_cache = caches[L - 1]
        grads["dA" + str(L)], grads["dW" + str(L)], grads["db" + str(L)] = linear_activation_backward(AL, current_cache,Y,"softmax")

    elif case  == "sigmoid":
        current_cache = caches[L - 1]
        grads["dA" + str(L)], grads["dW" + str(L)], grads["db" + str(L)] = linear_activation_backward(AL, current_cache,Y, "sigmoid")

    for l in reversed(range(L - 1)):
        current_cache = caches[l]
        dA_prev_temp, dW_temp, db_temp = linear_activation_backward(grads["dA" + str(l + 2)], current_cache, Y ,"relu")
        grads["dA" + str(l + 1)] = dA_prev_temp
        grads["dW" + str(l + 1)] = dW_temp
        grads["db" + str(l + 1)] = db_temp
    return grads


def update_parameters(parameters, grads, learning_rate):
    L = len(parameters) // 2  # 整除
    for l in range(L):
        parameters["W" + str(l + 1)] = parameters["W" + str(l + 1)] - learning_rate * grads["dW" + str(l + 1)]
        parameters["b" + str(l + 1)] = parameters["b" + str(l + 1)] - learning_rate * grads["db" + str(l + 1)]
    return parameters


def deepnet(X, Y,net_layers,learning_rate=0.0075, num_iterations=3000,step =1, print_cost=False, isPlot=True):
    np.random.seed(1) #设计种子
    costs = [] #用于画图
    parameters = init_W(net_layers)
    for i in range(0, num_iterations):
        # 迭代
        AL, caches = L_forword(X, parameters)

        costi = cost(AL, Y) #这里的Y是标准化的Y

        grads = L_model_backward(AL, Y, caches,"softmax")

        parameters = update_parameters(parameters, grads, learning_rate)

        if i % step == 0:
            # 记录成本
            costs.append(costi)
            # 是否打印成本值
            if print_cost:
                print("第", i, "次迭代,成本值为:", np.squeeze(costi))


    if isPlot:
        plt.plot(np.squeeze(costs))
        plt.ylabel('cost')
        plt.xlabel('iterations (per tens)')
        plt.title("Learning rate =" + str(learning_rate))
        plt.show()
        # plt.savefig(fnme = "cast"+str(datetime.datetime.now())+".jig")
    return parameters


def predict(X, y, parameters,Y_org):

    m = X.shape[1]
    n = len(parameters) // 2  # 神经网络的层数
    p = np.zeros((1, m))

    # 根据参数前向传播
    probas, caches = L_forword(X, parameters)
    p = np.argmax(probas,axis=0)
    zql = float(np.sum((p == Y_org)) / m)
    print("准确度为: " + str(float(np.sum((p == Y_org)) / m)))

    error_list = []
    for i in range(m):
        if p[i] != Y_org[i]:
            error_list.append(i)
    return p,error_list,zql


def save_model(parameters):
    np.set_printoptions(threshold=sys.maxsize)

    model_number = 0
    f = open("model/model" + str(model_number) + ".txt", "a+")
    f.write(str(datetime.datetime.now()) + "n")
    f.write("model_number " + str(model_number) + "n")
    for i, j in parameters.items():
        f.write(str(i) + "n")
        f.write(str(j) + "n")
    f.close()
    return 0

#保存为h5数据格式
def save_h5(data,layers,zql):
    str1 = "./model/model"+str(datetime.datetime.now().strftime("%Y%m%d%H%M%S"))+".h5"
    f = h5py.File(str1, "w")
    ID = ["model layer "]
    f.create_dataset("layers",data = layers)
    i = len(data) // 2
    for j in range(i):
        f.create_dataset("W"+str(j+1),data = data["W"+str(j+1)])
        f.create_dataset("b"+str(j+1),data = data["b"+str(j+1)])
    f.create_dataset("accuracy",data = zql)
    f.close()


def predict1(X, parameters):
    # 根据参数前向传播
    probas, caches = L_forword(X, parameters)
    p = np.argmax(probas,axis=0)
    return p

def read_ccs(path):
    w = h5py.File(path, "r")
    layers = w["layers"][:]
    l = len(layers)
    p = {}
    # print(l)
    for i in range(1, l):
        p["W" + str(i)] = w["W" + str(i)][:]
        p["b" + str(i)] = w["b" + str(i)][:]
    return p, layers
(3)train.py
import DeepNET
import time

import function


if __name__ == '__main__':
    # 计时开始
    start1 = time.time()
    train_image_path = './MNIST/train-images-idx3-ubyte/train-images.idx3-ubyte'
    train_lable_path = './MNIST/train-labels-idx1-ubyte/train-labels.idx1-ubyte'
    teat_image_path = './MNIST/t10k-images-idx3-ubyte/t10k-images.idx3-ubyte'
    teat_lable_path = './MNIST/t10k-labels-idx1-ubyte/t10k-labels.idx1-ubyte'
    # #加载数据
    train_image = function.jiexi_image(train_image_path)
    train_lable = function.jiexi_label(train_lable_path)
    teat_image = function.jiexi_image(teat_image_path)
    test_lable = function.jiexi_label(teat_lable_path)
    # print(train_image.shape)

    function.plot_data(train_image,train_lable,10,True)

    train_image = train_image.reshape(train_image.shape[0], -1).T / 255
    teat_image = teat_image.reshape(teat_image.shape[0], -1).T / 255
    train_lable1 = function.label_init(train_lable)
    test_lable1 =  function.label_init(test_lable)

    print(train_image.shape)

    end1 = time.time()

    start2 = time.time()
    layers = [784, 200, 150, 10]
    parameters = DeepNET.deepnet(train_image, train_lable1,layers , learning_rate=0.0075, num_iterations=3000,
                                 step=100, print_cost=True, isPlot=True)
    end2 = time.time()

    p ,error_list_train,zql1 = DeepNET.predict(train_image, train_lable1, parameters, train_lable)
    p0 ,error_list_test ,zql2 = DeepNET.predict(teat_image,test_lable1,parameters,test_lable)
    zql = [[zql1],[zql2]]
    print("数据加载时间:",end1-start1," 秒")
    print("模型训练时间:",end2-start2," 秒")

    DeepNET.save_h5(parameters,layers,zql)
(4) main.py
# 加载库
from MainWidget import MainWidget
from PyQt5.QtWidgets import QApplication
import sys

def main():
    app = QApplication(sys.argv)

    mainWidget = MainWidget()  # 新建一个主界面
    mainWidget.show()  # 显示主界面

    exit(app.exec_())  # 进入消息循环


if __name__ == '__main__':
    main()
(5)mainwidget.py
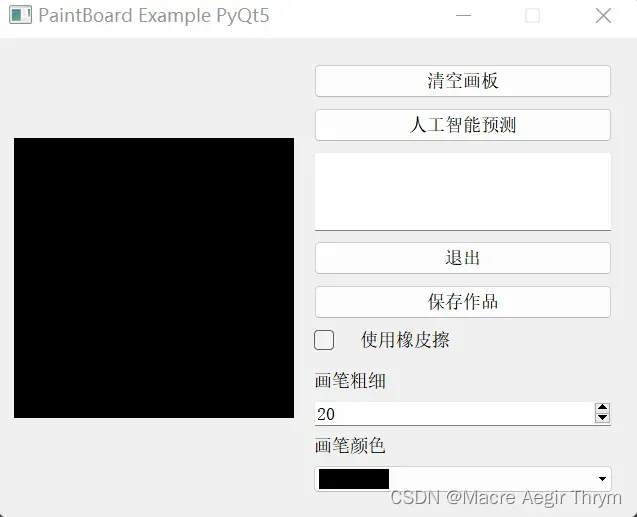
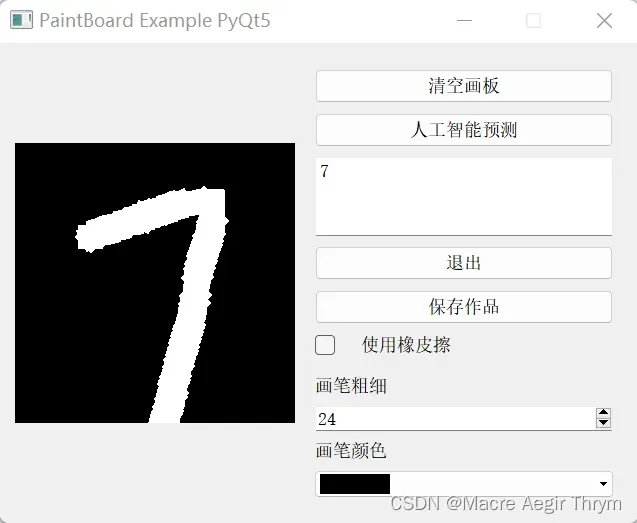
使用画板程序之前得跟该你的模型路径名字。就是红色部分。
def yuce(self):
# #标准化图片 获取Y
savePath = “./image_rgzn/test.png”
image = self.__paintBoard.GetContentAsQImage()
image.save(savePath)
img = Image.open(savePath)
img = img.convert(“I”)
img = img.resize((28, 28))
x = np.array(img)
train_image = x.reshape(1, -1).T / 255
w,layer = DeepNET.read_ccs(“./model/model20221119225104.h5”)
p = DeepNET.predict1(train_image,w)
self.__text_out.setText(str(p[0]))
print(p)
# print(“hello”)
# res = QMessageBox.information(self,”人工智能判断为:”,str(p),QMessageBox.Yes|QMessageBox.No)
# res.exec_()
# 读取数据权重
# 预测并输出
'''
Created on 2018年8月8日

@author: Freedom
'''
from PyQt5.Qt import QWidget, QColor, QPixmap, QIcon, QSize, QCheckBox
from PyQt5.QtWidgets import QHBoxLayout, QVBoxLayout, QPushButton, QSplitter,
    QComboBox, QLabel, QSpinBox, QFileDialog,QTextEdit
from PaintBoard import PaintBoard
import numpy as np
from PIL import Image
import DeepNET


class MainWidget(QWidget):

    def __init__(self, Parent=None):
        '''
        Constructor
        '''
        super().__init__(Parent)

        self.__InitData()  # 先初始化数据,再初始化界面
        self.__InitView()

    def __InitData(self):
        '''
                  初始化成员变量
        '''
        self.__paintBoard = PaintBoard(self)
        # 获取颜色列表(字符串类型)
        self.__colorList = QColor.colorNames()

    def __InitView(self):
        '''
                  初始化界面
        '''
        self.setFixedSize(640, 480)
        self.setWindowTitle("PaintBoard Example PyQt5")

        # 新建一个水平布局作为本窗体的主布局
        main_layout = QHBoxLayout(self)
        # 设置主布局内边距以及控件间距为10px
        main_layout.setSpacing(10)

        # 在主界面左侧放置画板
        main_layout.addWidget(self.__paintBoard)

        # 新建垂直子布局用于放置按键
        sub_layout = QVBoxLayout()

        # 设置此子布局和内部控件的间距为10px
        sub_layout.setContentsMargins(10, 10, 10, 10)

        self.__btn_Clear = QPushButton("清空画板")
        self.__btn_Clear.setParent(self)  # 设置父对象为本界面
        # 将按键按下信号与画板清空函数相关联
        self.__btn_Clear.clicked.connect(self.__paintBoard.Clear)
        sub_layout.addWidget(self.__btn_Clear)

        self.__btn_yuce = QPushButton("人工智能预测")
        self.__btn_yuce.setParent(self)  # 设置父对象为本界面
        self.__btn_yuce.clicked.connect(lambda:self.yuce())
        sub_layout.addWidget(self.__btn_yuce)


        self.__text_out = QTextEdit(self)
        self.__text_out.setParent(self)
        self.__text_out.setObjectName("预测结果为:")
        sub_layout.addWidget(self.__text_out)


        self.__btn_Quit = QPushButton("退出")
        self.__btn_Quit.setParent(self)  # 设置父对象为本界面
        self.__btn_Quit.clicked.connect(self.Quit)
        sub_layout.addWidget(self.__btn_Quit)

        self.__btn_Save = QPushButton("保存作品")
        self.__btn_Save.setParent(self)
        self.__btn_Save.clicked.connect(self.on_btn_Save_Clicked)
        sub_layout.addWidget(self.__btn_Save)

        self.__cbtn_Eraser = QCheckBox("  使用橡皮擦")
        self.__cbtn_Eraser.setParent(self)
        self.__cbtn_Eraser.clicked.connect(self.on_cbtn_Eraser_clicked)
        sub_layout.addWidget(self.__cbtn_Eraser)

        splitter = QSplitter(self)  # 占位符
        sub_layout.addWidget(splitter)

        self.__label_penThickness = QLabel(self)
        self.__label_penThickness.setText("画笔粗细")
        self.__label_penThickness.setFixedHeight(20)
        sub_layout.addWidget(self.__label_penThickness)

        self.__spinBox_penThickness = QSpinBox(self)
        self.__spinBox_penThickness.setMaximum(40)
        self.__spinBox_penThickness.setMinimum(2)
        self.__spinBox_penThickness.setValue(20)  # 默认粗细为10
        self.__spinBox_penThickness.setSingleStep(2)  # 最小变化值为2
        self.__spinBox_penThickness.valueChanged.connect(
            self.on_PenThicknessChange)  # 关联spinBox值变化信号和函数on_PenThicknessChange
        sub_layout.addWidget(self.__spinBox_penThickness)

        self.__label_penColor = QLabel(self)
        self.__label_penColor.setText("画笔颜色")
        self.__label_penColor.setFixedHeight(20)
        sub_layout.addWidget(self.__label_penColor)

        self.__comboBox_penColor = QComboBox(self)
        self.__fillColorList(self.__comboBox_penColor)  # 用各种颜色填充下拉列表
        self.__comboBox_penColor.currentIndexChanged.connect(
            self.on_PenColorChange)  # 关联下拉列表的当前索引变更信号与函数on_PenColorChange
        sub_layout.addWidget(self.__comboBox_penColor)

        main_layout.addLayout(sub_layout)  # 将子布局加入主布局

    def __fillColorList(self, comboBox):

        index_black = 0
        index = 0
        for color in self.__colorList:
            if color == "black":
                index_black = index
            index += 1
            pix = QPixmap(70, 20)
            pix.fill(QColor(color))
            comboBox.addItem(QIcon(pix), None)
            comboBox.setIconSize(QSize(70, 20))
            comboBox.setSizeAdjustPolicy(QComboBox.AdjustToContents)

        comboBox.setCurrentIndex(index_black)

    def on_PenColorChange(self):
        color_index = self.__comboBox_penColor.currentIndex()
        color_str = self.__colorList[color_index]
        self.__paintBoard.ChangePenColor(color_str)

    def on_PenThicknessChange(self):
        penThickness = self.__spinBox_penThickness.value()
        self.__paintBoard.ChangePenThickness(penThickness)

    def on_btn_Save_Clicked(self):
        savePath = QFileDialog.getSaveFileName(self, 'Save Your Paint', '.\', '*.png')
        print(savePath)
        if savePath[0] == "":
            print("Save cancel")
            return
        image = self.__paintBoard.GetContentAsQImage()
        image.save(savePath[0])

    def on_cbtn_Eraser_clicked(self):
        if self.__cbtn_Eraser.isChecked():
            self.__paintBoard.EraserMode = True  # 进入橡皮擦模式
        else:
            self.__paintBoard.EraserMode = False  # 退出橡皮擦模式

    def Quit(self):
        self.close()


    def yuce(self):
        # #标准化图片 获取Y
        savePath = "./image_rgzn/test.png"
        image = self.__paintBoard.GetContentAsQImage()
        image.save(savePath)
        img = Image.open(savePath)
        img = img.convert("I")
        img = img.resize((28, 28))
        x = np.array(img)
        train_image = x.reshape(1, -1).T / 255
        w,layer = DeepNET.read_ccs("./model/model20221119225104.h5")
        p = DeepNET.predict1(train_image,w)
        self.__text_out.setText(str(p[0]))
        print(p)
        # print("hello")
        # res = QMessageBox.information(self,"人工智能判断为:",str(p),QMessageBox.Yes|QMessageBox.No)
        # res.exec_()
        # 读取数据权重

        # 预测并输出
(6)paintboard.py
'''
Created on 2018年8月9日

@author: Freedom
'''
from PyQt5.QtWidgets import QWidget
from PyQt5.Qt import QPixmap, QPainter, QPoint, QPaintEvent, QMouseEvent, QPen,
    QColor, QSize
from PyQt5.QtCore import Qt


class PaintBoard(QWidget):

    def __init__(self, Parent=None):
        '''
        Constructor
        '''
        super().__init__(Parent)

        self.__InitData()  # 先初始化数据,再初始化界面
        self.__InitView()

    def __InitData(self):

        self.__size = QSize(280, 280)

        # 新建QPixmap作为画板,尺寸为__size
        self.__board = QPixmap(self.__size)
        self.__board.fill(Qt.black)  # 用白色填充画板

        self.__IsEmpty = True  # 默认为空画板
        self.EraserMode = False  # 默认为禁用橡皮擦模式

        self.__lastPos = QPoint(0, 0)  # 上一次鼠标位置
        self.__currentPos = QPoint(0, 0)  # 当前的鼠标位置

        self.__painter = QPainter()  # 新建绘图工具

        self.__thickness = 10  # 默认画笔粗细为10px
        self.__penColor = QColor("white")  # 设置默认画笔颜色为黑色
        self.__colorList = QColor.colorNames()  # 获取颜色列表

    def __InitView(self):
        # 设置界面的尺寸为__size
        self.setFixedSize(self.__size)

    def Clear(self):
        # 清空画板
        self.__board.fill(Qt.black)
        self.update()
        self.__IsEmpty = True

    def ChangePenColor(self, color="black"):
        # 改变画笔颜色
        self.__penColor = QColor(color)

    def ChangePenThickness(self, thickness=10):
        # 改变画笔粗细
        self.__thickness = thickness

    def IsEmpty(self):
        # 返回画板是否为空
        return self.__IsEmpty

    def GetContentAsQImage(self):
        # 获取画板内容(返回QImage)
        image = self.__board.toImage()
        return image

    def paintEvent(self, paintEvent):
        # 绘图事件
        # 绘图时必须使用QPainter的实例,此处为__painter
        # 绘图在begin()函数与end()函数间进行
        # begin(param)的参数要指定绘图设备,即把图画在哪里
        # drawPixmap用于绘制QPixmap类型的对象
        self.__painter.begin(self)
        # 0,0为绘图的左上角起点的坐标,__board即要绘制的图
        self.__painter.drawPixmap(0, 0, self.__board)
        self.__painter.end()

    def mousePressEvent(self, mouseEvent):
        # 鼠标按下时,获取鼠标的当前位置保存为上一次位置
        self.__currentPos = mouseEvent.pos()
        self.__lastPos = self.__currentPos

    def mouseMoveEvent(self, mouseEvent):
        # 鼠标移动时,更新当前位置,并在上一个位置和当前位置间画线
        self.__currentPos = mouseEvent.pos()
        self.__painter.begin(self.__board)

        if self.EraserMode == False:
            # 非橡皮擦模式
            self.__painter.setPen(QPen(self.__penColor, self.__thickness))  # 设置画笔颜色,粗细
        else:
            # 橡皮擦模式下画笔为纯白色,粗细为10
            self.__painter.setPen(QPen(Qt.white, 10))

        # 画线
        self.__painter.drawLine(self.__lastPos, self.__currentPos)
        self.__painter.end()
        self.__lastPos = self.__currentPos

        self.update()  # 更新显示

    def mouseReleaseEvent(self, mouseEvent):
        self.__IsEmpty = False  # 画板不再为空
感谢看完的读者,希望你们都可以对编程产生热爱!
文章出处登录后可见!