文章目录
- Segment Anything Model(SAM)模型解读
- 相关资料
- Abstract
- 摘要
- Segment Anything Task
- Task
- Pre-training
- Zero-shot transfer
- Segment Anything Model
- Image encoder
- Prompt encoder
- Mask decoder
- Segment Anything Data Engine
- Assisted-manual stage
- Semi-automatic stage
- Fully automatic stage
- Segment Anything Model(SAM)模型代码复现
- 开发环境
- 使用点标记预测
- 单点标记预测
- 多点标记预测
- 使用框标记预测
- 单框标记预测
- 多框标记预测
- 混合使用点标记和框标记预测
- 全局分割预测
Segment Anything Model(SAM)模型解读
相关资料
Segment Anything论文
Segment Anything Model官网
官方demo网页端
模型源码
SAM应用:生成包含语义信息的遥感图像分割结果
Abstract
We introduce the Segment Anything (SA) project: a new task, model, and dataset for image segmentation. Using our efficient model in a data collection loop, we built the largest segmentation dataset to date (by far), with over 1 billion masks on 11M licensed and privacy respecting images. The model is designed and trained to be promptable, so it can transfer zero-shot to new image distributions and tasks. We evaluate its capabilities on numerous tasks and find that its zero-shot performance is impressive – often competitive with or even superior to prior fully supervised results. We are releasing the Segment Anything Model (SAM) and corresponding dataset (SA-1B) of 1B masks and 11M images at https://segment-anything.com to foster research into foundation models for computer vision.
摘要
我们提出了Segment Anything(SA)项目:一个用于图像分割的新任务、新模型和新数据集。在数据收集循环中使用我们的高效模型,我们建立了迄今为止最大的分割数据集,在1100万张特许和尊重隐私的图像上有超过10亿个掩码。该模型的设计和训练是可提示的,因此它可以zero-shot的方式转移到新的图像分布和任务。我们对其在众多任务上的能力进行了评估,发现其zero-shot的性能令人印象深刻–通常与先前的全监督结果相比较,甚至优于后者。我们正在发布Segment Anything Model(SAM)和相应的数据集(SA-1B),包括10亿个掩模和1100万张图像,https://segment-anything.com,以促进对计算机视觉基础模型的研究。
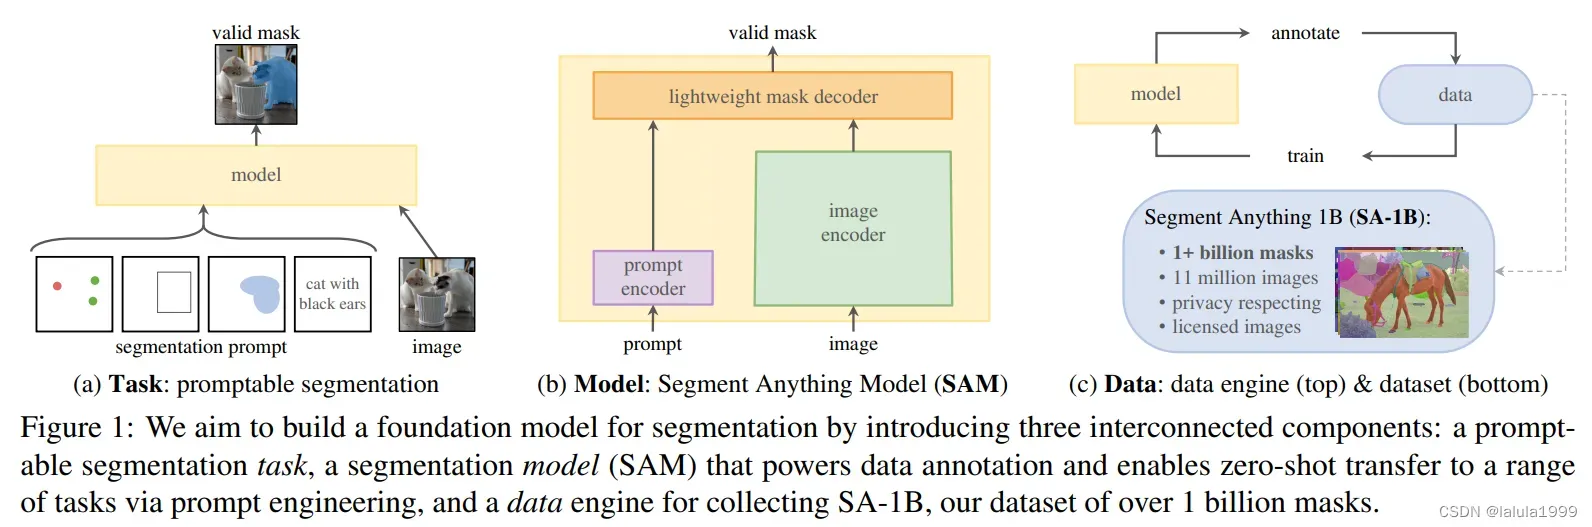
Segment Anything Task
作者的目标是创建一个类似NLP领域的foundation model(例如GPT),它是一种使用prompt engineering机制的预训练模型并可以灵活地解决下游任务。
Task
使用prompt的类型:
- 一组前景、背景标记点
- 粗略的标记框或者掩码
- 自由格式的文字(文章中提到效果并不稳定,官方demo中并未展示)
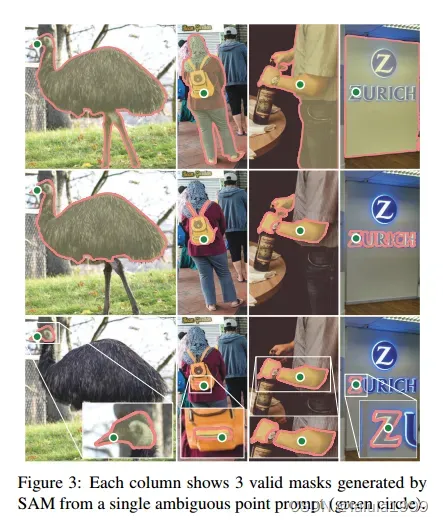
可提示分割任务(promptable segmentation task)是在给定任何提示的情况下返回有效的分割掩码。
有效掩码的要求意味着即使提示不明确,并且可能涉及多个对象,输出也应该是其中至少一个对象的合理掩码。
Pre-training
可提示分割任务提出了一种自然的预训练算法,该算法模拟每个训练样本的prompt序列(例如,点、框、掩码),并将模型的掩码预测与Ground Truth进行比较。
我们的方法与前人的交互式分割工作不同:
- 交互式分割的目的是在足够的用户输入(多次与用户交互并不断优化)后最终预测有效的掩码
- 可提示分割的目的是始终预测任何提示的有效掩码,即使提示不明确(与用户交互后产生多个预测结果)
这确保了预训练的模型在涉及歧义的用例中是有效的,包括我们的数据引擎所要求的自动注释。
Zero-shot transfer
我们的预训练任务赋予了模型在推理时对任何提示做出适当响应的能力,因此下游任务可以通过设计适当的提示来解决。
例如,如果有一个目标检测任务识别出猫的边界框,则可以通过我们的模型使用框作为输入来解决猫实例分割任务。
Segment Anything Model
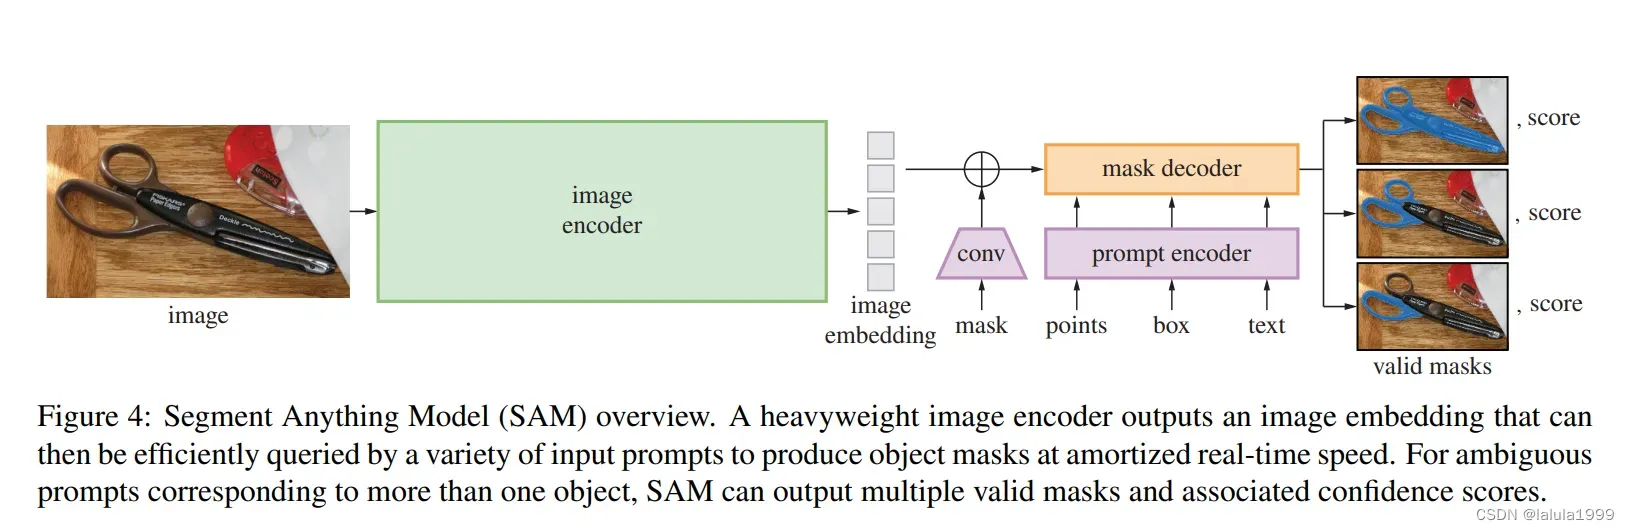
Image encoder
使用MAE预训练的Vision Transformer (ViT)适应高分辨率输入
Prompt encoder
Prompt类型:
- 稀疏类型
点标记:位置编码
框标记:位置编码
文本提示:CLIP - 稠密类型
掩码标记:卷积+使用图像编码进行逐像素求和
Mask decoder
Transformer解码器变种:
- prompt self-attention
- cross-attention(从prompt到image和从image到prompt)
Segment Anything Data Engine
由于分割掩码在互联网上并不丰富,我们构建了一个数据引擎来收集我们的11亿掩码数据集SA-1B(每张图片约有100张掩码)。数据引擎有三个阶段:
- 模型辅助的手动注释阶段
- 混合了自动预测掩码和模型辅助注释的半自动阶段
- 没有注释器输入的情况下生成掩码的全自动阶段
Assisted-manual stage
在第一阶段,类似于经典的交互式分割,一个专业的注释者团队使用基于浏览器的交互式分割工具,通过点击前景/背景对象点来标记掩码。可以使用像素精确的“笔刷”和“橡皮擦”工具来改进掩码。我们的模型辅助注释直接在浏览器中实时运行(使用预先计算的图像嵌入),从而实现真正的交互式体验。我们没有对标记对象施加语义约束,只需要标记出对象即可。我们建议注释者标记他们可以命名或描述的对象,但没有收集这些名称或描述。注释者被要求按突出顺序标记对象。
- 在这一阶段的开始,SAM使用公共分割数据集进行训练
- 在充分标注数据后,SAM仅使用新标注的掩码进行再训练
- 随着Mask的增加,图像编码器从ViT-B调整到ViT-H,其他结构细节也随之演变
我们总共重新训练了我们的模型6次。随着模型的改进,每个掩码的平均注释时间从34秒减少到14秒。随着SAM的改进,每幅图像的平均掩码数量从20个增加到44个掩码。总的来说,在这个阶段,我们从12万张图像中收集了4.3万个掩码。
Semi-automatic stage
在这个阶段,我们的目的是增加掩码的多样性,以提高我们的模型对任何事物的分割能力。为了让注释者专注于不太突出的物体:
- 首先,我们自动检测出置信度高的掩码
- 然后,我们向注释者展示预先填充了这些掩码的图像,并要求他们注释任何其他未注释的物体
- 为了获取置信度高的掩码,我们在所有第一阶段的掩码上训练了一个边界盒检测器,使用一个通用的 “物体 “类别
在这一阶段,我们在18万张图片中又收集了590万个掩码(总共有1020万个掩码)。与第一阶段一样,我们定期在新收集的数据上重新训练我们的模型(5次)。每个掩码的平均注释时间回升到34秒(不包括自动掩码),因为这些物体的标签更具挑战性。每张图片的平均掩码数从44个增加到72个(包括自动掩码)。
Fully automatic stage
在最后阶段,注释是完全自动的。这是可行的,因为我们的模型有两个主要的改进:
- 在这个阶段的开始,我们已经收集了足够多的掩码来大大改进模型,包括前一个阶段的各种掩码
- 到了这个阶段,我们已经开发了模糊感知模型,这使得我们即使在模糊的情况下也能预测有效的掩码。具体来说,我们用一个32×32的规则网格提示模型,并为每个点预测了一组可能对应于有效物体的掩码。有了模糊感知模型,如果一个点位于一个部分或子部分上,我们的模型将返回子部分、部分和整个物体。
我们模型的IoU预测模块被用来选择置信度高的掩码;此外,我们只识别和选择稳定的掩码(如果在0.5 – δ和0.5 + δ处对概率图进行阈值处理的结果是相似的掩码,我们认为掩码是稳定的)。最后,在选择了置信度高和稳定的面具后,我们应用非极大值抑制(NMS)来过滤重复的掩码。为了进一步提高小规格掩码的质量,我们还处理了多个重叠的放大的图像裁剪。我们对数据集中的所有1100万张图像进行了全自动的掩码生成,总共产生了11亿个高质量的掩码。
Segment Anything Model(SAM)模型代码复现
开发环境
- Python 3.6.9
- Pytorch 1.7.0
- torchvision 0.8.1
- cuda 11.0
使用点标记预测
单点标记预测
导入相关库
import numpy as np
import torch
import matplotlib.pyplot as plt
import cv2
更好的可视化点标记、框标记和掩码
def show_mask(mask, ax, random_color=False):
    if random_color:
        color = np.concatenate([np.random.random(3), np.array([0.6])], axis=0)
    else:
        color = np.array([30/255, 144/255, 255/255, 0.6])
    h, w = mask.shape[-2:]
    mask_image = mask.reshape(h, w, 1) * color.reshape(1, 1, -1)
    ax.imshow(mask_image)

def show_points(coords, labels, ax, marker_size=375):
    pos_points = coords[labels==1]
    neg_points = coords[labels==0]
    ax.scatter(pos_points[:, 0], pos_points[:, 1], color='green', marker='*', s=marker_size, edgecolor='white', linewidth=1.25)
    ax.scatter(neg_points[:, 0], neg_points[:, 1], color='red', marker='*', s=marker_size, edgecolor='white', linewidth=1.25)

def show_box(box, ax):
    x0, y0 = box[0], box[1]
    w, h = box[2] - box[0], box[3] - box[1]
    ax.add_patch(plt.Rectangle((x0, y0), w, h, edgecolor='green', facecolor=(0,0,0,0), lw=2))
读取数据
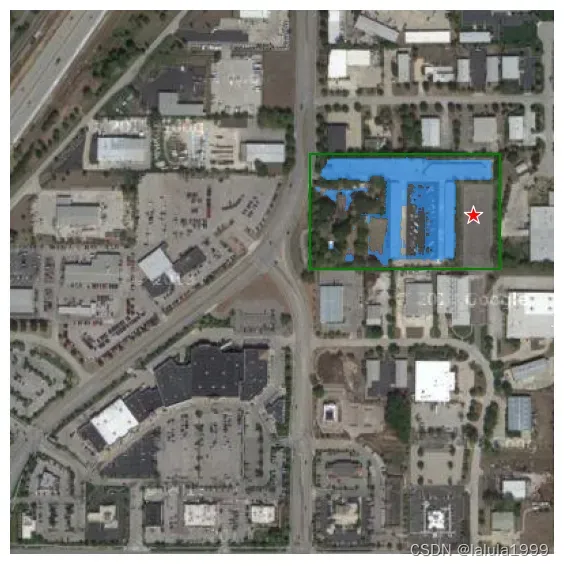
image = cv2.imread('/lvdongrui/segment_anything/Industrial_Facilities_version1_5.jpg')
# 还原原图像色彩
image = cv2.cvtColor(image, cv2.COLOR_BGR2RGB)
plt.figure(figsize=(10,10))
plt.imshow(image)
plt.axis('on')
plt.show()

加载SAM模型
import sys
from segment_anything import sam_model_registry, SamPredictor

sam_checkpoint = '/lvdongrui/segment_anything/sam_vit_h_4b8939.pth' # 预训练模型地址
model_type = "vit_h"

device = "cuda" # 使用GPU

sam = sam_model_registry[model_type](checkpoint=sam_checkpoint)
sam.to(device=device)

# 调用预测模型
predictor = SamPredictor(sam)

# 通过调用`SamPredictor.set_image`来处理图像以产生一个图像嵌入。`SamPredictor`会记住这个嵌入,并将其用于随后的掩码预测。
predictor.set_image(image)
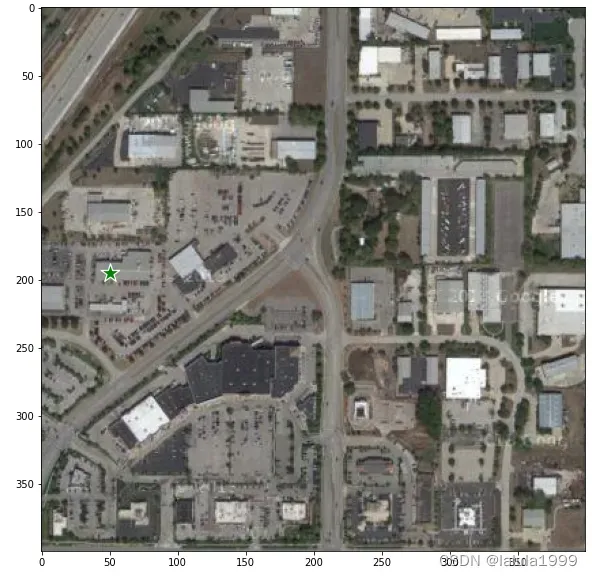
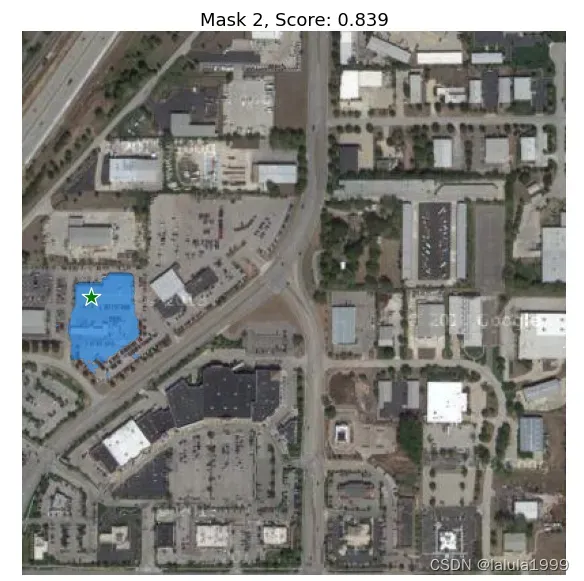
加入点标记
# 加入想要获取目标的标记点,假设我们想获取如图标记点的建筑物
input_point = np.array([[50, 195]])
input_label = np.array([1])

plt.figure(figsize=(10,10))
plt.imshow(image)
show_points(input_point, input_label, plt.gca())
plt.axis('on')
plt.show()
预测并产生结果
# 用`SamPredictor.predict`进行预测。该模型返回掩码、这些掩码的质量预测和低分辨率的掩码对数,可传递给下一次迭代预测。
masks, scores, logits = predictor.predict(
    point_coords=input_point,
    point_labels=input_label,
    multimask_output=True, # 是否产生多个掩码
)
# 默认产生3个掩码
masks.shape  # (number_of_masks) x H x W
![]()
可视化结果
# 将3个掩码可视化
for i, (mask, score) in enumerate(zip(masks, scores)):
    plt.figure(figsize=(10,10))
    plt.imshow(image)
    show_mask(mask, plt.gca())
    show_points(input_point, input_label, plt.gca())
    plt.title(f"Mask {i+1}, Score: {score:.3f}", fontsize=18)
    plt.axis('off')
    plt.show()


多点标记预测
添加正点标记
# 添加新标记点进行辅助标记
input_point = np.array([[50, 195], [72,190]])
input_label = np.array([1, 1])

mask_input = logits[np.argmax(scores), :, :]  # Choose the model's best mask

masks, scores, logits = predictor.predict(
    point_coords=input_point,
    point_labels=input_label,
    mask_input=mask_input[None, :, :],
    multimask_output=False, # 只产生一个掩码
)
masks.shape
![]()
可视化结果
# 将掩码可视化
plt.figure(figsize=(10,10))
plt.imshow(image)
show_mask(masks, plt.gca())
show_points(input_point, input_label, plt.gca())
plt.title(f"Score: {score:.3f}", fontsize=18)
plt.axis('off')
plt.show()

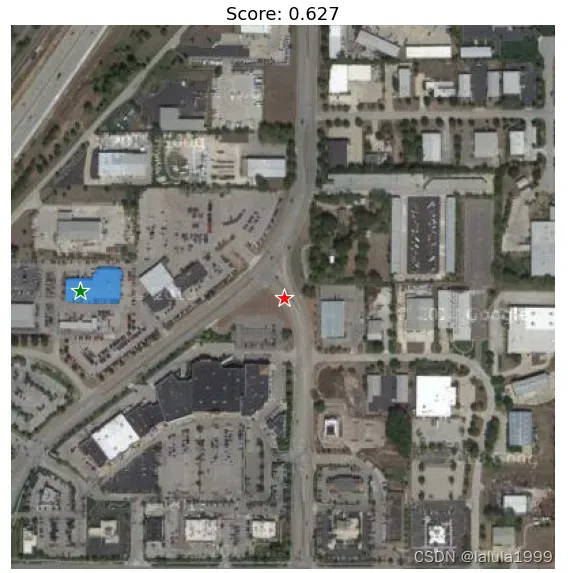
添加负点标记
# 使用排除点
input_point = np.array([[50, 195], [200, 200]])
input_label = np.array([1, 0])

mask_input = logits[np.argmax(scores), :, :]

masks, scores, _ = predictor.predict(
    point_coords=input_point,
    point_labels=input_label,
    mask_input=mask_input[None, :, :],
    multimask_output=False,
)

plt.figure(figsize=(10, 10))
plt.imshow(image)
show_mask(masks, plt.gca())
show_points(input_point, input_label, plt.gca())
plt.title(f"Score: {score:.3f}", fontsize=18)
plt.axis('off')
plt.show()
可视化结果
使用框标记预测
单框标记预测
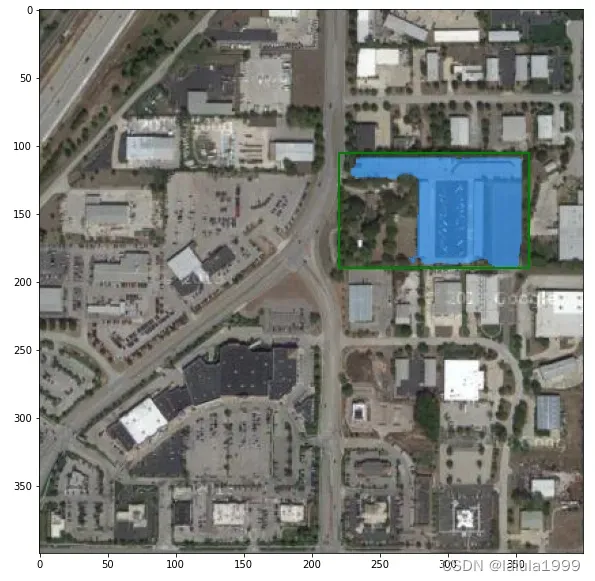
# 使用box进行输入
input_box = np.array([220, 105, 360, 190]) # 左 上 右 下

masks, score, _ = predictor.predict(
    point_coords=None,
    point_labels=None,
    box=input_box[None, :],
    multimask_output=False,
)

plt.figure(figsize=(10, 10))
plt.imshow(image)
show_mask(masks[0], plt.gca())
show_box(input_box, plt.gca())
# plt.title(f"Score: {score:.3f}", fontsize=18)
plt.axis('on')
plt.show()
可视化结果
多框标记预测
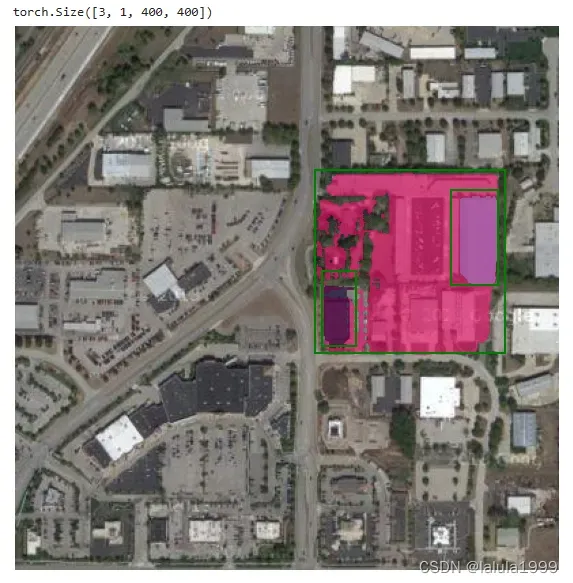
# 左 上 右 下
input_boxes = torch.tensor([
    [220, 105, 360, 240],
    [320, 120, 355, 190],
    [225, 180, 250, 235],
], device=predictor.device)

transformed_boxes = predictor.transform.apply_boxes_torch(input_boxes, image.shape[:2])
masks, _, _ = predictor.predict_torch(
    point_coords=None,
    point_labels=None,
    boxes=transformed_boxes,
    multimask_output=False,
)

print(masks.shape)  # (batch_size) x (num_predicted_masks_per_input) x H x W

plt.figure(figsize=(10, 10))
plt.imshow(image)
for mask in masks:
    show_mask(mask.cpu().numpy(), plt.gca(), random_color=True)
for box in input_boxes:
    show_box(box.cpu().numpy(), plt.gca())
plt.axis('off')
plt.show()
可视化结果
混合使用点标记和框标记预测
# 混合使用box和标记点
input_box = np.array([220, 105, 360, 190])
input_point = np.array([[340, 150]])
input_label = np.array([0])

masks, _, _ = predictor.predict(
    point_coords=input_point,
    point_labels=input_label,
    box=input_box,
    multimask_output=False,
)

plt.figure(figsize=(10, 10))
plt.imshow(image)
show_mask(masks[0], plt.gca())
show_box(input_box, plt.gca())
show_points(input_point, input_label, plt.gca())
plt.axis('off')
plt.show()
可视化结果
全局分割预测
导入相关库和优化可视化效果
import numpy as np
import torch
import matplotlib.pyplot as plt
import cv2

def show_anns(anns):
    if len(anns) == 0:
        return
    sorted_anns = sorted(anns, key=(lambda x: x['area']), reverse=True)
    ax = plt.gca()
    ax.set_autoscale_on(False)
    polygons = []
    color = []
    for ann in sorted_anns:
        m = ann['segmentation']
        img = np.ones((m.shape[0], m.shape[1], 3))
        color_mask = np.random.random((1, 3)).tolist()[0]
        for i in range(3):
            img[:,:,i] = color_mask[i]
        ax.imshow(np.dstack((img, m*0.35)))
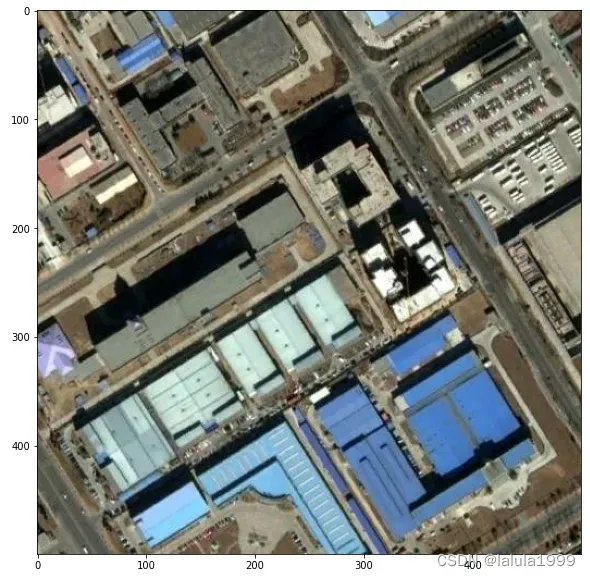
读取数据
image = cv2.imread('/lvdongrui/segment_anything/beijing_B_2.jpg')
# 还原原图像色彩
image = cv2.cvtColor(image, cv2.COLOR_BGR2RGB)
plt.figure(figsize=(10,10))
plt.imshow(image)
plt.axis('on')
plt.show()
加载模型
import sys
from segment_anything import sam_model_registry, SamAutomaticMaskGenerator, SamPredictor
# 加载模型
sam_checkpoint = '/lvdongrui/segment_anything/sam_vit_h_4b8939.pth'
model_type = "vit_h"
device = "cuda"
sam = sam_model_registry[model_type](checkpoint=sam_checkpoint)
sam.to(device=device)
# 调用全局分割模型
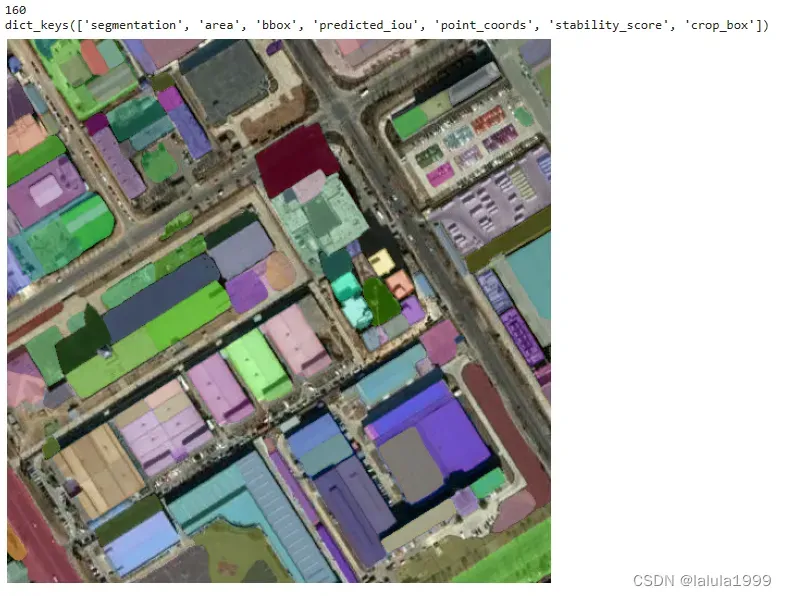
mask_generator = SamAutomaticMaskGenerator(sam)
预测并输出可视化结果
masks = mask_generator.generate(image)
print(len(masks)) # 产生的掩码数量
print(masks[0].keys()) # 第1个掩码内的相关属性

plt.figure(figsize=(10,10))
plt.imshow(image)
show_anns(masks)
plt.axis('off')
plt.show()
调整相关参数
# 配置相关参数
mask_generator_2 = SamAutomaticMaskGenerator(
    model=sam,
    points_per_side=32,
    pred_iou_thresh=0.86, # IOU阈值
    stability_score_thresh=0.92, # 稳定性得分阈值
    crop_n_layers=1,
    crop_n_points_downscale_factor=2,
    min_mask_region_area=100,  # Requires open-cv to run post-processing
)

masks2 = mask_generator_2.generate(image)
print(len(masks2)) # 产生的掩码数量
print(masks2[0].keys())

plt.figure(figsize=(10,10))
plt.imshow(image)
show_anns(masks2)
plt.axis('off')
plt.show()
SamAutomaticMaskGenerator()参数详解:
- model (Sam):用于掩膜预测的SAM模型。
- points_per_side (int or None): 沿着图像一侧采样的点的数量。点的总数是point_per_side**2。如果没有,’point_grids’必须提供明确的点采样。
- points_per_batch (int):设置模型同时运行的点的数量。更高的数字可能会更快,但会使用更多的GPU内存。
- pred_iou_thresh (float): 滤波阈值,在[0,1]中,使用模型的预测掩膜质量。
- stability_score_thresh (float):滤波阈值,在[0,1]中,使用掩码在用于二进制化模型的掩码预测的截止点变化下的稳定性。
- stability_score_offset (float):计算稳定性分数时,对截止点的偏移量。
- box_nms_thresh (float):非最大抑制用于过滤重复掩码的箱体IoU截止点。
- crop_n_layers (int):如果>0,蒙版预测将在图像的裁剪上再次运行。设置运行的层数,其中每层有2**i_layer的图像裁剪数。
- crop_nms_thresh (float):非最大抑制用于过滤不同作物之间的重复掩码的箱体IoU截止值。
- crop_overlap_ratio (float):设置作物重叠的程度。在第一个作物层中,作物将以图像长度的这个分数重叠。在第一个裁剪层中,裁剪物将以图像长度的这一比例重叠,以后的裁剪层中,更多的裁剪物将缩小这一重叠。
- crop_n_points_downscale_factor (int):在图层n中每面采样的点数被crop_n_points_downscale_factor**n缩减。
- point_grids (list(np.ndarray) or None):用于取样的明确网格的列表,归一化为[0,1]。列表中的第n个网格被用于第n个作物层。与points_per_side排他。
- min_mask_region_area (int):如果>0,后处理将被应用于移除面积小于min_mask_region_area的遮罩中的不连接区域和孔。需要opencv。
- output_mode (str):掩模的返回形式。可以是’binary_mask’, ‘uncompressed_rle’, 或者’coco_rle’。coco_rle’需要pycocotools。对于大的分辨率,’binary_mask’可能会消耗大量的内存。
SamAutomaticMaskGenerator()参数默认值:
model: Sam,
points_per_side: Optional[int] = 32,
points_per_batch: int = 64,
pred_iou_thresh: float = 0.88,
stability_score_thresh: float = 0.95,
stability_score_offset: float = 1.0,
box_nms_thresh: float = 0.7,
crop_n_layers: int = 0,
crop_nms_thresh: float = 0.7,
crop_overlap_ratio: float = 512 / 1500,
crop_n_points_downscale_factor: int = 1,
point_grids: Optional[List[np.ndarray]] = None,
min_mask_region_area: int = 0,
output_mode: str = “binary_mask”,
文章出处登录后可见!