💥本文中出自CSDN:落难Coder,无任何授权,不允许私自转载!
一、🏴总概述
YOLOv5以其简单易用出色的性能被广泛应用在比赛、课设、毕设、工业落地等各个方面,但是对于小白来说,去使用它仍然有很大的困难。博主立志做一个全网最权威最详细的教学内容,教你快速让YOLOv5迭代到你的任何项目中。本次带来的内容包括:
- ✨GPU/CPU环境详解及安装
- 🌟Labelimg数据标注及数据转化
- 🌈YOLOv5模型训练与测试
- 🌞YOLOv5模型导出
- 💌tfjs部署导出模型
- 🧠以API方式部署模型
- 🧜♀️以微信小程序方式部署模型
- 💥以GUI界面方式部署使用模型
- 💦ONNX部署(便于迁移部署)
二、✨GPU/CPU环境详解及安装
- 什么是CPU?什么GPU?
(1)CPU主要用于串行运算;而GPU则是大规模并行运算。由于深度学习中样本量巨大,参数量也很大,所以GPU的作用就是加速网络运算。
(2)CPU计算神经网络也是可以的,算出来的神经网络放到实际应用中效果也很好,只不过速度会很慢罢了。而目前GPU运算主要集中在矩阵乘法和卷积上,其他的逻辑运算速度并没有CPU快。
- 我该选择使用GPU还是CPU?
GPU和CPU的选择一方面看自己的需求,另一方面取决于自己的PC性能(如果你拥有一块RTX3060,而你刚好对深度学习感兴趣,那你有什么利用不利用起来它呢)。
接下来我们详细说一下怎么安装GPU环境,安装GPU环境需要我们首先安装CUDA(CUDA(ComputeUnified Device Architecture),是显卡厂商NVIDIA推出的运算平台。 CUDA是一种由NVIDIA推出的通用并行计算架构,该架构使GPU能够解决复杂的计算问题。)和CUDNN(NVIDIA cuDNN是用于深度神经网络的GPU加速库。它强调性能、易用性和低内存开销。):
2.1查看本机显卡
首先我们要确定本机是否有独立显卡,在计算机管理-设备管理器-显示适配器中,查看是否有独立显卡。
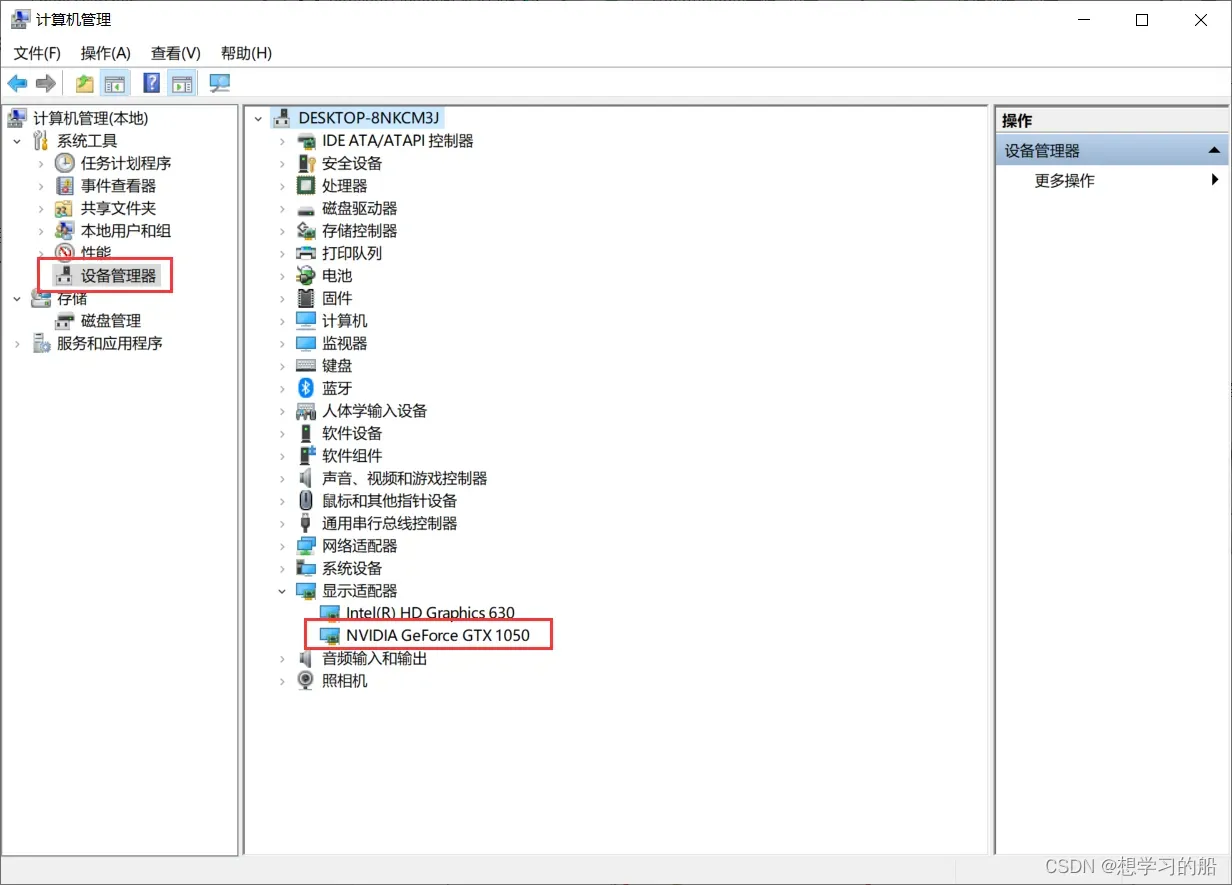
可以看到本机有一个集成显卡和独立显卡NVIDIA GetForce GTX 1050。
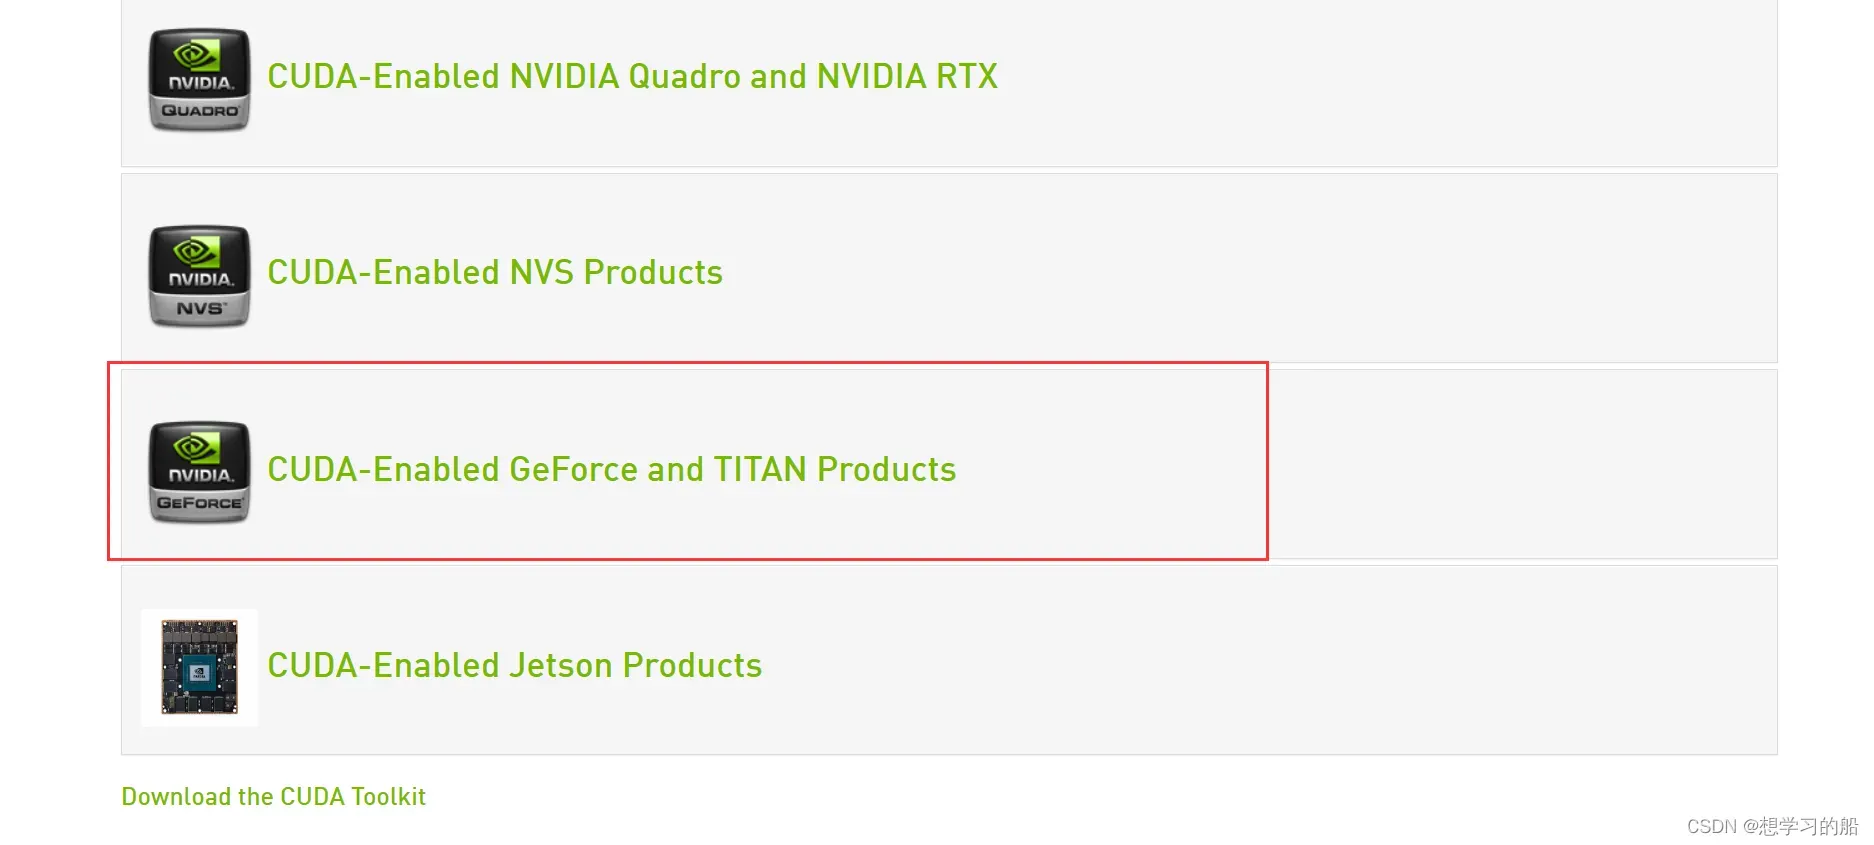
2.2查询是否支持CUDA安装
进入:https://developer.nvidia.com/cuda-gpus :
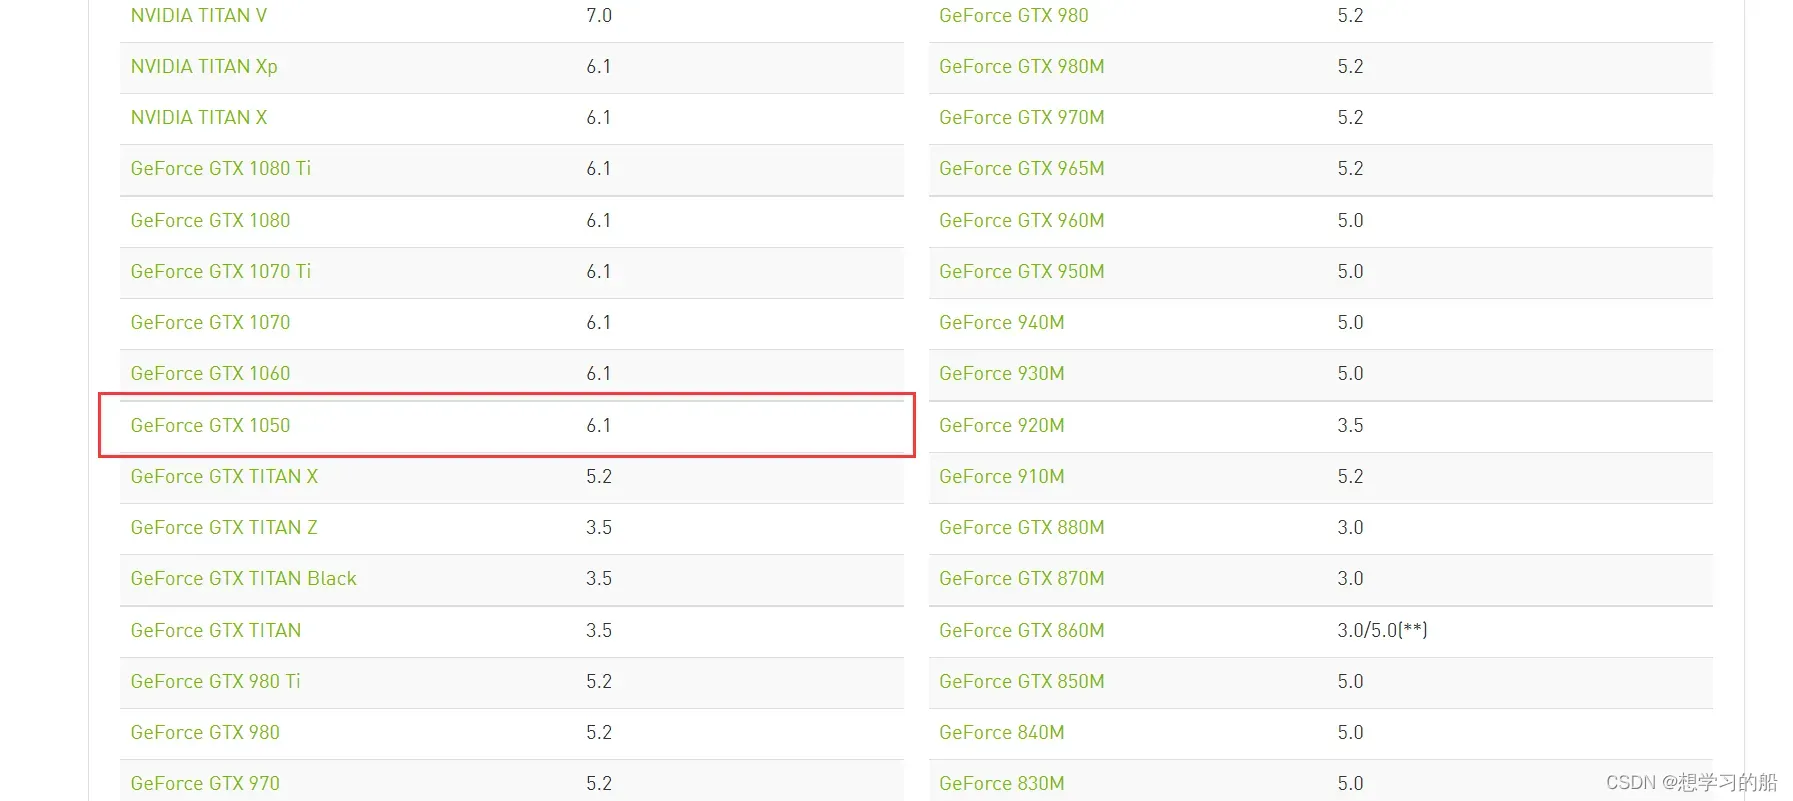
从上图中,可以看到我本机的独立显卡是支持CUDA安装的,计算力是6.1。
2.3CUDA下载
进入https://developer.nvidia.com/cuda-toolkit-archive :
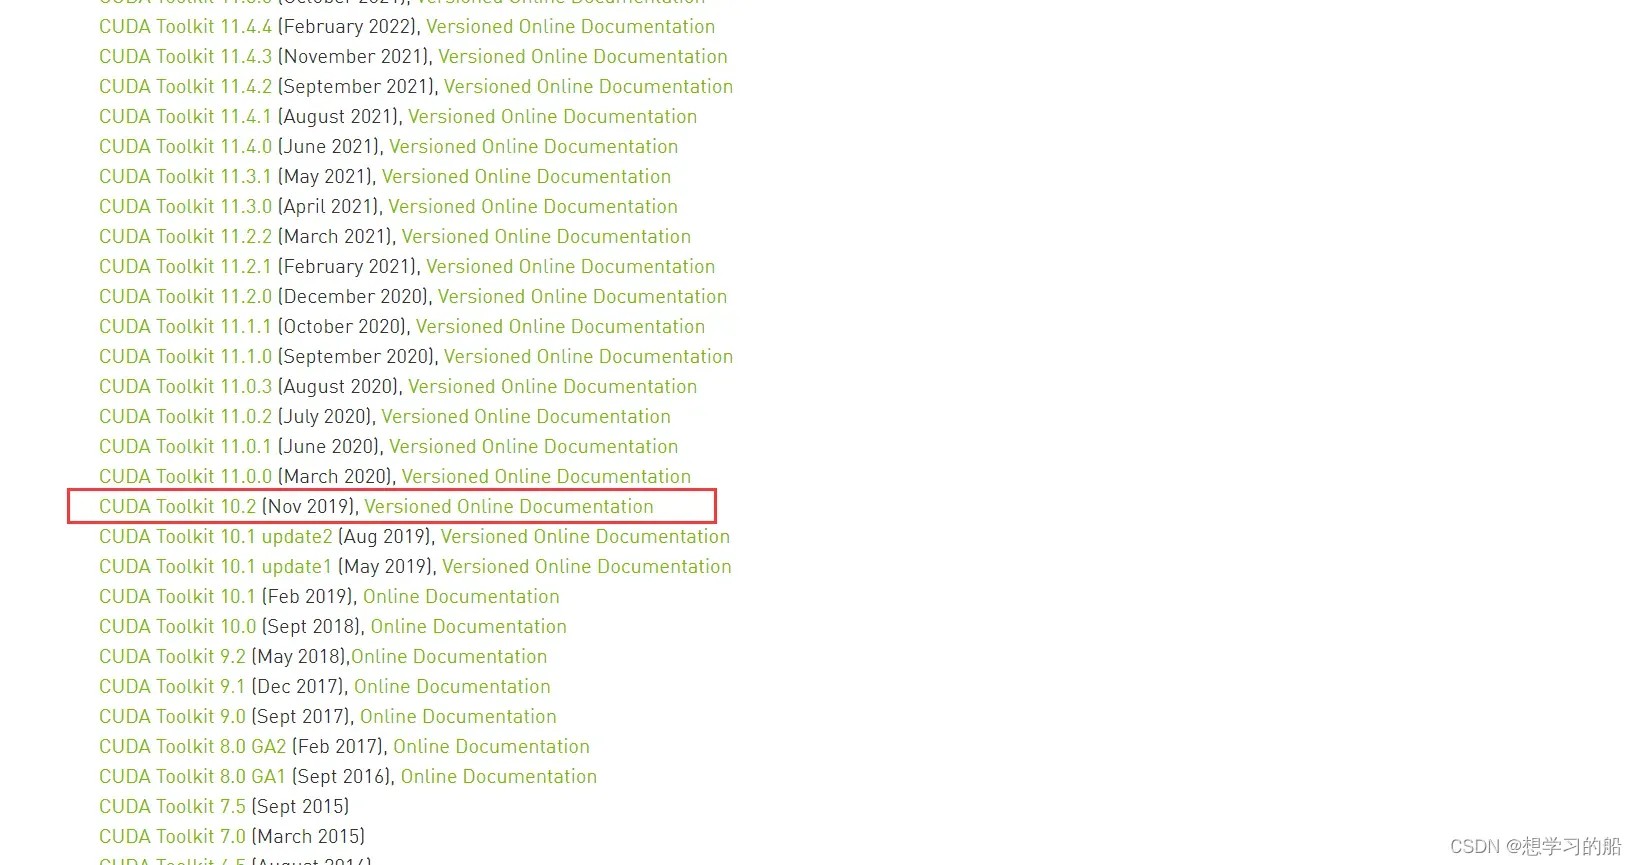
在这里会有众多CUDA版本,关于如何选择,我不能给出详细说法,只能说说我的理解。(
CUDA的安装主要取决于个人使用要求和硬件性能,如你是RTX3060及以上的30系显卡我推荐你安装CUDA11.x,如果你像我一样是RTX1050这样不太高端显卡,选择CUDA9.x和CUDA10.x均可以,以我的习惯就是下载CUDA10.2)
选择版本进入下载页面:
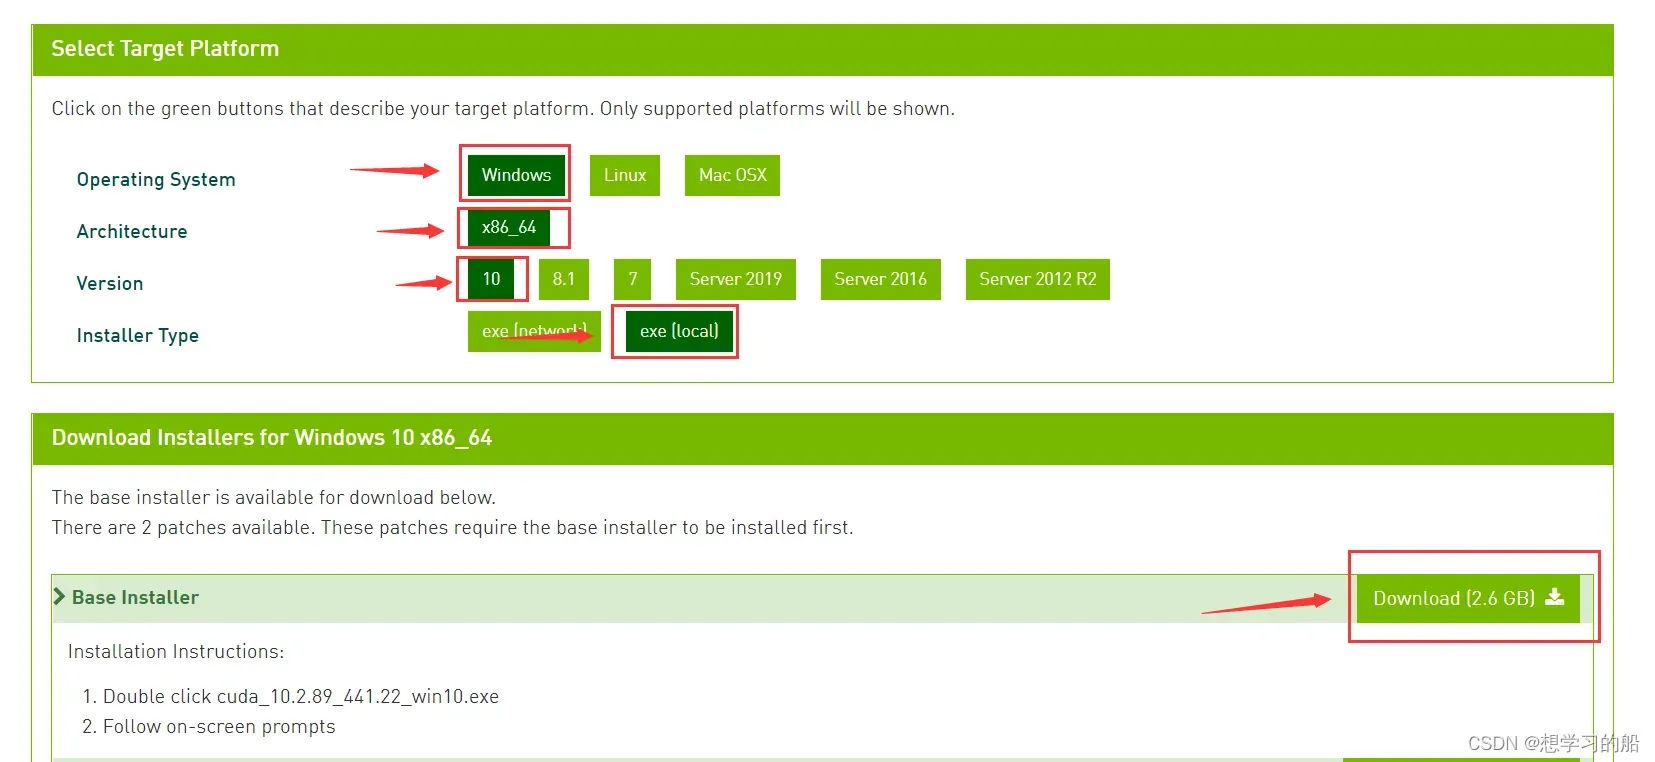
*从上到下依次单击选择:Operating System、Architecture、Version、Installer Type、“Download`。等待下载,下载完成后你就会获得安装包。
2.4CUDA安装
双击打开,显示解压安装目录,不需要改变,默认即可。
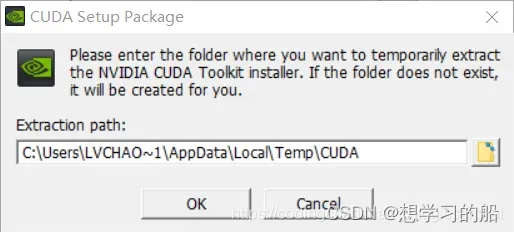
默认安装,保证后续过程不会出现太多其他不必要的问题!
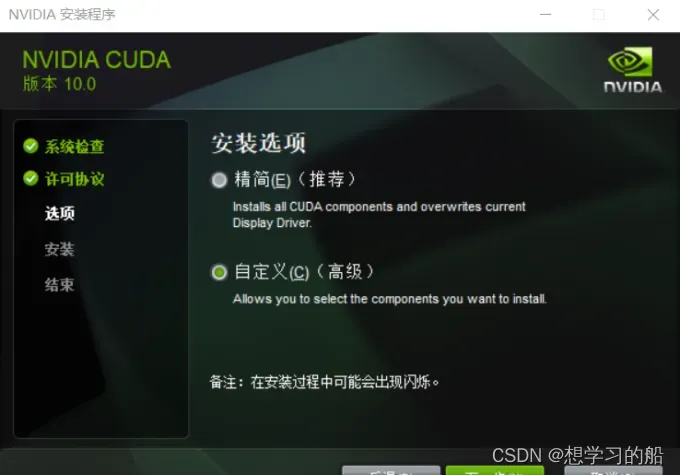
接下来,进入NVIDIA安装过程,在这安装过程中,我一开始直接选择的精简安装,如果由于VS的原因,导致无法正常安装,可以换成自定义的安装方式,并将VS勾给去掉,便可以正常安装了,至于CUDA的安装目录,大家默认安装在C盘即可。
2.5CUDA环境变量设置
安装完成之后,便是配置环境变量。方法为:右键我的电脑–属性–高级系统设置–环境变量–系统变量–找到变量名为PATH–双击打开,添加以下环境变量。
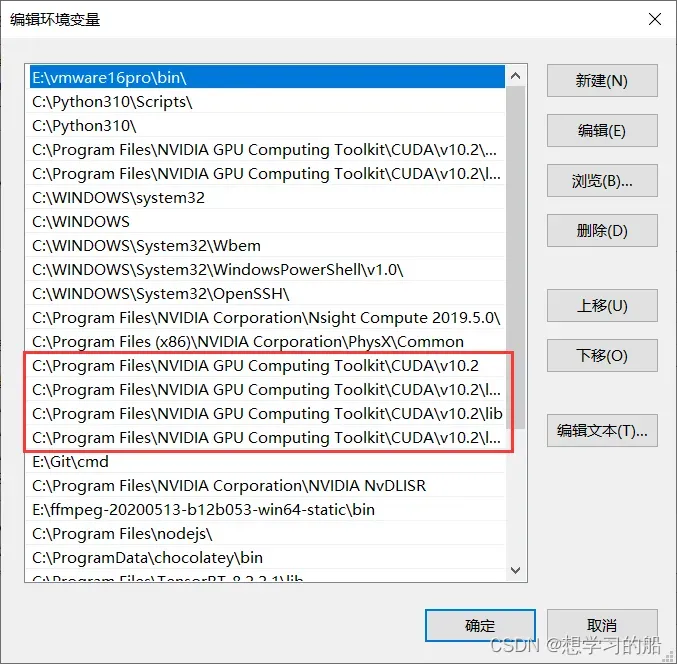
里面新增的内容包括:
C:\Program Files\NVIDIA GPU Computing Toolkit\CUDA\v10.2
C:\Program Files\NVIDIA GPU Computing Toolkit\CUDA\v10.2\lib\x64
C:\Program Files\NVIDIA GPU Computing Toolkit\CUDA\v10.2\lib
C:\Program Files\NVIDIA GPU Computing Toolkit\CUDA\v10.2\libnvvp
如果你前面默认安装路径,那么大概率你跟我新增内容一样(如果你选择的其他安装路径,找到相应路径添加即可;如果你选择的其他版本,更换上面内容的
10.2为你的版本即可!)
2.6测试CUDA安装
打开cmd输入:
$ nvcc -V
nvcc: NVIDIA (R) Cuda compiler driver
Copyright (c) 2005-2019 NVIDIA Corporation
Built on Wed_Oct_23_19:32:27_Pacific_Daylight_Time_2019
Cuda compilation tools, release 10.2, V10.2.89
有以上输出即为安装正确!
2.7CUDNN下载
进入https://developer.nvidia.com/zh-cn/cudnn ,点击下载cuDNN会出现:

这里写的很明白,就是必须你注册登录账户才有资格下载,因此你注册一个账户登录进去即可!
登录进去以后,点击选择相应的下载即可,但是要注意:CUDA的版本与CUDNN的版本要一致
在要下载的CUDNN的点击名称最后会有
CUDA 10.0或者CUDA 10.2这样的后缀,这就是代表与相应CUDA对应版本的CUDNN。
2.8CUDNN安装
下载之后,你会得到一个zip的压缩包。解压缩,将CUDNN压缩包里面的bin、include、lib三整个文件夹直接复制到CUDA的安装目录下,覆盖掉原来CUDA的这三个文件夹 即可。
至此,所有的安装工作已经完成,你可以接下来去安装gpu版本的各种库了。
2.9GPU版本的Pytorch安装
(1)🟢在线安装
有了本地的GPU环境,我们就可以安装GPU版本的Pytorch了。进入https://pytorch.org/ ,点击INXTALL:
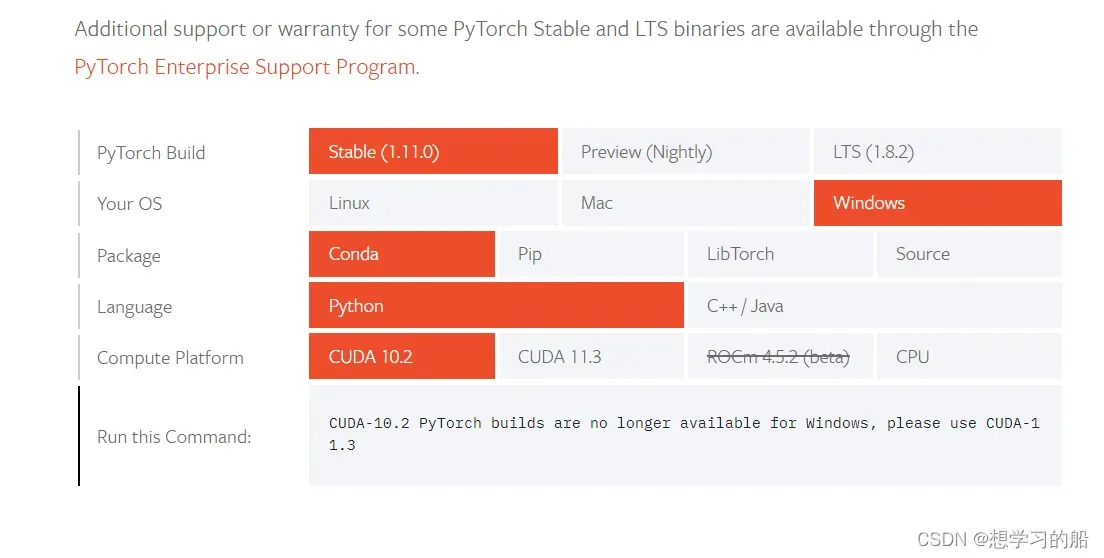
根据自己的需求和安装的CUDA的版本对应安装Pytorch,复制输出的命令即可。如果下方Run this Command提醒CUDA-10.2 PyTorch builds are no longer available for Windows, please use CUDA-11.3 , 可以访问:https://pytorch.org/get-started/previous-versions/ 查找之前的版本在线安装。
(2)🟡离线安装
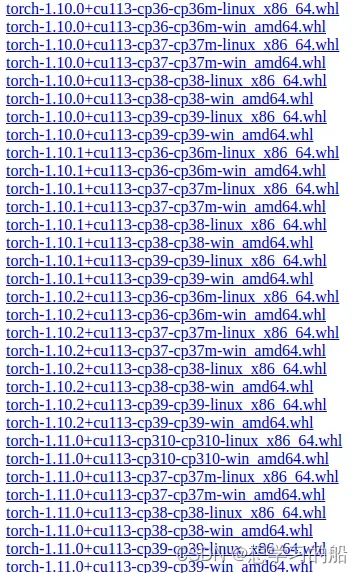
📌 方法一:进入官网下载地址,torch安装包列表 | torchvision安装包列表
📌 方法二:进入官网指定的CUDA版本下载地址:https://download.pytorch.org/whl/cu113/torch_stable.html (以CUDA11.3为例)
# 标*部分可以根据自己的CUDA型号进行搜索,比如CUDA 10.2对应为102,CUDA11.3对应为113
https://download.pytorch.org/whl/cu***/torch_stable.html
📌 根据自己的实验环境,包括操作系统、CUDA类型、Python版本等,选择安装的torch和torchvision的安装包
pip install ./torch-***.whl # 先安装
pip install ./torchvision-***.whl # 后安装
注意:这里存在安装顺序,由于
torch是torchvision的上级安装包,如果先安装torchvision,则会自动下载torch安装包。因此先安装torch,再安装torchvision
👉最后,给大家放一个Pytorch和torchvision对应的版本表:https://github.com/pytorch/pytorch/wiki/PyTorch-Versions
至此,所有比较麻烦的环境安装问题基本解决完成了,接下来我们就可以去找数据、标数据、训数据了。
三、🌟Labelimg数据标注及数据转化
3.1初识Labelimg
用于深度网络训练的数据集做标注的方法和工具有好多,像Labelme、labelImg、yolo_mark、Vatic、Sloth等等,此处暂时只介绍其中的一种标注工具:labelImg。Labelimg 是一款开源的数据标注工具,可以标注三种格式:
1.PascalVOC标签格式,保存为xml文件
2.YOLO标签格式,保存为txt文件
3.CreateML标签格式,保存为json文件
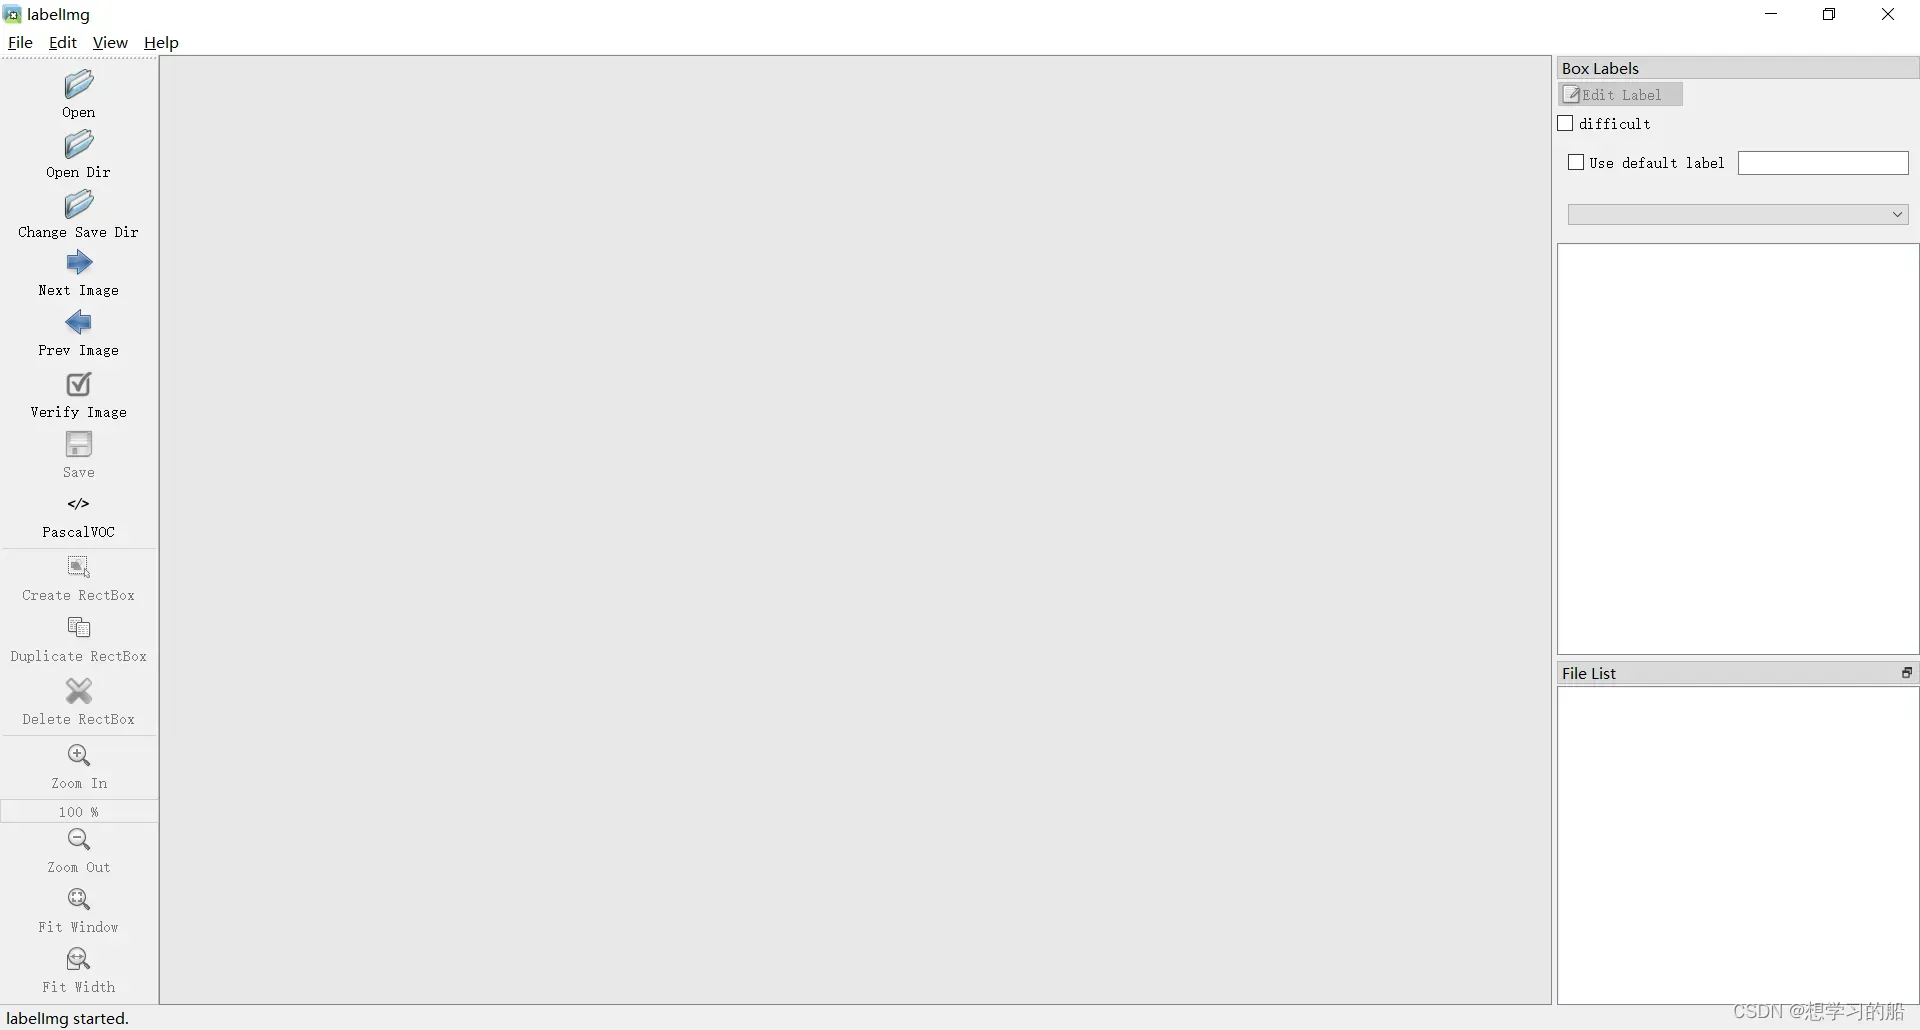
可以看到这是它的主页,唯一不太好的方面是,它是英文界面,不太友好,这里我改了一个中文版本的labelImg,大一可以去下载使用!
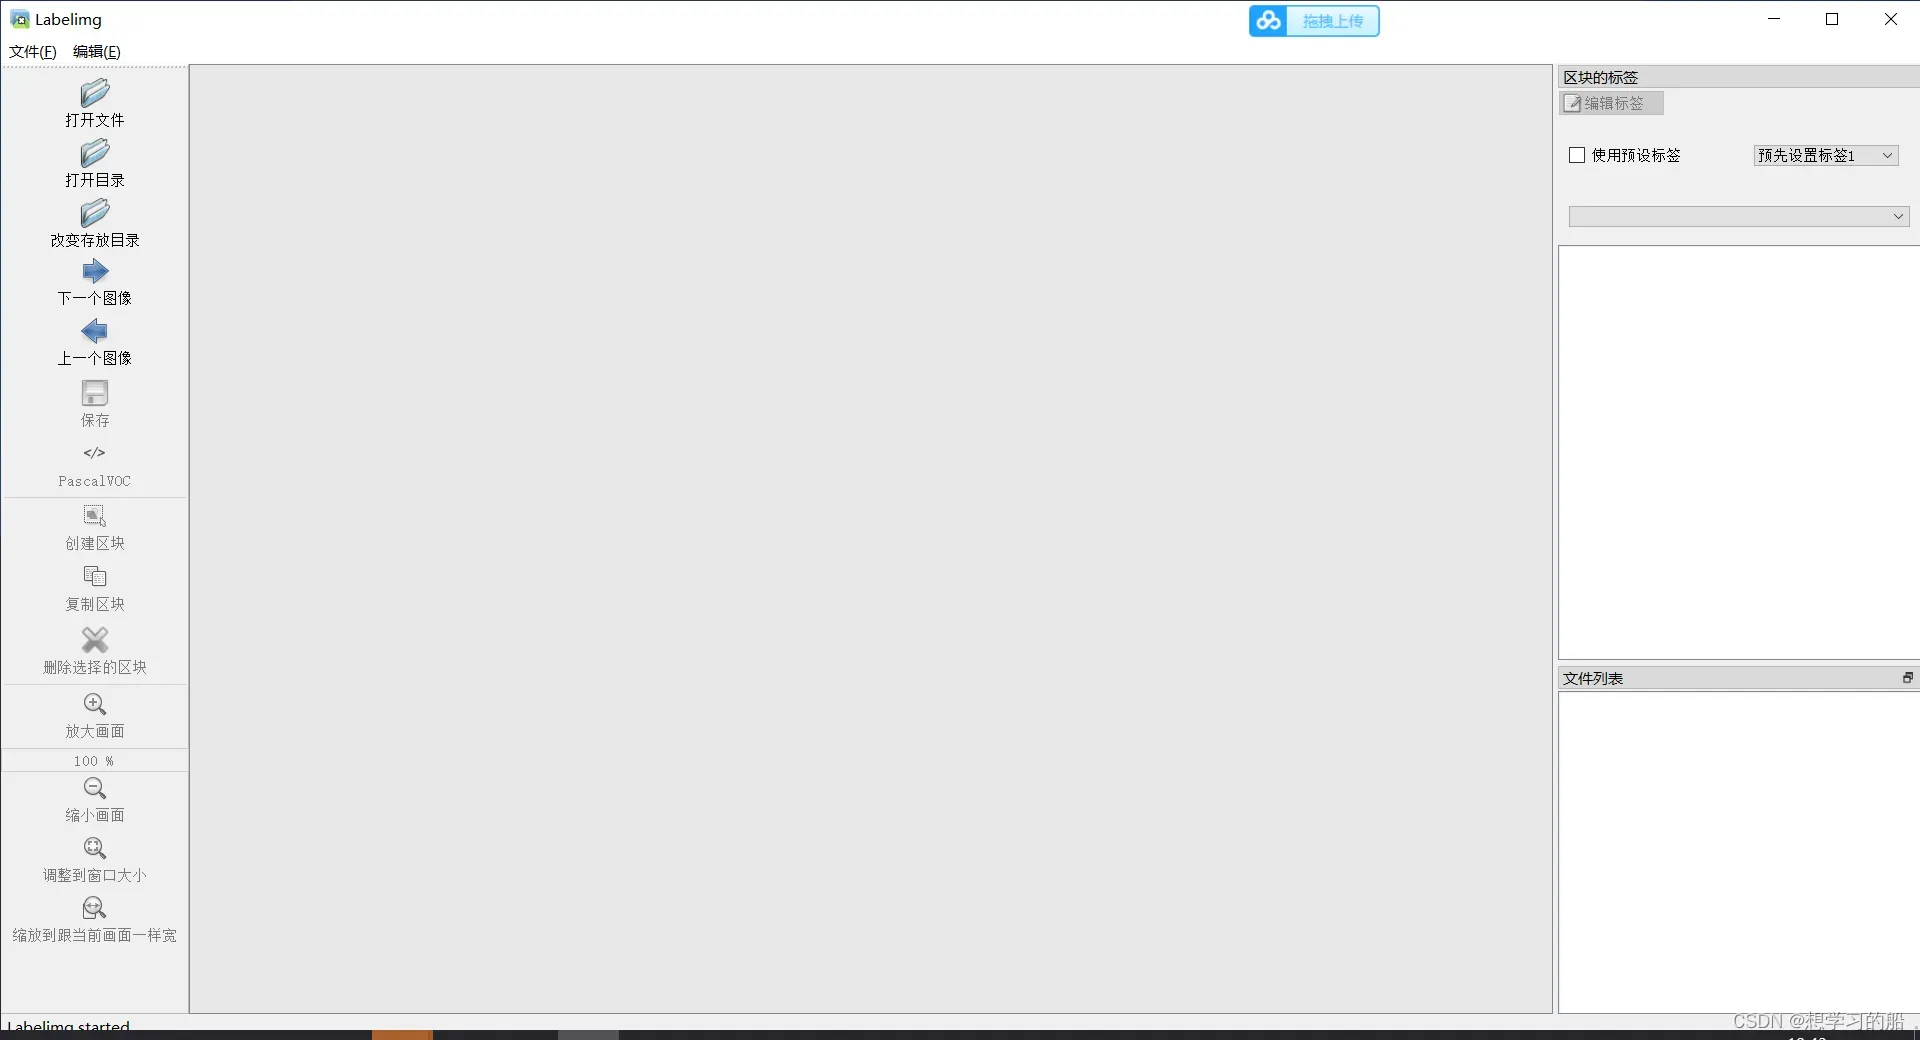
👁️🗨️中文版本的labelImg下载
3.2Labelimg标注
我们找一个新的位置,新建两个文件夹:Annotations和JPEGImages,把自己要标注的图像数据放在JPEGImages,然后打开labelimg进行标注就可以了。
.
│
├─Annotations
│		空
└─JPEGImages
        1.jpg
        2.jpg
        3.jpg
        ...
注意如果你发现你的图片的后缀不一致,最好是修改成一样的,避免后续的麻烦!!!(可以看到我这里JPEGImages文件夹下都是.jpg结尾的)
如果你想把某个后缀改成另外一个,可以在JPEGImages文件夹新建一个
rename.bat,写入:ren *.jpg *.jpeg # 这里的意思是将.jpg修改成.jpeg修改完成后,记得把这个
rename.bat删除哦
超级详细的标注过程看这里:YOLO数据集制作1(含LabelImg工具讲解)
标注完成以后是这样的:
.
│
├─Annotations
│		1.xml
|       2.xml
|       3.xml
|       ...
└─JPEGImages
        1.jpg
        2.jpg
        3.jpg
        ...
3.3数据转化
- 为什么转化?
我们标注完成的形式是VOC格式,但是YOLOv5的格式是yolo格式,也就是txt文件标注的。
⚡接下来新建的所有代码,我把大家需要修改的地方用中文做了标注!!!
新建get_labels.py:
import xml.dom.minidom as xmldom
import os

annotation_path=r'./Annotations/'
annotation_names=[os.path.join(annotation_path,i) for i in os.listdir(annotation_path)]

labels = list()
for names in annotation_names:
    xmlfilepath = names
    domobj = xmldom.parse(xmlfilepath)
    elementobj = domobj.documentElement
    subElementObj = elementobj.getElementsByTagName("object")
    for s in subElementObj:
        label=s.getElementsByTagName("name")[0].firstChild.data
        #print(label)
        if label not in labels:
            labels.append(label)
print(labels)
新建voc2yolo.py:
import xml.etree.ElementTree as ET
import pickle
import os
from os import listdir, getcwd
from os.path import join

# 把运行get_labels.py获得的输出直接贴过来
classes = ['bag','cup','key','phone','wallet']

def convert(size, box):
    dw = 1./(size[0])
    dh = 1./(size[1])
    x = (box[0] + box[1])/2.0 - 1
    y = (box[2] + box[3])/2.0 - 1
    w = box[1] - box[0]
    h = box[3] - box[2]
    x = x*dw
    w = w*dw
    y = y*dh
    h = h*dh
    if w>=1:
        w=0.99
    if h>=1:
        h=0.99
    return (x,y,w,h)

def convert_annotation(rootpath,xmlname):
    xmlpath = rootpath + '/Annotations'
    xmlfile = os.path.join(xmlpath,xmlname)
    with open(xmlfile, "r", encoding='UTF-8') as in_file:
      txtname = xmlname[:-4]+'.txt'
      print(txtname)
      txtpath = rootpath + '/worktxt'
      if not os.path.exists(txtpath):
        os.makedirs(txtpath)
      txtfile = os.path.join(txtpath,txtname)
      with open(txtfile, "w+" ,encoding='UTF-8') as out_file:
        tree=ET.parse(in_file)
        root = tree.getroot()
        size = root.find('size')
        w = int(size.find('width').text)
        h = int(size.find('height').text)
        out_file.truncate()
        for obj in root.iter('object'):
            difficult = obj.find('difficult').text
            cls = obj.find('name').text
            if cls not in classes or int(difficult)==1:
                continue
            cls_id = classes.index(cls)
            xmlbox = obj.find('bndbox')
            b = (float(xmlbox.find('xmin').text), float(xmlbox.find('xmax').text), float(xmlbox.find('ymin').text), float(xmlbox.find('ymax').text))
            bb = convert((w,h), b)
            out_file.write(str(cls_id) + " " + " ".join([str(a) for a in bb]) + '\n')


if __name__ == "__main__":
    rootpath='.'
    xmlpath=rootpath+'/Annotations'
    list=os.listdir(xmlpath)
    for i in range(0,len(list)) :
        path = os.path.join(xmlpath,list[i])
        if ('.xml' in path)or('.XML' in path):
            convert_annotation(rootpath,list[i])
            print('done', i)
        else:
            print('not xml file',i)
新建split_data.py:
import os
import random
import sys

root_path = '.'
xmlfilepath = root_path + '/Annotations'
txtsavepath = root_path + '/ImageSets/Main'

if not os.path.exists(txtsavepath):
    os.makedirs(txtsavepath)

# 划分数据集
# (训练集+验证集)/(训练集+验证集+测试集)
train_test_percent = 0.9
# 训练集/(训练集+验证集)
train_valid_percent = 0.9

total_xml = os.listdir(xmlfilepath)
num = len(total_xml)
list = range(num)
tv = int(num * train_test_percent)
ts = int(num-tv)
tr = int(tv * train_valid_percent)
tz = int(tv-tr)
trainval = random.sample(list, tv)
train = random.sample(trainval, tr)

print("train and valid size:", tv)
print("train size:", tr)
print("test size:", ts)
print("valid size:", tz)

# ftrainall = open(txtsavepath + '/ftrainall.txt', 'w')
ftest = open(txtsavepath + '/test.txt', 'w')
ftrain = open(txtsavepath + '/train.txt', 'w')
fvalid = open(txtsavepath + '/valid.txt', 'w')

ftestimg = open(txtsavepath + '/img_test.txt', 'w')
ftrainimg = open(txtsavepath + '/img_train.txt', 'w')
fvalidimg = open(txtsavepath + '/img_valid.txt', 'w')

for i in list:
    name = total_xml[i][:-4] + '.txt' + '\n'
    imgname = total_xml[i][:-4] + '.jpg' + '\n'  # 这里如果你的图片后缀为.png,记得修改成.png
    if i in trainval:
        # ftrainall.write(name)
        if i in train:
            ftrain.write(name)
            ftrainimg.write(imgname)
        else:
            fvalid.write(name)
            fvalidimg.write(imgname)
    else:
        ftest.write(name)
        ftestimg.write(imgname)

# ftrainall.close()
ftrain.close()
fvalid.close()
ftest.close()

ftrainimg.close()
fvalidimg.close()
ftestimg.close()
新建remove_data.py:
import os
import shutil

img_txt_cg_train = []
img_txt_cg_test = []
img_txt_cg_valid = []
label_txt_cg_train = []
label_txt_cg_test = []
label_txt_cg_valid = []

path = './ImageSets/Main/'

for line in open(path+"img_train.txt"):
    line=line.strip('\n')
    img_txt_cg_train.append(line)
for line1 in open(path+"img_test.txt"):
    line1=line1.strip('\n')
    img_txt_cg_test.append(line1)
for line2 in open(path+"img_valid.txt"):
    line2=line2.strip('\n')
    img_txt_cg_valid.append(line2)

for line3 in open(path+"train.txt"):
    line3=line3.strip('\n')
    label_txt_cg_train.append(line3)
for line4 in open(path+"test.txt"):
    line4=line4.strip('\n')
    label_txt_cg_test.append(line4)
for line5 in open(path+"valid.txt"):
    line5=line5.strip('\n')
    label_txt_cg_valid.append(line5)

new_dataset_train = './data/train/images/'
new_dataset_test = './data/test/images/'
new_dataset_valid = './data/valid/images/'

new_dataset_trainl = './data/train/labels/'
new_dataset_testl = './data/test/labels/'
new_dataset_validl = './data/valid/labels/'

if not os.path.exists(new_dataset_train):
    os.makedirs(new_dataset_train)
if not os.path.exists(new_dataset_test):
    os.makedirs(new_dataset_test)
if not os.path.exists(new_dataset_valid):
    os.makedirs(new_dataset_valid)
if not os.path.exists(new_dataset_trainl):
    os.makedirs(new_dataset_trainl)
if not os.path.exists(new_dataset_testl):
    os.makedirs(new_dataset_testl)
if not os.path.exists(new_dataset_validl):
    os.makedirs(new_dataset_validl)

# cg移动
fimg = './JPEGImages/'
flable = './worktxt/'

# 小数据建议:copy 大数据建议:move
for i in range(len(img_txt_cg_train)):
    shutil.copy(fimg+str(img_txt_cg_train[i]),new_dataset_train)
    shutil.copy(flable+str(label_txt_cg_train[i]),new_dataset_trainl)
for j in range(len(img_txt_cg_test)):
    shutil.copy(fimg+str(img_txt_cg_test[j]),new_dataset_test)
    shutil.copy(flable+str(label_txt_cg_test[j]),new_dataset_testl)
for q in range(len(img_txt_cg_valid)):
    shutil.copy(fimg+str(img_txt_cg_valid[q]),new_dataset_valid)
    shutil.copy(flable+str(label_txt_cg_valid[q]),new_dataset_validl)
新建所有的代码之后,整个文件夹的目录是这样的:
.
│-get_labels.py
|-voc2yolo.py
|-split_data.py
|-remove_data.py
├─Annotations
│		1.xml
|       2.xml
|       3.xml
|       ...
└─JPEGImages
        1.jpg
        2.jpg
        3.jpg
        ...
依次运行:get_labels.py、voc2yolo.py、split_data.py、remove_data.py即可,之后会生成所需要的data文件夹,进入data文件夹,新建data.yaml并写入:
train: ./dataset/train/images
val: ./dataset/valid/images
test: ./dataset/test/images

nc: 5 # 修改为你的物体类别数
names: ['bag','cup','key','phone','wallet'] # 修改为get_labels.py运行的结果
最终,我们整个data文件夹就是我们可以参与到YOLOv5训练的数据集。
注意:YOLOv5官方代码中也会有一个data文件夹,为了区别两个文件夹,我们可以把我们这个data文件夹重命名为
dataset。
四、🌈YOLOv5模型训练与测试
4.1准备工作
这一步我们需要去下载官方的YOLOv5代码:https://github.com/ultralytics/yolov5 ,官方仓库代码里面还有版本的区别,截止到2022-05-19,共有:6.1、6.0、5.0、4.0等版本,每一个版本都是对应官方的一次重大改进,通常我们会默认选择下载最新版本的YOLOv5代码即可。
来到YOLOV5的官方仓库下:https://github.com/ultralytics/yolov5 看到一个绿色的按钮 Code,然后点击Download ZIP,就可以拿到代码了。如果你进不去这个仓库的网址,你可以查看这个方法:github网址无法访问怎么办? 把YOLOv5这个仓库链接代码导入到Gitee,你就可以下载了。解压缩代码以后,进入到YOLOv5的代码文件夹:
- 📦我们把之前做好的
dataset文件夹复制进来; - 📄修改必要参数:进入到models下,把每个**.yaml**结尾的文件里面的第4行修改为你的类别数;
- ⛏️安装其他必要第三方库:
pip install -r requirements.txt
为什么我们还要pip install一些库呢?我们之前确实安装了torch、torchvision两个重要的核心库,但是一些简单的第三方库我们并没有安装,为了避免运行报错,我们可以让机器自己再检查安装一遍必要的YOLOv5第三方库。
4.2开始训练
本地训练
我们已经在自己机器上安装好了所有的环境,可以在我们自己机器上进行训练了,在YOLOv5文件夹下打开cmd:
# img是输入网络图片大小,batch是每批次读入图片数量,epochs是训练的轮次,data是我们准备的数据集文件夹,cfg是模型配置文件,weights是采取的预训练模型,device是使用什么设备,0就是gpu,使用cpu就写cpu
# 注意:这里cfg和weights必须是指定的同一网络,如果是yolov5n.yaml,就必须是yolov5n.pt
python train.py --img 640 --batch 16 --epochs 150 --data ./dataset/data.yaml --cfg models/yolov5n.yaml --weights yolov5n.pt --device 0
这样既可以训练了,但是也可能会有一些小bug报错,我们使用伟大的百度搜索解决即可了!实在解决不了可以在文章下留言哦!
云端训练
有些时候,我们并不是装好了所有的环境就是为了训练模型。对于大部分人而言电脑性能其实并不是太好,像我的RTX1050,我觉得就是一种低端显卡。这时候我们可以采用一种新的策略:云端训练模型,本地推理模型。
- 什么是云端呢?
大家可能或多或少听过云服务器这种词吧,云服务器就是一个远程的电脑,我们本地电脑不好,我们可以去花钱租个拥有不错GPU的云服务器来训练模型。而且更有利的消息时,大部分的GPU云服务器商都会给我们准备好所有的环境,你可以通过点选配置好训练的环境哦。
推荐给大家几个云端服务器的租赁平台(这里不恰饭哦):
其实还有很多,大家可以百度输入关键词:GPU云服务器搜索就好了。
在云端训练代码和本地是一样的哦。进去命令行控制台,输入:
# img是输入网络图片大小,batch是每批次读入图片数量,epochs是训练的轮次,data是我们准备的数据集文件夹,cfg是模型配置文件,weights是采取的预训练模型,device是使用什么设备,0就是gpu,使用cpu就写cpu
# 注意:这里cfg和weights必须是指定的同一网络,如果是yolov5n.yaml,就必须是yolov5n.pt
python train.py --img 640 --batch 16 --epochs 150 --data ./dataset/data.yaml --cfg models/yolov5n.yaml --weights yolov5n.pt --device 0
训练完成以后会在YOLOv5文件夹下生成一个runs文件夹,打开train文件夹,里面就是我们本次训练的各种权重和训练结果以及测试图等信息:
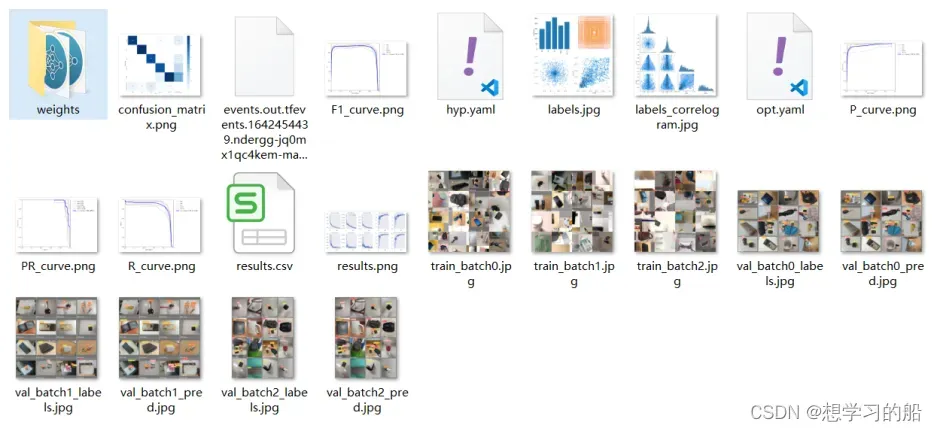
云端训练好的模型,我们可以打包下载到本地,也可以在云端直接测试模型都是可以的哦!
4.3模型测试
依旧是在YOLOv5文件夹下打开’cmd’:
- 一般推理
# source指定怎么进行推理,如果是图片就写图片的位置,如果是一整个文件夹的图片就写文件夹的位置,如果是0就是调用摄像头实时监测
python detect.py --data dataset/data.yaml --weights runs/train/exp/weights/best.pt --device 0 --source 0
- 带裁剪的推理
python detect.py --data dataset/data.yaml --weights runs/train/exp/weights/best.pt --device 0 --source dataset/test/images/38.jpeg --save-crop
- 带可视化的推理
python detect.py --data dataset/data.yaml --weights runs/train/exp/weights/best.pt --device 0 --source dataset/test/images/38.jpeg --visualize
推理之后会在YOLOv5文件夹下生成一个runs文件夹,打开detect文件夹,里面就是我们本次推理的图片信息!
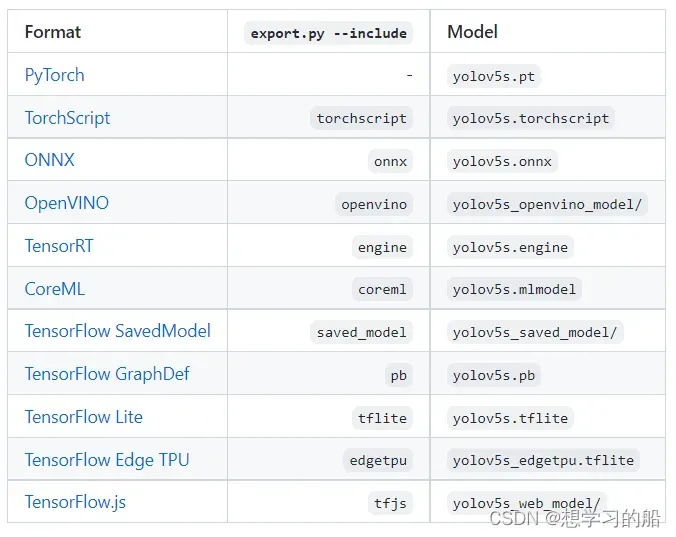
五、🌞YOLOv5模型导出
所谓模型导出就是把训练生成的pt格式转化为其他方式去调用。官方关于模型导出的说明:https://github.com/ultralytics/yolov5/issues/251
我们依旧在YOLOv5文件夹下打开cmd:
# torchscript导出
python export.py --data dataset/data.yaml --weights runs/train/exp/weights/best.pt --include torchscript
# onnx导出
python export.py --data dataset/data.yaml --weights runs/train/exp/weights/best.pt --opset 12 --include onnx
# tfjs导出
python export.py --data dataset/data.yaml --weights runs/train/exp/weights/best.pt --include tfjs
关于其他导出,大家可以根据需求来进行。导出后会在runs/train/exp/weights/生成相应的导出权重。
- tfjs导出的模型就是接下来我们部署tfjs导出的模型
- torchscript导出的模型就是我们部署Android所需要的模型(但是具体导出还需要看安卓部分导出的解释)
- onnx导出的模型是部署onnx部分的
六、💌tfjs部署导出模型
1、下载源代码:https://github.com/WangRongsheng/YOLOv5_tfjs
2、导出以后会生成模型名称_web_model文件夹,将模型名称_web_model 目录加入到static 中
3、修改配置
// 权重文件
const weights = '../模型名称_web_model/model.json';

// 类别名称,这里修改为你的即可
const cls_names = ['人', '自行车', '汽车', '摩托车', '飞机', '公交车', '火车', '卡车', '船', '红绿灯', '消防栓', '停止标志',
    '停车收费表', '长凳', '鸟', '猫', '狗', '马', '羊', '牛', '象', '熊', '斑马', '长颈鹿', '背包', '雨伞', '手提包', '领带',
    '手提箱', '飞盘', '滑雪板', '单板滑雪', '运动球', '风筝', '棒球棒', '棒球手套', '滑板', '冲浪板', '网球拍', '瓶子', '红酒杯',
    '杯子', '叉子', '刀', '勺', '碗', '香蕉', '苹果', '三明治', '橙子', '西兰花', '胡萝卜', '热狗', '比萨', '甜甜圈', '蛋糕',
    '椅子', '长椅', '盆栽', '床', '餐桌', '马桶', '电视', '笔记本电脑', '鼠标', '遥控器', '键盘', '手机', '微波炉', '烤箱',
    '烤面包机', '洗碗槽', '冰箱', '书', '时钟', '花瓶', '剪刀', '泰迪熊', '吹风机', '牙刷'
]
4、修改tfjs版本(可以不用修改)
# 修改index.html文件,自定义TensorFlow.js的版本
<script src="https://cdn.jsdelivr.net/npm/@tensorflow/tfjs@3.16.0/dist/tf.min.js"></script>
注意:TensorFlow.js的版本>=3.9.0,本项目目前使用的版本为3.16.0
七、🧠以API方式部署模型
7.1介绍
https://lncoder.blog.csdn.net/article/details/124797197

7.2源码
https://mianbaoduo.com/o/bread/mbd-YpqYmp5x
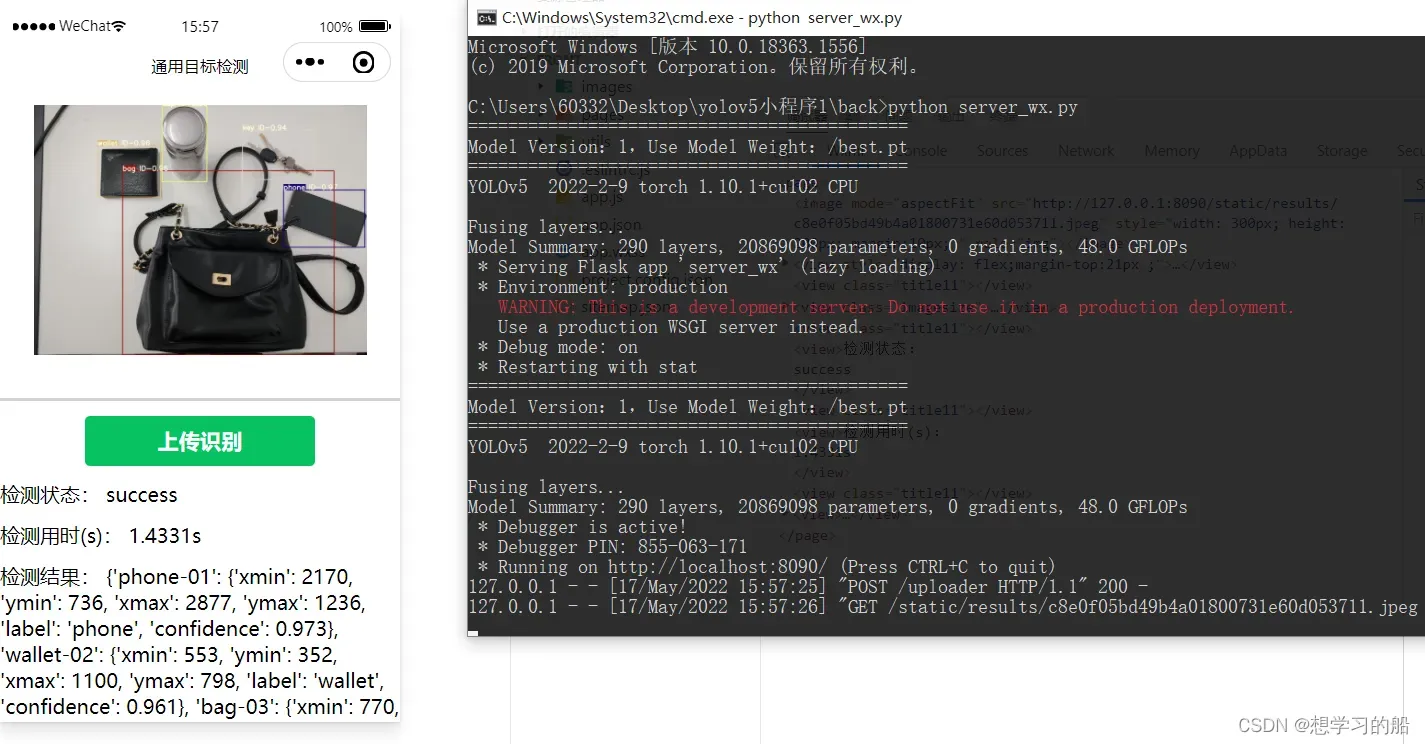
八、🧜♀️以微信小程序方式部署模型
8.1介绍
https://lncoder.blog.csdn.net/article/details/124824452
8.2源码
https://mianbaoduo.com/o/bread/mbd-YpqZlZls
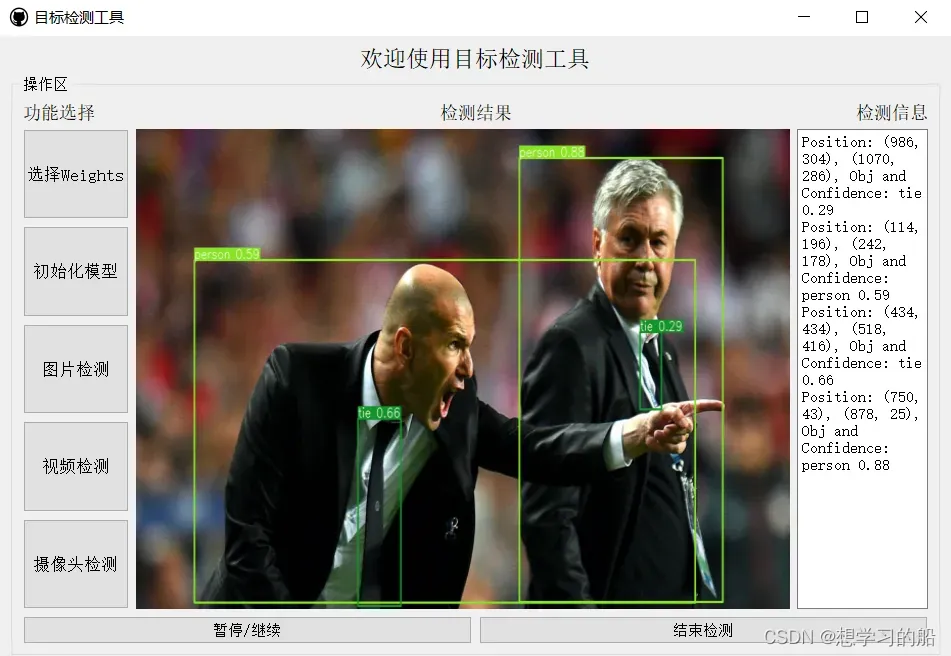
九、💥以GUI界面方式部署使用模型
9.1介绍
https://lncoder.blog.csdn.net/article/details/124840193
9.2源码
https://mianbaoduo.com/o/bread/mbd-YpqZmJhv
十、💦ONNX部署(便于迁移部署)
- 什么是ONNX?
Open Neural Network Exchange (ONNX) 是一个开放的生态系统,是一种深度模型的开放格式,它使 AI 开发人员能够随着项目的发展选择合适的工具,增强模型的交互性。 ONNX 为深度学习和传统 ML 的 AI 模型提供开源格式。 它定义了一个可扩展的计算图模型,以及内置运算符和标准数据类型的定义。ONNX 得到广泛支持,可以在许多框架、工具和硬件中找到,实现不同框架之间的互操作性并简化从研究到生产的路径,也就是说不同框架(TensorFlow/Pytorch/Paddle)训练出来的模型都可以转换成onnx模型进行存储以后后续的推理。
import cv2
import numpy as np
import time
import os
from numpy import array


class Colors:
    # Ultralytics color palette https://ultralytics.com/
    def __init__(self):
        # hex = matplotlib.colors.TABLEAU_COLORS.values()
        hex = ('FF3838', 'FF9D97', 'FF701F', 'FFB21D', 'CFD231', '48F90A', '92CC17', '3DDB86', '1A9334', '00D4BB',
               '2C99A8', '00C2FF', '344593', '6473FF', '0018EC', '8438FF', '520085', 'CB38FF', 'FF95C8', 'FF37C7')
        self.palette = [self.hex2rgb('#' + c) for c in hex]
        self.n = len(self.palette)

    def __call__(self, i, bgr=False):
        c = self.palette[int(i) % self.n]
        return (c[2], c[1], c[0]) if bgr else c

    @staticmethod
    def hex2rgb(h):  # rgb order (PIL)
        return tuple(int(h[1 + i:1 + i + 2], 16) for i in (0, 2, 4))

colors = Colors()


class yolov5():
    def __init__(self, onnx_path, confThreshold=0.25, nmsThreshold=0.45):
        self.classes = ['person', 'bicycle', 'car', 'motorcycle', 'airplane', 'bus', 'train', 'truck', 'boat', 'traffic light',
        'fire hydrant', 'stop sign', 'parking meter', 'bench', 'bird', 'cat', 'dog', 'horse', 'sheep', 'cow',
        'elephant', 'bear', 'zebra', 'giraffe', 'backpack', 'umbrella', 'handbag', 'tie', 'suitcase', 'frisbee',
        'skis', 'snowboard', 'sports ball', 'kite', 'baseball bat', 'baseball glove', 'skateboard', 'surfboard',
        'tennis racket', 'bottle', 'wine glass', 'cup', 'fork', 'knife', 'spoon', 'bowl', 'banana', 'apple',
        'sandwich', 'orange', 'broccoli', 'carrot', 'hot dog', 'pizza', 'donut', 'cake', 'chair', 'couch',
        'potted plant', 'bed', 'dining table', 'toilet', 'tv', 'laptop', 'mouse', 'remote', 'keyboard', 'cell phone',
        'microwave', 'oven', 'toaster', 'sink', 'refrigerator', 'book', 'clock', 'vase', 'scissors', 'teddy bear',
        'hair drier', 'toothbrush']

        #self.classes = ['bag','cup','key','phone','wallet']
        self.colors = [np.random.randint(0, 255, size=3).tolist() for _ in range(len(self.classes))]
        num_classes = len(self.classes)
        self.anchors = [[10, 13, 16, 30, 33, 23], [30, 61, 62, 45, 59, 119], [116, 90, 156, 198, 373, 326]]
        self.nl = len(self.anchors)
        self.na = len(self.anchors[0]) // 2
        self.no = num_classes + 5
        self.stride = np.array([8., 16., 32.])
        self.inpWidth = 640
        self.inpHeight = 640
        self.net = cv2.dnn.readNetFromONNX(onnx_path)

        self.confThreshold = confThreshold
        self.nmsThreshold = nmsThreshold

    def _make_grid(self, nx=20, ny=20):
        xv, yv = np.meshgrid(np.arange(ny), np.arange(nx))
        return np.stack((xv, yv), 2).reshape((-1, 2)).astype(np.float32)

    def letterbox(self, im, new_shape=(640, 640), color=(114, 114, 114), auto=True, scaleFill=False, scaleup=True, stride=32):
     # Resize and pad image while meeting stride-multiple constraints
        shape = im.shape[:2]  # current shape [height, width]
        if isinstance(new_shape, int):
            new_shape = (new_shape, new_shape)

        # Scale ratio (new / old)
        r = min(new_shape[0] / shape[0], new_shape[1] / shape[1])
        if not scaleup:  # only scale down, do not scale up (for better val mAP)
            r = min(r, 1.0)

        # Compute padding
        ratio = r, r  # width, height ratios
        new_unpad = int(round(shape[1] * r)), int(round(shape[0] * r))
        dw, dh = new_shape[1] - new_unpad[0], new_shape[0] - new_unpad[1]  # wh padding
        if auto:  # minimum rectangle
            dw, dh = np.mod(dw, stride), np.mod(dh, stride)  # wh padding
        elif scaleFill:  # stretch
            dw, dh = 0.0, 0.0
            new_unpad = (new_shape[1], new_shape[0])
            ratio = new_shape[1] / shape[1], new_shape[0] / shape[0]  # width, height ratios

        dw /= 2  # divide padding into 2 sides
        dh /= 2

        if shape[::-1] != new_unpad:  # resize
            im = cv2.resize(im, new_unpad, interpolation=cv2.INTER_LINEAR)
        top, bottom = int(round(dh - 0.1)), int(round(dh + 0.1))
        left, right = int(round(dw - 0.1)), int(round(dw + 0.1))
        im = cv2.copyMakeBorder(im, top, bottom, left, right, cv2.BORDER_CONSTANT, value=color)  # add border
        return im, ratio, (dw, dh)


    def box_area(self,boxes :array):
        return (boxes[:, 2] - boxes[:, 0]) * (boxes[:, 3] - boxes[:, 1])

    def box_iou(self,box1 :array, box2: array):
        """
        :param box1: [N, 4]
        :param box2: [M, 4]
        :return: [N, M]
        """
        area1 = self.box_area(box1)  # N
        area2 = self.box_area(box2)  # M
        # broadcasting, 两个数组各维度大小 从后往前对比一致, 或者 有一维度值为1;
        lt = np.maximum(box1[:, np.newaxis, :2], box2[:, :2])
        rb = np.minimum(box1[:, np.newaxis, 2:], box2[:, 2:])
        wh = rb - lt
        wh = np.maximum(0, wh) # [N, M, 2]
        inter = wh[:, :, 0] * wh[:, :, 1]
        iou = inter / (area1[:, np.newaxis] + area2 - inter)
        return iou  # NxM

    def numpy_nms(self, boxes :array, scores :array, iou_threshold :float):

        idxs = scores.argsort()  # 按分数 降序排列的索引 [N]
        keep = []
        while idxs.size > 0:  # 统计数组中元素的个数
            max_score_index = idxs[-1]
            max_score_box = boxes[max_score_index][None, :]
            keep.append(max_score_index)

            if idxs.size == 1:
                break
            idxs = idxs[:-1]  # 将得分最大框 从索引中删除; 剩余索引对应的框 和 得分最大框 计算IoU;
            other_boxes = boxes[idxs]  # [?, 4]
            ious = self.box_iou(max_score_box, other_boxes)  # 一个框和其余框比较 1XM
            idxs = idxs[ious[0] <= iou_threshold]

        keep = np.array(keep)
        return keep

    def xywh2xyxy(self,x):
        # Convert nx4 boxes from [x, y, w, h] to [x1, y1, x2, y2] where xy1=top-left, xy2=bottom-right
       # y = x.clone() if isinstance(x, torch.Tensor) else np.copy(x)
        y = np.copy(x)
        y[:, 0] = x[:, 0] - x[:, 2] / 2  # top left x
        y[:, 1] = x[:, 1] - x[:, 3] / 2  # top left y
        y[:, 2] = x[:, 0] + x[:, 2] / 2  # bottom right x
        y[:, 3] = x[:, 1] + x[:, 3] / 2  # bottom right y
        return y

    def non_max_suppression(self,prediction, conf_thres=0.25,agnostic=False):                                                 #25200 = 20*20*3 + 40*40*3 + 80*80*3
        xc = prediction[..., 4] > conf_thres  # candidates,获取置信度,prediction为所有的预测结果.shape(1, 25200, 21),batch为1,25200个预测结果,21 = x,y,w,h,c + class个数
        # Settings
        min_wh, max_wh = 2, 4096  # (pixels) minimum and maximum box width and height
        max_nms = 30000  # maximum number of boxes into torchvision.ops.nms()
        output = [np.zeros((0, 6))] * prediction.shape[0]
        # for p in prediction:
        #     for i in p:
        #         with open('./result.txt','a') as f:
        #             f.write(str(i) + '\n')
        for xi, x in enumerate(prediction):  # image index, image inference
            # Apply constraints
            x = x[xc[xi]]  # confidence,获取confidence大于conf_thres的结果
            if not x.shape[0]:
                continue
            # Compute conf
            x[:, 5:] *= x[:, 4:5]  # conf = obj_conf * cls_conf
            # Box (center x, center y, width, height) to (x1, y1, x2, y2)
            box = self.xywh2xyxy(x[:, :4])
            # Detections matrix nx6 (xyxy, conf, cls)
            conf = np.max(x[:, 5:], axis=1)    #获取类别最高的置信度
            j = np.argmax(x[:, 5:],axis=1)     #获取下标
            #转为array:  x = torch.cat((box, conf, j.float()), 1)[conf.view(-1) > conf_thres]
            re = np.array(conf.reshape(-1)> conf_thres)
            #转为维度
            conf =conf.reshape(-1,1)
            j = j.reshape(-1,1)
            #numpy的拼接
            x = np.concatenate((box,conf,j),axis=1)[re]
            # Check shape
            n = x.shape[0]  # number of boxes
            if not n:  # no boxes
                continue
            elif n > max_nms:  # excess boxes
                x = x[x[:, 4].argsort(descending=True)[:max_nms]]  # sort by confidence
            # Batched NMS
            c = x[:, 5:6] * (0 if agnostic else max_wh)  # classes
            boxes, scores = x[:, :4] + c, x[:, 4]  # boxes (offset by class), scores
            i = self.numpy_nms(boxes, scores, self.nmsThreshold)
            output[xi] = x[i]
        return output

    def detect(self, srcimg):
        im = srcimg.copy()
        im, ratio, wh = self.letterbox(srcimg, self.inpWidth, stride=self.stride, auto=False)
        # Sets the input to the network
        blob = cv2.dnn.blobFromImage(im, 1 / 255.0,swapRB=True, crop=False)
        self.net.setInput(blob)
        outs = self.net.forward(self.net.getUnconnectedOutLayersNames())[0]
        #NMS
        pred = self.non_max_suppression(outs, self.confThreshold,agnostic=False)
        #draw box
        for i in pred[0]:
            left = int((i[0] - wh[0])/ratio[0])
            top = int((i[1]-wh[1])/ratio[1])
            width = int((i[2] - wh[0])/ratio[0])
            height = int((i[3]-wh[1])/ratio[1])
            conf = i[4]
            classId = i[5]
            cv2.rectangle(srcimg, (int(left), int(top)), (int(width),int(height)), colors(classId, True), 2, lineType=cv2.LINE_AA)
            label = '%.2f' % conf
            label = '%s:%s' % (self.classes[int(classId)], label)
            # Display the label at the top of the bounding box
            labelSize, baseLine = cv2.getTextSize(label, cv2.FONT_HERSHEY_SIMPLEX, 0.5, 1)
            top = max(top, labelSize[1])
            cv2.putText(srcimg, label, (int(left-20),int(top - 10)), cv2.FONT_HERSHEY_SIMPLEX, 0.5, (0,255,255), thickness=1, lineType=cv2.LINE_AA)
        return srcimg

def mult_test(onnx_path, img_dir, save_root_path, video=False):
    model = yolov5(onnx_path)
    if video:
        cap = cv2.VideoCapture(0)
        frame_height = int(cap.get(cv2.CAP_PROP_FRAME_HEIGHT))
        frame_width = int(cap.get(cv2.CAP_PROP_FRAME_WIDTH))
        fps = cap.get(cv2.CAP_PROP_FPS)       #视频平均帧率
        size = (frame_height,frame_width)     #尺寸和帧率和原视频相同
        #fourcc = cv2.VideoWriter_fourcc(*'XVID')
        fourcc = cv2.VideoWriter_fourcc(*'mp4v')
        out = cv2.VideoWriter('out.mp4',fourcc,fps,size)
        while cap.isOpened():
            ok, frame = cap.read()
            if not ok:
                break
            frame = model.detect(frame)
            out.write(frame)
            cv2.imshow('result', frame)
            c = cv2.waitKey(1) & 0xFF
            if c==27 or c==ord('q'):
                break
        cap.release()
        out.release()
        cv2.destroyAllWindows()
    else:
        if not os.path.exists(save_root_path):
            os.mkdir(save_root_path)
        for root, dir, files in os.walk(img_dir):
            for file in files:
                image_path = os.path.join(root, file)
                save_path = os.path.join(save_root_path, file)
                if "mp4" in file or 'avi' in file:
                    cap = cv2.VideoCapture(image_path)
                    frame_height = int(cap.get(cv2.CAP_PROP_FRAME_HEIGHT))
                    frame_width = int(cap.get(cv2.CAP_PROP_FRAME_WIDTH))
                    fps = cap.get(cv2.CAP_PROP_FPS)
                    size = (frame_width, frame_height)
                    fourcc = cv2.VideoWriter_fourcc(*'XVID')
                    out = cv2.VideoWriter(save_path,fourcc,fps,size)
                    while cap.isOpened():
                        ok, frame = cap.read()
                        if not ok:
                            break
                        frame = model.detect(frame)
                        out.write(frame)
                    cap.release()
                    out.release()
                    print("  finish:   ", file)
                elif 'jpg' or 'png' in file:
                    srcimg = cv2.imread(image_path)
                    srcimg = model.detect(srcimg)
                    print("  finish:   ", file)
                    cv2.imwrite(save_path, srcimg)

if __name__ == "__main__":
	# 设置onnx路径
    onnx_path = r'.\weights\yolov5n.onnx'
    # 新建一个input_image文件夹
    input_path = r'./input_image'
    # 新建一个output_image文件夹
    save_path = r'./output_image'
    #video=True代表开启摄像头
    mult_test(onnx_path, input_path, save_path, video=True)
注意看修改第30行为你的标签名称!
其他内容注意看中文注释即可!
文章出处登录后可见!