引言
最近硅星人多次报道过 AI 图片生成技术,提到过 DALL·E、Midjourney、DALL·E mini(现用名 Craiyon)、Imagen、TikTok AI绿幕等知名产品。
实际上,Stable Diffusion 有着强大的生成能力和广泛的使用可能性,模型可以直接在消费级显卡上运行,生成速度也相当之快。而其免费开放的本质,更是能够让 AI 图片生成模型不再作为少数业内人士的玩物。
在强者如云、巨头纷纷入局的 AI 图片生成领域,Stable Diffusion 背后的“神秘”机构 Stability AI,也像是“世外高僧”一般的存在。它的创始人没有那么出名,创办故事和融资细节也不是公开信息。再加上免费开源 Stable Diffusion 的慈善行为,更让人增加了对这家神秘 AI 科研机构的兴趣。
Stable Diffusion介绍
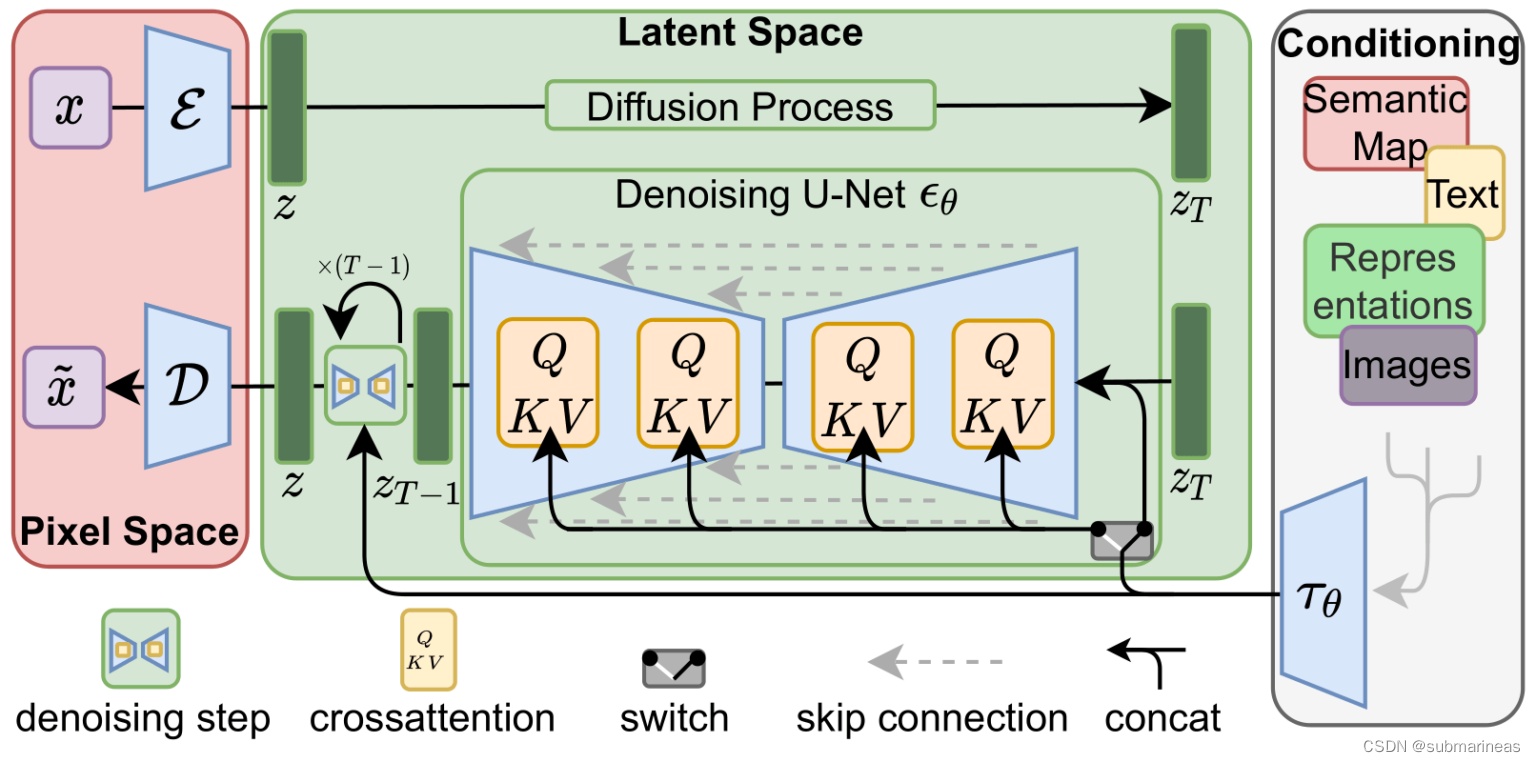
项目开发领导者有两位,分别是 AI 视频剪辑技术创业公司 Runway 的 Patrick Esser,和慕尼黑大学机器视觉学习组的 Robin Romabach。这个项目的技术基础主要来自于这两位开发者之前在计算机视觉大会 CVPR22 上合作发表的潜伏扩散模型 (Latent Diffusion Model) 研究。
在训练方面,模型采用了4000台 A100 显卡集群,用了一个月时间。训练数据来自大规模AI开放网络项目旗下的一个注重“美感”的数据子集 LAION-Aesthetics,包括近59亿条图片-文字平行数据。
虽然训练过程的算力要求特别高,Stable Diffusion使用起来还是相当亲民的:可以在普通显卡上运行,即使显存不到10GB,仍可以在几秒钟内生成高分辨率的图像结果。
训练扩散模型,预测每一步对样本进行轻微去噪的方法,经过几次迭代,得到结果。扩散模型已经应用于各种生成任务,例如图像、语音、3D 形状和图形合成。
扩散模型包括两个步骤:
- 前向扩散——通过逐渐扰动输入数据将数据映射到噪声。这是通过一个简单的随机过程正式实现的,该过程从数据样本开始,并使用简单的高斯扩散核迭代地生成噪声样本。此过程仅在训练期间使用,而不用于推理。
- 参数化反向 – 撤消前向扩散并执行迭代去噪。这个过程代表数据合成,并被训练通过将随机噪声转换为真实数据来生成数据。
这其实是非常繁琐的,而正是基于此,Stable Diffusion采用了一种更加高效的方式构建扩散模型,具体如下(来源于该模型paper):
Stable Diffusion模型搭建记录
stable-diffusion-v1-1 环境准备
为啥区别开v1.1与后面的v1.4环境,是我看到v1.1的仓库好像只是作为一个测试,里面并没有v1.4完整的代码,并且模型权重以及安装难度小很多。
- sd-v1-1.ckpt: 237k steps at resolution 256×256 on laion2B-en. 194k steps at resolution 512×512 on laion-high-resolution (170M examples from LAION-5B with resolution >= 1024×1024).
- sd-v1-2.ckpt: Resumed from sd-v1-1.ckpt. 515k steps at resolution 512×512 on laion-aesthetics v2 5+ (a subset of laion2B-en with estimated aesthetics score > 5.0, and additionally filtered to images with an original size >= 512×512, and an estimated watermark probability < 0.5. The watermark estimate is from the LAION-5B metadata, the aesthetics score is estimated using the LAION-Aesthetics Predictor V2).
- sd-v1-3.ckpt: Resumed from sd-v1-2.ckpt. 195k steps at resolution 512×512 on “laion-aesthetics v2 5+” and 10% dropping of the text-conditioning to improve classifier-free guidance sampling.
- sd-v1-4.ckpt: Resumed from sd-v1-2.ckpt. 225k steps at resolution 512×512 on “laion-aesthetics v2 5+” and 10% dropping of the text-conditioning to improve classifier-free guidance sampling.
上述来源于Github,简单解释就是sd-v1-1.ckpt大概有1.3G左右,而sd-v1-4.ckpt是4G,full-v1.4是7.4G,所以进入v1.1环境安装过程。
pip install --upgrade diffusers transformers scipy
没错,就一句话。v1.1环境只是v1.4的一个简略版本,v1.4是完全版。
stable-diffusion-v1-4 环境准备
这个问题就有点多了,因为外网问题,以及有些包确实不好安装,开梯子可能会快很多,因我是在服务器上,以下是我踩坑的一些记录。
https://github.com/CompVis/stable-diffusion.git
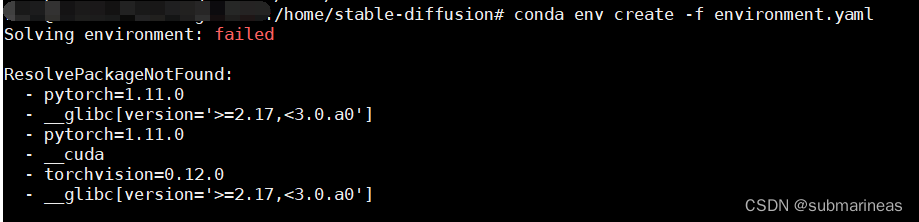
conda env create -f environment.yaml
conda activate ldm
上述bug主要在第二步,下载速度很慢,这里提供几种解决方案。作者在yaml中设置的channels是依据pytorch和conda默认源,但是很显然,没有梯子,不仅会很慢,而且timeout几率大大增加。考虑改变channel地址,为:
name: ldm
channels:
  - http://mirrors.tuna.tsinghua.edu.cn/anaconda/pkgs/free/
  - http://mirrors.tuna.tsinghua.edu.cn/anaconda/cloud/conda-forge/
  - http://mirrors.tuna.tsinghua.edu.cn/anaconda/cloud/msys2/
  - http://mirrors.tuna.tsinghua.edu.cn/anaconda/cloud/bioconda/
  - http://mirrors.tuna.tsinghua.edu.cn/anaconda/pkgs/main/
    # - defaults
我不知道是不是就我有问题,出现报错为Solving environment: failed,ResolvePackageNotFound,具体如下:
这个错我没分析出啥意思,但大概感觉里面有东西冲突了,我就改手动了,手动创建一个虚拟环境为py38,然后去下载包。除了CLIP和taming-transformers,其他没在出现问题。
最后两个包错误为 error: RPC failed; curl 56 GnuTLS recv error (-54): Error in the pull function.,报错给出的方案为note: This error originates from a subprocess, and is likely not a problem with pip.:
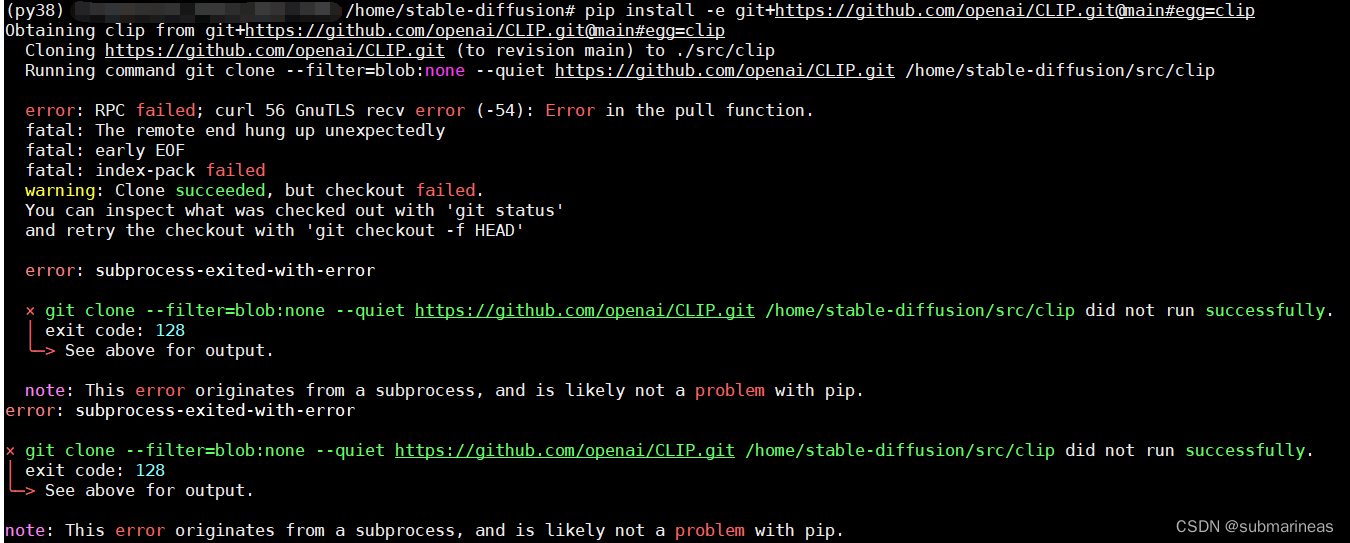
这个错的原因是,我手动创建的虚拟环境的pip一般安装最新版本,但这俩包需要的环境为pip==20.3,所以退下pip版本就安装成功。
huggingface 上 Diffusion申请使用资格
首先,如果想下载Stable Diffusion的模型,必须要去huggingface同意下载协议,具体链接为:
stable-diffusion-v1-1:
https://huggingface.co/CompVis/stable-diffusion-v1-1
stable-diffusion-v1-4:
https://huggingface.co/CompVis/stable-diffusion-v1-4
点进这两个里面,首先会弹出相关协议,大概是不用于商用,不做违法乱纪,xxxxx等,但怎么说呢,量子位那篇《Stable Diffusion火到被艺术家集体举报,网友科普背后机制被LeCun点赞》一文看完,感觉该商用的公司依然会套层皮商用,因为太火?emmm。。。切回正题,只有点击同意该协议后,就可以在服务器端下载了。
在服务器端输入:
huggingface-cli login
就会弹出登录界面:
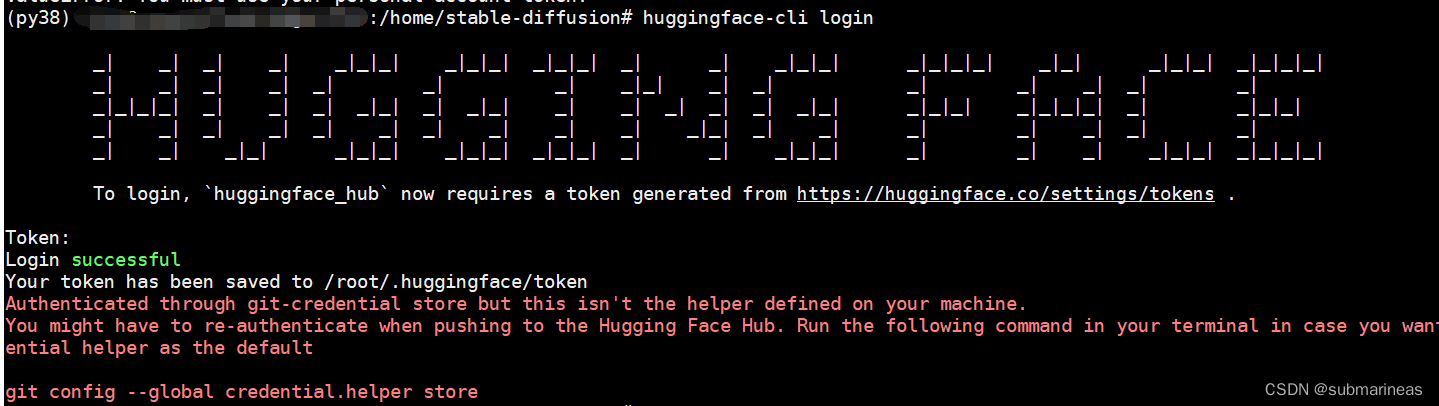
然后去网页上进入settings,跟GitHub操作差不多,选择User Access Tokens,复制token,输入上图进行登陆,如果没有User Access Tokens,请进行创建:
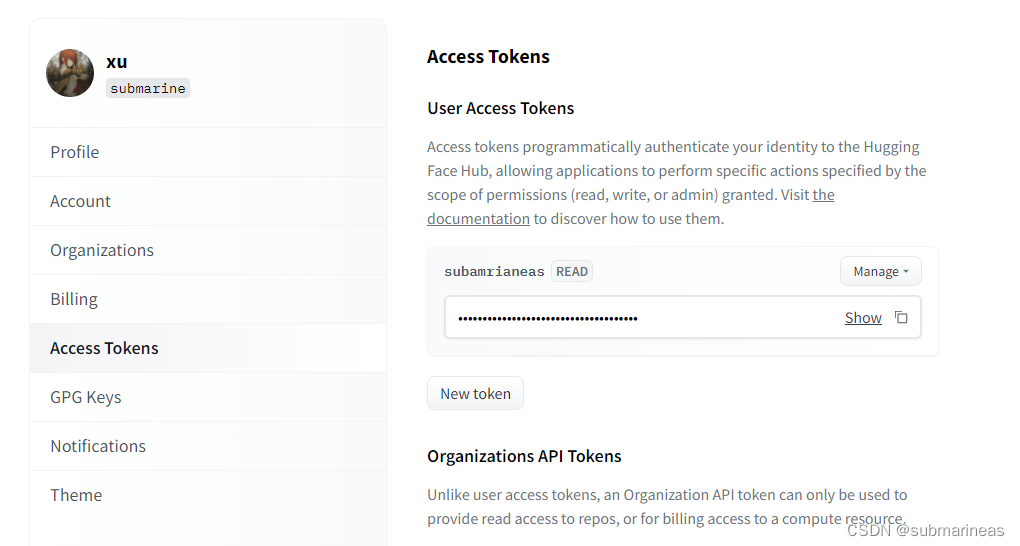
token登录后,就能进行模型测试了。
stable-diffusion-v1-1 测试
import torch
from torch import autocast
from diffusers import StableDiffusionPipeline

model_id = "CompVis/stable-diffusion-v1-1"
device = "cuda"


pipe = StableDiffusionPipeline.from_pretrained(model_id, use_auth_token=True)
pipe = pipe.to(device)

prompt = "a photo of an astronaut riding a horse on mars"
with autocast("cuda"):
    image = pipe(prompt, guidance_scale=7.5)["sample"][0]

image.save("astronaut_rides_horse.png")
不出意外,会出现条形滚动模型下载输出,我就不再演示了,虽然该模型只有1.3G,但是我网速有点差,下了v1.4,已经有点耐心受限。。
当然,上述只是最原始的模型下载方式,还有其余选项下载不同权重:
"""
如果您受到 GPU 内存的限制并且可用的 GPU RAM 少于 10GB,请确保以 float16 精度加载 StableDiffusionPipeline,而不是如上所述的默认 float32 精度。
"""
import torch

pipe = StableDiffusionPipeline.from_pretrained(model_id, torch_dtype=torch.float16, revision="fp16", use_auth_token=True)
pipe = pipe.to(device)

prompt = "a photo of an astronaut riding a horse on mars"
with autocast("cuda"):
    image = pipe(prompt, guidance_scale=7.5)["sample"][0]

image.save("astronaut_rides_horse.png")

"""
要换出噪声调度程序,请将其传递给from_pretrained:
"""
from diffusers import StableDiffusionPipeline, LMSDiscreteScheduler

model_id = "CompVis/stable-diffusion-v1-1"
# Use the K-LMS scheduler here instead
scheduler = LMSDiscreteScheduler(beta_start=0.00085, beta_end=0.012, beta_schedule="scaled_linear", num_train_timesteps=1000)
pipe = StableDiffusionPipeline.from_pretrained(model_id, scheduler=scheduler, use_auth_token=True)
pipe = pipe.to("cuda")

prompt = "a photo of an astronaut riding a horse on mars"
with autocast("cuda"):
    image = pipe(prompt, guidance_scale=7.5)["sample"][0]

image.save("astronaut_rides_horse.png")
最后,如果网速实在太差,可以直接去网页端下载,链接为:
https://huggingface.co/CompVis/stable-diffusion-v-1-1-original
stable-diffusion-v1-4 测试
和1.1一样,首先是模型下载,也是有很多种选择,我就不一一列出了:
# make sure you're logged in with `huggingface-cli login`
from torch import autocast
from diffusers import StableDiffusionPipeline

pipe = StableDiffusionPipeline.from_pretrained(
        "CompVis/stable-diffusion-v1-4",
        use_auth_token=True
).to("cuda")

prompt = "a photo of an astronaut riding a horse on mars"
with autocast("cuda"):
    image = pipe(prompt)["sample"][0]

image.save("astronaut_rides_horse.png")


# device = "cuda"
# model_path = "CompVis/stable-diffusion-v1-4"
#
# # Using DDIMScheduler as anexample,this also works with PNDMScheduler
# # uncomment this line if you want to use it.
#
# # scheduler = PNDMScheduler.from_config(model_path, subfolder="scheduler", use_auth_token=True)
#
# scheduler = DDIMScheduler(beta_start=0.00085, beta_end=0.012, beta_schedule="scaled_linear", clip_sample=False, set_alpha_to_one=False)
# pipe = StableDiffusionImg2ImgPipeline.from_pretrained(
#     model_path,
#     scheduler=scheduler,
#     revision="fp16",
#     torch_dtype=torch.float16,
#     use_auth_token=True
# ).to(device)
上述我采用最开始的下载方式,默认为32位,其它参数没动,就是大概要下载4个多G的模型:
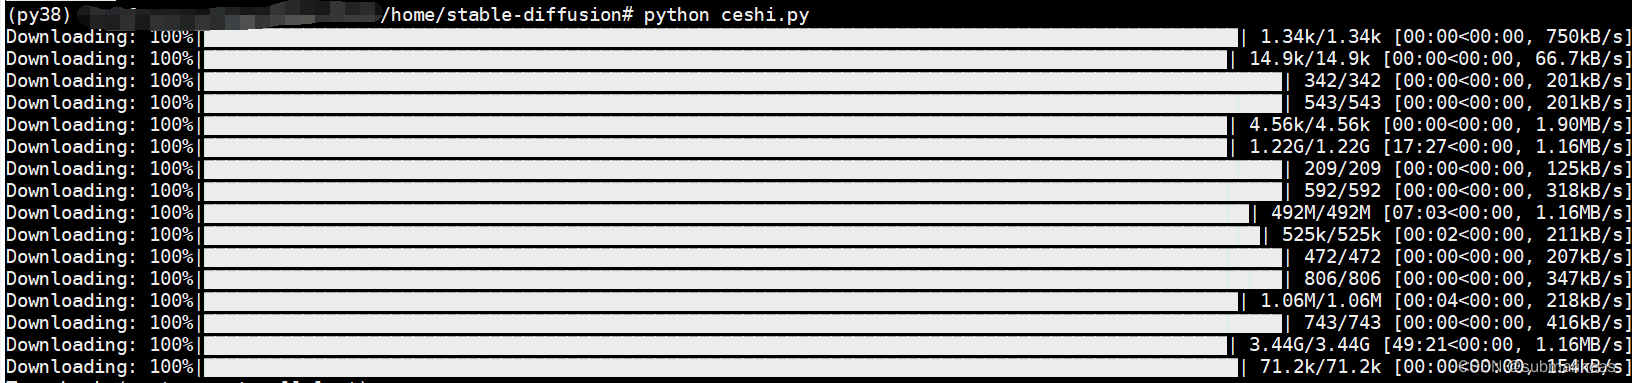
中途断过几次,每次断都跟xxxx一样,网络不好就很难受。但所幸还是下载完了,下载完后跟pytorch的模型库一样,存储路径为:

当前目录生成了prompt的话内容相似的图:
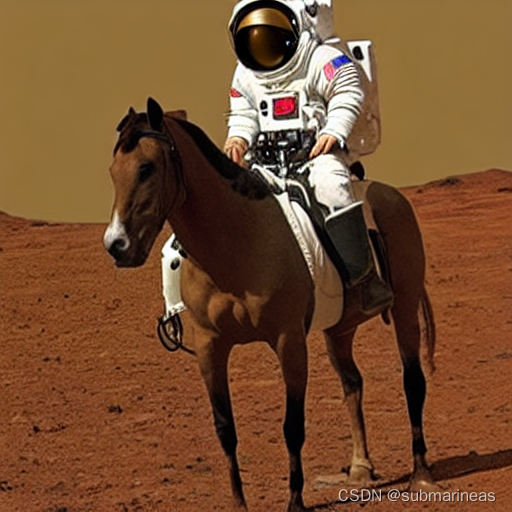
感觉还是挺有喜剧效果的。另外在上述等待时间内,我还做了两手准备,直接在官方下模型了,不怕一万,就怕万一。地址为:https://huggingface.co/CompVis/stable-diffusion-v-1-4-original/blob/main/sd-v1-4.ckpt
不管哪种方式,只要能用就好,那么紧接着就可以测试文本转图像文本例程,这里我自己写了两条,另外,参考了模型方法–Stable Diffusion 中的prompt和运行命令,因为感觉写得很全的样子。实例为:
python txt2img.py --prompt "Asia girl, glossy eyes, face, long hair, fantasy, elegant, highly detailed, digital painting, artstation, concept art, smooth, illustration, renaissance, flowy, melting, round moons, rich clouds, very detailed, volumetric light, mist, fine art, textured oil over canvas, epic fantasy art, very colorful, ornate intricate scales, fractal gems, 8 k, hyper realistic, high contrast"
                  --plms
                  --outdir ./output/
                  --ckpt ./models/sd-v1-4.ckpt
                  --ddim_steps 100
                  --H 512
                  --W 512
                  --seed 8
这里为了好看,参数做了换行处理,如果直接运行请去除换行,参数的解释可以直接看GitHub,没有太难的参数设置。在终端跑起来后,还需要下载一个HardNet模型:

下载完后就可以出结果了,图像为:

还有两组我随便写得参数为:
prompt = "women, pink hair, ArtStation, on the ground, open jacket, video game art, digital painting, digital art, video game girls, sitting, game art, artwork"

prompt = "fantasy art, women, ArtStation, fantasy girl, artwork, closed eyes, long hair. 4K, Alec Tucker, pipes, fantasy city, fantasy art, ArtStation"
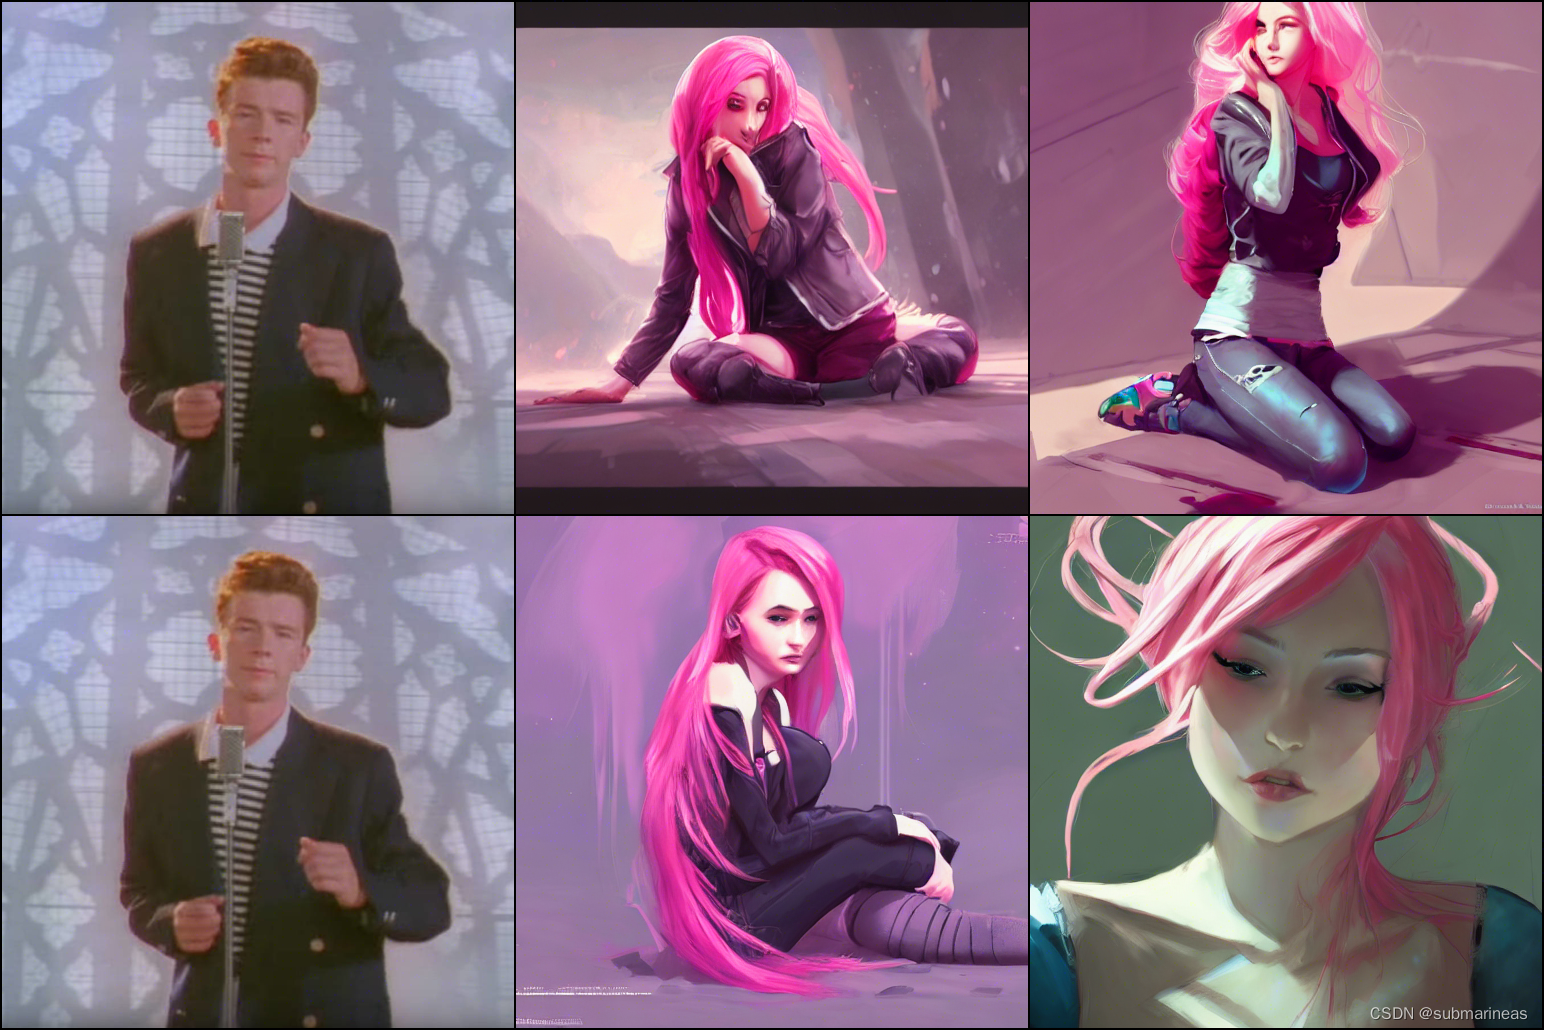
好像混进去什么奇怪的东西?emmm,我也不知道为什么会出来。。。
这是文字转图片的用例,还有一种就是 图像+文字转图像,那么启动方式为:
python img2img.py --prompt "magic fashion girl portrait, glossy eyes, face, long hair, fantasy, intricate, elegant, highly detailed, digital painting, artstation, concept art, smooth, sharp focus, illustration, renaissance, flowy, melting, round moons, rich clouds, very detailed, volumetric light, mist, fine art, textured oil over canvas, epic fantasy art, very colorful, ornate intricate scales, fractal gems, 8 k, hyper realistic, high contrast"
                          --init-img ./ceshi/33.jpg
                          --strength 0.8
                          --outdir ./output/
                          --ckpt ./models/sd-v1-4.ckpt
                          --ddim_steps 100
本来我以为,跑demo就此就可以很顺利的结束了,然而很悲催的是,卡资源不够了。刚好卡空间少了几G(PS:也就是v1.4需要的显存,不止15G):
    return _VF.einsum(equation, operands)  # type: ignore[attr-defined]
RuntimeError: CUDA out of memory. Tried to allocate 2.44 GiB (GPU 0; 14.75 GiB total capacity; 11.46 GiB already allocated; 1.88 GiB free; 11.75 GiB reserved in total by PyTorch) If reserved memory is >> allocated memory try setting max_split_size_mb to avoid fragmentation.  See documentation for Memory Management and PYTORCH_CUDA_ALLOC_CONF
所以,我也不纠结了,直接转FP16精度,并且参考colab上的实验,我看有人是用t4成功了,那么话不多说,直接转jupyter notebook。
先导包:
import inspect
import warnings
from typing import List, Optional, Union

import torch
from torch import autocast
from tqdm.auto import tqdm

from diffusers import (
    AutoencoderKL,
    DDIMScheduler,
    DiffusionPipeline,
    PNDMScheduler,
    UNet2DConditionModel,
)
from diffusers.pipelines.stable_diffusion import StableDiffusionSafetyChecker
from transformers import CLIPFeatureExtractor, CLIPTextModel, CLIPTokenizer
然后加入数据管道源码,下载预训练权重模型,指定模型为float16:
class StableDiffusionImg2ImgPipeline(DiffusionPipeline):
    def __init__(
        self,
        vae: AutoencoderKL,
        text_encoder: CLIPTextModel,
        tokenizer: CLIPTokenizer,
        unet: UNet2DConditionModel,
        scheduler: Union[DDIMScheduler, PNDMScheduler],
        safety_checker: StableDiffusionSafetyChecker,
        feature_extractor: CLIPFeatureExtractor,
    ):
        super().__init__()
        scheduler = scheduler.set_format("pt")
        self.register_modules(
            vae=vae,
            text_encoder=text_encoder,
            tokenizer=tokenizer,
            unet=unet,
            scheduler=scheduler,
            safety_checker=safety_checker,
            feature_extractor=feature_extractor,
        )

    @torch.no_grad()
    def __call__(
        self,
        prompt: Union[str, List[str]],
        init_image: torch.FloatTensor,
        strength: float = 0.8,
        num_inference_steps: Optional[int] = 50,
        guidance_scale: Optional[float] = 7.5,
        eta: Optional[float] = 0.0,
        generator: Optional[torch.Generator] = None,
        output_type: Optional[str] = "pil",
    ):

        if isinstance(prompt, str):
            batch_size = 1
        elif isinstance(prompt, list):
            batch_size = len(prompt)
        else:
            raise ValueError(f"`prompt` has to be of type `str` or `list` but is {type(prompt)}")

        if strength < 0 or strength > 1:
          raise ValueError(f'The value of strength should in [0.0, 1.0] but is {strength}')

        # set timesteps
        accepts_offset = "offset" in set(inspect.signature(self.scheduler.set_timesteps).parameters.keys())
        extra_set_kwargs = {}
        offset = 0
        if accepts_offset:
            offset = 1
            extra_set_kwargs["offset"] = 1

        self.scheduler.set_timesteps(num_inference_steps, **extra_set_kwargs)

        # encode the init image into latents and scale the latents
        init_latents = self.vae.encode(init_image.to(self.device)).sample()
        init_latents = 0.18215 * init_latents

        # prepare init_latents noise to latents
        init_latents = torch.cat([init_latents] * batch_size)

        # get the original timestep using init_timestep
        init_timestep = int(num_inference_steps * strength) + offset
        init_timestep = min(init_timestep, num_inference_steps)
        timesteps = self.scheduler.timesteps[-init_timestep]
        timesteps = torch.tensor([timesteps] * batch_size, dtype=torch.long, device=self.device)

        # add noise to latents using the timesteps
        noise = torch.randn(init_latents.shape, generator=generator, device=self.device)
        init_latents = self.scheduler.add_noise(init_latents, noise, timesteps)

        # get prompt text embeddings
        text_input = self.tokenizer(
            prompt,
            padding="max_length",
            max_length=self.tokenizer.model_max_length,
            truncation=True,
            return_tensors="pt",
        )
        text_embeddings = self.text_encoder(text_input.input_ids.to(self.device))[0]

        # here `guidance_scale` is defined analog to the guidance weight `w` of equation (2)
        # of the Imagen paper: https://arxiv.org/pdf/2205.11487.pdf . `guidance_scale = 1`
        # corresponds to doing no classifier free guidance.
        do_classifier_free_guidance = guidance_scale > 1.0
        # get unconditional embeddings for classifier free guidance
        if do_classifier_free_guidance:
            max_length = text_input.input_ids.shape[-1]
            uncond_input = self.tokenizer(
                [""] * batch_size, padding="max_length", max_length=max_length, return_tensors="pt"
            )
            uncond_embeddings = self.text_encoder(uncond_input.input_ids.to(self.device))[0]

            # For classifier free guidance, we need to do two forward passes.
            # Here we concatenate the unconditional and text embeddings into a single batch
            # to avoid doing two forward passes
            text_embeddings = torch.cat([uncond_embeddings, text_embeddings])


        # prepare extra kwargs for the scheduler step, since not all schedulers have the same signature
        # eta (η) is only used with the DDIMScheduler, it will be ignored for other schedulers.
        # eta corresponds to η in DDIM paper: https://arxiv.org/abs/2010.02502
        # and should be between [0, 1]
        accepts_eta = "eta" in set(inspect.signature(self.scheduler.step).parameters.keys())
        extra_step_kwargs = {}
        if accepts_eta:
            extra_step_kwargs["eta"] = eta

        latents = init_latents
        t_start = max(num_inference_steps - init_timestep + offset, 0)
        for i, t in tqdm(enumerate(self.scheduler.timesteps[t_start:])):
            # expand the latents if we are doing classifier free guidance
            latent_model_input = torch.cat([latents] * 2) if do_classifier_free_guidance else latents

            # predict the noise residual
            noise_pred = self.unet(latent_model_input, t, encoder_hidden_states=text_embeddings)["sample"]

            # perform guidance
            if do_classifier_free_guidance:
                noise_pred_uncond, noise_pred_text = noise_pred.chunk(2)
                noise_pred = noise_pred_uncond + guidance_scale * (noise_pred_text - noise_pred_uncond)

            # compute the previous noisy sample x_t -> x_t-1
            latents = self.scheduler.step(noise_pred, t, latents, **extra_step_kwargs)["prev_sample"]

        # scale and decode the image latents with vae
        latents = 1 / 0.18215 * latents
        image = self.vae.decode(latents)

        image = (image / 2 + 0.5).clamp(0, 1)
        image = image.cpu().permute(0, 2, 3, 1).numpy()

        # run safety checker
        safety_cheker_input = self.feature_extractor(self.numpy_to_pil(image), return_tensors="pt").to(self.device)
        image, has_nsfw_concept = self.safety_checker(images=image, clip_input=safety_cheker_input.pixel_values)

        if output_type == "pil":
            image = self.numpy_to_pil(image)

        return {"sample": image, "nsfw_content_detected": has_nsfw_concept}

device = "cuda"
model_path = "CompVis/stable-diffusion-v1-4"

# Using DDIMScheduler as anexample,this also works with PNDMScheduler
# uncomment this line if you want to use it.

# scheduler = PNDMScheduler.from_config(model_path, subfolder="scheduler", use_auth_token=True)

scheduler = DDIMScheduler(beta_start=0.00085, beta_end=0.012, beta_schedule="scaled_linear", clip_sample=False, set_alpha_to_one=False)
pipe = StableDiffusionImg2ImgPipeline.from_pretrained(
    model_path,
    scheduler=scheduler,
    revision="fp16",
    torch_dtype=torch.float16,
    use_auth_token=True
).to(device)
这里大概也有接近3G的模型,没有报错后,载入图像并对其进行预处理,以便我们可以将其传递给管道。可以先选择官方图进行测试:
预处理:
import PIL
from PIL import Image
import numpy as np

def preprocess(image):
    w, h = image.size
    w, h = map(lambda x: x - x % 32, (w, h))  # resize to integer multiple of 32
    image = image.resize((w, h), resample=PIL.Image.LANCZOS)
    image = np.array(image).astype(np.float32) / 255.0
    image = image[None].transpose(0, 3, 1, 2)
    image = torch.from_numpy(image)
    return 2.*image - 1.
加载官方图,可以手动下载传上去,也能直接走网络请求:
import requests
from io import BytesIO

url = "https://raw.githubusercontent.com/CompVis/stable-diffusion/main/assets/stable-samples/img2img/sketch-mountains-input.jpg"

response = requests.get(url)
init_img = Image.open(BytesIO(response.content)).convert("RGB")
init_img = init_img.resize((768, 512))
init_img

最后载入prompt,加载进pipeline,就可以得到跟GitHub中一样的效果:
init_image = preprocess(init_img)

prompt = "A fantasy landscape, trending on artstation"

generator = torch.Generator(device=device).manual_seed(1024)
with autocast("cuda"):
    images = pipe(prompt=prompt, init_image=init_image, strength=0.75, guidance_scale=7.5, generator=generator)["sample"]
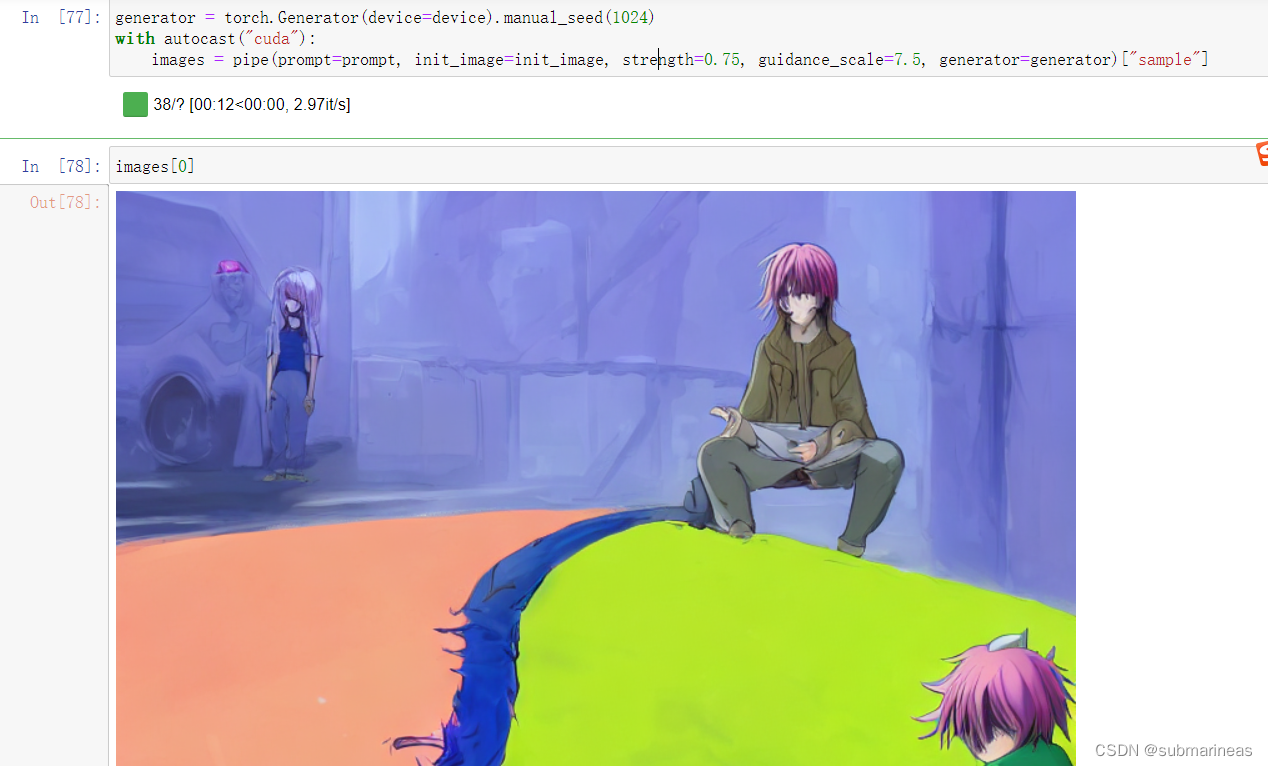
不过我这里加入的是另一个词条,为:
prompt = "Anime, Comic, pink hair, ArtStation, on the ground,cartoon, Game "
结果为:
这样看上去还行,但我去下了几张动漫图,准备还用上面词条,主要是pink hair的关键字,脑子一瞬间想到的是栗山未来和圣人惠(检查的时候发现问题,然而樱花+惠的组合让我印象深刻),结果上述图里我的jupyter本来就几个命令块代码,跑了接近80次,有60多次都是我在微调。。。单词黔驴技穷了,感觉词条有问题,但就那样了,调的比较好的一次作品为:
 |  |
不过看网上别人做的,是真的好看。从结果来讲,第一可能是我模型精度选得小,第二就是我的词汇量有点匮乏,这个用例是边写博客边调的,另外有其它事情忙,调得有点烦,不过还算满意。(PS:不满意又能怎么办?emmm)
上面内容都是自己搭建环境自己调,相当于可以自己手动调教模型参数,朝着自己想要的方向走,而下面将介绍一些我在huggingface以及一个商用的已经调教好的在线平台。
在线体验Stable Diffusion
这里推荐两个地址,一个是为官方的测试地址:
https://huggingface.co/spaces/stabilityai/stable-diffusion
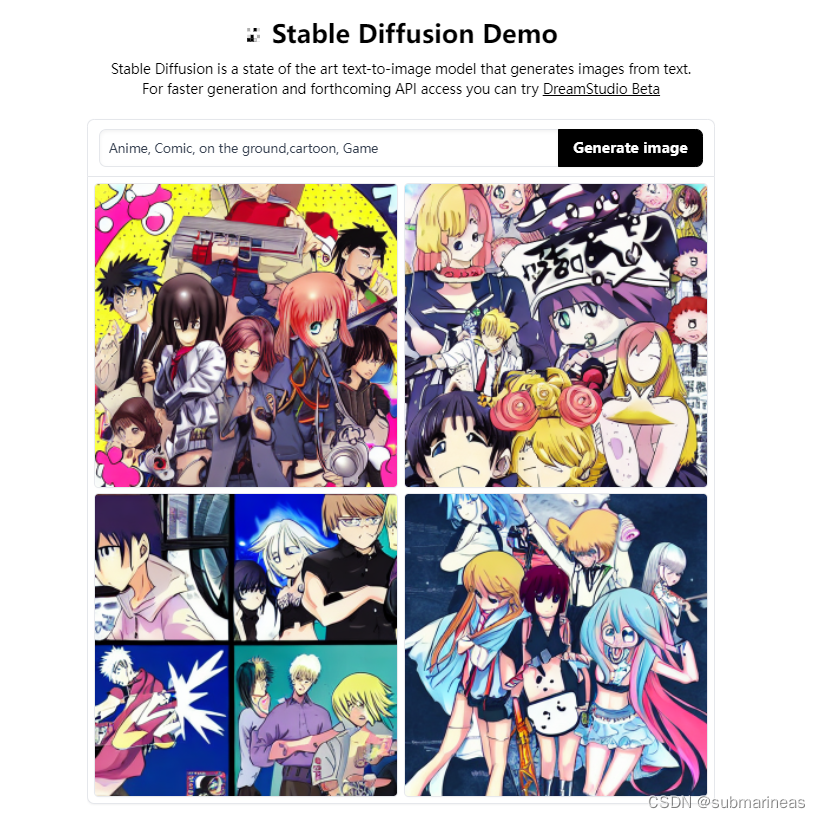
输入Anime, Comic, on the ground,cartoon, Game,感觉上不可名状,官方在线部署的应该是小模型了,并且训练结果很慢。
https://huggingface.co/spaces/huggingface/diffuse-the-rest
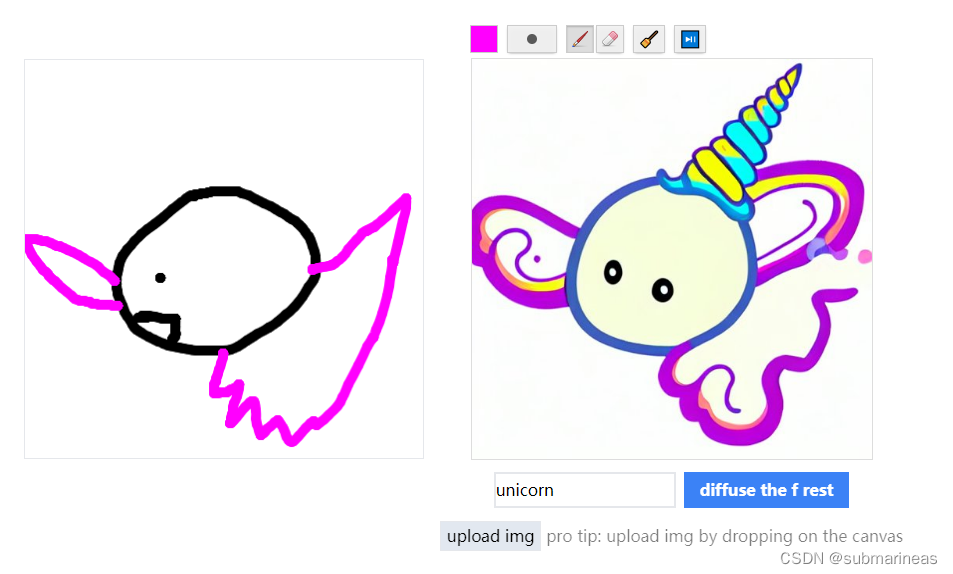
不错,看来我画的还是很写实的,emmm。另外,体验了几次后,我发现对于亚洲,或者直接指定国内,不论男女,颜值与欧美的相比有点出入,可能还是国内的数据集不够多。
最后,是找到一个非开源的名字叫做stable-diffusion-animation的项目:
https://replicate.com/andreasjansson/stable-diffusion-animation
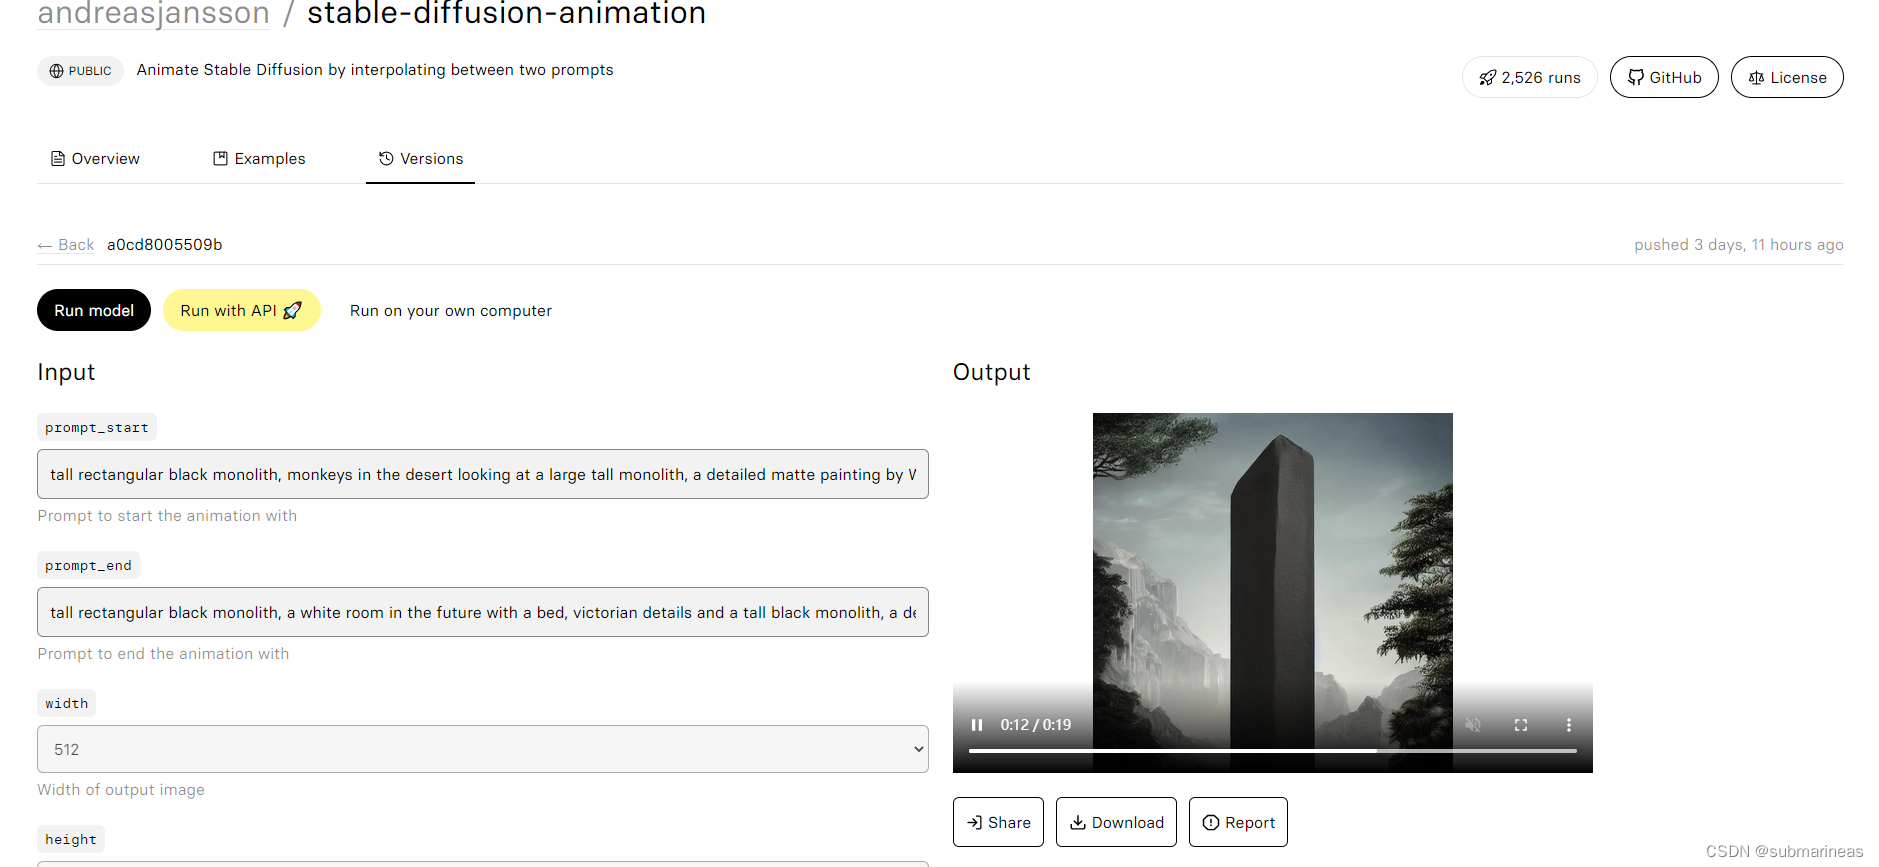
这个就比较写实了,用24帧图像做出了一个20秒的视频,正好对上了最火的那个生物起源的视频,不知道是不是用该项目做的。那么到此,本篇博客结束。
文章出处登录后可见!