本人的第一次发文,还在努力学习中,可能有不正确的地方,请各位大神轻喷。
数据集介绍:
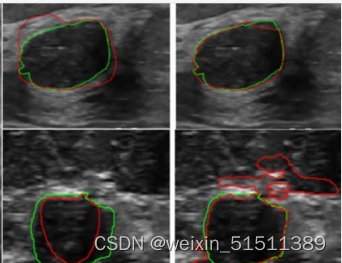
乳腺癌是全世界妇女中最常见的死亡原因之一。早期检测有助于减少早期死亡的数量。该数据回顾了使用超声扫描的乳腺癌医疗图像。乳房超声数据集被分为三类:正常、良性和恶性图像。乳房超声图像与机器学习相结合,可以在乳腺癌的分类、检测和分割方面产生巨大效果。
本数据集收集的数据包括年龄在25至75岁之间的妇女的乳房超声图像。这个数据是在2018年收集的。患者的数量是600名女性患者。该数据集由780张图像组成,平均图像大小为500*500像素。这些图像是PNG格式的。肿瘤图像(mask)与原始图像(image)一起呈现。这些图像被分为三类,即正常normal(无肿瘤)、良性benign和恶性malignant。
如果你使用这个数据集,请引用:
Al-Dhabyani W, Gomaa M, Khaled H, Fahmy A. Dataset of breast ultrasound images. Data in Brief. 2020 Feb;28:104863. DOI: 10.1016/j.dib.2019.104863.
数据集来源:kaggle
对于机器学习来说,我们需要把不同类型图像给分开以更有利于划分训练集和测试机,本例中需要将image和mask划分并分别把这两种类型图像放置到两个文件夹中以便一一对应。
数据集初始状态
image和mask混合在一起
此部分需要先将正常,良性和恶性所对应的图片细分到六个文件夹里即正常image/正常mask,良性image/良性mask,恶性image/恶性mask。
本人的做法是先将每个文件夹中以mask.png结尾的文件筛选出来并移动到指定目录:
src = r"./images"#原混合图片文件夹路径
dst = r"./masks"#创建放对应mask图片文件夹路径

def moveimages(src,dst):   #定义移动函数
    new_path=dst
    for derName, subfolders, filenames in os.walk(src):
        print(derName)
        print(subfolders)
        print(filenames)
        for i in range(len(filenames)):
            if filenames[i].endswith('_mask.png'):
                file_path=derName+'/'+filenames[i]
                newpath=new_path+'/'+filenames[i]
                shutil.copy(file_path,newpath)
                os.remove(file_path)
            elif filenames[i].endswith('_mask_1.png'or'_mask_3.png'or'_mask_2.png'):
                file_path=derName+'/'+filenames[i]
                os.remove(file_path)
#处理良性样本
moveimages(src+'\\benign',dst+'\\benign')
#处理恶性样本
moveimages(src+'\\malignant',dst+'\\malignant')
#处理正常样本
moveimages(src+'\\normal',dst+'\\normal')

#删除图片文件多余字符,仅保留数字+后缀,如(01).png
#Windows系统下使用powertoys对文件进行批量更名
数据初步处理完成,将分好的原图像image和掩码mask分别汇总起来并且要做到一一对应,这样才能让模型学习image和mask的关系。例如良性01号图要和良性01号mask图对应。
from glob import glob
bNames = glob(r'../input/donewelldataset/images/benign/*')
mNames = glob(r'../input/donewelldataset/images/malignant/*')
nNames = glob(r'../input/donewelldataset/images/normal/*')
clabels = [0]*len(bNames) + [1]*len(mNames) + [2]*len(nNames)
imgNames = bNames + mNames + nNames
bmskNames = glob(r'../input/donewelldataset/masks/benign/*')
nmskNames = glob(r'../input/donewelldataset/masks/normal/*')
mmskNames = glob(r'../input/donewelldataset/masks/malignant/*')
mskNames = bmskNames + mmskNames + nmskNames
maskNames = sorted(mskNames)
imgNames = sorted(imgNames)
label_order = ['benign','malignant','normal']

#图像汇总
imgNames
输出结果:
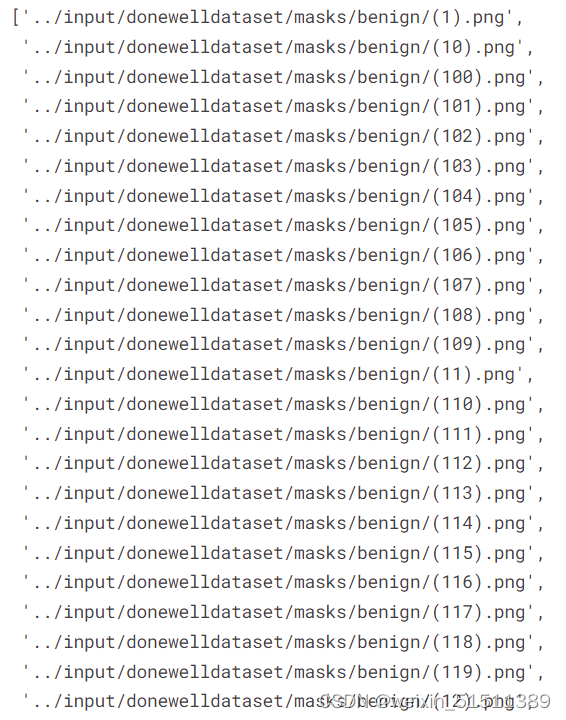
#掩码汇总
maskNames
输出结果:
那么怎么才能知道是否一一对应了呢?我们可以试着随机生成一个2*5的图像,并且以第一排展示原图image,第二排展示掩码mask。如果多生成几张并且都能够对应,那么八九不离十正确了。
import random
from PIL import Image
import cv2
import numpy as np
from matplotlib import pyplot as plt

plt.figure(figsize=(12,7))
for i in range(0,5):
    #random.seed(1232)
    a = random.randint(0,780)
    print(a,mskNames[a],imgNames[a])

    ax=plt.subplot(2,5,i+1)
    img=Image.open(imgNames[a])
    plt.imshow(img)
    plt.axis('off')
    plt.title('image')

    ax=plt.subplot(2,5,i+6)
    msk=Image.open(maskNames[a])
    plt.imshow(msk)
    plt.axis('off')
    plt.title('mask')


plt.show() 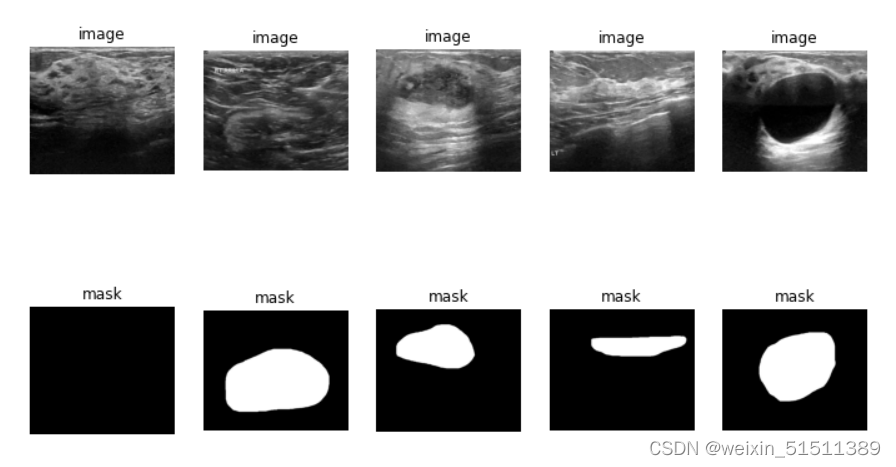
模型的选择与构建:
图像分类相关模型:AlexNet、VGGNet、GoogleNet、ResNet、MobileNet、vit等 CNN:卷积神经网络
VGGNet 是牛津大学计算机视觉组(Visual Geometry Group)和谷歌 DeepMind 一起研究出来的深度卷积神经网络, 因而冠名为 VGG。VGG是一种被广泛使用的卷积神经网络结构,其在在2014年的 ImageNet 大规模视觉识别挑战(ILSVRC -2014)中获得了亚军, 不是VGG不够强,而是对手太强,因为当年获得冠军的是GoogleNet
构建模型,开启机器学习:
#导入实验所需要用到的包
import numpy as np
import pandas as pd
import matplotlib.pyplot as plt
import seaborn as sns
import glob, os

import tensorflow as tf
from tensorflow import keras
from tensorflow.keras import layers, activations, optimizers, losses, metrics, initializers
from tensorflow.keras.preprocessing import image, image_dataset_from_directory
from tensorflow.keras.applications import MobileNetV3Small, MobileNet, InceptionV3
from tensorflow.keras.applications.mobilenet_v3 import preprocess_input, decode_predictions

seed = 36
tf.random.set_seed(seed) #设置图级随机seed
np.random.seed(seed) #np.random.random()可以按顺序产⽣⼀组固定的数组,如果使⽤相同的seed()值,则每次⽣成的随机数都相同,如果不设置这个值,那么每次⽣成的随机数不同

dir_path = '/kaggle/input/breast-ultrasound-images-dataset/Dataset_BUSI_with_GT/'
IMAGE_SHAPE = (224, 224)

#处理数据集

#开始读文件
directories = os.listdir(dir_path) # 用os库读文件夹

files = [] # 保存图像文件
labels = [] # 保存图像名

# 逐层开始读
for folder in directories:

    fileList = glob.glob(dir_path + '/'+ folder + '/*')
    labels.extend([folder for l in fileList])
    files.extend(fileList)
print(len(files), len(labels))#看看是不是一样 ![]()
正如我们所看到的,我们在所有的数据集中有1578张图像,但有一些掩码图像不适合与原始图像一起训练,所以我们将从数据集中移除所有的掩码图像。
准备开始移除,条件:如果文件名中不含mask。
个人小笔记:和上节课数据预处理方法有所区别,当时使用的是如果文件以mask.png结尾则移除出images文件夹。此处使用if not 的逻辑条件,更佳!避免了_mask_1.png、_mask_2.png无法被endswith识别到的情况
# 创建两个列表,只保存非mask的图像,并为每个列表添加标签。
selected_files = []
selected_labels = []

for file, label in zip(files, labels):
    if 'mask' not in file:
        selected_files.append(file)
        selected_labels.append(label)
print(len(selected_files), len(selected_labels)) #看看还有多少
搞定,超声图像和其掩码mask被分开,mask被分到了selected_files中准备图像
#开始创建方法处理文件以便能满足高效神经网络运行训练
def prepare_image(file):
    img = image.load_img(file, target_size=IMAGE_SHAPE) #从对应路径加载图片
    img_array = image.img_to_array(img)#img_to_array就是将图片转化成数组,转换前后类型都是一样的,唯一区别是转换前元素类型是整型,转换后元素类型是浮点型(和keras)等机器学习框架相适应的图像类型。
    return tf.keras.applications.efficientnet.preprocess_input (img_array)
#用字典将图像和其标签(名字)组合在一起
images = {
    'image': [],
    'target': []
}

print('冲冲冲冲冲,开始处理')#走过程,提示用户开始处理图像

for i, (file, label) in enumerate(zip(selected_files, selected_labels)): #enumerate() 函数用于将一个可遍历的数据对象(如列表、元组或字符串)组合为一个索引序列,同时列出数据和数据下标,一般用在 for 循环当中。
    images['image'].append(prepare_image(file)) #字典的key:image中放入value,并且是用前面方法处理好的图片文件
    images['target'].append(label) #同理,字典的key:label中放入value

print('哈哈,结束啦!') #结束啦!!!!
准备划分数据集(训练集,测试集)
作用:
- 将图像转换为numpy数组,以便更好地进行计算
- 对标签进行编码,将分类名称转换为数字
# 图片转化为数组
images['image'] = np.array(images['image'])
images['target'] = np.array(images['target'])

# 对标签数据进行解码
from sklearn.preprocessing import LabelEncoder
le = LabelEncoder()

images['target'] = le.fit_transform(images['target'])

classes = le.classes_ # 获取标签数据target的类别
print(f'标签数据(target)有: {classes}')

#LabelEncoder是用来对分类型特征值进行编码,即对不连续的数值或文本进行编码。其中包含以下常用方法:

#fit(y) :fit可看做一本空字典,y可看作要塞到字典中的词。
#fit_transform(y):相当于先进行fit再进行transform,即把y塞到字典中去以后再进行transform得到索引值。
#inverse_transform(y):根据索引值y获得原始数据。
#transform(y) :将y转变成索引值。
开始分割数据集去train和test了
from sklearn.model_selection import train_test_split

x_train, x_test, y_train, y_test = train_test_split(images['image'], images['target'], test_size=.10)#test_size:用于指定验证集所占的比例

x_train.shape, x_test.shape, y_train.shape, y_test.shape #老生常谈,对sklearn机器学习所需进行训练集和测试集的划分并展示划分数据结果![]()
分别对应x训练集,x测试集,y训练集,y测试机。
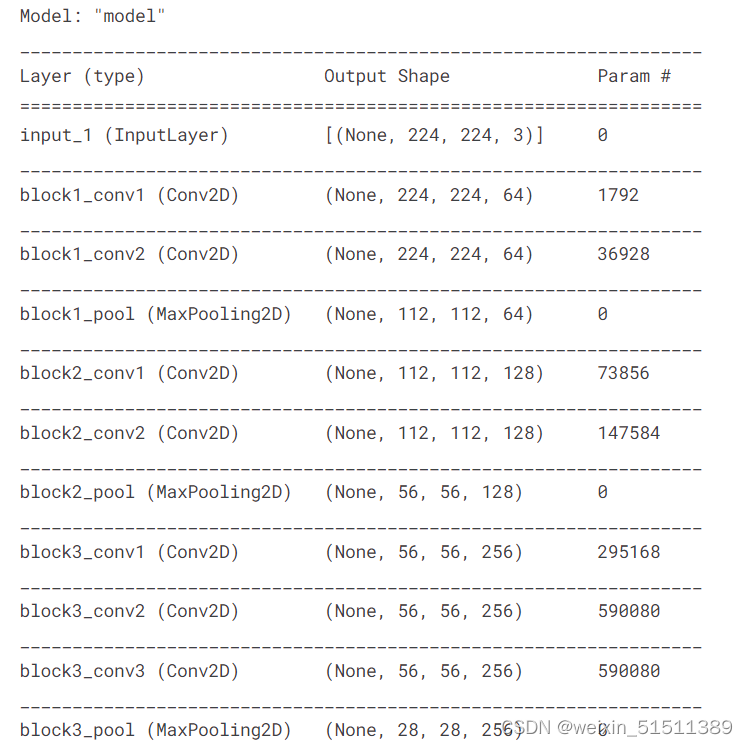
建立模型
- 创建VGG16模型
- #include_top=False:禁用顶部(Top) 3层『完全连阶层』(fully-connected layers)。即只利用VGG16萃取特征
- #weights:使用的权重,分两种
- imagenet:即使用ImageNet的预先训练的资料,约100万张图片,判断1000类别的日常事物,例如动物、交通工具…等,我们通常选这一项。
- None:随机起始值
from keras.applications.vgg16 import VGG16
base_model = VGG16(
    include_top=False,
    weights='../input/vgg16-weights/vgg16_weights_tf_dim_ordering_tf_kernels_notop.h5', #手动导入预训练模型(外网下载)
    input_shape=(*IMAGE_SHAPE, 3),
    classes=3)

# 冻结模型
base_model.trainable = False

# 在模型的顶部添加我自己的层
x = base_model.output

# 1st conv block 卷积层
x = layers.Conv2D(256, 3, padding='same')(x)
x = layers.BatchNormalization()(x)
x = layers.Activation('relu')(x)
x = layers.GlobalAveragePooling2D(keepdims = True)(x)

# 2nd conv block
x = layers.Conv2D(128, 3, padding='same')(x)
x = layers.BatchNormalization()(x)
x = layers.Activation('relu')(x)
x = layers.GlobalAveragePooling2D(keepdims = True)(x)

# 1st FC layer Fully Connected layer全连接层
x = layers.Flatten()(x)
x = layers.Dense(64)(x)
x = layers.BatchNormalization()(x)
x = layers.Activation('relu')(x)

# 2nd FC layer
x = layers.Dense(32, activation = 'relu')(x)
x = layers.BatchNormalization()(x)
x = layers.Activation('relu')(x)
x = layers.Dropout(.2)(x)

x = layers.Dense(3, 'softmax')(x)

incept_model = keras.models.Model(inputs = base_model.input, outputs = x)

# compile the model
incept_model.compile(optimizer=optimizers.RMSprop(.001), loss = losses.sparse_categorical_crossentropy, metrics= [metrics.SparseCategoricalAccuracy()])

incept_model.summary()
输出结果:
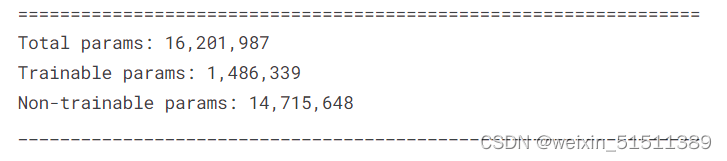
太多了就只截取头尾
模型评估
incept_model.evaluate(x=x_test, y = y_test, batch_size=32, verbose=1)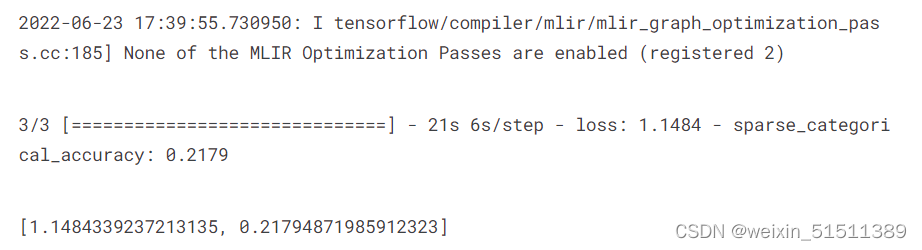
结果是这个样子
模型预测 训练完了就得是骡子是马拉出来看看了
# 用于预测模型,并将原始图像与真实值和预测值的标题可视化。
def predict_image(img_path, label):
    img1 = prepare_image(img_path) # 准备数据
    res = incept_model.predict(np.expand_dims(img1, axis = 0)) # predict the image
    pred = classes[np.argmax(res)]

    # Visualize the image
    img = image.load_img(img_path)
    plt.imshow(np.array(img))
    plt.title(f'True: {label}\nPredicted: {pred}')
predict_image(dir_path + 'benign/benign (20).png', 'benign') #随便选一张图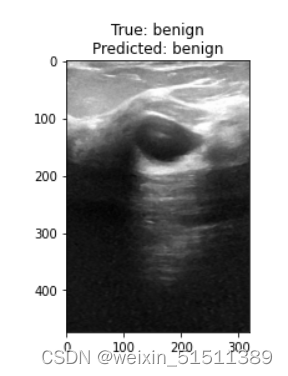
看得出来预测值和我们所知道的真实值还是很接近的!nice!不过样本量和计算能力有限,还需要进行更多数据和更多计算能力的训练吧,也不能保证百分之百正确!!!
一些模型评估
#数组模型评估
incept_model.evaluate(np.array(x_test),np.array(y_test))

predicted = []
for item in incept_model.predict(x_test):
    predicted.append(np.argmax(item))

for item in predicted:
    print(item,)

from sklearn.metrics import confusion_matrix
import seaborn as sns
conf = confusion_matrix(y_test,predicted)
print(conf)
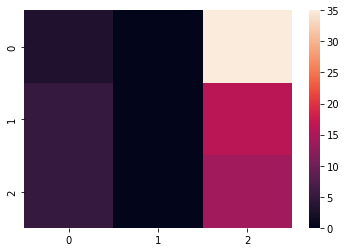
热力图
#预测与实际结果热力图
info = [
    'benign'   ,  # 0
    'normal'   ,  # 1
    'malignant',  # 2
]
plt.figure(figsize = (10,10))
ax = sns.heatmap(conf, cmap=plt.cm.Greens, annot=True, square=True, xticklabels = info, yticklabels = info)
ax.set_ylabel('Actual', fontsize=40)
ax.set_xlabel('Predicted', fontsize=40)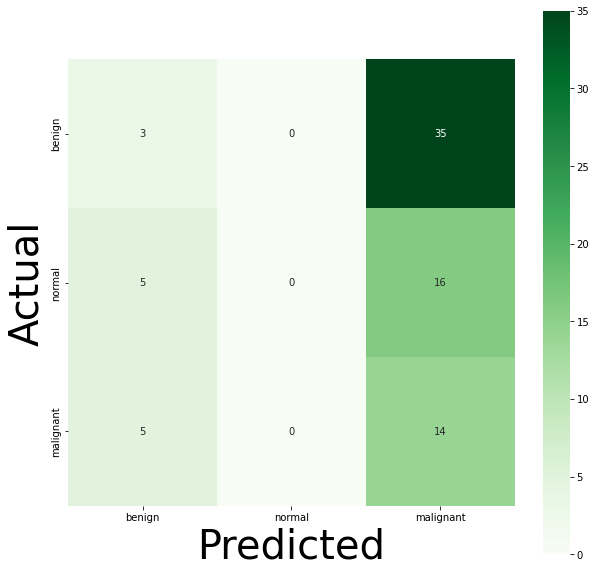
import seaborn as sns
sns.heatmap(conf)
到此为止啦!感受科技的美丽,感受计算机的魅力,能够用机器学习的方式进行阅片判断。希望随着科技的发展变得越来越好!感谢各位大神的贡献,让机器学习,深度学习变得越来越超乎人们的想象。
文章出处登录后可见!