目录
一、项目简介
本项目使用编程语言Python3.8,anaconda,开发工具pycharm,数据库MySQL5.7。
技术应用:开源计算机视觉库opencv-python,开源人脸识别库face_recognition,使用PyQt5制作人脸识别以及考勤界面,dlib人脸检测技术,以及MySQLdb连接数据库。
功能介绍:
第一步:录入,进入录入界面。调用摄像头检测识别人脸、输入姓名学号,人脸照片保存在faces文件夹中,姓名学号保存在数据库中。
第二步:考勤,进入考勤界面。调用摄像头进行人脸识别,摄像头识别出人脸和人脸对应的名字。
二、功能展示
1.人脸识别功能测试
这是从网上随便找了一张图片识别静态人脸,成功。
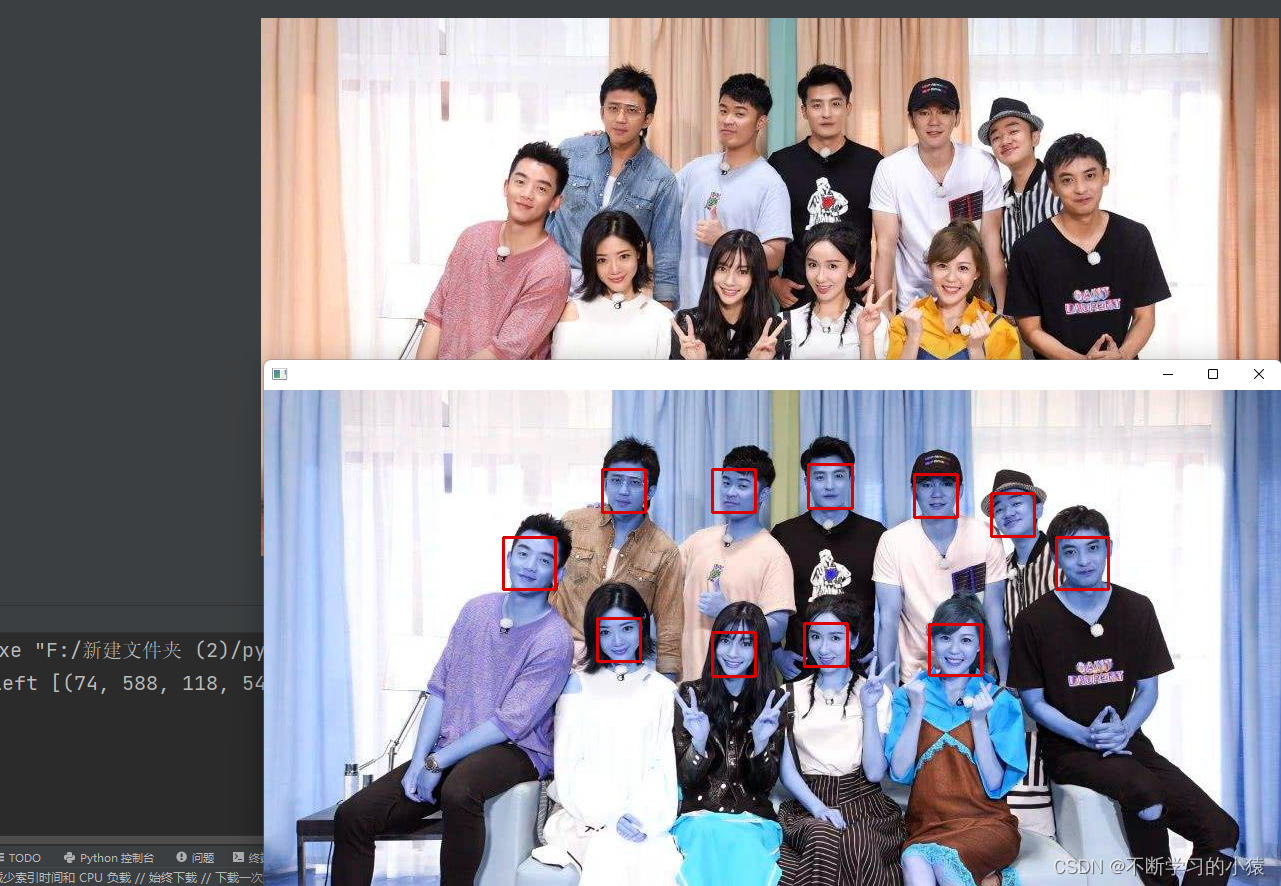
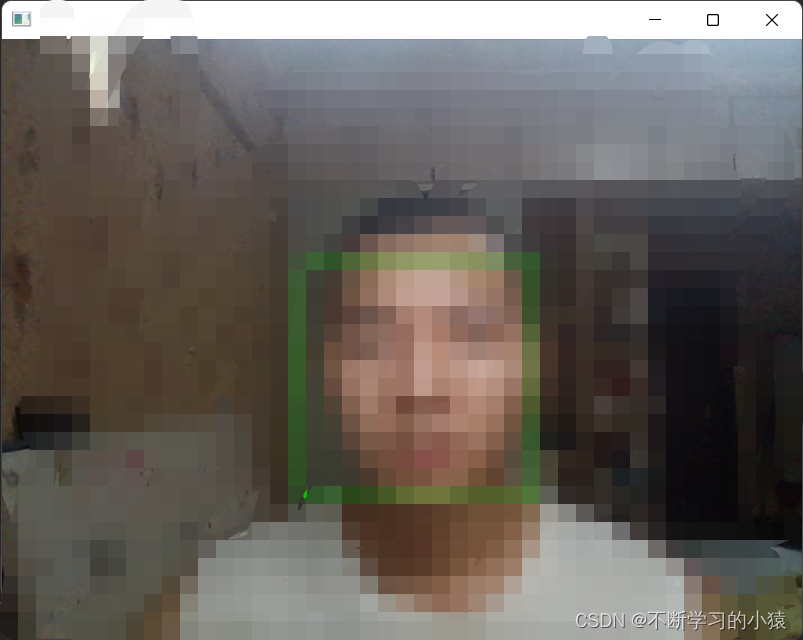
调用摄像头识别动态人脸,成功
上述功能代码如下:
def a1():
    #加载图片
    img=face_recognition.load_image_file("1.jpeg")
    #检测脸部位置
    pos=face_recognition.face_locations(img)
    print("位置top,right,bottom,left",pos)
    for i in range(len(pos)):
        rect=pos[i]
        #绘制矩形
        cv2.rectangle(img,(rect[3],rect[0]),(rect[1],rect[2]),(0,0,220),2)
    #显示窗口
    cv2.imshow("",img)
    cv2.waitKey(0)
def a2():
    vd=cv2.VideoCapture(0)
    while True:
        #读取摄像头数据流
        ok,frame=vd.read()
        #矩阵子集
        facearea=frame[:,:,::-1]
        pos=face_recognition.face_locations(facearea)
        for(top,right,bottom,left) in pos:
            cv2.rectangle(frame,(left,top),(right,bottom),(0,200,0),2)
        cv2.imshow("",frame)
        cv2.waitKey(1)
    vd.release()
    cv2.destroyAllWindows()
2.识别并录入人脸及个人信息
此时人脸已经录入faces文件中,点击确定即可填写个人信息。
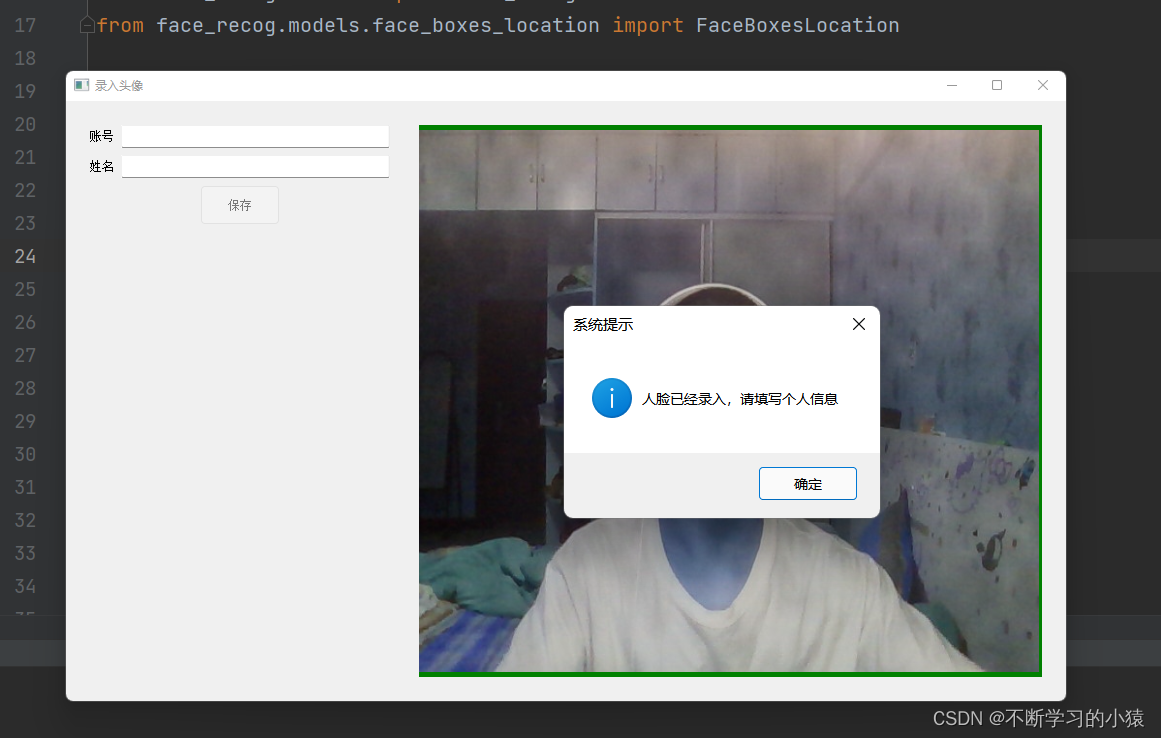
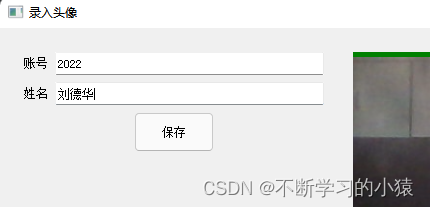 填写好信息,点击保存,信息即保存到数据库。
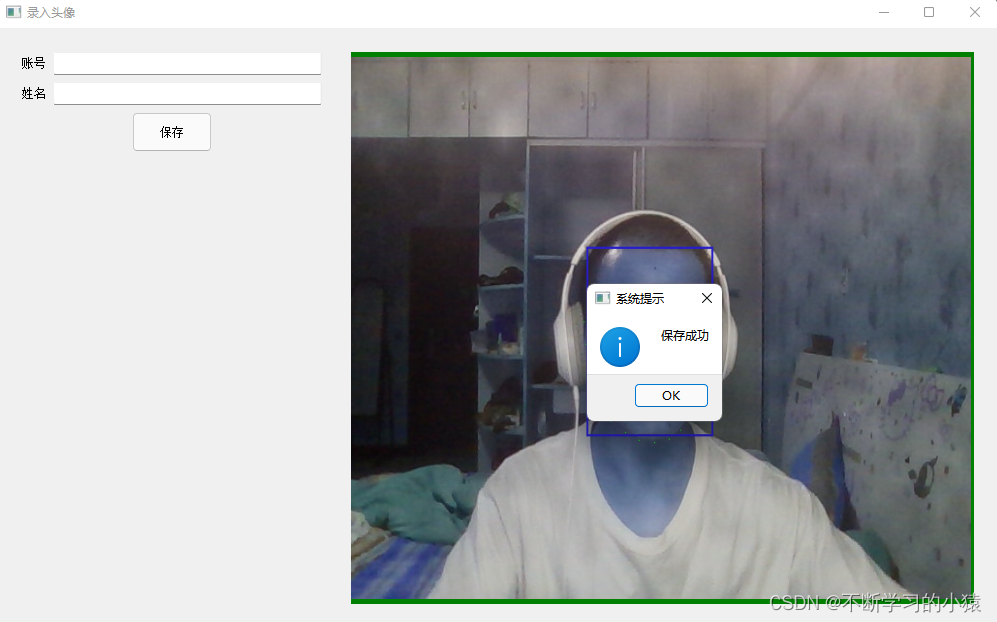
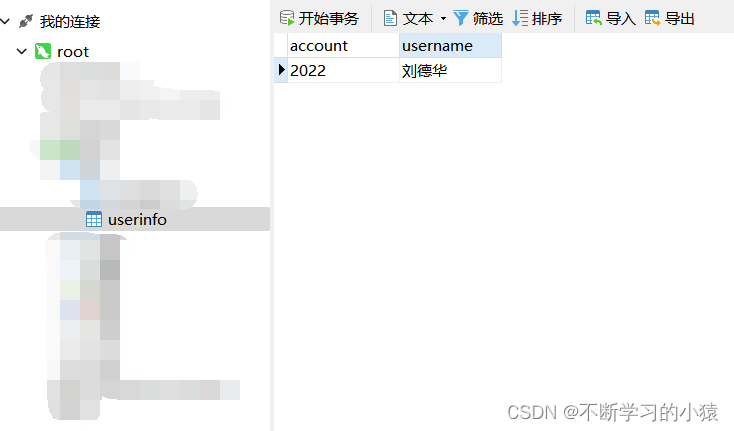
此时刚刚输入的账号和姓名已经保存到faces文件中,如下
 (挡住了一点,但是能看到)
功能代码如下:
class LuruApp(UI_FaceRec):
    def __init__(self):
        super().__init__()
        self.running = True
        self.btn.setEnabled(False)
        self.face_encode = None
        self.open()
        self.face_img = None
        self.face_img_encode = ""

    def open(self):
        frame = np.zeros((500, 600, 3), np.uint8)
        img = Image.fromarray(cv2.cvtColor(frame, cv2.COLOR_BGR2RGB))
        draw = ImageDraw.Draw(img)
        font = ImageFont.truetype("simkai.ttf", 40, encoding="utf-8")
        draw.text((200, 200), "请正视摄像头", (200, 30, 40), font=font)
        frame = cv2.cvtColor(np.asarray(img), cv2.COLOR_BGR2RGB)
        frame = cv2.resize(frame, (self.img.width() - 10, self.img.height() - 10))
        h, w1, d = frame.shape
        # 从内存创建图像
        frame = QImage(frame.data, w1, h, w1 * d, QImage.Format_RGB888)
        self.img.setPixmap(QPixmap.fromImage(frame))
        # 开启子线程
        self.thread = Thread(target=self.doLuru)
        self.thread.start()

    def doLuru(self):

        fbl = FaceBoxesLocation()
        msg = ""
        self.cap = cv2.VideoCapture(0)
        # if self.cap.isOpened():
        #   ok, frame = self.cap.read()
        while self.running:
            ok, frame = self.cap.read()
            frame = cv2.flip(frame, 1)
            rawFrame = frame.copy()
            # 脸部区域
            face_pos = fbl.face_location(frame).astype(int)
            if len(face_pos) == 0:
                msg = "没有人脸"
            elif len(face_pos) > 1:
                msg = "请一个一个来!"
            else:
                msg = ""
                face_mark = face_recog.face_landmarks(frame, face_pos)
                # 脸部特征
                new_face_encode = face_recog.face_encodings(frame, face_pos)[0]
                if self.face_encode is None:
                    self.face_encode = new_face_encode
                    x1, y1, x2, y2 = face_pos[0]
                    self.face_img = frame[y1:y2, x1:x2]
                    print(self.face_img)
                    self.face_img_encode = self.face_encode.tolist()
                # else:
                #    face_distance = face_recog.face_distance(self.face_encode[np.newaxis], new_face_encode)[0]
                #   if face_distance < 0.5:
                # x1, y1, x2, y2 = face_pos[0]
                # self.face_img = frame[y1:y2, x1:x2]
                # print(self.face_img)
                # self.face_img_encode = self.face_encode.tolist()
                img = Image.fromarray(cv2.cvtColor(rawFrame, cv2.COLOR_BGR2RGB))
                draw = ImageDraw.Draw(img)
                for x1, y1, x2, y2 in face_pos:
                    draw.rectangle([(x1, y1), (x2, y2)], outline=(200, 30, 40), width=2)
                    # 绘制五官
                    if face_mark is not None:
                        for x, y in face_mark[0]:
                            draw.point((x, y), (20, 250, 25))
                font = ImageFont.truetype("simkai.ttf", 40, encoding="utf-8")
                draw.text((200, 200), msg, (200, 30, 40), font=font)
                frame = cv2.cvtColor(np.asarray(img), cv2.COLOR_BGR2RGB)
                frame = cv2.resize(frame, (self.img.width() - 10, self.img.height() - 10))
                h, w1, d = frame.shape
                # 从内存创建图像
                frame = QImage(frame.data, w1, h, w1 * d, QImage.Format_RGB888)
                self.img.setPixmap(QPixmap.fromImage(frame))
                self.running = False
                root = tkinter.Tk()
                root.withdraw()
                tkinter.messagebox.showinfo('系统提示', '人脸已经录入,请填写个人信息')
                self.btn.setEnabled(True)
                self.cap.release()
3.数据库保存信息
我使用的数据库可视化工具是Navicat12 for MySQL(也可以不用,mysql基本命令知道的话直接管理员cmd也可)
4.考勤打卡
运行如下,此时摄像头一直在运行,绿色框框始终识别你的人脸(跟随你移动)
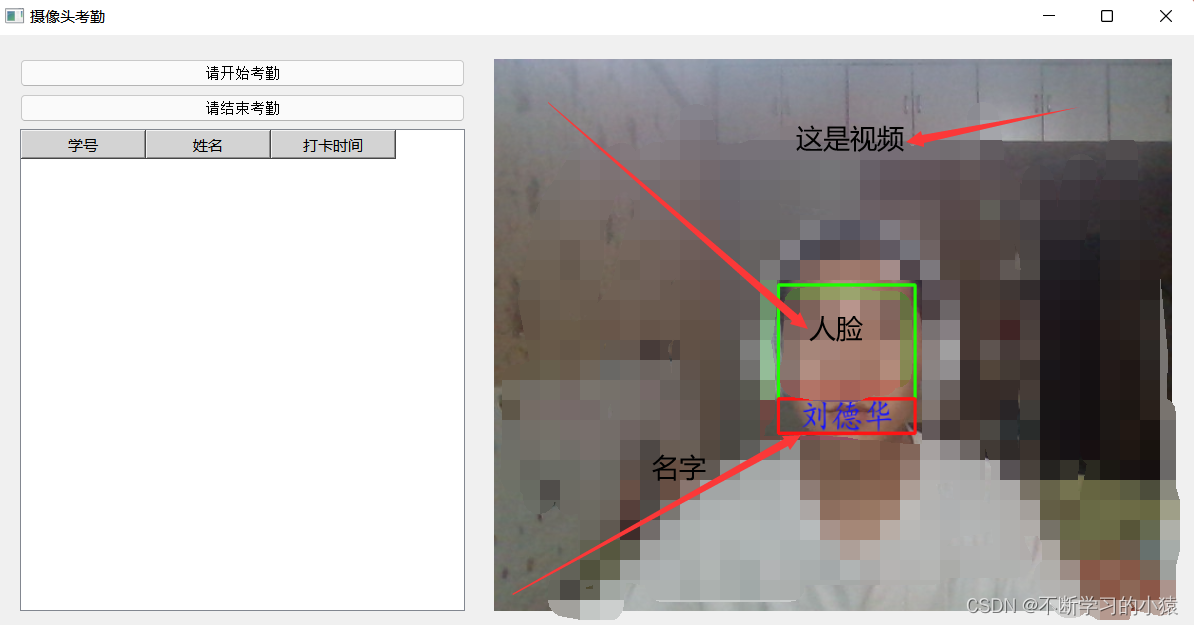
点击“请开始考勤”,开始考勤时间会直接显示在界面上

点击“请结束考勤”,结束考勤时间会存入数据库
功能代码如下:
class AttendanceApp(UI_FaceAttend):
    def __init__(self):
        super().__init__()
        # 摄像头开启开关
        self.running = True
        self.startattend = False
        # 摄像头看到的人的名字
        self.vnames = []
        # 存储学号+姓名+打卡时间
        self.ats = []
        self.open()

    # 打开摄像头
    def open(self):
        frame = np.zeros((500, 600, 3), np.uint8)
        # 灰化
        img = Image.fromarray(cv2.cvtColor(frame, cv2.COLOR_BGR2RGB))
        draw = ImageDraw.Draw(img)
        font = ImageFont.truetype("simkai.ttf", 40, encoding="utf-8")
        draw.text((200, 200), "准备考勤...", (200, 30, 40), font=font)
        frame = cv2.cvtColor(np.asarray(img), cv2.COLOR_BGR2RGB)
        # 调整图像大小
        frame = cv2.resize(frame, (self.video.width(), self.video.height()))
        h, w, d = frame.shape
        # 从内存创建图像
        frame = QImage(frame.data, w, h, w * d, QImage.Format_RGB888)
        self.video.setPixmap(QPixmap.fromImage(frame))
        # # 开启子线程
        self.thread = Thread(target=self.doAttend)
        self.thread.start()

    def doAttend(self):
        # 已录入的头像
        luruimgs = []
        # 头像对应人员
        lurunames = []
        path = "..\\faces"
        # 遍历目录下的所有文件,得到所有文件名字
        for root, dirs, files in os.walk(path):
            for file in files:
                filename = os.path.join(root, file)
                if file.endswith("jpg"):
                    kimg = face_recognition.load_image_file(filename)
                    # 把图像转为矩阵
                    kimg_encoding = face_recognition.face_encodings(kimg)
                    if len(kimg_encoding) > 0:
                        firstencoder = kimg_encoding[0]
                        luruimgs.append(firstencoder)
                        name = file.split(".")[0]
                        xuehao = filename.split("\\")[-2]
                        # 格式:学号,姓名
                        lurunames.append(xuehao + "," + name)
        # print("--",lurunames)
        self.vcap = cv2.VideoCapture(0)
        while self.running:
            ok, frame = self.vcap.read()
            rgbimg = frame[:, :, ::-1]
            # 检测人脸
            v_face_pos = face_recognition.face_locations(rgbimg)
            # 人脸编码生成矩阵
            v_face_encoding = face_recognition.face_encodings(rgbimg, v_face_pos)
            for face in v_face_encoding:
                # 比较摄像头人脸和已录入的人脸
                matcher = face_recognition.compare_faces(luruimgs, face, 0.6)
                # 距离
                face_dist = face_recognition.face_distance(luruimgs, face)
                # 取出最短距离
                small = np.argmin(face_dist)
                if matcher[small]:
                    facename = lurunames[small]
                    # 避免重复添加
                if facename not in self.vnames:
                    self.vnames.append(facename)
                    self.ats.append(facename + "," + str(datetime.now()))
                # print(facename)
            # 合并数组
            templist = zip(v_face_pos, self.vnames)
            # 把摄像头看到的所有人的名字显示在图像区
            for (top, right, bottom, left), name in templist:
                cv2.rectangle(frame, (left, top), (right, bottom), (0, 255, 30), 2)
                cv2.rectangle(frame, (left, bottom - 30), (right, bottom), (20, 20, 255), 2)
                img = Image.fromarray(cv2.cvtColor(frame, cv2.COLOR_BGR2RGB))
                draw = ImageDraw.Draw(img)
                font = ImageFont.truetype("simkai.ttf", 30, encoding="utf-8")
                # 显示人名
                draw.text((left + 20, bottom - 30), name.split(",")[1], (20, 20, 255), font=font)
                frame = cv2.cvtColor(np.asarray(img), cv2.COLOR_BGR2RGB)
            self.showHead(frame)
            # 点击开始打卡按钮
            if self.startattend:
                self.fillData()
        self.vcap.release()
三、环境安装实例
Anaconda!真的好用!
1.下载python对应版本的dlib
然后pip install dlib -……..whl(install后面为你下载的dlib的文件名)
pip install Cmake
2.安装opencv-python
pip install opencv-python
3.安装face_recognition
pip install face_recognition
4.安装pyqt5
pip install pyqt5
5.安装mysqlclient
pip install mysqlclient
四、需要源码私信并call邮箱lij867967@gmail.com
至此,结束!
小猿写的第一篇博客,写的不好还请担待
文章出处登录后可见!
