内容
- 前言
- 0、导入需要的包
- 1、幻想(Ghost)模块
- 1.1、GhostConv
- 1.2、GhostBottleneck
- 2、MixConv2d
- 3、Ensemble
- 4、attempt_load
- 5、CrossConv
- 6、Sum
- 总结
前言
源码:YOLOv5源码.
导航:【YOLOV5-5.x 源码讲解】整体项目文件导航.
注释版全部项目文件已上传至GitHub:yolov5-5.x-annotations.
这个模块是yolov5的实验模块。
0、导入需要的包
import numpy as np     # numpy矩阵操作模块
import torch           # PyTorch深度学习模块
import torch.nn as nn  # PYTorch模块函数库

from models.common import Conv, DWConv
from utils.google_utils import attempt_download
1、幻想(Ghost)模块
幻象(Ghost)模块是2020提出的新型的轻量化网络模块Ghost,来自论文:https://arxiv.org/abs/1911.11907.源码:https://github.com/huawei-noah/CV-Backbones/tree/master/ghostnet_pytorch。幻象模块虽然不能增加mAP,但是可以大大减少模型计算量。如果想进一步了解论文内容,可以看看我的另一篇博客:【论文复现】GhostNet_GhostModule(2020).
使用:可以用GhostConv代替一般的Conv,GhostBottleneck代替C3,至于在哪些位置代替,可以自己决定。
1.1、GhostConv
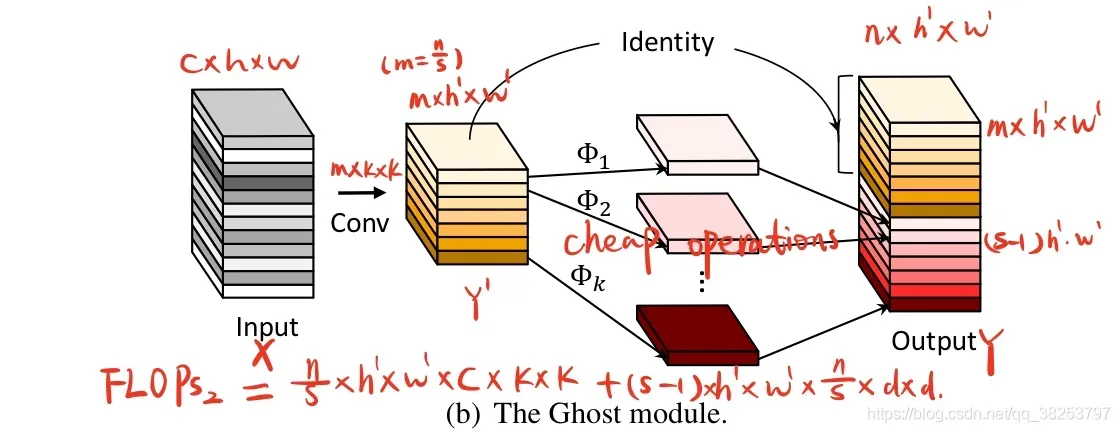
GhostConv模块代码:
class GhostConv(nn.Module):
    """
    Ghost Convolution 幻象卷积  轻量化网络卷积模块
    论文: https://arxiv.org/abs/1911.11907
    源码: https://github.com/huawei-noah/ghostnet
    """
    def __init__(self, c1, c2, k=1, s=1, g=1, act=True):  # ch_in, ch_out, kernel, stride, groups
        super(GhostConv, self).__init__()
        c_ = c2 // 2  # hidden channels
        # 第一步卷积: 少量卷积, 一般是一半的计算量
        self.cv1 = Conv(c1, c_, k, s, None, g, act)
        # 第二步卷积: cheap operations 使用3x3或5x5的卷积, 并且是逐个特征图的进行卷积(Depth-wise convolutional)
        self.cv2 = Conv(c_, c_, 5, 1, None, c_, act)

    def forward(self, x):
        y = self.cv1(x)
        return torch.cat([y, self.cv2(y)], 1)
1.2、GhostBottleneck
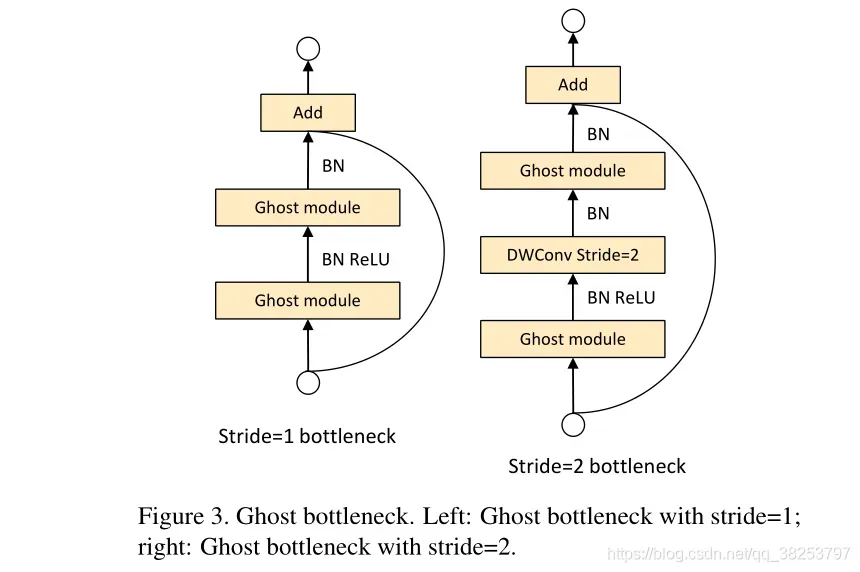
GhostBottleneck模块代码:
class GhostBottleneck(nn.Module):
    """
    Ghost Convolution 幻象卷积  轻量化网络卷积模块
    论文: https://arxiv.org/abs/1911.11907
    源码: https://github.com/huawei-noah/ghostnet
    """
    def __init__(self, c1, c2, k=3, s=1):  # ch_in, ch_out, kernel, stride
        super(GhostBottleneck, self).__init__()
        c_ = c2 // 2
        self.conv = nn.Sequential(GhostConv(c1, c_, 1, 1),  # pw
                                  DWConv(c_, c_, k, s, act=False) if s == 2 else nn.Identity(),  # dw
                                  GhostConv(c_, c2, 1, 1, act=False))  # pw-linear
        # 注意, 源码中并不是直接Identity连接, 而是先经过一个DWConv + Conv, 再进行shortcut连接的。
        self.shortcut = nn.Sequential(DWConv(c1, c1, k, s, act=False),
                                      Conv(c1, c2, 1, 1, act=False)) if s == 2 else nn.Identity()

    def forward(self, x):
        return self.conv(x) + self.shortcut(x)
2、MixConv2d
MixConv2d 混合深度卷积来自于2019年发表的一篇论文:https://arxiv.org/abs/1907.09595。源码:https://github.com/tensorflow/tpu/tree/master/models/official/mnasnet/mixnet。混合深度卷积就是使用不同大小的卷积核对深度卷积的不同channel分组处理。也可以看作是 分组深度卷积 + Inception结构 的多种卷积核混用。
MixConv2d模块示意图: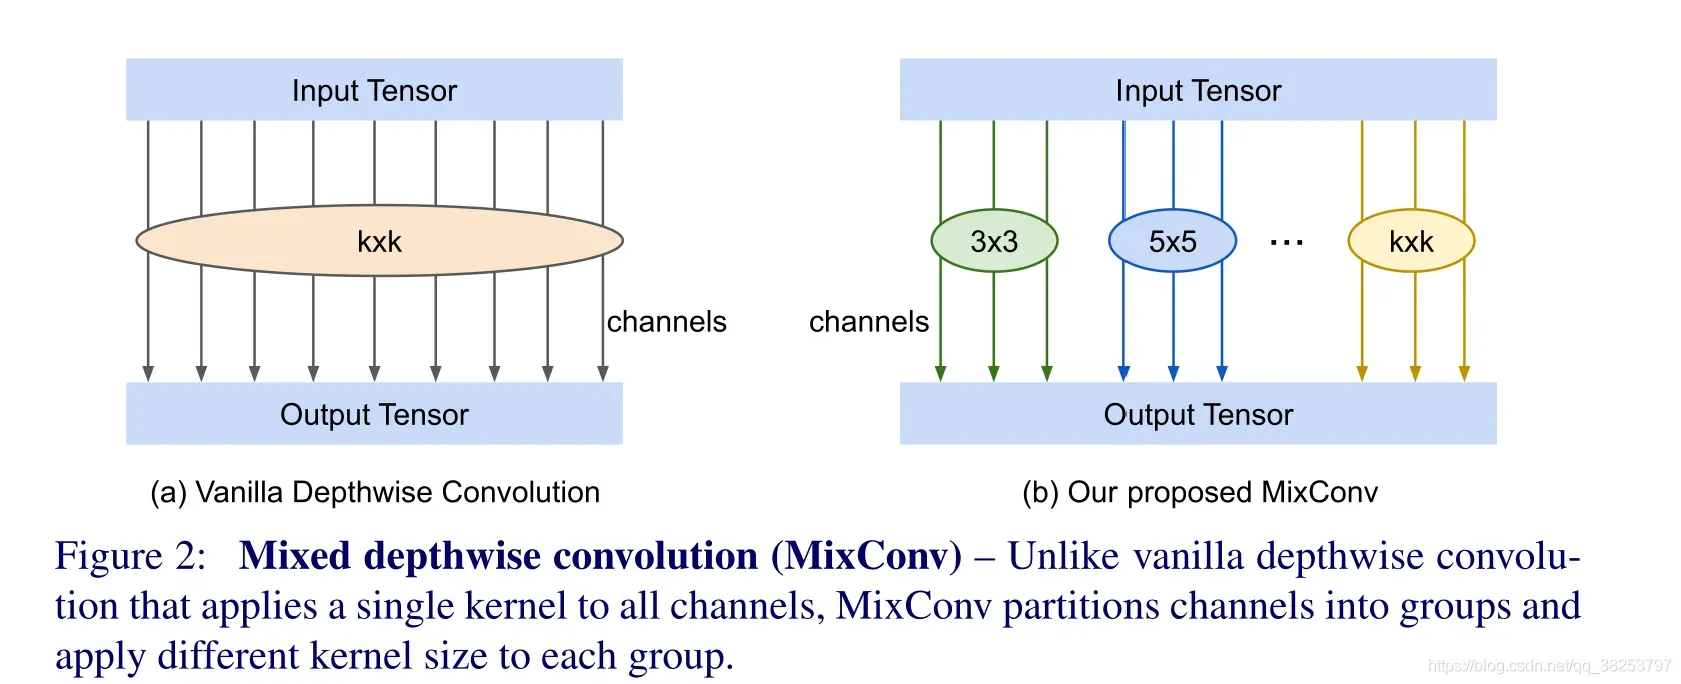
MixConv2d函数代码:
class MixConv2d(nn.Module):
    """
    Mixed Depthwise Conv 混合深度卷积 就是使用不同大小的卷积核对深度卷积的不同channel分组处理 也可以看作是分组深度卷积 + Inception结构的多种卷积核混用
    论文: https://arxiv.org/abs/1907.09595.
    源码: https://github.com/tensorflow/tpu/tree/master/models/official/mnasnet/mixnet.
    """
    def __init__(self, c1, c2, k=(1, 3), s=1, equal_ch=True):
        """
        :params c1: 输入feature map的通道数
        :params c2: 输出的feature map的通道数(这个函数的关键点就是对c2进行分组)
        :params k: 混合的卷积核大小 其实论文里是[3, 5, 7...]用的比较多的
        :params s: 步长 stride
        :params equal_ch: 通道划分方式 有均等划分和指数划分两种方式  默认是均等划分
        """
        super(MixConv2d, self).__init__()
        groups = len(k)
        if equal_ch:  # 均等划分通道
            i = torch.linspace(0, groups - 1E-6, c2).floor()  # c2 indices
            c_ = [(i == g).sum() for g in range(groups)]  # intermediate channels
        else:  # 指数划分通道
            b = [c2] + [0] * groups
            a = np.eye(groups + 1, groups, k=-1)
            a -= np.roll(a, 1, axis=1)
            a *= np.array(k) ** 2
            a[0] = 1
            c_ = np.linalg.lstsq(a, b, rcond=None)[0].round()  # solve for equal weight indices, ax = b

        self.m = nn.ModuleList([nn.Conv2d(c1, int(c_[g]), k[g], s, k[g] // 2, bias=False) for g in range(groups)])
        self.bn = nn.BatchNorm2d(c2)
        self.act = nn.LeakyReLU(0.1, inplace=True)

    def forward(self, x):
        # 这里和原论文略有出入,这里加了一个shortcut操作
        return x + self.act(self.bn(torch.cat([m(x) for m in self.m], 1)))
3、Ensemble
概念:集成建模是通过使用许多不同的建模算法或使用不同的训练数据集创建多个不同的模型来预测结果的过程。使用集成模型的动机是减少预测的泛化误差。只要底层模型多样且独立,使用集成方法可以减少模型的预测误差。该方法在进行预测时寻求群众的智慧。即使集成模型在模型中有多个基础模型(多个模型的平均值或最大值),它仍然作为单个模型运行和执行(并最终预测为集成模型的舍入)。
yolov5作者解释:
Ensemble modeling is a process where multiple perse models are created to predict an outcome, either by using many different modeling algorithms or using different training data sets. The ensemble model then aggregates the prediction of each base model and results in once final prediction for the unseen data. The motivation for using ensemble models is to reduce the generalization error of the prediction. As long as the base models are perse and independent, the prediction error of the model decreases when the ensemble approach is used. The approach seeks the wisdom of crowds in making a prediction. Even though the ensemble model has multiple base models within the model, it acts and performs as a single model.
Ensemble模块代码:
class Ensemble(nn.ModuleList):
    """
    模型集成  Ensemble of models
    动机: 减少模型的泛化误差
    https://github.com/ultralytics/yolov5/issues/318
    来源: https://www.sciencedirect.com/topics/computer-science/ensemble-modeling
    """
    def __init__(self):
        super(Ensemble, self).__init__()

    def forward(self, x, augment=False):
        y = []
        # 集成模型为多个模型时, 在每一层forward运算时, 都要运行多个模型在该层的结果append进y中
        for module in self:
            y.append(module(x, augment)[0])  # 添加module
        # y = torch.stack(y).max(0)[0]  # 求两个模型结果的最大值 max ensemble
        y = torch.stack(y).mean(0)  # 求两个模型结果的均值 mean ensemble
        # y = torch.cat(y, 1)  # 将两个模型结果concat 后面做nms(等于翻了一倍的pred) nms ensemble
        return y, None  # inference, train output
4、attempt_load
这个函数用于加载模型权重文件并构建模型(可以构造普通模型或者集成模型)。被广泛用于val.py、detect.py、train.py等文件中,用在测试、验证阶段。
attempt_load模块代码:
def attempt_load(weights, map_location=None, inplace=True):
    """用在val.py、detect.py、train.py等文件中  一般用在测试、验证阶段
    加载模型权重文件并构建模型(可以构造普通模型或者集成模型)
    Loads an ensemble of models weights=[a,b,c] or a single model weights=[a] or weights=a
    :params weights: 模型的权重文件地址 默认weights/yolov5s.pt
                     可以是[a]也可以是list格式[a, b]  如果是list格式将调用上面的模型集成函数 多模型运算 提高最终模型的泛化误差
    :params map_location: attempt_download函数参数  表示模型运行设备device
    :params inplace: pytorch 1.7.0 compatibility设置
    """
    from models.yolo import Detect, Model

    model = Ensemble()
    for w in weights if isinstance(weights, list) else [weights]:
        ckpt = torch.load(attempt_download(w), map_location=map_location)  # load model weights
        model.append(ckpt['ema' if ckpt.get('ema') else 'model'].float().fuse().eval())  # FP32 model->fuse融合->验证模式

    # Compatibility updates(关于版本兼容的设置)
    for m in model.modules():
        if type(m) in [nn.Hardswish, nn.LeakyReLU, nn.ReLU, nn.ReLU6, nn.SiLU, Detect, Model]:
            m.inplace = inplace  # pytorch 1.7.0 compatibility
        elif type(m) is Conv:
            m._non_persistent_buffers_set = set()  # pytorch 1.6.0 compatibility

    if len(model) == 1:  # 单个模型 正常返回
        return model[-1]  # return model
    else:  # 多个模型 使用模型集成 并对模型先进行一些必要的设置
        print(f'Ensemble created with {weights}\n')
        # 给每个模型一个name属性
        for k in ['names']:
            setattr(model, k, getattr(model[-1], k))
        # 给每个模型分配stride属性
        model.stride = model[torch.argmax(torch.tensor([m.stride.max() for m in model])).int()].stride  # max stride
        return model  # return ensemble 返回集成模型
在val.py中使用:
使用命令行调用多个模型进行集成:
python val.py –weights yolov5x.pt yolov5l6.pt –data coco.yaml –img 640 –half
直接使用pycharm调用多个模型进行集成:
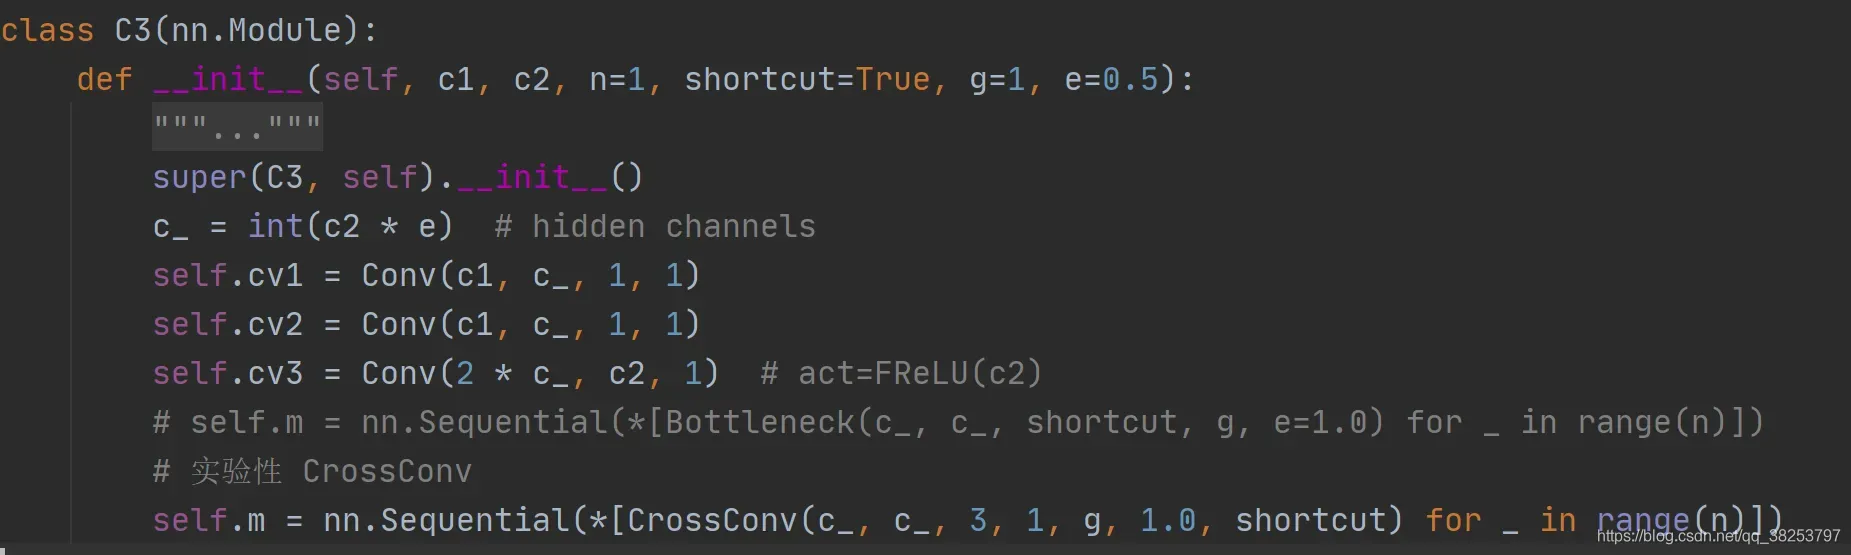
5、CrossConv
这个模块的代码很简单,但是原理暂时没有查到,可能是yolov5作者的原创。
CrossConv模块代码:
class CrossConv(nn.Module):
    """可以用在C3模块中(实验)
    Cross Convolution Downsample   3x3 -> 1x9 + 9x1
    https://github.com/ultralytics/yolov5/issues/4030
    """
    def __init__(self, c1, c2, k=3, s=1, g=1, e=1.0, shortcut=False):
        # ch_in, ch_out, kernel, stride, groups, expansion, shortcut
        super(CrossConv, self).__init__()
        c_ = int(c2 * e)  # hidden channels
        # 1x5+5x1  或1x3+3x1  可以多多尝试
        self.cv1 = Conv(c1, c_, (1, k), (1, s))
        self.cv2 = Conv(c_, c2, (k, 1), (s, 1), g=g)
        self.add = shortcut and c1 == c2

    def forward(self, x):
        return x + self.cv2(self.cv1(x)) if self.add else self.cv2(self.cv1(x))
可以用在C3模块中(实验):
6、Sum
加权特征融合模块。原理来自于论文 :EfficientDet: Scalable and Efficient Object Detection。
思想: 传统的特征融合往往只是简单的feature map叠加/相加 (sum them up), 比如使用concat或者shortcut连接, 而不对同时加进来的feature map进行区分。然而,不同的输入feature map具有不同的分辨率, 它们对融合输入feature map的贡献也是不同的, 因此简单的对他们进行相加或叠加处理并不是最佳的操作, 所以这里我们提出了一种简单而高效的加权特融合的机制。
下面是一篇论文中加权特征融合的例子: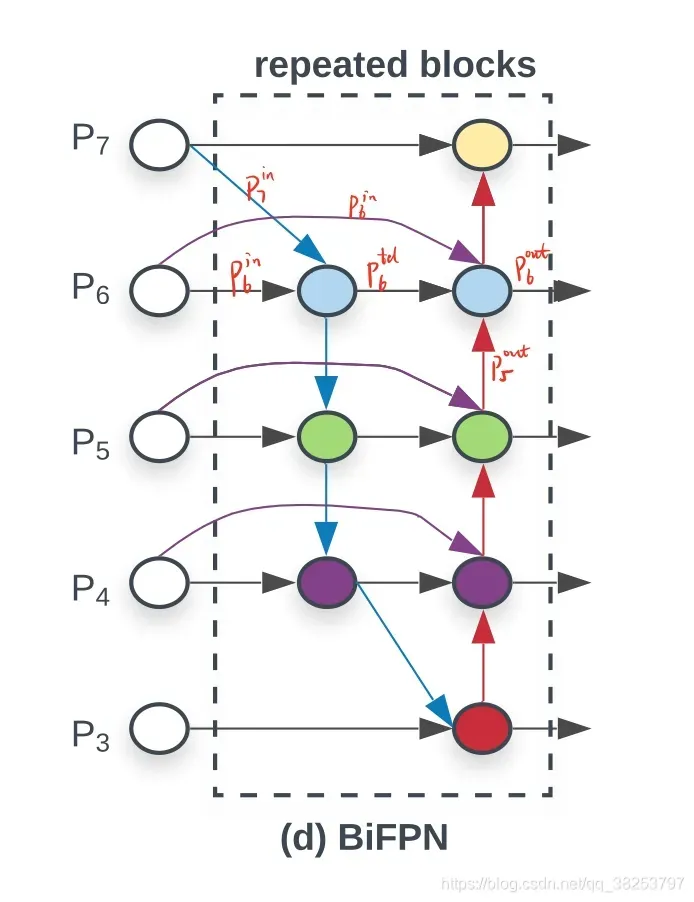
计算: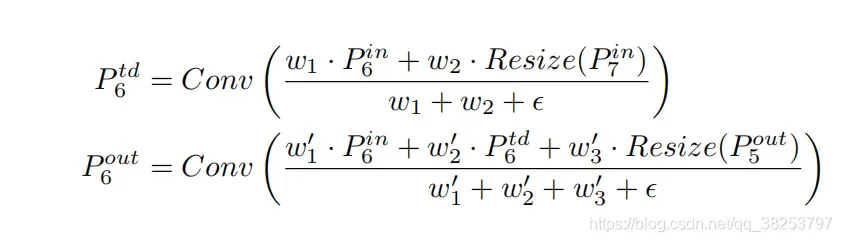
与论文不同的是,这里的权重参数是可以学习的。
Sum模块代码:
class Sum(nn.Module):
    """
    加权特征融合: 学习不同输入特征的重要性,对不同输入特征有区分的融合  Weighted sum of 2 or more layers
    思想: 传统的特征融合往往只是简单的feature map叠加/相加 (sum them up), 比如使用concat或者shortcut连接, 而不对同时加进来的
         feature map进行区分。然而,不同的输入feature map具有不同的分辨率, 它们对融合输入feature map的贡献也是不同的, 因此简单
         的对他们进行相加或叠加处理并不是最佳的操作, 所以这里我们提出了一种简单而高效的加权特融合的机制。
    from: https://arxiv.org/abs/1911.09070
    """
    def __init__(self, n, weight=False):  # n: number of inputs
        super(Sum, self).__init__()
        self.weight = weight  # 是否使用加权权重融合
        self.iter = range(n - 1)  # 加权 iter
        if weight:
            self.w = nn.Parameter(-torch.arange(1., n) / 2, requires_grad=True)  # 初始化可学习权重

    def forward(self, x):
        y = x[0]  # no weight
        if self.weight:
            w = torch.sigmoid(self.w) * 2   # 得到每一个layer的可学习权重
            for i in self.iter:
                y = y + x[i + 1] * w[i]     # 加权特征融合
        else:
            for i in self.iter:
                y = y + x[i + 1]            # 特征融合
        return y
总结
这个模块大多是在近年来的一些奇思妙想的论文中提出来的,yolov5的作者将这些模块与yolov5相结合,进行尝试,大家也可以试试用在自己的任务中。
–2021.08.22
版权声明:本文为博主满船清梦压星河HK原创文章,版权归属原作者,如果侵权,请联系我们删除!
原文链接:https://blog.csdn.net/qq_38253797/article/details/119854460