Datawhale干货
作者:宋志学,Datawhale成员
花了一晚上照着transformers仓库的LLaMA源码,把张量并行和梯度保存的代码删掉,只留下模型基础结构,梳理了一遍LLaMA的模型结构。
今年四月份的时候,我第一次接触深度学习,也是今年第一次接触Datawhale,在Datawhale和小伙伴一起学习、讨论了大半年,不知不觉已经可以做到看源码的程度了。
Datawhale才是一个没有围墙的大学,在这里无论你有什么想法💡,只要你愿意前进,总会有小伙伴和你一起。
博客地址:
https://flowus.cn/kmno4/share/527055be-464f-4f0f-98c5-8b8f72a1fc2e
LLaMA-Model
在transformers仓库中可以看到llama的源码,首先是LlamaModel类,继承自PreTrainedModel,这个类是所有模型的基类,包含了一些通用的方法,比如保存模型、加载模型、初始化权重等。
继承关系为:LlamaModel-> LlamaPreTrainedModel-> PreTrainedModel
LlamaConfig
LlamaConfig 中主要是定义一些参数,比如vocab_size、hidden_size、num_hidden_layers、num_attention_heads等。所有的参数有默认值,可以直接创建cofing就能用。
config = LlamaConfig()LlamaModel
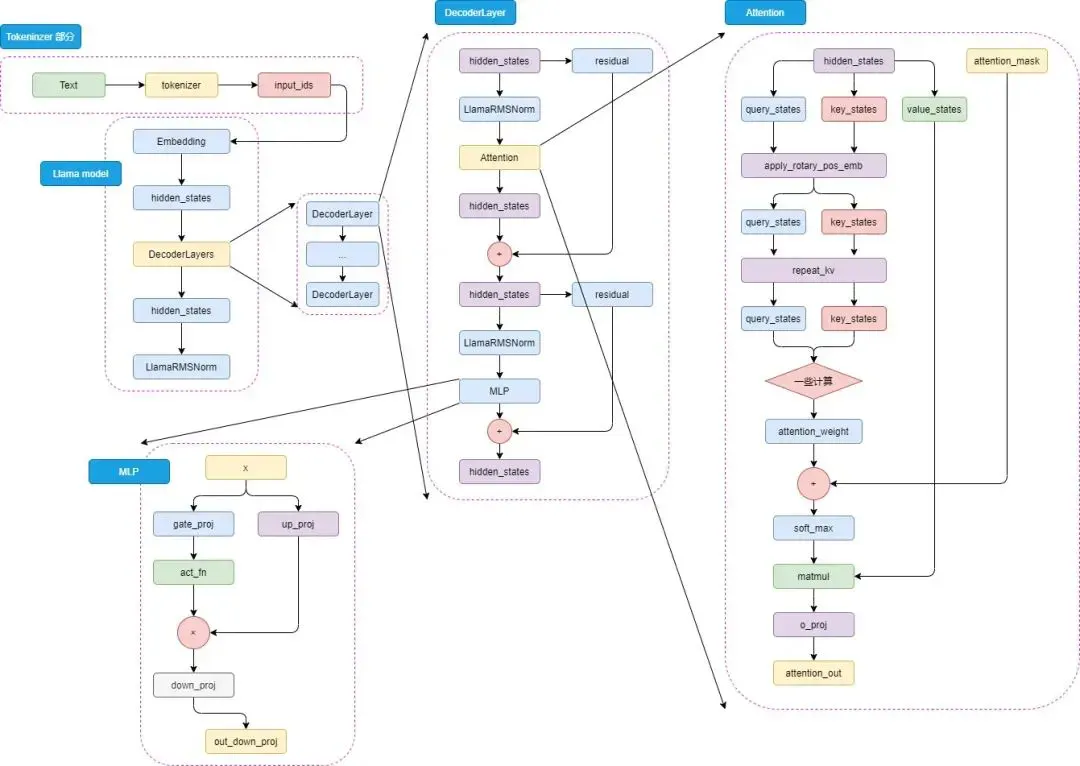
LlamaModel 初始化
设置了模型的两个属性:padding_idx(用于指定填充标记的索引),vocab_size(词汇表的大小)
初始化了模型的嵌入层、解码器层、归一化层
嵌入层(nn.Embedding):模型使用嵌入层将输入的标记映射成密集的向量表示。
解码器层(nn.ModuleList()):模型包含多个解码器层,这些层都是由 LlamaDecoderLayer 定义
归一化层 LlamaRMSNorm:归一化层使用的是 Root Mean Square Layer Normalization(RMS Layer Norm)
设置了是否使用 gradient_checkpoint 主要是用来节省显存
调用 post_init() 完成一些初始化和准备检查的代码
def __init__(self, config: LlamaConfig):
    super().__init__(config)
    self.padding_idx = config.pad_token_id
    self.vocab_size = config.vocab_size

    # embedding 层
    self.embed_tokens = nn.Embedding(config.vocab_size, config.hidden_size, self.padding_idx)
    # 中间的一堆 decoderlayers 层
    self.layers = nn.ModuleList(
        [LlamaDecoderLayer(config, layer_idx) for layer_idx in range(config.num_hidden_layers)]
    )
    self._use_sdpa = config._attn_implementation == "sdpa"
    self._use_flash_attention_2 = config._attn_implementation == "flash_attention_2"
    self.norm = LlamaRMSNorm(config.hidden_size, eps=config.rms_norm_eps)

    self.gradient_checkpointing = False
    # Initialize weights and apply final processing
    self.post_init()
可以看一下 post_init() 的代码,主要是初始化权重和gradient_checkpointing相关的一些事情。该方法在PreTrainedModel基类中,transformers中所有模型基本都继承这个类。
def post_init(self):
    """
    A method executed at the end of each Transformer model initialization, to execute code that needs the model's
    modules properly initialized (such as weight initialization).
    """
    self.init_weights()
    self._backward_compatibility_gradient_checkpointing()
LlamaModel forward
forward 部分的代码有点长,但其实大部分都是张量并行或者是节省显存相关的代码,对于理解模型结构来说可以直接忽略。
首先进来就是把 inputs_ids 进行向量化,然后拿到 hidden_states 。然后是存起来所有的hidden_states 进入 decoder_layer 再拿一个 hidden_states,作为下一轮 decoder_layer 的 hidden_states 输入,最后给 hidden_states norm一下。如下代码所示:
inputs_embeds = self.embed_tokens(input_ids)
hidden_states = inputs_embeds

for decoder_layer in self.layers:
    # 存起来所有的 hidden_states
    if output_hidden_states:
        all_hidden_states += (hidden_states,)
    # 这里是 decoder_layer 的 forward
    layer_outputs = decoder_layer(
        hidden_states,
        attention_mask=attention_mask,
        position_ids=position_ids,
        past_key_value=past_key_values,
        output_attentions=output_attentions,
        use_cache=use_cache,
    )
    # 再拿一个 hidden_states,作为下一轮 decoder_layer 的 hidden_states 输入
    hidden_states = layer_outputs[0]

hidden_states = self.norm(hidden_states)
最后就是以 BaseModelOutputWithPast 的形式输出。ok,接下来继续看decoder_layer中的其他代码。
LlamaDecoderLayer
Embedding层不用多说,用的就是torch中的nn.Embedding。那就直接来看DecoderLayer。
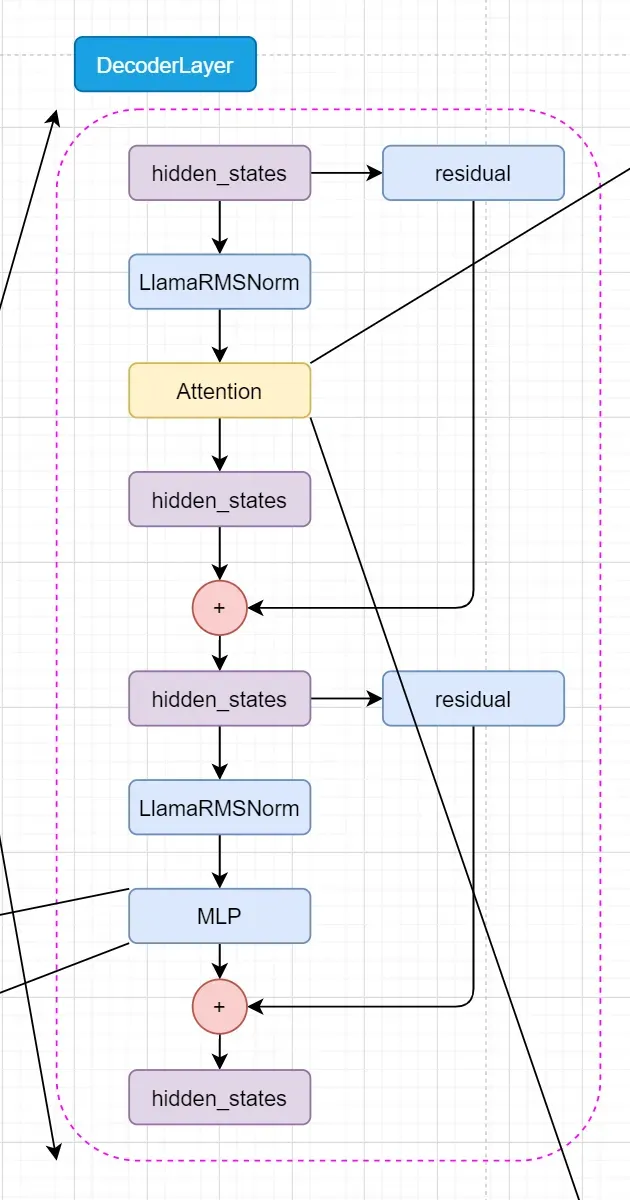
DecoderLayers 初始化
先来看初始化。
hidden_size: 也就是在上面说的输入输出。self_attn: 别看它写这么多啊,其实就是选一下用什么attention。看见大写字母不要怕,直接点进去看看怎么个事!LLAMA_ATTENTION_CLASSES = { "eager": LlamaAttention, "flash_attention_2": LlamaFlashAttention2, "sdpa": LlamaSdpaAttention, }mlp: 一个全连接层LlamaMLP这个待会后面再说,输入输出都是hidden_size大小。input_layernorm:LlamaRMSNorm层,输入时候的normpost_attention_layernorm: 丢入mlp之前的操作。
class LlamaDecoderLayer(nn.Module):
    def __init__(self, config: LlamaConfig, layer_idx: int):
        super().__init__()
        self.hidden_size = config.hidden_size

        self.self_attn = LLAMA_ATTENTION_CLASSES[config._attn_implementation](config=config, layer_idx=layer_idx)

        self.mlp = LlamaMLP(config)
        self.input_layernorm = LlamaRMSNorm(config.hidden_size, eps=config.rms_norm_eps)
        self.post_attention_layernorm = LlamaRMSNorm(config.hidden_size, eps=config.rms_norm_eps)\
DecoderLayers forward
首先复制一份 hidden_states 给 residual。然后 hidden_states 进入 input_layernorm 进行norm。然后进入 self_attn 进行 attention 操作,拿到 hidden_states、self_attn_weights、present_key_value。然后 hidden_states 和 residual 相加,得到 hidden_states。
然后 hidden_states 进入 post_attention_layernorm 进行norm。最后 hidden_states 进入 mlp 进行全连接操作,拿到 hidden_states。然后 hidden_states 和 residual 相加,得到 hidden_states。最后输出 hidden_states。
residual = hidden_states

hidden_states = self.input_layernorm(hidden_states)

# Self Attention
hidden_states, self_attn_weights, present_key_value = self.self_attn(
    hidden_states=hidden_states,
    attention_mask=attention_mask,
    position_ids=position_ids,
    past_key_value=past_key_value,
    output_attentions=output_attentions,
    use_cache=use_cache,
    **kwargs,
)
hidden_states = residual + hidden_states

# Fully Connected
residual = hidden_states
hidden_states = self.post_attention_layernorm(hidden_states)
hidden_states = self.mlp(hidden_states)
hidden_states = residual + hidden_states

outputs = (hidden_states,)

if output_attentions:
    outputs += (self_attn_weights,)

if use_cache:
    outputs += (present_key_value,)

return outputs
Llama Attention
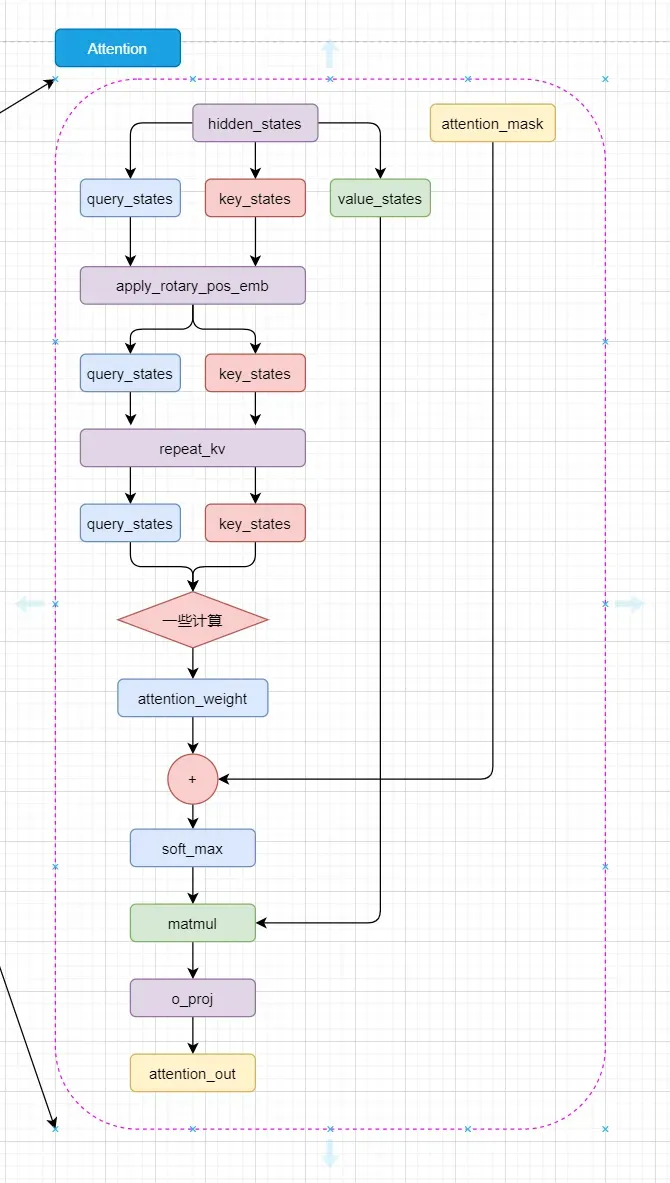
看代码首先映入眼帘的就是 Attention Is All You Need 好好好,很有精神!那我们接着往下看。
先来看 init 部分叭。
layer_idx: 这个就是第几个DecoderLayers层。不用关心。attention_dropout: 用于dropout的概率。hidden_size: 输入输出大小。num_attention_heads: 多头注意力的头数。head_dim: 多头注意力的维度self.hidden_size // self.num_heads,和transformers中的一样。num_key_value_heads: 用于key和value的头数。
其他的参数都在 LlamaConfig 中有默认值,可以直接使用,也可以直接去LlamaConfig的源码中看具体的解释,这里就不再多说。
再往下就是 q_proj、 k_proj 、v_proj、 o_proj 四个矩阵(全连接层),耳熟能详了。
class LlamaAttention(nn.Module):
    """Multi-headed attention from 'Attention Is All You Need' paper"""

    def __init__(self, config: LlamaConfig, layer_idx: Optional[int] = None):
        super().__init__()
        self.config = config
        self.layer_idx = layer_idx
        if layer_idx is None:
            logger.warning_once(
                f"Instantiating {self.__class__.__name__} without passing `layer_idx` is not recommended and will "
                "to errors during the forward call, if caching is used. Please make sure to provide a `layer_idx` "
                "when creating this class."
            )

        self.attention_dropout = config.attention_dropout
        self.hidden_size = config.hidden_size
        self.num_heads = config.num_attention_heads
        self.head_dim = self.hidden_size // self.num_heads
        self.num_key_value_heads = config.num_key_value_heads
        self.num_key_value_groups = self.num_heads // self.num_key_value_heads
        self.max_position_embeddings = config.max_position_embeddings
        self.rope_theta = config.rope_theta
        self.is_causal = True

        if (self.head_dim * self.num_heads) != self.hidden_size:
            raise ValueError(
                f"hidden_size must be divisible by num_heads (got `hidden_size`: {self.hidden_size}"
                f" and `num_heads`: {self.num_heads})."
            )

        self.q_proj = nn.Linear(self.hidden_size, self.num_heads * self.head_dim, bias=config.attention_bias)
        self.k_proj = nn.Linear(self.hidden_size, self.num_key_value_heads * self.head_dim, bias=config.attention_bias)
        self.v_proj = nn.Linear(self.hidden_size, self.num_key_value_heads * self.head_dim, bias=config.attention_bias)
        self.o_proj = nn.Linear(self.num_heads * self.head_dim, self.hidden_size, bias=config.attention_bias)
        self._init_rope()
LlamaAttention forward
重头戏来了,attention forward 部分。
注意:其中有关于张量并行或者显存节省的部分我就直接省略了,直接看主要代码。这个笔记主要是分析llama的模型结构,并不讨论如何节省显存。
首先拿到 hidden_states 的 batch_size 和 seq_len 。然后把 hidden_states 丢入 q_proj、 k_proj 、v_proj 三个矩阵(全连接层),拿到 query_states、 key_states 、value_states 。然后把 query_states、 key_states 、value_states reshape 为下一步计算做准备。
将旋转位置嵌入应用于查询和键张量。使用了旋转位置嵌入的余弦和正弦部分,将它们与查询和键张量相乘,并将结果相加,从而实现旋转位置嵌入的效果
key_states和value_states重复self.num_key_value_groups次。然后,使用torch.matmul()函数计算query_states和转置后的key_states之间的矩阵乘法。最后,将结果除以math.sqrt(self.head_dim)进行归一化
然后 attn_weights 加上 attention_mask,再 softmax 和 dropout。然后 attn_weights 和 value_states 相乘,把 attn_output reshape 为下一步计算做准备,最后把 attn_output 丢入 o_proj ,然后return就行了。
好了,至此。我觉得llama最激动人心的地方已经结束了。
# 获取 batch_size 和 seq_len
bsz, q_len, _ = hidden_states.size()

# 把 hidden_states 丢入 q_proj、k_proj、v_proj
query_states = self.q_proj(hidden_states)
key_states = self.k_proj(hidden_states)
value_states = self.v_proj(hidden_states)

# 把 q_proj、k_proj、v_proj 的输出 reshape 为下一步计算做准备
query_states = query_states.view(bsz, q_len, self.num_heads, self.head_dim).transpose(1, 2)
key_states = key_states.view(bsz, q_len, self.num_key_value_heads, self.head_dim).transpose(1, 2)
value_states = value_states.view(bsz, q_len, self.num_key_value_heads, self.head_dim).transpose(1, 2)

# 将旋转位置嵌入应用于查询和键张量。使用了旋转位置嵌入的余弦和正弦部分,将它们与查询和键张量相乘,并将结果相加,从而实现旋转位置嵌入的效果
cos, sin = self.rotary_emb(value_states, seq_len=kv_seq_len)
query_states, key_states = apply_rotary_pos_emb(query_states, key_states, cos, sin, position_ids)

# 首先,它将key_states和value_states重复self.num_key_value_groups次。然后,使用torch.matmul()函数计算query_states和转置后的key_states之间的矩阵乘法。最后,将结果除以math.sqrt(self.head_dim)进行归一化
key_states = repeat_kv(key_states, self.num_key_value_groups)
value_states = repeat_kv(value_states, self.num_key_value_groups)
attn_weights = torch.matmul(query_states, key_states.transpose(2, 3)) / math.sqrt(self.head_dim)

# 然后 attn_weights 加上 attention_mask
attn_weights = attn_weights + attention_mask

# softmax + dropout
attn_weights = nn.functional.softmax(attn_weights, dim=-1, dtype=torch.float32).to(query_states.dtype)
attn_weights = nn.functional.dropout(attn_weights, p=self.attention_dropout, training=self.training)

# 然后 attn_weights 和 value_states 相乘
attn_output = torch.matmul(attn_weights, value_states)

# 然后把 attn_output reshape 为下一步计算做准备
attn_output = attn_output.transpose(1, 2).contiguous()
attn_output = attn_output.reshape(bsz, q_len, self.hidden_size)

# 最后把 attn_output 丢入 o_proj
attn_output = self.o_proj(attn_output)

# 返回 attn_output、attn_weights、present_key_value
return attn_output, attn_weights, past_key_value
LlamaMLP
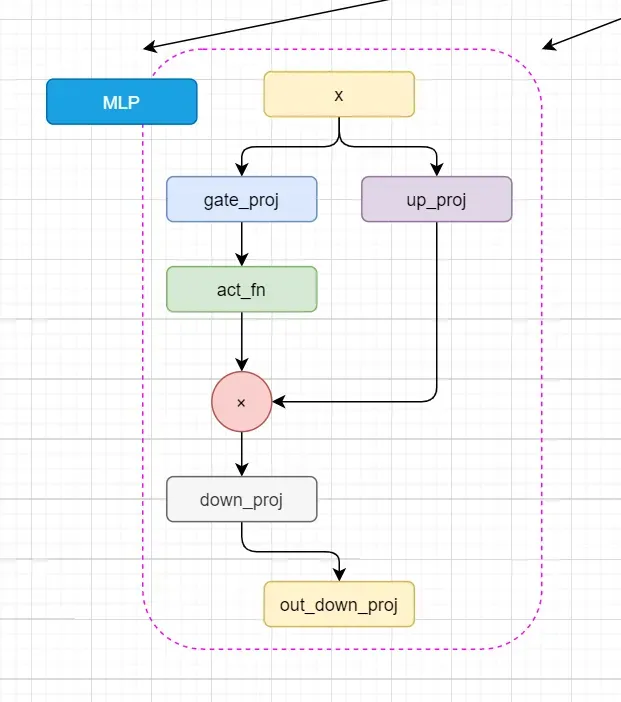
看完 attention 再看 MLP ,突然就觉得好简单了,哈哈哈。这部分代码比较少,就直接放到一起了。
x进来之后先进去up_proj和gate_proj,gate_proj进行激活,然后这俩再乘起来,丢进 down_proj。那直接放个图叭,这个过程有点简单了。
class LlamaMLP(nn.Module):
    def __init__(self, config):
        super().__init__()
        # 这俩不必多说
        self.config = config
        self.hidden_size = config.hidden_size
        self.intermediate_size = config.intermediate_size

        # 三个全连接层
        self.gate_proj = nn.Linear(self.hidden_size, self.intermediate_size, bias=False)
        self.up_proj = nn.Linear(self.hidden_size, self.intermediate_size, bias=False)
        self.down_proj = nn.Linear(self.intermediate_size, self.hidden_size, bias=False)
        self.act_fn = ACT2FN[config.hidden_act]

    def forward(self, x):
        down_proj = self.down_proj(self.act_fn(self.gate_proj(x)) * self.up_proj(x))
        return down_proj
LlamaRMSNorm
RMSNorm函数可以用以下数学公式表示:
其中:
是层的输入。
代表层的权重。
是权重的数量。
是一个小常数,用于数值稳定性(以避免除以零的情况)。
这种归一化有助于通过确保权重的规模不会变得过大或过小来稳定学习过程,这在具有许多层的深度学习模型中特别有用。
class LlamaRMSNorm(nn.Module):
    def __init__(self, hidden_size, eps=1e-6):
        """
        LlamaRMSNorm is equivalent to T5LayerNorm
        """
        super().__init__()
        self.weight = nn.Parameter(torch.ones(hidden_size))
        self.variance_epsilon = eps

    def forward(self, hidden_states):
        input_dtype = hidden_states.dtype
        hidden_states = hidden_states.to(torch.float32)
        variance = hidden_states.pow(2).mean(-1, keepdim=True)
        hidden_states = hidden_states * torch.rsqrt(variance + self.variance_epsilon)
        return self.weight * hidden_states.to(input_dtype)
参考:https://space.bilibili.com/45156039

干货学习,点赞三连↓
文章出处登录后可见!