后面对Sklearn的学习主要以《Python机器学习基础教程》和《机器学习实战基于scikit-learn和tensorflow》,两本互为补充进行学习,下面是开篇的学习内容。
1 初识数据
iris数据集的中文名是安德森鸢尾花卉数据集,英文全称是Anderson’s Iris data set。iris包含150个样本,对应数据集的每行数据。每行数据包含每个样本的四个特征和样本的类别信息,所以iris数据集是一个150行5列的二维表。
通俗地说,iris数据集是用来给花做分类的数据集,每个样本包含了花萼长度、花萼宽度、花瓣长度、花瓣宽度四个特征(前4列),我们需要建立一个分类器,分类器可以通过样本的四个特征来判断样本属于山鸢尾、变色鸢尾还是维吉尼亚鸢尾(这三个名词都是花的品种)。
iris的每个样本都包含了品种信息,即目标属性(第5列,也叫target或label)。如下所示:
1. 导入数据集
(1) 在线导入
调用load_iris函数来加载数据:
from sklearn.datasets import load_iris

iris_dataset = load_iris()
load_iris 返回的 iris 对象是一个 Bunch 对象,与字典非常相似,里面包含键和值:
print(iris_dataset.keys())
# dict_keys(['data', 'target', 'frame', 'target_names', 'DESCR', 'feature_names', 'filename', 'data_module'])
print(iris_dataset["DESCR"][:193])
DESCR 键对应的值是数据集的简要说明。这里给出说明的开头部分。
target_names 键对应的值是一个字符串数组,里面包含我们要预测的花的品种:
print("Target names: {}".format(iris_dataset["target_names"]))
# Target names: ['setosa' 'versicolor' 'virginica']
feature_names 键对应的值是一个字符串列表,对每一个特征进行了说明:
print("Feature names: {}".format(iris_dataset['feature_names']))
# Feature names: ['sepal length (cm)', 'sepal width (cm)', 'petal length (cm)', 'petal width (cm)']
数据包含在target 和data 字段中。data 里面是花萼长度、花萼宽度、花瓣长度、花瓣宽度的测量数据,格式为NumPy 数组:
print("Type of data: {}".format(type(iris_dataset['data'])))
# Type of data: <class 'numpy.ndarray'>
data 数组的每一行对应一朵花,列代表每朵花的四个测量数据:
print("shape of data: {}".format(iris_dataset['data'].shape))
# shape of data: (150, 4)
可以看出,数组中包含150 朵不同的花的测量数据。前机器学习中的个体叫作样本(sample),其属性叫作特征(feature)。data 数组的形状(shape)是样本数乘以特征数。这是 scikit-learn 中的约定,你的数据形状应始终遵循这个约定。下面给出前 5 个样本的特征数值:
print("First five rows of data:\n{}".format(iris_dataset['data'][:5]))
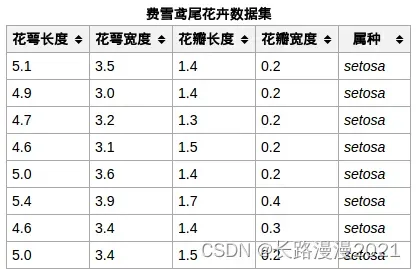
# First five rows of data:
# [[5.1 3.5 1.4 0.2]
# [4.9 3. 1.4 0.2]
# [4.7 3.2 1.3 0.2]
# [4.6 3.1 1.5 0.2]
# [5. 3.6 1.4 0.2]]
从数据中可以看出,前5 朵花的花瓣宽度都是0.2cm,第一朵花的花萼最长,是5.1cm。
target 数组包含的是测量过的每朵花的品种,也是一个NumPy 数组:
print("Type of target:{}".format(type(iris_dataset['target'])))
# Type of target:<class 'numpy.ndarray'>
target 是一维数组,每朵花对应其中一个数据:
print("Shape of target:{}".format(iris_dataset['target'].shape))
# Shape of target:(150,)
品种被转换成从 0 到 2 的整数:
print("target:\n{}".format(iris_dataset['target']))
'''
target:
[0 0 0 0 0 0 0 0 0 0 0 0 0 0 0 0 0 0 0 0 0 0 0 0 0 0 0 0 0 0 0 0 0 0 0 0 0
 0 0 0 0 0 0 0 0 0 0 0 0 0 1 1 1 1 1 1 1 1 1 1 1 1 1 1 1 1 1 1 1 1 1 1 1 1
 1 1 1 1 1 1 1 1 1 1 1 1 1 1 1 1 1 1 1 1 1 1 1 1 1 1 2 2 2 2 2 2 2 2 2 2 2
 2 2 2 2 2 2 2 2 2 2 2 2 2 2 2 2 2 2 2 2 2 2 2 2 2 2 2 2 2 2 2 2 2 2 2 2 2
 2 2]
 '''
上述数字的代表含义由iris_dataset['target']数组给出:0 代表setosa,1 代表versicolor,2 代表virginica。
(2) 本地导入
# 导入相关包
import numpy as np
import pandas as pd
import seaborn as sns
import matplotlib.pyplot as plt
from sklearn import datasets
# 导入数据集
data = "../seaborn-data-master/iris.csv"

iris_local = pd.read_csv(data, usecols=[0, 1, 2, 3, 4])
iris_local = iris_local.dropna()    # 丢弃含空值的行、列
iris_local.head()
 可以发现本地导入和在线导入的键是不同的(即列名),而且这里最后一列标签值未编码,后面在使用的时候需要注意。
# 查看数据集信息
iris_local.info()
'''
<class 'pandas.core.frame.DataFrame'>
Int64Index: 150 entries, 0 to 149
Data columns (total 5 columns):
sepal_length    150 non-null float64
sepal_width     150 non-null float64
petal_length    150 non-null float64
petal_width     150 non-null float64
species         150 non-null object
dtypes: float64(4), object(1)
memory usage: 7.0+ KB
'''
# 载入特征和标签集
X = iris_local[['sepal_length', 'sepal_width', 'petal_length', 'petal_width']]        # 等价于iris_dataset.data
y = iris_local['species']     # 等价于iris_dataset.target
下面需要对对标签集进行编码:
# 对标签集进行编码
from sklearn.preprocessing import LabelEncoder

encoder = LabelEncoder()
y = encoder.fit_transform(y)
print(y)
2 训练数据与测试数据
将收集好的带标签数据(此例中是150 朵花的测量数据)分成两部分。一部分数据用于构建机器学习模型,叫作训练数据(training data)或训练集(training set)。其余的数据用来评估模型性能,叫作测试数据(test data)、测试集(test set)或留出集(hold-out set)。
scikit-learn 中的train_test_split 函数可以打乱数据集并进行拆分。这个函数将75% 的行数据及对应标签作为训练集,剩下25% 的数据及其标签作为测试集。训练集与测试集的分配比例可以是随意的,但使用25% 的数据作为测试集是很好的经验法则。
对数据调用train_test_split,并对输出结果采用下面这种命名方法:
from sklearn.model_selection import train_test_split

X_train, X_test, y_train, y_test = train_test_split(iris_dataset['data'], iris_dataset['target'], random_state=0)
# X_train, X_test, y_train, y_test = train_test_split(X, y, random_state=0)
在对数据进行拆分之前,train_test_split 函数利用伪随机数生成器将数据集打乱。如果我们只是将最后25% 的数据作为测试集,那么所有数据点的标签都是2,因为数据点是按标签排序的(参见之前iris[‘target’] 的输出)。测试集中只有三个类别之一,这无法告诉我们模型的泛化能力如何,所以我们将数据打乱,确保测试集中包含所有类别的数据。
为了确保多次运行同一函数能够得到相同的输出,我们利用random_state 参数指定了随机数生成器的种子。这样函数输出就是固定不变的,所以这行代码的输出始终相同。
train_test_split 函数的输出为X_train、X_test、y_train 和y_test,它们都是NumPy数组。X_train 包含75% 的行数据,X_test 包含剩下的25%:
print("X_train shape: {}".format(X_train.shape))        # X_train shape: (112, 4)
print("y_train shape: {}".format(y_train.shape))        # y_train shape: (112,)
print("X_test shape: {}".format(X_test.shape))          # X_test shape: (38, 4)
print("y_test shape: {}".format(y_test.shape))          # y_test shape: (38,)
3 探索数据
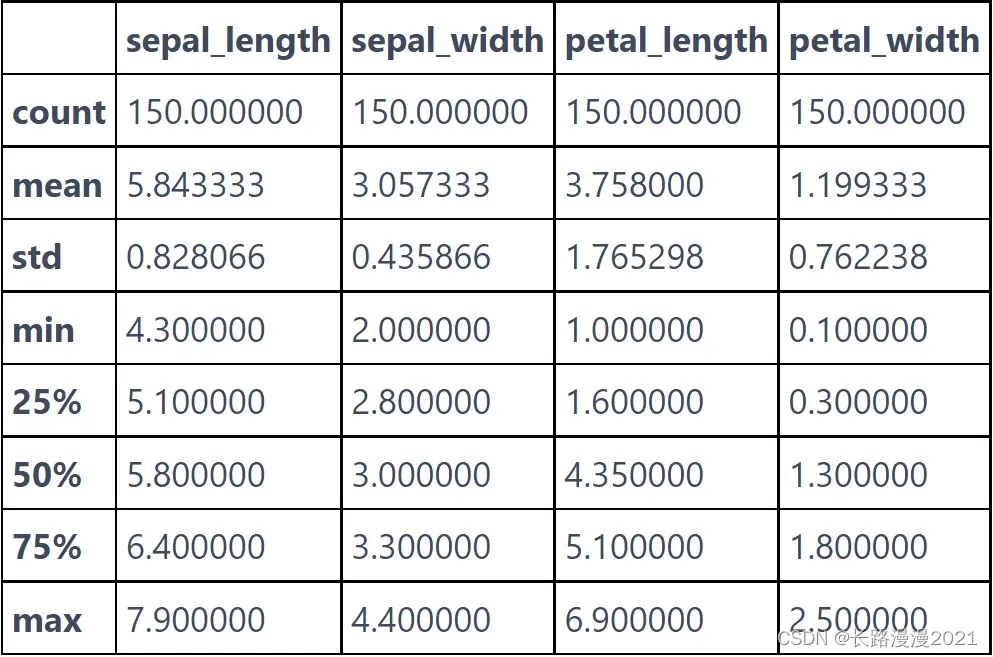
检查数据也是发现异常值和特殊值的好方法。检查数据的最佳方法之一就是将其可视化。先查看数据集各特征列的摘要统计信息:
iris_local.describe()
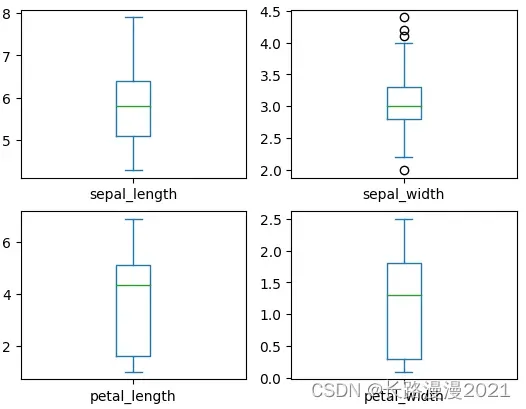
箱线图描述了数据的分布情况,包括:上下界,上下四分位数和中位数,可以简单的查看数据的分布情况。比如:上下四分位数相隔较远的话,一般可以很容易分为2类。
iris_local.plot(kind='box', subplots=True, layout=(2, 2), sharex=False, sharey=False)
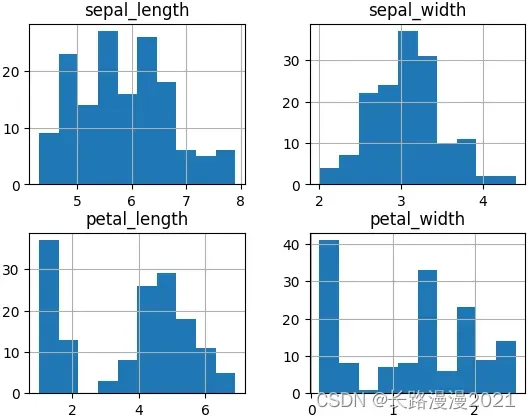
直方图,反馈的是数据的频度,一般常见的是高斯分布(正态分布)。
iris_local.hist()
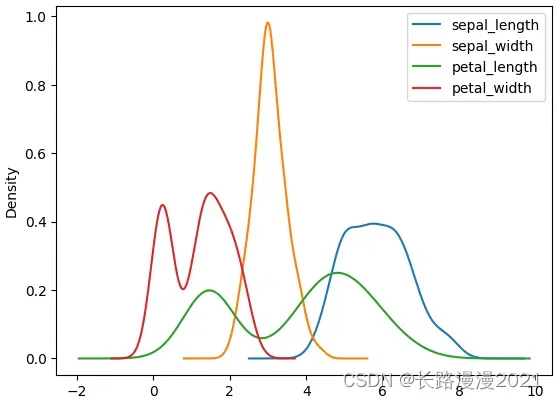
plot直接展示数据的分布情况,kde核密度估计对比直方图来看
iris_local.plot()

iris_local.plot(kind='kde')
径向可视化是多维数据降维的可视化方法,不管是数据分析还是机器学习,降维是最基础的方法之一,通过降维,可以有效的减少复杂度。径向坐标可视化是基于弹簧张力最小化算法。它把数据集的特征映射成二维目标空间单位圆中的一个点,点的位置由系在点上的特征决定。把实例投入圆的中心,特征会朝圆中此实例位置(实例对应的归一化数值)“拉”实例。
ax = pd.plotting.radviz(iris_local, 'species', colormap='brg')
ax.add_artist(plt.Circle((0,0), 1, color='r', fill = False))

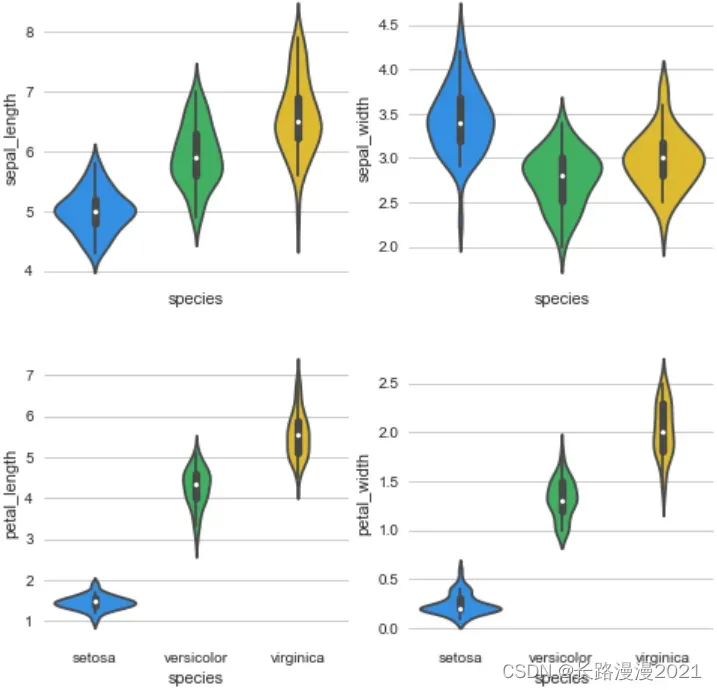
通过Violinplot 和 Pointplot,分别从数据分布和斜率,观察各特征与品种之间的关系
# 设置颜色主题
antV = ['#1890FF', '#2FC25B', '#FACC14', '#223273', '#8543E0', '#13C2C2', '#3436c7', '#F04864']

# 绘制  Violinplot
f, axes = plt.subplots(2, 2, figsize=(8, 8), sharex=True)
sns.despine(left=True)

sns.violinplot(x='species', y='sepal_length', data=iris_local, palette=antV, ax=axes[(0, 0)])
sns.violinplot(x='species', y='sepal_width', data=iris_local, palette=antV, ax=axes[(0, 1)])
sns.violinplot(x='species', y='petal_length', data=iris_local, palette=antV, ax=axes[(1, 0)])
sns.violinplot(x='species', y='petal_width', data=iris_local, palette=antV, ax=axes[(1, 1)])

plt.show()
文章出处登录后可见!