一、前期准备:
首先你需要有一份yolov5的官方源码,并且能够找到其中的detect.py文件即可。
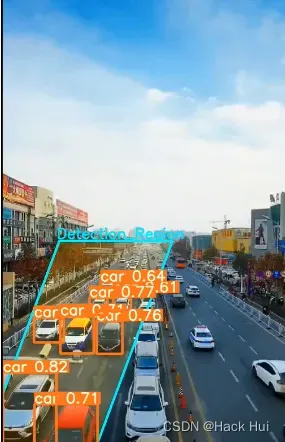
在检测过程中,有些项目不需要我们检测所有的区域,比如禁止区域的入侵检测,只需要检测制定规划出来的区域就可以。例如下图所示这样,在网上随便找的一段视频,这是其中的一张截图:
二、区域检测原理分析
在使用YOLOv5的有些时候,我们会遇到一些具体的目标检测要求,比如要求不检测全图,只在规定的区域内才检测。所以为了满足这个需求,可以使用掩码操作去覆盖掉不想检测的区域,使得在检测的时候,只检测我们规定的检测范围。
1、确定区域检测范围
 # mask for certain region
        #1,2,3,4 分别对应左上,右上,右下,左下四个点
        hl1 = 1.4 / 10 #监测区域高度距离图片顶部比例
        wl1 = 6.4 / 10 #监测区域高度距离图片左部比例
        hl2 = 1.4 / 10  # 监测区域高度距离图片顶部比例
        wl2 = 6.8 / 10  # 监测区域高度距离图片左部比例
        hl3 = 4.5 / 10  # 监测区域高度距离图片顶部比例
        wl3 = 7.6 / 10  # 监测区域高度距离图片左部比例
        hl4 = 4.5 / 10  # 监测区域高度距离图片顶部比例
        wl4 = 5.5 / 10  # 监测区域高度距离图片左部比例
2、在135行左右的位置:for path, img, im0s, vid_cap in dataset: 下插入代码:
        # mask for certain region
        #1,2,3,4 分别对应左上,右上,右下,左下四个点
        hl1 = 1.6 / 10 #监测区域高度距离图片顶部比例
        wl1 = 6.4 / 10 #监测区域高度距离图片左部比例
        hl2 = 1.6 / 10  # 监测区域高度距离图片顶部比例
        wl2 = 6.8 / 10  # 监测区域高度距离图片左部比例
        hl3 = 4.5 / 10  # 监测区域高度距离图片顶部比例
        wl3 = 7.6 / 10  # 监测区域高度距离图片左部比例
        hl4 = 4.5 / 10  # 监测区域高度距离图片顶部比例
        wl4 = 5.5 / 10  # 监测区域高度距离图片左部比例
        if webcam:
            for b in range(0,img.shape[0]):
                mask = np.zeros([img[b].shape[1], img[b].shape[2]], dtype=np.uint8)
                #mask[round(img[b].shape[1] * hl1):img[b].shape[1], round(img[b].shape[2] * wl1):img[b].shape[2]] = 255
                pts = np.array([[int(img[b].shape[2] * wl1), int(img[b].shape[1] * hl1)],  # pts1
                                [int(img[b].shape[2] * wl2), int(img[b].shape[1] * hl2)],  # pts2
                                [int(img[b].shape[2] * wl3), int(img[b].shape[1] * hl3)],  # pts3
                                [int(img[b].shape[2] * wl4), int(img[b].shape[1] * hl4)]], np.int32)
                mask = cv2.fillPoly(mask,[pts],(255,255,255))
                imgc = img[b].transpose((1, 2, 0))
                imgc = cv2.add(imgc, np.zeros(np.shape(imgc), dtype=np.uint8), mask=mask)
                #cv2.imshow('1',imgc)
                img[b] = imgc.transpose((2, 0, 1))

        else:
            mask = np.zeros([img.shape[1], img.shape[2]], dtype=np.uint8)
            #mask[round(img.shape[1] * hl1):img.shape[1], round(img.shape[2] * wl1):img.shape[2]] = 255
            pts = np.array([[int(img.shape[2] * wl1), int(img.shape[1] * hl1)],  # pts1
                            [int(img.shape[2] * wl2), int(img.shape[1] * hl2)],  # pts2
                            [int(img.shape[2] * wl3), int(img.shape[1] * hl3)],  # pts3
                            [int(img.shape[2] * wl4), int(img.shape[1] * hl4)]], np.int32)
            mask = cv2.fillPoly(mask, [pts], (255,255,255))
            img = img.transpose((1, 2, 0))
            img = cv2.add(img, np.zeros(np.shape(img), dtype=np.uint8), mask=mask)
            img = img.transpose((2, 0, 1))
3、画检测区域线 :在196行: p, s, im0, frame = path, ‘’, im0s.copy(), getattr(dataset, ‘frame’, 0) 后添加
            if webcam:  # batch_size >= 1
                p, s, im0, frame = path[i], f'{i}: ', im0s[i].copy(), dataset.count
                cv2.putText(im0, "Detection_Region", (int(im0.shape[1] * wl1 - 5), int(im0.shape[0] * hl1 - 5)),
                            cv2.FONT_HERSHEY_SIMPLEX,
                            1.0, (255, 255, 0), 2, cv2.LINE_AA)

                pts = np.array([[int(im0.shape[1] * wl1), int(im0.shape[0] * hl1)],  # pts1
                                [int(im0.shape[1] * wl2), int(im0.shape[0] * hl2)],  # pts2
                                [int(im0.shape[1] * wl3), int(im0.shape[0] * hl3)],  # pts3
                                [int(im0.shape[1] * wl4), int(im0.shape[0] * hl4)]], np.int32)  # pts4
                # pts = pts.reshape((-1, 1, 2))
                zeros = np.zeros((im0.shape), dtype=np.uint8)
                mask = cv2.fillPoly(zeros, [pts], color=(0, 165, 255))
                im0 = cv2.addWeighted(im0, 1, mask, 0.2, 0)
                cv2.polylines(im0, [pts], True, (255, 255, 0), 3)
                # plot_one_box(dr, im0, label='Detection_Region', color=(0, 255, 0), line_thickness=2)
            else:
                p, s, im0, frame = path, '', im0s.copy(), getattr(dataset, 'frame', 0)
                cv2.putText(im0, "Detection_Region", (int(im0.shape[1] * wl1 - 5), int(im0.shape[0] * hl1 - 5)),
                            cv2.FONT_HERSHEY_SIMPLEX,
                            1.0, (255, 255, 0), 2, cv2.LINE_AA)
                pts = np.array([[int(im0.shape[1] * wl1), int(im0.shape[0] * hl1)],  # pts1
                                [int(im0.shape[1] * wl2), int(im0.shape[0] * hl2)],  # pts2
                                [int(im0.shape[1] * wl3), int(im0.shape[0] * hl3)],  # pts3
                                [int(im0.shape[1] * wl4), int(im0.shape[0] * hl4)]], np.int32)  # pts4
                # pts = pts.reshape((-1, 1, 2))
                zeros = n
文章出处登录后可见!
已经登录?立即刷新