改进YOLOv8,YOLOv8添加20多种注意力机制
- 一、注意力机制介绍
- 二.添加方法
- 1.GAM注意力
- 添加方法1
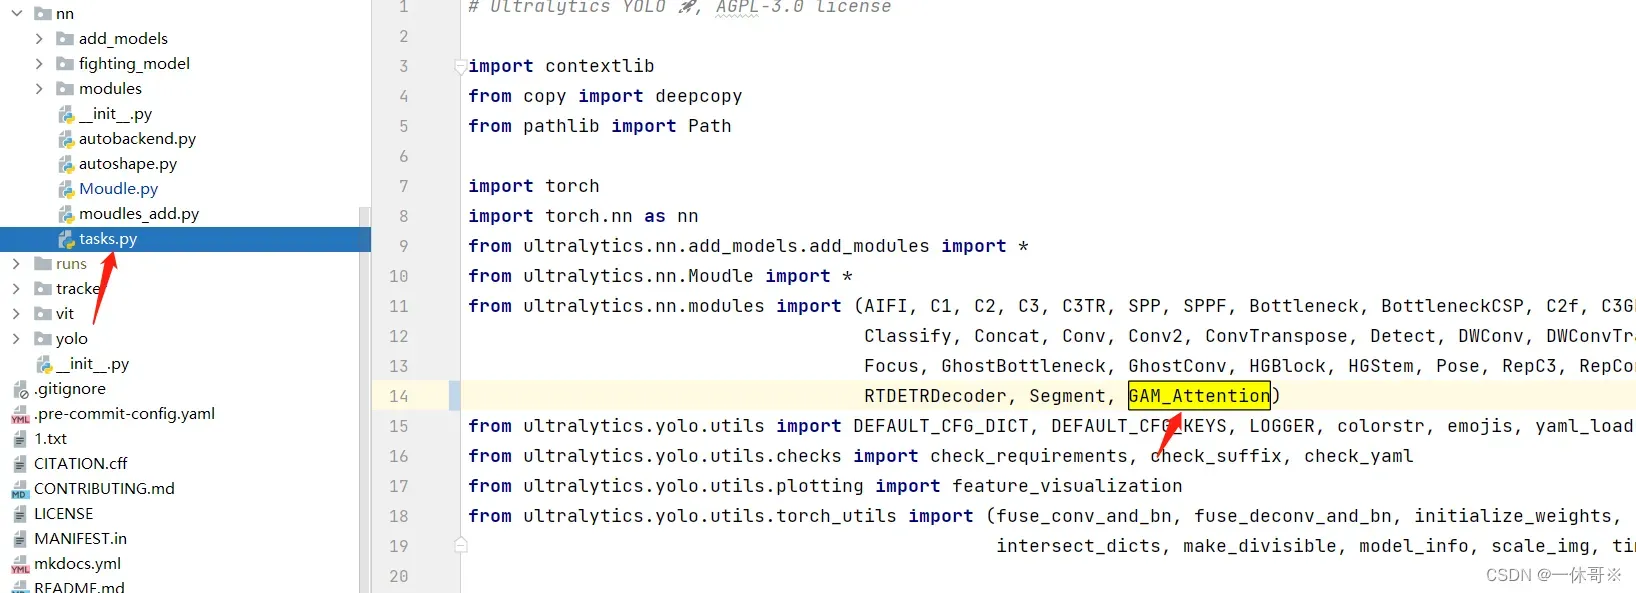
- 在tasks.py里要加入from yltralytics.nn.modules import *
- 2.骨干中添加
- 添加方法2
- 1.block代码中加入注意力代码
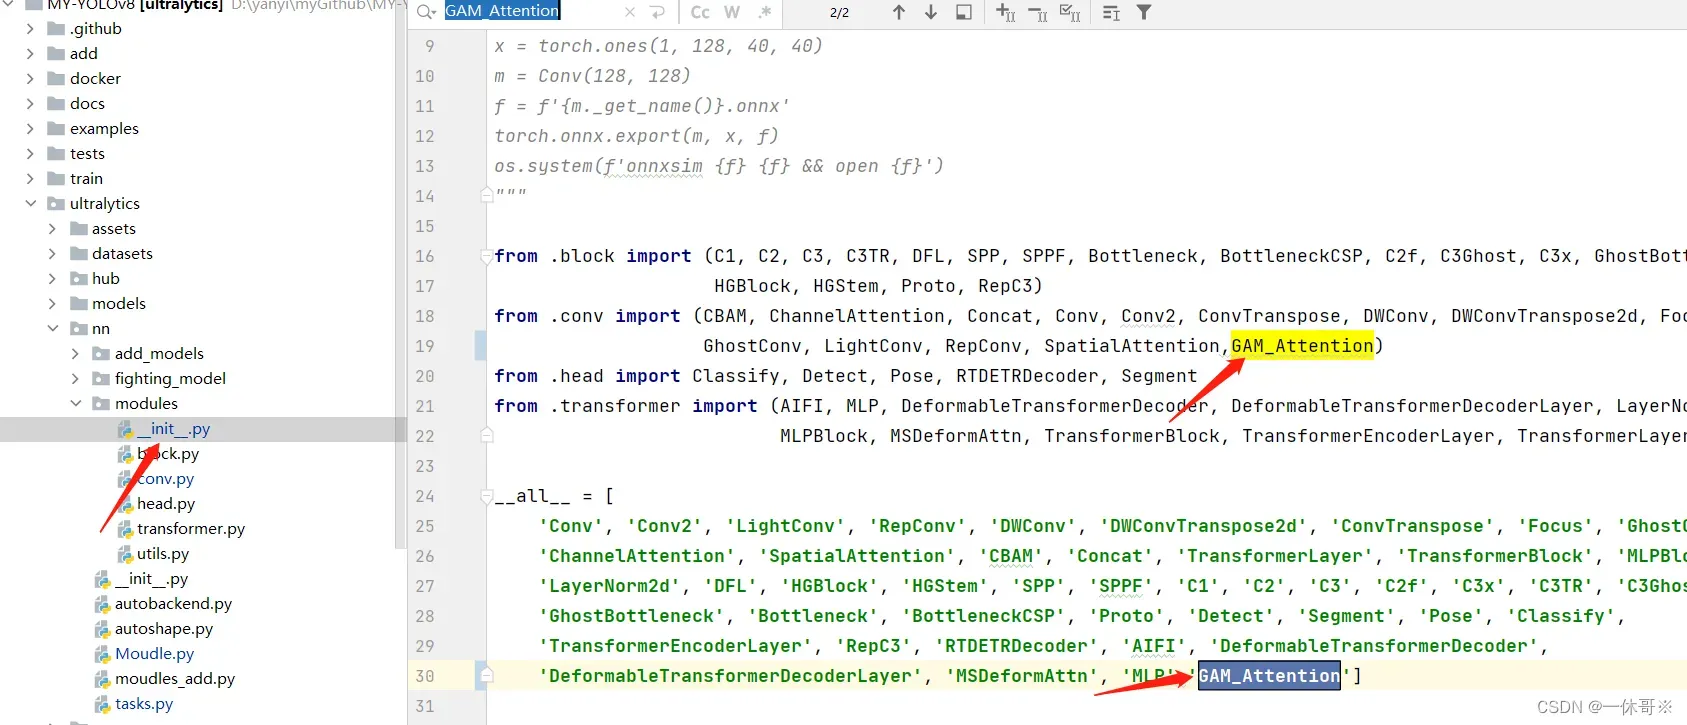
- 2.注册及引用GAM注意力代码
- tasks里写入调用方式
- yaml文件
- 3. 瓶颈模块中添加
- 三、所有的注意力机制代码:

一、注意力机制介绍
注意力机制(Attention Mechanism)是深度学习中一种重要的技术,它可以帮助模型更好地关注输入数据中的关键信息,从而提高模型的性能。注意力机制最早在自然语言处理领域的序列到序列(seq2seq)模型中得到广泛应用,后来逐渐扩展到了计算机视觉、语音识别等多个领域。
注意力机制的基本思想是为输入数据的每个部分分配一个权重,这个权重表示该部分对于当前任务的重要程度。在自然语言处理任务中,这通常意味着对输入句子中的每个单词分配一个权重,而在计算机视觉任务中,这可能意味着为输入图像的每个像素或区域分配一个权重。
二.添加方法
1.GAM注意力
论文原文:https://arxiv.org/pdf/2112.05561v1.pdf
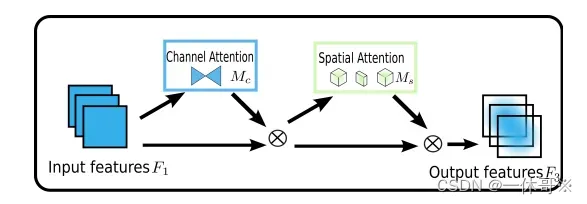
该论文提出了一种全局注意力机制(GAM),可以通过保留空间和通道信息之间的关联来提高模型的性能。GAM能够有效地捕捉不同通道之间的相关性,进而更好地区分不同的目标。
网络结构图:
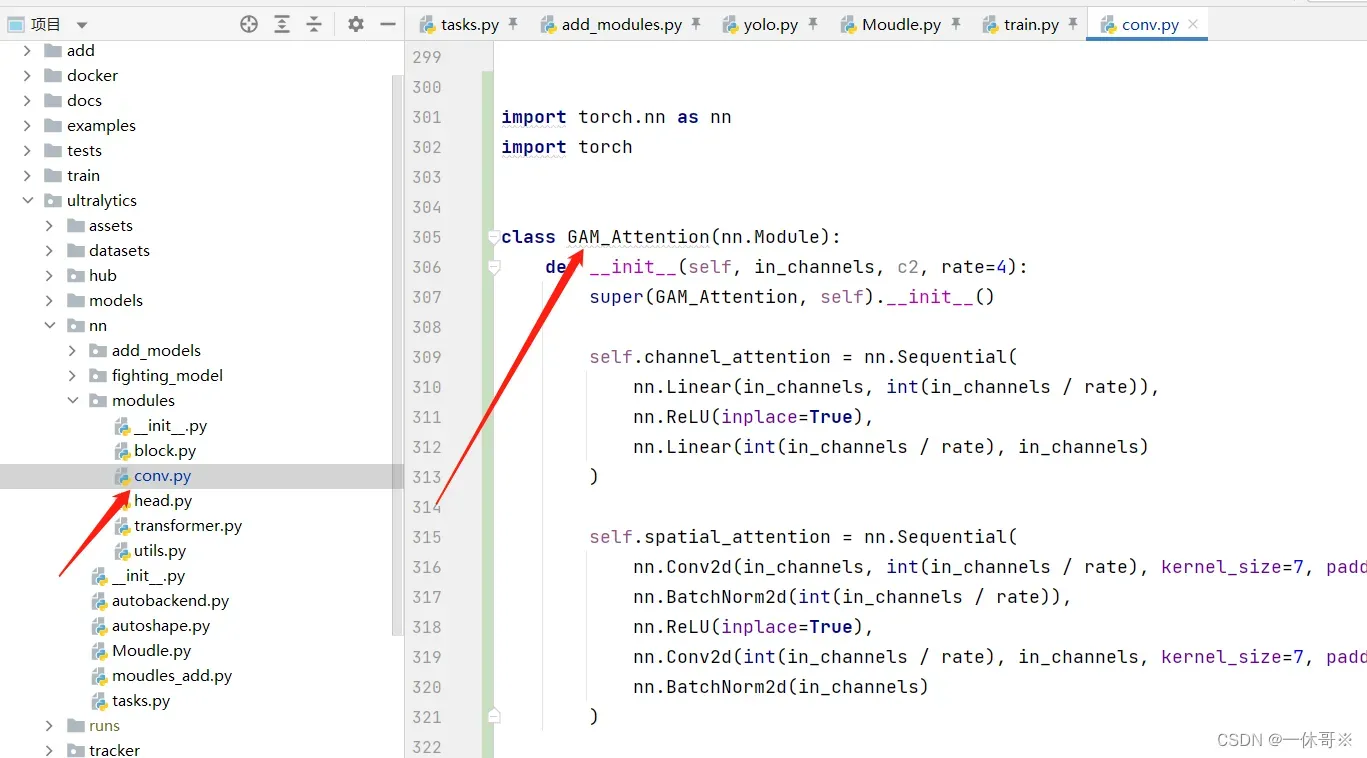
import torch.nn as nn
import torch

class GAM_Attention(nn.Module):
    def __init__(self, in_channels,c2, rate=4):
        super(GAM_Attention, self).__init__()

        self.channel_attention = nn.Sequential(
            nn.Linear(in_channels, int(in_channels / rate)),
            nn.ReLU(inplace=True),
            nn.Linear(int(in_channels / rate), in_channels)
        )

        self.spatial_attention = nn.Sequential(
            nn.Conv2d(in_channels, int(in_channels / rate), kernel_size=7, padding=3),
            nn.BatchNorm2d(int(in_channels / rate)),
            nn.ReLU(inplace=True),
            nn.Conv2d(int(in_channels / rate), in_channels, kernel_size=7, padding=3),
            nn.BatchNorm2d(in_channels)
        )

    def forward(self, x):
        b, c, h, w = x.shape
        x_permute = x.permute(0, 2, 3, 1).view(b, -1, c)
        x_att_permute = self.channel_attention(x_permute).view(b, h, w, c)
        x_channel_att = x_att_permute.permute(0, 3, 1, 2).sigmoid()
        x = x * x_channel_att
        x_spatial_att = self.spatial_attention(x).sigmoid()
        out = x * x_spatial_att

        return out

if __name__ == '__main__':
    x = torch.randn(1, 64, 20, 20)
    b, c, h, w = x.shape
    net = GAM_Attention(in_channels=c)
    y = net(x)
    print(y.size())
添加方法1
此方法适用于较早版本的yolov8代码,最新的yolov8代码加入方式看方法2
##将以上代码放到ultralytics/nn/modules.py里
在tasks.py里要加入from yltralytics.nn.modules import *
在ultralytics/nn/tasks.py处引用

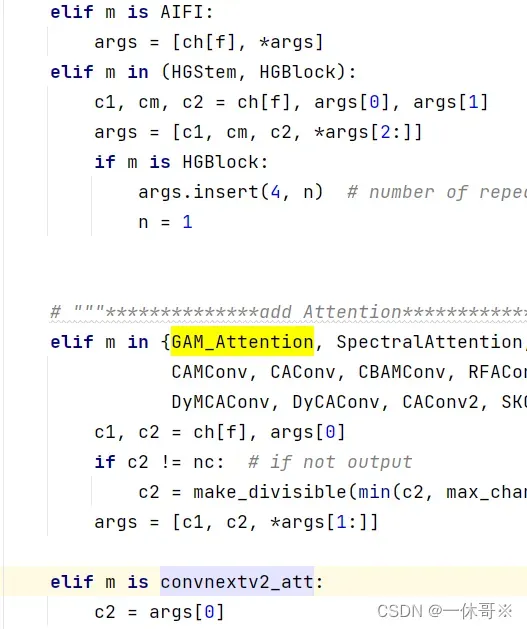
注册以下代码:
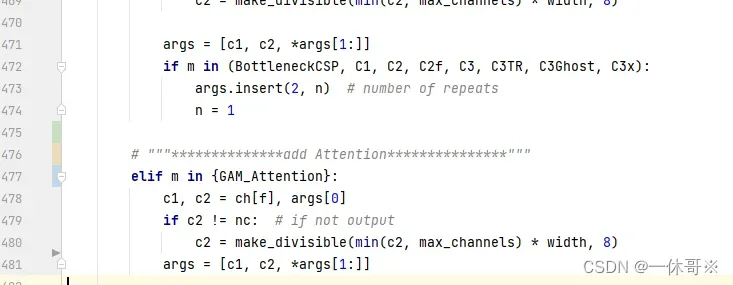
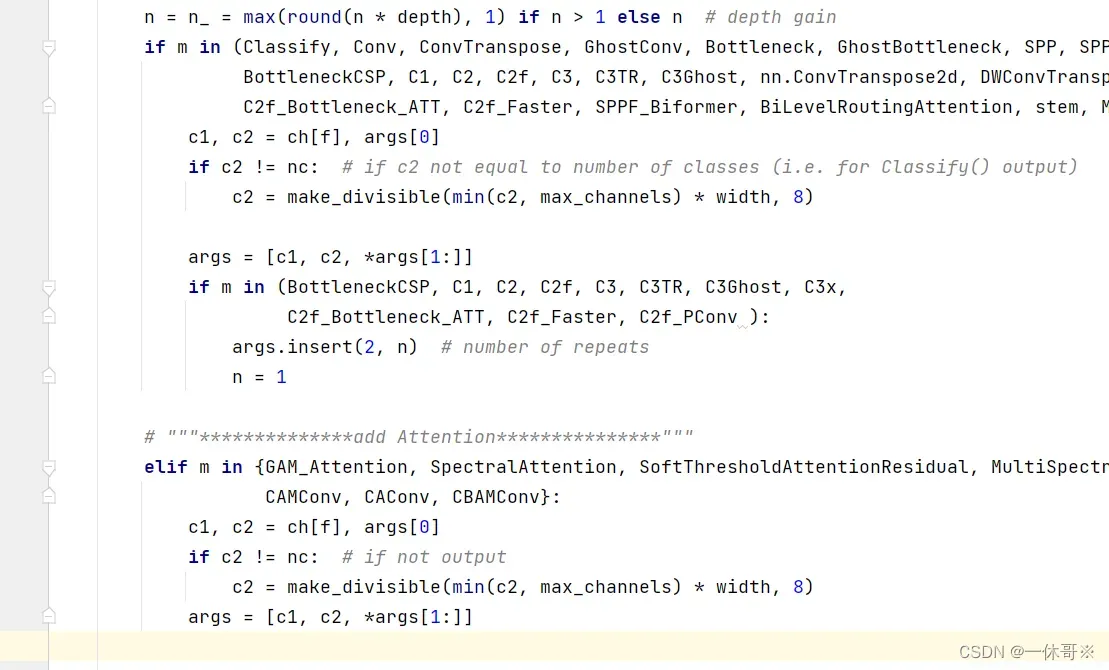
# """**************add Attention***************"""
        elif m in {GAM_Attention}:
            c1, c2 = ch[f], args[0]
            if c2 != nc:  # if not output
                c2 = make_divisible(min(c2, max_channels) * width, 8)
            args = [c1, c2, *args[1:]]
2.骨干中添加
新建yaml文件
添加方法2
1.block代码中加入注意力代码
2.注册及引用GAM注意力代码
ultralytics/nn/modules/init.py文件中
ultralytics/nn/tasks.py文件中
tasks里写入调用方式
        # """**************add Attention***************"""
        elif m in {GAM_Attention}:
            c1, c2 = ch[f], args[0]
            if c2 != nc:  # if not output
                c2 = make_divisible(min(c2, max_channels) * width, 8)
            args = [c1, c2, *args[1:]]
示例
yaml文件
# Ultralytics YOLO 🚀, GPL-3.0 license
# YOLOv8 object detection model with P3-P5 outputs. For Usage examples see https://docs.ultralytics.com/tasks/detect

# Parameters
nc: 80  # number of classes
scales: # model compound scaling constants, i.e. 'model=yolov8n.yaml' will call yolov8-SPPCSPC.yaml with scale 'n'
  # [depth, width, max_channels]
  n: [0.33, 0.25, 1024]  # YOLOv8n summary: 225 layers,  3157200 parameters,  3157184 gradients,   8.9 GFLOPs
  s: [0.33, 0.50, 1024]  # YOLOv8s summary: 225 layers, 11166560 parameters, 11166544 gradients,  28.8 GFLOPs
  m: [0.67, 0.75, 768]   # YOLOv8m summary: 295 layers, 25902640 parameters, 25902624 gradients,  79.3 GFLOPs
  l: [1.00, 1.00, 512]   # YOLOv8l summary: 365 layers, 43691520 parameters, 43691504 gradients, 165.7 GFLOPs
  x: [1.00, 1.25, 512]   # YOLOv8x summary: 365 layers, 68229648 parameters, 68229632 gradients, 258.5 GFLOPs

# YOLOv8.0n backbone
backbone:
  # [from, repeats, module, args]
  - [-1, 1, Conv, [64, 3, 2]]  # 0-P1/2
  - [-1, 1, Conv, [128, 3, 2]]  # 1-P2/4
  - [-1, 3, C2f, [128, True]]
  - [-1, 1, Conv, [256, 3, 2]]  # 3-P3/8
  - [-1, 6, C2f, [256, True]]
  - [-1, 1, Conv, [512, 3, 2]]  # 5-P4/16
  - [-1, 6, C2f, [512, True]]
  - [-1, 1, Conv, [1024, 3, 2]]  # 7-P5/32
  - [-1, 3, C2f, [1024, True]]
  - [-1, 3, GAM_Attention, [1024]]
  - [-1, 1, SPPF, [1024, 5]]  # 10

# YOLOv8.0n head
head:
  - [-1, 1, nn.Upsample, [None, 2, 'nearest']]
  - [[-1, 6], 1, Concat, [1]]  # cat backbone P4
  - [-1, 3, C2f, [512]]  # 13

  - [-1, 1, nn.Upsample, [None, 2, 'nearest']]
  - [[-1, 4], 1, Concat, [1]]  # cat backbone P3
  - [-1, 3, C2f, [256]]  # 16 (P3/8-small)

  - [-1, 1, Conv, [256, 3, 2]]
  - [[-1, 13], 1, Concat, [1]]  # cat head P4
  - [-1, 3, C2f, [512]]  # 19 (P4/16-medium)

  - [-1, 1, Conv, [512, 3, 2]]
  - [[-1, 10], 1, Concat, [1]]  # cat head P5
  - [-1, 3, C2f, [1024]]  # 22 (P5/32-large)

  - [[16, 19, 22], 1, Detect, [nc]]  # Detect(P3, P4, P5)
源目录下新建py文件,运行即可
from ultralytics import YOLO
if __name__ == '__main__':
    # 加载模型
    model = YOLO("yolov8s-Backbone-ATT.yaml")  # 从头开始构建新模型
    # model = YOLO("yolov8s.pt")  # 加载预训练模型(推荐用于训练)

    # Use the model
    results = model.train(data="VOC_five.yaml", epochs=150, batch=16, workers=8, close_mosaic=0, name='cfg')  # 训练模型
    # results = model.val()  # 在验证集上评估模型性能
    # results = model("https://ultralytics.com/images/bus.jpg")  # 预测图像
    # success = model.export(format="onnx")  # 将模型导出为 ONNX 格式
注意:yolov8s表示为调用s模型结构
3. 瓶颈模块中添加
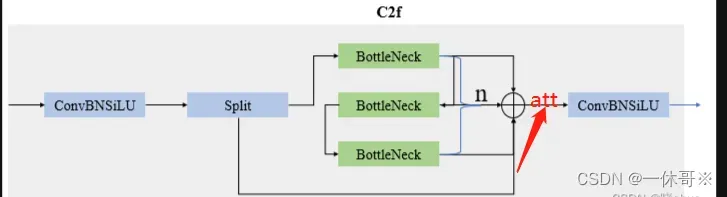
代码:此代码实现了可以选择在一层中加入注意力机制,将0改为1即可
# Ultralytics YOLO 🚀, GPL-3.0 license
# YOLOv8 object detection model with P3-P5 outputs. For Usage examples see https://docs.ultralytics.com/tasks/detect

# Parameters
nc: 80  # number of classes
scales: # model compound scaling constants, i.e. 'model=yolov8n.yaml' will call yolov8-SPPCSPC.yaml with scale 'n'
  # [depth, width, max_channels]
  n: [0.33, 0.25, 1024]  # YOLOv8n summary: 225 layers,  3157200 parameters,  3157184 gradients,   8.9 GFLOPs
  s: [0.33, 0.50, 1024]  # YOLOv8s summary: 225 layers, 11166560 parameters, 11166544 gradients,  28.8 GFLOPs
  m: [0.67, 0.75, 768]   # YOLOv8m summary: 295 layers, 25902640 parameters, 25902624 gradients,  79.3 GFLOPs
  l: [1.00, 1.00, 512]   # YOLOv8l summary: 365 layers, 43691520 parameters, 43691504 gradients, 165.7 GFLOPs
  x: [1.00, 1.25, 512]   # YOLOv8x summary: 365 layers, 68229648 parameters, 68229632 gradients, 258.5 GFLOPs

# YOLOv8.0n backbone
backbone:
  # [from, repeats, module, args]
  - [-1, 1, Conv, [64, 3, 2]]  # 0-P1/2
  - [-1, 1, Conv, [128, 3, 2]]  # 1-P2/4
  - [-1, 3, C2f_Bottleneck_ATT, [128, True, 0]]
  - [-1, 1, Conv, [256, 3, 2]]  # 3-P3/8
  - [-1, 6, C2f_Bottleneck_ATT, [256, True, 0]]
  - [-1, 1, Conv, [512, 3, 2]]  # 5-P4/16
  - [-1, 6, C2f_Bottleneck_ATT, [512, True, 0]]
  - [-1, 1, Conv, [1024, 3, 2]]  # 7-P5/32
  - [-1, 3, C2f_Bottleneck_ATT, [1024, True, 0]]
  - [-1, 1, SPPF, [1024, 5]]  # 9

# YOLOv8.0n head
head:
  - [-1, 1, nn.Upsample, [None, 2, 'nearest']]
  - [[-1, 6], 1, Concat, [1]]  # cat backbone P4
  - [-1, 3, C2f_Bottleneck_ATT, [512]]  # 12

  - [-1, 1, nn.Upsample, [None, 2, 'nearest']]
  - [[-1, 4], 1, Concat, [1]]  # cat backbone P3
  - [-1, 3, C2f_Bottleneck_ATT, [256]]  # 15 (P3/8-small)

  - [-1, 1, Conv, [256, 3, 2]]
  - [[-1, 12], 1, Concat, [1]]  # cat head P4
  - [-1, 3, C2f_Bottleneck_ATT, [512]]  # 18 (P4/16-medium)

  - [-1, 1, Conv, [512, 3, 2]]
  - [[-1, 9], 1, Concat, [1]]  # cat head P5
  - [-1, 3, C2f_Bottleneck_ATT, [1024]]  # 21 (P5/32-large)

  - [[15, 18, 21], 1, Detect, [nc]]  # Detect(P3, P4, P5)
C2f_Bottleneck_ATT代码,添加到common里:
class C2f_Bottleneck_ATT(nn.Module):
    # CSP Bottleneck with 2 convolutions
    def __init__(self, c1, c2, n=1, shortcut=False, use_ATT=0., g=1,
                 e=0.5):  # ch_in, ch_out, number, shortcut, groups, expa
        super().__init__()
        self.c = int(c2 * e)  # hidden channels
        self.cv1 = Conv(c1, 2 * self.c, 1, 1)
        self.cv2 = Conv((2 + n) * self.c, c2, 1)  # optional act=FReLU(c2)
        self.m = nn.ModuleList(
            Bottleneck_ATT(self.c, self.c, shortcut, g, k=((3, 3), (3, 3)), e=1.0, use_ATT=use_ATT) for _ in range(n))

    def forward(self, x):
        y = list(self.cv1(x).chunk(2, 1))
        y.extend(m(y[-1]) for m in self.m)
        return self.cv2(torch.cat(y, 1))

    def forward_split(self, x):
        y = list(self.cv1(x).split((self.c, self.c), 1))
        y.extend(m(y[-1]) for m in self.m)
        return self.cv2(torch.cat(y, 1))
class Bottleneck_ATT(nn.Module):
    # Standard bottleneck
    def __init__(self, c1, c2, shortcut=True, g=1, k=(3, 3), e=0.5, use_ATT=0.):  # ch_in, ch_out, shortcut, groups, kernels, expand
        super().__init__()
        c_ = int(c2 * e)  # hidden channels
        self.cv1 = Conv(c1, c_, k[0], 1)
        self.cv2 = Conv(c_, c2, k[1], 1, g=g)
        self.add = shortcut and c1 == c2
        # self.ATT = GAM_Attention(c_) #这里可以随意更换注意力机制,使用use_ATT控制
        has_ATT = use_ATT is not None and use_ATT > 0.
        # Squeeze-and-excitation
        if has_ATT:
            # self.ATT = GAM_Attention(c2,c2)
            self.ATT = BiLevelRoutingAttention(c2,c2)
        else:
            self.ATT = None
    def forward(self, x):
        if self.ATT is not None:
            out = x + self.ATT(self.cv2(self.cv1(x))) if self.add else self.ATT(self.cv2(self.cv1(x)))
        else:
            out = x + self.cv2(self.cv1(x)) if self.add else self.cv2(self.cv1(x))
        return out
添加到tasks里:首先引用

其次注册:
# """**************add Attention***************"""
        elif m in {GAM_Attention, SpectralAttention, SoftThresholdAttentionResidual, MultiSpectralAttentionLayer,
                   CAMConv, CAConv, CBAMConv}:
            c1, c2 = ch[f], args[0]
            if c2 != nc:  # if not output
                c2 = make_divisible(min(c2, max_channels) * width, 8)
            args = [c1, c2, *args[1:]]
三、所有的注意力机制代码:
部分注意力需要安装timm. 如运行提示缺少timm安装即可. 安装命令:pip install timm,点击下面链接即可使用!
注意力网络链接地址
文章出处登录后可见!