目录
1 基本原理
2 DFS算法流程
3 时间复杂度
4 空间复杂度
5 DFS算法应用案例:
5.1 解决路径查找问题
5.2 解决图的连通性问题
5.3 拓扑排序
5.4 在树结构中进行深度遍历
深度优先搜索(DFS)是一种重要的图遍历算法,用于探索图中的节点和边。
1 基本原理
- DFS 是一种递归或栈(堆栈)数据结构的算法,用于图的遍历。
- 从一个起始节点开始,尽可能深入图的分支,直到无法继续深入,然后回溯并探索其他分支。
- 通过标记已访问的节点来避免重复访问。
2 DFS算法流程
创建一个空的栈(Stack)数据结构,用于存储待访问的节点。
从起始节点开始,将其标记为已访问并入栈。
重复以下步骤,直到栈为空: a. 出栈一个节点,并标记为已访问。 b. 检查该节点的所有未被访问的邻居节点。 c. 对于每个未访问的邻居节点,将其标记为已访问并入栈。
如果无法再继续,即没有未访问的邻居节点,返回上一个节点并继续。
重复步骤2-4,直到遍历整个图。
3 时间复杂度
- 在最坏情况下,DFS的时间复杂度可以是O(V + E),其中V是节点数,E是边数。
- 由于DFS可能访问整个图,因此在稠密图中可能效率较低。
4 空间复杂度
- 空间复杂度取决于递归深度或堆栈的大小,通常为O(V)
5 DFS算法应用案例:
5.1 解决路径查找问题
一个常见的应用案例是查找从起始节点到目标节点的路径。例如,在以下示例图中,我们要查找从节点A到节点G的路径。
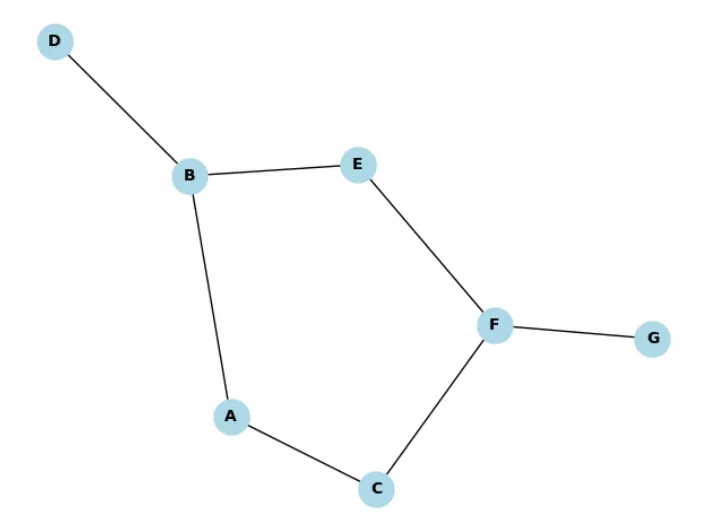
下面是一个简单的Python代码示例,用于执行DFS算法,找到从节点A到节点G的路径。
# 定义示例图
GRAPH = {
    'A': ['B', 'C'],
    'B': ['D', 'E'],
    'C': ['F'],
    'D': [],
    'E': ['F'],
    'F': ['G'],
    'G': []
}

# 定义DFS算法,查找从起始节点到目标节点的路径
def dfs(graph, start, end, path=[]):
    # 将当前节点添加到路径中
    path = path + [start]

    # 如果当前节点等于目标节点,返回找到的路径
    if start == end:
        return path

    # 如果当前节点不在图中,返回None
    if start not in graph:
        return None

    # 遍历当前节点的邻居节点
    for node in graph[start]:
        # 如果邻居节点不在已访问的路径中,继续DFS
        if node not in path:
            new_path = dfs(graph, node, end, path)
            # 如果找到路径,返回该路径
            if new_path:
                return new_path

    # 如果无法找到路径,返回None
    return None

# 调用DFS算法查找从A到G的路径
path = dfs(GRAPH, 'A', 'G')
if path:
    print("Path from A to G:", path)
else:
    print("No path found.")
输出:
![]()
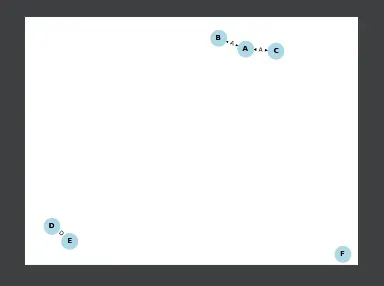
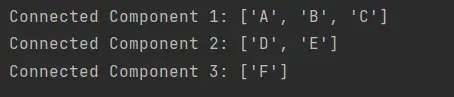
5.2 解决图的连通性问题:查找下图中的连通组件
import networkx as nx
import matplotlib.pyplot as plt

# 定义一个有向图的邻接列表表示
graph = {
    'A': ['B', 'C'],
    'B': ['A'],
    'C': ['A'],
    'D': ['E'],
    'E': ['D'],
    'F': [],
}

def find_connected_components(graph):
    def dfs(node, component):
        visited.add(node)
        component.append(node)
        for neighbor in graph.get(node, []):
            if neighbor not in visited:
                dfs(neighbor, component)

    visited = set()
    connected_components = []

    for node in graph:
        if node not in visited:
            component = []
            dfs(node, component)
            connected_components.append(component)

    return connected_components

# 查找连通组件
components = find_connected_components(graph)

# 打印连通组件
for i, component in enumerate(components, start=1):
    print(f"Connected Component {i}: {component}")

# 创建有向图
G = nx.DiGraph(graph)

# 绘制图形
pos = nx.spring_layout(G)
nx.draw(G, pos, with_labels=True, node_size=500, node_color='lightblue', font_size=10, font_color='black', font_weight='bold')

# 添加边的标签
labels = {}
for node in G.nodes():
    labels[node] = node
edge_labels = {(u, v): v for u, v in G.edges()}
nx.draw_networkx_edge_labels(G, pos, edge_labels=edge_labels, font_size=8)

plt.show()
输出:
示例创建
find_connected_components函数,用于查找图中的连通组件。它使用深度优先搜索(DFS)来遍历图,找到连通组件,并将它们添加到connected_components列表中。解析如下:
find_connected_components(graph)函数接受一个有向图的邻接列表表示为输入,并返回图中的连通组件。内部嵌套的
dfs(node, component)函数是深度优先搜索函数。它采用两个参数:
node表示当前遍历的节点。component是一个列表,用于存储当前连通组件中的节点。
dfs函数的目标是遍历与node相关联的节点,并将它们添加到component中。
visited是一个集合,用于跟踪已访问的节点。一开始,它是空的。
connected_components是一个列表,用于存储找到的连通组件。开始时,它也是空的。外部的
for循环遍历图中的每个节点,以确保所有节点都被覆盖。对于每个节点,它执行以下操作:
- 如果该节点尚未在
visited中,表示它是一个新的连通组件的起始节点。- 创建一个新的空列表
component,用于存储该连通组件的节点。- 调用
dfs(node, component)函数,开始深度优先搜索,并将所有与该节点相连的节点添加到component中。- 将
component添加到connected_components中,表示已找到一个连通组件。最后,函数返回
connected_components列表,其中包含了所有找到的连通组件。
5.3 拓扑排序
拓扑排序是用于确定有向图中节点的线性顺序,使得图中的每一条有向边都是从前面的节点指向后面的节点。在拓扑排序中,没有环路存在。
应用示例:
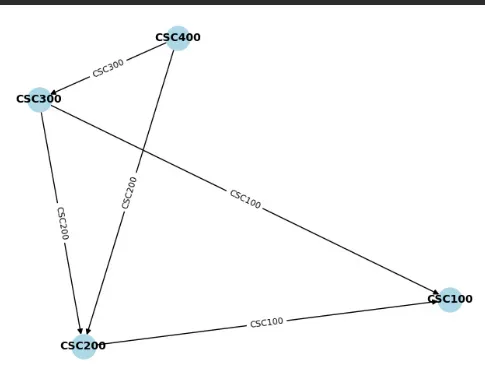
假设有一个有向图如下,表示课程之间的依赖关系,您需要找到一个可以完成所有课程的顺序。如果存在环路,表示存在无法解决的依赖关系,您需要找到一个没有环路的顺序。
import networkx as nx
import matplotlib.pyplot as plt

def topological_sort(graph):
    def dfs(node):
        visited.add(node)
        for neighbor in graph.get(node, []):
            if neighbor not in visited:
                dfs(neighbor)
        result.append(node)

    visited = set()
    result = []

    for node in graph:
        if node not in visited:
            dfs(node)

    return result[::-1]

# 定义有向图的依赖关系
courses = {
    'CSC300': ['CSC100', 'CSC200'],
    'CSC200': ['CSC100'],
    'CSC100': [],
    'CSC400': ['CSC300', 'CSC200'],
}

# 创建一个有向图
G = nx.DiGraph(courses)

# 调用拓扑排序算法
topological_order = topological_sort(courses)

if topological_order:
    print("Topological Order of Courses:", topological_order)
else:
    print("No valid topological order (contains a cycle).")

# 绘制有向图
pos = nx.spring_layout(G)
nx.draw(G, pos, with_labels=True, node_size=500, node_color='lightblue', font_size=10, font_color='black', font_weight='bold')

# 添加边的标签
labels = {}
for node in G.nodes():
    labels[node] = node
edge_labels = {(u, v): v for u, v in G.edges()}
nx.draw_networkx_edge_labels(G, pos, edge_labels=edge_labels, font_size=8)

plt.show()
输出为:
![]()
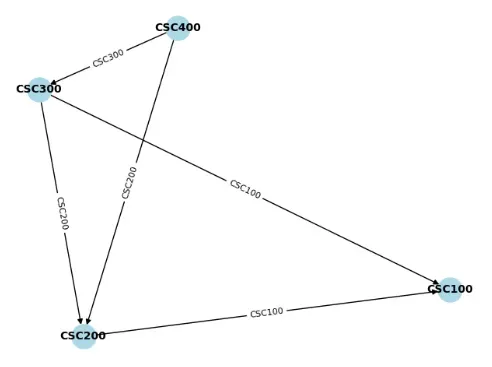
示例定义了
topological_sort函数,用于执行拓扑排序。这个函数使用深度优先搜索(DFS)来查找图的拓扑排序。如果图中存在环路,该函数仍然会返回一个排序结果,但它不保证是一个有效的拓扑排序。
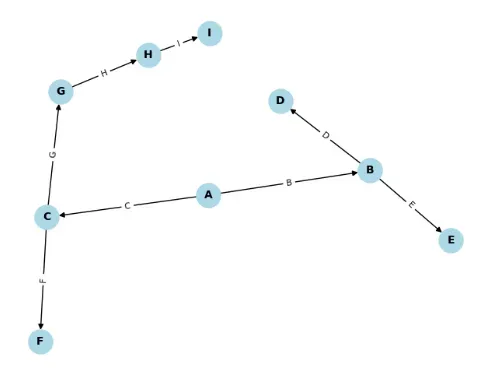
5.4 在树结构中进行深度遍历
import networkx as nx
import matplotlib.pyplot as plt

class TreeNode:
    def __init__(self, value):
        self.value = value
        self.children = []

    def add_child(self, child_node):
        self.children.append(child_node)

def depth_first_search(node, graph, parent=None):
    if node is None:
        return

    graph.add_node(node.value)  # 添加节点到图中

    if parent is not None:
        graph.add_edge(parent.value, node.value)  # 添加边连接父节点和当前节点

    print(node.value)  # 在DFS时输出节点值

    for child in node.children:
        depth_first_search(child, graph, node)  # 递归遍历子节点

# 创建一个较复杂的树结构
root = TreeNode("A")
b = TreeNode("B")
c = TreeNode("C")
d = TreeNode("D")
e = TreeNode("E")
f = TreeNode("F")
g = TreeNode("G")
h = TreeNode("H")
i = TreeNode("I")

root.add_child(b)
root.add_child(c)
b.add_child(d)
b.add_child(e)
c.add_child(f)
c.add_child(g)
g.add_child(h)
h.add_child(i)

# 创建一个有向图
G = nx.DiGraph()

# 执行深度优先搜索并创建图
depth_first_search(root, G)

# 绘制树结构图
pos = nx.spring_layout(G)
nx.draw(G, pos, with_labels=True, node_size=500, node_color='lightblue', font_size=10, font_color='black', font_weight='bold')

# 添加边的标签
labels = {}
for node in G.nodes():
    labels[node] = node
edge_labels = {(u, v): v for u, v in G.edges()}
nx.draw_networkx_edge_labels(G, pos, edge_labels=edge_labels, font_size=8)

plt.show()
这段代码用于创建一个树结构,然后执行深度优先搜索(DFS),最后绘制树结构图并添加标签。以下是对代码的详细解析:
首先,定义了一个树结构的节点类
TreeNode,其中每个节点具有一个值和子节点列表。在
depth_first_search函数中,执行深度优先搜索。它接受三个参数:
node:当前要处理的节点。graph:用于构建树结构图的 NetworkX 有向图对象。parent:父节点,用于添加边。在函数中,执行以下操作:
- 添加当前节点到图中(
graph.add_node(node.value))。- 如果存在父节点,添加从父节点到当前节点的边(
graph.add_edge(parent.value, node.value))。- 打印当前节点的值,以在DFS期间输出节点值。
- 递归遍历当前节点的子节点,使用当前节点作为父节点。
创建一个较复杂的树结构:
- 根节点为 “A”,有两个子节点 “B” 和 “C”。
- 节点 “B” 有两个子节点 “D” 和 “E”。
- 节点 “C” 有两个子节点 “F” 和 “G”。
- 节点 “G” 有一个子节点 “H”。
- 节点 “H” 有一个子节点 “I”。
创建一个 NetworkX 有向图对象
G,用于存储树结构图。执行深度优先搜索,从根节点 “A” 开始。深度优先搜索会递归遍历树的每个分支,并在DFS期间输出节点值。
使用 NetworkX 绘制树结构图:
nx.spring_layout用于确定节点的位置。nx.draw用于绘制节点和边,设置节点的大小、颜色和标签。nx.draw_networkx_edge_labels用于添加边的标签。最后,通过
plt.show()显示绘制的树结构图。
文章出处登录后可见!