Intel N100工控机使用核显加速推理yolov5模型
- 前言
- 安装openvino环境
- 核显加速运行yolov5
- 进一步加速
- 再进一步量化压榨
前言
今年3月初开始,某平台开始陆续上货基于英特尔Alder Lake-N处理器系列的迷你主机。最先出现的是N95和N100两款处理器,迷你主机的整机价格已经打到800元左右的水平了,还是有挺高可玩性的。其中N100的规格如下:
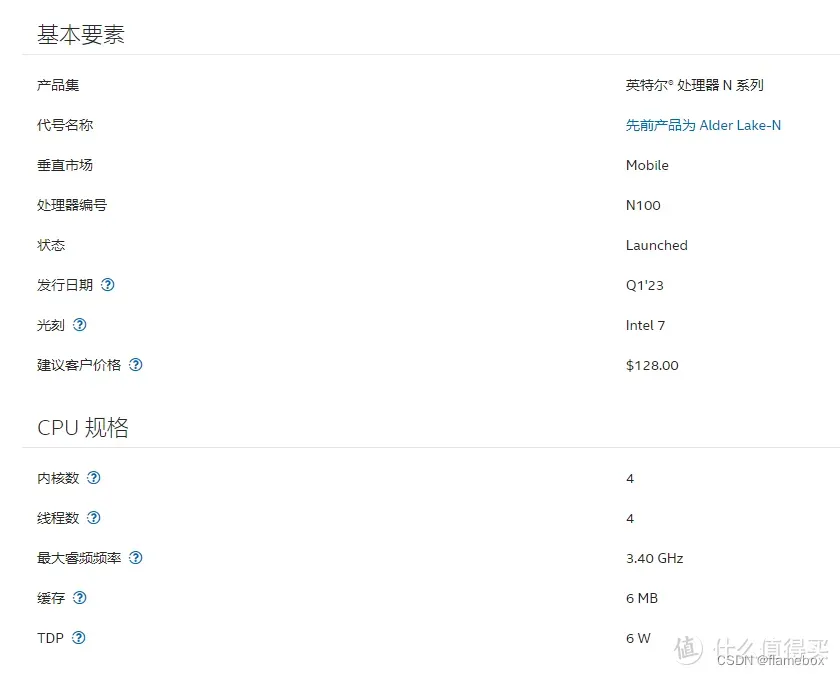
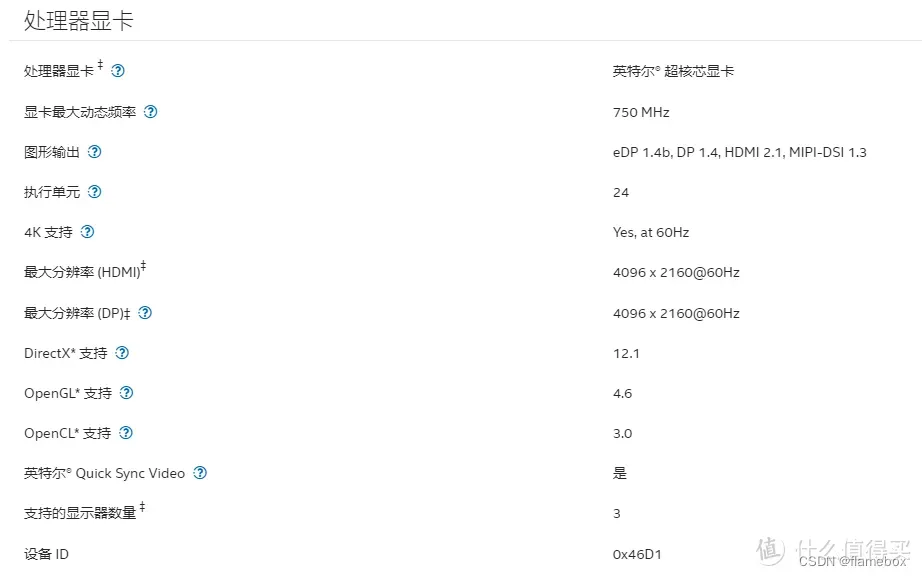
这个cpu性能虽然不是很强,性能接近4代i5移动端,但功耗很低,TDP只有6W。而且有个24单元的核显,解码视频能力不差。我很期待它用来跑跑yolov5是什么效果。
安装openvino环境
既然是intel的cpu,还要在核显上跑,那肯定是用自家的openvino框架了。安装openvino环境很简单,官网上说得很详细(我的环境是ubuntu22.04):
python3 -m venv openvino_env
source openvino_env/bin/activate
python -m pip install --upgrade pip
pip install openvino-dev
# 最后输入这条命令测试环境是否正常,正常的话就是没有任何回复报错的
python -c "from openvino.runtime import Core"
运行时安装很简单,但是在运行程序时,却报出了未能识别opencl驱动的错误
terminate called after throwing an instance of 'InferenceEngine::GeneralError'
  what():  Failed to create plugin /opt/intel/openvino_2022/deployment_tools/inference_engine/lib/intel64/libclDNNPlugin.so for device GPU
Please, check your environment
[CLDNN ERROR]. clGetPlatformIDs error -1001
我之前是按照文档sudo apt-get install intel-opencl-icd安装了intel-openc驱动的,但实际还是出现上面的报错。网上看了很多文章,看得云里雾里。最后还是按官方文档手动下载最新驱动安装成功的。具体流程也很简单:
mkdir neo    #建立一个安装目录
cd neo
# 下载驱动
wget https://github.com/intel/intel-graphics-compiler/releases/download/igc-1.0.12812.26/intel-igc-core_1.0.12812.26_amd64.deb
wget https://github.com/intel/intel-graphics-compiler/releases/download/igc-1.0.12812.26/intel-igc-opencl_1.0.12812.26_amd64.deb
wget https://github.com/intel/compute-runtime/releases/download/22.53.25242.13/intel-level-zero-gpu-dbgsym_1.3.25242.13_amd64.ddeb
wget https://github.com/intel/compute-runtime/releases/download/22.53.25242.13/intel-level-zero-gpu_1.3.25242.13_amd64.deb
wget https://github.com/intel/compute-runtime/releases/download/22.53.25242.13/intel-opencl-icd-dbgsym_22.53.25242.13_amd64.ddeb
wget https://github.com/intel/compute-runtime/releases/download/22.53.25242.13/intel-opencl-icd_22.53.25242.13_amd64.deb
wget https://github.com/intel/compute-runtime/releases/download/22.53.25242.13/libigdgmm12_22.3.0_amd64.deb
# 校验下载文件
wget https://github.com/intel/compute-runtime/releases/download/22.53.25242.13/ww53.sum
sha256sum -c ww53.sum
# 一键安装
sudo dpkg -i *.deb
核显加速运行yolov5
环境搭好后,跑yolov5就是一个python文件这么简单的事情了。代码爬网上的。。。
from pyexpat import model
import cv2
import numpy as np
import time
import yaml
# from openvino.inference_engine import IECore # the version of openvino <= 2021.4.2
from openvino.runtime import Core  # the version of openvino >= 2022.1

# 载入coco的labels
class_list = ['person', 'bicycle', 'car', 'motorcycle', 'airplane', 'bus', 'train', 'truck', 'boat',
              'traffic light', 'fire hydrant', 'stop sign', 'parking meter', 'bench', 'bird', 'cat', 'dog',
              'horse', 'sheep', 'cow', 'elephant', 'bear', 'zebra', 'giraffe', 'backpack', 'umbrella',
              'handbag',
              'tie', 'suitcase', 'frisbee', 'skis', 'snowboard', 'sports ball', 'kite', 'baseball bat',
              'baseball glove',
              'skateboard', 'surfboard', 'tennis racket', 'bottle', 'wine glass', 'cup', 'fork', 'knife',
              'spoon', 'bowl',
              'banana', 'apple', 'sandwich', 'orange', 'broccoli', 'carrot', 'hot dog', 'pizza', 'donut',
              'cake', 'chair',
              'couch', 'potted plant', 'bed', 'dining table', 'toilet', 'tv', 'laptop', 'mouse', 'remote',
              'keyboard',
              'cell phone', 'microwave', 'oven', 'toaster', 'sink', 'refrigerator', 'book', 'clock', 'vase',
              'scissors',
              'teddy bear', 'hair drier', 'toothbrush']

# YOLOv5s输入尺寸
INPUT_WIDTH = 640
INPUT_HEIGHT = 640


# 目标检测函数,返回检测结果
def detect(image, net):
    blob = cv2.dnn.blobFromImage(image, 1 / 255.0, (INPUT_WIDTH, INPUT_HEIGHT), swapRB=True, crop=False)
    preds = net([blob])[next(iter(net.outputs))]  # API version>=2022.1
    # result = net.infer({"images": blob}) # API version<=2021.4.2
    # preds = result["output"] # API version<=2021.4.2
    return preds


# YOLOv5的后处理函数,解析模型的输出
def wrap_detection(input_image, output_data):
    class_ids = []
    confidences = []
    boxes = []
    # print(output_data.shape)
    rows = output_data.shape[0]

    image_width, image_height, _ = input_image.shape

    x_factor = image_width / INPUT_WIDTH
    y_factor = image_height / INPUT_HEIGHT

    for r in range(rows):
        row = output_data[r]
        confidence = row[4]
        if confidence >= 0.4:

            classes_scores = row[5:]
            _, _, _, max_indx = cv2.minMaxLoc(classes_scores)
            class_id = max_indx[1]
            if (classes_scores[class_id] > .25):
                confidences.append(confidence)

                class_ids.append(class_id)

                x, y, w, h = row[0].item(), row[1].item(), row[2].item(), row[3].item()
                left = int((x - 0.5 * w) * x_factor)
                top = int((y - 0.5 * h) * y_factor)
                width = int(w * x_factor)
                height = int(h * y_factor)
                box = np.array([left, top, width, height])
                boxes.append(box)

    indexes = cv2.dnn.NMSBoxes(boxes, confidences, 0.25, 0.45)

    result_class_ids = []
    result_confidences = []
    result_boxes = []

    for i in indexes:
        result_confidences.append(confidences[i])
        result_class_ids.append(class_ids[i])
        result_boxes.append(boxes[i])

    return result_class_ids, result_confidences, result_boxes


# 按照YOLOv5要求,先将图像长:宽 = 1:1,多余部分填充黑边
def format_yolov5(frame):
    row, col, _ = frame.shape
    _max = max(col, row)
    result = np.zeros((_max, _max, 3), np.uint8)
    result[0:row, 0:col] = frame
    return result


# 载入yolov5s onnx模型
model_path = "./model.onnx"
# Read yolov5s onnx model with OpenVINO API
# ie = IECore()  #Initialize IECore version<=2021.4.2
ie = Core()  # Initialize Core version>=2022.1

'''#List all the available devices
devices = ie.available_devices
for device in devices:
    device_name = ie.get_property(device_name=device, name="FULL_DEVICE_NAME")
    print(f"{device}: {device_name}")
'''

# net = ie.load_network(network=model_path, device_name="AUTO") # API version<=2021.4.2
model_onnx = ie.read_model(model=model_path)  # read model, API version>=2022.1
# print(model_onnx.inputs) #Check the input nodes of the model
# print(model_onnx.outputs) #Check the output nodes of the model
net = ie.compile_model(model=model_onnx, device_name="GPU")

# 开启Webcam,并设置为1280x720
cap = cv2.VideoCapture(0)
cap.set(cv2.CAP_PROP_FRAME_WIDTH, 1280)
cap.set(cv2.CAP_PROP_FRAME_HEIGHT, 720)

# 调色板
colors = [(255, 255, 0), (0, 255, 0), (0, 255, 255), (255, 0, 0)]

# 开启检测循环
while True:
    start = time.time()
    _, frame = cap.read()
    if frame is None:
        print("End of stream")
        break
    # 将图像按最大边1:1放缩
    inputImage = format_yolov5(frame)
    # 执行推理计算
    outs = detect(inputImage, net)
    # 拆解推理结果
    class_ids, confidences, boxes = wrap_detection(inputImage, outs[0])

    # 显示检测框bbox
    for (classid, confidence, box) in zip(class_ids, confidences, boxes):
        color = colors[int(classid) % len(colors)]
        cv2.rectangle(frame, box, color, 2)
        cv2.rectangle(frame, (box[0], box[1] - 20), (box[0] + box[2], box[1]), color, -1)
        cv2.putText(frame, class_list[classid], (box[0], box[1] - 10), cv2.FONT_HERSHEY_SIMPLEX, .5, (0, 0, 0))

    # 显示推理速度FPS
    end = time.time()
    inf_end = end - start
    fps = 1 / inf_end
    fps_label = "FPS: %.2f" % fps
    cv2.putText(frame, fps_label, (10, 25), cv2.FONT_HERSHEY_SIMPLEX, 1, (0, 0, 255), 2)
    print(fps_label + "; Detections: " + str(len(class_ids)))
    cv2.imshow("output", frame)

    if cv2.waitKey(1) > -1:
        print("finished by user")
        break
要核显加速,这句:net = ie.compile_model(model=model_onnx, device_name="GPU")指定为GPU就行了。
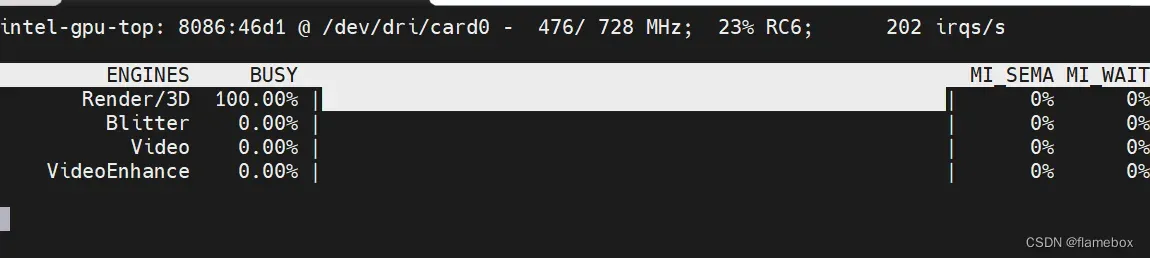
这台N100实际跑下来,能有个6fps,观察gpu占用率,也吃得差不多了。
不过也不能难为它了😂。如果是cpu跑,帧率只得一半,3fps。加速效果100%啊。。。
进一步加速
查了下资料,发现在GPU上使用FP16格式推理更友好,还有进一步提速空间。方法如下:
# 使用openvino自带的mo工具优化模型
mo --input_model model.onnx --data_type FP16
就得到了IR格式的两个模型文件model.bin和model.xml。
将程序改为model_path = "./model.xml"加载就可以了。
最终结果是是8FPS,相对一开始cpu跑onnx提速了160%了。
也可以使用openvino提供的benchmark_app工具来测试模型的性能数据
benchmark_app -m model.xml -d AUTO:-CPU -hint cumulative_throughput
再进一步量化压榨
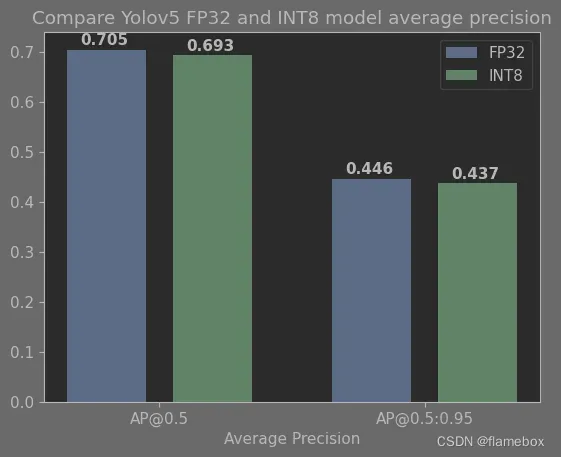
通过openvino社区的OpenVINO™ Notebooks项目例程了解到,通过模型量化能在舍弃一点点精度的情况下最大程度地提升推理的速度。这里直接给出了针对yolov5模型量化和评估的notebook工程,打开不断点击执行就ok了,很贴心。
最后会导出IR格式的量化模型文件,大小7MB多,精度损失也几乎可以忽略。
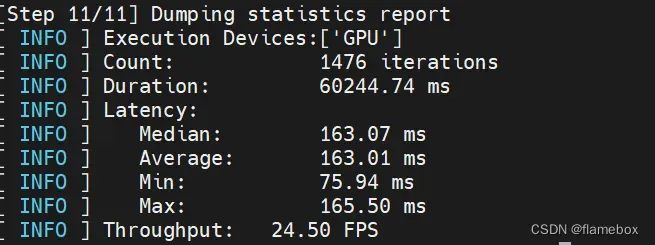
在N100上继续使用模型跑分工具测试,理论吞吐量可以达到24.5FPS。
然而在上面的python摄像头实时推理demo中,帧率只是从8提升到9帧。此时cpu和核显的占用都只有40%多,可见是python端的前后处理比较简单,导致了gpu在等待。后面改用c++和合理的pipeline设计,应该能最大程度压榨这颗cpu的全部算力。
文章出处登录后可见!