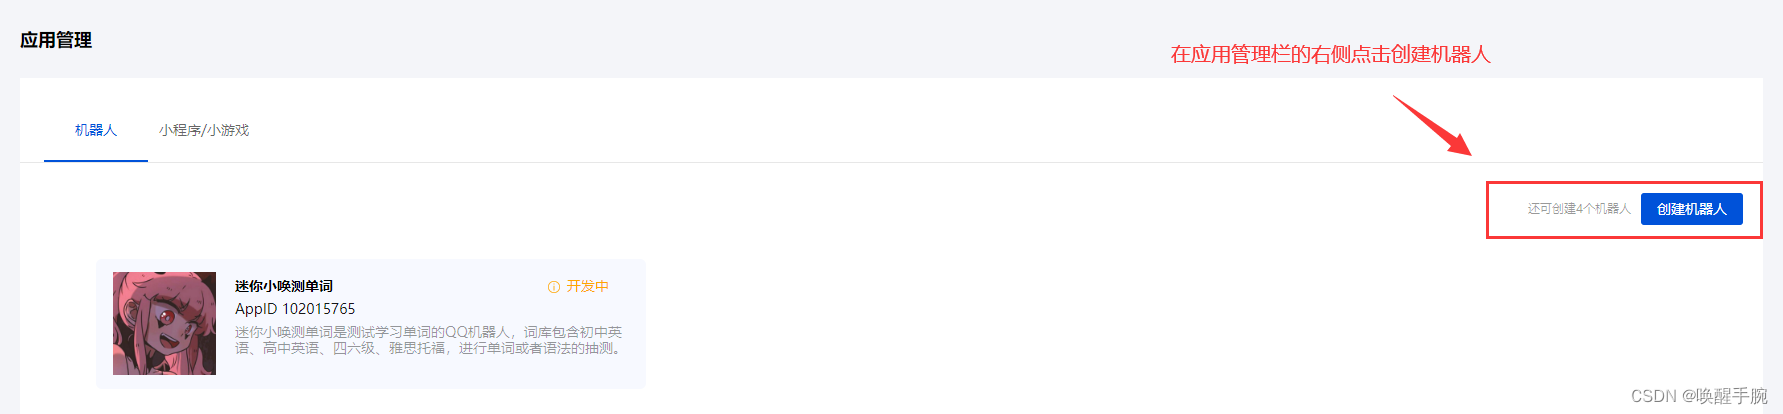
第 1 课、注册 QQ 开放平台账户
QQ开放平台官方地址:https://q.qq.com/#/app/bot
QQ开放平台包含:QQ机器人、QQ小程序、QQ小游戏,我们这边选择QQ机器人。
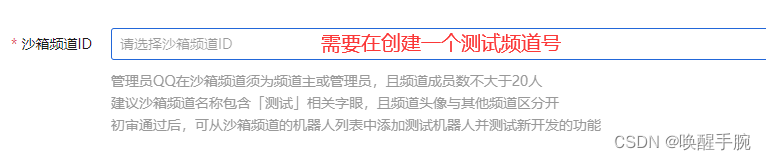
机器人类型:设置私域机器人或者公域机器人,当然公域机器人对于服务器的要求过高,我们这边选择私域机器人进行开发。
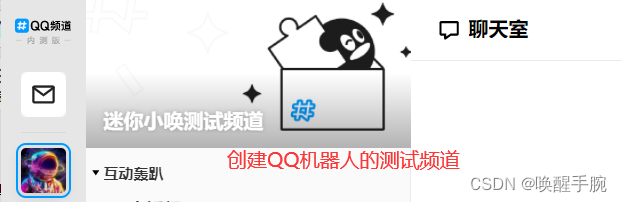
特别注意在选择沙箱频道的时候,你必须提前创建个测试频道,必须<20人的频道。
例如我这边创建了迷你小唤QQ机器人的测试频道。
创建完成后就能够进入你刚刚创建QQ机器人的后台,展示如下所示:
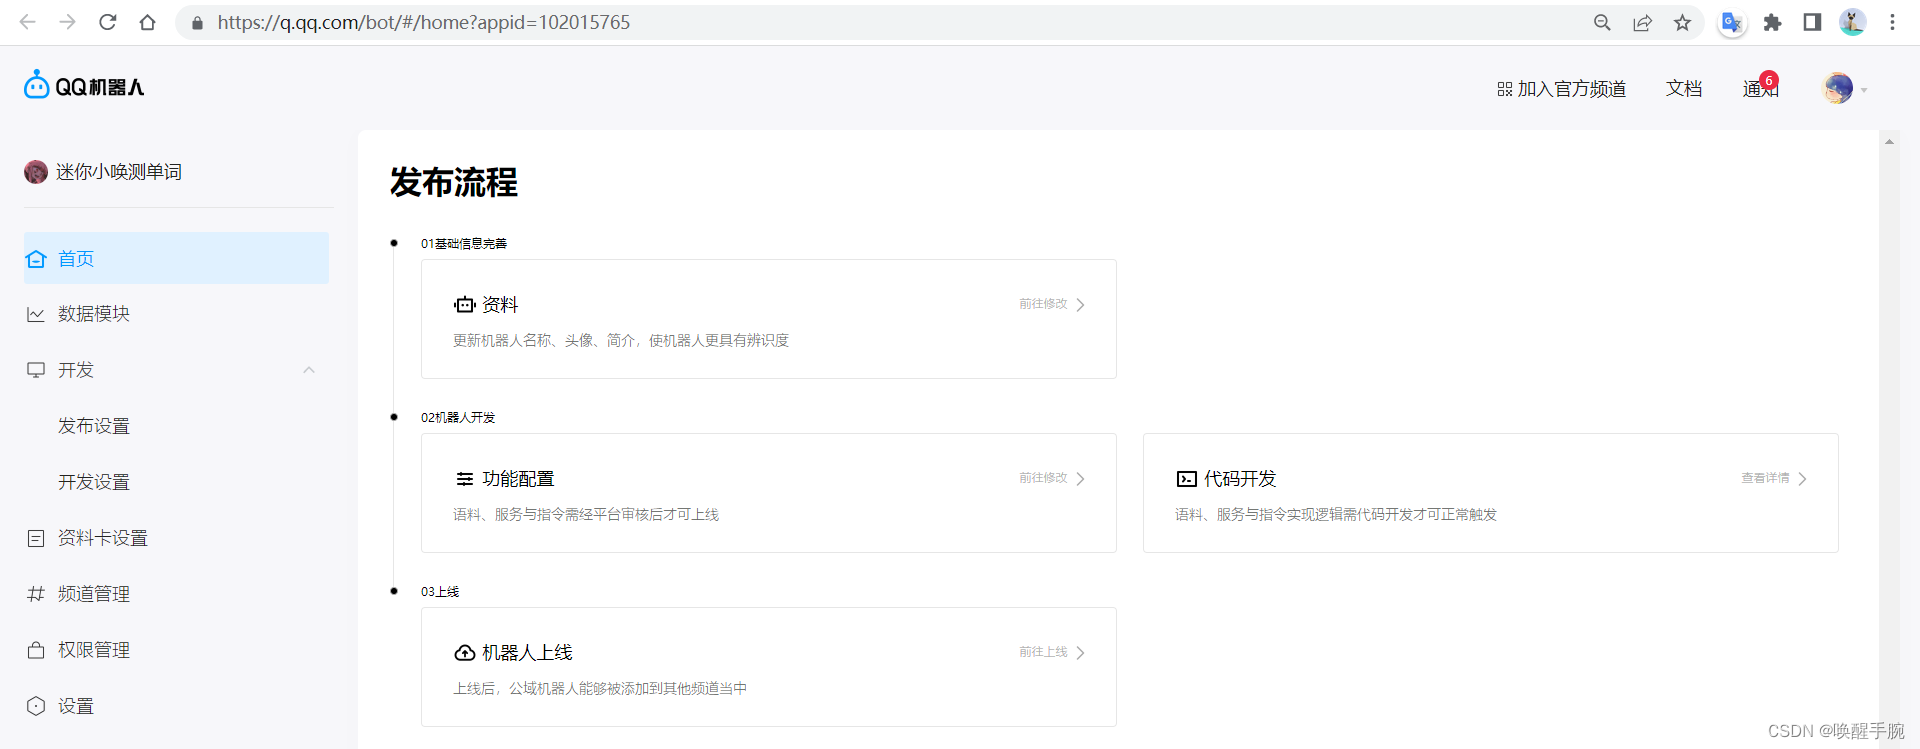
然后点击发布流程中的代码开发即可查看API文档,进行编写我们服务器端的程序代码。
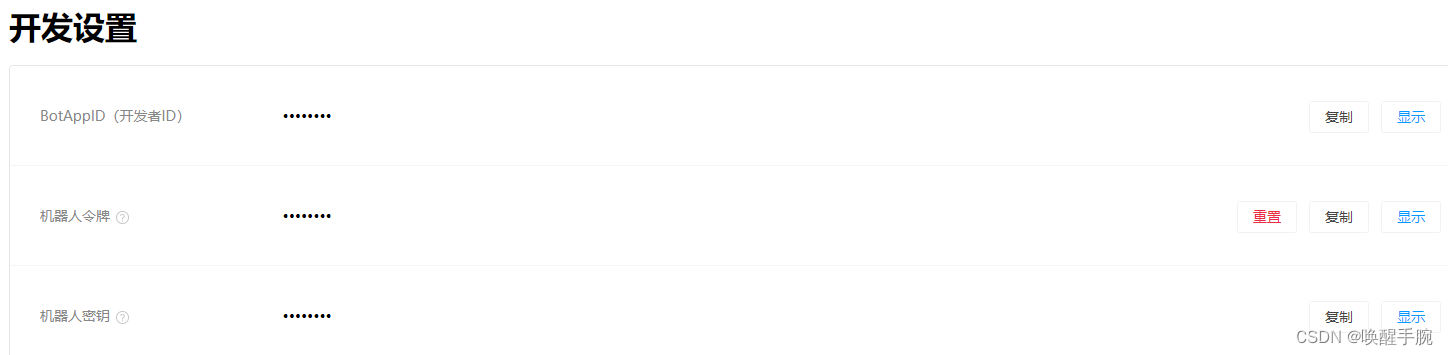
点击开发设置能够查看 BotAppID、机器人令牌、机器人密钥,后续服务器端开发需要。
第 2 课、QQ 频道机器人接口说明
QQ频道机器人提供两类接口:
第一种:基于 REST 风格的 OPENAPI。
传统风格 描述形式:http://localhost/user/getById?id=1
Rest 风格 描述形式:http://localhost/user/1
显而易见,Rest风格优点:隐藏资源的访问行为,无法通过地址得知对资源是哪种操作;简化书写。
第二种:基于 WebSocket 提供实时事件通知的事件中心。
这种的话,和野生的nonebot框架采用的类似,都是基于协议端与服务器端的长连接模式。
博客推荐:Python基于cq-http协议端,使用nonebot2框架制作属于自己的智能机器人
第 3 课、SDK 开发基础库安装
QQ 小程序的开发 SDK 官方提供了三种语言,分别是:GO语言、JS语言、Python语言,分别对应如下 3 基础库:
golang: https://github.com/tencent-connect/botgo(opens new window)
nodejs: https://github.com/tencent-connect/bot-node-sdk(opens new window)
python: https://github.com/tencent-connect/botpy
我们选择 Python 语言进行开发:
GITHUB:https://github.com/tencent-connect/botpy
安装 qq-botpy 第三方库
pip install qq-botpy
使用方法:需要使用的地方import botpy
import botpy
兼容提示:原机器人的老版本qq-bot仍然可以使用,但新接口的支持上会逐渐暂停,此次升级不会影响线上使用的机器人
第 4 课、botpy 快速入门案例测试
版本介绍:
首先介绍下版本问题,老版本是 qq-bot,新版本是 botpy,当然随着新版本迭代升级,老版本将会陆续的停用相关api,但是腾讯云的案例是 基于 老版本 qq-bot。
第 ① 步:通过继承实现 bot.Client,实现自己的机器人 Client
第 ② 步:实现机器人相关事件的处理方法,如 on_at_message_create, 详细的事件监听列表,请参考 事件监听.md
如下,是定义机器人被@的后自动回复:
import botpy
from botpy.message import Message

class MyClient(botpy.Client):
    async def on_at_message_create(self, message: Message):
        await message.reply(content=f"机器人{self.robot.name}收到你的@消息了: {message.content}")
注意:每个事件会下发具体的数据对象,如message相关事件是message.Message的对象 (部分事件透传了后台数据,暂未实现对象缓存)
第 ③ 步:设置机器人需要监听的事件通道,并启动 client
import botpy
from botpy.message import Message

class MyClient(botpy.Client):
    async def on_at_message_create(self, message: Message):
        await self.api.post_message(channel_id=message.channel_id, content="content")

intents = botpy.Intents(public_guild_messages=True)
client = MyClient(intents=intents)
client.run(appid="12345", token="xxxx")
也可以通过预设置的类型,设置需要监听的事件通道
import botpy

intents = botpy.Intents.none()
intents.public_guild_messages=True
第 5 课、腾讯云官方模拟实验
环境搭建
安装Python3,推荐使用Python3,实验环境已经预安装,可执行下面命令,进行Python版本验证。
python3 --version
安装机器人SDK
在终端执行下面命令安装机器人PythonSDK:
pip install qq-bot
同时,由于需要读取 yaml 文件的内容,我们也需要安装 pyyaml
pip install pyyaml
创建项目文件
创建一个 demo 项目文件夹
mkdir /home/demo && cd /home/demo
在 demo 文件夹下创建名为 config.yaml 的配置文件
touch config.yaml
接着,在 demo 文件夹下创建一个名为 robot.py 的文件:
touch robot.py
导入Token 和 AppID
请点击打开 config.yaml 文件,并填入自己机器人的 AppID 和 Token ,注意保存:
token:
  appid: "自己QQ小程序AppID"
  token: "自己QQ小程序token"
导入依赖包
请点击打开 robot.py ,并在文件中复制导入相关依赖包的代码,注意保存:
import asyncio
import json
import os.path
import threading
from typing import Dict, List

import aiohttp
import qqbot

from qqbot.core.util.yaml_util import YamlUtil
from qqbot.model.message import MessageEmbed, MessageEmbedField, MessageEmbedThumbnail, CreateDirectMessageRequest, \
    MessageArk, MessageArkKv, MessageArkObj, MessageArkObjKv

test_config = YamlUtil.read(os.path.join(os.path.dirname(__file__), "config.yaml"))
设置机器人自动回复普通消息
在 robot.py 文件中添加如下代码,注意保存:
async def _message_handler(event, message: qqbot.Message):
    """
    定义事件回调的处理
    :param event: 事件类型
    :param message: 事件对象(如监听消息是Message对象)
    """
    msg_api = qqbot.AsyncMessageAPI(t_token, False)
    # 打印返回信息
    qqbot.logger.info("event %s" % event + ",receive message %s" % message.content)

    # 发送消息告知用户
    message_to_send = qqbot.MessageSendRequest(content="你好", msg_id=message.id)
    await msg_api.post_message(message.channel_id, message_to_send)


# async的异步接口的使用示例
if __name__ == "__main__":
    t_token = qqbot.Token(test_config["token"]["appid"], test_config["token"]["token"])
    # @机器人后推送被动消息
    qqbot_handler = qqbot.Handler(
        qqbot.HandlerType.AT_MESSAGE_EVENT_HANDLER, _message_handler
    )
    qqbot.async_listen_events(t_token, False, qqbot_handler)
代码运行
在终端命令行输入并执行下列命令,运行机器人
python3 /home/demo/robot.py
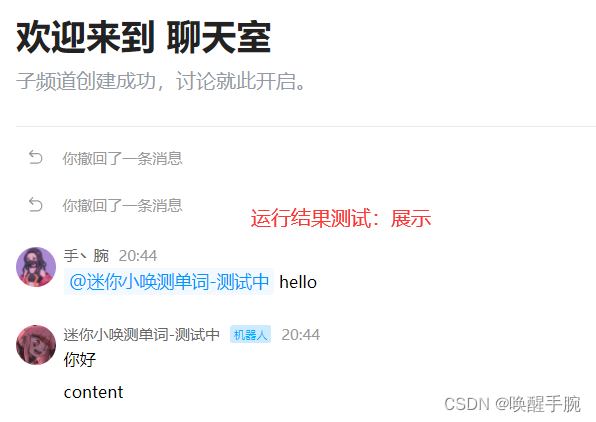
这时在频道内 @机器人 hello 指令就可以收到回复了
第 6 课、腾讯云官方案例:天气
代码说明
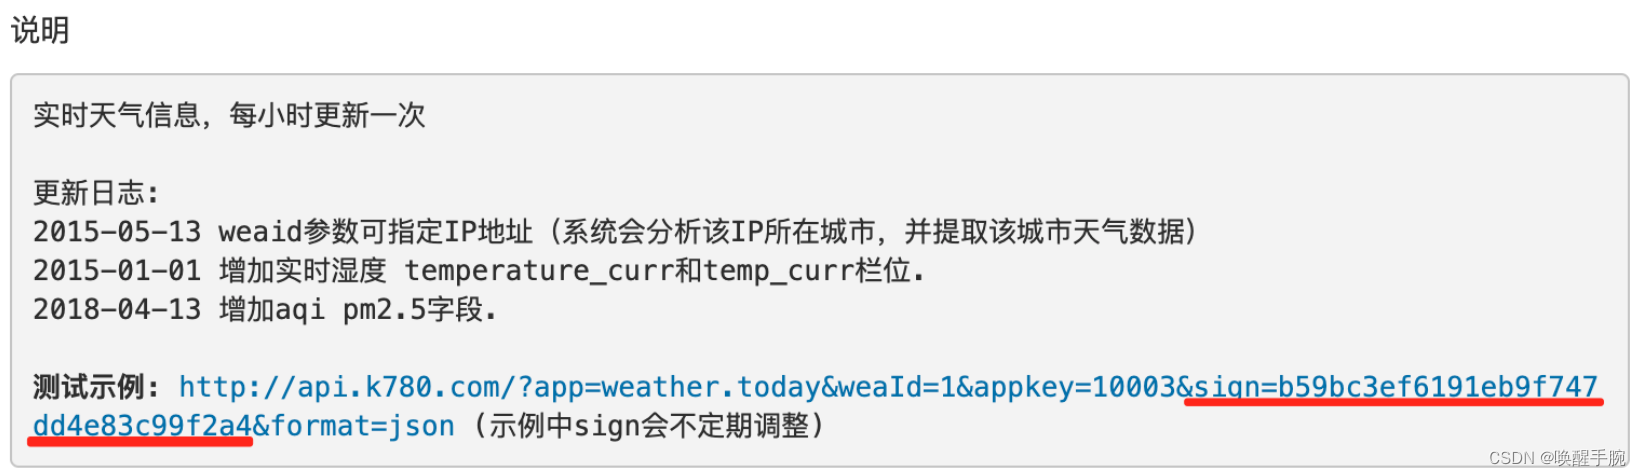
上面链接的天气API使用的sign=b59bc3ef6191eb9f747dd4e83c99f2a4可能会过期,如下图指引:
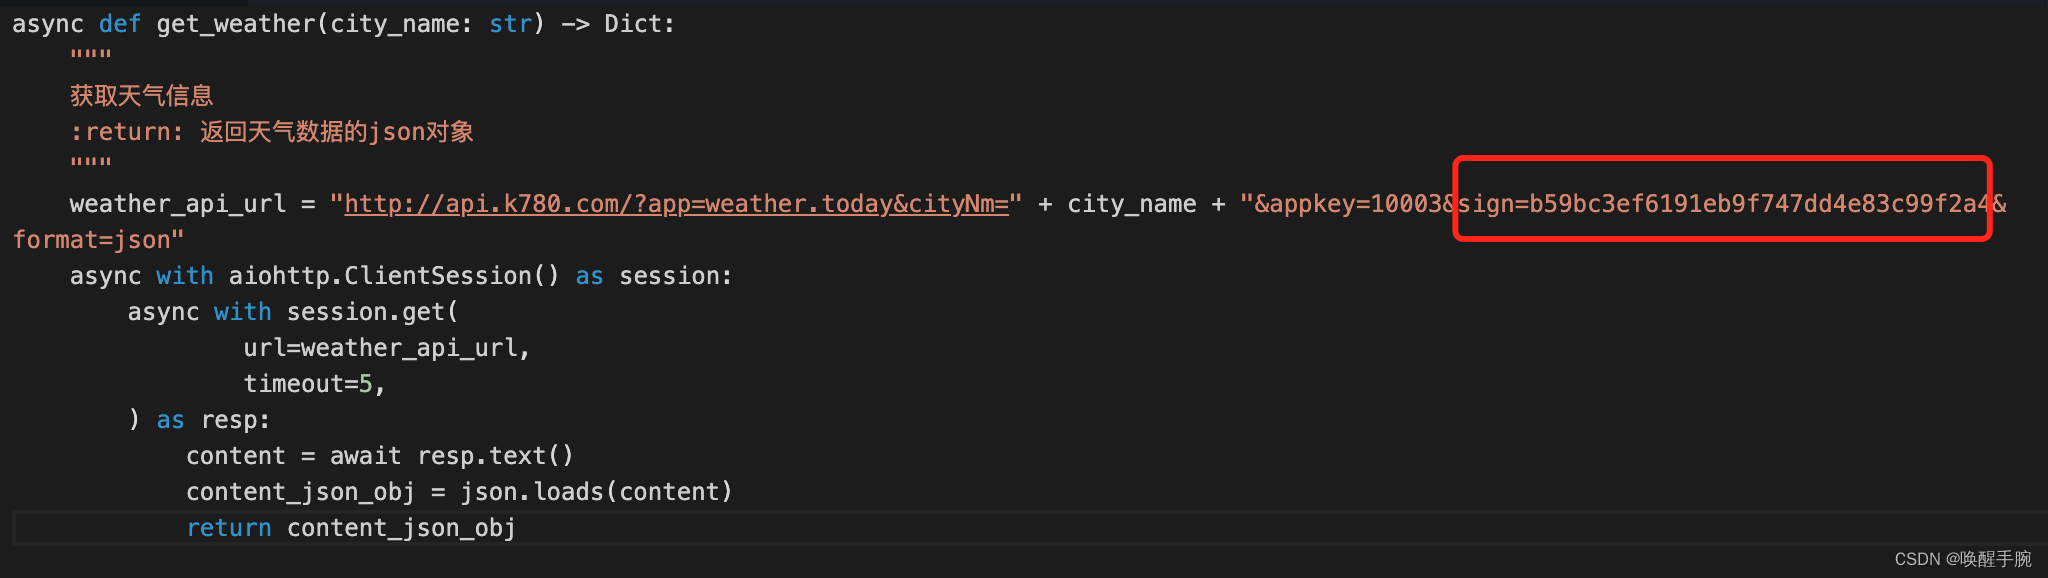
请前往天气API地址查看最新的测试sign并替换,或注册账号申请一个免费sign
天气免费API:https://www.nowapi.com/api/weather.today
修改 _message_handler 方法
在 _message_handler 方法中,加入调用 get_weather 函数并发送天气的代码。完整 _message_handler 的实现如下:
async def _message_handler(event, message: qqbot.Message):
    """
    定义事件回调的处理
    :param event: 事件类型
    :param message: 事件对象(如监听消息是Message对象)
    """
    msg_api = qqbot.AsyncMessageAPI(t_token, False)
    # 打印返回信息
    qqbot.logger.info("event %s" % event + ",receive message %s" % message.content)
    # 获取天气数据并发送消息告知用户
    weather_dict = await get_weather("深圳")
    weather_desc = weather_dict['result']['citynm'] + " " \
        + weather_dict['result']['weather'] + " " \
        + weather_dict['result']['days'] + " " \
        + weather_dict['result']['week']
    message_to_send = qqbot.MessageSendRequest(msg_id=message.id, content=weather_desc, image=weather_dict['result']['weather_icon'])
    await msg_api.post_message(message.channel_id, message_to_send)
接口函数 get_weather(city_name: str) -> Dict:
async def get_weather(city_name: str) -> Dict:

    weather_api_url = "http://api.k780.com/?app=weather.today&appkey=10003&sign=b59bc3ef6191eb9f747dd4e83c99f2a4&format=json&cityNm=" + city_name
    async with aiohttp.ClientSession() as session:
        async with session.get(
            url=weather_api_url,
            timeout=5,
        ) as resp:
            content = await resp.text()
            content_json_obj = json.loads(content)
            return content_json_obj
代码运行
在终端命令行输入并执行下列命令,运行机器人
python3 /home/demo/robot.py
效果图如下:
第 7 课、腾讯云官方案例:主动推送
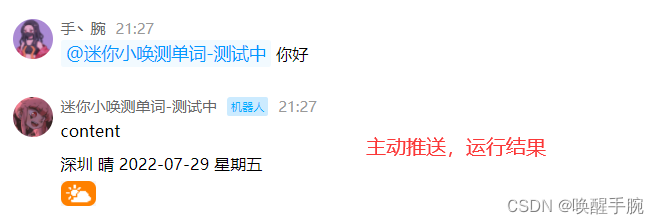
设置机器人主动推送消息
上面的教程只实现一个简单的获取天气的功能,但是我们做的是天气机器人,希望实现一个报告天气的功能。一般的天气应用都会在一个特定时间给你推送天气通知,在频道机器人中,你可以通过主动消息来实现这个功能。
在 robot.py 中添加定时发送消息的函数,代码如下:
async def send_weather_message_by_time():
    """
    任务描述:每天推送一次普通天气消息(演示方便改为100s定时运行)
    """
    # 获取天气数据
    weather_dict = await get_weather("深圳")
    # 获取频道列表都取首个频道的首个子频道推送
    user_api = qqbot.AsyncUserAPI(t_token, False)
    guilds = await user_api.me_guilds()
    guilds_id = guilds[0].id
    channel_api = qqbot.AsyncChannelAPI(t_token, False)
    channels = await channel_api.get_channels(guilds_id)
    channels_id = channels[0].id
    qqbot.logger.info("channelid %s" % channel_id)
    # 推送消息
    weather = "当前天气是:" + weather_dict['result']['weather']
    send = qqbot.MessageSendRequest(content=weather)
    msg_api = qqbot.AsyncMessageAPI(t_token, False)
    await msg_api.post_message(channels_id, send)
    # 如果需要每天都执行,加上下面两句
    t = threading.Timer(100, await send_weather_message_by_time)
    t.start()
在main中添加执行 send_weather_message_by_time() 的语句:
# 定时推送主动消息
send_weather_message_by_time()
编写完毕,注意保存
在终端命令行输入并执行下列命令,运行机器人
python3 /home/demo/robot.py
效果图如下:
第 8 课、腾讯云官方案例:指令回复
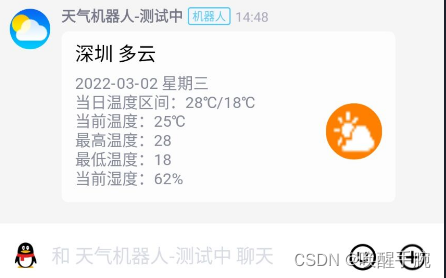
设置机器人指令回复ark消息
提供给个人开发者的 Ark 有3种,这里使用 23 号 Ark。其它 Ark 见 消息模板
消息模板:https://bot.q.qq.com/wiki/develop/api/openapi/message/message_template.html
先在 robot.py 中添加发送ark的函数
async def _create_ark_obj_list(weather_dict) -> List[MessageArkObj]:
    obj_list = [MessageArkObj(obj_kv=[MessageArkObjKv(key="desc", value=weather_dict['result']['citynm'] + " " + weather_dict['result']['weather'] +  " " + weather_dict['result']['days'] + " " + weather_dict['result']['week'])]),
                MessageArkObj(obj_kv=[MessageArkObjKv(key="desc", value="当日温度区间:" + weather_dict['result']['temperature'])]),
                MessageArkObj(obj_kv=[MessageArkObjKv(key="desc", value="当前温度:" + weather_dict['result']['temperature_curr'])]),
                MessageArkObj(obj_kv=[MessageArkObjKv(key="desc", value="当前湿度:" + weather_dict['result']['humidity'])])]
    return obj_list

async def send_weather_ark_message(weather_dict, channel_id, message_id):
    """
    被动回复-子频道推送模版消息
    :param channel_id: 回复消息的子频道ID
    :param message_id: 回复消息ID
    :param weather_dict:天气消息
    """
    # 构造消息发送请求数据对象
    ark = MessageArk()
    # 模版ID=23
    ark.template_id = 23
    ark.kv = [MessageArkKv(key="#DESC#", value="描述"),
              MessageArkKv(key="#PROMPT#", value="提示消息"),
              MessageArkKv(key="#LIST#", obj=await _create_ark_obj_list(weather_dict))]
    # 通过api发送回复消息
    send = qqbot.MessageSendRequest(content="", ark=ark, msg_id=message_id)
    msg_api = qqbot.AsyncMessageAPI(t_token, False)
    await msg_api.post_message(channel_id, send)
再在被动回复处理函数 _message_handler 添加以下代码,用于发送ark
# 根据指令触发不同的推送消息
content = message.content
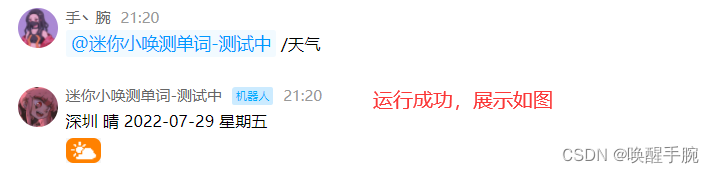
if "/天气" in content:
# 通过空格区分城市参数
split = content.split("/天气 ")
weather = await get_weather(split[1])
await send_weather_ark_message(weather, message.channel_id, message.id)
编写完毕,注意保存
代码运行,在终端命令行输入并执行下列命令,运行机器人
python3 /home/demo/robot.py
@机器人后输入“/天气 城市名”,效果如下图:

设置机器人私信
我们希望能提供不同用户不同地方的天气,但是发太多的消息会影响其它的用户。针对这种情况,我们可以通过私信来实现。下面函数中,当我们@机器人hello时收到机器人的私信。
私信中我们不使用ark,而是使用Embed。Embed也是一种结构化消息,它比Ark简单
在 robot.py 添加发送Embed的函数如下:
async def send_weather_embed_direct_message(weather_dict, guild_id, user_id):
    """
    被动回复-私信推送天气内嵌消息
    :param user_id: 用户ID
    :param weather_dict: 天气数据字典
    :param guild_id: 发送私信需要的源频道ID
    """
    # 构造消息发送请求数据对象
    embed = MessageEmbed()
    embed.title = weather_dict['result']['citynm'] + " " + weather_dict['result']['weather']
    embed.prompt = "天气消息推送"
    # 构造内嵌消息缩略图
    thumbnail = MessageEmbedThumbnail()
    thumbnail.url = weather_dict['result']['weather_icon']
    embed.thumbnail = thumbnail
    # 构造内嵌消息fields
    embed.fields = [MessageEmbedField(name="当日温度区间:" + weather_dict['result']['temperature']),
                    MessageEmbedField(name="当前温度:" + weather_dict['result']['temperature_curr']),
                    MessageEmbedField(name="最高温度:" + weather_dict['result']['temp_high']),
                    MessageEmbedField(name="最低温度:" + weather_dict['result']['temp_low']),
                    MessageEmbedField(name="当前湿度:" + weather_dict['result']['humidity'])]

    # 通过api发送回复消息
    send = qqbot.MessageSendRequest(embed=embed, content="")
    dms_api = qqbot.AsyncDmsAPI(t_token, False)
    direct_message_guild = await dms_api.create_direct_message(CreateDirectMessageRequest(guild_id, user_id))
    await dms_api.post_direct_message(direct_message_guild.guild_id, send)
    qqbot.logger.info("/私信推送天气内嵌消息 成功")
在_message_handler中调用刚刚添加的函数,使机器人是在私信里给你发送Embed
elif "/私信天气" in content:
     # 通过空格区分城市参数
     split = content.split("/私信天气 ")
     weather = await get_weather(split[1])
     await send_weather_embed_direct_message(weather, message.guild_id, message.author.id)
编写完毕,注意保存
在终端命令行输入并执行下列命令,运行机器人
python3 /home/demo/robot.py
在频道中执行下列步骤验证效果:
@机器人后输入“/私信天气 城市名”执行
等待几分钟后,到私信面板看看是否有机器人推送过来的天气消息。
第 9 课、腾讯云官方案例:小程序
当用户想要查看全国或者某个省份的天气情况,一次次@机器人就显得十分麻烦,这个时候你可以使用小程序来解决这个问题。了解具体的小程序开发可以看 QQ小程序开发文档,这里只介绍如何通过机器人打开小程序。
机器人打开小程序非常简单,只需要按照下面配置就可以了,不需要增加额外的代码:


第 10 课、Pycharm SSH 连接服务器
为了方便使用我们也可以,直接使用Python Pycharm SSH 连接我们的的小程序服务器端:这边我们现在宝塔面板下载 id_rsa 密钥文件,当然你也可以直接 host + password 进行连接。
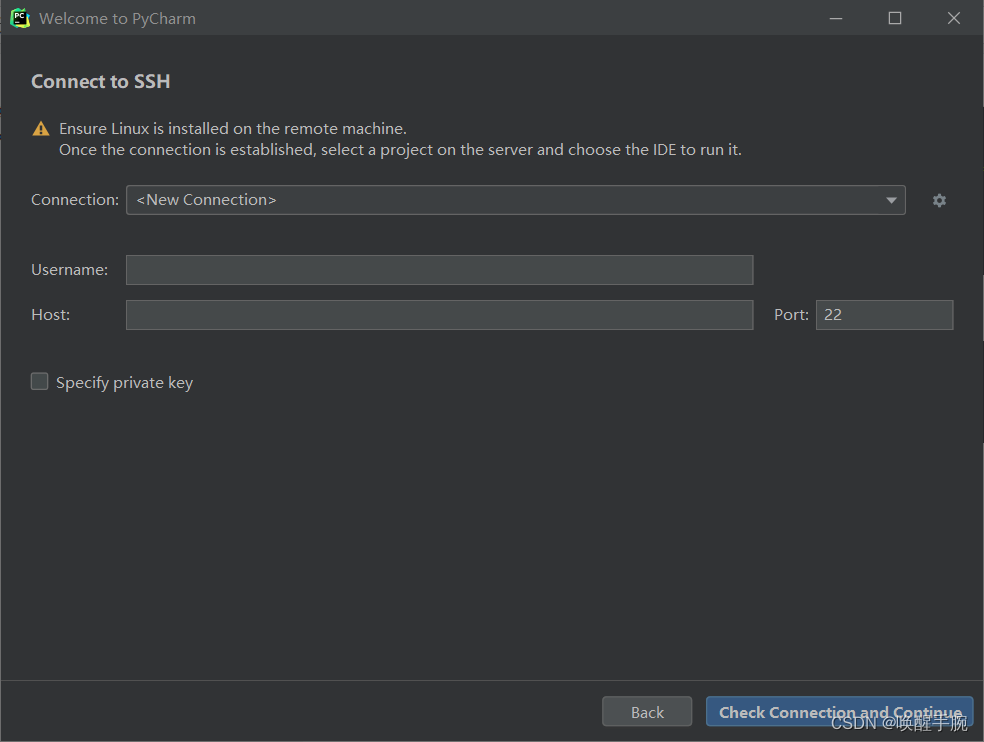
然后连接配置后,选择IDE 版本 和 项目工程的目录(对应服务器的目录)

然后需要等待大概10分钟左右让它安装好环境,然后会自动打开,可见如下所示已经是刚才配置的服务器端的项目目录了。
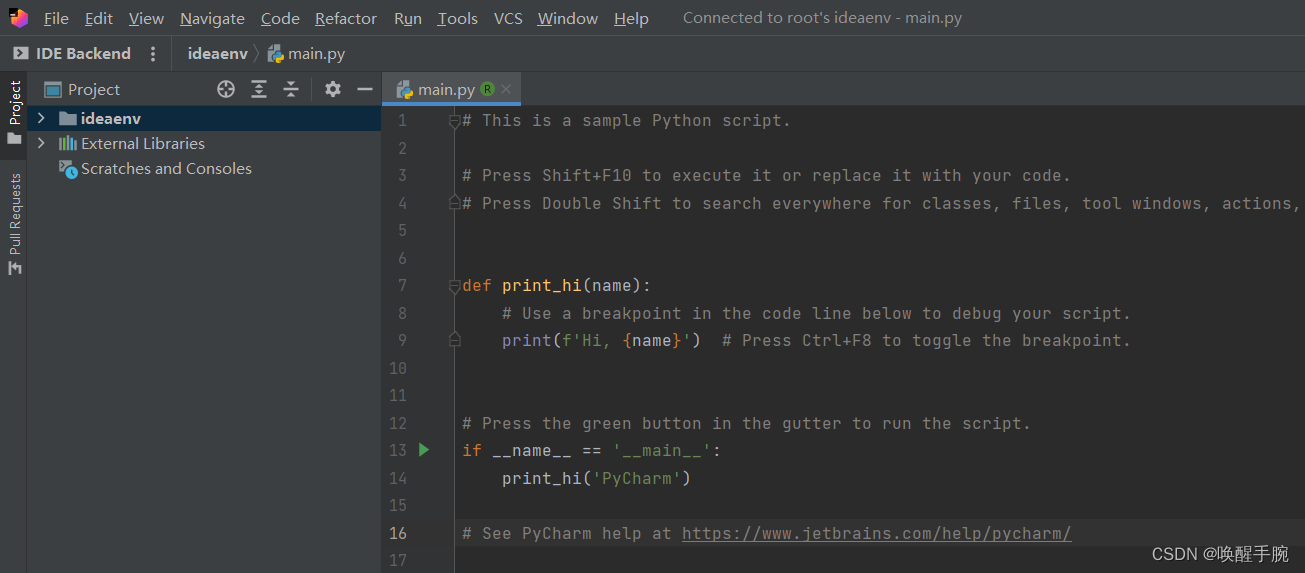
在服务器端项目目录编写测试代码,其中 appid 和 token 换成你自己小程序的数据:
import botpy
from botpy.types.message import Message

class MyClient(botpy.Client):
    async def on_at_message_create(self, message: Message):
        await self.api.post_message(channel_id=message.channel_id, content="content")

intents = botpy.Intents(public_guild_messages=True)
client = MyClient(intents=intents)
client.run(appid={appid}, token={token})
报错提示: from typing import TypedDict ImportError: cannot import name ‘TypedDict’
如果出现如上的问题:说明你的 python 版本和 botpy 版本不匹配:
官方说明:botpy 更新包的话需要添加 –upgrade 兼容版本:python3.8+
第 11 课、Python 读取 YAML 文件
在框架搭建中,一些配置文件(例如:数据库账号、url,日志级别等…)会经常的用到,所以我们需要一个存放这些参数的文件,并从中读取和写入。当然,存放参数除了用yaml,像ini文件、json文件、excel文件也是可以的,看个人选择。本文就介绍yaml文件的操作方法。
安装 pyyaml 模块:
pip install pyyaml
读取YAML代码如下:
import yaml

file = open('test.yaml', 'r', encoding="utf-8")
# 使用文件对象作为参数
data = yaml.load(file)
print(data)
结果运行出现警告,原因是YAML 5.1版本后弃用了 yaml.load(file) 这个用法,因为觉得很不安全,5.1 版本之后就修改了需要指定 Loader,通过默认加载器(FullLoader)禁止执行任意函数,该 load 函数也变得更加安全。建议代码如下:
import yaml

file = open('test.yaml', 'r', encoding="utf-8")
# 读取文件中的所有数据
file_data = file.read()
file.close()

# 指定Loader
data = yaml.load(file_data,Loader=yaml.FullLoader)
print(data)
上述例子和之前的例子我用了两种不同的读取方式,第一种为文件对象,第二种为文件中的所有字符串数据,两种方法都可以。
同时大家也发现了:yaml读取出来的数据结构不是由pyyaml模块读取代码决定的,而是yaml文件中的内容决定了它的结构,比如现在举例的YAML是字典里面嵌套列表,从文件读取出来后,也是这种数据结构形式。
load_all() 方法使用代码如下:
import yaml
file = open('test.yaml', 'r', encoding="utf-8")
#datas为load_all()方法返回的迭代器对象
datas = yaml.load_all(file,Loader=yaml.FullLoader)
for data in datas:
    print(data)
本例中的 YAML 文件使用分为两段,load_all()方法会创建一个迭代器对象,分开存放两段数据。
使用 dump() 方法将一个 python 对象生成 yaml 格式的文档
import yaml
data = { 'name':'唤醒手腕', 'age':20 , 'sex':'男' }
yaml_file = open('test.yaml','w')

# yaml_file作为dump()第二个参数,是一个可写状态的文件对象
yaml.dump(data, yaml_file ,default_flow_style=False,encoding='utf-8',allow_unicode=True)
yaml_file.flush()
yaml_file.close()
第 12 课、API 教程:用户对象 User
用户对象中所涉及的 ID 类数据,都仅在机器人场景流通,与真实的 ID 无关。请不要理解为真实的 ID
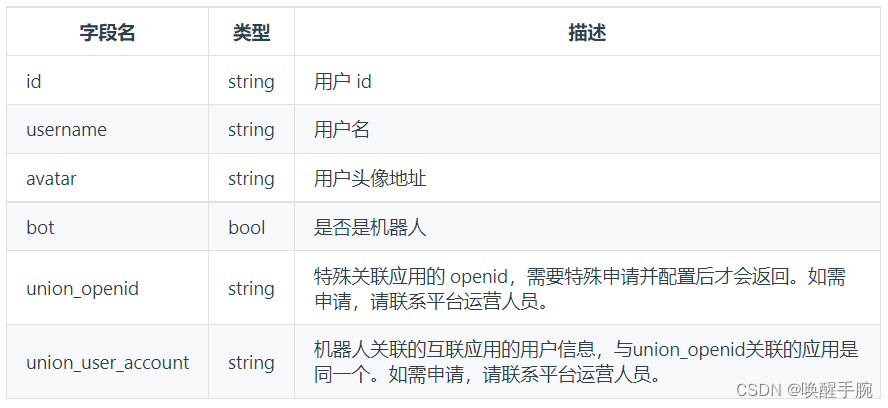
注意:union_openid 是关联应用的 openid,如果你不是分布式场景,其实是无所谓的。
union_openid 与 union_user_account 只有在单独拉取 member 信息的时候才会提供,在其他的事件中所携带的 user 对象,均无这两个字段的内容。
获取当前用户信息
import botpy
import yaml
from botpy.message import Message

config = yaml.load(open('config.yaml', encoding="utf-8").read(), Loader=yaml.FullLoader)


class MyClient(botpy.Client):
    async def on_at_message_create(self, message: Message):
        user = await self.api.me()
        botpy.logger.info(user)


intents = botpy.Intents(public_guild_messages=True)
client = MyClient(intents=intents)
client.run(appid=config['token']['appid'], token=config['token']['token'])
日志打印 QQ 机器人信息
{
  "id": "11586990140073229091",
  "username": "gitsub",
  "avatar": "https://thirdqq.qlogo.cn/g?b=oidb&k=M5TibpXicS7Jt4z89BZxiamAA&s=100&t=1641802698",
  "union_openid": "74F138F7F3AF68C4B8E8325013FCA295",
  "union_user_account": ""
}
第 13 课、API 教程:发消息 / 回复
单纯回复发送文本消息
消息回复简单调用 message 事件的 reply 方法:
await message.reply(content="content")
官方回复消息案例代码:
# -*- coding: utf-8 -*-
import asyncio
import os

import botpy
from botpy import logging
from botpy.ext.cog_yaml import read
from botpy.message import Message

test_config = read(os.path.join(os.path.dirname(__file__), "config.yaml"))

_log = logging.get_logger()


class MyClient(botpy.Client):
    async def on_ready(self):
        _log.info(f"robot 「{self.robot.name}」 on_ready!")

    async def on_at_message_create(self, message: Message):
        _log.info(message.author.avatar)
        if "sleep" in message.content:
            await asyncio.sleep(10)
        _log.info(message.author.username)
        await message.reply(content=f"机器人{self.robot.name}收到你的@消息了: {message.content}")


if __name__ == "__main__":
    # 通过预设置的类型,设置需要监听的事件通道
    # intents = botpy.Intents.none()
    # intents.public_guild_messages=True

    # 通过kwargs,设置需要监听的事件通道
    intents = botpy.Intents(public_guild_messages=True)
    client = MyClient(intents=intents)
    client.run(appid=test_config["appid"], token=test_config["token"])
首先分析下 message 事件对象的信息:
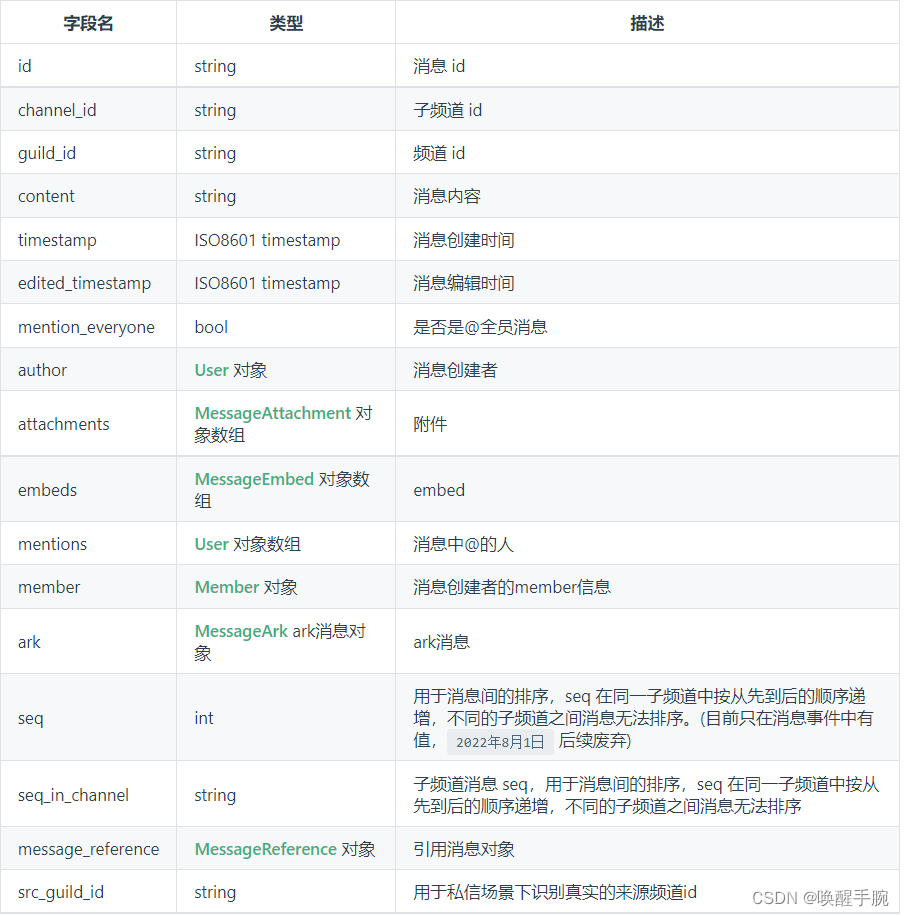
案例代码中 message.content 是获取消息的内容
运行结果:
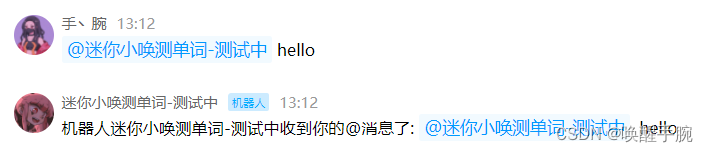
回复其他类型的消息
import botpy
from botpy.message import Message

class MyClient(botpy.Client):
    async def on_at_message_create(self, message: Message):
        await self.api.post_message(channel_id="xxxx", content="xxx", msg_id="xxxx", embed=embed)

intents = botpy.Intents(public_guild_messages=True)
client = MyClient(intents=intents)
client.run(appid={appid}, token={token})
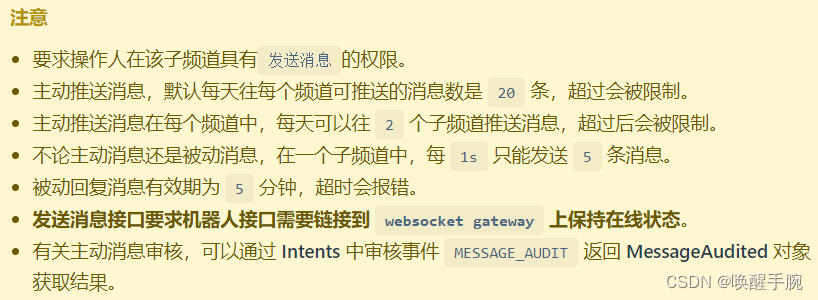
官方 api 发送消息:
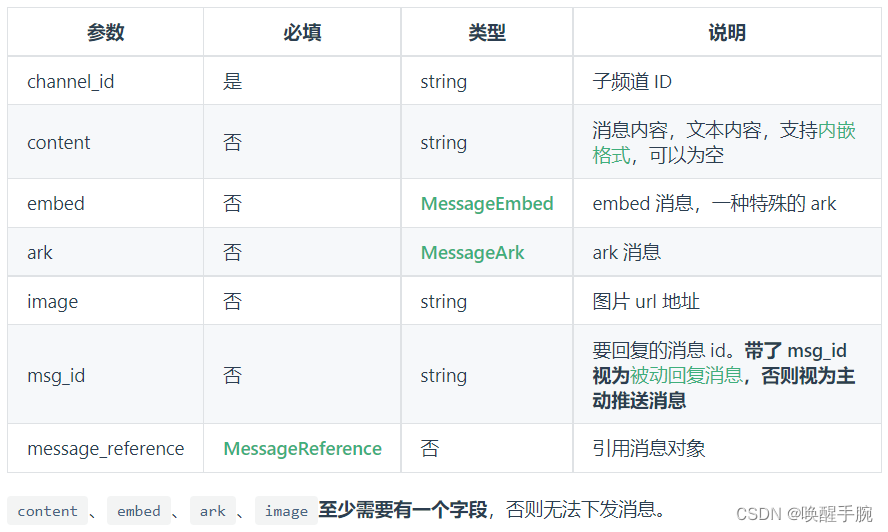
注意事项:
发送图片案例:回复对方的头像
在第 12 课介绍了,user 对象的相关属性,用户头像就是:message.author.avatar
import os
import botpy
from botpy.ext.cog_yaml import read
from botpy.message import Message

test_config = read(os.path.join(os.path.dirname(__file__), "config.example.yaml"))


class MyClient(botpy.Client):
    async def on_at_message_create(self, message: Message):
        await message.reply(image=message.author.avatar)


if __name__ == "__main__":
    intents = botpy.Intents(public_guild_messages=True)
    client = MyClient(intents=intents)
    client.run(appid=test_config["appid"], token=test_config["token"])
运行结果展示:
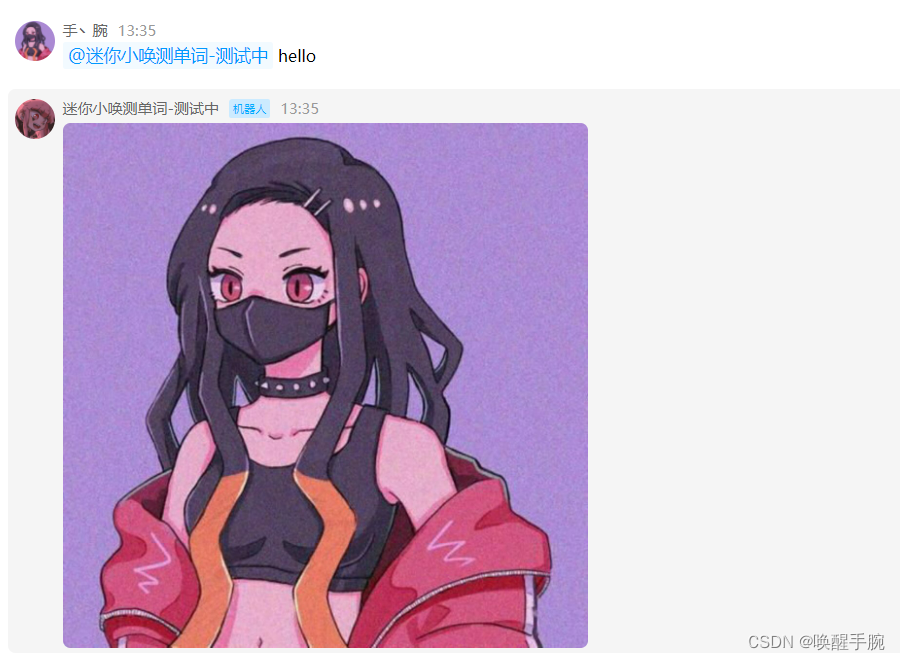
内嵌格式:进行 @ 某人 / 全体成员、内嵌表情
功能描述:利用 content 字段发送内嵌格式的消息。
内嵌格式仅在 content 中会生效,在 Ark 和 Embed 中不生效。
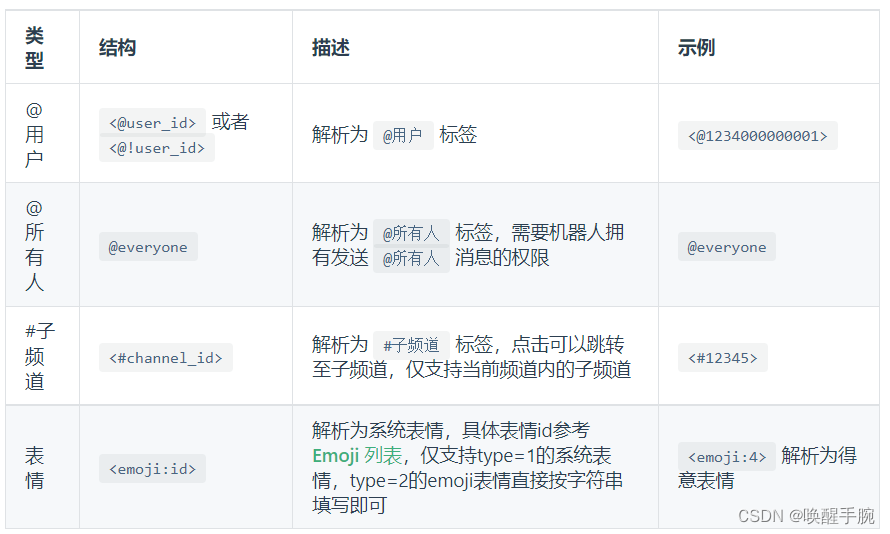
表情:https://bot.q.qq.com/wiki/develop/api/openapi/emoji/model.html
await message.reply(content='你在干嘛呀?<emoji:4>')
小补充:事件 id :message.event_id
事件 id 区分不同的事件,每次都是唯一不同的
await message.reply(content='你在干嘛呀?<emoji:4>,{}'.format(message.event_id))
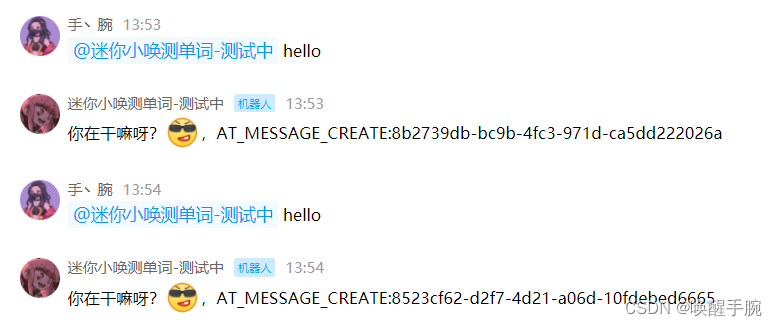
回复消息内容:
async def on_at_message_create(self, message: Message):
    # 构造消息发送请求数据对象
    message_reference = Reference(message_id=message.id)
    # 通过api发送回复消息
    await self.api.post_message(
        channel_id=message.channel_id,
        content="<emoji:4>这是一条引用消息",
        msg_id=message.id,
        message_reference=message_reference,
    )
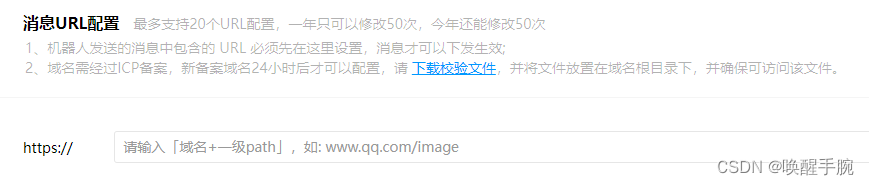
消息中包含的URL需要进行配置
第 14 课、API 教程:语音房上麦
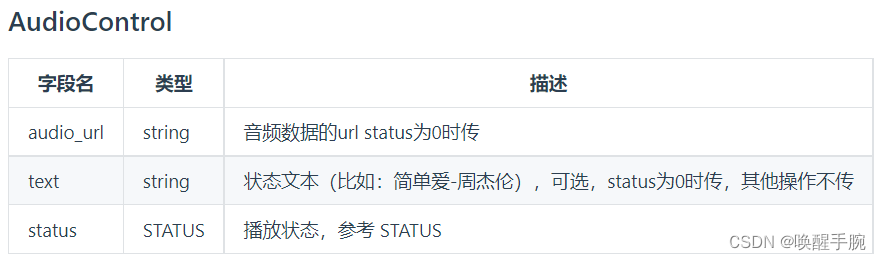
START 0 开始播放操作、PAUSE 1 暂停播放操作、RESUME 2 继续播放操作、STOP 3 停止播放操作
案例代码测试:
import botpy
from botpy.audio import Audio

class MyClient(botpy.Client):
    async def on_audio_start(self, audio: Audio):
        audio_control={
            "audio_url":"url",
            "text":"简单爱-周杰伦",
            "status":"START",
        }
        await self.api.update_audio(audio.channel_id, audio_control=audio_control)

intents = botpy.Intents(audio_action=True)
client = MyClient(intents=intents)
client.run(appid={appid}, token={token})
[botpy] 接口请求异常,请求连接: https://api.sgroup.qq.com/channels/9368829/mic, 错误代码: 401, 返回内容: {‘message’: ‘check app privilege not pass’, ‘code’: 11253}, trace_id:adfcc85b0e21b5c2f4817abe82d9c15d
特别注意:ErrorCheckAppPrivilegeNotPass 检查应用权限不通过,该机器人应用未获得调用该接口的权限,需要向平台申请
第 15 课、API 教程:注册指令 handler
注册指令handler 模式编程
# -*- coding: utf-8 -*-
import os

import botpy
from botpy import logging, BotAPI

from botpy.ext.command_util import Commands
from botpy.message import Message
from botpy.ext.cog_yaml import read

test_config = read(os.path.join(os.path.dirname(__file__), "config.yaml"))

_log = logging.get_logger()


@Commands(name=("你好", "hello"))
async def hello(api: BotAPI, message: Message, params=None):
    _log.info(params)
    # 第一种用reply发送消息
    await message.reply(content=params)
    # 第二种用api.post_message发送消息
    await api.post_message(channel_id=message.channel_id, content=params, msg_id=message.id)
    return True


@Commands("晚安")
async def good_night(api: BotAPI, message: Message, params=None):
    _log.info(params)
    # 第一种用reply发送消息
    await message.reply(content=params)
    # 第二种用api.post_message发送消息
    await api.post_message(channel_id=message.channel_id, content=params, msg_id=message.id)
    return True


class MyClient(botpy.Client):
    async def on_at_message_create(self, message: Message):
        # 注册指令handler
        handlers = [
            hello,
            good_night,
        ]
        for handler in handlers:
            if await handler(api=self.api, message=message):
                return


if __name__ == "__main__":
    # 通过预设置的类型,设置需要监听的事件通道
    # intents = botpy.Intents.none()
    # intents.public_guild_messages=True

    # 通过kwargs,设置需要监听的事件通道
    intents = botpy.Intents(public_guild_messages=True)
    client = MyClient(intents=intents)
    client.run(appid=test_config["appid"], token=test_config["token"])
第 16 课、API 教程:频道对象 guild
获取频道的信息:
import botpy
from botpy.audio import Audio
from botpy.message import Message


class MyClient(botpy.Client):
    async def on_at_message_create(self, message: Message):
        guild = await self.api.get_guild(guild_id=message.guild_id)
        await self.api.post_message(channel_id=message.channel_id, content=str(guild), msg_id=message.event_id)

intents = botpy.Intents(audio_action=True, public_guild_messages=True)
client = MyClient(intents=intents)
client.run(appid="", token="")
运行结果:

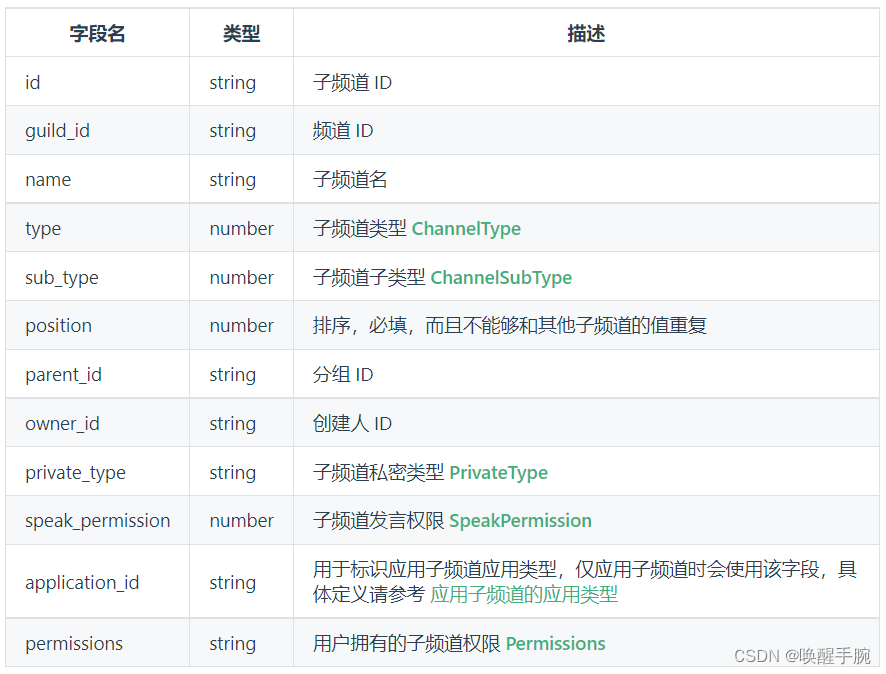
获取频道的子频道信息:
async def on_at_message_create(self, message: Message):
    channels = await self.api.get_channels(guild_id=message.guild_id)
    await self.api.post_message(channel_id=message.channel_id, content=str(channels), msg_id=message.event_id)

channel 频道对象信息
第 17 课、API 教程:发送按钮消息
功能描述
通过在 MessageSendRequest 中指定 keyboard 字段发送带按钮的消息,支持 keyboard 模版 和 自定义 keyboard 两种请求格式。
要求操作人在该子频道具有发送消息和 对应消息按钮组件 的权限。请求参数 keyboard 模版 和 自定义 keyboard 只能单一传值。
keyboard 模版
调用前需要先申请消息按钮组件模板,这一步会得到一个模板 id,在请求时填在 keyboard 字段上。申请消息按钮组件模板需要提供响应的 json,具体格式参考 InlineKeyboard。
注意:仅 markdown 消息支持消息按钮。
import botpy
from botpy.message import Message
from botpy.types.message import MarkdownPayload, MessageMarkdownParams

class MyClient(botpy.Client):
    async def handle_send_markdown_by_template(self, channel_id, msg_id):
        params = [
            MessageMarkdownParams(key="title", values=["标题"]),
            MessageMarkdownParams(key="content", values=["为了成为一名合格的巫师,请务必阅读频道公告", "藏馆黑色魔法书"]),
        ]
        markdown = MarkdownPayload(template_id=65, params=params)

        # 通过api发送回复消息
        await self.api.post_message(channel_id, markdown=markdown, msg_id=msg_id)

    async def handle_send_markdown_by_content(self, channel_id, msg_id):
        markdown = MarkdownPayload(content="# 标题 \n## 简介很开心 \n内容")
        # 通过api发送回复消息
        await self.api.post_message(channel_id, markdown=markdown, msg_id=msg_id)

    async def on_at_message_create(self, message: Message):
        await message.reply(content=f"机器人{self.robot.name}收到你的@消息了: {message.content}")
        await self.handle_send_markdown_by_template(message.channel_id, message.id)
        await self.handle_send_markdown_by_content(message.channel_id, message.id)

intents = botpy.Intents(public_guild_messages=True)
client = MyClient(intents=intents)
client.run(appid={appid}, token={token})
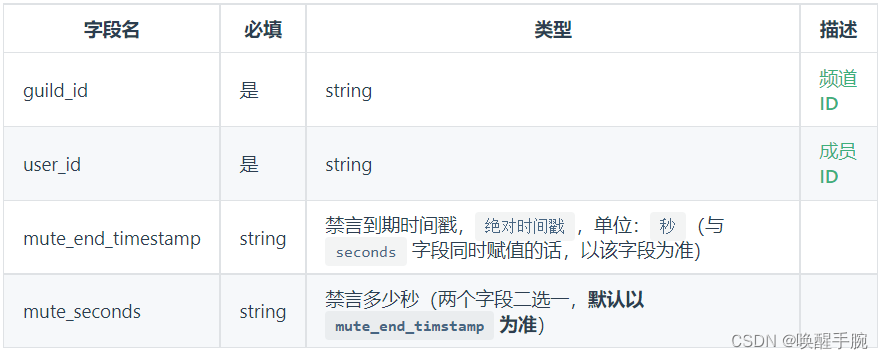
第 18 课、API 教程:禁言(非管理员)
import botpy

from botpy.message import Message

class MyClient(botpy.Client):
    async def on_at_message_create(self, message: Message):
        await self.api.mute_member(guild_id="xxxx", user_id="xxxx", mute_end_timestamp="xxxx", mute_seconds="xxxx")

intents = botpy.Intents(public_guild_messages=True)
client = MyClient(intents=intents)
client.run(appid={appid}, token={token})
self.api.mute_member 禁言 非管理员
第 19 课、API 教程:查看错误码
错误码:查看 – 错误码
第 20 课、API 教程:事件监听
通过继承实现 bot.Client, 实现自己的机器人Client,在 MyClient 类中调用函数实现处理事件的功能。
class MyClient(botpy.Client):
监听的事件(公域消息事件的监听)
首先需要订阅事件public_guild_messages
intents = botpy.Intents(public_guild_messages=True)
client = MyClient(intents=intents)
监听 @ 机器人 和 频道删除消息
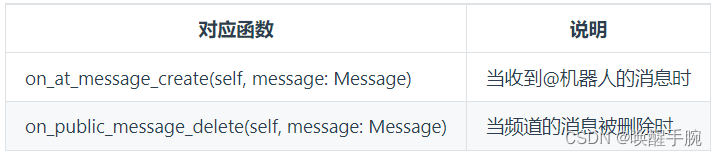
from botpy.message import Message

class MyClient(botpy.Client):
    async def on_at_message_create(self, message: Message):
        """
        此处为处理该事件的代码
        """
    async def on_public_message_delete(self, message: Message):
        """
        此处为处理该事件的代码
        """
全部消息监听,而不只是 at 机器人的消息
首先需要订阅事件guild_messages
intents = botpy.Intents(guild_messages=True)
client = MyClient(intents=intents)
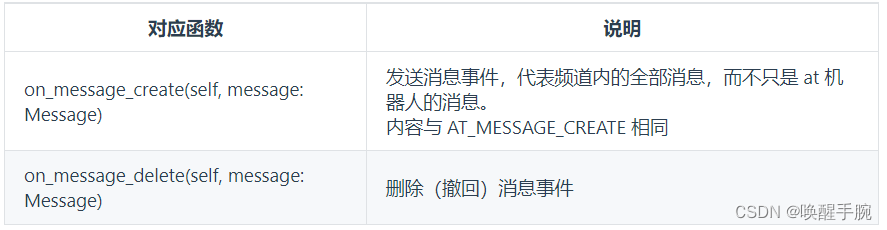
from botpy.message import Message

class MyClient(botpy.Client):
    async def on_message_create(self, message: Message):
        """
        此处为处理该事件的代码
        """
    async def on_message_delete(self, message: Message):
        """
        此处为处理该事件的代码
        """
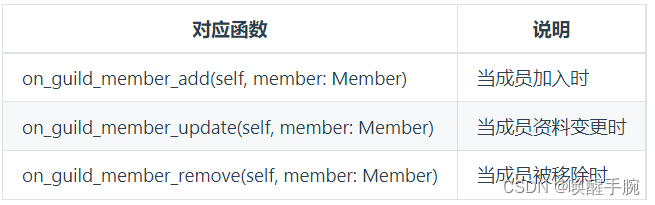
频道成员事件的监听
首先需要订阅事件guild_members
intents = botpy.Intents(guild_members=True)
client = MyClient(intents=intents)
首先需要订阅事件guild_members

intents = botpy.Intents(guild_members=True)
client = MyClient(intents=intents)
互动事件的监听
首先需要订阅事件interaction
intents = botpy.Intents(interaction=True)
client = MyClient(intents=intents)

注:需要引入Interaction
from botpy.interaction import Interaction

class MyClient(botpy.Client):
    async def on_interaction_create(self, interaction: Interaction):
        """
        此处为处理该事件的代码
        """
论坛事件的监听
仅 私域 机器人能够设置此 intents
首先需要订阅事件forums
intents = botpy.Intents(forums=True)
client = MyClient(intents=intents)
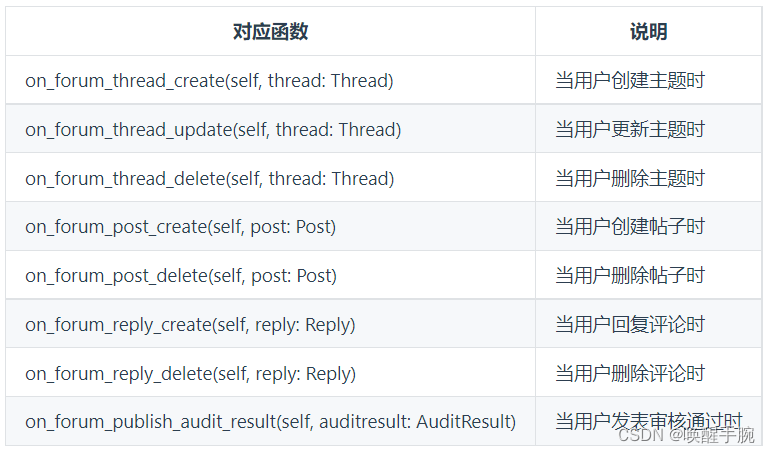 注:需要引入Thread、Post、Reply和AuditResult
from botpy.forum import Thread
from botpy.types.forum import Post, Reply, AuditResult

class MyClient(botpy.Client):
    async def on_forum_thread_create(self, thread: Thread):
        """
        此处为处理该事件的代码
        """
    async def on_forum_thread_update(self, thread: Thread):
        """
        此处为处理该事件的代码
        """
    async def on_forum_thread_delete(self, thread: Thread):
        """
        此处为处理该事件的代码
        """
    async def on_forum_post_create(self, post: Post):
        """
        此处为处理该事件的代码
        """
    async def on_forum_post_delete(self, post: Post):
        """
        此处为处理该事件的代码
        """
    async def on_forum_reply_create(self, reply: Reply):
        """
        此处为处理该事件的代码
        """
    async def on_forum_reply_delete(self, reply: Reply):
        """
        此处为处理该事件的代码
        """
    async def on_forum_publish_audit_result(self, auditresult: AuditResult):
        """
        此处为处理该事件的代码
        """
文章出处登录后可见!