文章目录
- 1. ChatGLM-6B
- 1.1 P-Tuning v2简介
- 2. 运行环境
- 2.1 项目准备
- 3.数据准备
- 4.使用P-Tuning v2对ChatGLM-6B微调
- 5. 模型评估
- 6. 利用微调后的模型进行验证
- 6.1 微调后的模型
- 6.2 原始ChatGLM-6B模型
- 6.3 结果对比
1. ChatGLM-6B
ChatGLM-6B仓库地址:https://github.com/THUDM/ChatGLM-6B
ChatGLM-6B/P-Tuning仓库地址:https://github.com/THUDM/ChatGLM-6B/tree/main/ptuning
1.1 P-Tuning v2简介
P-Tuning是一种较新的模型微调方法,它采用了参数剪枝的技术,可以将微调的参数量减少到原来的0.1%。具体来说,P-Tuning v2是基于P-Tuning v1的升级版,主要的改进在于采用了更加高效的剪枝方法,可以进一步减少模型微调的参数量。
P-Tuning v2的原理是通过对已训练好的大型语言模型进行参数剪枝,得到一个更加小巧、效率更高的轻量级模型。具体地,P-Tuning v2首先使用一种自适应的剪枝策略,对大型语言模型中的参数进行裁剪,去除其中不必要的冗余参数。然后,对于被剪枝的参数,P-Tuning v2使用了一种特殊的压缩方法,能够更加有效地压缩参数大小,并显著减少模型微调的总参数量。
总的来说,P-Tuning v2的核心思想是让模型变得更加轻便、更加高效,同时尽可能地保持模型的性能不受影响。这不仅可以加快模型的训练和推理速度,还可以减少模型在使用过程中的内存和计算资源消耗,让模型更适用于各种实际应用场景中。
2. 运行环境
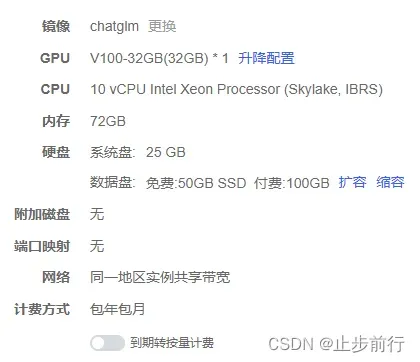
本项目租借autoDL GPU机器,具体配置如下:
2.1 项目准备
1.创建conda环境
conda create -n tuning-chatglm python=3.8
conda activate tuning-chatglm
2.拉取ChatGLM-6B项目代码
# 拉取代码
git clone https://github.com/THUDM/ChatGLM-6B.git

# 安装依赖库
pip install -r requirements.txt -i https://pypi.tuna.tsinghua.edu.cn/simple/
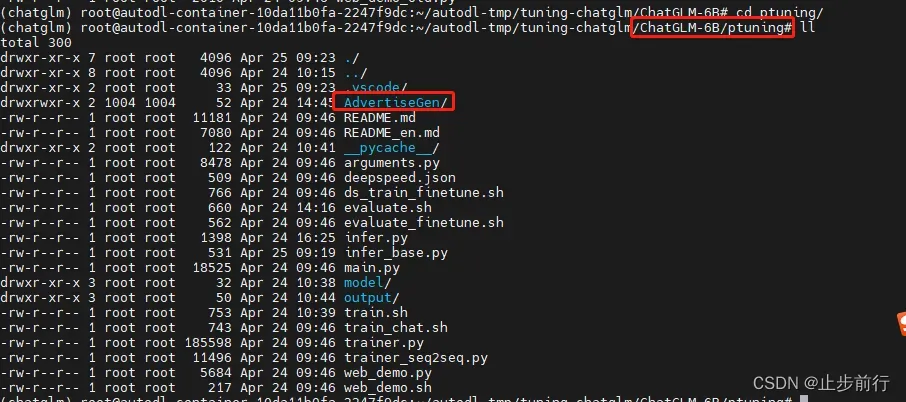
3.进入ptuning目录
运行微调需要4.27.1版本的transformers。除 ChatGLM-6B 的依赖之外,还需要安装以下依赖
cd ptuning
# 再次安装依赖,ptuning文档里有说明
pip install rouge_chinese nltk jieba datasets  -i https://pypi.tuna.tsinghua.edu.cn/simple/
4.补充
对于需要pip安装失败的依赖,可以采用源码安装的方式,具体步骤如下
git clone https://github.com/huggingface/peft.git
cd peft
pip install -e .
3.数据准备
官方微调样例是以 ADGEN (广告生成) 数据集为例来介绍微调的具体使用。
ADGEN 数据集为根据输入(content)生成一段广告词(summary),具体格式如下所示:
{
    "content": "类型#上衣*版型#宽松*版型#显瘦*图案#线条*衣样式#衬衫*衣袖型#泡泡袖*衣款式#抽绳",
    "summary": "这件衬衫的款式非常的宽松,利落的线条可以很好的隐藏身材上的小缺点,穿在身上有着很好的显瘦效果。领口装饰了一个可爱的抽绳,漂亮的绳结展现出了十足的个性,配合时尚的泡泡袖型,尽显女性甜美可爱的气息。"
}
请从官网下载 ADGEN 数据集,放到ptuning目录下并将其解压到 AdvertiseGen 目录。
下载地址:https://drive.google.com/file/d/13_vf0xRTQsyneRKdD1bZIr93vBGOczrk/view
tar -zxvf AdvertiseGen.tar.gz
查看数据集大小:
> wc -l AdvertiseGen/*
> 1070 AdvertiseGen/dev.json
> 114599 AdvertiseGen/train.json
> 115669 total
4.使用P-Tuning v2对ChatGLM-6B微调
对于 ChatGLM-6B 模型基于 P-Tuning v2 进行微调。可将需要微调的参数量减少到原来的 0.1%,再通过模型量化、Gradient Checkpoint 等方法,最低只需要 7GB 显存即可运行。
进入到ptuning目录,首先,修改train.sh脚本,主要是修改其中的train_file、validation_file、model_name_or_path、output_dir参数:
train_file:训练数据文件位置validation_file:验证数据文件位置model_name_or_path:原始ChatGLM-6B模型文件路径output_dir:输出模型文件路径
PRE_SEQ_LEN=128
LR=2e-2

CUDA_VISIBLE_DEVICES=0 python3 main.py \
    --do_train \
    --train_file AdvertiseGen/train.json \
    --validation_file AdvertiseGen/dev.json \
    --prompt_column content \
    --response_column summary \
    --overwrite_cache \
    --model_name_or_path model/chatglm-6b \
    --output_dir output/adgen-chatglm-6b-pt-$PRE_SEQ_LEN-$LR \
    --overwrite_output_dir \
    --max_source_length 64 \
    --max_target_length 64 \
    --per_device_train_batch_size 1 \
    --per_device_eval_batch_size 1 \
    --gradient_accumulation_steps 16 \
    --predict_with_generate \
    --max_steps 3000 \
    --logging_steps 10 \
    --save_steps 1000 \
    --learning_rate $LR \
    --pre_seq_len $PRE_SEQ_LEN \
    --quantization_bit 4
执行bash train.sh脚本,运行过程如下:
  0%|                  | 0/3000 [00:00<?, ?it/s]
...
{'loss': 4.2962, 'learning_rate': 0.0196, 'epoch': 0.01}
{'loss': 4.3112, 'learning_rate': 0.019533333333333333, 'epoch': 0.01}
  2%|███▊             | 70/3000 [03:20<4:17:06,  2.81s/it]
即使用了P-Tuning v2进行参数高效微调,但训练的速度还是很慢。
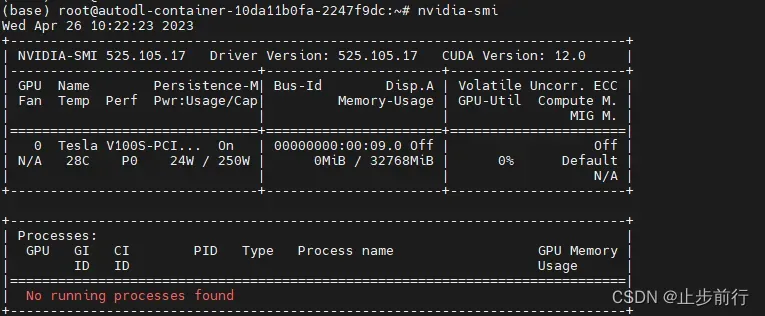
V100 32G显存的机器,训练花了4个多小时,显存占用率在85%左右
可以修改train.sh增大batch_size继续训练,由于时间及机器性能问题,本人没有进行操作过。
PRE_SEQ_LEN=128
LR=2e-2

CUDA_VISIBLE_DEVICES=0 python3 main.py \
    --do_train \
    --train_file AdvertiseGen/train.json \
    --validation_file AdvertiseGen/dev.json \
    --prompt_column content \
    --response_column summary \
    --overwrite_cache \
    --model_name_or_path model/chatglm-6b \
    --output_dir output/adgen-chatglm-6b-pt-$PRE_SEQ_LEN-$LR \
    --overwrite_output_dir \
    --max_source_length 64 \
    --max_target_length 64 \
    --per_device_train_batch_size 128 \
    --per_device_eval_batch_size 8 \
    --gradient_accumulation_steps 16 \
    --predict_with_generate \
    --max_steps 3000 \
    --logging_steps 10 \
    --save_steps 1000 \
    --learning_rate $LR \
    --pre_seq_len $PRE_SEQ_LEN \
    --quantization_bit 4
输出文件:
> ls -al /root/autodl-tmp/tuning-chatglm/ChatGLM-6B/ptuning/output/adgen-chatglm-6b-pt-128-2e-2/
total 12
drwxrwxr-x 2 root root   98 Apr 24 21:12 .
drwxrwxr-x 8 root root  177 Apr 24 17:12 ..
-rw-rw-r-- 1 root root  195 Apr 24 21:12 all_results.json
-rw-rw-r-- 1 root root 1185 Apr 24 21:12 trainer_state.json
-rw-rw-r-- 1 root root  195 Apr 24 21:12 train_results.json
5. 模型评估
修改evaluate.sh文件,修改model_name_or_path(模型路径),ptuning_checkpoint(P-Tuning v2微调之后的权重路径)等参数:
model_name_or_path:原始ChatGLM-6B模型文件路径ptuning_checkpoint:训练完成后,生成的文件目录
运行:bash evaluate.sh
PRE_SEQ_LEN=128
CHECKPOINT=adgen-chatglm-6b-pt-128-2e-2
STEP=3000

CUDA_VISIBLE_DEVICES=0 python3 main.py \
    --do_predict \
    --validation_file AdvertiseGen/dev.json \
    --test_file AdvertiseGen/dev.json \
    --overwrite_cache \
    --prompt_column content \
    --response_column summary \
    --model_name_or_path model/chatglm-6b \
    --ptuning_checkpoint ./output/$CHECKPOINT/checkpoint-$STEP \
    --output_dir ./output/$CHECKPOINT \
    --overwrite_output_dir \
    --max_source_length 64 \
    --max_target_length 64 \
    --per_device_eval_batch_size 1 \
    --predict_with_generate \
    --pre_seq_len $PRE_SEQ_LEN \
    --quantization_bit 4
再次查看output输出文件:

模型评估花了3个多小时
6. 利用微调后的模型进行验证
6.1 微调后的模型
新建infer.py文件
import os
import torch
from transformers import AutoConfig, AutoModel, AutoTokenizer


MODEL_PATH = "./model/chatglm-6b"
CHECKPOINT_PATH = "./output/adgen-chatglm-6b-pt-128-2e-2/checkpoint-1000"

# 载入Tokenizer
tokenizer = AutoTokenizer.from_pretrained(MODEL_PATH, trust_remote_code=True)

config = AutoConfig.from_pretrained(MODEL_PATH, trust_remote_code=True, pre_seq_len=128)
model = AutoModel.from_pretrained(MODEL_PATH, config=config, trust_remote_code=True).cuda()

prefix_state_dict = torch.load(os.path.join(CHECKPOINT_PATH, "pytorch_model.bin"))
new_prefix_state_dict = {}

for k, v in prefix_state_dict.items():
    if k.startswith("transformer.prefix_encoder."):
        new_prefix_state_dict[k[len("transformer.prefix_encoder."):]] = v
model.transformer.prefix_encoder.load_state_dict(new_prefix_state_dict)

print(f"Quantized to 4 bit")
model = model.quantize(4)
model = model.half().cuda()
model.transformer.prefix_encoder.float()
model = model.eval()


print("用户:你好\n")
response, history = model.chat(tokenizer, "你好", history=[])
print("ChatGLM-6B:\n",response)
print("\n------------------------------------------------\n用户:")

line = input()
while line:
    response, history = model.chat(tokenizer, line, history=history)
    print("ChatGLM-6B:\n", response)
    print("\n------------------------------------------------\n用户:")
    line = input()
6.2 原始ChatGLM-6B模型
新建infer_base.py文件
import torch
from transformers import AutoTokenizer, AutoModel

tokenizer = AutoTokenizer.from_pretrained("./model/chatglm-6b", trust_remote_code=True)
model = AutoModel.from_pretrained("./model/chatglm-6b", trust_remote_code=True).half().cuda()
model = model.eval()

while True:
    a = input("请输入您的问题:(输入q以退出)")
    if a.strip() == 'q':
        exit()
    response, history = model.chat(tokenizer, "问题:" + a.strip() + '\n答案:', max_length=256, history=[])
    print("回答:", response)
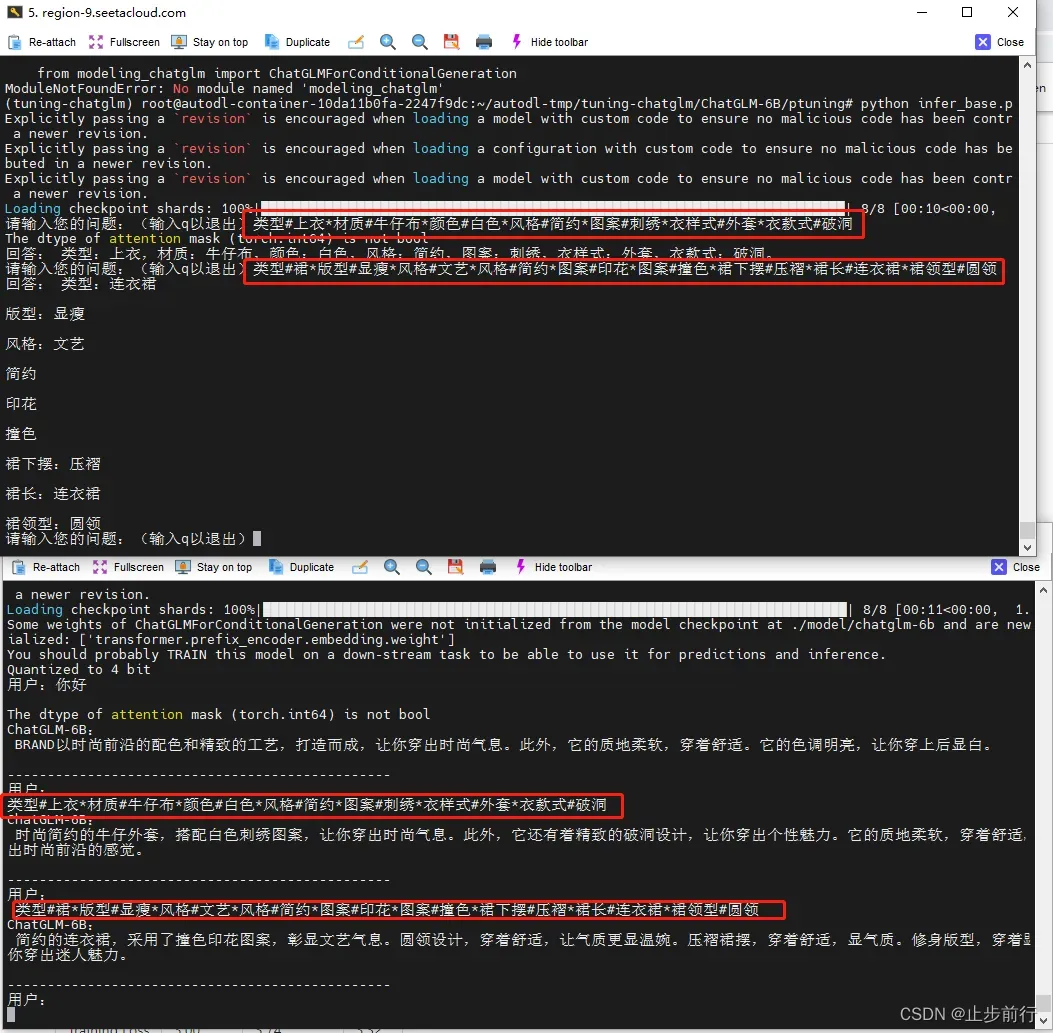
6.3 结果对比
相同输入,上面窗口为原始ChatGLM-6B模型回答,下方为微调后模型回答。
文章出处登录后可见!