cuda和cudnn的安装方法,网上有很多,就不在这里写了,只要去nvida的网站下载安装就好了。anaconda 我这边使用的是anaconda3 5.2.0。我这边用的显卡是RTX3090。
这次做目标检测用的是Tensorflow的框架,之前也尝试了mobile ssd,YOLO3遇到了一些问题,效果不是很好。所以最后使用了Tensorflow,效果不错。中间也遇到了很多问题,选用Tensorflow1,Tensorflow2就尝试一周最后还是Tensorflow2的效果好,这个显卡在Tensorflow1上没有找到适合的cuda只能是在Tensorflow 1.9.0上使用CPU版本(ssd_mobilenet_v1_coco模型),GPU版本没有测试成功,训练的时候各种错误。但是在Tensorflow2上使用的2.4.0和cuda11.2 + cudnn8.1.1.33 使用的是centernet_resnet50_v2_512x512模型成功了,识别的效果还很好。
一 、下载Tensorflow代码
在github上下载源代码:
git clone https://github.com/tensorflow/models.git
这上面写了在tensrflow2上如何编译,运行的步骤。
https://github.com/tensorflow/models/tree/master/research/object_detection
可以在上面的地址看到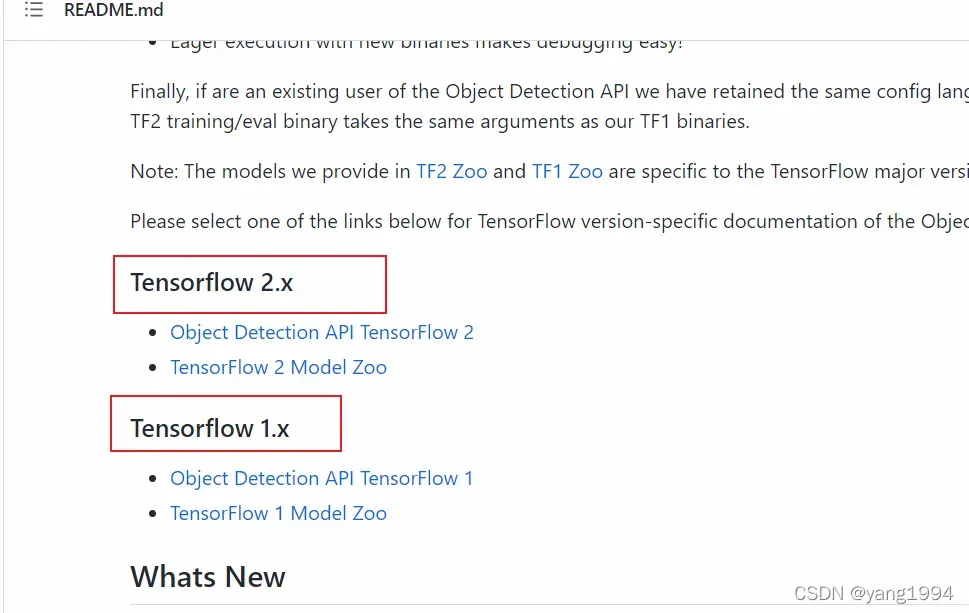
这分别是tf2和tf1的使用方法。tf2就进入“Object Detection API TensorFlow 2”链接。
二、下载protoc
我下载的是3.4.0版本
https://github.com/protocolbuffers/protobuf
解压一下,通过命令行工具cmd进入tensorflow的代码目录下。
cd models\research
# 编译proto
e:\protoc-3.4.0-win32\bin\protoc.exe object_detection/protos/*.proto --python_out=.
这样会在protos的目录下生成很多的python文件。
安装Install TensorFlow Object Detection API
先把 object_detection/packages/tf2/目录下的setup.py文件拷贝到research目录下,执行如下命令,一般不会出错,很容易就把环境安装好了。
pip install cython
pip install git+git://github.com/philferriere/cocoapi.git#subdirectory=PythonAPI

python -m pip install --use-feature=2020-resolver .
进入research/slim目录里删除build文件使用cmd 在此文件夹下使用命令
python setup.py install
图片资源的准备
训练的图片需要控制在400×600左右大小,使用这个大小的图片进行标注。
我是使用MRLabeler工具标注的图片,github上有下载,也有使用说明很简单。
https://github.com/imistyrain/MRLabeler
标注完会是这样的目录,我们需要的使用的资源是Annotations里的xml文件,ImageSets里的train.txt,test.txt以及images里的图片。
完成后我会先把images文件夹修改成JPEGImages,再把测试数据放到Annotations_test,JPEGImages_test里,也就比上面的多两个文件夹。
把所有文件夹都放到research目录下,再把JPEGImages和JPEGImages_test拷贝一份放到research目录下。
下面就是要制作record文件用来训练用。
首先把xml转换成csv
import os
import glob
import pandas as pd
import xml.etree.ElementTree as ET


def xml_to_csv(path):
    xml_list = []
    for xml_file in glob.glob(path + '/*.xml'):
        print(xml_file)
        tree = ET.parse(xml_file)
        root = tree.getroot()
        for member in root.findall('object'):
            try:
                value = (root.find('filename').text,
                         int(root.find('size')[0].text),
                         int(root.find('size')[1].text),
                         member[0].text,
                         int(member[4][0].text),
                         int(member[4][1].text),
                         int(member[4][2].text),
                         int(member[4][3].text)
                         )
            except ValueError:
                value = (root.find('filename').text,
                         int(root.find('size')[0].text),
                         int(root.find('size')[1].text),
                         member[0].text,
                         int(member[4][1][0].text),
                         int(member[4][1][1].text),
                         int(member[4][1][2].text),
                         int(member[4][1][3].text)
                         )
            xml_list.append(value)
    column_name = ['filename', 'width', 'height', 'class', 'xmin', 'ymin', 'xmax', 'ymax']
    xml_df = pd.DataFrame(xml_list, columns=column_name)
    return xml_df


def main():
    image_path = os.path.join(os.getcwd(), 'VOC2022S\Annotations')
    xml_df = xml_to_csv(image_path)
    xml_df.to_csv('labels.csv', index=None)
    print('Successfully converted xml to csv.')


main()
根据自己的目录情况侯main()里image_path目录,生成labels.csv就是训练文件,生成测试文件就是修改一下目录和labels_test.csv就行。这样会生成两个文件一个是labels.csv和labels_test.csv,使用这两个文件分别生成record文件。
"""
Usage:
  # From tensorflow/models/
  # Create train data:
  python generate_tfrecord.py --csv_input=data/train_labels.csv  --output_path=train.record
  # Create test data:
  python generate_tfrecord.py --csv_input=data/test_labels.csv  --output_path=test.record
"""
from __future__ import pision
from __future__ import print_function
from __future__ import absolute_import

import os
import io
import pandas as pd
#import tensorflow as tf
import tensorflow.compat.v1 as tf

from PIL import Image
from object_detection.utils import dataset_util
from collections import namedtuple, OrderedDict

flags = tf.app.flags
flags.DEFINE_string('csv_input', '', 'Path to the CSV input')
flags.DEFINE_string('output_path', '', 'Path to output TFRecord')
flags.DEFINE_string('images_dir', 'images', 'Path to output TFRecord')
FLAGS = flags.FLAGS


# TO-DO replace this with label map
def class_text_to_int(row_label):
    if row_label == 'red_block':
        return 1
    elif row_label == 'green_block':
        return 2
    elif row_label == 'blue_block':
        return 3
    else:
        None


def split(df, group):
    data = namedtuple('data', ['filename', 'object'])
    gb = df.groupby(group)
    return [data(filename, gb.get_group(x)) for filename, x in zip(gb.groups.keys(), gb.groups)]


def create_tf_example(group, path):
    with tf.gfile.GFile(os.path.join(path, '{}'.format(group.filename)), 'rb') as fid:
        encoded_jpg = fid.read()
    encoded_jpg_io = io.BytesIO(encoded_jpg)
    image = Image.open(encoded_jpg_io)
    width, height = image.size

    filename = group.filename.encode('utf8')
    image_format = b'jpg'
    xmins = []
    xmaxs = []
    ymins = []
    ymaxs = []
    classes_text = []
    classes = []

    for index, row in group.object.iterrows():
        xmins.append(row['xmin'] / width)
        xmaxs.append(row['xmax'] / width)
        ymins.append(row['ymin'] / height)
        ymaxs.append(row['ymax'] / height)
        classes_text.append(row['class'].encode('utf8'))
        classes.append(class_text_to_int(row['class']))

    tf_example = tf.train.Example(features=tf.train.Features(feature={
        'image/height': dataset_util.int64_feature(height),
        'image/width': dataset_util.int64_feature(width),
        'image/filename': dataset_util.bytes_feature(filename),
        'image/source_id': dataset_util.bytes_feature(filename),
        'image/encoded': dataset_util.bytes_feature(encoded_jpg),
        'image/format': dataset_util.bytes_feature(image_format),
        'image/object/bbox/xmin': dataset_util.float_list_feature(xmins),
        'image/object/bbox/xmax': dataset_util.float_list_feature(xmaxs),
        'image/object/bbox/ymin': dataset_util.float_list_feature(ymins),
        'image/object/bbox/ymax': dataset_util.float_list_feature(ymaxs),
        'image/object/class/text': dataset_util.bytes_list_feature(classes_text),
        'image/object/class/label': dataset_util.int64_list_feature(classes),
    }))
    return tf_example


def main(_):
    writer = tf.python_io.TFRecordWriter(FLAGS.output_path)
    path = os.path.join(os.getcwd(), FLAGS.images_dir)

    examples = pd.read_csv(FLAGS.csv_input)
    grouped = split(examples, 'filename')

    print('path: {}.{}'.format(path,grouped))
    for group in grouped:
        tf_example = create_tf_example(group, path)
        writer.write(tf_example.SerializeToString())

    writer.close()
    output_path = os.path.join(os.getcwd(), FLAGS.output_path)
    print('Successfully created the TFRecords: {}'.format(output_path))


if __name__ == '__main__':
    tf.app.run()
这个需要修改的就是class_text_to_int根据自己的分类去写,我的是三个分类。
python generate_tfrecord.py --csv_input=labels.csv --output_path=train.record --images_dir=JPEGImages

python generate_tfrecord.py --csv_input=labels_test.csv --output_path=train_test.record --images_dir=JPEGImages_test
这样就生成了训练用的train.record,train_test.record。
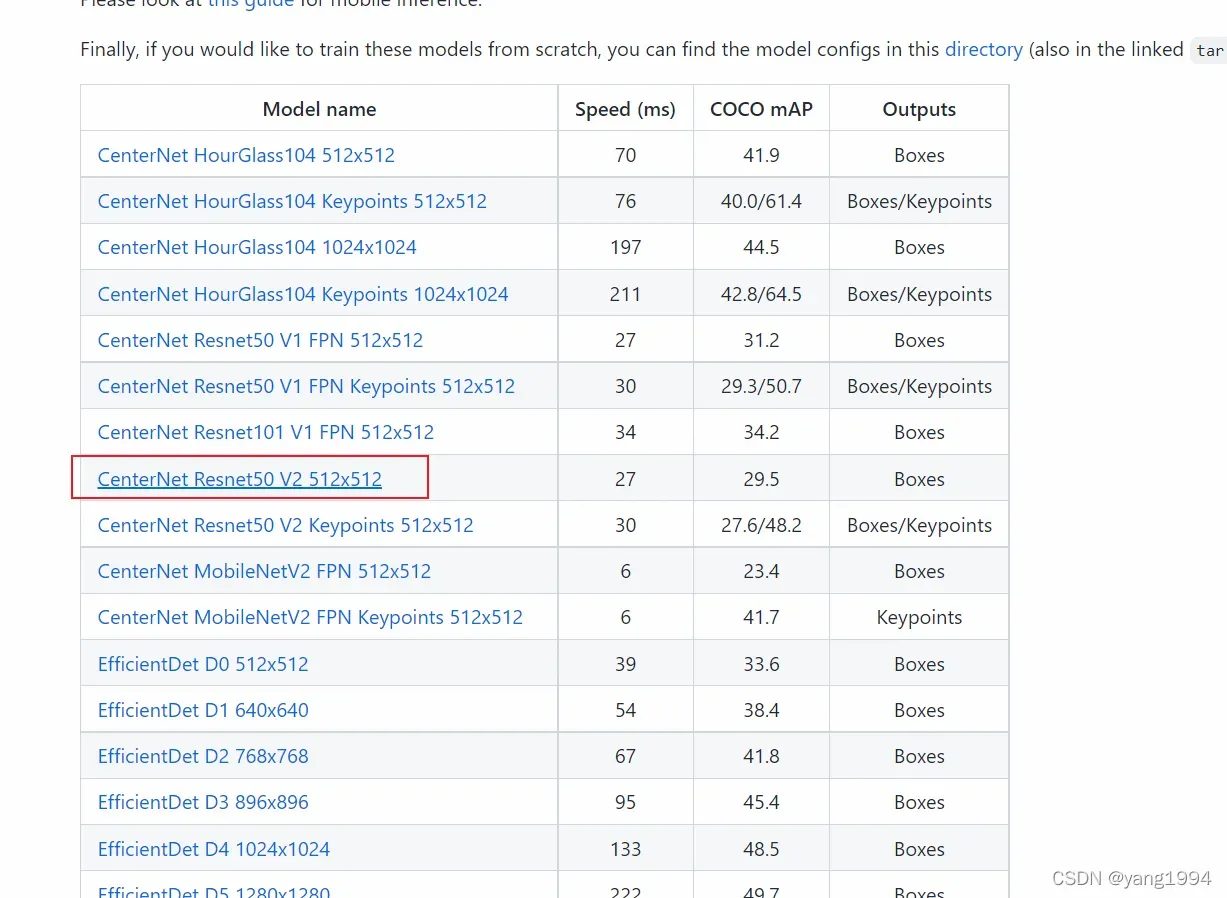
训练数据准备完成了,后面需要下载模型我使用的是CenterNet Resnet50 V2 512×512
下载模型
https://github.com/tensorflow/models/blob/master/research/object_detection/g3doc/tf2_detection_zoo.md
下载后解压到research目录下把pipline.config文件拷贝出来。
需要修改几个地方。
 center_net {
    num_classes: 3
    feature_extractor {
      type: "resnet_v2_50"
    }
num_classes 修改成自己的分类数。
train_config: {

  batch_size: 2
  num_steps: 250000

  data_augmentation_options {
    random_horizontal_flip {
    }
  }
batch_size我写的是2
 max_number_of_boxes: 100
  unpad_groundtruth_tensors: false

  fine_tune_checkpoint_version: V2
  fine_tune_checkpoint: "./training/checkpoint/ckpt-0"
  fine_tune_checkpoint_type: "detection"
}
fine_tune_checkpoint 写模型的地址,我把模型里的所有文件都放到training目录里了。fine_tune_checkpoint_type是“detection”
train_input_reader: {
  label_map_path: "label_map.pbtxt"
  tf_record_input_reader {
    input_path: "train.record"
  }
}

eval_config: {
  metrics_set: "coco_detection_metrics"
  use_moving_averages: false
  batch_size: 1;
}

eval_input_reader: {
  label_map_path: "label_map.pbtxt"
  shuffle: false
  num_epochs: 1
  tf_record_input_reader {
    input_path: "train_test.record"
  }
}
label_map.pbtxt里写了自己的分类信息,对应的input_path一个写train.record,一个写train_test.record都是刚刚生成的,这些文件都放到research目录下。这样就可以了。
label_map.pbtxt的内容类似如下:
item {
    id: 1
    name: 'person'
}

item {
    id: 2
    name: 'car'
}
训练
训练使用model_main_tf2.py这个文件在object_detection文件夹里,我把它拷贝到了research目录下。
在research目录下创建train_dir用来保存训练文件
python model_main_tf2.py -- \
  --model_dir=train_dir \
  --pipeline_config_path=pipline.config \
  --alsologtostderr
执行这个命令就可以,等待训练的完成。用gpu我基本1天半可以跑完。
题:
(python3.6)(matplotlib) AttributeError: ‘version_info’ object has no attribute ‘version
根据错误提示,找到你所对应的文件…\Lib\site-packages\pyparsing_init.py
class version_info(NamedTuple):定义修改如下

class version_info():
    def __init__(self, major: int, minor: int, micro: int, releaselevel: str, serial: int):
        self.major = major
        self.minor = minor
        self.micro = micro
        self.releaselevel = releaselevel
        self.serial = serial

    @property
    def __version__(self):
        return "{}.{}.{}".format(self.major, self.minor, self.micro) + (
            "{}{}{}".format(
                "r" if self.releaselevel[0] == "c" else "",
                self.releaselevel[0],
                self.serial,
            ),
            "",
        )[self.releaselevel == "final"]

    def __str__(self):
        return "{} {} / {}".format(__name__, self.__version__, __version_time__)

    def __repr__(self):
        return "{}.{}({})".format(
            __name__,
            type(self).__name__,
            ", ".join("{}={!r}".format(*nv) for nv in zip(self._fields, self)),
        )
出口
使用exporter_main_v2.py完成导出。提前创建好models_mydataset文件夹用来保存导出文件
python exporter_main_v2.py ^
--input_type image_tensor ^
--pipeline_config_path pipeline.config ^
--trained_checkpoint_dir train_dir_mydataset/ ^
--output_directory models_mydataset
测试
import matplotlib
import matplotlib.pyplot as plt

import os
import io
import scipy.misc
import numpy as np
from six import BytesIO
from PIL import Image, ImageDraw, ImageFont

import tensorflow.compat.v2 as tf

from object_detection.utils import label_map_util
from object_detection.utils import config_util
from object_detection.utils import visualization_utils as viz_utils
from object_detection.builders import model_builder
import cv2

tf.enable_v2_behavior()
os.environ["CUDA_VISIBLE_DEVICES"] = '0' #use GPU with ID=0
config = tf.compat.v1.ConfigProto()
config.gpu_options.per_process_gpu_memory_fraction = 0.5 # maximun alloc gpu50% of MEM
config.gpu_options.allow_growth = True #allocate dynamically

gpus = tf.config.experimental.list_physical_devices(device_type='GPU')
for gpu in gpus:
   tf.config.experimental.set_memory_growth(gpu, True)

def load_image_into_numpy_array(path):
    """Load an image from file into a numpy array.

    Puts image into numpy array to feed into tensorflow graph.
    Note that by convention we put it into a numpy array with shape
    (height, width, channels), where channels=3 for RGB.

    Args:
      path: the file path to the image

    Returns:
      uint8 numpy array with shape (img_height, img_width, 3)
    """
    img_data = tf.io.gfile.GFile(path, 'rb').read()
    image = Image.open(BytesIO(img_data))
    (im_width, im_height) = image.size
    return np.array(image.getdata()).reshape(
        (im_height, im_width, 3)).astype(np.uint8)


def get_keypoint_tuples(eval_config):
    """Return a tuple list of keypoint edges from the eval config.

    Args:
      eval_config: an eval config containing the keypoint edges

    Returns:
      a list of edge tuples, each in the format (start, end)
    """
    tuple_list = []
    kp_list = eval_config.keypoint_edge
    for edge in kp_list:
        tuple_list.append((edge.start, edge.end))
    return tuple_list

pipeline_config = os.path.join('pipeline.config')
model_dir = 'models_mydataset/checkpoint/'

# Load pipeline config and build a detection model
configs = config_util.get_configs_from_pipeline_file(pipeline_config)
model_config = configs['model']
detection_model = model_builder.build(
      model_config=model_config, is_training=False)

# Restore checkpoint
ckpt = tf.compat.v2.train.Checkpoint(
      model=detection_model)
ckpt.restore(os.path.join(model_dir, 'ckpt-0')).expect_partial()

def get_model_detection_function(model):
  """Get a tf.function for detection."""

  @tf.function
  def detect_fn(image):
    """Detect objects in image."""

    image, shapes = model.preprocess(image)
    prediction_dict = model.predict(image, shapes)
    detections = model.postprocess(prediction_dict, shapes)

    return detections, prediction_dict, tf.reshape(shapes, [-1])

  return detect_fn

detect_fn = get_model_detection_function(detection_model)

label_map_path = configs['eval_input_config'].label_map_path
label_map = label_map_util.load_labelmap(label_map_path)
categories = label_map_util.convert_label_map_to_categories(
    label_map,
    max_num_classes=label_map_util.get_max_label_map_index(label_map),
    use_display_name=True)
category_index = label_map_util.create_category_index(categories)
label_map_dict = label_map_util.get_label_map_dict(label_map, use_display_name=True)


def read_pic_from_local():
    for root, dirs, files in os.walk('JPEGImages_test/'):
        for image_path in files:
            image_path = os.path.join(root,image_path)
            image_np = load_image_into_numpy_array(image_path)
            image_cv = cv2.imread(image_path)
            # Things to try:
            # Flip horizontally
            # image_np = np.fliplr(image_np).copy()

            # Convert image to grayscale
            # image_np = np.tile(
            #     np.mean(image_np, 2, keepdims=True), (1, 1, 3)).astype(np.uint8)

            input_tensor = tf.convert_to_tensor(
                np.expand_dims(image_np, 0), dtype=tf.float32)
            detections, predictions_dict, shapes = detect_fn(input_tensor)

            label_id_offset = 1
            image_np_with_detections = image_np.copy()

            # Use keypoints if available in detections
            keypoints, keypoint_scores = None, None
            if 'detection_keypoints' in detections:
              keypoints = detections['detection_keypoints'][0].numpy()
              keypoint_scores = detections['detection_keypoint_scores'][0].numpy()

            viz_utils.visualize_boxes_and_labels_on_image_array(
                  image_cv,
                  detections['detection_boxes'][0].numpy(),
                  (detections['detection_classes'][0].numpy() + label_id_offset).astype(int),
                  detections['detection_scores'][0].numpy(),
                  category_index,
                  use_normalized_coordinates=True,
                  max_boxes_to_draw=200,
                  min_score_thresh=.30,
                  agnostic_mode=False,
                  keypoints=keypoints,
                  keypoint_scores=keypoint_scores,
                  keypoint_edges=get_keypoint_tuples(configs['eval_config']))

            cv2.imshow("image", image_cv)
            key = cv2.waitKey()

            if key != 1:
                print("keydown")
    cv2.destroyAllWindows()

def read_pic_from_camera():
    capture = cv2.VideoCapture(0)
    while (True):
        ret, frame = capture.read()

        image_cv = cv2.cvtColor(frame, cv2.COLOR_RGB2BGR)
        image_np = image_cv

        input_tensor = tf.convert_to_tensor(
            np.expand_dims(image_np, 0), dtype=tf.float32)
        detections, predictions_dict, shapes = detect_fn(input_tensor)

        label_id_offset = 1

        # Use keypoints if available in detections
        keypoints, keypoint_scores = None, None
        if 'detection_keypoints' in detections:
            keypoints = detections['detection_keypoints'][0].numpy()
            keypoint_scores = detections['detection_keypoint_scores'][0].numpy()

        viz_utils.visualize_boxes_and_labels_on_image_array(
            frame,
            detections['detection_boxes'][0].numpy(),
            (detections['detection_classes'][0].numpy() + label_id_offset).astype(int),
            detections['detection_scores'][0].numpy(),
            category_index,
            use_normalized_coordinates=True,
            max_boxes_to_draw=200,
            min_score_thresh=.30,
            agnostic_mode=False,
            keypoints=keypoints,
            keypoint_scores=keypoint_scores,
            keypoint_edges=get_keypoint_tuples(configs['eval_config']))

        cv2.imshow("image", frame)
        key = cv2.waitKey(1)

        if key != 1:
            print("keydown")
    cv2.destroyAllWindows()

#read_pic_from_local()
read_pic_from_camera()
read_pic_from_local()方法可以读取测试数据集里的图片
read_pic_from_camera()是读取摄像头的数据。
版权声明:本文为博主yang1994原创文章,版权归属原作者,如果侵权,请联系我们删除!
原文链接:https://blog.csdn.net/yang1994/article/details/123181255