这个问题是我遇到很多小伙伴问的,这个推理的API难度不大,主要涉及四个步骤:加载模型和硬件、检测输入输出、输入重塑以及执行推理。大致可以参考下面这张图片: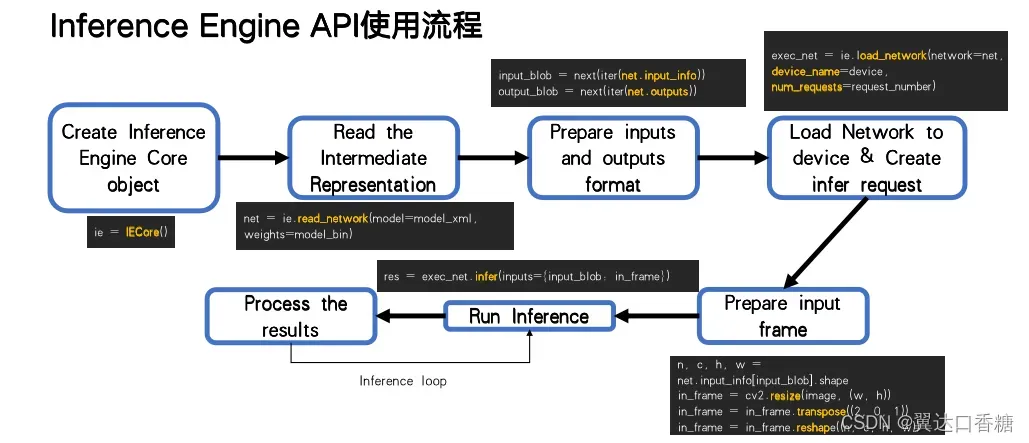
1.用Core()初始化推理引擎
from openvino.runtime import Core
ie = Core()
推理引擎可以在设备上加载网络。这里的设备指的是CPU、英特尔GPU、神经计算棒2等。available_devices属性显示系统上可用的设备。get_property()的“FULL_DEVICE_NAME”选项显示了设备的名称。
我的设备上使用的是CPU设备。如果使用集成GPU就改成device_name=“GPU”。注意,在GPU上加载网络会比在CPU上加载慢,但推断可能会更快。
devices = ie.available_devices

for device in devices:
    device_name = ie.get_property(device_name=device, name="FULL_DEVICE_NAME")
    print(f"{device}: {device_name}")

2.加载模型
在初始化推理引擎之后,首先用read_model()读取模型文件,然后用compile_model()将其编译到指定的设备。
IR模型
一个IR (Intermediate Representation)模型由一个xml文件和一个bin文件组成,其中包含关于网络拓扑的信息,而bin文件则包含权重和偏差二进制数据。read_model()默认是指(bin)weights文件与xml文件位于相同的目录中,文件名相同,扩展名为.bin,那不需要制定,否则就需要指定。
from openvino.runtime import Core

ie = Core()
classification_model_xml = "model/classification.xml"

model = ie.read_model(model=classification_model_xml)
compiled_model = ie.compile_model(model=model, device_name="CPU")
ONNX模型
ONNX模型是一个单一的文件。读取和加载ONNX模型的工作方式与读取和加载IR模型的方式相同。model参数指向ONNX文件名。
from openvino.runtime import Core

ie = Core()
onnx_model_path = "model/segmentation.onnx"
model_onnx = ie.read_model(model=onnx_model_path)
compiled_model_onnx = ie.compile_model(model=model_onnx, device_name="CPU")
为了用默认设置将ONNX模型导出到IR,也可以使用.serialize()方法。
from openvino.offline_transformations import serialize

serialize(model=model_onnx, model_path="model/exported_onnx_model.xml", weights_path="model/exported_onnx_model.bin")
2.检测输入输出和图片
OpenVINO IENetwork实例存储关于模型的信息。关于模型的输入和输出的信息都在模型中。输入和model.outputs。因为现在是支持静态输入,第二个是为了使输入的图形符合输入层,所以需要检测输入输出层。
from openvino.runtime import Core

ie = Core()
classification_model_xml = "model/classification.xml"
model = ie.read_model(model=classification_model_xml)
model.inputs[0].any_name
上面的单元格显示加载的模型需要一个输入,这个输入有一个名称输入。如果您加载了不同的模型,您可能会看到不同的输入层名称,并且您可能会看到更多输入。
提供对第一输入层名称的引用通常是有用的。对于只有一个输入的模型,使用next(iter(model.inputs))会得到这个名称。
input_layer = next(iter(model.inputs))
input_layer
该输入层的信息存储在输入中。下一个单元格打印输入的布局、精度和形状。
print(f"input precision: {input_layer.element_type}")
print(f"input shape: {input_layer.shape}")
注意我改了图中的名字,过程是一样的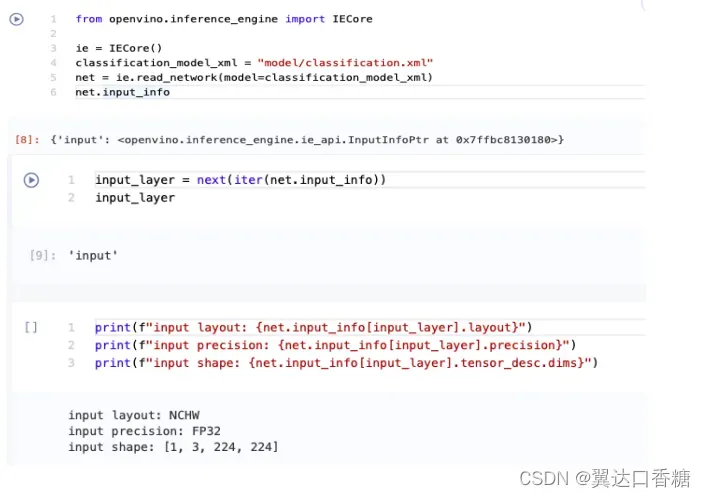
这个单元格输出告诉我们,模型期望输入的形状为[1,3,224,224],并且这是在NCHW布局中。这意味着模型期望输入的数据批量大小(N)为1,3个通道©,图像高度(H)和宽度(W)为224。输入数据期望达到FP32(浮点)精度。
模型输入
from openvino.runtime import Core

ie = Core()
classification_model_xml = "model/classification.xml"
model = ie.read_model(model=classification_model_xml)
model.outputs[0].any_name
模型输出信息存储在Model .outputs中。上面的单元格显示模型返回一个输出,其名称为MobilenetV3/Predictions/Softmax。如果您加载了一个不同的模型,您可能会看到一个不同的输出层名称,并且您可能会看到更多的输出。
因为这个模型只有一个输出,所以按照与输入层相同的方法来获得它的名字。
output_layer = next(iter(model.outputs))
output_layer
获取输出精度和形状类似于获取输入精度和形状。
print(f"output precision: {output_layer.element_type}")
print(f"output shape: {output_layer.shape}")
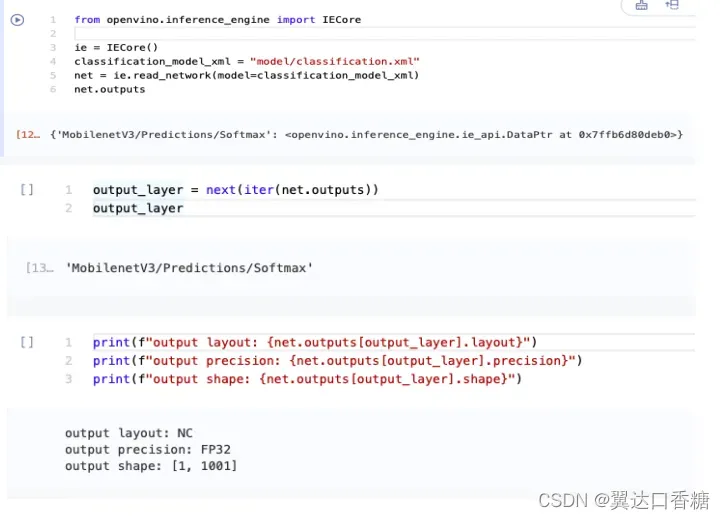
这个单元格输出显示模型返回的输出形状为[1,1001],其中1是批大小(N), 1001是类的数量©。输出作为32位浮点数返回。
3.输入重塑
这里我们将前面的步骤连续执行一次,得到图的输入和输出
from openvino.runtime import Core

ie = Core()
classification_model_xml = "model/classification.xml"
model = ie.read_model(model=classification_model_xml)
compiled_model = ie.compile_model(model=model, device_name="CPU")
input_layer = next(iter(compiled_model.inputs))
output_layer = next(iter(compiled_model.outputs))
准备工作:加载图像并转换为输入形状
要通过网络传播图像,您需要将其加载到数组中,调整其大小以满足网络的要求,并将其转换为网络的输入布局。
import cv2

image_filename = "data/coco_hollywood.jpg"
image = cv2.imread(image_filename)
image.shape
该图像的形状为(663,994,3)。它高663像素,宽994像素,有3个颜色通道。我们得到了网络期望的高度和宽度的参考,并将图像的大小调整为该大小。
# N,C,H,W = batch size, number of channels, height, width
N, C, H, W = input_layer.shape
# OpenCV resize expects the destination size as (width, height)
qresized_image = cv2.resize(src=image, dsize=(W, H))
resized_image.shape
现在图像的格式是H,W,C格式。我们首先调用np.transpose()将其更改为N,C,H,W格式(其中N=1),然后通过调用np。expand_dimms()将N维相加。使用np.astype()将数据转换为FP32。
import numpy as np

input_data = np.expand_dims(np.transpose(resized_image, (2, 0, 1)), 0).astype(np.float32)
input_data.shape
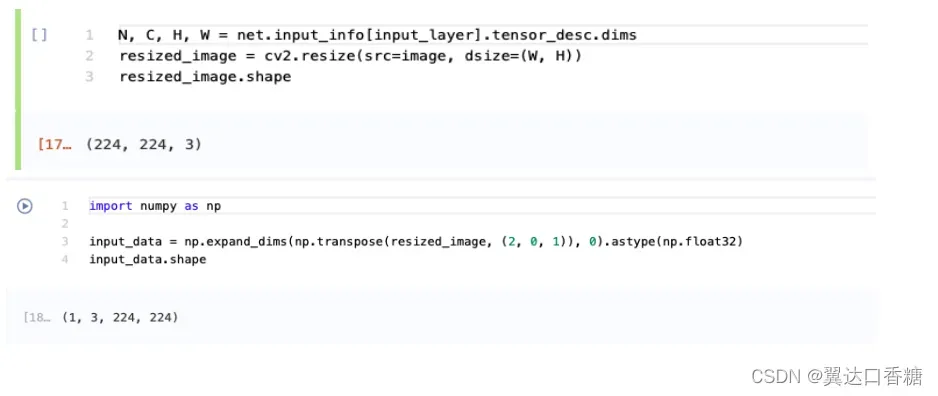
进行推理
既然输入数据的形状是正确的,就可以进行推断了。
result = compiled_model([input_data])[output_layer]
request = compiled_model.create_infer_request()
request.infer(inputs={input_layer.any_name: input_data})
result = request.get_output_tensor(output_layer.index).data
这个网络可以返回一个输出,所以我们将对输出层的引用存储在output_layer中。Index参数时,我们可以使用request. get_output_张量(output_layer.index)获取数据。要从输出中获得numpy数组,我们需要加后缀.data。
result.shape
输出的形状是(1,1001),我们看到的是预期的输出形状。这个输出形状表明网络返回1001个类的概率是1.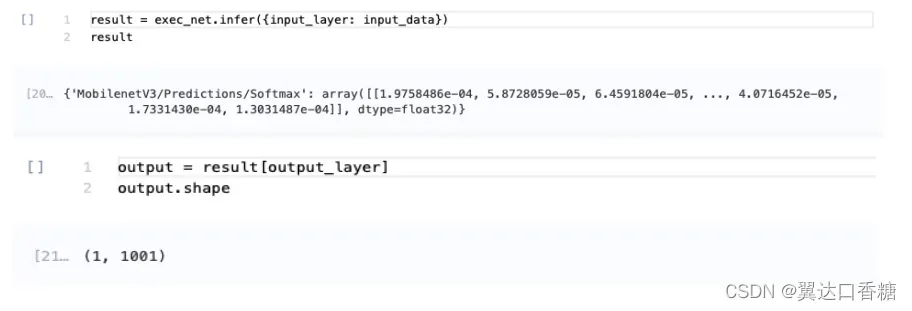
以上就是所有推理代码的全过程。
文章出处登录后可见!
