最近从0开始学习了李沐老师的动手学深度学习课程,收益匪浅,想着弄个笔记,若有错误请及时指出,感谢各位!
目录
1.预备基础
1.1 坐标变换
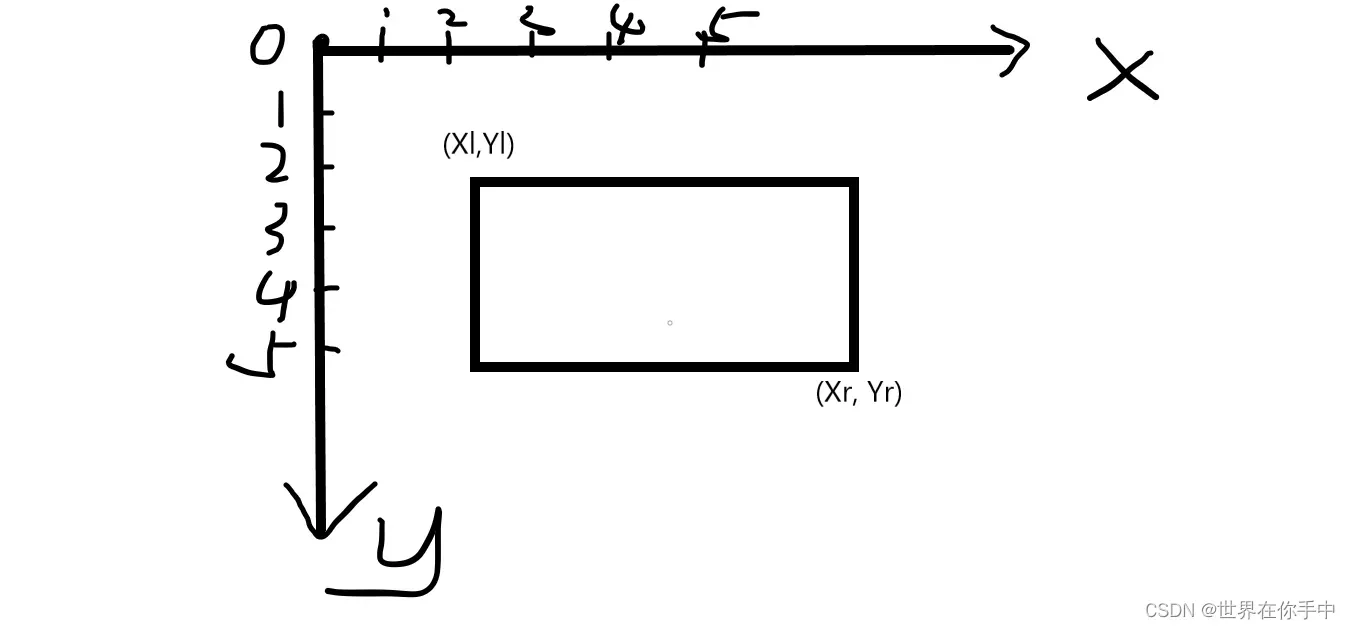
对于图片而言,一般采取两种格式来保存图片中的位置信息(左上, 右下)和(中心坐标, 宽, 高)
1)从(左上, 右下) —> (中心位置, 宽度, 高度)
假设box = [Xl, Yl, Xr, Yr](其中l=left, r=right),那么
center = ((Xl + Xr) / 2, (Yl + Yr) / 2
width = Xr – Xl
height=Yr-Yl。
这里的细节在于 Y轴的方向和我们平时生活中的不一样。他是从上到下递增,因此Yr为较大值。图示:
具体实现:
def box_corner_to_center(boxes):
    """从(左上, 右下)转换到(中间, 宽度, 高度)"""
    x1, y1, x2, y2 = boxes[:, 0], boxes[:, 1], boxes[:, 2], boxes[:, 3]
    cx = (x1 + x2) / 2  # 得到x的中心位置
    cy = (y1 + y2) / 2  # 得到y的中心位置
    w = x2 - x1  # 宽度
    h = y2 - y1  # 高度
    boxes = torch.stack((cx, cy, w, h), axis=-1)
    return boxes
2) 从(中心位置, 宽度, 高度) —> (左上, 右下)
假设box = [centerX, centerY, width, height], 那么
Xl = centerX – (0.5 * width)
Yl = centerY – (0.5 * height)
Xr = centerX + (0.5 * width)
Yr = centerY + (0.5 * height)
具体实现:
def box_center_to_corner(boxes):
    """从(中间, 宽度, 高度)转换到(左上, 右下)"""
    cx, cy, w, h = boxes[:, 0], boxes[:, 1], boxes[:, 2], boxes[:, 3]
    xl = cx - 0.5 * w
    yl = cy - 0.5 * h
    xr = cx + 0.5 * w
    yr = cy + 0.5 * h
    boxes = torch.stack((xl, yl, xr, yr), axis=-1)
    return boxes
1.2 矩形框(锚框)绘制
可以运用opencv中的cv2.rectangle 或者 matplotlib.pylot中的Rectangle进行绘制,由于课程中使用的是matplotlib,为了后续内容这里只解释后者。
plt.Rectangle((Xl, Yl), width, height, fill, edgecolor, linewidth)第一个参数:左上点
第二,三个参数:宽度,高度
fill: 是否填充矩形
edgecolor : 边框颜色
linewidth : 边框线的宽度
具体实现:
def bbox_to_rect(bbox, color):
    return plt.Rectangle(xy=(bbox[0], bbox[1]),
                         width=bbox[2] - bbox[0],
                         height=bbox[3] - bbox[1],
                         fill=False,
                         edgecolor=color, linewidth=2)
文章出处登录后可见!
已经登录?立即刷新