mmdetection版本:2.24.1
pytorch版本:1.11.0
官方文档Tutorial 11: How to xxx — MMDetection 2.24.1 documentation对更换backbone已经有了比较详细的介绍,特别是较新的版本已经支持mmcls库以及timm库中的现有分类网络,一般直接拿来修改使用即可,但这里最重要的一点就是需要保证修改后的backbone要和后面的neck结构进行进行匹配,主要是通道数方面。目标检测模型的通用结构如下图所示,如果更改backbone后导致于neck的结构不适配,将导致模型失效报错。下面以mmdetection中的yolox模型为例子对官方文档更换backbone的方法进行补充说明,最后再举例yolov3模型替换swin transformer的例子。

1.Mmcls 骨干模型替换
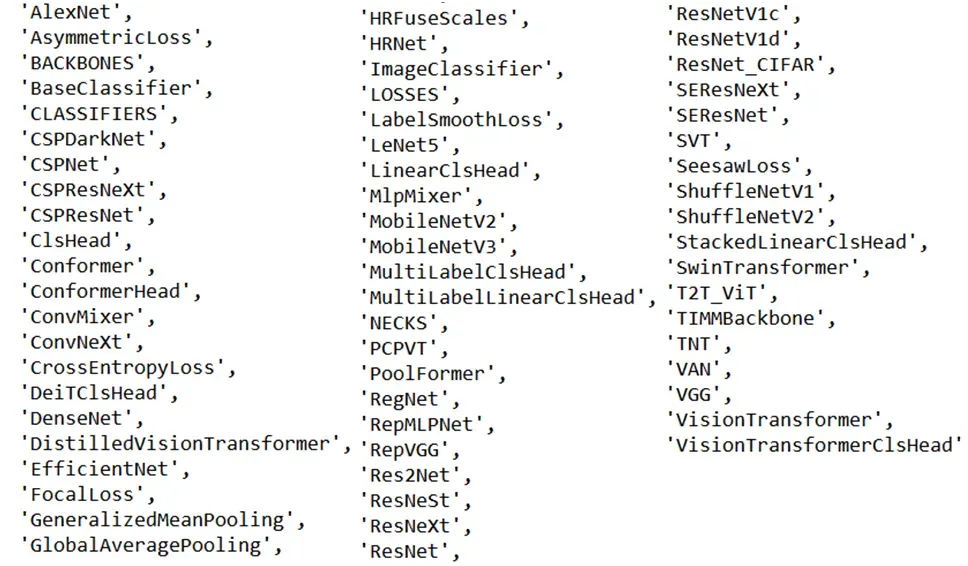
使用命令pip install mmcls安装mmcls,之后导入mmcls.models可以查看支持的backbone,如下图所示。可以看出mmcls库基本囊括了主流、经典的模型,这也是openmmlab打造一体化生态的体现。
以ShuffleNetV2这一轻量化模型为例,将此模型替换yolox原本的cspdarknet骨干网络。首先查看一下mmcls.models.ShuffleNetV2的模型接口:
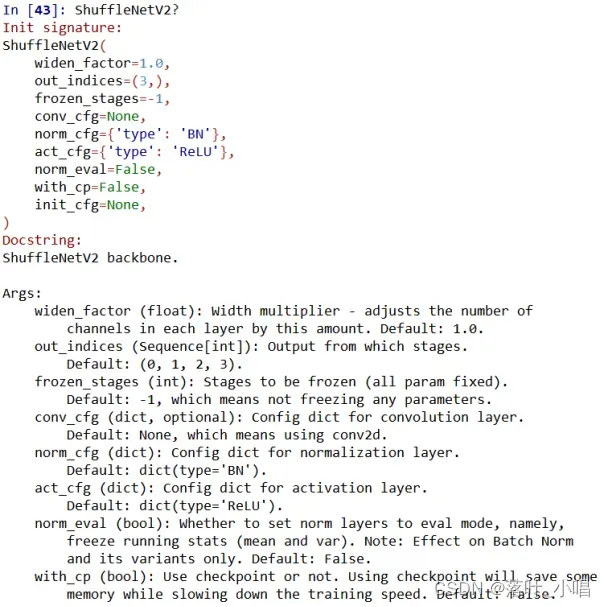
需要注意的是out_indices这一参数,默认为选取第四个stage的卷积输出,而在yolox是原有设计中输入了3个stage的特征图:
   #============== CSPDarknet ==============
    backbone=dict(type='CSPDarknet', deepen_factor=0.33, widen_factor=0.5),
    neck=dict(
        type='YOLOXPAFPN',
        in_channels=[128, 256, 512],
        out_channels=128,
        num_csp_blocks=1),
    #============== end =================
根据这种思路,我们也可以输出特定的几个stage特征图,例如out_indices选择(1,2,3),下一步便需要确定这几个stage的输出通道,以此和neck的in_channels参数匹配,可以利用下列代码查看ShuffleNetV2模型的输出通道数:
from mmcls.models import ShuffleNetV1, ShuffleNetV2, MobileNetV2, MobileNetV3
import torch
# m = MobileNetV3(out_indices=(3, 8, 11))
m = ShuffleNetV2(out_indices=(0,1,2,3))
# m.eval()
inputs = torch.rand(1, 3, 640, 640)
level_outputs = m(inputs)
for level_out in level_outputs:
print(tuple(level_out.shape))
(1, 116, 80, 80)
(1, 232, 40, 40)
(1, 464, 20, 20)
(1, 1024, 20, 20)
从以上结果可以看出indices(1,2,3)对应的输出通道数为(232,464,1024),
因此yolox配置文件中模型部分的设置修改为:
# please install mmcls>=0.20.0
# import mmcls.models to trigger register_module in mmcls
custom_imports = dict(imports=['mmcls.models'], allow_failed_imports=False)
pretrained = 'https://download.openmmlab.com/mmclassification/v0/shufflenet_v1/shufflenet_v1_batch1024_imagenet_20200804-5d6cec73.pth'

# model settings
model = dict(
    type='YOLOX',
    input_size=img_scale,
    random_size_range=(15, 25),
    random_size_interval=10,
     #============== shufflenet v2 =================
    backbone=dict(
        # _delete_=True,
        type='mmcls.ShuffleNetV2',
        out_indices=(1,2,3), # Modify out_indices (116, 232,464,1024)
        init_cfg=dict(
            type='Pretrained',
            checkpoint=pretrained,
            prefix='backbone.')),
    neck=dict(
        type='YOLOXPAFPN',
        in_channels=[232,464,1024],
        out_channels=128,
        num_csp_blocks=1),
    #============== end =================
注意需要在配置文件的开头添加
custom_imports = dict(imports=['mmcls.models'], allow_failed_imports=False)
让mmdetection支持mmcls模型。pretrained是预训练权重地址,可以官方帮助文档ShuffleNet V1 — MMClassification 0.23.0 documentation找到。
2.TIMM骨干模型替换
Timm库也包含了大量图像分类模型,可以利用mmcls.TIMMBackbone接口进行调用,使用方法和前述步骤大体一致,需要先导入mmcls,然后在设置相应的模型参数,以mobilenetv2例子为例,模型配置修改如下:
# please install mmcls>=0.20.0
# import mmcls.models to trigger register_module in mmcls
custom_imports = dict(imports=['mmcls.models'], allow_failed_imports=False)
model settings
model = dict(
    type='YOLOX',
    input_size=img_scale,
    random_size_range=(15, 25),
    random_size_interval=10,
    #============== mobilenet v2 (timm) =================
    backbone=dict(
        # _delete_=True,
        type='mmcls.TIMMBackbone',
        model_name='mobilenetv2_100',
        features_only=True,
        pretrained=True,
        out_indices=(2, 3, 4)),
    neck=dict(
        type='YOLOXPAFPN',
        in_channels=[32, 96, 320],
        out_channels=128,
        num_csp_blocks=1),
#============== end =================
)
3. yolov3替换swin transformer骨干
最后举一个例子,将mmdetection的yolov3模型中默认的cspdarknet53骨干网络替换为swin transformer,用到了mmcls库,关键配置文件修改如下:
# please install mmcls>=0.20.0
# import mmcls.models to trigger register_module in mmcls
custom_imports = dict(imports=['mmcls.models'], allow_failed_imports=False)

# model settings
model = dict(
    type='YOLOV3',

    # backbone=dict(
    #     type='Darknet',
    #     depth=53,
    #     out_indices=(3, 4, 5),
    #     init_cfg=dict(type='Pretrained', checkpoint='open-mmlab://darknet53')),
    # neck=dict(
    #     type='YOLOV3Neck',
    #     num_scales=3,
    #     in_channels=[1024, 512, 256],
    #     out_channels=[512, 256, 128]),

    #============== MobileNetV3 ================
    # backbone=dict(
    #     type='mmcls.MobileNetV3',
    #     arch='small',
    #     out_indices=(3, 8, 11),
    #     init_cfg=dict(type='Pretrained', checkpoint='https://download.openmmlab.com/mmclassification/v0/mobilenet_v3/convert/mobilenet_v3_small-8427ecf0.pth',prefix='backbone.')),
    # neck=dict(
    #     type='YOLOV3Neck',
    #     num_scales=3,
    #     in_channels=[96, 48, 24],  # 顺序是反的
    #     out_channels=[512, 256, 128]),
    #==============  end  ===============

    #============== SwinTransformer ================
    backbone=dict(
        type='mmcls.SwinTransformer',
        arch='tiny',
        out_indices=(0,1,2),  # 192,384,768
        init_cfg=dict(type='Pretrained', checkpoint='https://download.openmmlab.com/mmclassification/v0/swin-transformer/swin_tiny_224_b16x64_300e_imagenet_20210616_090925-66df6be6.pth',prefix='backbone.')),
    neck=dict(
        type='YOLOV3Neck',
        num_scales=3,
        in_channels=[768,384,192],  # 顺序是反的
        out_channels=[512, 256, 128]),
    #==============  end  ===============
文章出处登录后可见!