YOLOX所使用的主干特征提取网络为CSPDarknet,如下图左侧框所示。
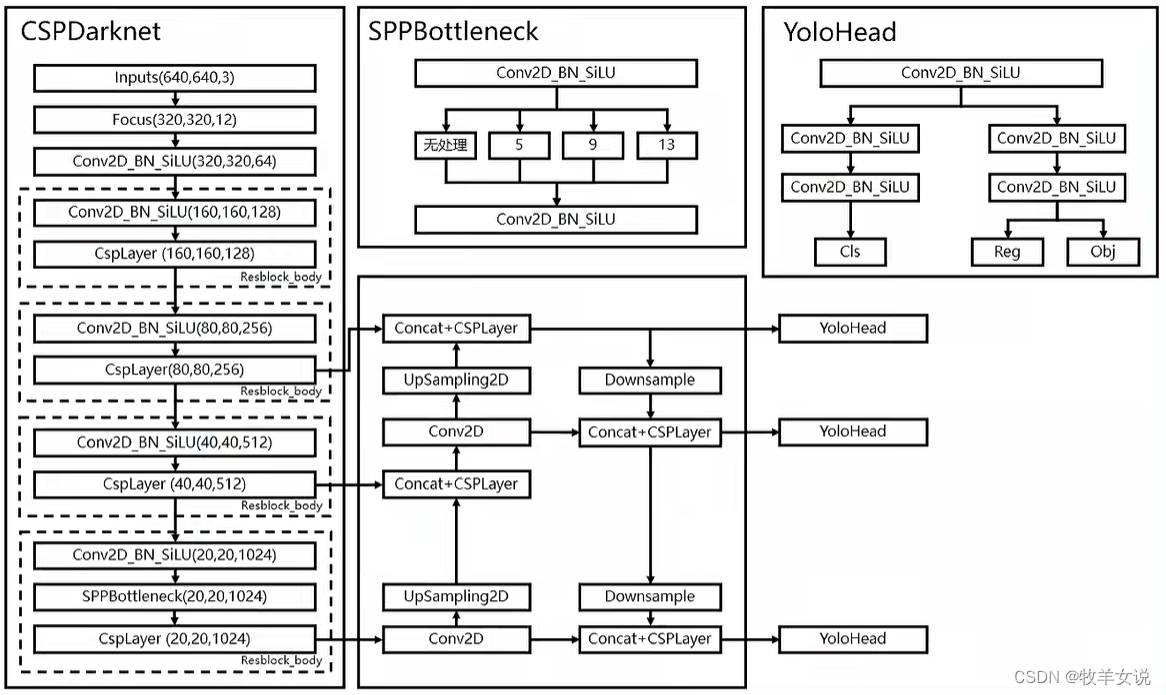
图片来源: Pytorch 搭建自己的YoloX目标检测平台(Bubbliiiing 深度学习 教程)_哔哩哔哩_bilibili
CSPDarknet的几个要点总结如下。
1. Focus网络结构
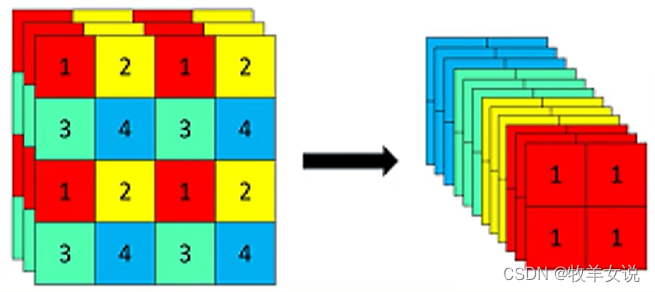
Focus结构的具体操作是,在一幅图像中行和列的方向进行隔像素抽取,组成新的特征层,每幅图像可重组为4个特征层,然后将4个特征层进行堆叠,将输入通道扩展为4倍。堆叠后的特征层相对于原先的3通道变为12通道,如下图所示:
PyTorch代码实现如下:
class Focus(nn.Module):
    """Focus width and height information into channel space."""

    def __init__(self, in_channels, out_channels, ksize=1, stride=1, act="silu"):
        super().__init__()
        self.conv = BaseConv(in_channels * 4, out_channels, ksize, stride, act=act)

    def forward(self, x):
        # shape of x (b,c,w,h) -> y(b,4c,w/2,h/2)
        patch_top_left = x[..., ::2, ::2]
        patch_top_right = x[..., ::2, 1::2]
        patch_bot_left = x[..., 1::2, ::2]
        patch_bot_right = x[..., 1::2, 1::2]
        x = torch.cat(
            (
                patch_top_left,
                patch_bot_left,
                patch_top_right,
                patch_bot_right,
            ),
            dim=1,
        )
        return self.conv(x)
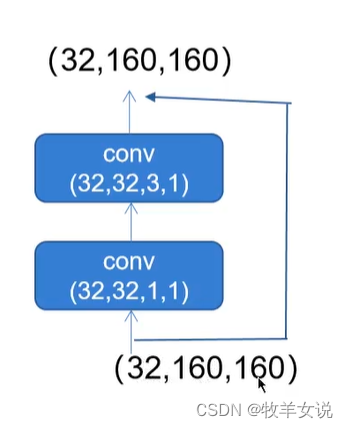
2. 残差网络Residual
CSPDarknet中的残差网络分为两个分支,主干分支做一次1×1卷积和一次3×3卷积,残差边部分不做任何处理,相当于直接将主干的输入和输出结合。
代码如下,
class Bottleneck(nn.Module):
    # Standard bottleneck
    def __init__(
        self,
        in_channels,
        out_channels,
        shortcut=True,
        expansion=0.5,
        depthwise=False,
        act="silu",
    ):
        super().__init__()
        hidden_channels = int(out_channels * expansion)
        Conv = DWConv if depthwise else BaseConv
        self.conv1 = BaseConv(in_channels, hidden_channels, 1, stride=1, act=act)
        self.conv2 = Conv(hidden_channels, out_channels, 3, stride=1, act=act)
        self.use_add = shortcut and in_channels == out_channels

    def forward(self, x):
        y = self.conv2(self.conv1(x))
        if self.use_add:
            y = y + x
        return y
其中的DWConv指的是Depthwise Convolution,在轻量级网络如YOLOX-Nano和YOLOX-Tiny会用到。
DWConv和BaseConv的定义如下:
class DWConv(nn.Module):
    """Depthwise Conv + Conv"""

    def __init__(self, in_channels, out_channels, ksize, stride=1, act="silu"):
        super().__init__()
        self.dconv = BaseConv(
            in_channels,
            in_channels,
            ksize=ksize,
            stride=stride,
            groups=in_channels,
            act=act,
        )
        self.pconv = BaseConv(
            in_channels, out_channels, ksize=1, stride=1, groups=1, act=act
        )

    def forward(self, x):
        x = self.dconv(x)
        return self.pconv(x)
class BaseConv(nn.Module):
    """A Conv2d -> Batchnorm -> silu/leaky relu block"""

    def __init__(
        self, in_channels, out_channels, ksize, stride, groups=1, bias=False, act="silu"
    ):
        super().__init__()
        # same padding
        pad = (ksize - 1) // 2
        self.conv = nn.Conv2d(
            in_channels,
            out_channels,
            kernel_size=ksize,
            stride=stride,
            padding=pad,
            groups=groups,
            bias=bias,
        )
        self.bn = nn.BatchNorm2d(out_channels)
        self.act = get_activation(act, inplace=True)

    def forward(self, x):
        return self.act(self.bn(self.conv(x)))

    def fuseforward(self, x):
        return self.act(self.conv(x))
3. CSPNet网络结构
CSPNet的结构跟Residual有点像,也是分成左右两部分,主干部分进行残差块的堆叠,另一部分则像残差边一样,经过少量处理后连接到主干部分的最后。图示如下:

图片来源于网络。
上图最右侧部分即为CSPNet的分解结构,其中,Bottleneck的数目根据不同的层可配置不同的数目 。该结构的代码实现如下:
class CSPLayer(nn.Module):
    """C3 in yolov5, CSP Bottleneck with 3 convolutions"""

    def __init__(
        self,
        in_channels,
        out_channels,
        n=1,
        shortcut=True,
        expansion=0.5,
        depthwise=False,
        act="silu",
    ):
        """
        Args:
            in_channels (int): input channels.
            out_channels (int): output channels.
            n (int): number of Bottlenecks. Default value: 1.
        """
        # ch_in, ch_out, number, shortcut, groups, expansion
        super().__init__()
        hidden_channels = int(out_channels * expansion)  # hidden channels
        # 主干部分第一次卷积
        self.conv1 = BaseConv(in_channels, hidden_channels, 1, stride=1, act=act)
        # 大的残差边部分第一次卷积
        self.conv2 = BaseConv(in_channels, hidden_channels, 1, stride=1, act=act)
        # 对堆叠结果进行卷积操作,注意堆叠后,输入的channels变成了两倍
        self.conv3 = BaseConv(2 * hidden_channels, out_channels, 1, stride=1, act=act)

        # 根据循环次数构建Bottleneck残差结构
        module_list = [
            Bottleneck(
                hidden_channels, hidden_channels, shortcut, 1.0, depthwise, act=act
            )
            for _ in range(n)
        ]
        self.m = nn.Sequential(*module_list)

    def forward(self, x):
        # X_1为主干部分
        x_1 = self.conv1(x)
        # x_2为大的残差边部分
        x_2 = self.conv2(x)
        # 主干部分利用残差结构堆叠进行特征提取
        x_1 = self.m(x_1)
        # 主干部分和大的残差边部分进行堆叠
        x = torch.cat((x_1, x_2), dim=1)
        # 对堆叠结果进行卷积处理
        return self.conv3(x)
4. SiLU激活函数
SiLU激活函数是Signoid和ReLU的改进版,具有有下界无上界、平滑、非单调的特性,在深层模型上的效果优于ReLU。类似这种图形:

实现代码如下:
class SiLU(nn.Module):
    """export-friendly version of nn.SiLU()"""

    @staticmethod
    def forward(x):
        return x * torch.sigmoid(x)
5. SPP结构
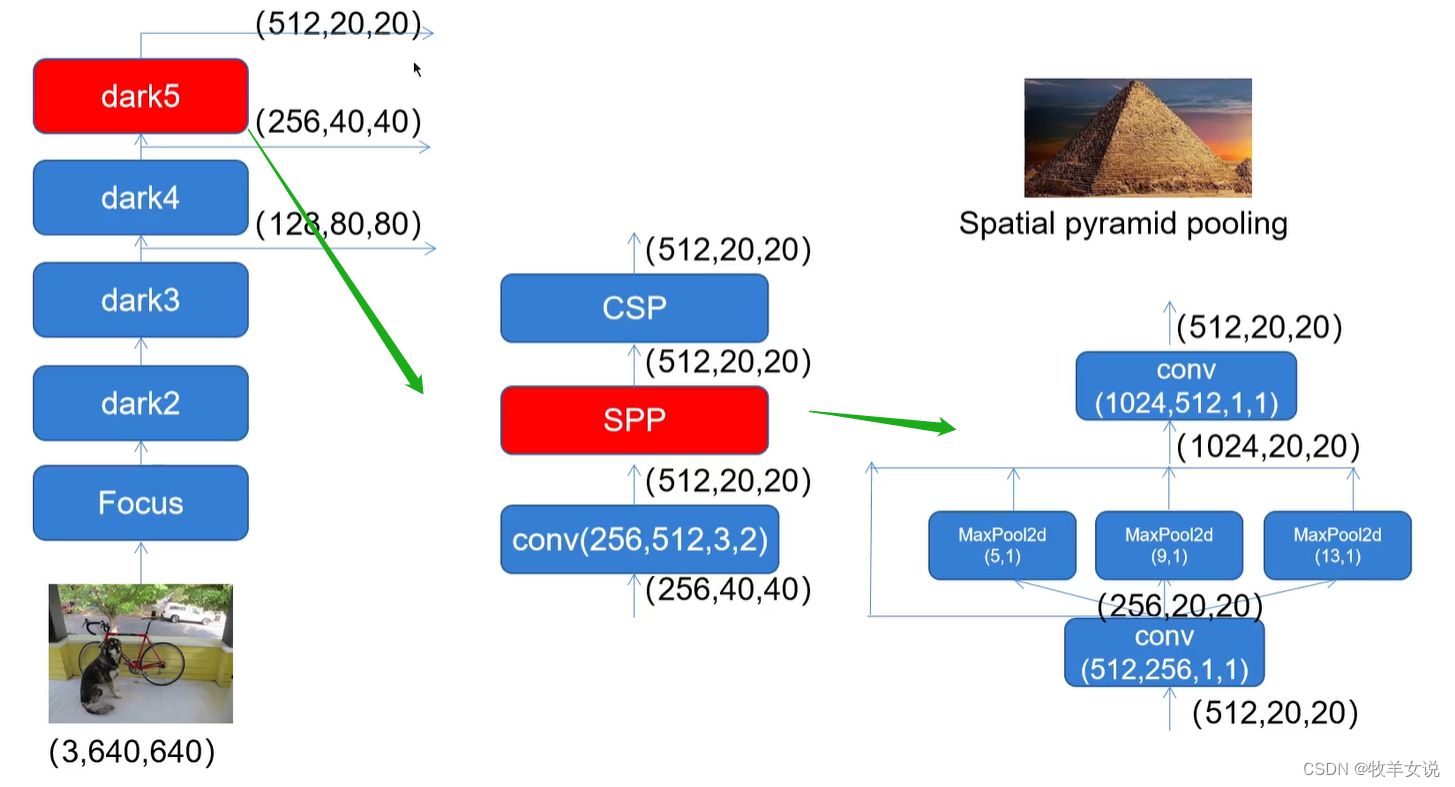
SPP是Spatial Pyramid Pooling的缩写。在CSPDarknet中,使用了不同池化核大小的MaxPool进行特征提取,以提高网络的感受野。与在YOLOv4中将SPP用在FPN里面不同,在YOLOX中,SPP模块被用在了主干特征提取网络中。示意图如下:
实现代码如下:
class SPPBottleneck(nn.Module):
    """Spatial pyramid pooling layer used in YOLOv3-SPP"""

    def __init__(
        self, in_channels, out_channels, kernel_sizes=(5, 9, 13), activation="silu"
    ):
        super().__init__()
        hidden_channels = in_channels // 2
        self.conv1 = BaseConv(in_channels, hidden_channels, 1, stride=1, act=activation)
        self.m = nn.ModuleList(
            [
                nn.MaxPool2d(kernel_size=ks, stride=1, padding=ks // 2)
                for ks in kernel_sizes
            ]
        )
        conv2_channels = hidden_channels * (len(kernel_sizes) + 1)
        self.conv2 = BaseConv(conv2_channels, out_channels, 1, stride=1, act=activation)

    def forward(self, x):
        x = self.conv1(x)
        x = torch.cat([x] + [m(x) for m in self.m], dim=1)
        x = self.conv2(x)
        return x
6. CSPDarknet完整实现
好了,CSPDarknet的组成部分介绍完了,接下来,需要将以上子模块拼装成最终的CSPDarknet。代码如下:
class CSPDarknet(nn.Module):
    def __init__(
        self,
        dep_mul,
        wid_mul,
        out_features=("dark3", "dark4", "dark5"),
        depthwise=False,
        act="silu",
    ):
        super().__init__()
        assert out_features, "please provide output features of Darknet"
        self.out_features = out_features
        Conv = DWConv if depthwise else BaseConv

        # 输入图片大小是640x640x3
        # 初始基本通道为64
        base_channels = int(wid_mul * 64)  # 64
        base_depth = max(round(dep_mul * 3), 1)  # 3

        # 利用focus网络结构进行特征提取
        # 640x640x3 -> 320x320x12 -> 320x320x64
        self.stem = Focus(3, base_channels, ksize=3, act=act)

        # dark2
        # Conv: 320x320x64 -> 160x160x128
        # CSPLayer: 160x160x128 -> 160x160x128
        self.dark2 = nn.Sequential(
            Conv(base_channels, base_channels * 2, 3, 2, act=act),
            CSPLayer(
                base_channels * 2,
                base_channels * 2,
                n=base_depth,
                depthwise=depthwise,
                act=act,
            ),
        )

        # dark3
        # Conv: 160x160x128 -> 80x80x256
        # CSPLayer: 80x80x256 -> 80x80x256
        self.dark3 = nn.Sequential(
            Conv(base_channels * 2, base_channels * 4, 3, 2, act=act),
            CSPLayer(
                base_channels * 4,
                base_channels * 4,
                n=base_depth * 3,
                depthwise=depthwise,
                act=act,
            ),
        )

        # dark4
        # Conv: 80x80x256 -> 40x40x512
        # CSPLayer: 40x40x512 -> 40x40x512
        self.dark4 = nn.Sequential(
            Conv(base_channels * 4, base_channels * 8, 3, 2, act=act),
            CSPLayer(
                base_channels * 8,
                base_channels * 8,
                n=base_depth * 3,
                depthwise=depthwise,
                act=act,
            ),
        )

        # dark5
        # Conv: 40x40x512 -> 20x20x1024
        # SPPConv: 20x20x1024 -> 20x20x1024
        # CSPLayer: 20x20x1024 -> 20x20x1024
        self.dark5 = nn.Sequential(
            Conv(base_channels * 8, base_channels * 16, 3, 2, act=act),
            SPPBottleneck(base_channels * 16, base_channels * 16, activation=act),
            CSPLayer(
                base_channels * 16,
                base_channels * 16,
                n=base_depth,
                shortcut=False,
                depthwise=depthwise,
                act=act,
            ),
        )

    def forward(self, x):
        outputs = {}
        x = self.stem(x)
        outputs["stem"] = x
        x = self.dark2(x)
        outputs["dark2"] = x

        # dark3的输出为80x80x256的有效特征层
        x = self.dark3(x)
        outputs["dark3"] = x

        # dark4的输出为40x40x512的有效特征层
        x = self.dark4(x)
        outputs["dark4"] = x

        # dark5的输出为20x20x1024的有效特征层
        x = self.dark5(x)
        outputs["dark5"] = x
        return {k: v for k, v in outputs.items() if k in self.out_features}
文章出处登录后可见!