 猛戳,跟哥们一起玩蛇啊! 👉 《一起玩蛇》🐍

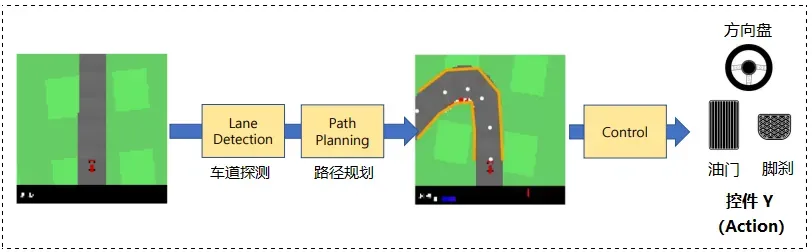
💭 写在前面: 本篇是关于多伦多大学自动驾驶专业项目的博客。GYM-Box2D CarRacing 是一种在 OpenAI Gym 平台上开发和比较强化学习算法的模拟环境。它是流行的 Box2D 物理引擎的一个版本,经过修改以支持模拟汽车在赛道上行驶的物理过程。
- 项目说明(讲解 “车道检测” 部分需要你去做什么、以及如何去做)
- lane_detection.py 实现分析以及代码的实现
- 项目运行部分
🔗 多伦多大学自动驾驶专项课程:Motion Planning for Self-Driving Cars | Coursera
🔗 Gym Car Racing 文档:Car Racing – Gym Documentation
 本篇博客全站热榜排名:1 👑
Ⅰ. 前置知识
0x00 引入:lane_dection 部分的实现
🚩 实践目标:
- 实现一个模块化组件框架,落实简化版的模块化流水线。
- 了解基本概念,并积累开发一个简单的自驱应用程序的经验。

🔨 环境选用:OpenAI Gym
- https://www.gymlibrary.ml/
- 我们将基于 Box2D CarRacing 实现,Box2D CarRacing 基本信息如下:
- Action:转向、加速、刹车
- Sensor input:
屏幕(显示汽车的状态和路径信息)
📜 尝试:
- 为汽车上方的部分找到一个好的裁剪,一个好的方法来分配车道边界的边缘,一个好的梯度阈值和样条平滑度的参数选择。
- 尝试找到失败的案例。
* 提供基础框架,只需要在 TODO 位置填写代码即可!
我就不提供资源下载链接了,直接手动吧:首先在桌面上创建一个文件夹,我们取名 skeleton ,然后创建出如下名称的 py 文件,将代码 CV 进去。
- lane detection.py
import numpy as np
import matplotlib.pyplot as plt
from scipy.signal import find_peaks
from scipy.interpolate import splprep, splev
from scipy.optimize import minimize
import time


class LaneDetection:
    '''
    Lane detection module using edge detection and b-spline fitting

    args:
        cut_size (cut_size=65) cut the image at the front of the car
        spline_smoothness (default=10)
        gradient_threshold (default=14)
        distance_maxima_gradient (default=3)

    '''

    def __init__(self, cut_size=65, spline_smoothness=10, gradient_threshold=14, distance_maxima_gradient=3):
        self.car_position = np.array([48,0])
        self.spline_smoothness = spline_smoothness
        self.cut_size = cut_size
        self.gradient_threshold = gradient_threshold
        self.distance_maxima_gradient = distance_maxima_gradient
        self.lane_boundary1_old = 0
        self.lane_boundary2_old = 0


    def cut_gray(self, state_image_full):
        '''
        ##### TODO #####
        This function should cut the image at the front end of the car (e.g. pixel row 65)
        and translate to gray scale

        input:
            state_image_full 96x96x3

        output:
            gray_state_image 65x96x1

        '''

        return gray_state_image[::-1]


    def edge_detection(self, gray_image):
        '''
        ##### TODO #####
        In order to find edges in the gray state image,
        this function should derive the absolute gradients of the gray state image.
        Derive the absolute gradients using numpy for each pixel.
        To ignore small gradients, set all gradients below a threshold (self.gradient_threshold) to zero.

        input:
            gray_state_image 65x96x1

        output:
            gradient_sum 65x96x1

        '''


        return gradient_sum


    def find_maxima_gradient_rowwise(self, gradient_sum):
        '''
        ##### TODO #####
        This function should output arguments of local maxima for each row of the gradient image.
        You can use scipy.signal.find_peaks to detect maxima.
        Hint: Use distance argument for a better robustness.

        input:
            gradient_sum 65x96x1

        output:
            maxima (np.array) shape : (Number_maxima, 2)

        '''

        return argmaxima


    def find_first_lane_point(self, gradient_sum):
        '''
        Find the first lane_boundaries points above the car.
        Special cases like just detecting one lane_boundary or more than two are considered.
        Even though there is space for improvement ;)

        input:
            gradient_sum 65x96x1

        output:
            lane_boundary1_startpoint
            lane_boundary2_startpoint
            lanes_found  true if lane_boundaries were found
        '''

        # Variable if lanes were found or not
        lanes_found = False
        row = 0

        # loop through the rows
        while not lanes_found:

            # Find peaks with min distance of at least 3 pixel
            argmaxima = find_peaks(gradient_sum[row],distance=3)[0]

            # if one lane_boundary is found
            if argmaxima.shape[0] == 1:
                lane_boundary1_startpoint = np.array([[argmaxima[0],  row]])

                if argmaxima[0] < 48:
                    lane_boundary2_startpoint = np.array([[0,  row]])
                else:
                    lane_boundary2_startpoint = np.array([[96,  row]])

                lanes_found = True

            # if 2 lane_boundaries are found
            elif argmaxima.shape[0] == 2:
                lane_boundary1_startpoint = np.array([[argmaxima[0],  row]])
                lane_boundary2_startpoint = np.array([[argmaxima[1],  row]])
                lanes_found = True

            # if more than 2 lane_boundaries are found
            elif argmaxima.shape[0] > 2:
                # if more than two maxima then take the two lanes next to the car, regarding least square
                A = np.argsort((argmaxima - self.car_position[0])**2)
                lane_boundary1_startpoint = np.array([[argmaxima[A[0]],  0]])
                lane_boundary2_startpoint = np.array([[argmaxima[A[1]],  0]])
                lanes_found = True

            row += 1

            # if no lane_boundaries are found
            if row == self.cut_size:
                lane_boundary1_startpoint = np.array([[0,  0]])
                lane_boundary2_startpoint = np.array([[0,  0]])
                break

        return lane_boundary1_startpoint, lane_boundary2_startpoint, lanes_found


    def lane_detection(self, state_image_full):
        '''
        ##### TODO #####
        This function should perform the road detection

        args:
            state_image_full [96, 96, 3]

        out:
            lane_boundary1 spline
            lane_boundary2 spline
        '''

        # to gray
        gray_state = self.cut_gray(state_image_full)

        # edge detection via gradient sum and thresholding
        gradient_sum = self.edge_detection(gray_state)
        maxima = self.find_maxima_gradient_rowwise(gradient_sum)

        # first lane_boundary points
        lane_boundary1_points, lane_boundary2_points, lane_found = self.find_first_lane_point(gradient_sum)

        # if no lane was found,use lane_boundaries of the preceding step
        if lane_found:

            ##### TODO #####
            #  in every iteration:
            # 1- find maximum/edge with the lowest distance to the last lane boundary point
            # 2- append maximum to lane_boundary1_points or lane_boundary2_points
            # 3- delete maximum from maxima
            # 4- stop loop if there is no maximum left
            #    or if the distance to the next one is too big (>=100)

            # lane_boundary 1

            # lane_boundary 2

            ################


            ##### TODO #####
            # spline fitting using scipy.interpolate.splprep
            # and the arguments self.spline_smoothness
            #
            # if there are more lane_boundary points points than spline parameters
            # else use perceding spline
            if lane_boundary1_points.shape[0] > 4 and lane_boundary2_points.shape[0] > 4:

                # Pay attention: the first lane_boundary point might occur twice
                # lane_boundary 1

                # lane_boundary 2

            else:
                lane_boundary1 = self.lane_boundary1_old
                lane_boundary2 = self.lane_boundary2_old
            ################

        else:
            lane_boundary1 = self.lane_boundary1_old
            lane_boundary2 = self.lane_boundary2_old

        self.lane_boundary1_old = lane_boundary1
        self.lane_boundary2_old = lane_boundary2

        # output the spline
        return lane_boundary1, lane_boundary2


    def plot_state_lane(self, state_image_full, steps, fig, waypoints=[]):
        '''
        Plot lanes and way points
        '''
        # evaluate spline for 6 different spline parameters.
        t = np.linspace(0, 1, 6)
        lane_boundary1_points_points = np.array(splev(t, self.lane_boundary1_old))
        lane_boundary2_points_points = np.array(splev(t, self.lane_boundary2_old))

        plt.gcf().clear()
        plt.imshow(state_image_full[::-1])
        plt.plot(lane_boundary1_points_points[0], lane_boundary1_points_points[1]+96-self.cut_size, linewidth=5, color='orange')
        plt.plot(lane_boundary2_points_points[0], lane_boundary2_points_points[1]+96-self.cut_size, linewidth=5, color='orange')
        if len(waypoints):
            plt.scatter(waypoints[0], waypoints[1]+96-self.cut_size, color='white')

        plt.axis('off')
        plt.xlim((-0.5,95.5))
        plt.ylim((-0.5,95.5))
        plt.gca().axes.get_xaxis().set_visible(False)
        plt.gca().axes.get_yaxis().set_visible(False)
        fig.canvas.flush_events()
- detection.py (用于测试,无需修改)
import gym
from gym.envs.box2d.car_racing import CarRacing
import pygame

from lane_detection import LaneDetection
import matplotlib.pyplot as plt
import numpy as np
import pyglet
from pyglet import gl
from pyglet.window import key

# action variables
action = np.array([0.0, 0.0, 0.0])
def register_input():

    for event in pygame.event.get():
        if event.type == pygame.KEYDOWN:
            if event.key == pygame.K_LEFT:
                action[0] = -1.0
            if event.key == pygame.K_RIGHT:
                action[0] = +1.0
            if event.key == pygame.K_UP:
                action[1] = +0.5
            if event.key == pygame.K_DOWN:
                action[2] = +0.8  # set 1.0 for wheels to block to zero rotation
            if event.key == pygame.K_r:
                global retry
                retry = True
            if event.key == pygame.K_s:
                global record
                record = True
            if event.key == pygame.K_q:
                global quit
                quit = True

        if event.type == pygame.KEYUP:
            if event.key == pygame.K_LEFT and action[0] < 0.0:
                action[0] = 0
            if event.key == pygame.K_RIGHT and action[0] > 0.0:
                action[0] = 0
            if event.key == pygame.K_UP:
                action[1] = 0
            if event.key == pygame.K_DOWN:
                action[2] = 0

# init environement
env = CarRacing()
env.render()
env.reset()

# define variables
total_reward = 0.0
steps = 0
retry = False
quit = False

# init modules of the pipeline
LD_module = LaneDetection()

# init extra plot
fig = plt.figure()
plt.ion()
plt.show()

while not quit:
    env.reset()
    retry = False
    while True:
        # perform step
        register_input()
        s, r, done, speed= env.step(action)

        # lane detection
        splines = LD_module.lane_detection(s)

        # reward
        total_reward += r

        # outputs during training
        if steps % 2 == 0 or done:
            print("\naction " + str(["{:+0.2f}".format(x) for x in action]))
            print("step {} total_reward {:+0.2f}".format(steps, total_reward))
            LD_module.plot_state_lane(s, steps, fig)
        steps += 1
        env.render()

        if done or retry or quit: break


env.close()
0x01 车道检测(Lane Detection)
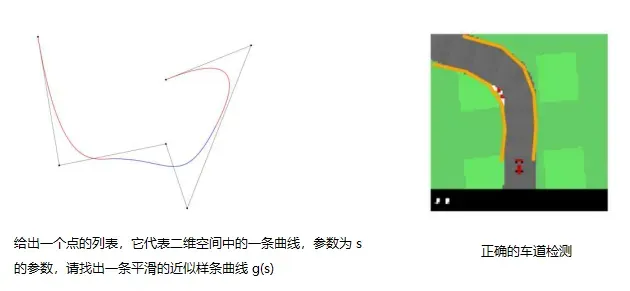
📜 我们一共分为三个步骤:
- Step1:边缘检测:梯度阈值法
- Step2:将边缘分配给车道边界:连续且最近的边缘搜索
- Step3:样条拟合:参数化样条曲线拟合
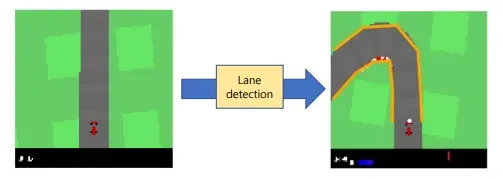
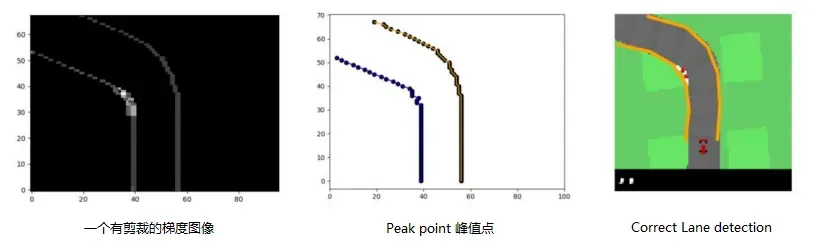
0x02 边缘检测(Lane Detection)
将状态图像转化为灰度图像,裁剪掉汽车上方的部分:
LaneDetection.cut_gray()推导出灰度图像梯度的绝对值并应用阈值化处理,忽略不重要的梯度:
LaneDetection.edge_detection() 确定每个像素行的绝对梯度的局部最大值的参数:
LaneDetection.find_maxima_gradient_rowwise() 提示:使用 scipy.signal.find_peaks()
0x03 将边缘分配给车道边界(Assign Edges to Lane Boundaries)
在最接近汽车的图像行中找到局部最大值的参数:
LaneDetection.find_first_lane_point() (already implemented) 通过连续搜索每个边界上最近的相邻边/最高值,将边分配给车道边界:
LaneDetection.lane_detection() 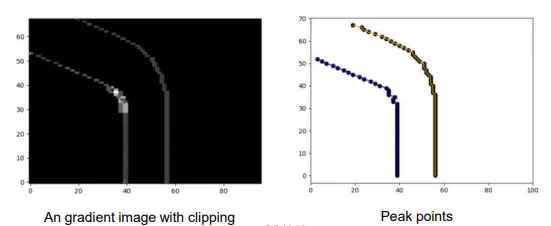
0x04 样条拟合(Spline Fitting)
对每个车道的边界进行参数化的样条拟合:
LaneDetection.lane_detection() 用 scipy.interpolate.splprep 进行拟合,用 scipy.interpolate.splev 进行评估。
(下面我们一律称为 splprep 与 splev )
🔍 链接:scipy.interpolate.splprep — SciPy v1.9.1 Manual
对于 B 样条曲线的知识,我们在上一节的 “前置知识” 部分有过讲解:
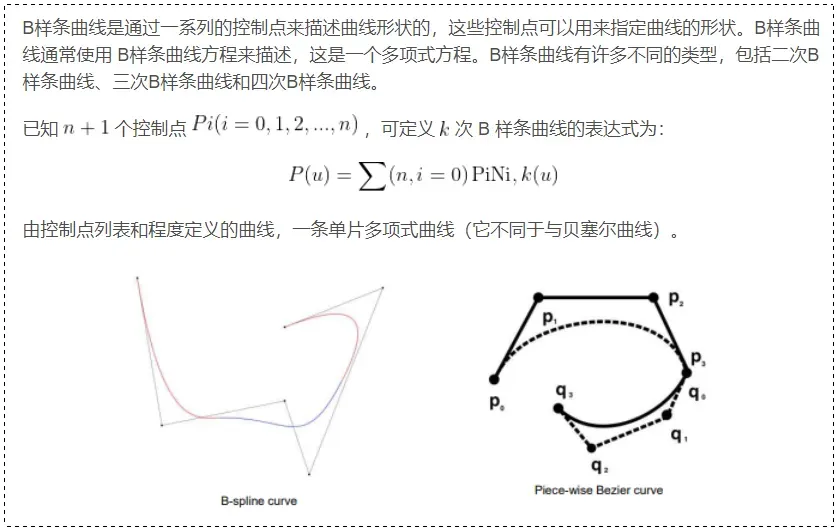
💭 举个例子:
splprep() 可以用来拟合一个光滑的 B 样条曲线到一组三维空间中的数据点。
函数返回拟合的 B 样条曲线函数的系数,以及一组可以用来对这些系数进行求值的控制点。
使用 splprep() 函数时,需提供一个包含数据点的数组,以及一些其它的可选参数,例如:
tck, u = splprep(points, u=None, s=0.0, per=0, quiet=1)point是包含数据点的数组。u是可选参数,它可以用来指定 B 样条曲线的形式参数。s是用来控制曲线的平滑度的参数。per用来指定曲线是否应该是周期的(bool)。quiet用以控制函数是否应该在出错时产生警告(bool)。
用 splev() 函数来对拟合的 B 样条曲线曲线进行求值,例如:
x, y, z = splev(tck, np.linspace(0, 1, num=1000))这将会返回B样条曲线在形式参数在 范围内的
个点的横坐标、纵坐标和纵坐标的值。
💬 对于每个车道的边界进行参数化的样条拟合:
splprep() 将返回参数,但我们只取它返回的第一个参数。
lane_boundary,_ = splprep(
        [lane_boundary_points[1:,0],
        lane_boundary_points[1:,1]],
        s=self.spline_smoothness,
        k=2
)
一样的,有了 splev() 这些参数和函数,我们就能提取曲线上的点了:
t = np.linspace(0, 1, 5) # t = [0, 0.25, 0.5, 0.75, 1]
Interpolated_lane_boundary_points = np.array(splev(t, self.lane_boundary))
.
Ⅱ. 代码实现与分析
0x00 转灰度图像:cur_gray
cut_gray 函数需要我们实现将状态图像转化为灰度图像。
💬 参考代码:
 def cut_gray(self, state_image_full):
        copy_img = state_image_full[:self.cut_size, :]
        red, green, blue = 0.2989, 0.5870, 0.1140
        return np.dot(copy_img[...,:3], [red, green, blue])[::-1]
💡 代码解析:
灰度图像是将彩色图像的三个通道的值统一转化为灰度值的图像。
具体来说,可以使用红色()、绿色(
)和蓝色(
)三个通道的值,按照一定的权值计算得到灰度图像的灰度值。这段代码中使用的是经典的加权平均法,即将
三个通道的值分别乘上 0.2989、0.5870、0.1140,再相加得到灰度值。
最后,这段代码将灰度图像进行反转,这是为了让图像的上方对应场景的前方,方便后续的处理。
0x01 边缘检测:edge_detection
为了在灰度图像中找到边缘,该函数应导出灰度图像的绝对梯度。使用 numpy 为每个像素导出绝对梯度。要忽略小渐变,需要将阈值 (self.gradient_threshold) 以下的所有渐变设置为 0。
💬 参考代码:
    def edge_detection(self, gray_image):
        '''
        ##### TODO #####
        In order to find edges in the gray state image,
        this function should derive the absolute gradients of the gray state image.
        Derive the absolute gradients using numpy for each pixel.
        To ignore small gradients, set all gradients below a threshold (self.gradient_threshold) to zero.

        input:
            gray_state_image 65x96x1

        output:
            gradient_sum 65x96x1
        '''

        gradient = np.gradient(gray_image)
        gradient_sum = abs(gradient[0]) + abs(gradient[1])
        gradient = gradient_sum < self.gradient_threshold
        gradient_sum[gradient] = 0

        return gradient_sum
💡 代码解析:
首先使用 numpy 中的 gradient 函数计算灰度图像的梯度。gradient 函数返回的是梯度的两个分量,即图像在水平方向( 轴)和垂直方向(
轴)的梯度。然后将这两个分量的绝对值相加,得到梯度的总和。
然后根据给我们的注释提示,将梯度总和小于阈值(self.gradient_threshold)的像素值设为 0。这样做的目的是去除小梯度,只保留图像中明显的边缘。
最后返回处理后的梯度总和,也就是边缘检测结果。
0x02 寻找边缘检测结果中的局部最大值:find_maxima_gradient_rowwise
为渐变图像的每一行输出局部最大值的参数,可以使用 scipy.signal 查找峰值以检测最大值。
* 提示:使用距离参数(distance)可以获得更好的鲁棒性。
- 距离参数
cuz车道应至少相隔 3 像素 find_peaks返回 `x` 中满足所有给定条件的峰值指数。
💬 参考代码:
    def find_maxima_gradient_rowwise(self, gradient_sum):
        '''
        ##### TODO #####
        This function should output arguments of local maxima for each row of the gradient image.
        You can use scipy.signal.find_peaks to detect maxima.
        Hint: Use distance argument for a better robustness.

        input:
            gradient_sum 65x96x1

        output:
            maxima (np.array) shape : (Number_maxima, 2)

        '''

        argmaxima = []
        pixel = 3        # 相隔参数
        i = 0
        while (i < gradient_sum.shape[0]):
            top, _ = find_peaks(gradient_sum[i], distance = pixel)
            argmaxima.append(top)

            i += 1

        return argmaxima
💡 代码解析:
寻找边缘检测结果中的局部最大值。局部最大值即指在图像的某一行中,值最大的像素的横坐标。
首先定义一个空的列表,用于存储各行中的局部最大值的横坐标。使用循环遍历边缘检测结果中的每一行。对于每一行,使用 scipy 的 find_peaks 函数检测峰值,并将检测结果存储在列表中。
find_peaks 函数返回的是满足所有给定条件的峰值指数,也就是峰值的横坐标。使用而 distance 参数,表示峰值之间的最小距离。这个参数的作用是使得检测到的峰值之间至少相隔 3 个像素,以此来获得更好的鲁棒性。最后返回列表,可得各行中的局部最大值的横坐标。
Ⅲ. 完整代码与运行结果
0x00 完整代码(仅供参考)
💬 参考代码:lane_detection.py
from turtle import distance
import numpy as np
import matplotlib.pyplot as plt
from scipy.signal import find_peaks
from scipy.interpolate import splprep, splev
from scipy.optimize import minimize
import time


class LaneDetection:
    '''
    Lane detection module using edge detection and b-spline fitting

    args:
        cut_size (cut_size=65) cut the image at the front of the car
        spline_smoothness (default=10)
        gradient_threshold (default=14)
        distance_maxima_gradient (default=3)

    使用边缘检测和b样条拟合的车道检测模块
    参数:
        cut_size(cut_size=65)在汽车前部剪切图像
        spline_smoothness(默认值=10)
        gradient_threshold(默认值=14)
        distance_maxima_gradient(默认值=3)

    '''

    def __init__(self, cut_size=65, spline_smoothness=10, gradient_threshold=14, distance_maxima_gradient=3):
        self.car_position = np.array([48,0])
        self.spline_smoothness = spline_smoothness
        self.cut_size = cut_size
        self.gradient_threshold = gradient_threshold
        self.distance_maxima_gradient = distance_maxima_gradient
        self.lane_boundary1_old = 0
        self.lane_boundary2_old = 0

    ## 将状态图像转化为灰度图像
    def cut_gray(self, state_image_full):
        '''
        ##### TODO #####
        This function should cut the image at the front end of the car (e.g. pixel row 65)
        and translate to gray scale

        input:
            state_image_full 96x96x3

        output:
            gray_state_image 65x96x1

        此功能应在汽车前端切割图像(例如像素行65),并转换为灰度
        输入:
            状态图像完整96x96x3
        输出:
            灰度_状态_图像65x96x1

        '''
        copy_img = state_image_full[:self.cut_size, :]
        red, green, blue = 0.2989, 0.5870, 0.1140
        return np.dot(copy_img[...,:3], [red, green, blue])[::-1]


    def edge_detection(self, gray_image):
        '''
        ##### TODO #####
        In order to find edges in the gray state image,
        this function should derive the absolute gradients of the gray state image.
        Derive the absolute gradients using numpy for each pixel.
        To ignore small gradients, set all gradients below a threshold (self.gradient_threshold) to zero.

        input:
            gray_state_image 65x96x1

        output:
            gradient_sum 65x96x1

        为了在灰度图像中找到边缘,
        该函数应导出灰度图像的绝对梯度。
        使用numpy为每个像素导出绝对梯度。
        要忽略小渐变,请将阈值(self.gradient_threshold)以下的所有渐变设置为0。
        '''

        gradient = np.gradient(gray_image)
        gradient_sum = abs(gradient[0]) + abs(gradient[1])
        gradient = gradient_sum < self.gradient_threshold
        gradient_sum[gradient] = 0

        return gradient_sum

    def find_maxima_gradient_rowwise(self, gradient_sum):
        '''
        ##### TODO #####
        This function should output arguments of local maxima for each row of the gradient image.
        You can use scipy.signal.find_peaks to detect maxima.
        Hint: Use distance argument for a better robustness.

        input:
            gradient_sum 65x96x1

        output:
            maxima (np.array) shape : (Number_maxima, 2)

        这个函数应该为渐变图像的每一行输出局部最大值的参数。
        您可以使用scipy.signal。查找峰值以检测最大值。
        提示:使用距离参数可以获得更好的鲁棒性。


        # 距离参数cuz车道应至少相隔3像素
        # find_peaks返回`x`中满足所有给定条件的峰值指数。
        '''

        argmaxima = []
        pixel = 3        # 相隔参数
        i = 0
        while (i < gradient_sum.shape[0]):
            top, _ = find_peaks(gradient_sum[i], distance = pixel)
            argmaxima.append(top)

            i += 1

        return argmaxima


    def find_first_lane_point(self, gradient_sum):
        '''
        Find the first lane_boundaries points above the car.
        Special cases like just detecting one lane_boundary or more than two are considered.
        Even though there is space for improvement ;)

        input:
            gradient_sum 65x96x1

        output:
            lane_boundary1_startpoint
            lane_boundary2_startpoint
            lanes_found  true if lane_boundaries were found

        找到汽车上方的第一个车道边界点。
        特殊情况下,如只检测一个或两个以上的车道边界。
        尽管还有改进的空间;)

        输入:
            梯度_总和65x96x1
        输出:
            车道边界1_起点
            车道边界2起点
            如果找到车道边界,则lanes_found为true
        '''

        # Variable if lanes were found or not
        lanes_found = False
        row = 0

        # loop through the rows
        while not lanes_found:

            # Find peaks with min distance of at least 3 pixel
            argmaxima = find_peaks(gradient_sum[row],distance=3)[0]

            # if one lane_boundary is found
            if argmaxima.shape[0] == 1:
                lane_boundary1_startpoint = np.array([[argmaxima[0],  row]])

                if argmaxima[0] < 48:
                    lane_boundary2_startpoint = np.array([[0,  row]])
                else:
                    lane_boundary2_startpoint = np.array([[96,  row]])

                lanes_found = True

            # if 2 lane_boundaries are found
            elif argmaxima.shape[0] == 2:
                lane_boundary1_startpoint = np.array([[argmaxima[0],  row]])
                lane_boundary2_startpoint = np.array([[argmaxima[1],  row]])
                lanes_found = True

            # if more than 2 lane_boundaries are found
            elif argmaxima.shape[0] > 2:
                # if more than two maxima then take the two lanes next to the car, regarding least square
                A = np.argsort((argmaxima - self.car_position[0])**2)
                lane_boundary1_startpoint = np.array([[argmaxima[A[0]],  0]])
                lane_boundary2_startpoint = np.array([[argmaxima[A[1]],  0]])
                lanes_found = True

            row += 1

            # if no lane_boundaries are found
            if row == self.cut_size:
                lane_boundary1_startpoint = np.array([[0,  0]])
                lane_boundary2_startpoint = np.array([[0,  0]])
                break

        return lane_boundary1_startpoint, lane_boundary2_startpoint, lanes_found


    def lane_detection(self, state_image_full):
        '''
        ##### TODO #####
        This function should perform the road detection

        args:
            state_image_full [96, 96, 3]

        out:
            lane_boundary1 spline
            lane_boundary2 spline

        此功能应执行道路检测
        参数:
            state_image_full [96, 96, 3]
        输出:
            lane_boundary1 spline
            lane_boundary2 spline
        '''

        # to gray
        gray_state = self.cut_gray(state_image_full)

        # edge detection via gradient sum and thresholding
        gradient_sum = self.edge_detection(gray_state)
        maxima = self.find_maxima_gradient_rowwise(gradient_sum)

        # first lane_boundary points
        lane_boundary1_points, lane_boundary2_points, lane_found = self.find_first_lane_point(gradient_sum)

        # if no lane was found,use lane_boundaries of the preceding step
        # l1 = lane_boundary1_points
        # l2 = lane_boundary2_points

        if lane_found:

            ##### TODO #####
            #  in every iteration:
            # 1- find maximum/edge with the lowest distance to the last lane boundary point
            # 2- append maximum to lane_boundary1_points or lane_boundary2_points
            # 3- delete maximum from maxima
            # 4- stop loop if there is no maximum left
            #    or if the distance to the next one is too big (>=100)

            '''
            #在每次迭代中:
                #1-查找到最后一个车道边界点的最小距离的最大/边缘
                #2-将最大值附加到lane_boundary1_points或lane_boondary2_point斯
                #3-从maxima中删除maximum
                #4-如果没有最大剩余
                # ,则停止循环
                #或者如果到下一个的距离太大(>=100)
            '''
            l1 = lane_boundary1_points
            l2 = lane_boundary2_points

            row = 1
            lim = 65
            while (row < lim):
                max_row = maxima[row]
                if len(max_row) < 2:
                    break
                #根据与先前车道预测的距离对点进行排序
                #此外,argsort还返回可以按顺序迭代的索引
                #因此,我们在排序后使用A[0]和B[0]

                arrayA, arrayB = np.argsort(pow(max_row - l1[0][0], 2)), np.argsort(pow(max_row - l2[0][0], 2))
                p1, p2 = np.array([[max_row[arrayA[0]], row]]), np.array([[max_row[arrayB[0]], row]])
                lane_boundary1_points, lane_boundary2_points = np.append(lane_boundary1_points, p1, axis=0), np.append(lane_boundary2_points, p2, axis=0)

                l1, l2 = p1, p2
                row += 1

            # lane_boundary 1
            # lane_boundary 2

            ################


            ##### TODO #####
            # spline fitting using scipy.interpolate.splprep
            # and the arguments self.spline_smoothness
            #
            # if there are more lane_boundary points points than spline parameters
            # else use perceding spline
            '''
            使用 scipy.interpolate.splprep  进行样条拟合
                #以及自变量self.spline_splity
                #如果车道边界点比样条曲线参数多
                #否则使用perceding样条线
            '''


            if lane_boundary1_points.shape[0] > 4 and lane_boundary2_points.shape[0] > 4:

                # Pay attention: the first lane_boundary point might occur twice
                # lane_boundary 1
                lane_boundary1, _ = splprep([lane_boundary1_points[1:,0], lane_boundary1_points[1:,1]], s=self.spline_smoothness, k=2)

                # lane_boundary 2
                lane_boundary2, _ = splprep([lane_boundary2_points[1:,0], lane_boundary2_points[1:,1]], s=self.spline_smoothness, k=2)

            else:
                lane_boundary1 = self.lane_boundary1_old
                lane_boundary2 = self.lane_boundary2_old

            ################

        else:
            lane_boundary1 = self.lane_boundary1_old
            lane_boundary2 = self.lane_boundary2_old

        self.lane_boundary1_old = lane_boundary1
        self.lane_boundary2_old = lane_boundary2

        # output the spline
        return lane_boundary1, lane_boundary2


    def plot_state_lane(self, state_image_full, steps, fig, waypoints=[]):
        '''
        Plot lanes and way points
        '''
        # evaluate spline for 6 different spline parameters.
        t = np.linspace(0, 1, 6)
        lane_boundary1_points_points = np.array(splev(t, self.lane_boundary1_old))
        lane_boundary2_points_points = np.array(splev(t, self.lane_boundary2_old))

        plt.gcf().clear()
        plt.imshow(state_image_full[::-1])
        plt.plot(lane_boundary1_points_points[0], lane_boundary1_points_points[1]+96-self.cut_size, linewidth=5, color='orange')
        plt.plot(lane_boundary2_points_points[0], lane_boundary2_points_points[1]+96-self.cut_size, linewidth=5, color='orange')
        if len(waypoints):
            plt.scatter(waypoints[0], waypoints[1]+96-self.cut_size, color='white')

        plt.axis('off')
        plt.xlim((-0.5,95.5))
        plt.ylim((-0.5,95.5))
        plt.gca().axes.get_xaxis().set_visible(False)
        plt.gca().axes.get_yaxis().set_visible(False)
        fig.canvas.flush_events()


# t = np.linspace(0, 1, 5) # t = [0, 0.25, 0.5, 0.75, 1]
# Interpolated_lane_boundary_points = np.array(splev(t, self.lane_boundary))
0x01 运行结果演示
到 skeleton 文件夹的路径下,输入
python test_lane_detection 运行代码:

🚩 运行结果:
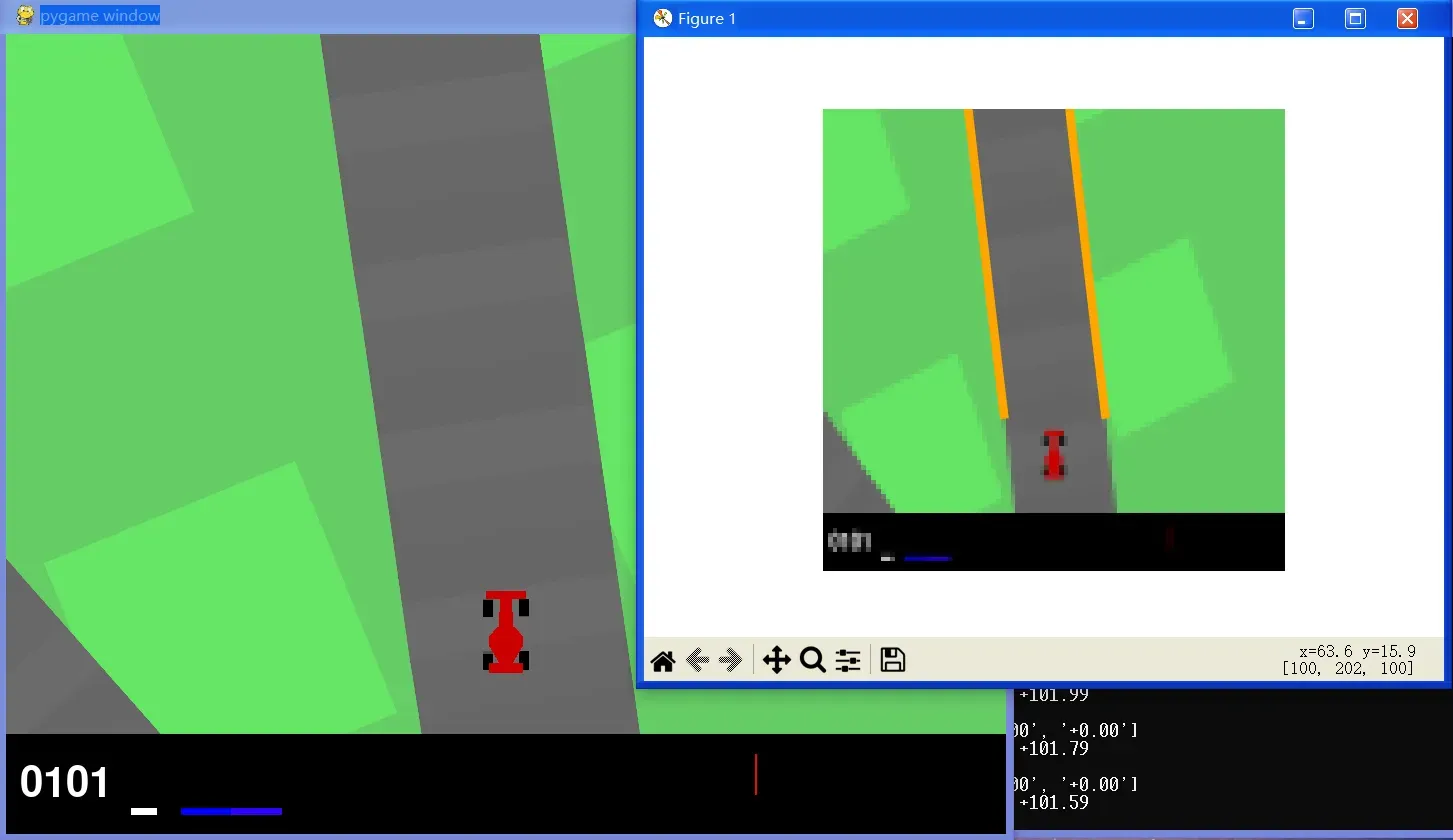
💻 GIF:

📌 [ 笔者 ]   王亦优
📃 [ 更新 ]   2023.1.1
❌ [ 勘误 ]   /* 暂无 */
📜 [ 声明 ]   由于作者水平有限,本文有错误和不准确之处在所难免,
本人也很想知道这些错误,恳望读者批评指正!| 📜 参考资料 [6] Montemerlo M, Becker J, Bhat S, et al. Junior: The Stanford entry in the Urban Challenge Slide Credit: Steven Waslander LaValle: Rapidly-exploring random trees: A new tool for path planning. Techical Report, 1998 Dolgov et al.: Practical Search Techniques in Path Planning for Autonomous Driving. STAIR, 2008. Microsoft. MSDN(Microsoft Developer Network)[EB/OL]. []. . 百度百科[EB/OL]. []. https://baike.baidu.com/. . [EB/OL]. []. https://blog.waymo.com/2021/10/the-waymo-driver-handbook-perception.html. |
文章出处登录后可见!