简介
论文: https://link.zhihu.com/?target=https%3A//arxiv.org/abs/2203.03605
代码: https://link.zhihu.com/?target=https%3A//github.com/IDEACVR/DINO
DINO: 让目标检测拥抱Transformer
主要特性:
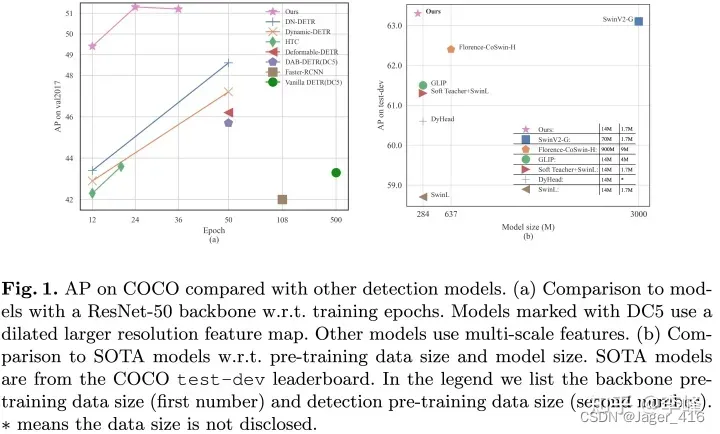
- SOTA性能:在大模型上以相对较小的数据和模型(~1/10相比之前SwinV2)取得了最好的检测结果。在ResNet-50的标准setting下取得了51.3 AP。
- End2end(端到端可学习):DINO属于DETR类型的检测器,是端到端可学习的,避免了传统检测器许多需要手工设计的模块(如NMS)。
- Fast converging(收敛快): 在标准的ResNet-50 setting下,使用 5 个尺度特征(5-scale)的 DINO 在 12 个 epoch 中达到 49.4 AP,在 24 个 epoch 中达到 51.3 AP。使用4个尺度特征(4-scale)的DINO达到了了类似的性能并可以以 23 FPS 运行。

配置环境
下载代码
git clone https://github.com/IDEA-Research/DINO.git
cd DINO
安装Pytorch环境
# an example:
conda install -c pytorch pytorch torchvision
安装代码环境
pip install -r requirements.txt
编译CUDA operators
cd models/dino/ops
python setup.py build install
# unit test (should see all checking is True)
python test.py
cd ../../..
注意:
- 若出现cocoapi/panopticapi/MultiScaleDeformableAttention编译安装失败的情况, 请检查电脑中是否存在完整的C++编译环境, 缺少请安装相应编译环境, Win请参考如何解决 Microsoft Visual C++ 14.0 or greater is required. Get it with “Microsoft C++ Build Tools“
- 编译CUDA operators 要求Pytorch与CUDA版本必须一致, 不能高也不能低. 若不一致请调成直至版本相同
- 执行
python test.py后若出现缺少包MultiScaleDeformableAttention, 则说明CUDA operators编译安装失败, 若出现显存/内存溢出报错则属于正常现象.
PS: 其实CUDA高于Pytorch并不影响运行,但是无法通过编译,因此也可以通过其使用他具有低版本CUDA环境的电脑将MultiScaleDeformableAttention编译成WHL版本再在本机安装即可。若实在是无法正常完成编译可以尝试使用对应包的WHL版本进行安装,这里提供一些我基于Python3.8、CUDA11.7环境下编译的一些常见包的WHL版本。
百度网盘
提取码:z4ia
训练
COCO数据集
执行scripts/DINO_train.sh /path/to/your/COCODIR即可开始训练
或
python main.py --output_dir ./logs/DINO/R50_IP102_finetune -c ./config/DINO/DINO_4scale.py --coco_path ./coco_path --options dn_scalar=100 embed_init_tgt=TRUE dn_label_coef=1.0 dn_bbox_coef=1.0 use_ema=False dn_box_noise_scale=1.0
自定义数据集
DINO采用COCO标准数据集, 目录结构如下:
COCODIR/
  ├── train2017/
  ├── val2017/
  └── annotations/
  	├── instances_train2017.json
  	└── instances_val2017.json
1. 准备数据集
训练前首先需要将自己的数据集转为COCO标准
若使用的是YOLO标准或是VOC标准,请自行搜索数据集转换工具
2. 修改num_classes
修改数据集后需要将所使用参数脚本DINO_4scale.py中的num_classes修改为最大类别ID+1(此处建议复制创建一个新的脚本, 防止出现混乱)
注意一定是最大类别ID+1, 这里num_classes有歧义,它指的并不一定真的是数据集中的类别数量, 比如COCO数据集虽然只有80是个类别,但是category_id的范围却是1-90, 因此这里默认的num_classes是90+1. 与是否从0开始以及是否存在间隔无关
具体详情见Confusion about num_classes 108
然后将models/dino.py中的717行处修改为如下代码:
match_unstable_error = args.match_unstable_error
dn_labelbook_size = args.dn_labelbook_size
if dn_labelbook_size < num_classes:
    dn_labelbook_size = num_classes
dn_labelbook_size默认为91, 它需要大于等于num_classes.
3. 修正Win环境特有错误
此处仅Win环境下需要修改
修改util/slconfig.py中的83行处代码为如下形式:
if filename.lower().endswith('.py'):
    with tempfile.TemporaryDirectory() as temp_config_dir:
        temp_config_dir = "C:/tempDir/"
        temp_config_file = tempfile.NamedTemporaryFile(
            dir=temp_config_dir, suffix='.py')

        temp_config_file = open('C:/tempDir/temp.py', 'w+b')
        temp_config_name = osp.basename(temp_config_file.name)
        shutil.copyfile(filename,
                        osp.join(temp_config_dir, temp_config_name))
        temp_module_name = osp.splitext(temp_config_name)[0]
        sys.path.insert(0, temp_config_dir)
        SLConfig._validate_py_syntax(filename)
        mod = import_module(temp_module_name)
        sys.path.pop(0)
        cfg_dict = {
            name: value
            for name, value in mod.__dict__.items()
            if not name.startswith('__')
        }
        # delete imported module
        del sys.modules[temp_module_name]
        # close temp file
        temp_config_file.close()
- 创建临时文件夹并在此文件夹下创建临时文件
- 将
temp_config_dir修改为临时文件夹 - 将
temp_config_file修改为临时文件
具体详见PermissionError: [Errno 13] Permission denied: ‘C:\Users\20825\AppData\Local\Temp\tmpt11h2ul9\tmp2fdhjty4.py’ #43
4. 训练
4.1 从零开始
python main.py --output_dir logs/DINO/R50_custom_finetune -c ./config/DINO/DINO_4scale_custom.py --coco_path ./coco_path --options dn_scalar=100 embed_init_tgt=TRUE dn_label_coef=1.0 dn_bbox_coef=1.0 use_ema=False dn_box_noise_scale=1.0
4.2微调
python main.py --output_dir logs/DINO/R50_custom_finetune -c config/DINO/DINO_4scale_custom.py --coco_path ./coco_path --options dn_scalar=100 embed_init_tgt=TRUE dn_label_coef=1.0 dn_bbox_coef=1.0 use_ema=False dn_box_noise_scale=1.0 --pretrain_model_path./checkpoint0033_4scale.pth --finetune_ignore label_enc.weight class_embed
引用
- DINO: 让目标检测拥抱Transformer
- PermissionError: [Errno 13] Permission denied: ‘C:\Users\20825\AppData\Local\Temp\tmpt11h2ul9\tmp2fdhjty4.py’ #43
- Confusion about num_classes 108
- 如何解决 Microsoft Visual C++ 14.0 or greater is required. Get it with “Microsoft C++ Build Tools“
文章出处登录后可见!
