文章目录
- 智能零售柜商品识别从零开始使用YOLOv5+PyQt5+OpenCV实现
- 1. 数据集的制作
- 1.1 数据集采集
- 1.2 使用labelme对图片进行标注
- 2. YOLOv5
- 2.1YOLO算法简单介绍
- 2.2 YOLOv5获取与调试
- 2.2.1 下载yolov5代码
- 2.2.2 安装yolov5训练所需的第三方库:
- 2.2.3 下载预训练的权重文件
- 2.2.4 配置自己的yaml文件
- 2.2.5 开始训练
- 2.2.5 编写detection方法用于后续检测的调用
- 3. Pyqt5
- 3.1介绍
- 3.2 window平台安装
- 4. OpenCV
- 安装
- 5. 图片检测
- 5.1界面布局
- 5.2 模型加载
- 5.3点击上传按钮事件和检测展示绑定
- 5.4完整代码
智能零售柜商品识别从零开始使用YOLOv5+PyQt5+OpenCV实现
全流程教程,从数据采集到模型使用到最终展示。若有任何疑问和建议欢迎评论区讨论。
先放上最终实现效果
检测效果
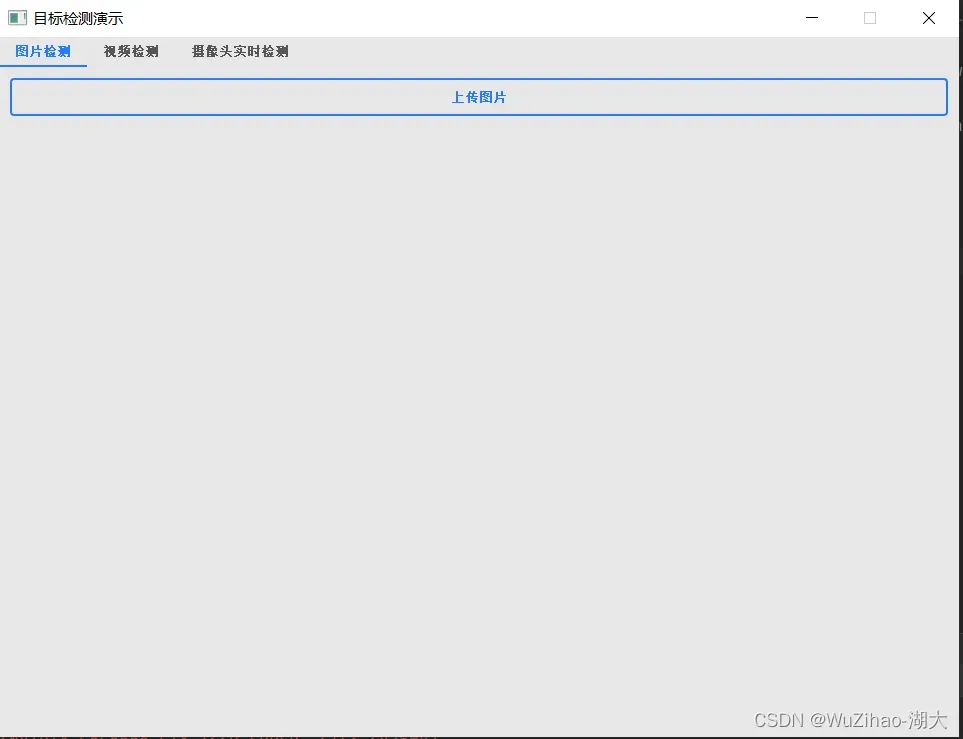

智能零售柜商品识别,当顾客将自己选购的商品放置在制定区域的时候,能精准地识别每一个商品,从而能够返回完整地购物清单及计算顾客应付的实际商品总价格。
1. 数据集的制作
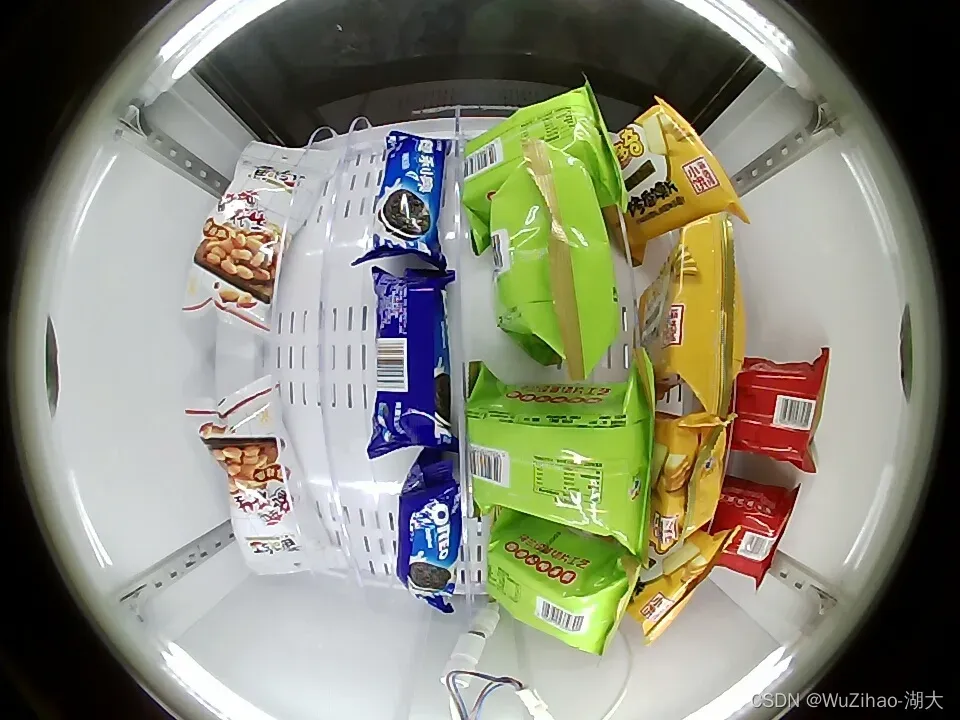
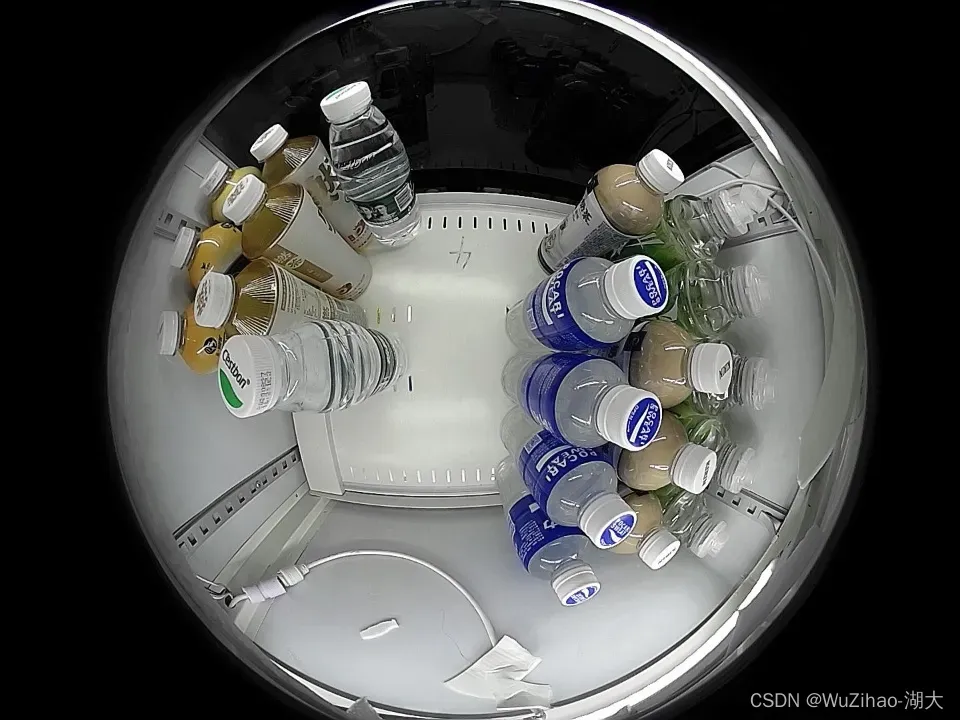
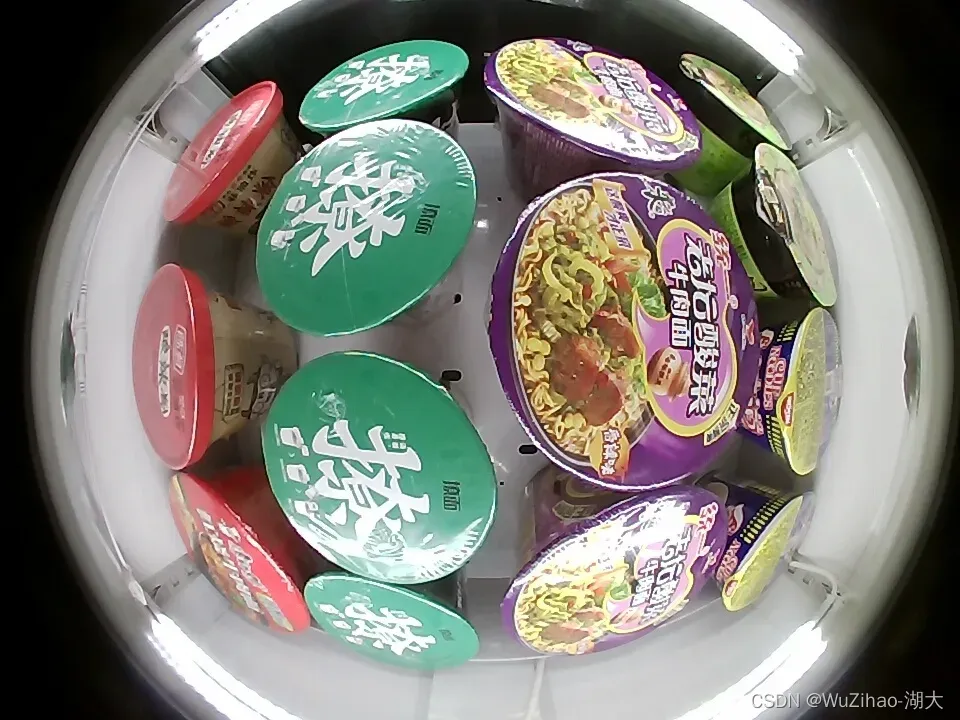
我已经处理了一份数据形成了对应的数据集。总数据量为5422张,且所有图片均已标注,共有113类商品。本数据集以对数据集进行划分,其中训练集3796张、验证集1084张、测试集542张。
所有标签如下,包含常见的如农夫山泉,可乐等。
3+2-2
3jia2
aerbeisi
anmuxi
aoliao
asamu
baicha
baishikele
baishikele-2
baokuangli
binghongcha
bingqilinniunai
bingtangxueli
buding
chacui
chapai
chapai2
damaicha
daofandian1
daofandian2
daofandian3
daofandian4
dongpeng
dongpeng-b
fenda
gudasao
guolicheng
guolicheng2
haitai
haochidian
haoliyou
heweidao
heweidao2
heweidao3
hongniu
hongniu2
hongshaoniurou
jianjiao
jianlibao
jindian
kafei
kaomo_gali
kaomo_jiaoyan
kaomo_shaokao
kaomo_xiangcon
kebike
kele
kele-b
kele-b-2
laotansuancai
liaomian
libaojian
lingdukele
lingdukele-b
liziyuan
lujiaoxiang
lujikafei
luxiangniurou
maidong
mangguoxiaolao
meiniye
mengniu
mengniuzaocan
moliqingcha
nfc
niudufen
niunai
nongfushanquan
qingdaowangzi-1
qingdaowangzi-2
qinningshui
quchenshixiangcao
rancha-1
rancha-2
rousongbing
rusuanjunqishui
suanlafen
suanlaniurou
taipingshuda
tangdaren
tangdaren2
tangdaren3
ufo
ufo2
wanglaoji
wanglaoji-c
wangzainiunai
weic
weitanai
weitanai2
weitanaiditang
weitaningmeng
weitaningmeng-bottle
weiweidounai
wuhounaicha
wulongcha
xianglaniurou
xianguolao
xianxiayuban
xuebi
xuebi-b
xuebi2
yezhi
yibao
yida
yingyangkuaixian
yitengyuan
youlemei
yousuanru
youyanggudong
yuanqishui
zaocanmofang
zihaiguo
示例图片
自己制作数据集可以参考如下步骤:
1.1 数据集采集
可以通过爬虫爬取一些图片。
1.2 使用labelme对图片进行标注
labelme是图形图像注释工具,它是用Python编写的,并将Qt用于其图形界面。说直白点,它是有界面的, 像软件一样,可以交互,但是它又是由命令行启动的,比软件的使用稍微麻烦点。其界面如下图:
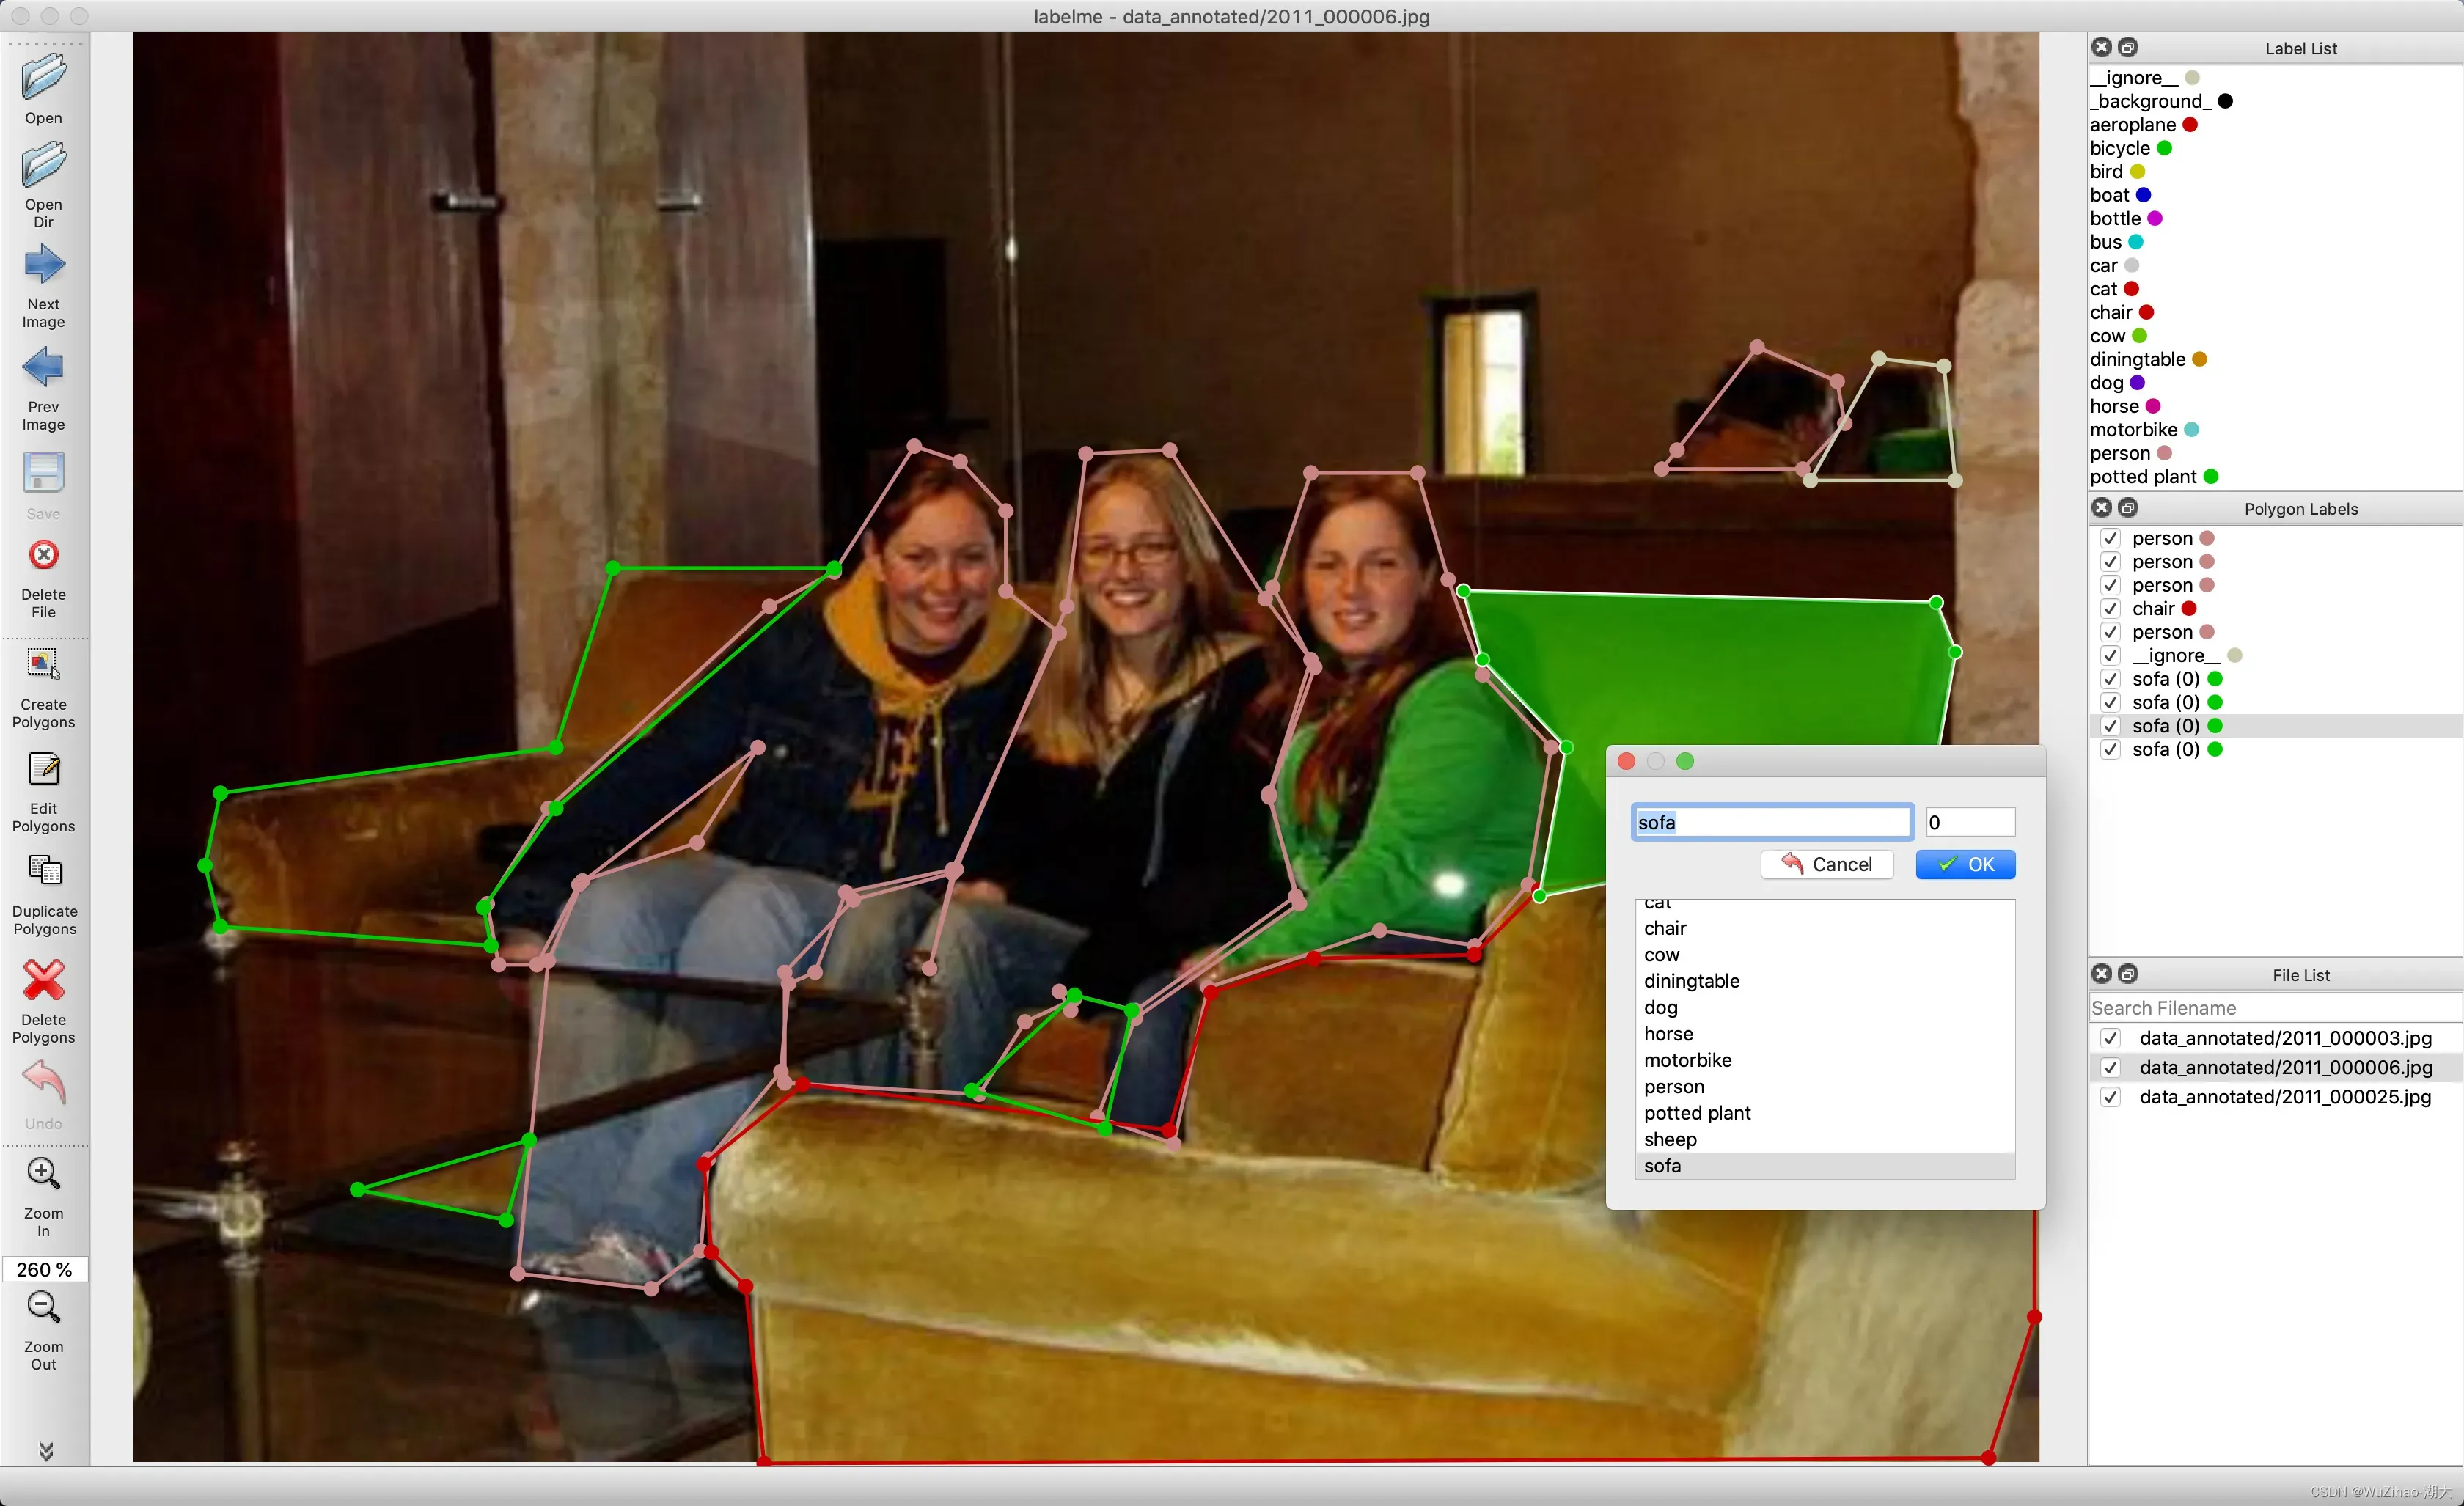
github链接: labelme https://github.com/wkentaro/labelme
它的功能很多,包括:
- 对图像进行多边形,矩形,圆形,多段线,线段,点形式的标注(可用于目标检-测,图像分割等任务)。
- 对图像进行进行 flag形式的标注(可用于图像分类 和 清理 任务)。
- 视频标注 – 生成 VOC 格式的数据集(for semantic / instancesegmentation)
- 生成 COCO 格式的数据集(for instance segmentation)
2. YOLOv5
2.1YOLO算法简单介绍
YOLO框架(You Only Look Once)与RCNN系列算法不一样,是以不同的方式处理对象检测。它将整个图像放在一个实例中,并预测这些框的边界框坐标和及所属类别概率。使用YOLO算法最大优的点是速度极快,每秒可处理45帧,也能够理解一般的对象表示。
在本节中,将介绍YOLO用于检测给定图像中的对象的处理步骤。
首先,输入图像:
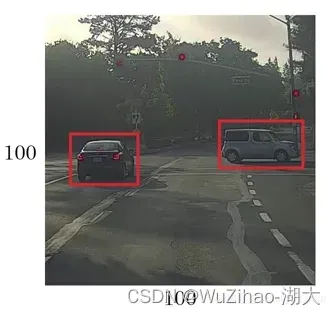
然后,YOLO将输入图像划分为网格形式(例如3 X 3):
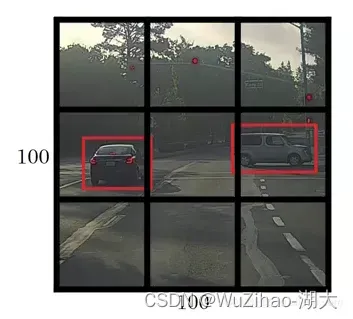
最后,对每个网格应用图像分类和定位处理,获得预测对象的边界框及其对应的类概率。
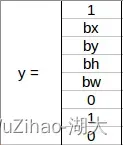
整个过程是不是很清晰,下面逐一详细介绍。首先需要将标记数据传递给模型以进行训练。假设已将图像划分为大小为3 X 3的网格,且总共只有3个类别,分别是行人(c1)、汽车(c2)和摩托车(c3)。因此,对于每个单元格,标签y将是一个八维向量:

其中:
pc定义对象是否存在于网格中(存在的概率);
bx、by、bh、bw指定边界框;
c1、c2、c3代表类别。如果检测对象是汽车,则c2位置处的值将为1,c1和c3处的值将为0;
假设从上面的例子中选择第一个网格:

由于此网格中没有对象,因此pc将为零,此网格的y标签将为:

?意味着其它值是什么并不重要,因为网格中没有对象。下面举例另一个有车的网格(c2=1):

在为此网格编写y标签之前,首先要了解YOLO如何确定网格中是否存在实际对象。大图中有两个物体(两辆车),因此YOLO将取这两个物体的中心点,物体将被分配到包含这些物体中心的网格中。中心点左侧网格的y标签会是这样的:
由于此网格中存在对象,因此pc将等于1,bx、by、bh、bw将相对于正在处理的特定网格单元计算。由于检测出的对象是汽车,所以c2=1,c1和c3均为0。对于9个网格中的每一个单元格,都具有八维输出向量。最终的输出形状为3X3X8。
使用上面的例子(输入图像:100X100X3,输出:3X3X8),模型将按如下方式进行训练:
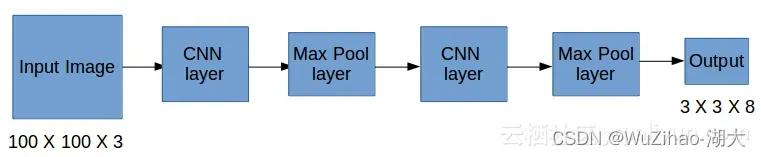
使用经典的CNN网络构建模型,并进行模型训练。在测试阶段,将图像传递给模型,经过一次前向传播就得到输出y。为了简单起见,使用3X3网格解释这一点,但通常在实际场景中会采用更大的网格(比如19X19)。
即使一个对象跨越多个网格,它也只会被分配到其中点所在的单个网格。可以通过增加更多网格来减少多个对象出现在同一网格单元中的几率。
2.2 YOLOv5获取与调试
2.2.1 下载yolov5代码
如果你有git,则使用git clone
git clone https://github.com/ultralytics/yolov5 # clone
如果你没有git,你可以使用Dwonload ZIP下载代码项目。
yolov5代码地址:yolov5
注意:yolov5的代码是最新的v8.0版本
可以通过这个链接下载6.0版本https://github.com/ultralytics/yolov5/tree/v6.0
2.2.2 安装yolov5训练所需的第三方库:
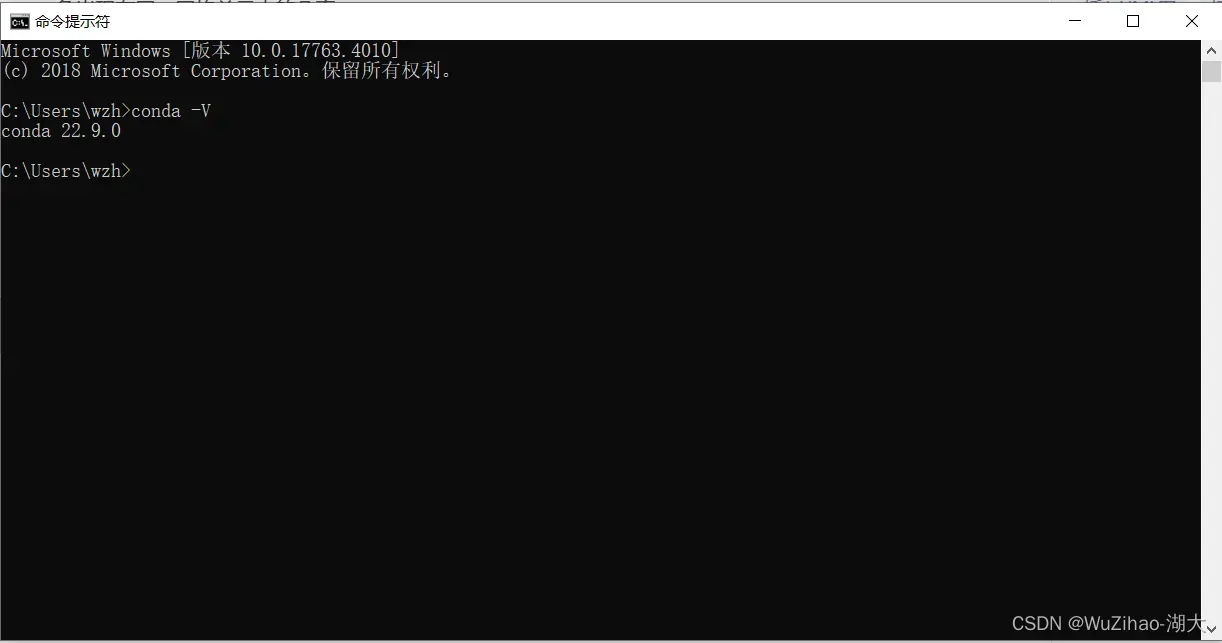
- 检查是否正确安装好anaconda。
windows+r打开cmd,输入 conda -V。若出现版本号,则安装成功。
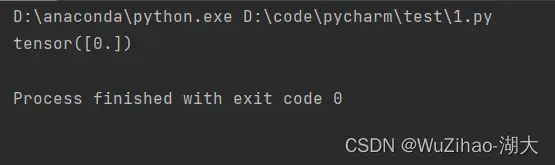
- 检查是否正确安装好pytorch
import torch
if __name__ == '__main__':
     print(torch.zeros(1))
- 进入yolov5文件夹目录安装第三方库
cd [path_to_yolov5]
如下图所示

安装第三方库
pip install -r requirement.txt
如下图所示,等待安装完成

2.2.3 下载预训练的权重文件
我们需要下载其预训练的权重文件然后再此基础上进行调整训练,这样在数据集数量较小时也能取得不错的检测准确率。
供选择的有yolov5s,yolov5m,yolov5l,yolov5x。模型的大小逐渐增大,训练时间更长,准确率提高。

这里我们以yolov5s为例训练。下载地址为yolov5s.pt
所有权重下载地址可在https://github.com/ultralytics/yolov5/releases/tag/v6.0界面找到
2.2.4 配置自己的yaml文件
配置models/yolov5s_mask.yaml 可以直接复制yolov5s.yaml文件,然后在nc即类别出进行修改,对于商品检测数量为113。其中anchors参数表示锚框的大小,可以通过对数据集进行knn聚类得到,这里直接使用默认即对COCO数据集进行聚类的结果。
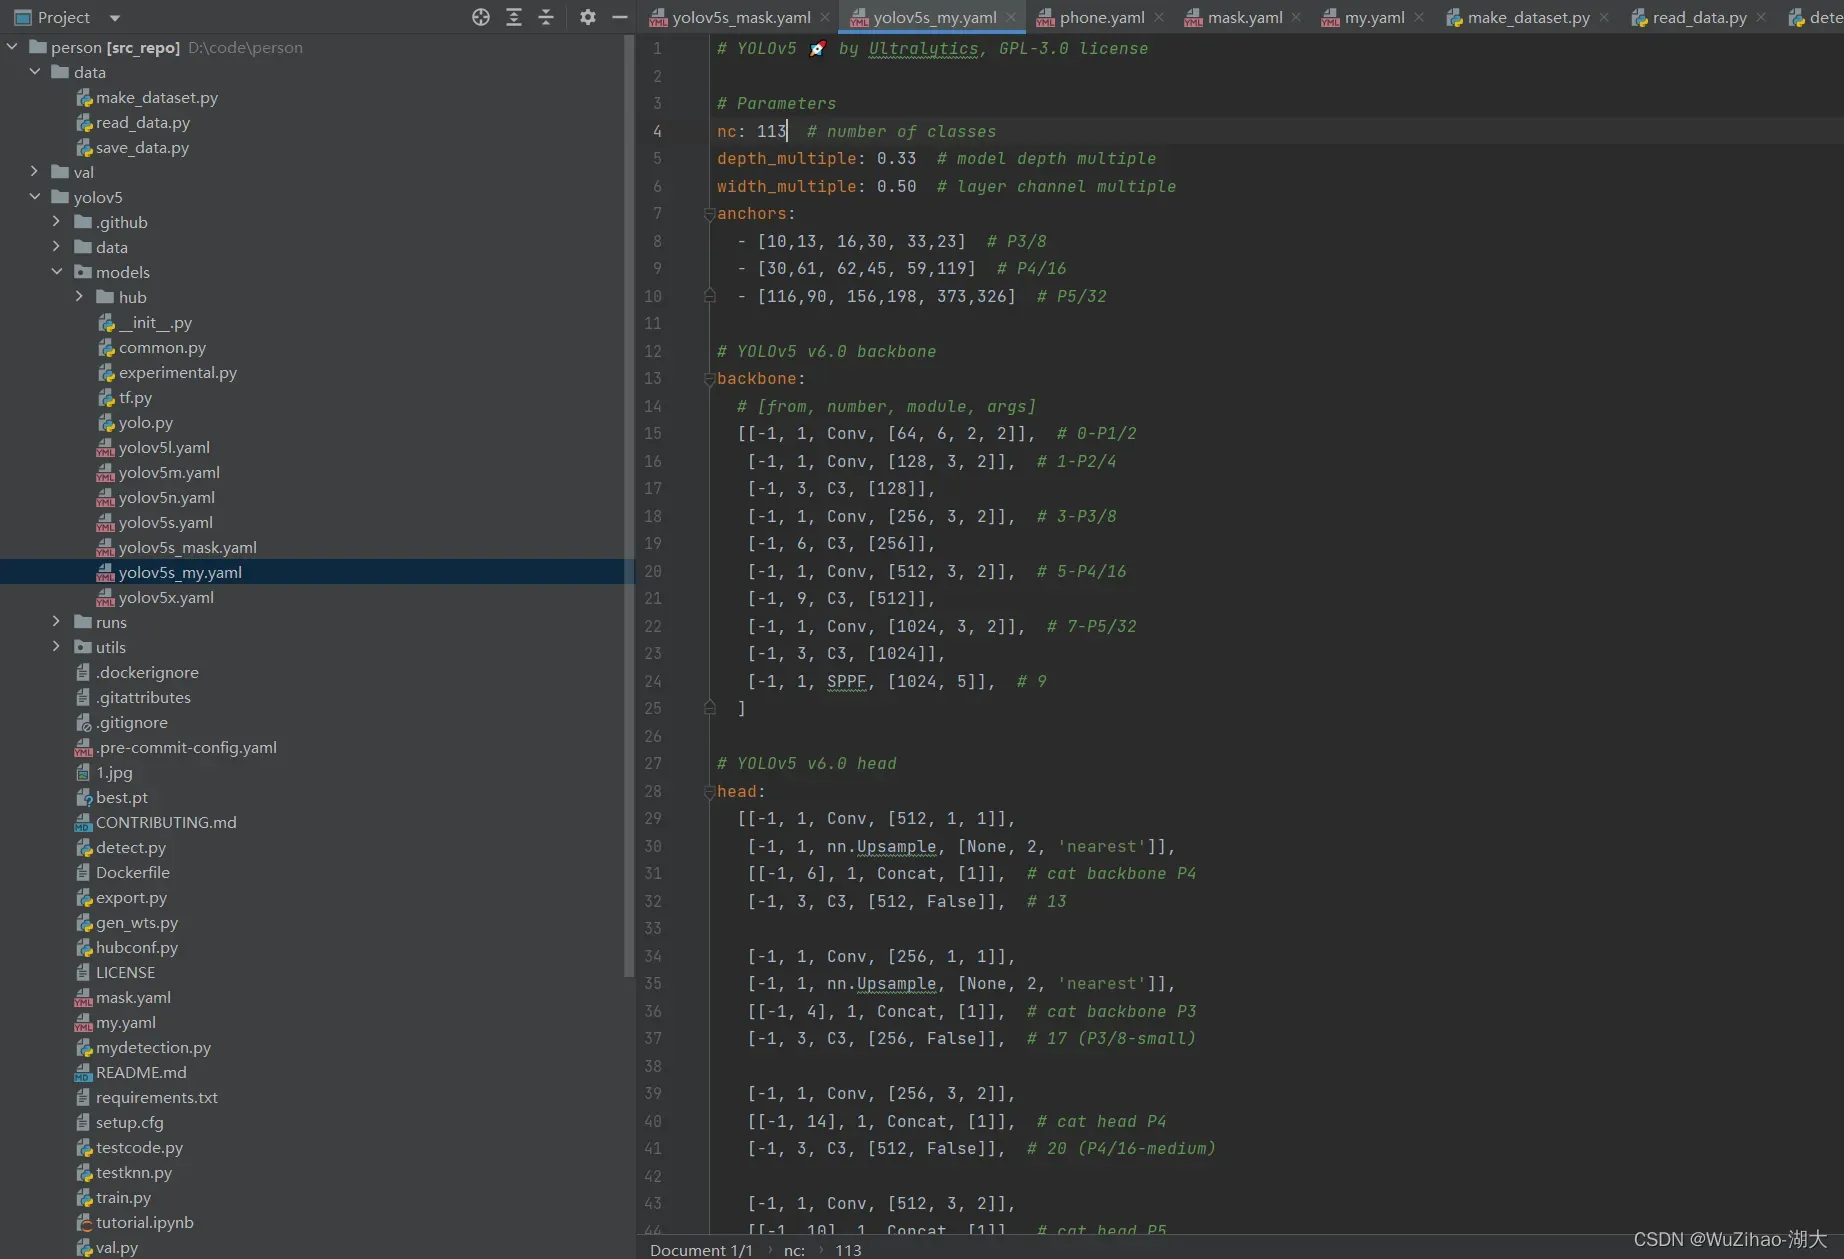
配置mask.yaml 。这里train指定训练数据集所在位置,val测试数据集所在位置,nc类别数,names类别的名称(注意顺序)

2.2.5 开始训练
python3 train.py --img 640 --batch 8 --epochs 50 --data my.yaml --cfg yolov5s_my.yaml --weights "yolov5s.pt"

如果出现显卡空间不足的情况可以改小–bath参数

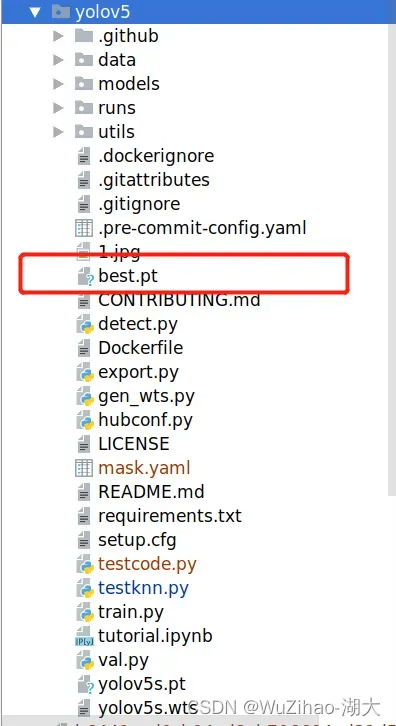
会在/runs/train/exp/weights/best.pt下生成最终的权重文件。

将此文件复制到yolov5目录下后续使用
2.2.5 编写detection方法用于后续检测的调用
后续进行图片或者视频检测时,只需要传入YOLOv5模型和图片,便会返回检测后图片
import os
import sys
from pathlib import Path

import numpy as np
import torch


FILE = Path(__file__).resolve()
ROOT = FILE.parents[0]  # YOLOv5 root directory
if str(ROOT) not in sys.path:
    sys.path.append(str(ROOT))  # add ROOT to PATH
ROOT = Path(os.path.relpath(ROOT, Path.cwd()))  # relative

from models.experimental import attempt_load
from utils.general import apply_classifier, check_img_size, check_imshow, check_requirements, check_suffix, colorstr, \
    increment_path, non_max_suppression, print_args, save_one_box, scale_coords, strip_optimizer, xyxy2xywh, LOGGER
from utils.plots import Annotator, colors
from utils.torch_utils import load_classifier, select_device, time_sync
from utils.augmentations import Albumentations, augment_hsv, copy_paste, letterbox, mixup, random_perspective

@torch.no_grad()
def detection(model,input_img):
    imgsz = 640  # inference size (pixels)
    conf_thres = 0.25   # confidence threshold
    iou_thres = 0.45   # NMS IOU threshold
    max_det = 1000  # maximum detections per image
    device = '0'  # cuda device, i.e. 0 or 0,1,2,3 or cpu
    view_img = False   # show results
    save_txt = False  # save results to *.txt
    save_conf = False    # save confidences in --save-txt labels
    save_crop = False   # save cropped prediction boxes
    nosave = False  # do not save images/videos
    classes = None   # filter by class: --class 0, or --class 0 2 3
    agnostic_nms = False   # class-agnostic NMS
    augment = False   # augmented inference
    project = ROOT / 'runs/detect',  # save results to project/name
    name = 'exp'   # save results to project/name
    exist_ok = False,  # existing project/name ok, do not increment
    line_thickness = 3   # bounding box thickness (pixels)
    hide_labels = False   # hide labels
    hide_conf = False   # hide confidences
    half = False  # use FP16 half-precision inference
    # Directories
    # Initialize
    device = select_device(device)
    weights = 'best.pt'
    # # Load model
    w = str(weights[0] if isinstance(weights, list) else weights)
    classify, suffix, suffixes = False, Path(w).suffix.lower(), ['.pt', '.onnx', '.tflite', '.pb', '']
    check_suffix(w, suffixes)  # check weights have acceptable suffix
    pt, onnx, tflite, pb, saved_model = (suffix == x for x in suffixes)  # backend booleans
    stride = int(model.stride.max())
    names = model.module.names if hasattr(model, 'module') else model.names  # get class names
    imgsz = check_img_size(imgsz, s=stride)  # check image size
    img0 = input_img  # BGR
    im0s=img0
    # Padded resize
    img = letterbox(img0, imgsz, stride=32, auto=pt)[0]

    # Convert
    img = img.transpose((2, 0, 1))[::-1]  # HWC to CHW, BGR to RGB
    img = np.ascontiguousarray(img)
    bs = 1  # batch_size

    dt, seen = [0.0, 0.0, 0.0], 0
    t1 = time_sync()
    img = torch.from_numpy(img).to(device)
    img = img.float()  # uint8 to fp16/32
    img /= 255.0  # 0 - 255 to 0.0 - 1.0
    if len(img.shape) == 3:
        img = img[None]  # expand for batch dim
    t2 = time_sync()
    dt[0] += t2 - t1
    # Inference
    if pt:
        pred = model(img, augment=augment)[0]
    t3 = time_sync()
    dt[1] += t3 - t2

    # NMS
    pred = non_max_suppression(pred, conf_thres, iou_thres, classes, agnostic_nms, max_det=max_det)
    dt[2] += time_sync() - t3
    # Process predictions
    for i, det in enumerate(pred):  # per image
        seen += 1
        im0=im0s.copy()
        annotator = Annotator(im0, line_width=line_thickness, example=str(names))
        if len(det):
            # Rescale boxes from img_size to im0 size
            det[:, :4] = scale_coords(img.shape[2:], det[:, :4], im0.shape).round()
            # Write results
            for *xyxy, conf, cls in reversed(det):
                  # Add bbox to image
                c = int(cls)  # integer class
                label = None if hide_labels else (names[c] if hide_conf else f'{names[c]} {conf:.2f}')
                annotator.box_label(xyxy, label, color=colors(c, True))
        # Stream results
        im0 = annotator.result()
        return im0
3. Pyqt5
我们通过pyqt来制作展示的界面
3.1介绍
PyQt5 是 Digia的一套 Qt5 应用框架与 python 的结合,同时支持 python2.x和 python3.x。
这里使用的是Python 3.x。Qt库由 Riverbank Computing开发,是最强大的GUI库之一 。
PyQt5 是由一系列 Python 模块组成。超过 620 个类,6000 函数和方法。能在诸如 Unix、Windows 和Mac OS 等主流操作系统上运行。PyQt5 有两种证书,GPL和 商业证书。
3.2 window平台安装
PyQt5 有两种安装方式,一种是从官网下载源码安装,另外一种是使用 pip 安装。
这里我推荐大家使用pip 安装。因为它会自动根据你的Python 版本来选择合适的 PyQt5 版本,如果是手动下载源码安装,难免会选择出错。建议使用比较稳妥的安装方式。
pip3 install PyQt5
另外,如果你的网络访问外网不是很好的话建议使用豆瓣的镜像下载,不然会很很慢或者直接安装失败。
pip install PyQt5 -i https://pypi.douban.com/simple
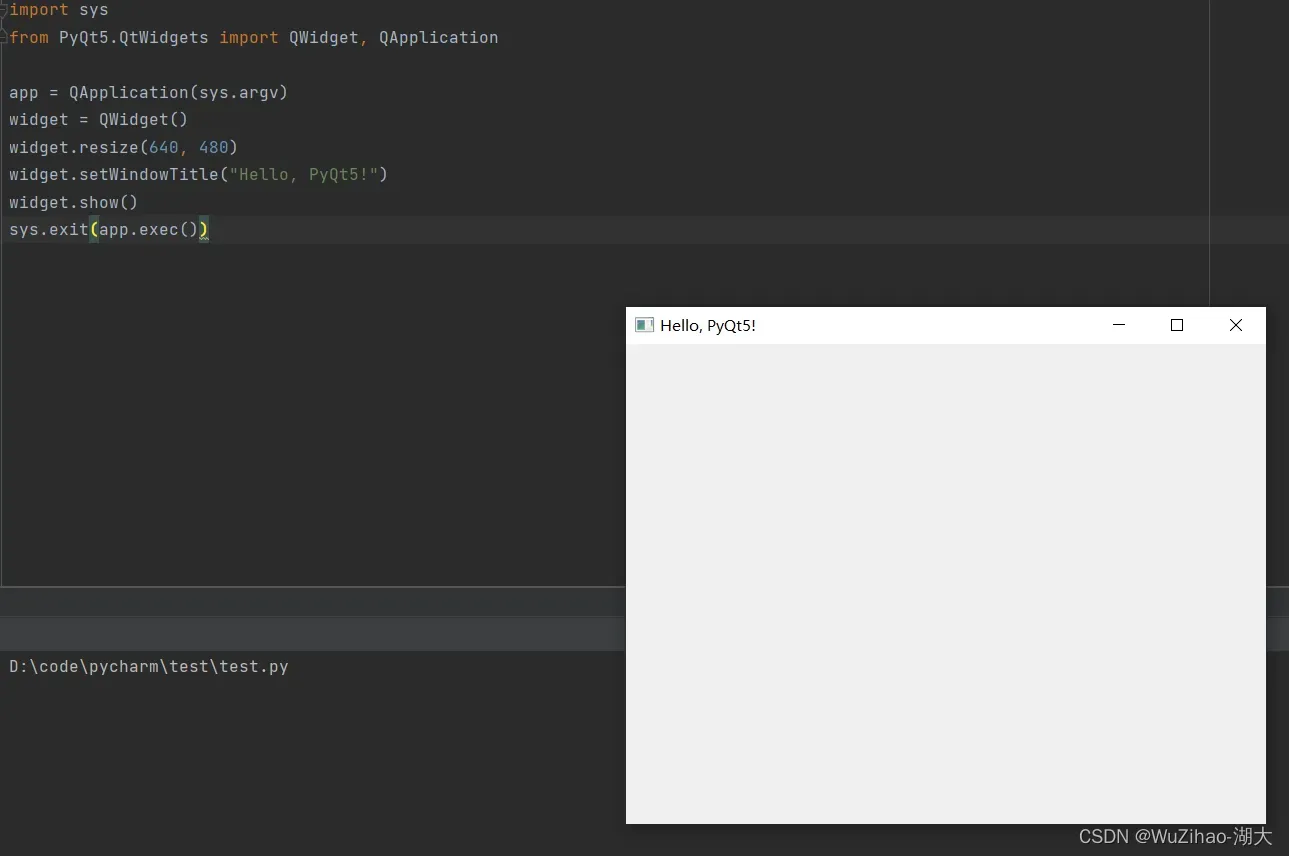
执行以下代码:
import sys
from PyQt5.QtWidgets import QWidget, QApplication

app = QApplication(sys.argv)
widget = QWidget()
widget.resize(640, 480)
widget.setWindowTitle("Hello, PyQt5!")
widget.show()
sys.exit(app.exec())
如果没有报错,弹出了一个标题为”Hello, PyQt5!”的窗口,则说明安装成功。
若pip安装pyqt5报错 error: Microsoft Visual C++ 14.0 or greater is required. Get it with “Microsoft C++ Build Tools”: https://visualstudio.microsoft.com/visual-cpp-build-tools/
error: Microsoft Visual C++ 14.0 or greater is required. Get it with "Microsoft C++ Build Tools": https://visualstudio.microsoft.com/visual-cpp-build-tools/
可参考我另外一篇文章 已解决(pip安装pyqt5报错) error: Microsoft Visual C++ 14.0 or greater is required. Get it with “Microsoft
对于运行项目做到此即可,若对pyqt感兴趣如图形界面开发工具Qt Designer等可以参考文章https://zhuanlan.zhihu.com/p/162866700
4. OpenCV
OpenCV(开源的计算机视觉库)是基于BSD协议,因此它可免费用于学术和商业用途。其提供C++,C,Python和Java接口,支持Windows,Linux,Mac OS,iOS和Android。
我们使用OpenCV来处理图片和视频,以便于将图片转为Yolov5模型需要的输入。
安装
首先我们得先安装另一个第三方库numpy,这是opencv的依赖库,没有它无法进行python-opencv开发。
安装numpy:pip install numpy
安装opencv-python: pip install opencv-python
5. 图片检测
5.1界面布局
首先使用pyqt设计我们界面的布局,主要为一个上传图片的按钮和两个展示板,一个展示原始图片,一个展示我们模型进行检测后的图片。这里主要使用的是网格布局QGridLayout()
class Qdetection1(QWidget):
    def __init__(self,model):
        super(Qdetection1, self).__init__()
        self.initUI()
        self.model=model
    def initUI(self):
        self.main_layout = QGridLayout()  # 创建主部件的网格布局
        self.setLayout(self.main_layout)  # 设置窗口主部件布局为网格布局
        self.button1 = QPushButton('上传图片')
        self.button1.clicked.connect(self.loadImage)
        self.main_layout.addWidget(self.button1)
        self.imageLabel1 = QLabel()
        self.main_layout.addWidget(self.imageLabel1)
        self.imageLabel2 = QLabel()
        self.main_layout.addWidget(self.imageLabel2)
        self.main_layout.addWidget(self.button1, 0, 0, 1, 2)
        self.main_layout.addWidget(self.imageLabel1, 2, 0, 1, 1)
        self.main_layout.addWidget(self.imageLabel2, 2, 1, 1, 1)
因为后续有视频检测和摄像头实时检测,为了将其集成在同一个界面里,可以使用QTabWidget()
    my_tabwidget=QTabWidget()
    tab1_widget=Qdetection1(model)
    tab2_widget = Qdetection2(model)
    tab3_widget = Qdetection3(model)
    my_tabwidget.setWindowTitle('目标检测演示 ')
    my_tabwidget.addTab(tab1_widget, '图片检测')
    my_tabwidget.addTab(tab2_widget, '视频检测')
    my_tabwidget.addTab(tab3_widget, '摄像头实时检测')
    my_tabwidget.show()
pyqt原始提供的组件并不美观,为了美化组件可以使用qt_material。其安装和使用都比较简单。
安装
pip install qt_material
使用
import sys
from PyQt5 import QtWidgets
from qt_material import apply_stylesheet

# create the application and the main window
app = QtWidgets.QApplication(sys.argv)
window = QtWidgets.QMainWindow()

# setup stylesheet
apply_stylesheet(app, theme='dark_teal.xml')

# run
window.show()
app.exec_()
对比效果

5.2 模型加载
我们需要将训练好的模型读取加载从而使用。为了提交响应速度和防止每个功能都重复加载,这里采用了在启动窗口的时候就进行加载。
if __name__ == '__main__':
    device = select_device('0')
    # Load model
    weights = 'best.pt'
    w = str(weights[0] if isinstance(weights, list) else weights)
    classify, suffix, suffixes = False, Path(w).suffix.lower(), ['.pt', '.onnx', '.tflite', '.pb', '']
    check_suffix(w, suffixes)  # check weights have acceptable suffix
    pt, onnx, tflite, pb, saved_model = (suffix == x for x in suffixes)  # backend booleans
    stride, names = 64, [f'class{i}' for i in range(1000)]  # assign defaults
    if pt:
        model = torch.jit.load(w) if 'torchscript' in w else attempt_load(weights, map_location=device)
        stride = int(model.stride.max())  # model stride
        names = model.module.names if hasattr(model, 'module') else model.names  # get class names
5.3点击上传按钮事件和检测展示绑定
当我们点击上传按钮后通过cv2读取文件,通过detection方法检测图片。然后将结果暂时到对应的展示板上。
    def loadImage(self):
        fname, _ = QFileDialog.getOpenFileName(self, '打开文件', '.', '图像文件(*.jpg *.png)')
        if fname is None or fname=="":
            print("未选择图片")
        else:
            img = cv2.imread(fname)
            np_img=detection(self.model,img)
            np_img = cv2.cvtColor(np_img, cv2.COLOR_BGR2RGB)
            img=cv2.cvtColor(img, cv2.COLOR_BGR2RGB)
            self.imageLabel1.setPixmap(QPixmap(QImage(img.data, img.shape[1], img.shape[0], img.shape[1]*3, QImage.Format_RGB888)))
            self.imageLabel2.setPixmap(QPixmap(QImage(np_img.data, np_img.shape[1], np_img.shape[0], np_img.shape[1]*3, QImage.Format_RGB888)))
5.4完整代码
import torch
from utils.general import  check_suffix
from utils.torch_utils import select_device
from pathlib import Path
import sys
from PyQt5.QtCore import *
from PyQt5.QtGui import *
from PyQt5.QtWidgets import *
import time
import cv2
from mydetection import detection
from yolov5.models.experimental import attempt_load
class Qdetection1(QWidget):
    def __init__(self,model):
        super(Qdetection1, self).__init__()
        self.initUI()
        self.model=model
    def initUI(self):
        self.main_layout = QGridLayout()  # 创建主部件的网格布局
        self.setLayout(self.main_layout)  # 设置窗口主部件布局为网格布局
        self.button1 = QPushButton('上传图片')
        self.button1.clicked.connect(self.loadImage)
        self.main_layout.addWidget(self.button1)
        self.imageLabel1 = QLabel()
        self.main_layout.addWidget(self.imageLabel1)
        self.imageLabel2 = QLabel()
        self.main_layout.addWidget(self.imageLabel2)
        self.main_layout.addWidget(self.button1, 0, 0, 1, 2)
        self.main_layout.addWidget(self.imageLabel1, 2, 0, 1, 1)
        self.main_layout.addWidget(self.imageLabel2, 2, 1, 1, 1)
    def loadImage(self):
        fname, _ = QFileDialog.getOpenFileName(self, '打开文件', '.', '图像文件(*.jpg *.png)')
        if fname is None or fname=="":
            print("未选择图片")
        else:
            img = cv2.imread(fname)
            np_img=detection(self.model,img)
            np_img = cv2.cvtColor(np_img, cv2.COLOR_BGR2RGB)
            img=cv2.cvtColor(img, cv2.COLOR_BGR2RGB)
            self.imageLabel1.setPixmap(QPixmap(QImage(img.data, img.shape[1], img.shape[0], img.shape[1]*3, QImage.Format_RGB888)))
            self.imageLabel2.setPixmap(QPixmap(QImage(np_img.data, np_img.shape[1], np_img.shape[0], np_img.shape[1]*3, QImage.Format_RGB888)))
if __name__ == '__main__':
    app = QApplication(sys.argv)
    device = select_device('0')
    # Load model
    weights = 'best.pt'
    w = str(weights[0] if isinstance(weights, list) else weights)
    classify, suffix, suffixes = False, Path(w).suffix.lower(), ['.pt', '.onnx', '.tflite', '.pb', '']
    check_suffix(w, suffixes)  # check weights have acceptable suffix
    pt, onnx, tflite, pb, saved_model = (suffix == x for x in suffixes)  # backend booleans
    stride, names = 64, [f'class{i}' for i in range(1000)]  # assign defaults
    if pt:
        model = torch.jit.load(w) if 'torchscript' in w else attempt_load(weights, map_location=device)
        stride = int(model.stride.max())  # model stride
        names = model.module.names if hasattr(model, 'module') else model.names  # get class names
    my_tabwidget=QTabWidget()
    tab1_widget=Qdetection1(model)
    my_tabwidget.setWindowTitle('目标检测演示 ')
    my_tabwidget.addTab(tab1_widget, '图片检测')
    my_tabwidget.show()
    apply_stylesheet(app, theme='light_blue.xml')
    sys.exit(app.exec_())
最终效果
文章出处登录后可见!